Category

Forms & Form Handlers

Become a pro at editing and creating Pardot landing pages, by using these 5 tips. These tips come from questions that are frequently asked within the Trailblazer Community and tips that I have come across while editing landing pages within Pardot.

Have some Pardot landing page tips of your own? Write them in the comments.

Note: These tips are specific to the Pardot Classic landing page editor. Check out this post to learn about using the Lightning landing page editor.

Tip #1: Responsive Images

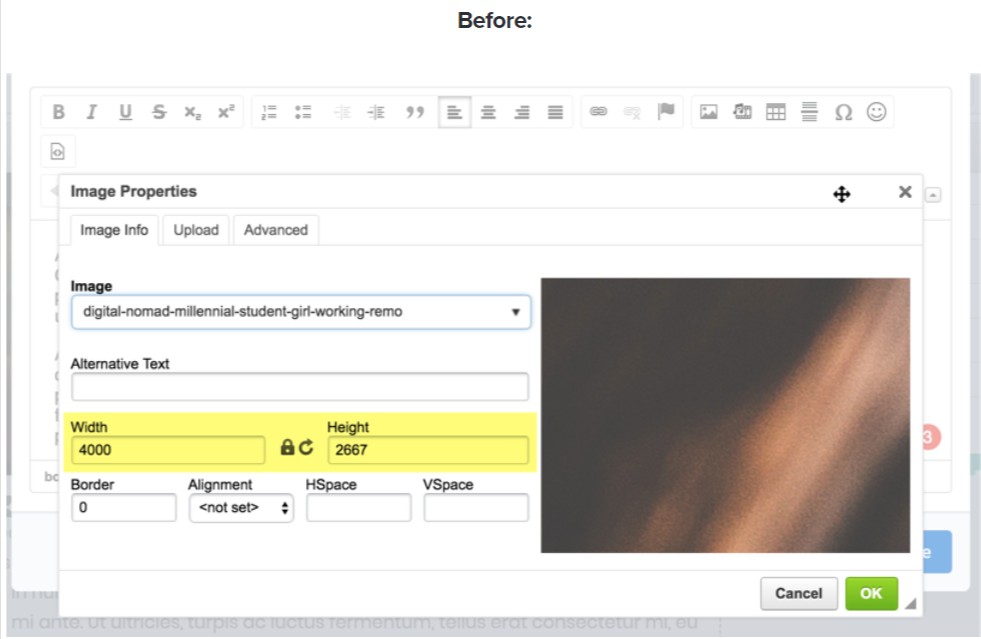
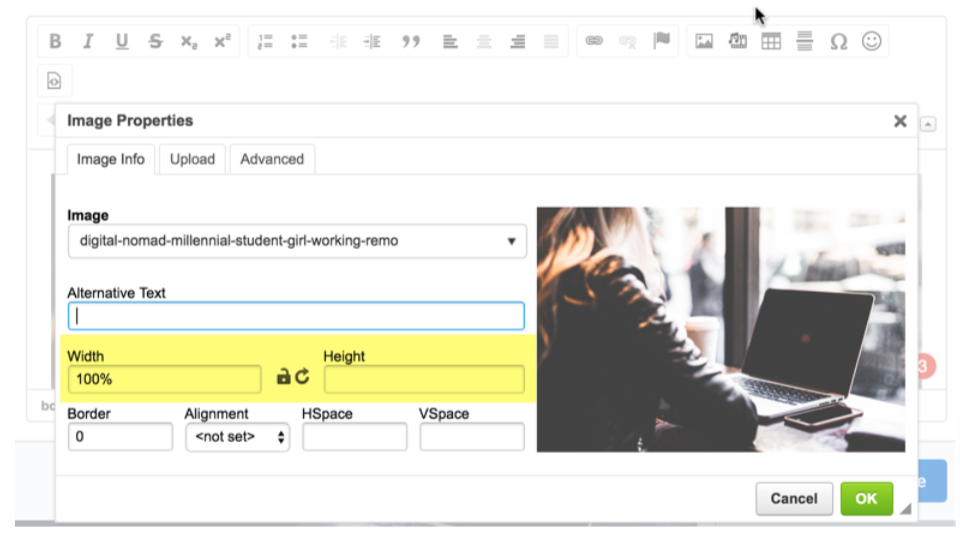
If you have responsive landing page templates, check your image heights and widths. Inserting an image through the WYSIWYG editor can add a fixed width & height automatically. To fix this you can update the width value to 100% and leave the height blank.

After:

Tip #2: Open links in a new tab

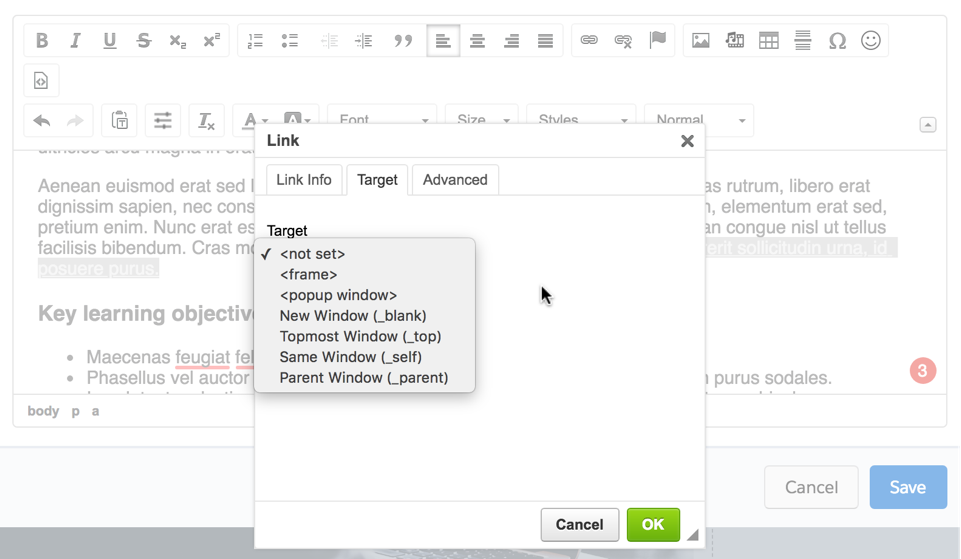
Specify the way a link should opened by selecting the link, clicking the link icon and navigating to the Target tab.

Tip #3: Add your tracking codes

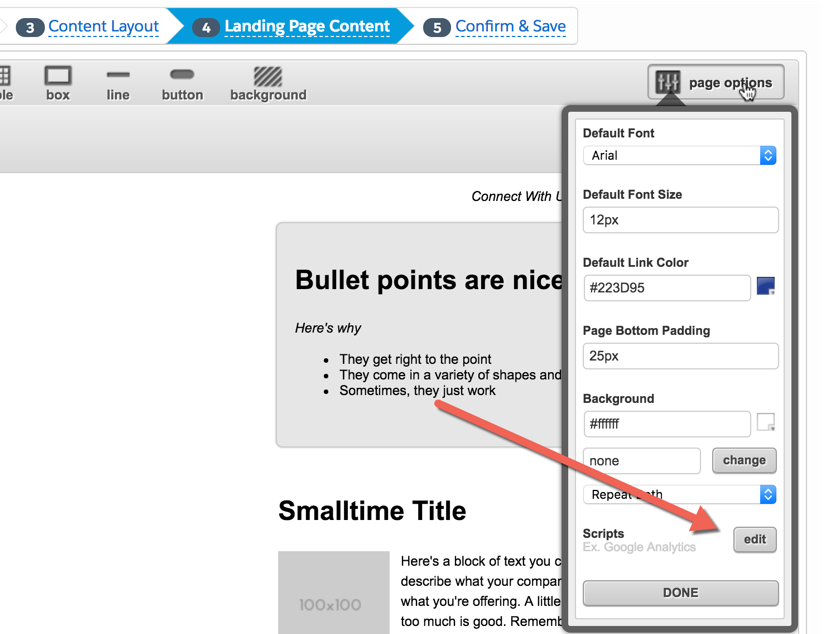
Don’t forget to add your Google Analytics tracking codes and any other tracking codes to your templates. If you created your own layout template, you can add the tracking codes directly in the template. If you are using one of the out-of-the-box templates Pardot provides, follow these steps:

  1. Edit your landing page
  2. Navigate to the landing page content tab
  3. Click on page options in the top right corner of the editor
  4. Under scripts click edit
  5. Paste in your scripts (don’t forget to add your <script> tags!)

Tip #4: Responsive, embedded videos

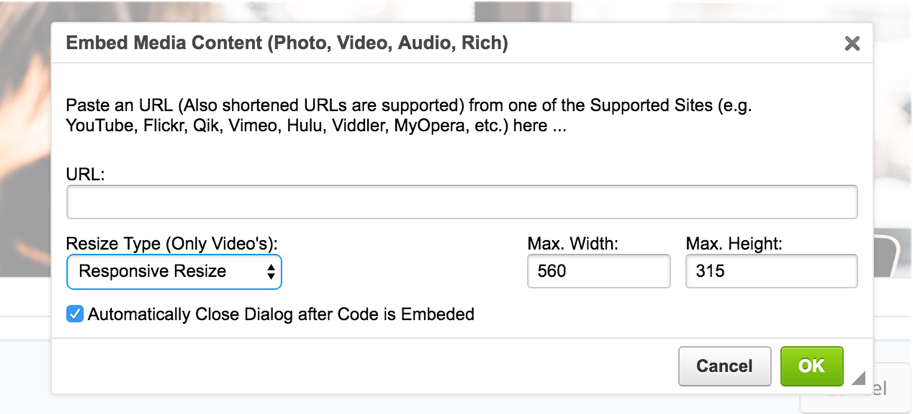
Click on the embed media button within the WYSIWYG editor, paste your video URL and select responsive embed as your video type. Optionally, you can update the max with and min height.

Tip #5: Use a Word to HTML converter

Easily take the copy from a Word doc and use it within your Pardot landing pages without reformatting. Copy & paste the content from your Word doc into an online converter, like this one. Then, simply copy the generated HTML and paste it into the Pardot editor.

Questions?

Send me a tweet @jennamolby or contact the Sercante team for help.

There are many ways to include a Pardot form on your WordPress website. And choosing the best method depends on your specific use case. For example, you can use a plugin, write custom code, or integrate it using a third-party tool.

In this blog post, we’ll cover each of the methods and provide tips for using them to include Pardot forms on a WordPress website.

How to Include Pardot Forms on a WordPress Website

Here are five methods that we’ve used and tested, along with a detailed breakdown of how each method works.

1. Add the embed code directly in WordPress

The first option to embed Pardot forms on your WordPress site is to simply copy the HTML embed code Pardot provides you with and paste it into a page or post.

This is definitely one of the easier methods. However, if you often toggle between the visual and text (HTML) editor within WordPress, I’ve found sometimes it strips out code.

If you use this method, just make sure you test your form if you make any updates to your page or post.

2. Install the Pardot WordPress plugin

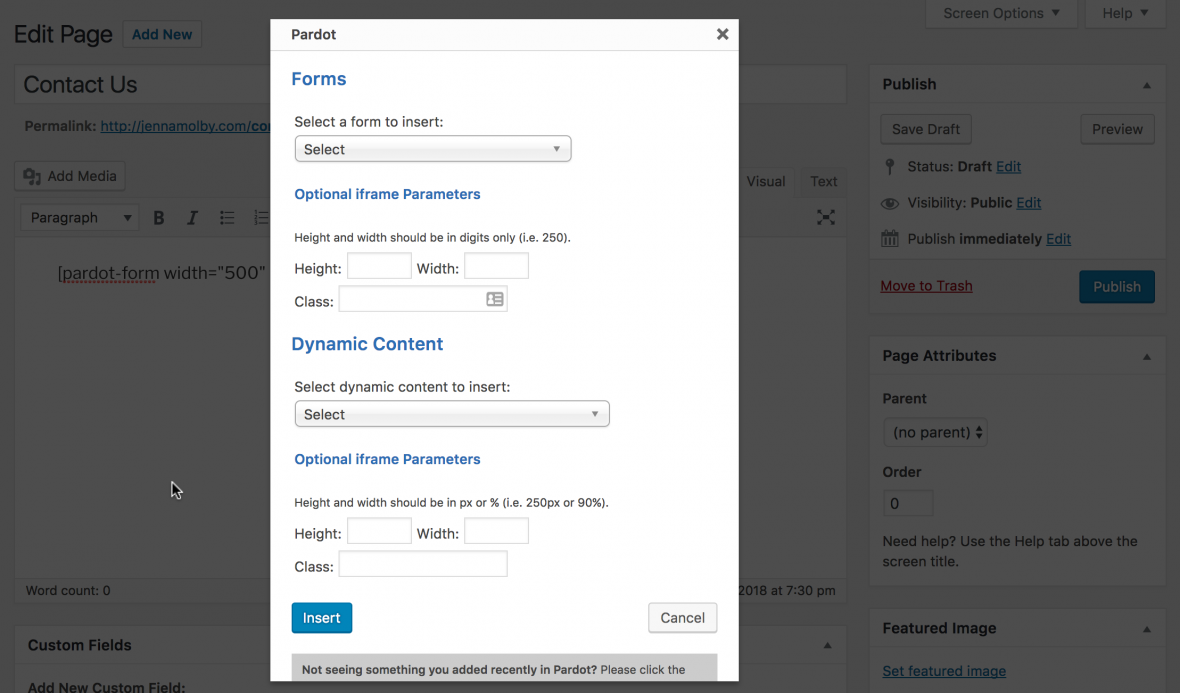
Another option is to install and configure the Pardot WordPress plugin. The plugin securely connects your Pardot instance with your WordPress installation. You will be able to track visitors, embed forms and dynamic content without touching a singe line of code.

How it works

Install the plugin and connect your Pardot account

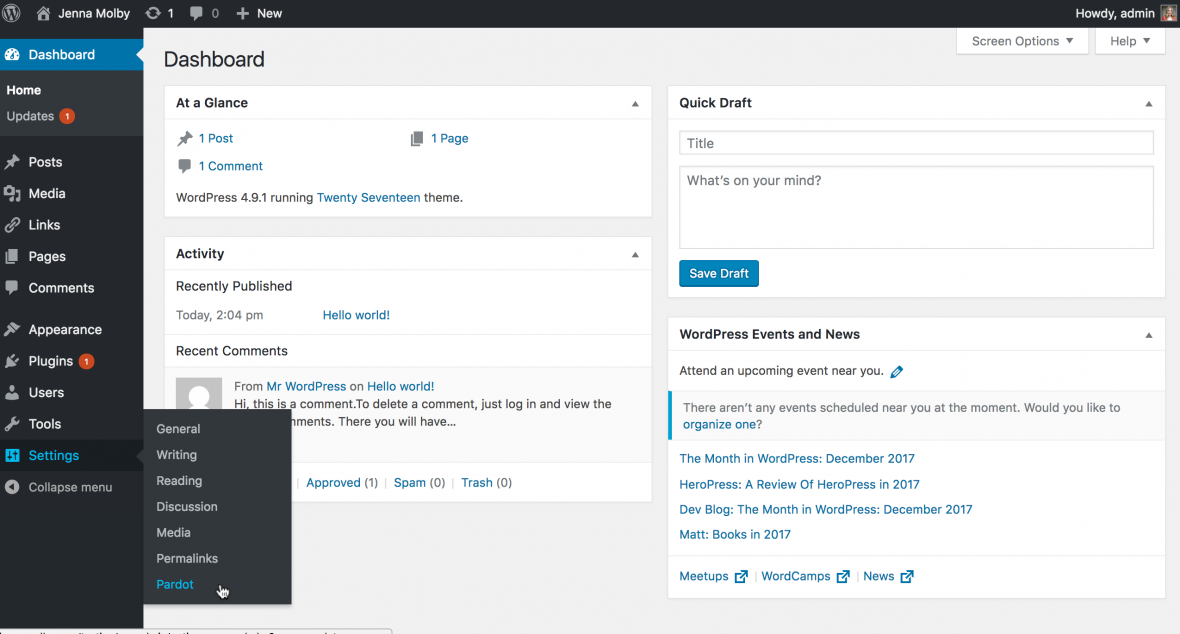
Install the Pardot WordPress Plugin and activate it within WordPress. This will create a new menu item under Settings > Pardot

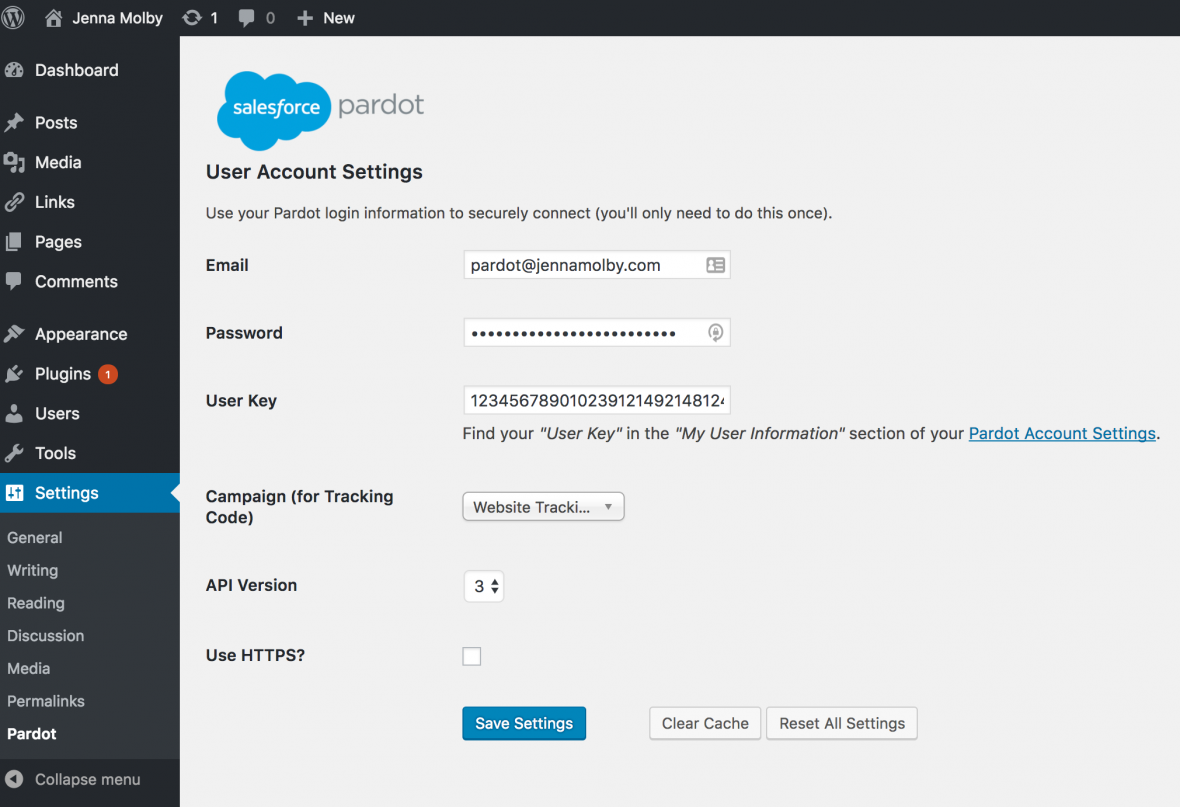
Enter in your Pardot credentials along with your user key and save the settings.

Add forms to your pages, posts, and widgets

Once the plugin is configured you will be able to use short codes to insert Pardot forms within posts, pages and widgets. Short codes can be generated by clicking on the Pardot icon within the WYSIWYG editor or by following their short code syntax located in the FAQ section of this page

3. Install a Short Code WordPress Plugin

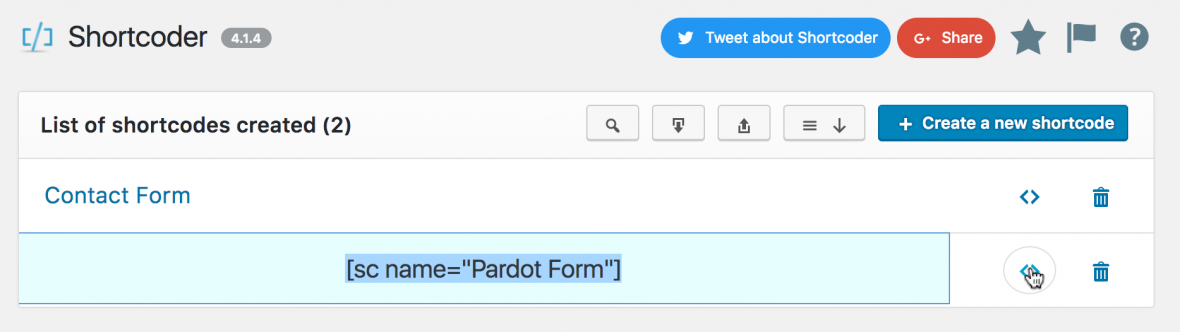
Another option is to download a short code WordPress plugin such as Shortcoder. This won’t give you as many features as using the Pardot WordPress plugin, since it doesn’t connect with your Pardot account and it won’t pull in all the forms within your account. However, Shortcoder has many other uses beyond including Pardot forms within your WordPress website, so it’s a good option if you want to limit the number of installed plugins within WordPress.

How it Works

Download and activate the plugin

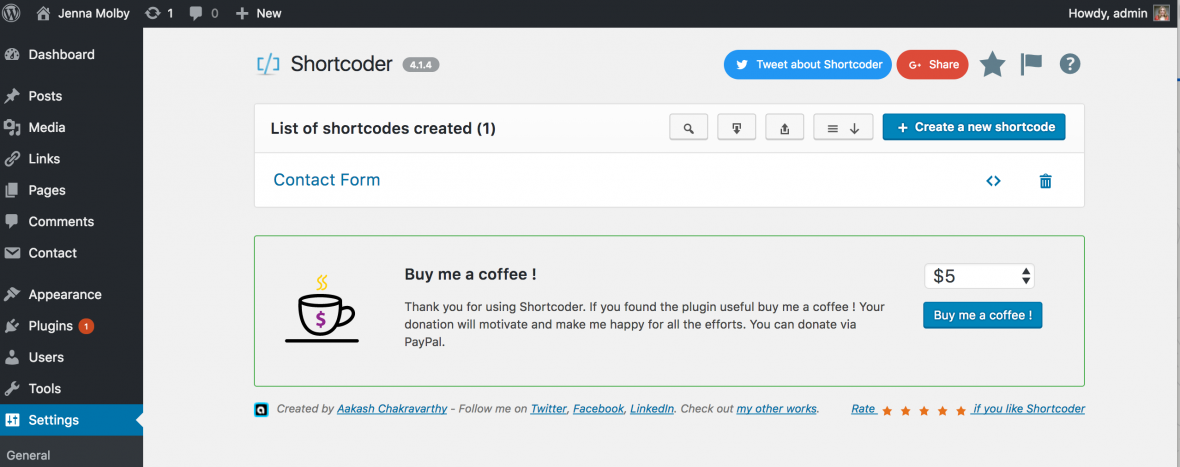
Download and activate the Shortcoder Plugin. This will create a new menu item under Settings > Shortcoder.

Copy & Paste Your Pardot Form Code

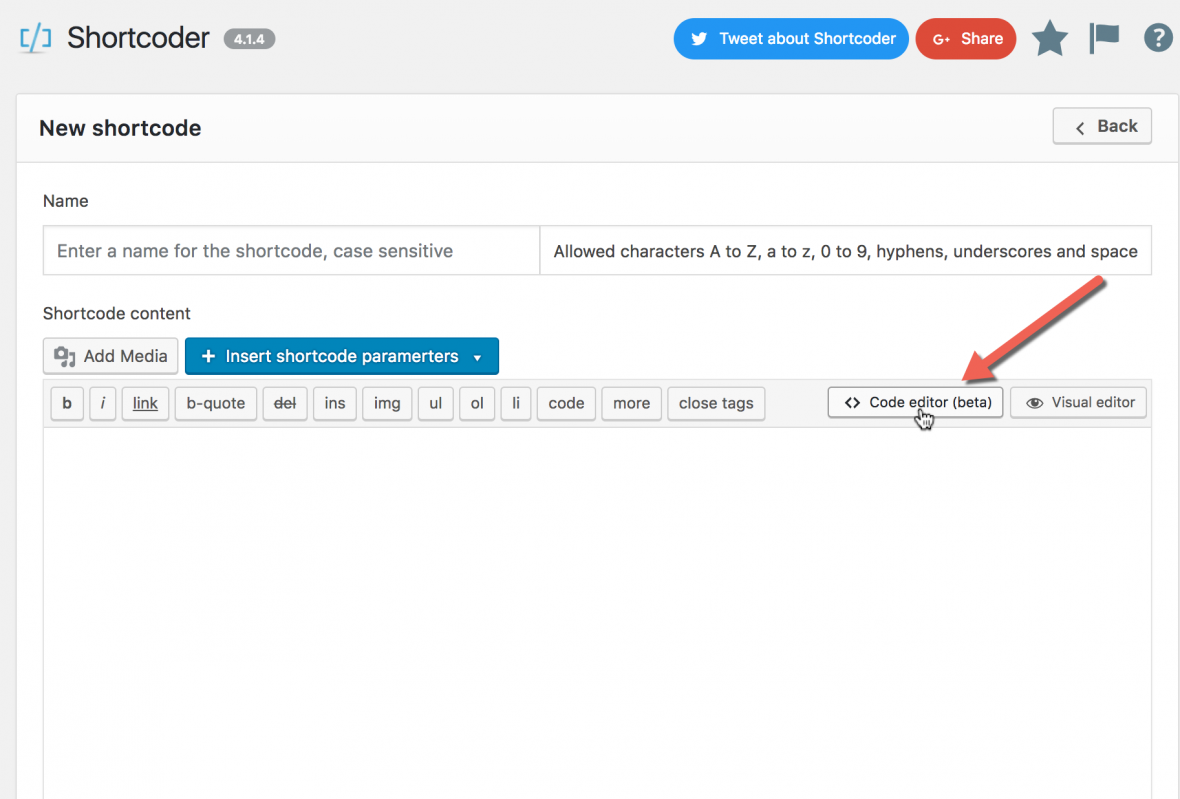
Create a new shortcode and give it a name. Make sure you select the code editor option.

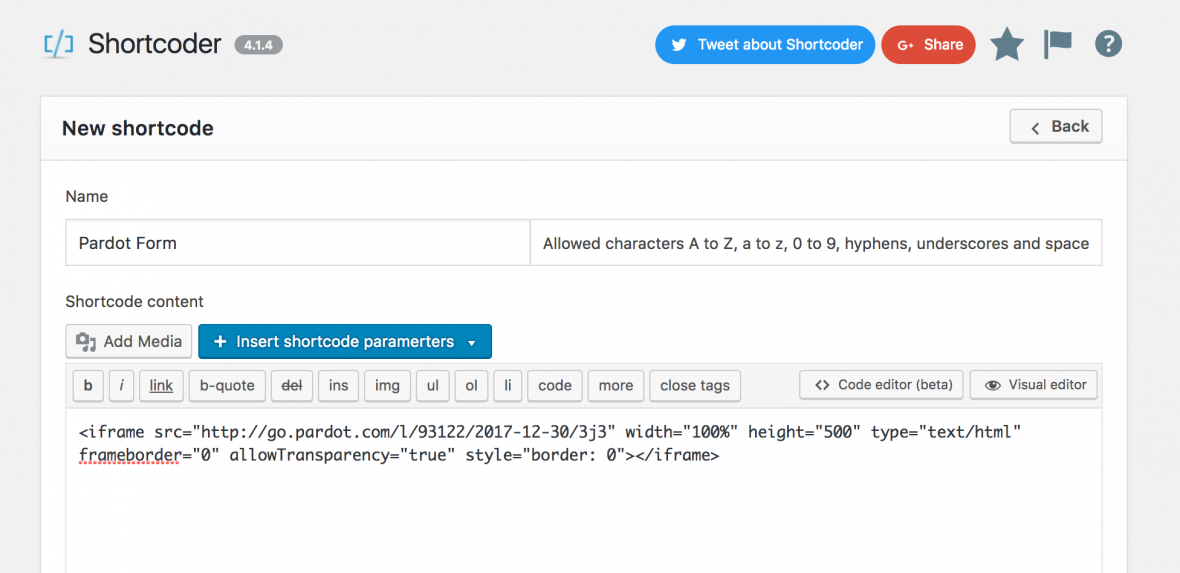
Copy and paste the HTML for your Pardot form in the shortcode editor and save.

Your Shortcode is ready to use!

Now, you can use the shortcode to place your Pardot form on any page, post, and widget within WordPress.

4. Integrate Contact Form 7 Plugin with Pardot Form Handlers

With a bit of config work you can integrate the Contact Form 7 Plugin with Pardot form handlers. This method is great since Contact Form 7 is a popular WordPress plugin which you might already have installed. The form will also inherit any form styles you already have included on your website.

How it Works

Install and activate the plugins

Install the Contact Form 7 Plugin and activate it. You will also need to install and activate the 3rd Party Integration Plugin in order to integrate Pardot.

Create a new Contact 7 Form

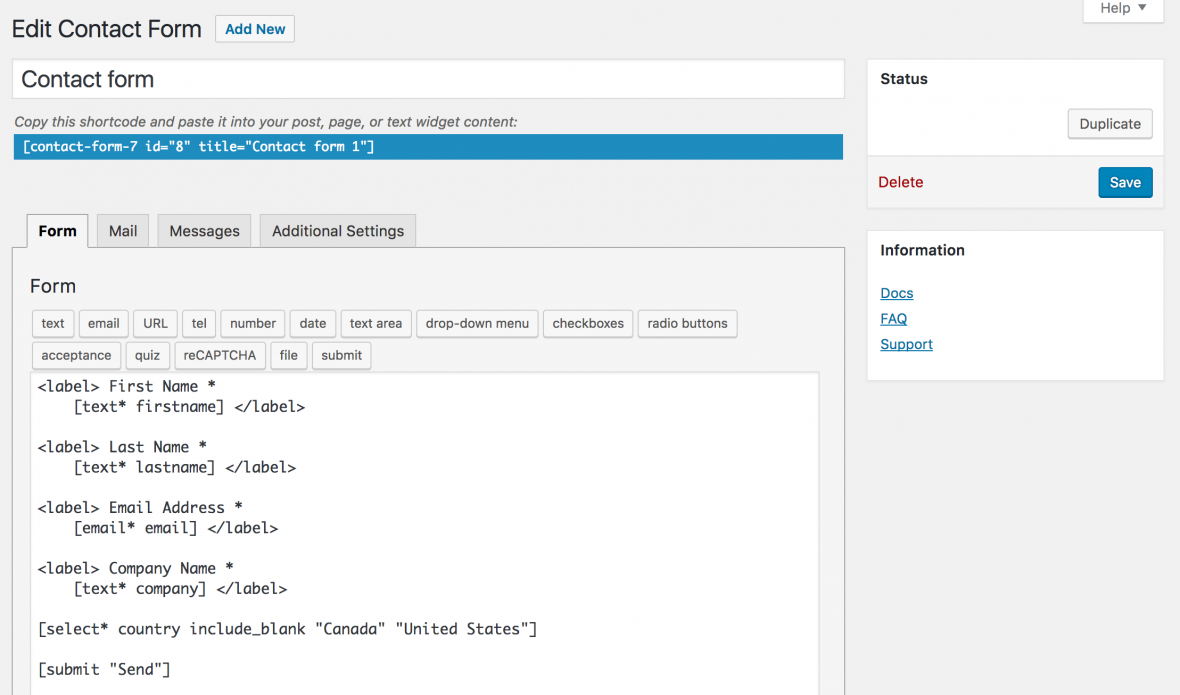
Under Contact create a new form or edit the default form that’s provided.

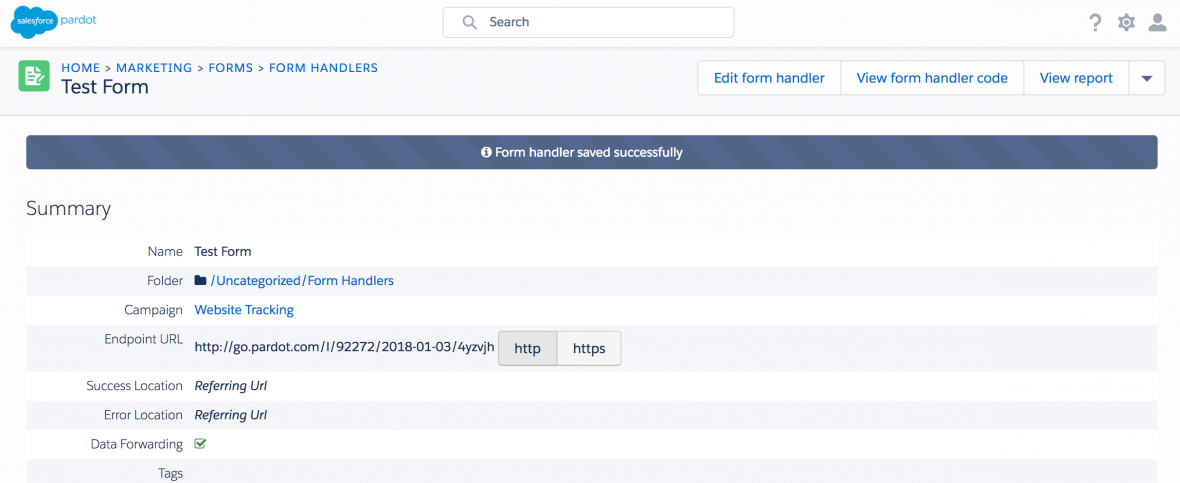
Create a new Pardot Form Handler

Create a new form handler in Pardot. The form will not use the success and error locations configured in the form handler settings, so you can leave those blank.

Set up the Integration

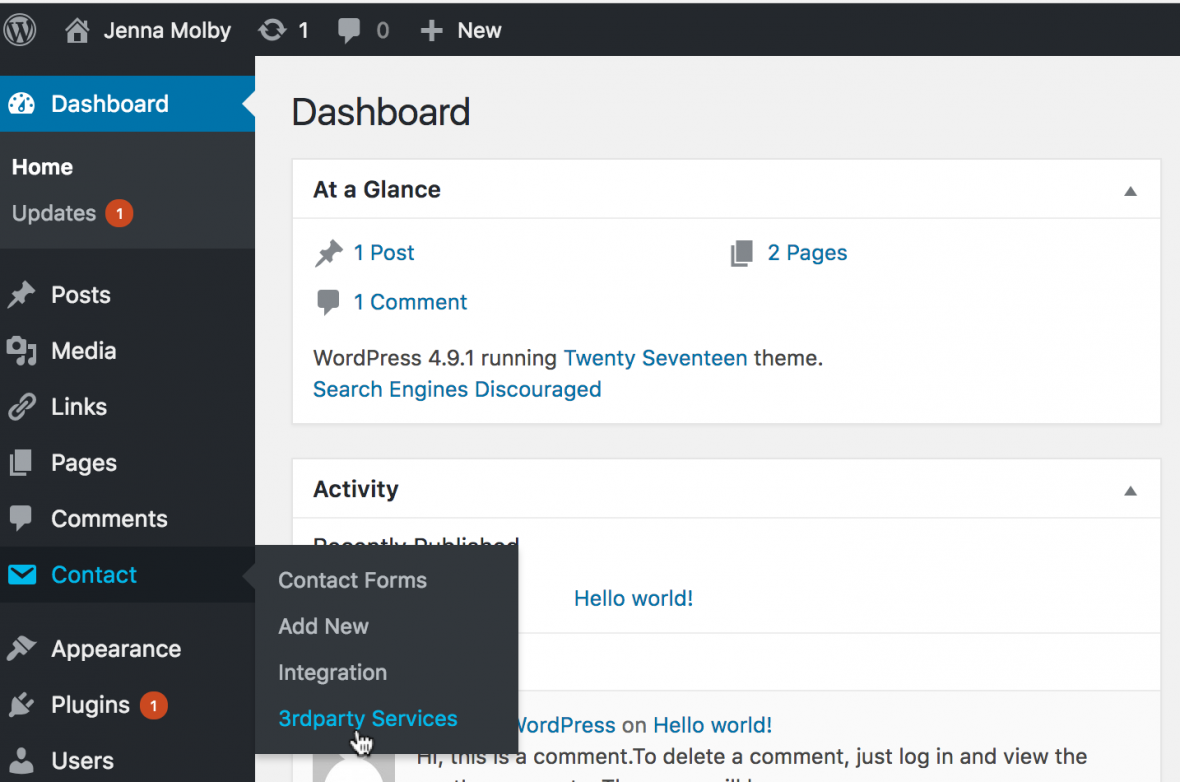
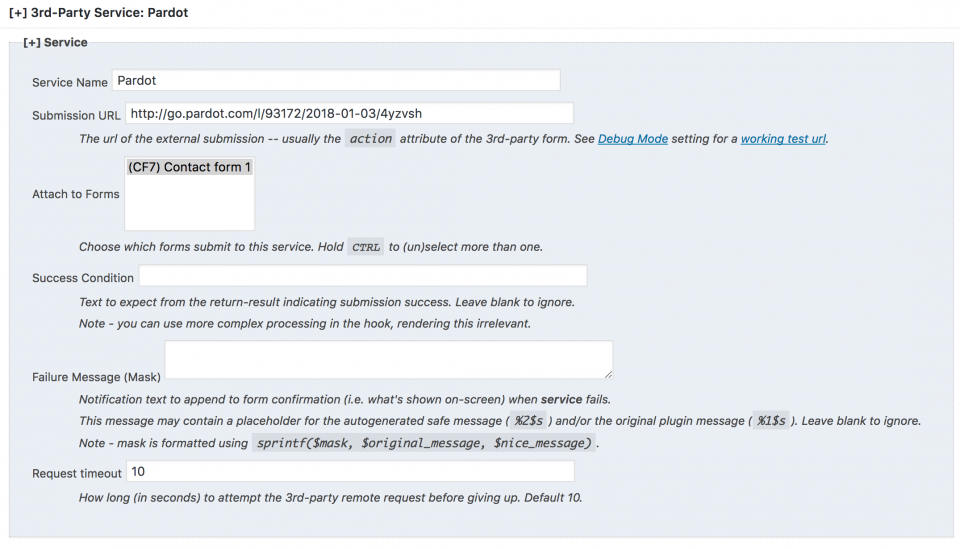
In WordPress, navigate to Contact > 3rd Party Services.

Add a new 3rd Party Service. Service name can be anything you want. Submission URL should be the URL Pardot provides for your form handler. Select the form you want to attach the Pardot form handler to. You can leave the success condition and the failure message blank to keep the Contact Form 7 defaults.

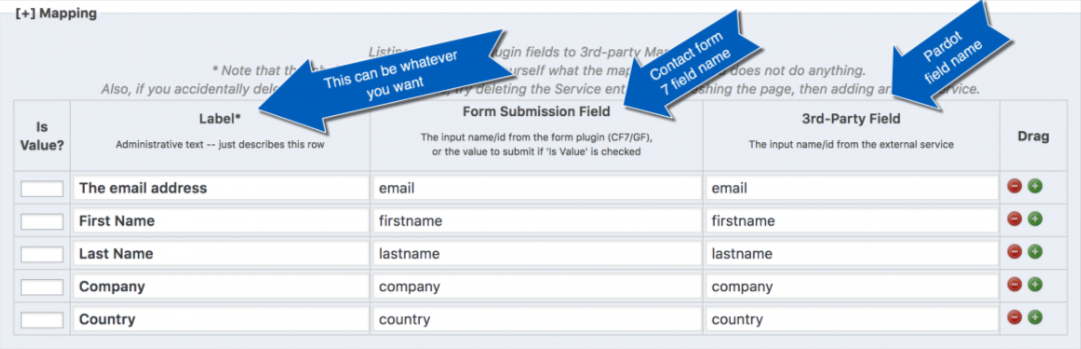
Map your fields

The last piece is to map the fields within Contact Form 7 to your Pardot form handler. I like to keep the names for both the same.

5. Popup Builder Plugin

This Popup Builder plugin allows you to create highly customizable popups that can be used with any of the methods outlined in this post. Perfect for gating assets on your website with Pardot forms, blog subscription popups and more!

How it works

Install and activate the plugin

Install and activate the Popup builder plugin. This will create a new navigation item called Popup Builder.

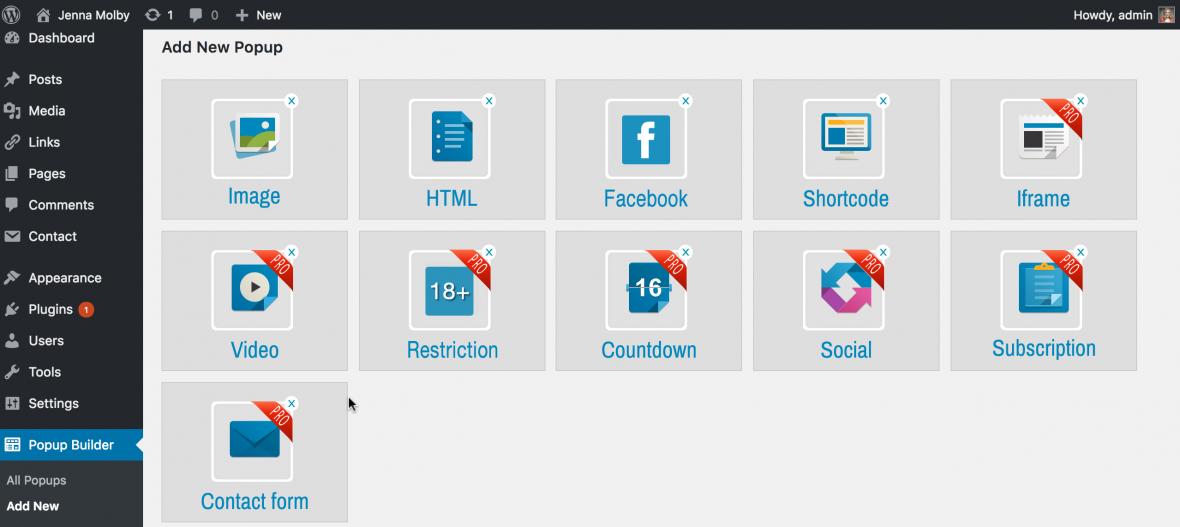
Create a new popup

Create a new popup and select the type. You can select HTML if you want to copy & paste the iFrame code Pardot provides directly into WordPress. You can also use the short code option if you want to use the popup plugin in conjunction with another plugin, such as the Pardot WordPress Plugin.

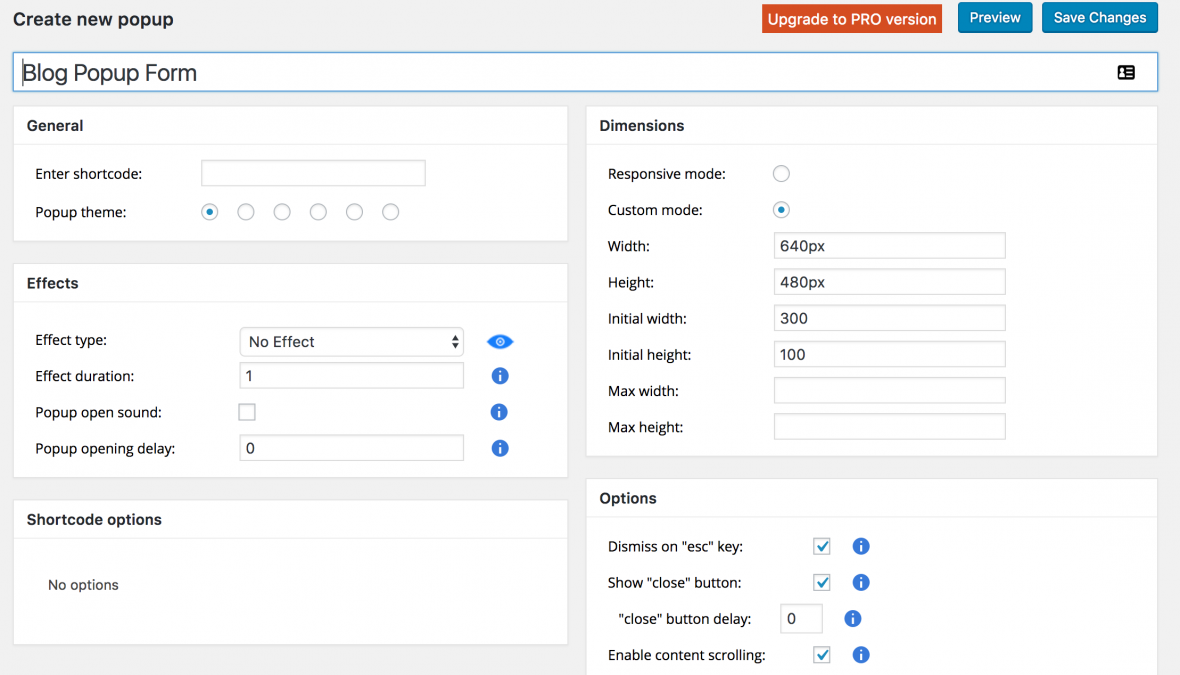
Configure the popup

Configure your popup using one of the many options available and save.

Add it to your pages

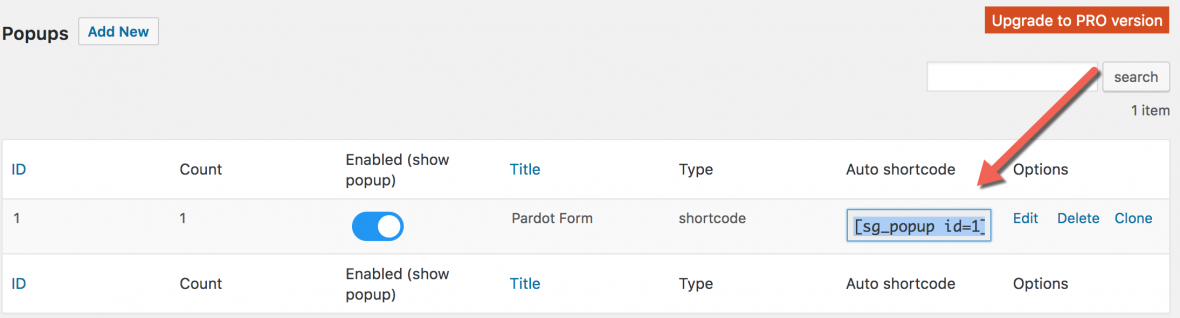
The plugin will generate a shortcode which can be added to you post and pages.

Questions?

Send me a tweet @jennamolby, or contact the Sercante team for help.

I’m going to let you in on a little secret. It’s taken me my entire career to learn this.

The silver bullet to success with marketing automation is…

THERE ISN’T ONE, DAMMIT. STOP LOOKING FOR IT.

The temptation of the shiny object

Our industry is obsessed with hyperbole and the next big thing.  If I had a dollar for every time I heard:

“The playbook is broken…”

“Everything has changed…”

“Modern marketers are doing [fill in the latest buzzword].”

…then we could all be spending our days doing something a little like this:

Don’t get me wrong — thinking about the future is vital.

But if you’re looking for the martech equivalent of that “one weird trick to lose your belly fat in 30 days,” you will be disappointed.

There’s no substitute for strategy and disciplined execution

When things aren’t quite working the way you hoped, it’s tempting to succumb to the lure of this “playbook is broken” messaging.

But the companies that are killing at aren’t fluttering from shiny object to shiny object.  They’re crafting a thoughtful strategy.  And then they’re executing.  And then revising the plan.  And then executing some more.

The fundamentals are as relevant as ever

Sure, a lot of things have changed.  We need to grow and evolve.  We need to be ahead of market shifts and the competition.  And that’s on top of (not in place of) rolling up our sleeves and doing the hard work involved in the foundational tasks of digital marketing.

There is still so much bad marketing out there — and this is actually a good thing.  In many market spaces, you will leapfrog the competition just by executing the basics well.

I can’t tell you how many companies I hear ranting and raving about the “next big thing” – AI, machine learning, bots, augmented reality – and then you turn around and look at their website and it’s some amateur shit. Or they don’t even have a content calendar or a written marketing plan.

There’s an abundance of room at the top — so claim your spot!

Okay, okay </rant>.

The main point I’m getting at is that there’s so much opportunity for companies who understand digital marketing and customer experience to get ahead and win.  And the beauty of digital marketing is that it rewards people more for the width of their brains than the width of their wallets.

So here’s to the marketers out there fighting the good fight and showing up every day to ship amazing work. I’m rooting for you, dudes!

Left to my own devices, I’m the kind of person who saves everything to her Desktop and has at least 5 Word docs titled “Notes Latest V2a” at any given point in time.

I’ve learned the hard way that this is NOT a good plan if you’re managing assets in a Pardot org.  (Kicking this can down the road means lots and lots of technical debt in your future! No bueno.)

It is SO worth it to take the time to build a coherent folder structure and standard file names.  Even if it’s boring and adds a few seconds to your process.  Your future self and team members will thank you for it.

General foldering best practices in Pardot

Pardot folders operate the same basic way they do on the hard drive of your computer.  A definition from Pardot:

Folders are a top-down organizational feature that house campaigns, emails, and other marketing modules together. Folders let you segment and nest marketing elements in a way that makes sense for your team.

Every piece of marketing content created must be placed in a folder.  And there’s a big catchall one called “Uncategorized” that is basically the Pardot equivalent of my messy desktop.

Side note: most people will find this to be fairly self-explanatory and intuitive, but it’s a little bit of a re-frame from what former Marketo users are used to. Marketo is very folder-centric and uses these to create programs and relate assets to each other.  That’s not really what Pardot’s trying to do – their version of folders are mostly just an organizational tool.

Options for Pardot folder structures

Folders are basically a blank canvas for organizing to your heart’s desire.  The only real limits are that you can have max 10,000 items in a folder, and up to 16 levels of subfolders.

But come on – do you really need deeper nesting than:

 Folder A >  Folder B >  Folder C >  Folder D >  Folder E >  Folder F >  Folder G >  Folder H >  Folder I >  Folder J >  Folder K >  Folder L >  Folder M >  Folder N >  Folder O >  Folder P

Common organizational structures I’ve seen include:

Heads Up: folders & scoring categories

A critically important thing to note is that folders are the basis for Scoring Categories.  Quick refresher: Scoring Categories allow you to break down the overall prospects scoring into subcategories – so that you could have separate scores for each of your product lines, or different business units, etc.

If you’re planning on using Scoring Categories at some point down the road, build your folders around the categories you will likely use (like product or business unit).  Worry about the points system later – and this will save you from a massive reshuffle when you’re ready to revisit that.

Naming conventions in Pardot

If you’ve already been using Pardot for a while, a great place to start with this is looking at how your team is naming files on their own.  If it’s good/useful – boom, document it.  If it’s a mess, then work the team to come up with a naming protocol.

Detailed file names are vital for searchability.  You will have some users that navigate to assets using the folder structure every time, and others that will type a few keywords in the search bar to filter down to what they’re looking for.  Standardized naming sets both groups up for success.

Data points you may want to work into your names could be:

  • Name/title
  • Campaign type (i.e. tradeshow, webinar, advertising)
  • Company division / business unit
  • Industry / vertical
  • Date
  • Region
  • Language
  • Audience (i.e. Client, Late Stage Prospects, etc.)

So for example, if you decided you wanted to set your naming convention to be:

Company Division – Name/Title Campaign Type – Audience – Date

This would translate into something like:

Employee Benefits – Complying with the ACA Webinar – Clients – July 2016

General tips & gotchas

Use dividers

Use some kind of dividing character so that your name doesn’t become one big string. I’m partial to – or |. Underscores are also a common divider – but personally I think they are harder to read.

Avoid over-reliance on tags

Tags are NOT a substitute for proper foldering and naming conventions. You have very limited reporting and search capabilities with tags.  They’re useful in a pinch, but I repeat, DO NOT make them the center of your organizational structure.

Consider whether date is really relevant

If you’re creating a template (an email, for example) that is going to be used in multiple initiatives over time, I’d suggest skipping the date as part of your name – it gets confusing.  You’ll always have the system created and last modified dates to refer to.

The briefer, the better

Try to keep names as short as you can, and put the most important/descriptive parts toward the front. Asset names can go up to 255 characters, max. But you’ll only see about the first 42 characters when you’re referencing in automation rules and completion actions, and about 20 characters when referencing in Engagement Studio.

Don’t set it and forget it

You’re not done when you decide on a plan and roll it out. Oh no.

Appoint someone Keep-It-Organized Cop or Organizational Officer, or whatever you want to call it – and check at least monthly to be sure things are being classified correctly to avoid a big pile up to sort out later.

Over to you: what do you think?

How is your process working?  What tactics have you tried in an effort to stay organized?  Any horror stories?

Let us know if the comments!

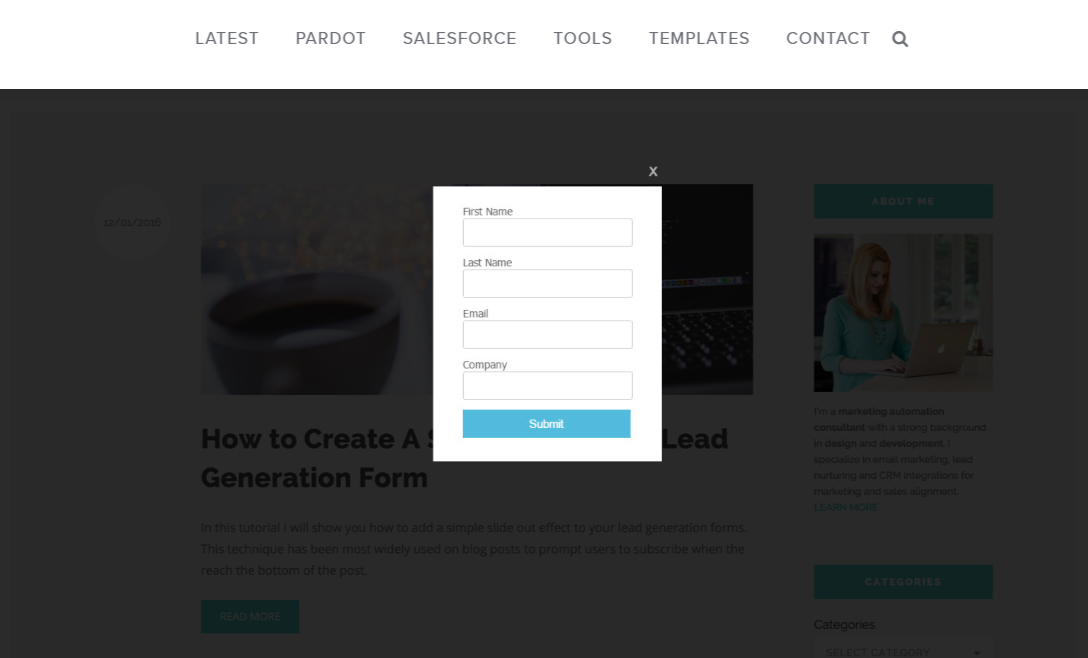
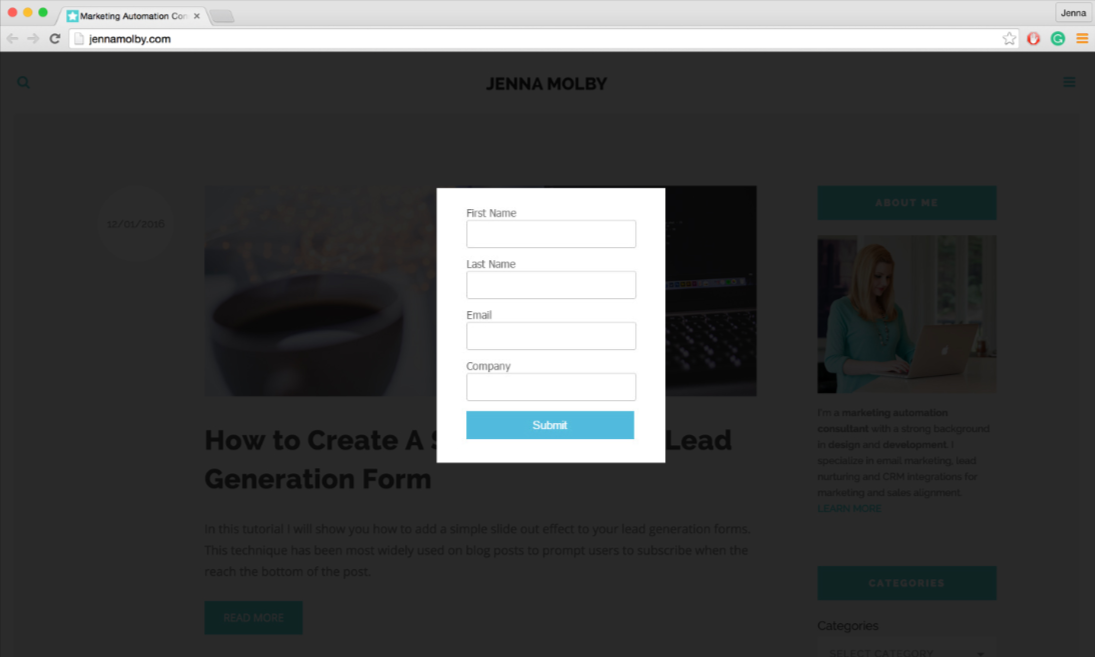
In this tutorial you will learn how to use a Pardot form to gate content on a page. Gated content allows you to capture a lead’s information, by asking them to provide contact details before accessing a piece of content that is valuable. Instead of creating more than one page for the gated content and form, this tutorial will focus on creating a popup on the page that contains the asset.

Gated Content via Pardot Form: The Concept

Here’s a high-level overview of what the user will experience when visiting the gated page:

  1. The user visits the page and is greeted with a popup containing the Pardot form.
  2. The user must complete the form in order to view the entire page.
  3. Once the user fills out the form, they are redirected to the asset page.

View Demo

Gated Content via Pardot Form: The Setup

Create the Pardot Form

First, create the form in Pardot, select the fields you want to use, select the form layout and save. Don’t worry about the ‘thank you’ messages yet, this will be edited later.

Add code to your web page

We will be using Magnific Pop-up jQuery Plugin to create the pop-up in Pardot.

Add the necessary plugins to the page

!-- Magnific Popup core CSS file -->
<link rel="stylesheet" href="https://cdnjs.cloudflare.com/ajax/libs/magnific-popup.js/1.1.0/magnific-popup.min.css">
 
<!-- Load jQuery -->
<script src="http://ajax.googleapis.com/ajax/libs/jquery/1.9.1/jquery.min.js"></script>
 
<!-- Magnific Popup core JS file -->
<script src="https://cdnjs.cloudflare.com/ajax/libs/magnific-popup.js/1.1.0/jquery.magnific-popup.min.js"></script>

Now this is the tricky part. In order to have the popup form and the gated content all on the same page, we need to tell the page when to show the form and when to hide the form. We can do this by using a URL parameter called ‘access’.

When the page is loaded the script will look for a parameter in the URL that looks like this:

http://yourlandingpageurl.com?access=yes

If the URL contains the parameter, the form won’t show on the page. If the URL doesn’t contain the parameter, then the Pardot form will show.

<script type="text/javascript">
$(document).ready(function() {
// Parse the URL
function getParameterByName(name) {
    name = name.replace(/[\[]/, "\\[").replace(/[\]]/, "\\]");
    var regex = new RegExp("[\\?&]" + name + "=([^&#]*)"),
        results = regex.exec(location.search);
    return results === null ? "" : decodeURIComponent(results[1].replace(/\+/g, " "));
}
// Give the URL parameters variable names
var access = getParameterByName('access');
 
// if access does not = yes then display the popup
if (access != 'yes') {
$.magnificPopup.open({
  items: {
    src: 'http://info.jennamolby.com/x/xxxxxx/xxxx-xx-xx/xx'
  },
  type: 'iframe', modal: true
});
}
});
</script>

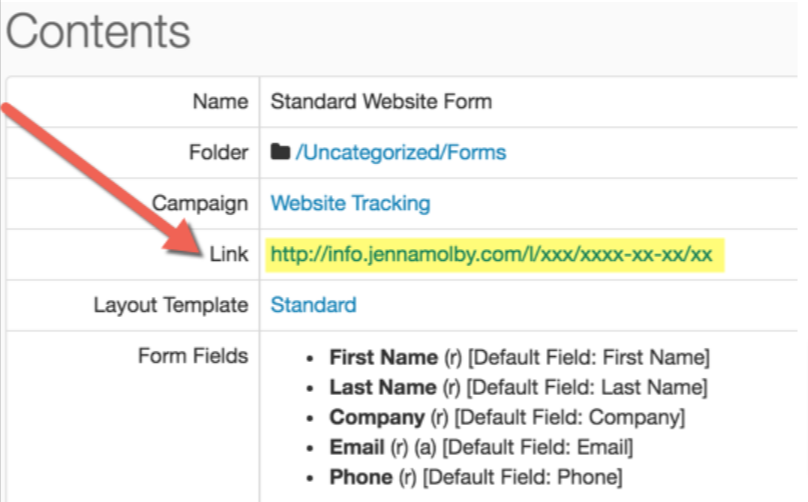
Update the http://info.jennamolby.com/x/xxxxxx/xxxx-xx-xx/xx with the link to your Pardot form. This can be found by navigating to your form in Pardot and copying the URL under Contents > Link.

Update the ‘thank you’ page settings

Now that the web page is setup, you can add in the ‘thank you’ page details in Pardot. Check the setting for Redirect the prospect instead of showing the form’s Thank You Content‘and set the redirect location to be the URL of your webpage PLUS the URL parameter.

View Demo

Questions?

Send me a tweet @jennamolby, or contact the Sercante team for help.

In this tutorial, I will show you how to create a pop-up form that can be placed on a Pardot landing page. I will go over 2 methods, opening the pop-up form when a link is clicked and opening the pop-up on page load.

Getting Started

Before you get started, make sure you have a form and a landing page created.

Get the pages and files ready

We will be using Magnific Pop-up jQuery Plugin to create the pop-up in Pardot.

Step 1: Download the Files

Download the Javascript File and the CSS file by pressing CTRL + S on your keyboard and saving it to your desktop.

Step 2: Upload files to Pardot

Now you will need to upload the 2 files you just downloaded to Pardot under Content > Files.

Copy and paste the URLs of the uploaded files into a word or text document. You will need these in step 3.

Step 3: Add the files to your layout template

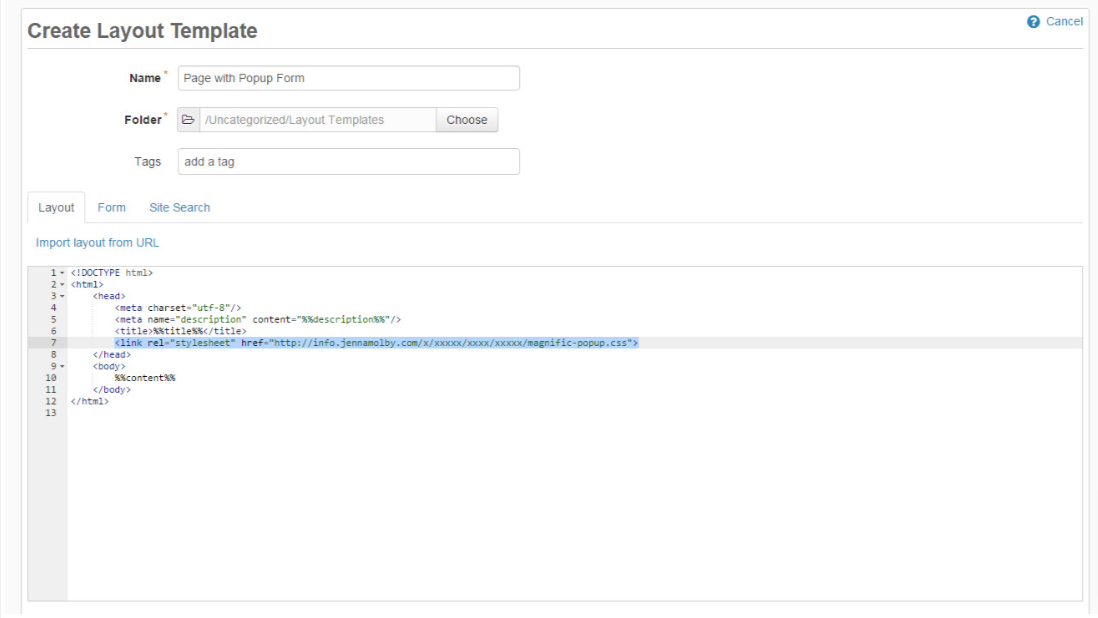
Add the CSS file

At the top of the page, somewhere within the <head> </head> tags, link the CSS file.

<style type="text/css">
    .white-popup-block{background:#FFF;padding:20px 30px;text-align:left;max-width:350px;margin:40px auto;position:relative}
</style>

Make sure you change the pop-up CSS URL to the Pardot content URL.

Add the JavaScript Files

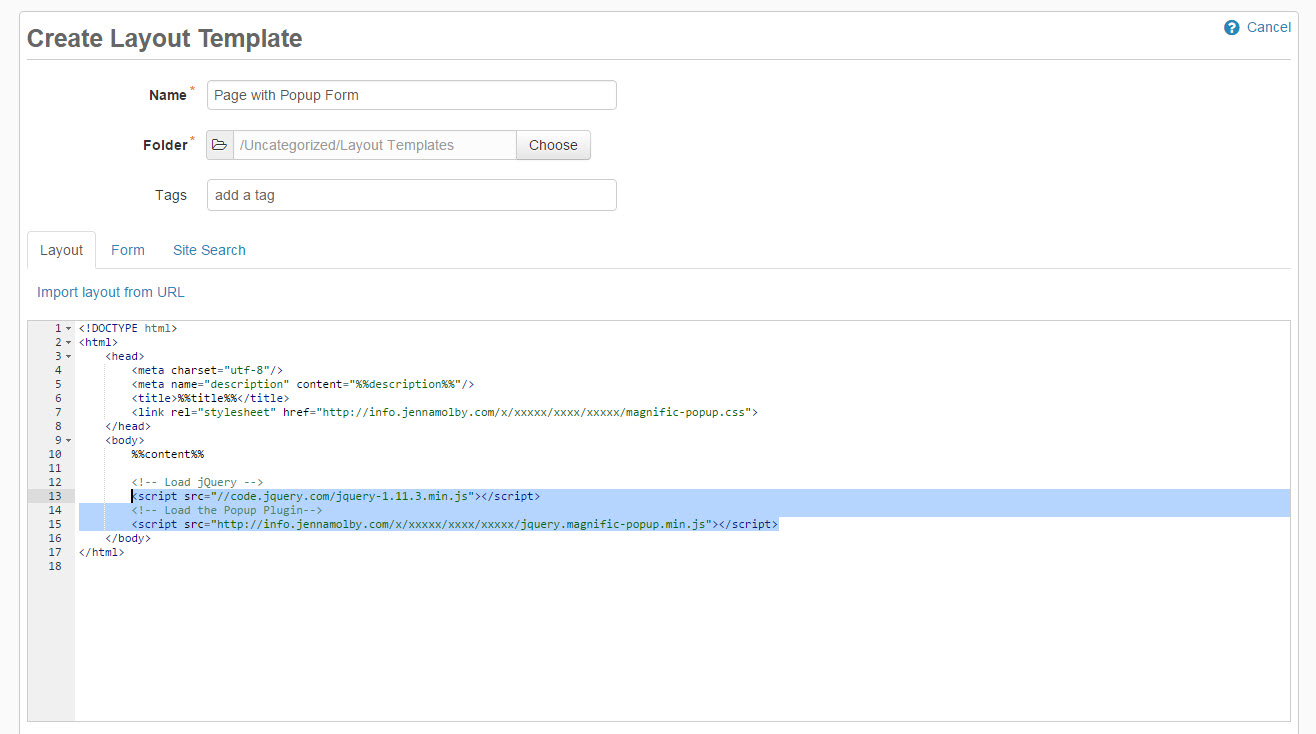
Open up your layout template, scroll down to the bottom of the page and add the following script right before the closing </body> tag.

<!-- Load jQuery -->
<script src="//code.jquery.com/jquery-1.11.3.min.js"></script>
<!-- Load the Pop-up Plugin-->
<script src="http://info.jennamolby.com/l/xxxx/xxxxxx/xxxx/xxx/xx/jquery.magnific_popup.min.js"></script>

Make sure you change the pop-up plugin URL to the Pardot content URL.

Open The Pop-up on Click

To open the pop-up form on click add this piece of code where you want the link or button to appear.

<a class="popup-with-form" href="#my-form">Open form</a>
%%content%%

Add this javascript code right before the closing </body> tag.

$(document).ready(function() {
$('.popup-with-form').magnificPopup({
type: 'inline',
});
});

Open The Pop-up on Page Load

To open the pop-up form when the page loads add this HTML anywhere in the body of your page.

%%content%%

add this javascript code right before the closing </body> tag.

$(document).ready(function() {
     $.magnificPopup.open({items: {src: '#my-form'},type: 'inline'}, 0);
});

You can remove the ability to close the pop-up, so the user has to input their information to continue, by adding modal:true to the JavaScript.

$(document).ready(function() {
    $.magnificPopup.open({items: {src: '#my-form'},type: 'inline', modal:true}, 0);
});

Questions?

Send me a tweet @jennamolby, or contact the Sercante team for help.

No more posts to show