Product Note: Marketing Cloud Growth and Advanced are editions of Marketing Cloud Next and have also been referred to as Agentforce Marketing.
Your marketing team just concluded a successful trade show, returning with over 2,500 new leads from booth scans that need to be imported. In this post, we’ll review the options for importing these trade show records into Marketing Cloud Next (aka Growth and Advanced) without creating duplicates and while adding the records to the correct Salesforce campaign.
Marketing Cloud Next – Import Options
The primary methods for importing records into Marketing Cloud Growth and Advanced are File Import and the Data Import Wizard.
The Data Import Wizard is a more advanced import tool that supports multiple objects, including Custom Objects. The key benefits of the Data Import Wizard are the ability to set matching criteria (to prevent the creation of duplicates) and the ability to add members to Campaigns during the import.
In short, when choosing between the native import options, you can’t go wrong with the Data Import Wizard.
Importing with Data Import Wizard
- Create an import template for use with all imports.
- Be sure to include columns for campaign id and campaign member status.
- Consider including a “Marketing Consent” field that can be used to selectively create consent records.
- Below is an example of my template using data from Mockaroo.

- Format data into your import template.
- Import contacts first.
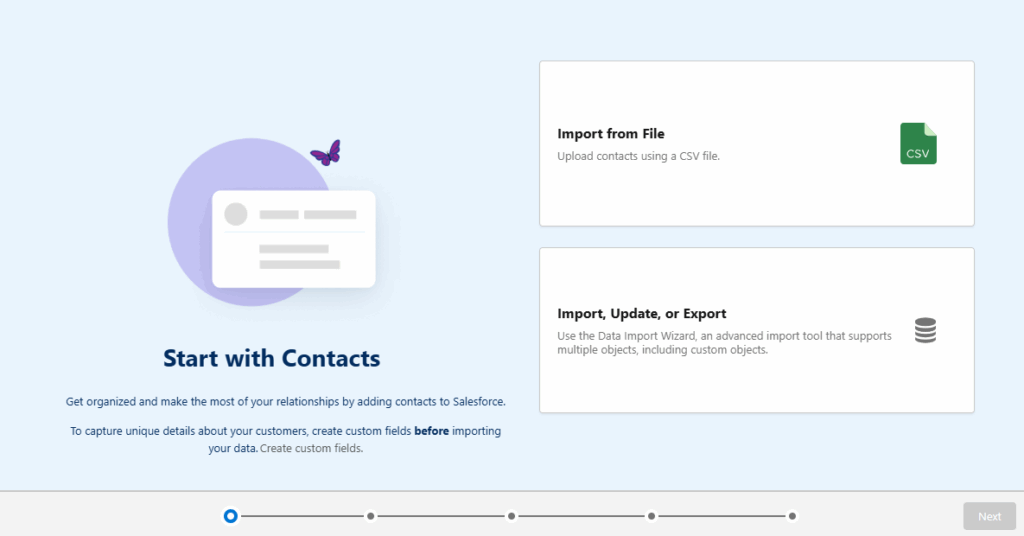
- From the Marketing App – Select the Contacts tab.
- Click the “Import” button.
- Select the “Import, Update, or Export” option.
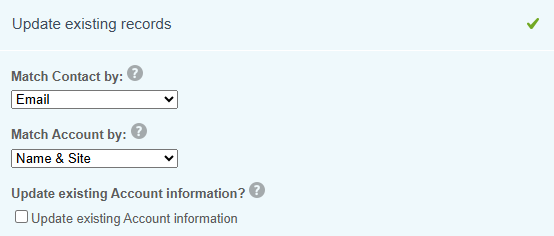
- Select Accounts and Contacts” and then the “Update existing records” option.
- Match Contact by: Email
- This will be used to find matching contacts to update.
- Match Account by: Name and Site
- This setting is used to update the Accounts the updated Contact, but will not create new Accounts because no new Contacts are being created.
- Leave the “Update existing Account information” box unchecked.
- This ensures that the import file does not overwrite any account data.
- Match Contact by: Email
- Select the “Assign contacts to campaigns” option at the bottom of the page – if you would like to add contacts to a campaign.
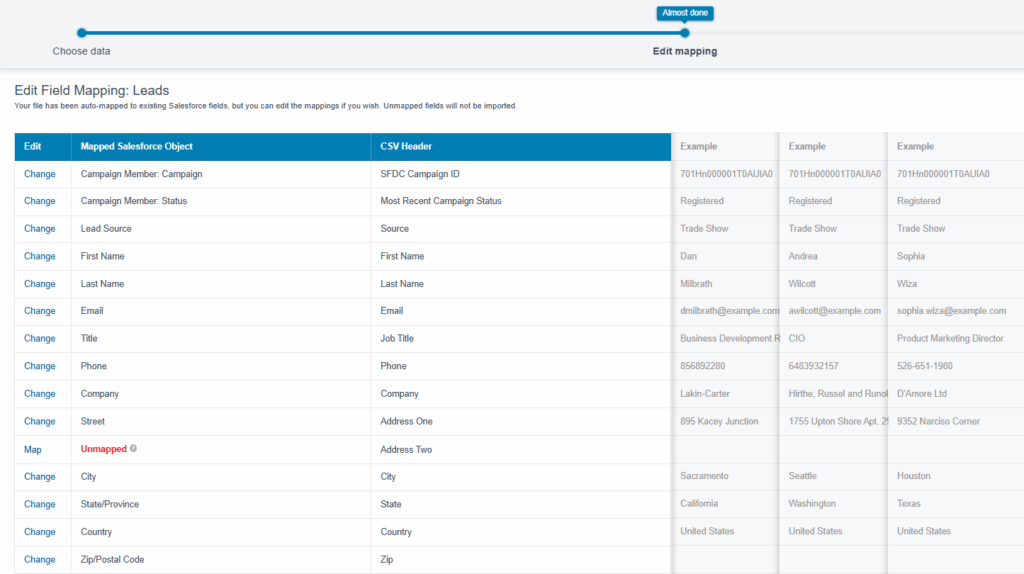
- Upload the CSV file.
- Complete the field mappings.

- Review the import and click the “Start Import” button.
- This import will add existing contacts to the Salesforce specified Salesforce campaign.
- Update and Import leads.
- Remove the contact records from the original import file.
- This can be done by reviewing the Bulk Data Load Job detail and removing records that were updated in step 2.
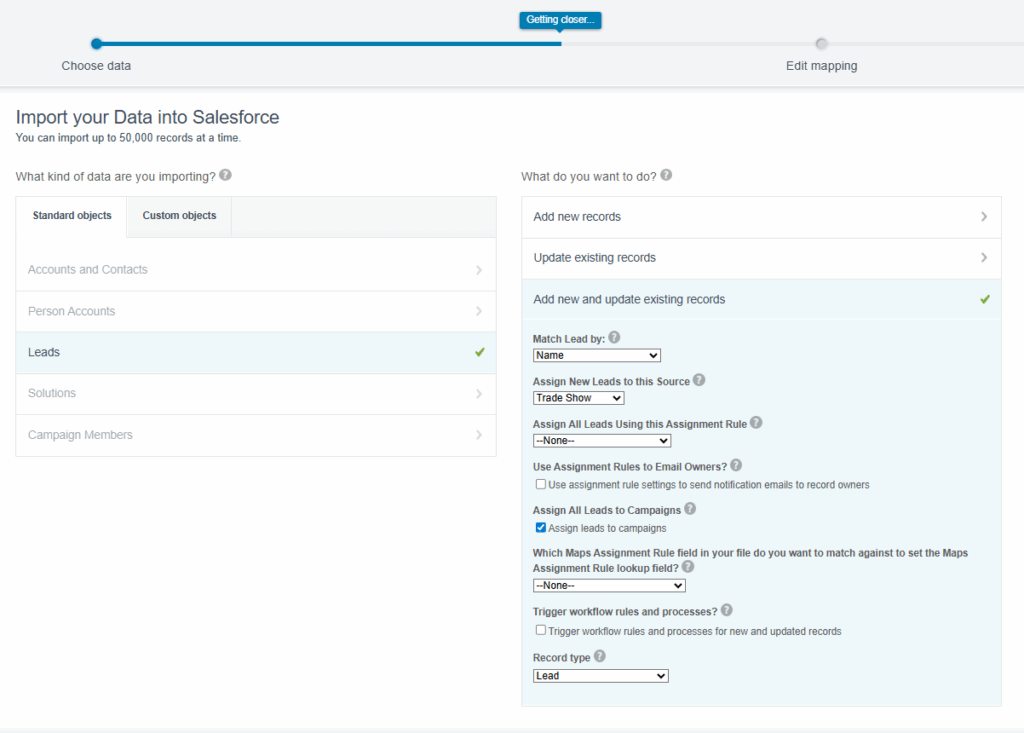
- From the Marketing App – Select the Leads tab.
- Click the “Import” button.
- Select the “Import, Update, or Export” option.
- Select “Lead” and then the “Add new and update existing records” option.
- Match Lead by: Email
- Assign New Leads to this Source: Select the correct lead source
- Assign All Leads Using this Assignment Rule: Optional
- Assign leads to campaigns: Check
- Remove the contact records from the original import file.
- Upload the CSV file.
- Complete the field mappings.
- Review the import and click the “Start Import” button.
- This import will update the existing leads and add them to the Salesforce specified Salesforce campaign. It will also create new leads and add them as well.
- Review campaign members.
- Once both imports are complete, review and confirm members in the Salesforce campaign.

Don’t Forget About the Consent Imports
The steps above have successfully updated existing records (contact & leads), created new lead records, and also created/updated campaign member records. That’s a great start, but consent records are also needed to send messages to Unified Individuals from Marketing Cloud Next.
Consent records are channel and subscription specific. If you have 5 subscriptions and send emails and SMS messages, a total of 10 consent imports that need to be completed to opt subscribers into all. The process is straightforward and fast, but requires some extra work.
Consent Imports
- Format the consent import file for each subscription
- The same file can be used for multiple imports – if the records should be added to all subscriptions.
- The file must include the email address or phone number and consent date of the record.
- Ensure the consent date field is formatted correctly.
- Select the “Consent” tab from the Marketing App.
- Click the “+ Import” button.
- Select the channel, subscription, and consent status in the wizard.
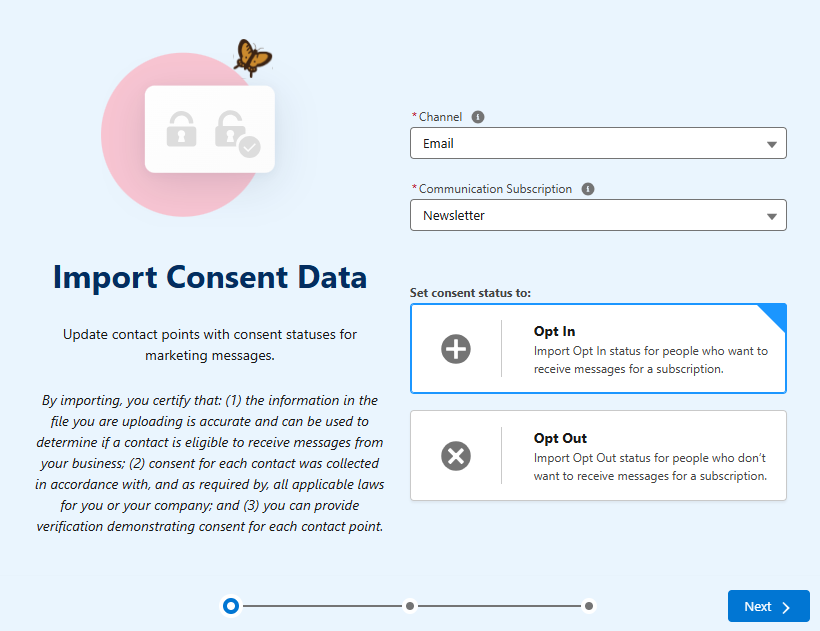
- Click ‘Next’, upload the file and then complete the import.
- Repeat the process for all needed subscriptions across all needed channels.
Whew! That’s a Lot of Work!
The process detailed above does the job, but there are quite a few steps involved. Our simple trade show import has gone from one import to a dozen imports (2 Import Wizard jobs and 10 Consent Imports – 5 subscriptions x 2 channels) .
This is fine for the occasional event, but what if your event team has a robust trade show calendar? This process does not scale well.
There has to be a better way.
What about Data Loader?
I’m a big fan of Data Loader and Dataloader.io, but they simply don’t meet the needs in this case. There are two major shortcomings that can’t be overlooked.
- Data loader does not have deduplication capabilities.
- Data loader does not have the ability to create/update campaign member records when importing or updating records (contacts or leads).
Data Loader also does not address the need to do consent imports.
There is Another Way
Many of my clients attend a large number of trade shows, and our goal is to minimize work and automate where possible.
With this in mind, I developed another process using a custom object and flow. This requires some upfront work but will streamline the process and make things faster in the long run.
The logic of this process could also be adapted to use other tools like LeanData and TractionComplete. Both are designed to match new leads to existing contacts and leads before creating new ones. Additionally, they can both create and update Campaign Member records. Creation of consent records is a potential gap and would need to be tested.
Solution Breakdown
Here’s a summary of how the solution works.
- Create a custom object for Marketing Imports.
- Mine is creatively named “Marketing Import” (Data Loader can’t import in the “Prospect” object).
- Include all fields from your import template as fields on the custom object.
- Create a record-triggered flow that runs when a new record is created on a “Marketing Import” custom object.
- The flow performs the following actions:
- Updates existing contacts.
- Updates existing leads.
- Creates new leads.
- Updates or creates campaign member records.
- Creates consent records (for new leads).
- The flow performs the following actions:
- A single file loaded into the “Marketing Import” object (using Data Loader or Dataloader.io) triggers the flow and performs all the needed actions.
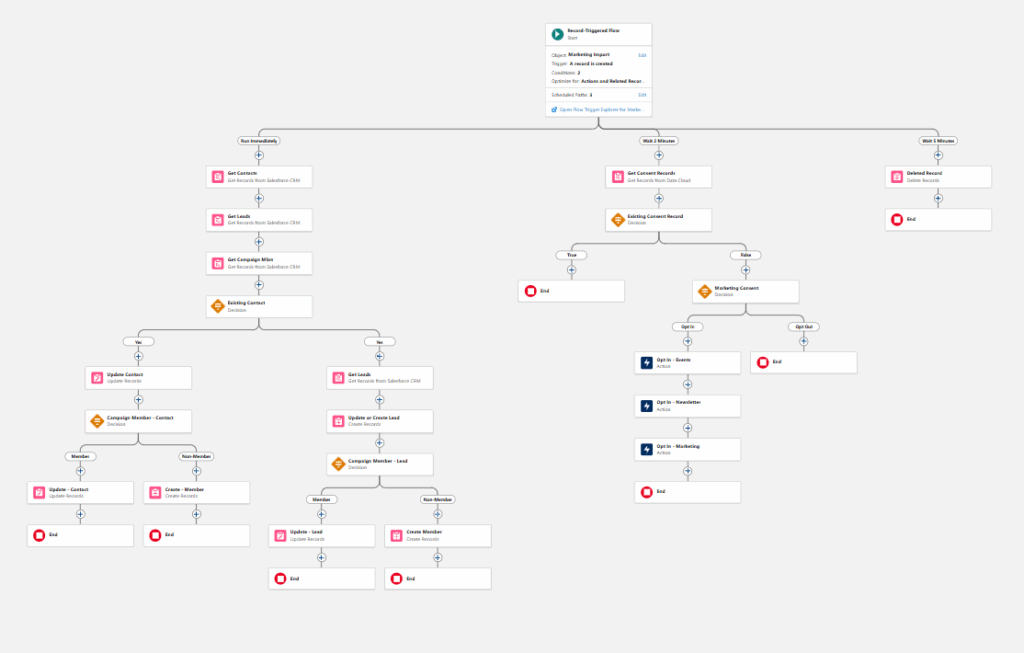
Building the Flow
The flow performs three major functions and a bit of clean up on the backend. All functions are completed in separate paths to ensure they take place in the proper sequence and allow time for record creation.
- Path 1 (Run Immediately)
- Checks for and updates existing contacts and leads. If a matching record is not found, a new lead is created.
- Compares the contact and lead records to the existing campaign members. If a match is found, the campaign member status is updated. If a match is not found, a new campaign member with the proper campaign member status is created.
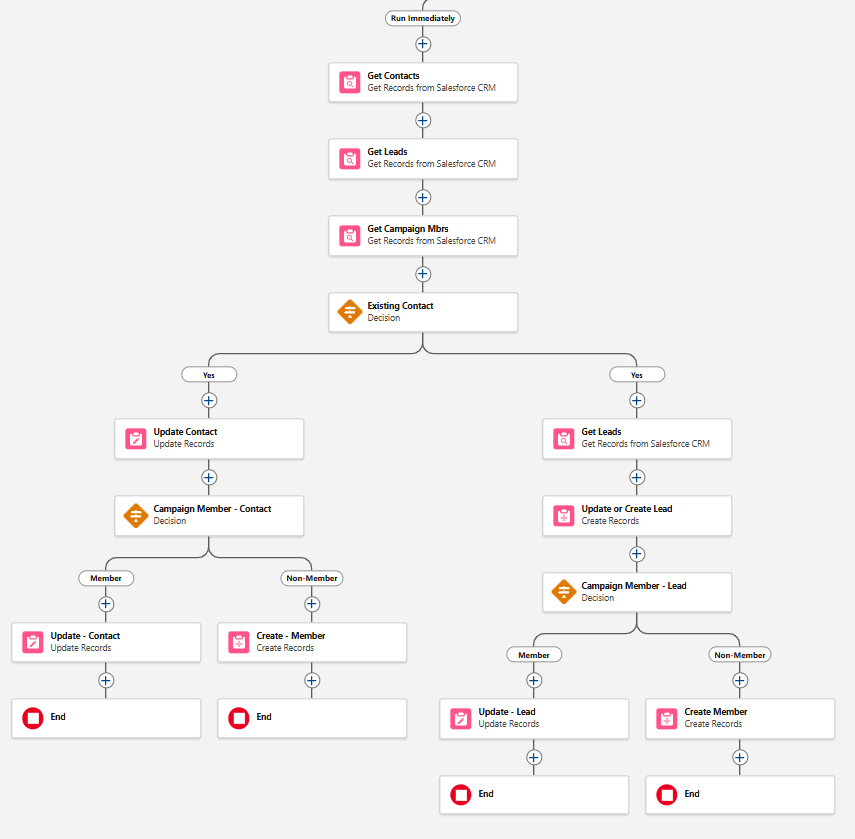
- Path 2 (Wait 2 Minutes)
- Creates consent records. This is a very important step as consent is required to send emails from Marketing Cloud Next.
- Creates consent records. This is a very important step as consent is required to send emails from Marketing Cloud Next.

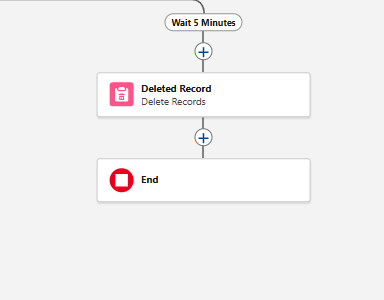
- Path 3 (Wait 5 Minutes)
- Deletes records that were created on the “Marketing Import” object. The idea here is to not store a large amount of redundant data in Salesforce. Since lead records have been created for the newly imported records, this data is no longer needed.
Complete Flow
Consent Records
Consent records are a tricky issue.
If you choose to automatically create consent records, I recommend including a “Marketing Consent” field in your import file. This field will indicate the consent status for each record being imported.
My example flow uses this value to selectively create consent records for new leads upon creation. However, you have options:
- Option 1 – Include this step directly in your import flow.
- Option 2 – Create a separate record-triggered flow. This flow will create consent records when a new lead is created with a “Marketing Consent” value of “Yes/True”. Important: This flow will trigger anytime a new lead is created, not just during marketing imports.
It’s important to note that the neither option updates the consent records of existing leads and contacts. An additional Data Cloud-Triggered flow is required to manage those updates.
Develop and Implement an Import Plan
Importing records into Marketing Cloud Growth and Advanced requires upfront planning and internal discussion. The process does not include the automatic matching process that Account Engagement users are accustomed to, necessitating careful data preparation. There are also additional considerations related to consent imports that must be discussed (be sure to include the legal team) and decisions related to who should have permission to import using Import Wizard or Data Loader, since imports will modify data in Salesforce.
If you’d like support thinking through your data planning, preparation, and importing records into Marketing Cloud Next, reach out to the Sercante team.