With the upcoming June 2026 updates Salesforce has just announced, Salesforce is once again raising the bar for platform security. While these updates are designed to keep your data safer than ever, they do require some proactive heavy lifting from admins to ensure integrations don’t break and user access remains seamless.
In line with the messaging we’ve seen from Salesforce recently—focusing on the intersection of AI, Data, and Trust—these enhancements are mandatory. We want to make sure you’re ahead of the curve. Let’s dive into the core security requirements and what you need to do to prepare.
Email Domain Verification
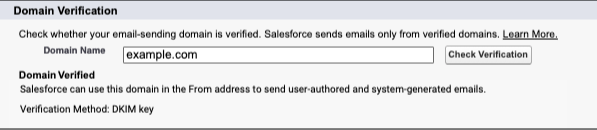
- What is changing: Salesforce now strictly requires all outbound email-sending domains to be verified. To verify a domain, you must establish ownership using either DKIM key (recommended) or a verified entry in the authorized email domains list. As part of this change, Salesforce will no longer deliver emails from unverified domains, even if the specific sender’s individual email address was previously verified.
- Why it matters: Email deliverability is becoming stricter globally, with major mail providers increasingly filtering or rejecting unauthenticated domains. If your organization attempts to send an email from an unverified domain, the delivery will fail and the email will be silently dropped. It won’t generate a bounce notification or an error message for your automations.
- Who is impacted: Any emails sent directly from the Salesforce platform, which includes emails sent via the Email Composer, Apex email, Flow-triggered emails and even system-generated emails like notifications of a new Lead or Opportunity assignment.
- Timeline: Enforcement began rolling out to sandboxes in March 2026, and production orgs in April 2026.
- How to prepare:
- You can check the verification status in your org by going to Deliverability settings in Setup and enter your domain in the Check Domain Verification section.
- Ensure your email sending domains are verified using one of the following methods:
- Create a DKIM Key (Recommended)
- Alternative Option: Authorized Email Domains
- Enable a Safety Net: To minimize immediate business disruption while waiting for domain verification, enable “Use a substitute email address for unverified domains” on the Deliverability Setup page.
- More Information: Spring ’26 Email-Sending Domain Verification Requirement
MFA Mandatory for All Users
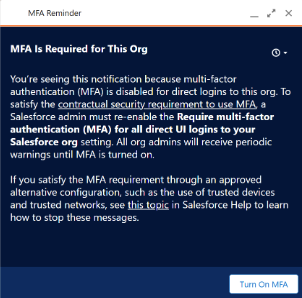
- What is changing: While Multi-Factor Authentication (MFA) has been a contractual “requirement” for some time, Salesforce is moving toward technical enforcement for all UI logins (i.e. the login.salesforce.com page). This means any user logging into the Salesforce UI must use Multi-Factor Authentication. The ability to toggle this off for specific profiles or bypass it via legacy settings is being deprecated.
- Why it matters: Data breaches are commonly linked to compromised credentials. Making MFA a technical requirement for every single user, ensures that even if a password is compromised via social engineering, your org remains protected.
- Who is impacted: All users logging into Salesforce (direct UI or SSO logins) in production or sandbox orgs and do not have one of these permissions: System Administrator profile, Modify All Data, View All Data, Customize Application, or Author Apex. (Users with these permissions are considered “privileged” and have their own MFA requirements, see the next section)
- Timeline: Enforcement is rolling out in waves, starting in Sandboxes on June 22, 2026, and production orgs starting July 20th.
- Ahead of enforcement, orgs that have the setting “Require multi-factor authentication (MFA) for all direct UI logins to your Salesforce org” disabled may start seeing this pop-up message as a heads-up on the upcoming enforcement.
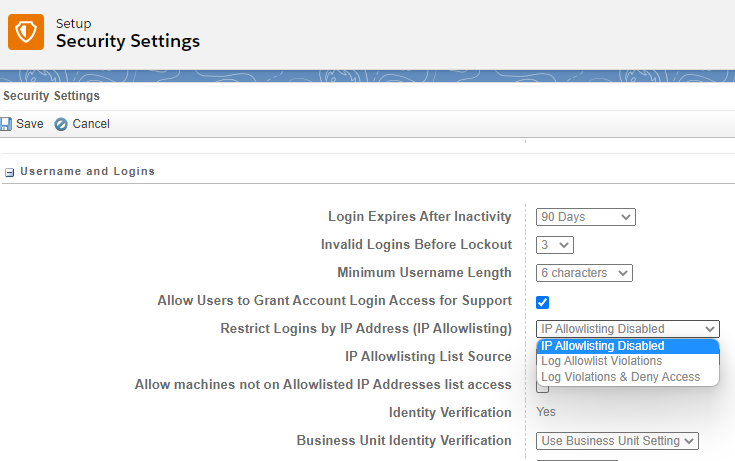
- Orgs with that have been updated will see the “Require multi-factor authentication (MFA) for all direct UI logins to your Salesforce org” setting (under Setup > Session Settings) enabled and greyed out.
- How to prepare:
- Audit users still not using MFA to assess who will be impacted. Use the “Identity Verification Methods Report” to view the methods being used by your organization.
- Identify users relying on the “Waive Multi-Factor Authentication for Exempt Users” permission. To restore this exemption for valid use cases (e.g., automated testing tools), you can contact Salesforce Support for approval.
- Identify the MFA methods available for your users and determine how they choose a method during initial registration.
- If you are using Single Sign-On (SSO) through another identity provider (e.g. Okta, Entra), make sure that provider is using MFA and sending valid signals to validate MFA was used (for more information, see Salesforce’s breakdown of signal requirements).
- Ensure users are prepared for the change and how to register their MFA method.
- More information: Prepare for MFA Enforcement for All Employee Users
Phishing-Resistant MFA for Admins or Privileged Users
- What is changing: Salesforce is introducing a requirement for phishing-resistant MFA for users with “privileged” access. This means moving away from verification codes and toward FIDO2/WebAuthn-based passkeys, hardware security keys (e.g. YubiKeys) or built-in authenticators (e.g. Windows Hello or FaceID) that use FIDO2/WebAuthn standards.
- Why it matters: Admins hold the keys to the kingdom. Phishing-resistant methods ensure a stronger protection against identity-based threats, and ensures access is tied to authorized users.
- Who is impacted:
- This change affects all users logging into Salesforce (direct UI or SSO logins) in production or sandbox orgs who meet any of the following conditions:
- Users assigned with the System Administrator profile
- Users assigned with any one of these privileged permissions: Modify All Data, View All Data, Customize Application, or Author Apex
- Once in effect, users will be prompted to register their phishing-resistant MFA method on their next login.

- Timeline: This change will be introduced in sandboxes starting June 22, 2026, and in production orgs starting July 1, 2026
- How to prepare:
- Audit all users who have the System Administrator profile, or one of these permissions: Modify All Data, View All Data, Customize Application, or Author Apex. You can use Salesforce Reports, User List Views, SOQL, or the User Access and Permissions Assistant.
- Identify users relying on the “Waive Multi-Factor Authentication for Exempt Users” permission. To restore this exemption for valid use cases (e.g., automated testing tools), you can contact Salesforce Support for approval.
- Ensure Security Keys and/or Built-In Authenticators are enabled in your Org. You can also enable Passwordless login using Passkeys for faster logins.
- If you are using Single Sign-On (SSO) through another identity provider (e.g. Okta, Entra), make sure that provider is updated to use phishing-resistant MFA, or enable Salesforce MFA for SSO logins (for more information, see how to configure SSO for MFA compliance).
- Test your MFA implementation to ensure you can successfully enroll and use phishing-resistant MFA to login
- Ensure users are prepared for the change and how to register their MFA method. Encourage them to pre-register before the enforcement date to avoid disruptions.
- More information: Prepare for Phishing-Resistant MFA Enforcement for Privileged Users including Admins
Containment for “High Risk” Connections
- What is changing: Salesforce will automatically detect and contain traffic that:
- Are from “High-Risk” connections through Connected App or API usage.
- Examples of “high risk” connections include anonymizing VPNs (e.g. NordVPN, ExpressVPN, Surfshark, or ProtonVPN), Proxies (e.g. HideMyAss or KProxy) or high-risk IP addresses (e.g. public wifi, blocklisted IPs)
- Connected App or API usage may include integrations, plugins (e.g. Salesforce Inspector Reloaded) or use of CLI tools.
- Are significant, novel deviations from typical user login activity based on network, client, authentication events, and geolocation. (detected through an AI-driven monitoring system)
- If a high risk connection is identified, the following actions will be taken:
- The affected user account will be frozen.
- All OAuth refresh tokens granted to the user will be revoked.
- An email will be delivered to org admins from Salesforce Security (See Administrator Notifications below).
- The affected user will need to contact their org admin to restore access to their account.
- Are from “High-Risk” connections through Connected App or API usage.
- Why it matters: This enhancement is aimed at protecting against suspicious activity via anonymizing VPNs, proxies, or high-risk IP addresses; credential harvesting; and token theft.
- Timeline: This change started April 24, 2026
- How to prepare:
- Ensure users running integrations, plugins or connects are not doing so from high-risk sources
- If automated containment affects a user, review their session and restore access by unfreezing their user
- Users will need to avoid connecting from high-risk connections to prevent re-containment. They will also need reauthorize any connected apps
- If your only admin account is locked out, contact Salesforce Support by phone to have your account reactivated
- More information: Preventing Connections from Anonymizing VPNs, Proxies and High-Risk IP Addresses
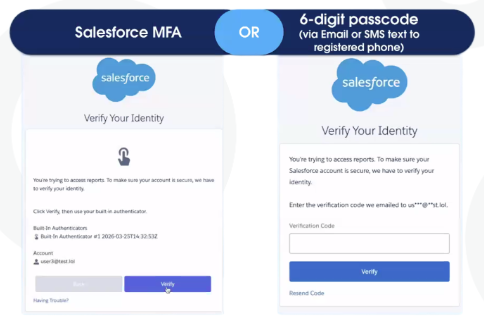
Step-Up Authentication for Reports
- What is changing: Salesforce is introducing “Step-Up Authentication.” Even if a user is already logged in, they will be prompted to re-verify their identity (via MFA) when they attempt to run or view reports if a configurable amount of time has passed since their last step-up challenge.
- Why it matters: This change is intended to prevent malicious data breaches or unauthorized transfer of data to external locations. Given that report views and exports can be susceptible to scraping or unauthorized external use, the step-up authentication ensures these actions require a stronger authentication challenge.
- Who is affected: This change impacts all users (direct login or SSO) who run or export reports.
- Timeline: Sandboxes will see this available starting May 27, 026 and enforced starting June 3, 2026. Production orgs will see this available starting May 27, 026 and enforced starting June 10, 2026.
- How to prepare:
- Ensure all users (especially SSO users) have a registered Salesforce MFA method, a valid email, or an SMS phone number, as they will need this to pass the challenge.
- Review and Configure the Policy: In Setup, go to Identity Verification settings and adjust the cool-down period threshold if your business requires a timeframe different from the 120-minute default.
The Bottom Line
June 2026 is right around the corner. By leaning into preparing for these enhancements now, you’re not just racing to a deadline—you’re hardening your business against the next generation of digital threats.
As you prepare for the rollout, keep these three steps top of mind:
- Audit: Identify which users will be impacted by the permission changes.
- Test: Run your critical processes in a Sandbox environment.
- Educate: Ensure your stakeholders understand the ‘why’ behind the new security protocols.
With a clear plan in place, the transition to a more secure Salesforce platform will be a seamless one.Need a hand getting your security posture ready for 2026? The Sercante team is ready to help you audit and prepare your org for these upcoming changes and your overall security posture. Reach out today!