Category

Mike Morris

Agentforce Marketing (aka: Marketing Cloud Next) introduced marketing teams to Salesforce Flow for the first time. While flows provide increased capabilities over tools like Engagement Studio in Account Engagement and Journey Builder in Marketing Cloud Engagement, building them can be time-consuming and even intimidating to new users.

In this post, we’ll explore how to create and use templates to increase efficiency while taking full advantage of the power of Flow.

Non-Admin Flow Types

“Non-admin” flows power Agentforce Marketing and allow marketers to automate key processes without needing administrator-level permissions. Common use cases include sending emails, delivering SMS messages, and creating Salesforce records.

There are two primary Flow types within Agentforce Marketing:

  • Form-Triggered: These have a 1-to-1 relationship with a marketing form. They are used to create or update Salesforce records, manage consent, and handle immediate post-submission tasks.
  • Segment-Triggered: These are primarily used to send individual or a series of emails and SMS messages. They also power Path Experiment (available in the Advanced Edition) and provide access to additional flow elements allowing marketers to build customized journeys.

Flow is extremely powerful, but getting started can be tough. The Flow canvas is a “blank slate” that requires thought and configuration.

Let’s take a look at how marketers can simplify and scale their efforts using flow templates with a real-world scenario.

Example Scenario

The marketing team has a high volume of assets that they would like to gate on the website using Agentforce Marketing forms. They need to ensure that existing contacts or leads are updated when a form is submitted before creating any new lead records. Additionally, they must generate consent records whenever a user opts in to marketing communications and add them to the correct Salesforce campaign for tracking purposes.

User Setup and Permissions

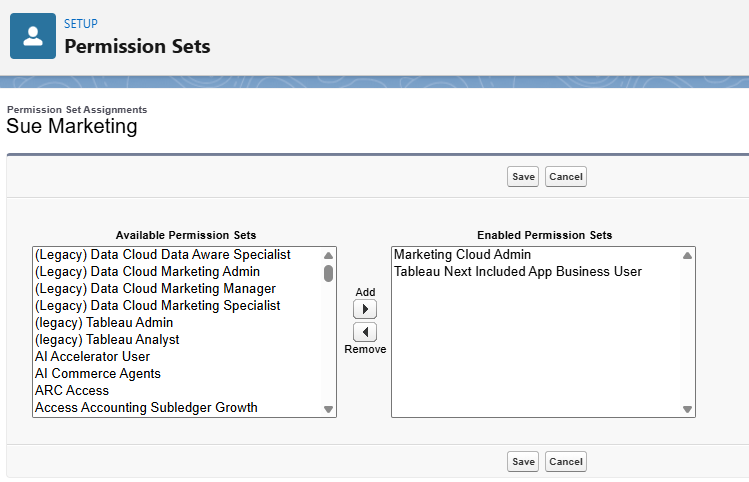
To replicate the experience of a marketing user, all flows and images in this post were created with a Salesforce user with the following profile and permissions. These are reflective of a standard marketing user.

  • Profile
    • Standard User
  • Permission Sets
    • Marketing Cloud Admin
    • Tableau Next Included App Business User (This provides access to the Marketing Performance Dashboards)
  • CMS Contributor Role
    • Content Manager
Permission Set Assignments

Form and Flow Templates

The first step is determining the fields that need to be included on the form. The best approach is to take a minimalistic approach and only ask for information that will be used or is needed for lead routing.

Hidden fields on forms are very useful for capturing form-specific data for use in your flow. For example, you can use them to automatically pass the Campaign ID and Campaign Member Status.

Creating the Form Template

  1. Select the “Marketing” app from the App Launcher.
  2. Click the “Content” tab to enter the Salesforce CMS.
  3. Click on the “Content Workspace for Marketing Cloud” workspace.
  4. Click the “Add” button and select “Content”.
  5. Choose the “Form” CMS content type.
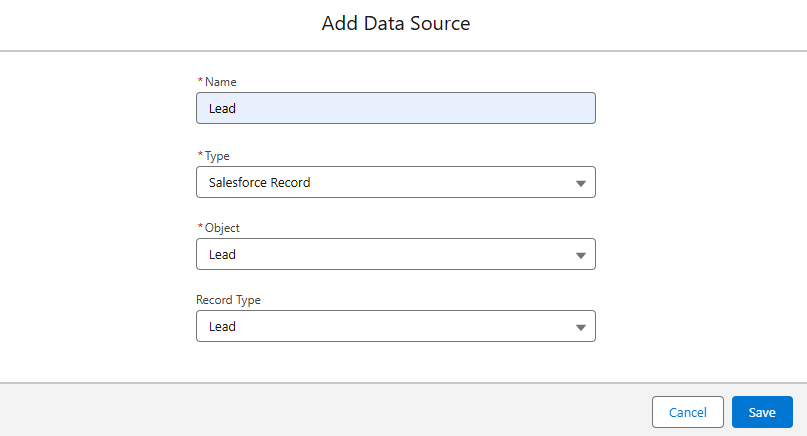
  6. Add Data Source as “Lead”.
Adding a Data Source
  1. Drag the input fields into the form, and configure the labels, unique names, and determine if the field should be required or hidden.
  2. Set the desired action at form submission (show thank you message or redirect).
  3. Add a title, API Name, and description and then save.


Here’s an example of my form. Note that all fields have been set to required (with the exception of the opt-in checkbox). It’s important to know that Flow will overwrite data in Salesforce if a submission is received with blank data. If optional fields are needed, formulas can be created in the flow to protect data.

Example of a form

Creating A Flow

  1. From the form you just created, click “New Flow” in the flow section.
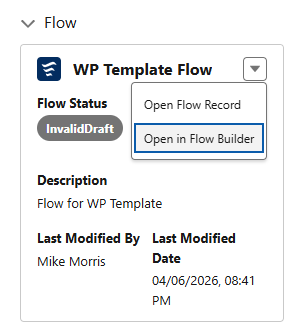
  2. Select “Open Flow in Flow Builder”.
Open flow in flow builder
  1. Customize the flow as needed and save.

Customizing the Flow

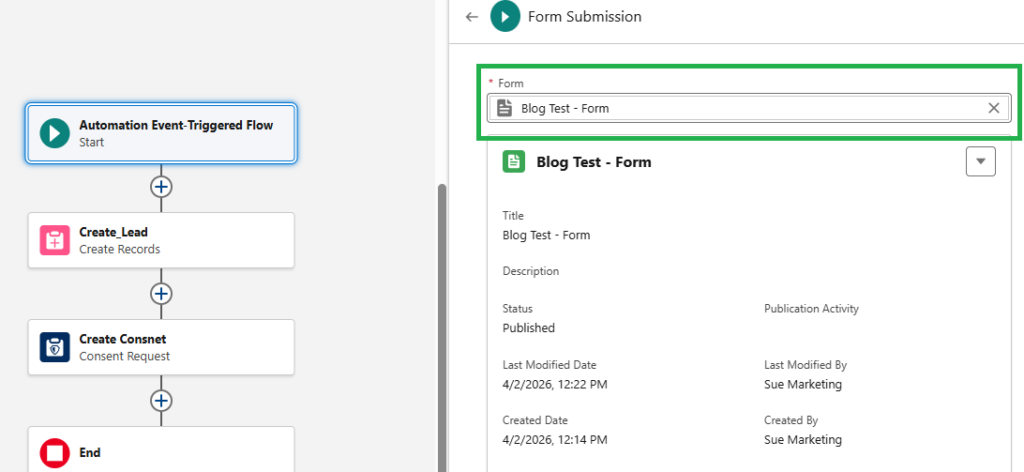
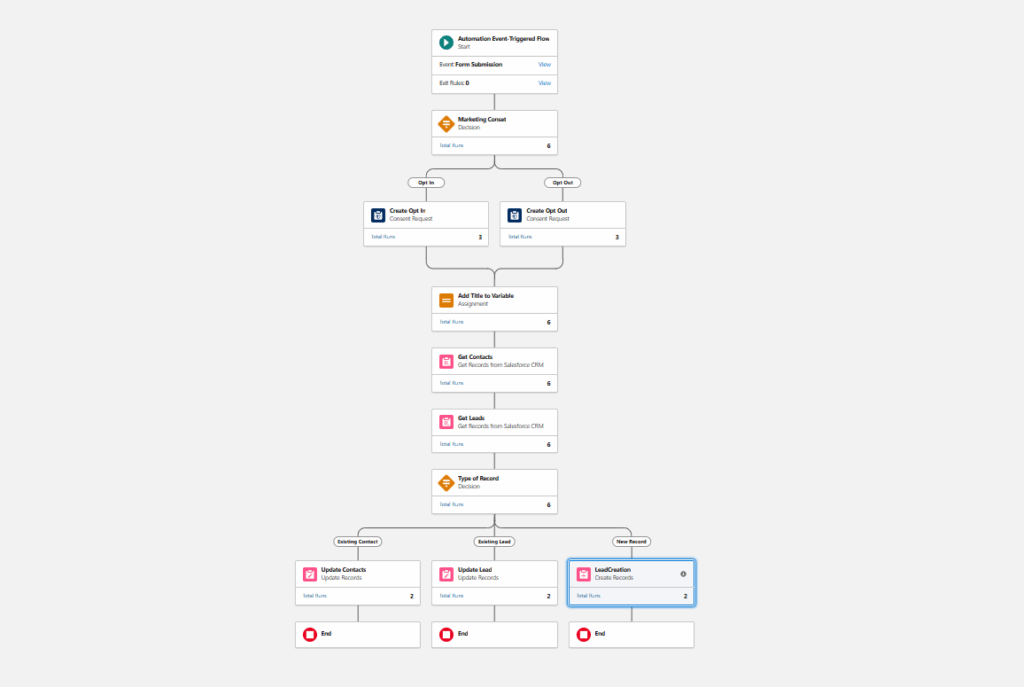
The flow needed to meet our requirements is a little complicated, but that’s the whole point of this post. We don’t want the marketing team building this logic repeatedly.

This flow was built by a user with the “Marketing Cloud Admin” permission set. The “Marketing Cloud Manager” role lacks access to certain required elements. If you’d prefer, your Salesforce Administrator can also set up this template for you.
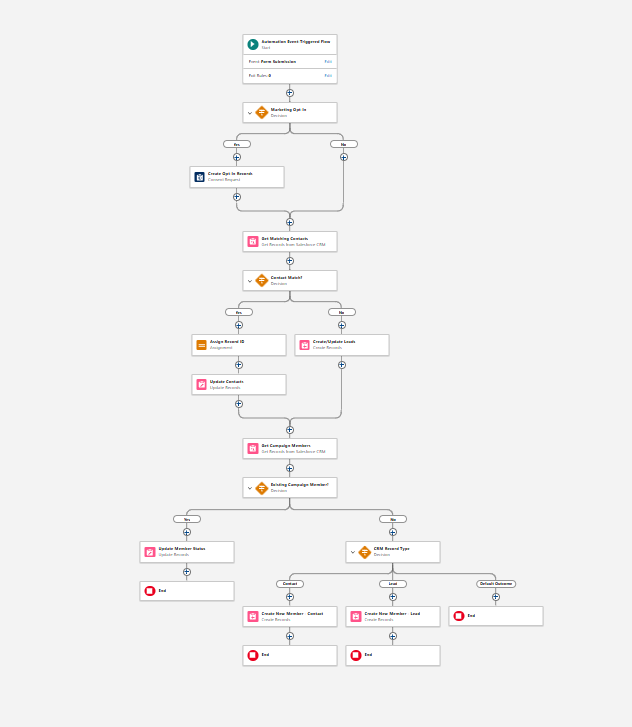
An example of a flow

Flow Summary 

Here’s a summary of the actions being performed in the flow.

  • Creates an opt-in consent record if the consent box on the form is checked.
  • Finds existing Salesforce contacts based on the email address and last name in the form submission.
    • Updates existing contact records, if found.
  • Finds existing Salesforce leads based on the email address and last name in the form submission.
    • Updates existing lead records, if found.
    • Created new leads, if matching records are not found.
  • Retrieves campaign members based on the CRM ID of the person who submitted the form and the campaign ID included in the hidden field on the form.
    • Updates the campaign member status of existing members to the value included in the Campaign Member Status hidden field from the form.
    • Created new campaign members using the hidden fields from the form.

Saving the Flow as a Template

We can now complete the creation of the flow template.

Save As Template  

  1. From the Flow tab, open the latest version of the flow.
  2. Delete the associated form from the “Start” element.
    • Click “Edit” next to “Event: Form Submission”.
    • Click the “X” to delete the form.
Steps to delete a form
  1. Click “Save As New Flow”.
    • Add the flow label and a detailed description of what the flow does and when it should be used. The API Name will automatically populate based on the flow label.
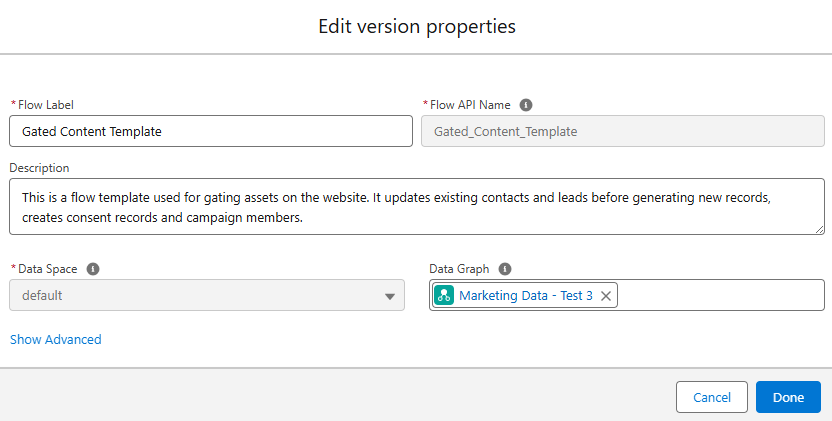
Example of how to add a flow label and form description
  • Note: You may run into an issue saving due to the presence of the Consent Request element. If this happens, delete the field reference in the Contact Point value and save. 
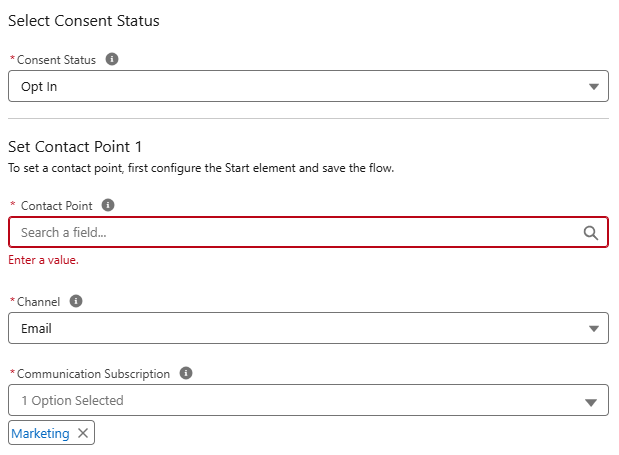
How to solve the issue of being unable to save
  1. Click “Save As New Version”.
    • It’s important to create a new version of the flow before saving as a template. The initial version of the flow will be v0.
    • Saving a new version will increment the version number and ensure your updates are available in the flow template. 
  2. Click the dropdown to the right of the “Save As New Version” button and select “Save as Template”.
  3. Confirm that the template has been created by completing the following steps:
    • Click the Flows tab.
    • Click the “New” button.
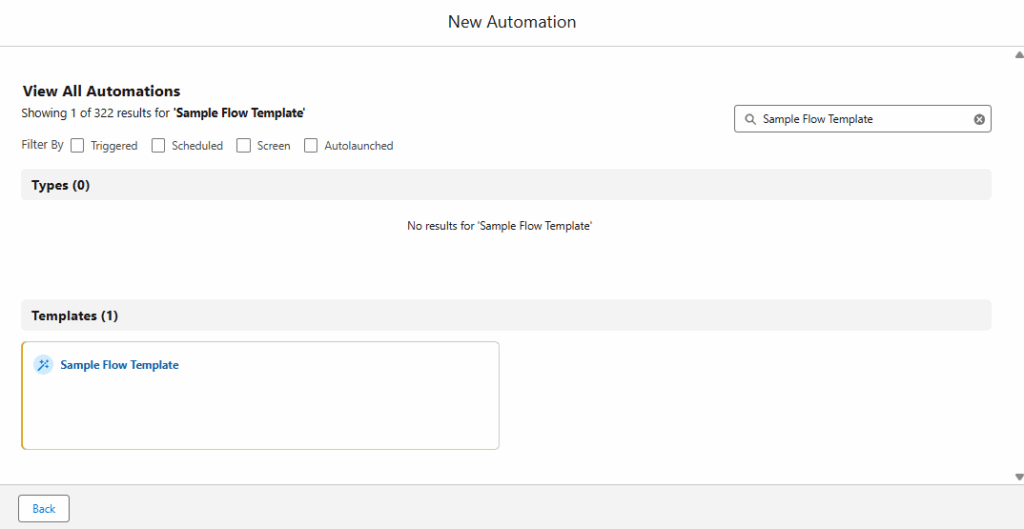
    • Enter the template name in the search box.. 
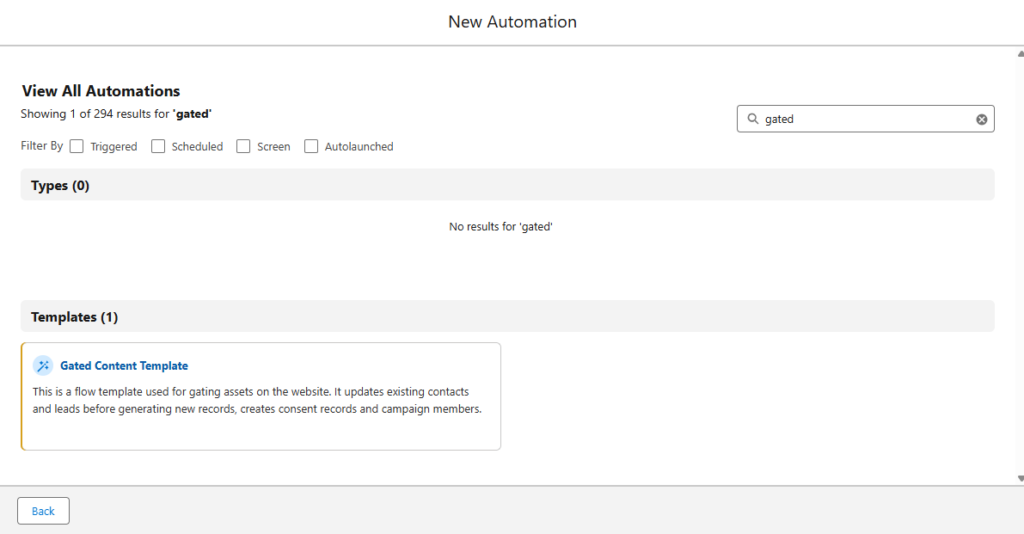
How to confirm that a template has been created

Using Your Templates

Now that all the heavy lifting is done, you or your team can use your form and flow templates to quickly support additional assets. Here’s how.

Repeat the following steps for all new assets

  1. Create the Salesforce campaign that will be used for the form and the campaign members.
    • When creating the campaign from the Marketing App, do not select a campaign template.
    • Selecting a template will result in an additional flow being created.

Do not select a template at the following screen.
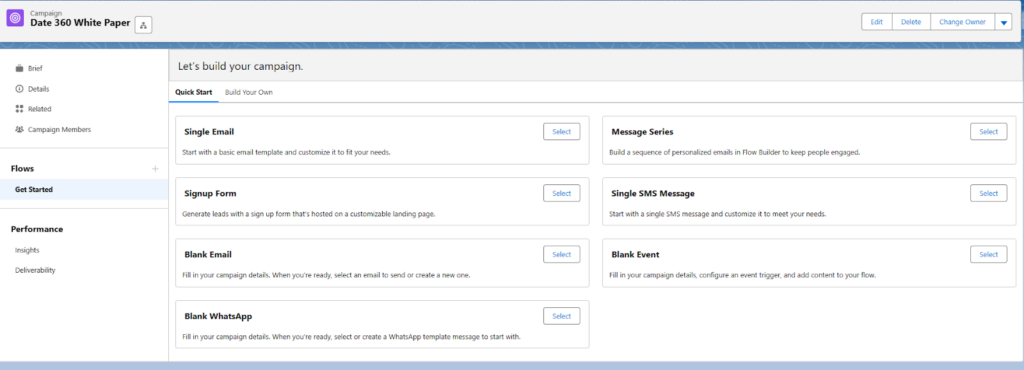
Do not select a campaign template when creating the campaign from the marketing app
  1. Navigate to the form template in the CMS.
  2. Select the “Clone” from the dropdown menu to the right of the form name.
How to clone a form
  1. Name the new form based on the asset name.
  2. Update the Campaign ID and Campaign Member Status (hidden field values) and Form Submission action.
How to update the campaign ID and campaign member status
  1. From the Flow tab, click the “New” button.
  2. Search for and select the gated content template.
  3. Click “Edit” next to “Event: Form Submission” and select the cloned form.
  4. Update the Contact Point value in the Consent Request element to reference the email address from the associated form.
  5. Click “Save” and name the new flow.
    • Click “Show Advanced” and delete the value in the “Source Template” field.
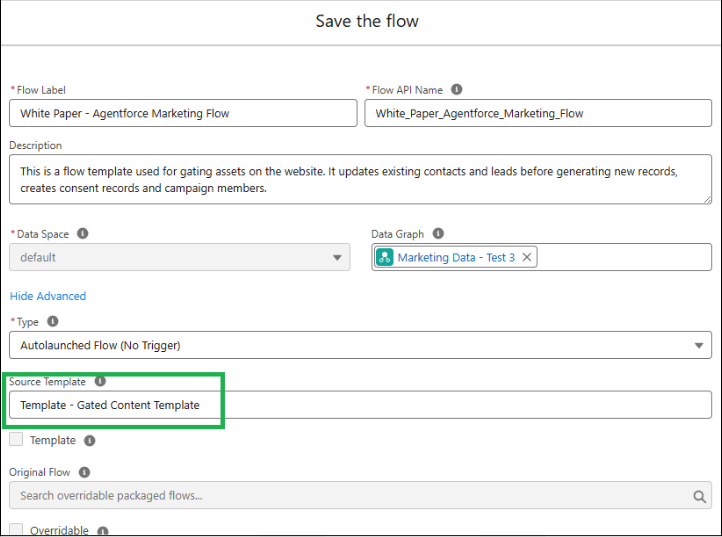
      • Non-admin users will not be able to activate the flow if this step is omitted.
Save the flow screen, highlighting the Source Template field.


  • The Consent Request element can be a bit finicky. If you see an error after updating the Contact Point, just delete the element and add it back.
  1. Exit the flow details page and associate the flow to the correct campaign using the “Associated Record” lookup.
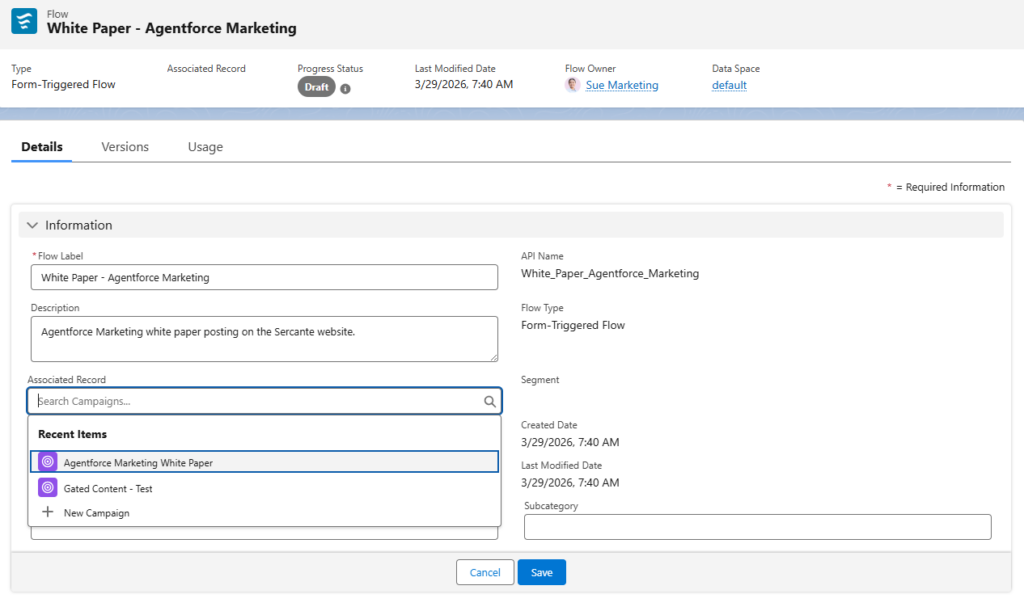
How to associate the flow to the correct campaign using the "Associated Record" lookup
  1.  Return to the CMS and publish the form (this will also activate the flow).
  2. Add the embed code to the web page promoting the asset.

Save Time and Increase Efficiency with Templates

Building the initial form and flow template featured in this post took approximately one hour. Because the logic is quite involved, I spent a portion of that time testing to ensure everything functioned exactly as intended.

Once the templates were ready, I put them to the test with a stopwatch. While the steps in the “Using Your Template” section might look detailed, I was able to create a brand-new form and flow in just 4 minutes and 1 second. That is a massive 93% time savings!

Beyond just saving time, templates ensure accuracy and process consistency. Asking multiple people to manually replicate the complex requirements stated in this post would almost certainly result in errors.

If you frequently build forms and flows with similar structures, do yourself a favor and templatize. Your future self (and coworkers) will thank you.

Sercante is recognized as a Marketing Cloud Growth and Advanced Implementation Expert and has the expertise to support your Agentforce Marketing needs. If you’re interested in support with Agentforce Marketing, reach out to us and let us know how we can help.

Agentforce Marketing forms are built in Salesforce CMS and can be hosted on Agentforce Marketing landing pages or embedded on external sites. These forms utilize Salesforce Flow to create and update records and represent a significant shift for users transitioning from Marketing Cloud Account Engagement. In this post, I’ve compiled five considerations that I encountered and provided solutions to help speed up your adoption.

Product Note: In previous blog posts, Agentforce Marketing has also been referred to or known as Marketing Cloud on Core and Marketing Cloud Next. This product may have also been referred to under its Edition names, Marketing Cloud Growth and Marketing Cloud Advanced.

Consideration #1 – Duplicate Record Creation

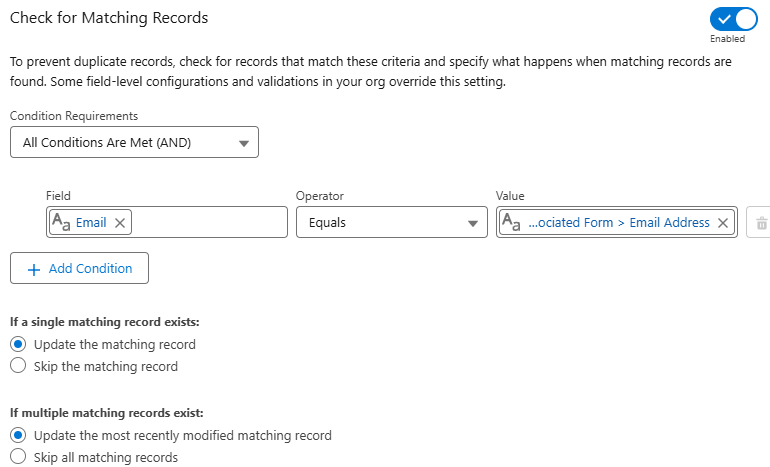
The Create Records element in Flow includes a feature to check for existing records and define actions when matches are found. However, the configuration of your organization impacts this setting and, in some cases, can cause duplicate records to still be created even with this feature enabled.

To prevent duplicate records, check for records that match these criteria and specify what happens when matching records are found. Some field-level configurations and validations in your org override this setting.

Checking for matching records

Solution – Test and Validate

Before getting too concerned about this one, do some testing. Salesforce is extremely customizable, so I get the disclaimer. It’s totally possible that duplicate rules, validation rules, or other configurations could impact this feature in your org.

I tested in my development org and a couple live orgs and did not run into any issues. Still this is worth noting and validating.

Consideration #2 – Specifying the Created By User for New Leads

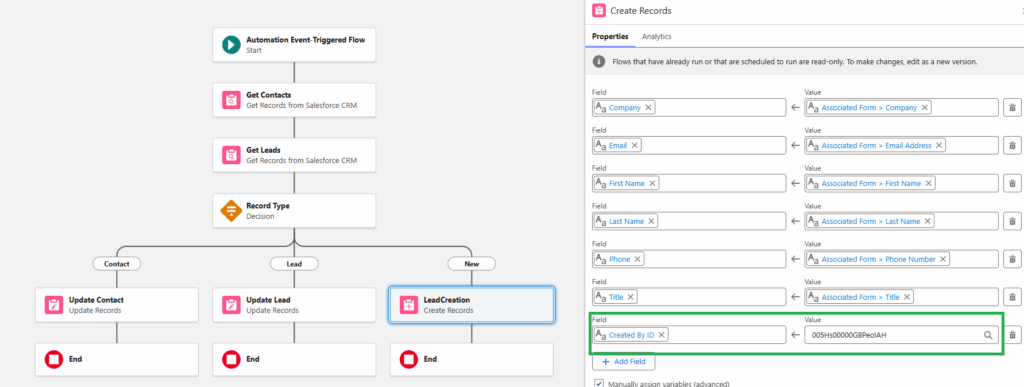
When new leads are created from a form-triggered flow, the“Created By” field defaults to the user who activated the flow. This is not ideal – especially when flows are activated by users that the sales team is unfamiliar with.

The simple fix is to specify the “Created By ID” in the create records element of the flow.  However, this field is an audit field and might not be available to you in your org.

Even if you have access to this field, there are limitations if you try to use it in conjunction with the “Check for Matching Records” setting. The “Created By ID” can’t be updated on matching records, which makes total sense.

Creating records and checking for matching records

Solution – Audit Fields and Flow Updates

The first step is ensuring that the “Created By ID” field is available and accessible to the user building the form-triggered flow.

This feature must be activated by your System Administrator and assigned to users. The full instructions are included in the Salesforce support article Enable the ‘Create Audit Fields’ Permission in Salesforce.

The second step is addressing the issue related to updating existing records. Since you can’t update the “Created By” field on an existing record, the best option is to add a decision element to your flow. This allows you to create different paths and actions based on the type of record.

This solution replicates the functionality of the “Determine CRM Record for Individual” element that’s currently available in segment-triggered flows. Fingers crossed that this element will be available in form-triggered flows in the future. Until then, this solution gives the flexibility to set the “Created By ID” on new records without impacting existing records.

Automation event-triggered flow processes

Consideration #3 – Overwriting Data

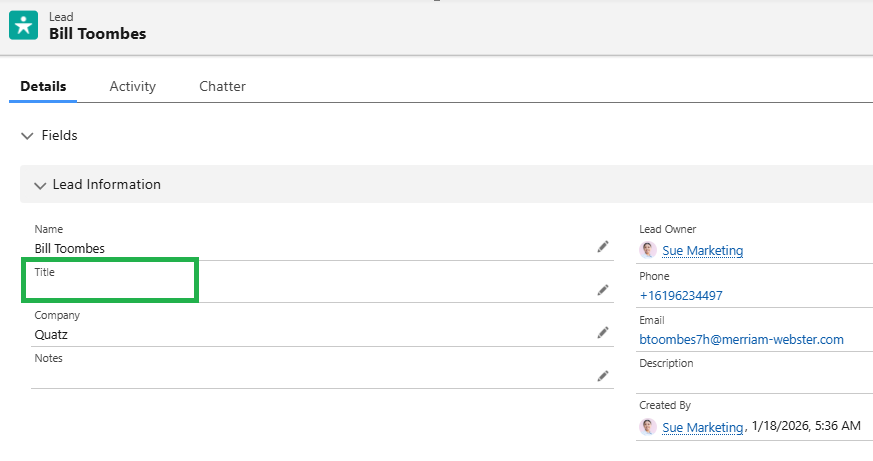
When an existing record completes an Agentforce Marketing form and leaves a field blank, the empty input overwrites the current Salesforce data. For example, if a lead with the job title ‘Quality Engineer’ submits a form with the title field empty, the existing value will be overwritten with a blank.

Before

Details of lead prospect information


After

Shows details of lead prospect without the title

Solution #1 – Required Fields

The quick and easy solution is to prevent blank data from being submitted in the first place. This can be done by updating the field to required in the form. 

Solution #2 – Formula Fields

Depending on the number of fields on your form, making all fields required could impact the user experience and reduce completion rates. Understanding that there will likely be times that there are optional fields on forms, we can still protect good data using formula fields.

Creating formula fields allows you to check to see if the form value is blank before updating data in Salesforce. If the form value is blank, the current value from the contact or the lead can be preserved.

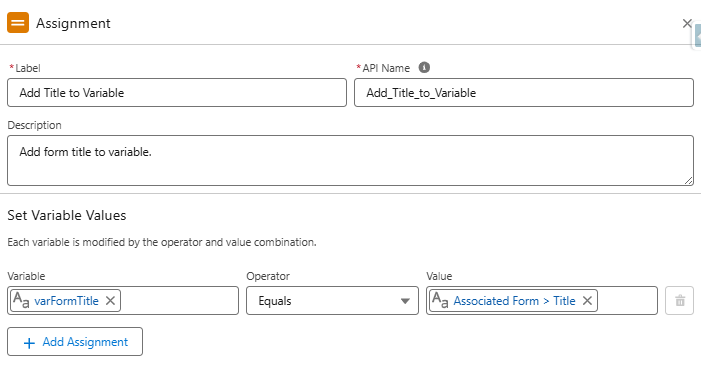
The formulas are complicated by the fact that form fields can’t be used in formulas. This is due to the fact that the data has not yet been committed to the flow’s local memory. This can be addressed by adding the value from the field to an assignment element and using it in the formula.

Protecting Fields 

  1. Create a Variable
    • Toolbox > New Resource > Variable
      • Resource Type: Variable
      • API Name: varFormTitle
      • Data Type: Text
Steps into creating a new resource
  1. Add Assignment Element
    • Set variable values as follows:
      • varFormTitle Equals Associated Form > Title
How to add titles, names, descriptions etc. to a variable
  1. Create Formula
    • API Name:  “clean_Title” (data type – text)
    • This formula will return the value of the varFormTitle variable if it has a value. If it’s blank, it will return the title from the contact record. If a contact record is not found, the final fallback is the title field from the lead. 
    • This ensures that if a blank value is submitted in the form, the current title from the contact will be retained (for contact records) and the title from the lead will be retained for lead records.

IF(
NOT(ISBLANK(TRIM({!varFormTitle}))),
{!varFormTitle},
IF(
NOT(ISBLANK({!Get_Contacts.Title})),
{!Get_Contacts.Title},
{!Get_Leads.Title}
)
)

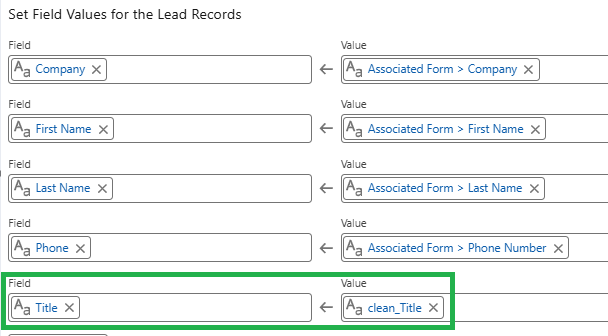
  1. Configure Update Elements
    • Use the “clean_Title” formula in the “Update Contacts” and “Update Leads” elements.
Setting field values for Lead Records

Consideration #4 – Campaign Member Records

Agentforce Marketing uses Opportunity Influence to track revenue as opposed to Campaign Member Influence, so campaign member records are not really needed. However, many marketers (present company included) rely on campaign member records for much more than just revenue tracking.

At this time, there is no single flow element that automatically adds submissions to a Salesforce campaign, but I’m optimistic that one will be added. Until this happens, we have a couple options.

Solution #1 – Customize Each Form Flow

While possible, this option is not very practical. Even with flow templates, this adds a lot of extra complexity to the form-triggered flow. 


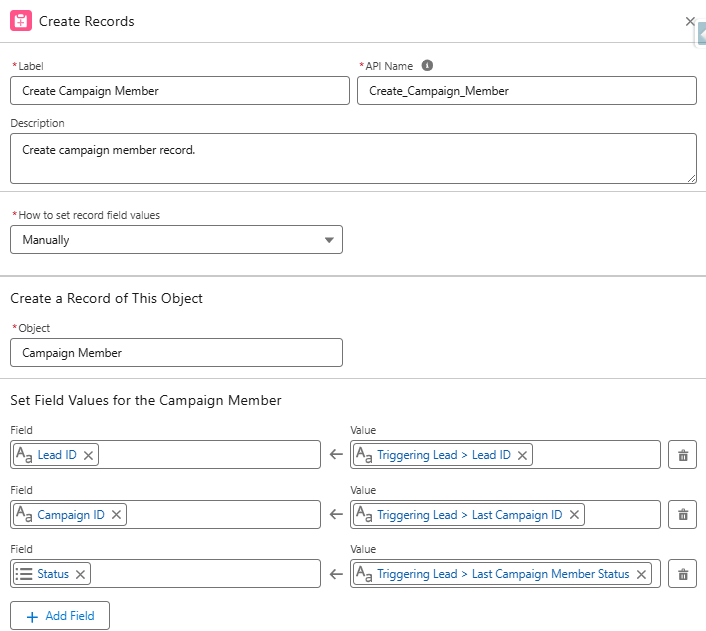
Solution #2 – Campaign Manager Flows

My preferred method for creating campaign member records is separate record-triggered flows. These flows are triggered when new records are created or the campaign or campaign member status on an existing record is changed. 

Creating Campaign Manager Flows

  1. Create Contact and Lead Fields
    • Last Campaign ID (text)
    • Last Campaign Member Status (text)
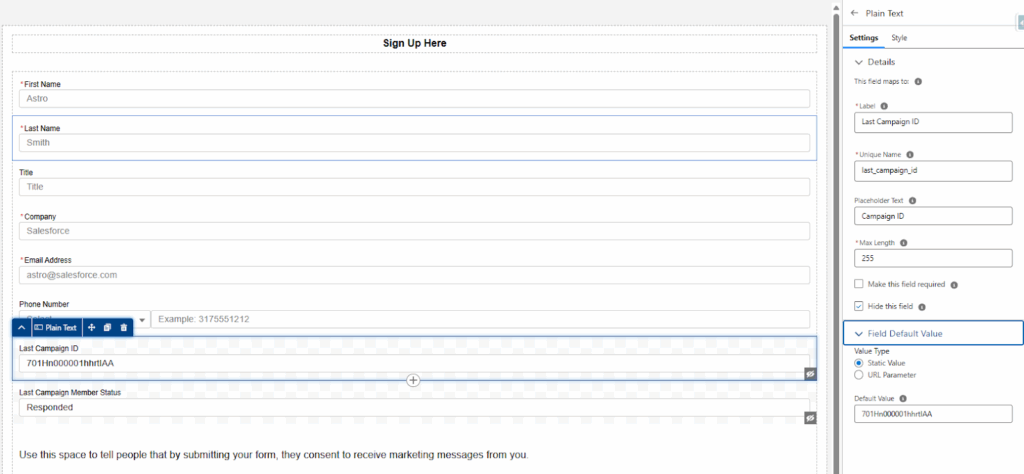
  2. Add Hidden Fields (to the form)
    • This makes it easy for users to update the values for specific forms by updating the default values of the hidden fields. This is preferable to modifying the flow, in my opinion.
      • Add the campaign ID associated with the form as the default value for the “Last Campaign ID” field.
      • Add the desired campaign member status as the default value for the “Last Campaign Member Status” field.
How to sign up for campaign manager flows
  1. Create the Flow (separate flow are needed for each object)
    • Type – Record-Triggered Flow
    • Object – Contact, Lead, or Account (if person accounts are being used)
    • Trigger – A record is created or updated
    • Entry Conditions – This formula triggers when a new record is created and the Last Campaign ID field has a value or when the Last Campaign ID or Last Campaign Member Status value on an existing record is changed.

OR(
AND(
ISNEW(),
NOT(ISBLANK({!$Record.Last_Campaign_ID__c}))
),
ISCHANGED({!$Record.Last_Campaign_Member_Status__c}),
ISCHANGED({!$Record.Last_Campaign_ID__c})
)

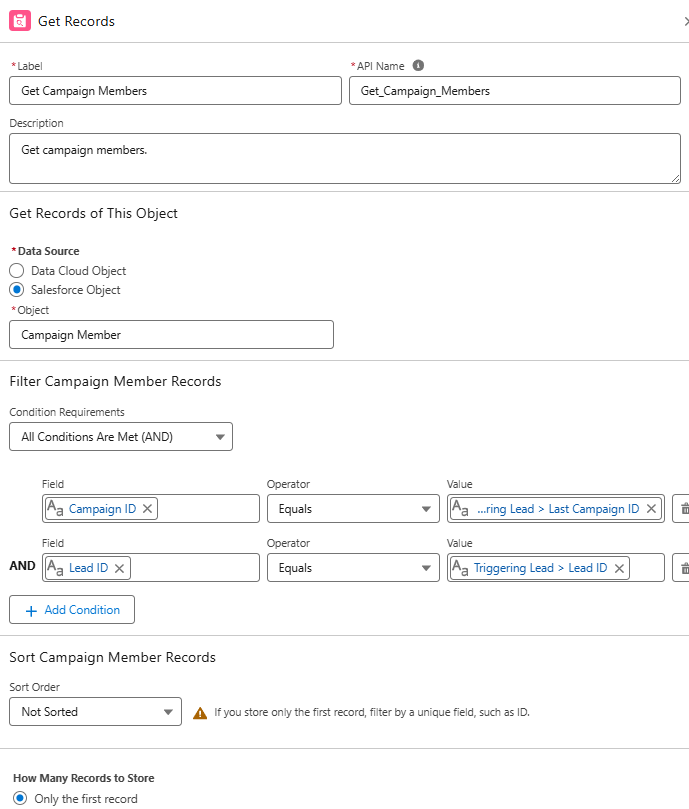
  1. Get Campaign Members
    • Add a “Get Records” element to get all the members of the campaign (based on the Last Campaign ID value from the form).
How to get campaign member records
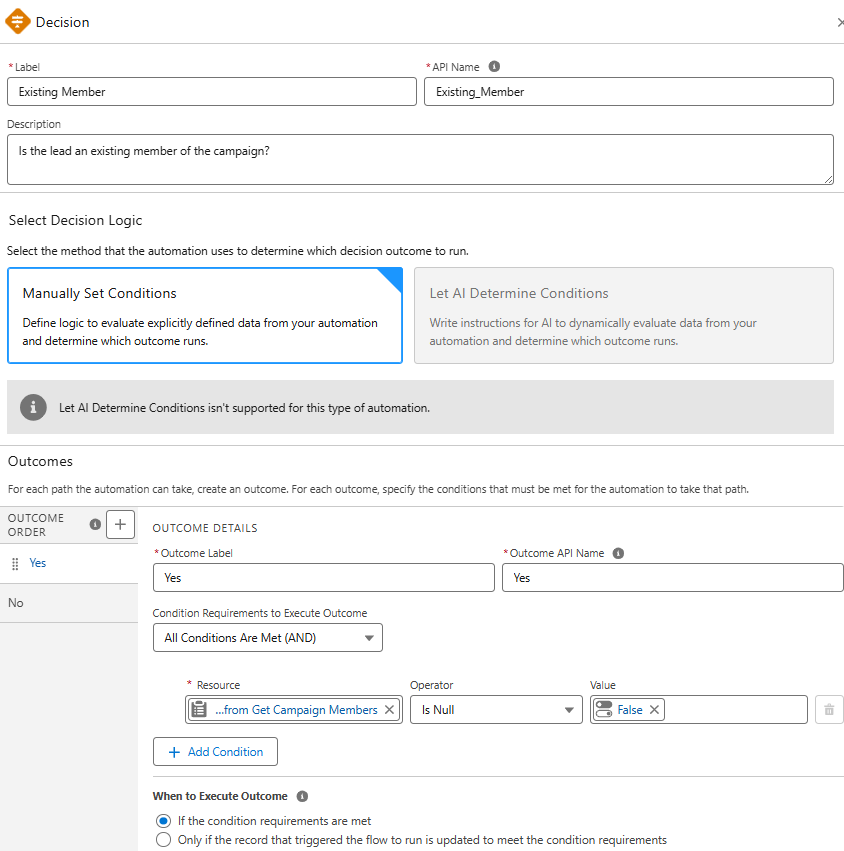
  1. Check for Existing Campaign Members
    • Add a “Decision Element” to create distinct paths for existing vs. new records.
How to check for existing campaign members
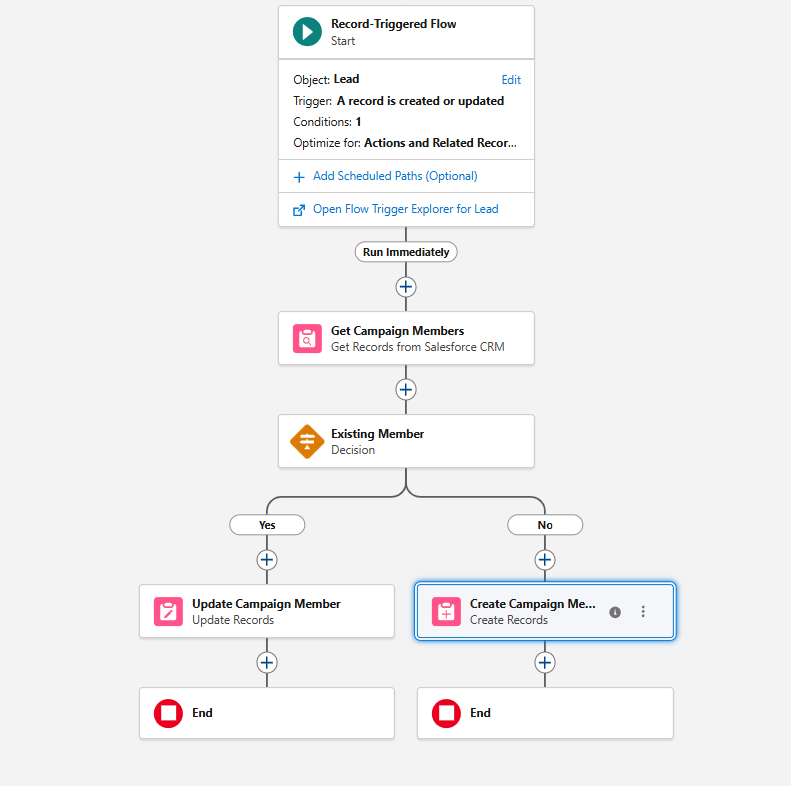
  1. Update/Create Records
    • Add an element to update the campaign member status of existing campaign members to the “Last Campaign Member Status” value.
    •  Add an element to create campaign members for new records based on the record ID, “Last Campaign ID” and ““Last Campaign Member Status”.
How to update/create records
  1. Activate the Flow
    • Based on the example flow (created on the lead object), new lead records or existing members that meet the entry conditions, will now be automatically added to the target campaign.
Activating the record-triggered flow

Consideration #5 – Time Spent Building Flows

Over the course of this post, we’ve taken a very basic flow and enhanced it with additional elements, assignment variables, and formula fields.

The most frequent concern I hear from clients is that they don’t have the time or skills to manage these builds. However, you don’t actually have to build everything from scratch.

Final Flow

Chart of the final flow

Solution – Flow Templates

Flow templates are a great way to jumpstart flow creation. An existing flow can be saved as a template and a new flow can be created from it. Once created, the new flow can be connected to a form.

Creating a Flow Template

  1. Open and existing flow.
  2. Click “Edit As New Version”.
  3. Open the “Start” element and remove the connected form.
  4. Select the “Save As New Flow” option, name, and save.
    • Note: You will have a large number of errors and warnings. This is expected as the flow is referencing form fields and there is no connected form.
    • With the new flow open, select the “Save as Template” option. This will set the flow type as a template. 
How to save a flow template
  1. Clone the source form.
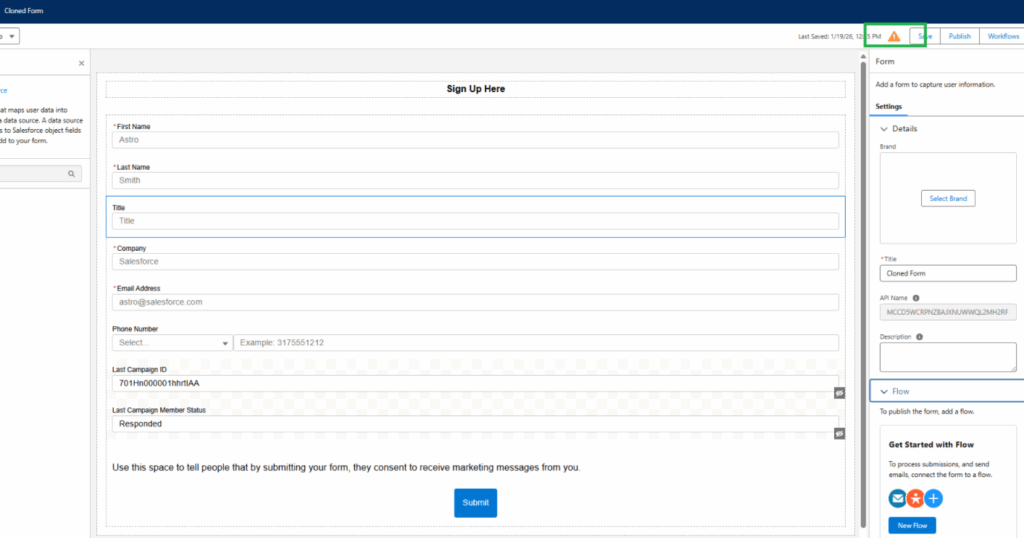
    • Since the original flow was created from a form, you can clone this form (essentially using it as a template). This will ensure that all fields map correctly to the flow and resolve the errors and warnings.
    • Update the hidden field as needed (Last Campaign ID, Last Campaign Member Status, and any other fields that may have been added).
    • Note – You will see a warning because a flow has not been created. This is expected.
Cloning the source form
  1. Create a new flow using the flow template.
    • Flow > New
    • Use the “Search automations” box to your flow template.
Creating a new flow using the flow template
  • Select the template.
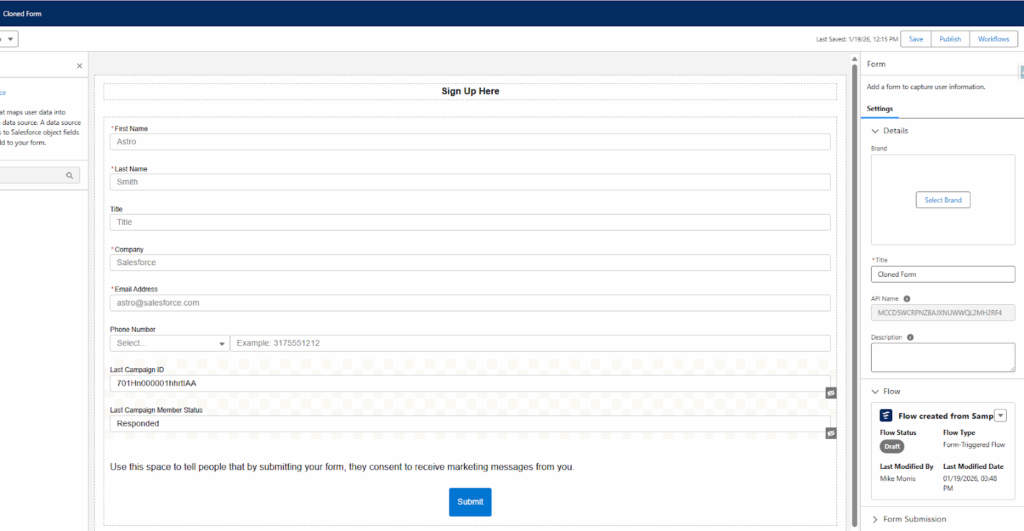
    • Close the “Something when wrong” message.
    • Open the “Event” section in the state element and select the new form that was created.
    •  Click “Save” and name the flow.
    • Confirm all errors and warnings have been resolved.
    • DO NOT ACTIVATE.
  1. Publish the form.
    • Return to the new form, confirm that the flow has been connected, click “Publish”.
Publishing the form

Accelerate Your Success 

Agenforce Marketing forms function a bit differently than Marketing Cloud Account Engagement forms, but they perform the same function. There’s an expected learning curve when adopting a new platform and my hope is that understanding some of the considerations will help speed up your adoption and success. 


Sercante is recognized as a Marketing Cloud Growth and Advanced Implementation Expert and has the expertise to support your Agentforce Marketing needs. Let us know how we can help.
Product Note: Marketing Cloud Growth and Advanced are editions of Marketing Cloud Next and have also been referred to as Agentforce Marketing.

Repeaters are one of the newer features in Marketing Cloud Next (aka as Marketing Cloud Growth or Advanced Edition), and one of the coolest in my opinion. In this post, we’ll review what repeaters are, how to set them up, and look at how Fellowes Brands is using them to simplify the customer experience.

What are Repeaters?

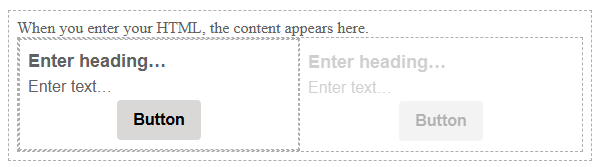
Before we get too deep, let’s talk a bit about what repeaters are and how they function. Repeaters are used to display a series of items in an email. These can include recent purchases, upcoming events, product recommendations, and more. The repeater’s layout can be configured to show images, merge fields, CTA buttons, and links.

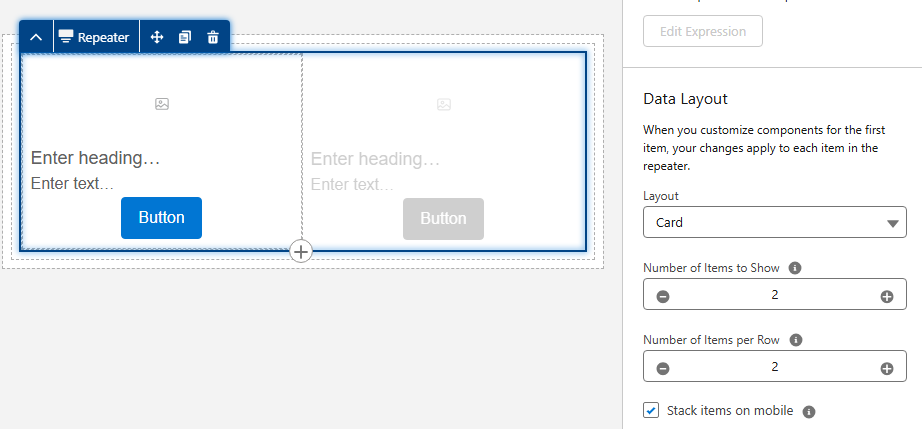
The magic of repeaters lies in their configuration. All configuration is done in the first item. Additional items inherit this configuration but display the relevant data based on the associated data source. Their layout also allows for customization of the number of items to display and the number of items included per row.

Web design interface with a repeater function.

Learn more about repeaters

The Need

Fellowes is recognized for their innovation in indoor air quality and produces a line of commercial air purifiers scientifically proven to remove COVID, SARS, H1N1 and other harmful viruses. Regular filter changes are key to optimizing the performance of their air quality products.

Fellowes needed a way to improve the customer experience by delivering timely reminders when filter changes were due and by providing relevant filter options based on the specific air purifier. There was also a need to simplify the purchase process by providing direct links to the filters with additional details and purchase options. 

The Solution

Data 360, Marketing Cloud Next, and repeaters were utilized to deliver a scalable solution that met the needs of Fellowes and their customers.

The end result was a tailored email sent to customers based on the expiration date of their current filters. The email offered filter recommendations specific to their air purifier and provided direct links to the corresponding product pages with purchase options and additional details. Below is an image of the repeater section of the final email.

Highlights of note:

  • The number of options vary based on the number of related products for the specific unit.
  • Images are rendered from base URLs appended with specific product codes using merge fields.
  • Images are linked to the product page on the website.
  • The product name and item number are merge fields.
  • The “Learn More” buttons use dynamic URLs to link to the product page on the website.
Filter options for air purifier.

The Build

The focus of this post is on repeaters, but it all starts with data. First, the proper relationships must be established in Salesforce. Then, the data must be ingested into Data Cloud, and a link to the unified individual must be established through the data graph. Once the data structure is in place, configuration of the repeater can begin.

Data Structure

The standard Product object is used to store all product data, including air purifiers and their filters. While this is a great starting point that uses the standard object as intended, it does not include the necessary relationships between the air purifiers and their filters.

A custom junction object named Product Relationships was created to establish these needed connections. This custom object consists of two lookups to the Product object: one for the Parent product and one for the Related product. The custom object also includes several additional “related product” fields used as merge fields, such as Related Product Code and Related Product Name.

Data 360 (Data Cloud)

The Product and Product Relationships objects were ingested into Data 360, and the necessary fields were mapped. The critical step was establishing a relationship between these two Data Model Objects (DMOs).

This was achieved by creating a relationship from the Product Relationship DMO to the Product DMO, using the Product ID as the connecting key.

Data Graph

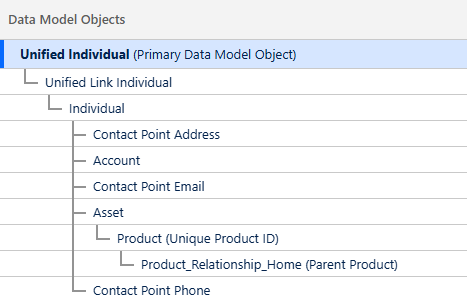
Data Graphs are essential for enabling personalization and configuring repeaters within Marketing Cloud Next. As stated previously, a relationship was needed between the Related Product and the Unified Individual to deliver upon the requirements of this use case.

The data graph was constructed using several objects to “hop” from the Product Relationship DMO to the Unified Individual record.

Data model diagram outlining relationships between different data objects.

Adding the Repeater

The email was built using the Marketing Cloud Next email builder. If you have any questions about this builder, be sure to check out Erin Duncan’s post, “Everything to Know About the Marketing Cloud Next Email Builder.”


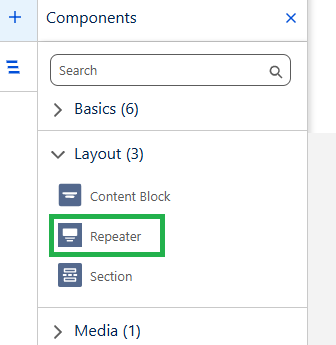
The Repeater component, located in the Layout section of the Components Panel, was dragged onto the canvas where it should appear in the email.

Email builder highlighting the "repeater" component within the "layout" section.

Configuring the Repeater

The Repeater component in this use case includes the following elements:

  • Filter image with a corresponding link and alt text
  • Filter name and item number
  • Call-to-Action (CTA) link that redirects to the filter page on the website


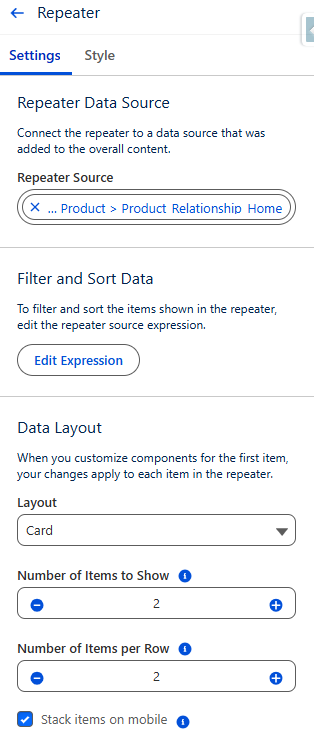
The repeater’s data source was set to use the Product Relationship DMO. The Card layout was selected, and the settings for both the number of items to show and the number of items per row were set to 2.

Shows settings related to a repeater data source. Shows options for filtering, sorting, and data layout.

Adding the Image

There are several options for adding images to a repeater, depending on where the image is hosted. If the image is in Salesforce CMS, it can be added using the Image component and selecting the Salesforce CMS image source option. If the image is not in the CMS, the Image component can still be used with the Merge field option.

In this specific example, more control was desired, so the Image component was replaced with an HTML component.


Here are the steps that were followed:

  1. The Image component in the first item of the repeater was replaced with an HTML component.
How to use HTML components.
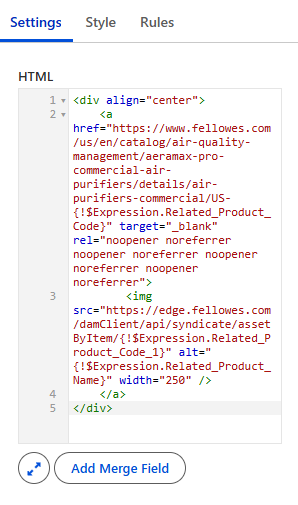
  1. HTML code was added into the HTML component.
    • All images were stored externally and followed a consistent format. Since all image URLs used the same base URL with the product code appended, the base URL could be hardcoded into the HTML, and the product code was appended using a merge field.
    • A consistent format was also used for the product page URLs on the website, so the same process was used to generate the product link.
    • The alt text was added using a merge field.
HTML code
  1. The product name and item number were populated using merge fields from Product Relationship DMO. 
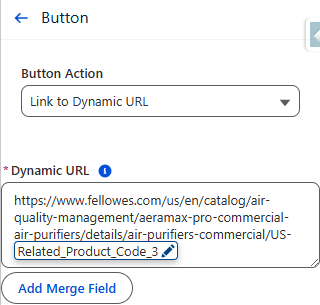
  2. The Call-to-Action (CTA) button was configured using a Dynamic URL.
    • The product code was added to the end of a consistent base URL to generate a unique URL linking to the specific product page on the website.
Shows a button configuration with a dynamic URL.

Important:

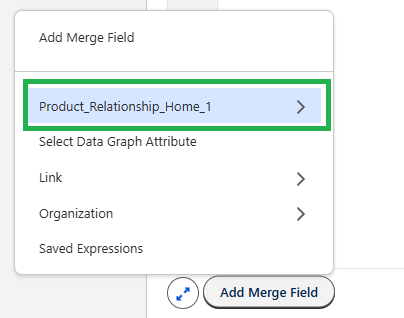
When adding merge fields into a Repeater component, the fields must be selected from the repeater data source as opposed to the data graph. Since the Product Relationship object serves as the repeater data source in this configuration, all merge fields were added from this source.

Shows a highlighted "add merge field" option

Testing

A segment was created that selected unified individuals who had purchased an air purifier. Test emails were sent using the “Preview” feature in Marketing Cloud Next.

Products displayed in the repeaters were checked against the Product Relationship object for accuracy. All links were also tested and confirmed.

How Will You Use Repeaters?

This use case is a great example of how repeaters can improve the customer experience and drive sales of related products. Building this process opened my eyes to the power of this feature, and I can’t wait to use it more. I hope this post has demystified repeaters and inspired you as well.

Let us know how you are using repeaters (or ideas you have for using them), by dropping a note in the comments section.

Product Note: Marketing Cloud Growth and Advanced are editions of Marketing Cloud Next and have also been referred to as Agentforce Marketing.

Your marketing team just concluded a successful trade show, returning with over 2,500 new leads from booth scans that need to be imported. In this post, we’ll review the options for importing these trade show records into Marketing Cloud Next (aka Growth and Advanced) without creating duplicates and while adding the records to the correct Salesforce campaign.

Marketing Cloud Next – Import Options

The primary methods for importing records into Marketing Cloud Growth and Advanced are File Import and the Data Import Wizard.

The Data Import Wizard is a more advanced import tool that supports multiple objects, including Custom Objects. The key benefits of the Data Import Wizard are the ability to set matching criteria (to prevent the creation of duplicates) and the ability to add members to Campaigns during the import.

In short, when choosing between the native import options, you can’t go wrong with the Data Import Wizard.

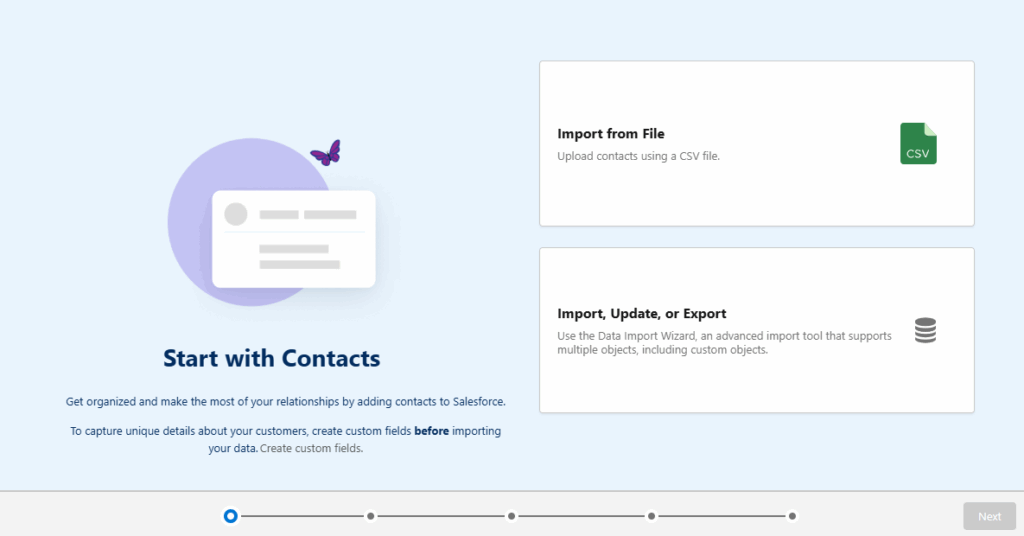
Options for importing contacts and data

Importing with Data Import Wizard

  1. Create an import template for use with all imports.
    • Be sure to include columns for campaign id and campaign member status.
    • Consider including a “Marketing Consent” field that can be used to selectively create consent records. 
    • Below is an example of my template using data from Mockaroo.
Instructions for creating and importing contact data using a template
  1. Format data into your import template.
  2. Import contacts first.
    • From the Marketing App – Select the Contacts tab.
    • Click the “Import” button.
    • Select the “Import, Update, or Export” option.
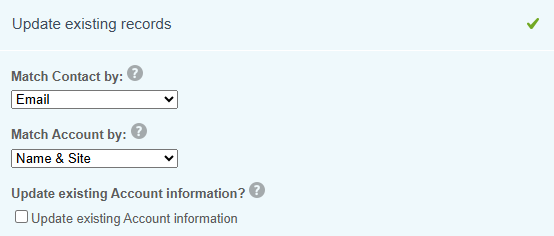
    • Select Accounts and Contacts” and then the “Update existing records” option.
      • Match Contact by: Email
        • This will be used to find matching contacts to update.
      • Match Account by: Name and Site
        • This setting is used to update the Accounts the updated Contact, but will not create new Accounts because no new Contacts are being created.
      • Leave the “Update existing Account information” box unchecked.
        • This ensures that the import file does not overwrite any account data.
Updating contacts and accounts with matching options
  • Select the “Assign contacts to campaigns” option at the bottom of the page – if you would like to add contacts to a campaign.
  • Upload the CSV file.
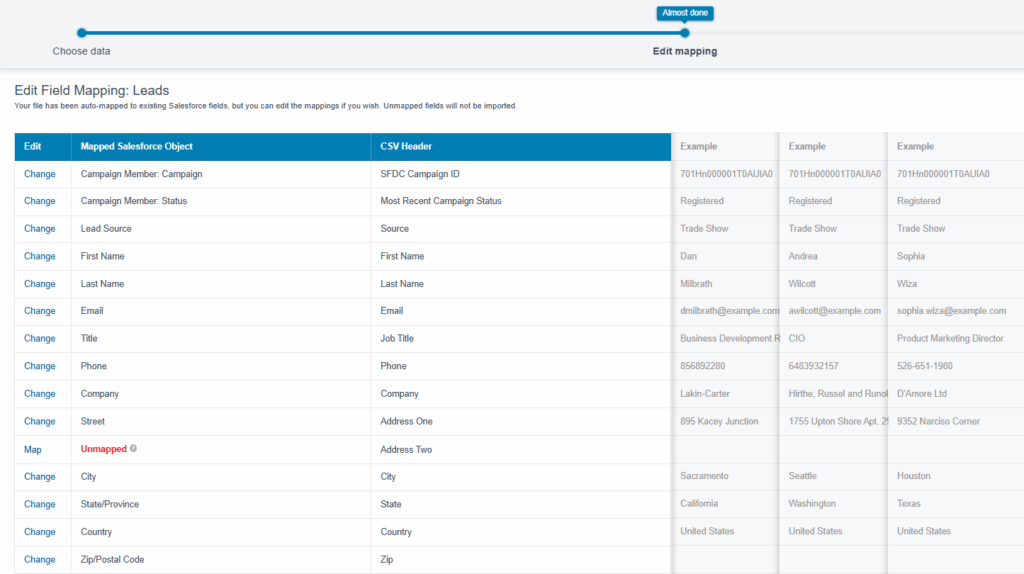
  • Complete the field mappings.
Salesforce data field mapping
  • Review the import and click the “Start Import” button.
  • This import will add existing contacts to the Salesforce specified Salesforce campaign. 
  1. Update and Import leads.
    • Remove the contact records from the original import file.
      • This can be done by reviewing the Bulk Data Load Job detail and removing records that were updated in step 2.
    • From the Marketing App – Select the Leads tab.
    • Click the “Import” button.
    • Select the “Import, Update, or Export” option.
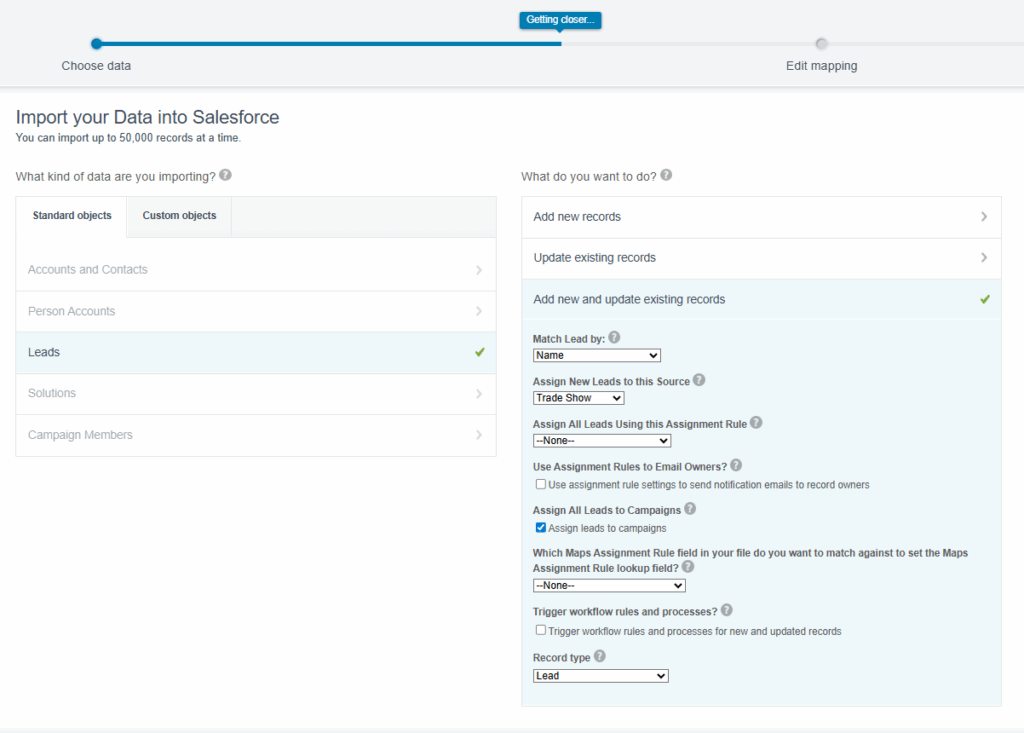
    • Select “Lead” and then the “Add new and update existing records” option.
      • Match Lead by: Email
      • Assign New Leads to this Source: Select the correct lead source
      • Assign All Leads Using this Assignment Rule: Optional
      • Assign leads to campaigns: Check
Data import in Salesforce
  • Upload the CSV file.
  • Complete the field mappings.
Importing data on field mapping
  • Review the import and click the “Start Import” button.
  • This import will update the existing leads and add them to the Salesforce specified Salesforce campaign. It will also create new leads and add them as well.
  1. Review campaign members.
    • Once both imports are complete, review and confirm members in the Salesforce campaign.
Shows campaign members


Don’t Forget About the Consent Imports 

The steps above have successfully updated existing records (contact & leads), created new lead records, and also created/updated campaign member records. That’s a great start, but consent records are also needed to send messages to Unified Individuals from Marketing Cloud Next.

Consent records are channel and subscription specific. If you have 5 subscriptions and send emails and SMS messages, a total of 10 consent imports that need to be completed to opt subscribers into all. The process is straightforward and fast, but requires some extra work.

Consent Imports

  • Format the consent import file for each subscription
    • The same file can be used for multiple imports – if the records should be added to all subscriptions.
    • The file must include the email address or phone number and consent date of the record.
    • Ensure the consent date field is formatted correctly.
  • Select the “Consent” tab from the Marketing App.
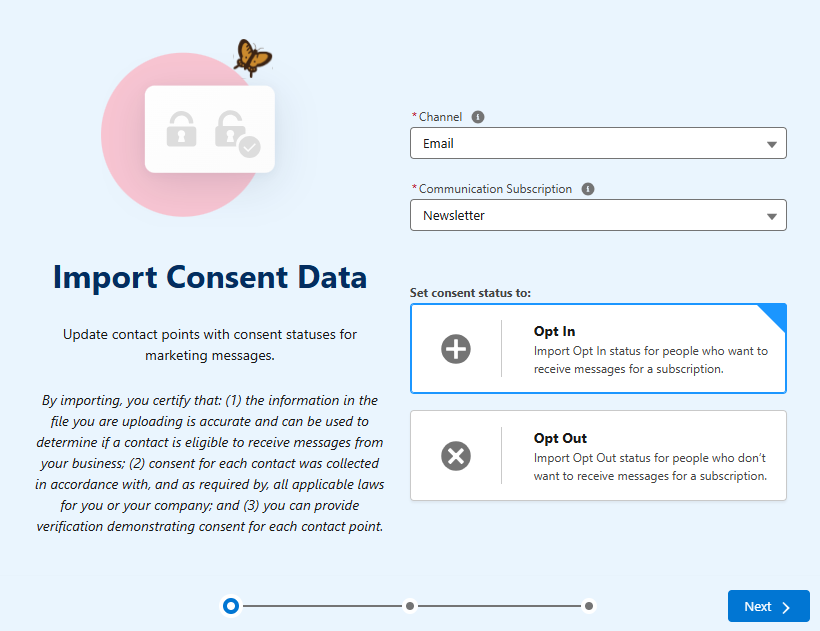
    • Click the “+ Import” button.
  • Select the channel, subscription, and consent status in the wizard.
Importing consent data with opt in and opt out options
  • Click ‘Next’, upload the file and then complete the import.
  • Repeat the process for all needed subscriptions across all needed channels.

Whew! That’s a Lot of Work!

The process detailed above does the job, but there are quite a few steps involved. Our simple trade show import has gone from one import to a dozen imports (2 Import Wizard jobs and 10 Consent Imports – 5 subscriptions x 2 channels) .

This is fine for the occasional event, but what if your event team has a robust trade show calendar? This process does not scale well.

There has to be a better way.

What about Data Loader?

I’m a big fan of Data Loader and Daloader.io, but they simply don’t meet the needs in this case. There are two major shortcomings that can’t be overlooked.

  1. Data loader does not have deduplication capabilities.
  2. Data loader does not have the ability to create/update campaign member records when importing or updating records (contacts or leads).

Data Loader also does not address the need to do consent imports.

There is Another Way

Many of my clients attend a large number of trade shows, and our goal is to minimize work and automate where possible.

With this in mind, I developed another process using a custom object and flow. This requires some upfront work but will streamline the process and make things faster in the long run.

The logic of this process could also be adapted to use other tools like LeanData and TractionComplete. Both are designed to match new leads to existing contacts and leads before creating new ones. Additionally, they can both create and update Campaign Member records. Creation of consent records is a potential gap and would need to be tested.

Solution Breakdown

Here’s a summary of how the solution works.

  1. Create a custom object for Marketing Imports.
    • Mine is creatively named “Marketing Import” (Data Loader can’t import in the “Prospect” object).
    • Include all fields from your import template as fields on the custom object.
  2. Create a record-triggered flow that runs when a new record is created on a “Marketing Import” custom object.
    • The flow performs the following actions:
      • Updates existing contacts.
      • Updates existing leads.
      • Creates new leads.
      • Updates or creates campaign member records.
      • Creates consent records (for new leads).
  3. A single file loaded into the “Marketing Import” object (using Data Loader or Datloader.io) triggers the flow and performs all the needed actions. 

Building the Flow

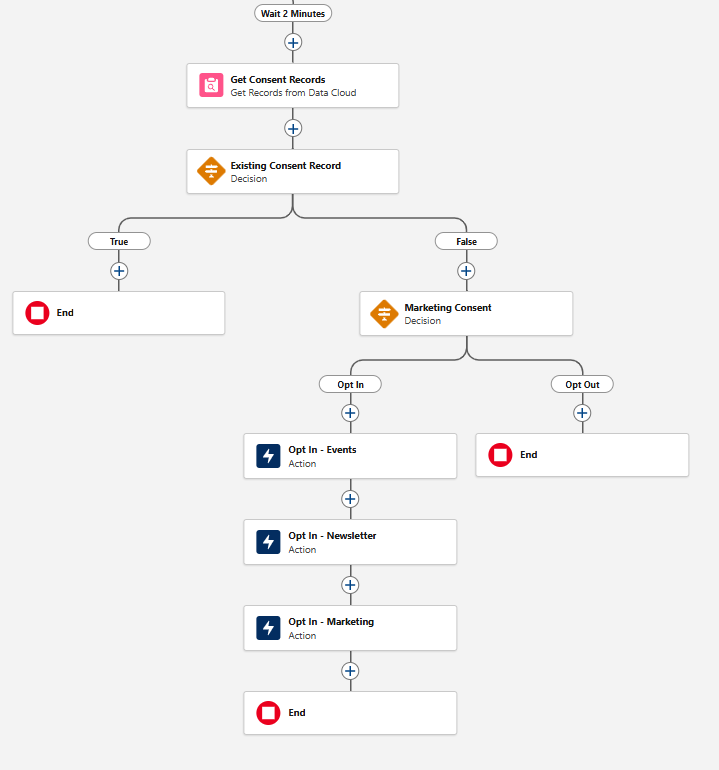
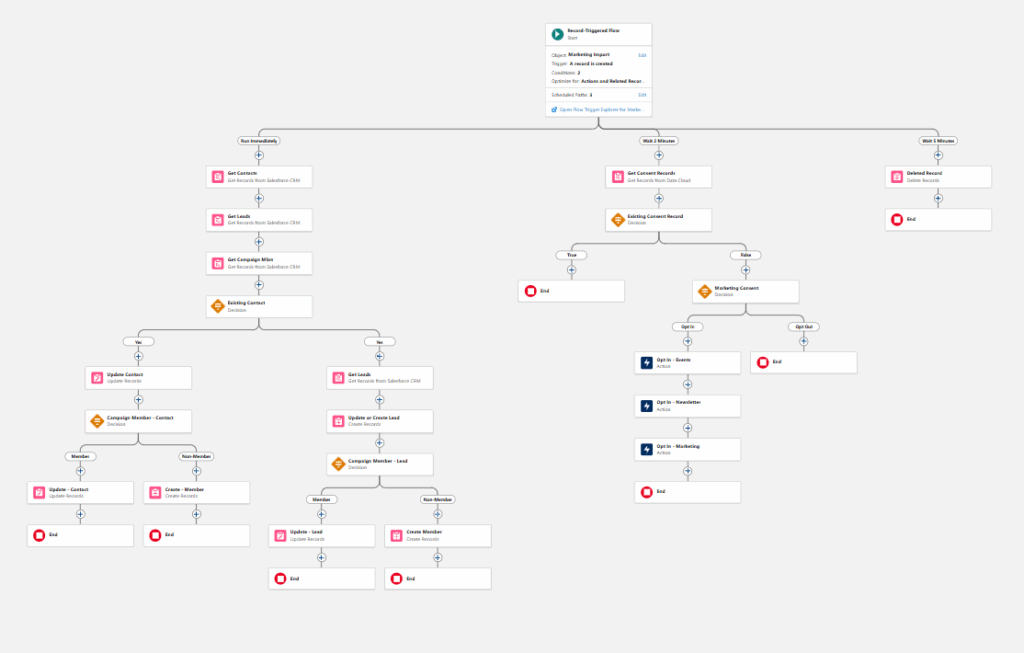
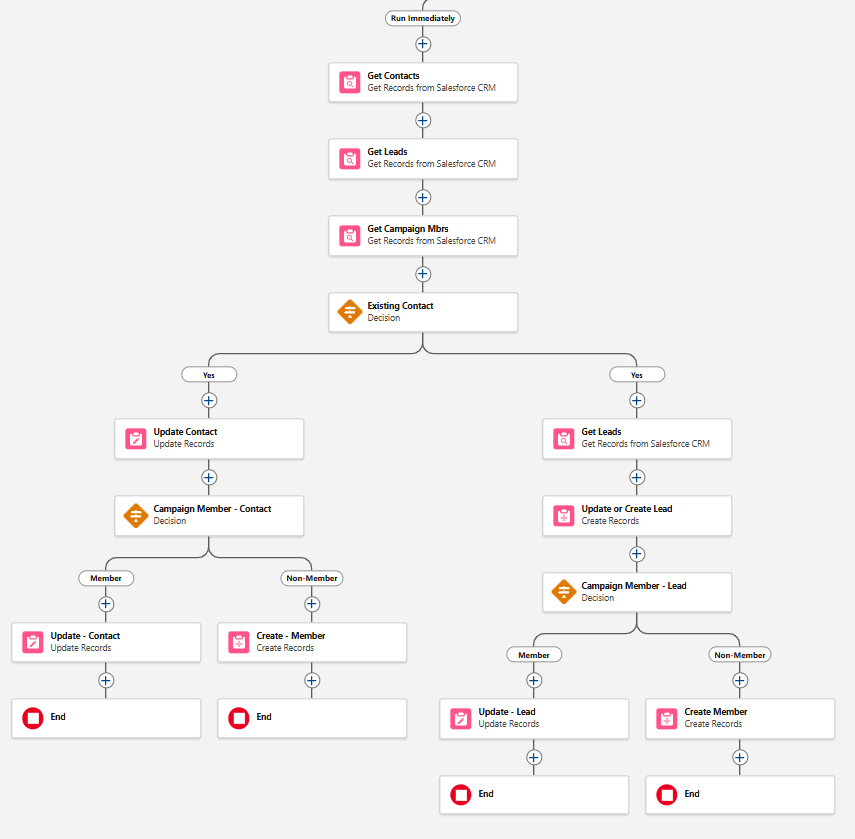
The flow performs three major functions and a bit of clean up on the backend. All functions are completed in separate paths to ensure they take place in the proper sequence and allow time for record creation.

  • Path 1 (Run Immediately)
    • Checks for and updates existing contacts and leads. If a matching record is not found, a new lead is created.
    • Compares the contact and lead records to the existing campaign members. If a match is found, the campaign member status is updated. If a match is not found, a new campaign member with the proper campaign member status is created.
Flowchart showing marketing process
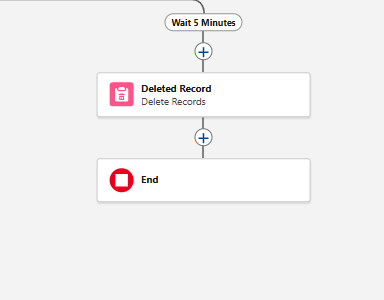
  • Path 3 (Wait 5 Minutes)
    • Deletes records that were created on the “Marketing Import” object. The idea here is to not store a large amount of redundant data in Salesforce. Since lead records have been created for the newly imported records, this data is no longer needed.
Flowchart showing marketing process

Complete Flow

Flowchart showing marketing process

Consent Records 

Consent records are a tricky issue. 


If you choose to automatically create consent records, I recommend including a “Marketing Consent” field in your import file. This field will indicate the consent status for each record being imported.

My example flow uses this value to selectively create consent records for new leads upon creation. However, you have options:

  • Option 1 – Include this step directly in your import flow.
  • Option 2 – Create a separate record-triggered flow. This flow will create consent records when a new lead is created with a “Marketing Consent” value of “Yes/True”. Important: This flow will trigger anytime a new lead is created, not just during marketing imports.


It’s important to note that the neither option updates the consent records of existing leads and contacts. An additional Data Cloud-Triggered flow is required to manage those updates.

Develop and Implement an Import Plan

Importing records into Marketing Cloud Growth and Advanced requires upfront planning and internal discussion. The process does not include the automatic matching process that Account Engagement users are accustomed to, necessitating careful data preparation. There are also additional considerations related to consent imports that must be discussed (be sure to include the legal team) and decisions related to who should have permission to import using Import Wizard or Data Loader, since imports will modify data in Salesforce. 

If you’d like support thinking through your data planning, preparation, and importing records into Marketing Cloud Next, reach out to the Sercante team.

Product Note: Marketing Cloud Growth and Advanced are editions of Marketing Cloud Next and have also been referred to as Agentforce Marketing.

Marketing Cloud Growth/Advanced (aka Next Gen Marketing Cloud) is built to leverage the power of Data Cloud, giving marketers key benefits like unified customer profiles, enhanced segmentation, cross-object personalization, and calculated insights. However, these capabilities come with a cost in the form of Data Cloud credit consumption. In this post, we’ll review several tips to help you maximize the benefits of Data Cloud without breaking the bank.

Introduction to Data Cloud Credits

Before we start talking about conserving credits, let’s take a look at what they are and what actions use them.

What Are Data Cloud Credits?

Salesforce defines Data Cloud Credits as “digital currency that you use to pay for Data Cloud services.” These credits are consumption-based, meaning you only pay for what you use. Use a little, pay a little. Use a lot, pay a lot. 

Credit use is calculated by multiplying the number of units consumed for each usage type by the corresponding multiplier from the rate card. Usage types include Data Services, Data Storage, Einstein Requests, and Segment Activations. Usage can be monitored in the Digital Wallet included in your Salesforce org.

The key takeaway is that credits are a valuable resource, and every action comes with a related cost. The goal is not to scare marketers or discourage credit usage. It’s to encourage smart, intentional use to ensure that each credit delivers value.

Here are some great resources if you would like to learn more about these topics.

Tips for Optimizing Your Data Cloud Credit Usage

Tip #1 – Apply Filters to Data Streams

Identity resolution rules are one of the largest consumers of Data Cloud credits. They use Data Service credits to create the unified individual records required for Marketing Cloud Growth/Advanced. This process is essential and must be activated. But it can be optimized.

Save Credits with Filters 

Identity resolution rules link data from multiple data sources into unified individual records. Credit consumption is based on the total number of records that Data Cloud reviews when unifying the records. Credits can be conserved by applying filters to the data streams to limit the number of records being used in the identity resolution process.

Example:

If your lead data stream contains 1M records and your contact data stream includes 500K records, 1.5M records will be used in the creation of the unified individual records. Data filters can be applied to limit the number of records used in the identity resolution process by focusing on only records that should be included in your marketing activities.

Applying Data Filters 

Data filters can be applied in two ways:

  1. When Ingesting: By adding a filter to the data streams
  2. After Ingestion: By applying a filter to the data lake object (DLO) in the data space (Marketing Cloud uses the default data space)


The filters will impact the system processes like unification, segmentation, and CI, but will not impact the total number in the data stream.

Example:
There are 6,088 total records in the lead data stream (and let’s say that 2,500 are from the USA). If you apply a filter for Country = USA, the total record count in the data stream stays the same (6,088), but only the 2,500 records from the USA will be used in system processes (including identity resolution).  This reduces the data being evaluated to only leads in the USA and will reduce credit consumption.

A screenshot of recently viewed data streams in Data Cloud.
A screenshot in Data Cloud showing how to edit the filter in a data stream to only include records whose country equals USA.


The great thing about filters is that they help save credits across multiple areas. They reduce credit usage in identity resolution and also limit the number of records evaluated in processes like segmentation and calculated insights. This saves you even more.

Tip #2 – Audit Refresh Schedules

Credits are consumed when data is refreshed in Data Cloud. This includes data streams, data graphs, calculated insights, identity resolution rules, and segments. 

Data Streams
Data streams based on Salesforce data refresh every 15 minutes by default and upsert with new or changed records. Manual updates can also be triggered if needed. Data ingested from other sources can be scheduled to run hourly or daily, so it’s worth taking a look at their schedules.

If you find the data is being refreshed hourly, consider the frequency that the data is actually updating (in the data source being ingested) and the “freshness” that’s needed in your marketing activities. Hourly refreshes make sense for data that changes frequently and is used in time-sensitive communications. In other cases, daily refreshes might meet your business needs and they would save credits.

Data Graphs
Data graphs are used for personalization and dynamic content, and refresh daily by default. The refresh interval can be updated by navigating to the data graph in Data Cloud and selecting the “Schedule” option from the dropdown (under the ▼icon).

More frequent refresh intervals mean “fresher” data, but will use more credits. I recommend sticking with the daily refresh option and adjusting based on your needs. Remember, manual refreshes can also be triggered if needed.

A screenshot of the Refresh Interval drop down setting to set your Data Graph's refresh schedule.

Identity Resolution
Identity Resolution rules run daily and the schedule can’t be changed. The rules will run once every 24 hours and the time of day might vary based on your org and the amount of data being processed. Manual refreshes can be triggered by navigating to the rule and clicking the “Run Ruleset” button.

The only real optimization for identity resolution is limiting the number of records processed (by applying filters) as discussed in the first tip.

Segments
Segment refresh schedules are the primary way that marketing teams can reduce Data Cloud credit consumption. When creating a segment, the Standard Publish option offers the following refresh schedules:

  • Don’t refresh
  • 12 hours
  • 24 hours


I recommend choosing “Don’t refresh” unless there’s a defined need to refresh more frequently. This ensures segments aren’t needlessly refreshing—and burning credits unnecessarily.

Make sure your segments are still up to date before sending emails by selecting the “Immediately before running this flow” refresh option in your segment-triggered flow. This guarantees your email targets the most current segment population, without incurring extra credit usage from scheduled refreshes.

A screenshot showing toggling on "Immediately before running this flow" for the setting for "When do you want to republish this segment?"

Tip #3 – Be Selective

Data storage is another factor to consider when evaluating credit consumption. When ingesting data into Data Cloud, start with a minimalist mindset. Ask yourself the following questions when deciding which fields to include:

  • Is this field needed for identity resolution?
  • Is this field needed to support marketing efforts (ex. dynamic content, personalization, segmentation)?
  • Is this field used in calculated insights?

If the answer to these questions is “no,” hold off on ingesting the field to reduce unnecessary data storage. If a new use case arises later, the field can always be added to the data stream.

How to add a field to an existing data stream 

  1. Confirm the Data Cloud Salesforce Connector has read access to the field.
    • Permission Sets > Data Cloud Salesforce Connector > Object Settings
      • Navigate to the object that contains the field and verify the “Read Access” box is checked
  2. In Data Cloud, select the Data Streams tab and the data stream related to the object where the field is located.
  3. Click the “Add Source Fields” button from the selected data stream.
  4. Select the field (or fields) from the table and save.
  5. Click the “Review” button in the Data Mapping section and map the fields from the data lake object to the data model object (you might need to create new custom fields).

Make the Most of Your Credits 

Data Cloud credits are a valuable resource and should be managed accordingly. With a little bit of planning and some regular audits, you can make the most of your credits and take full advantage of the AI, calculated insights, personalization, and segmentation capabilities of Marketing Cloud Growth/Advanced.

If you have questions about Data Cloud or Marketing Cloud Growth/Advanced reach out to the Sercante team or leave us a comment. 

Product Note: Marketing Cloud on Core is now known as Marketing Cloud Next. Marketing Cloud Growth and Advanced are editions of Marketing Cloud Next and have also been referred to as Agentforce Marketing.

Marketing Cloud on Core (aka Growth and Advanced Edition) offers simple out-of-the-box form-triggered flows that are great for lead generation and straightforward scenarios, but today we’re going to dive into something more complex! In this post, I’ll walk you through the process of building a flow that checks for existing contacts and leads before creating a new lead, creates consent records, and sends an autoresponder email. Let’s get started.

Setup Notes

All testing was conducted after the Spring ‘25 release in a demo org. The standard lead duplicate rule was active and configured to allow the creation of duplicate records with alerts.

OOTB Form-Triggered Flows

Before we begin customizing the out-of-the-box flow, it’s important to understand the capabilities and limitations of Form-Triggered Flows. This helps guide decisions concerning when customization is necessary.

OOTB Form-Triggered Flow without Lead Matching

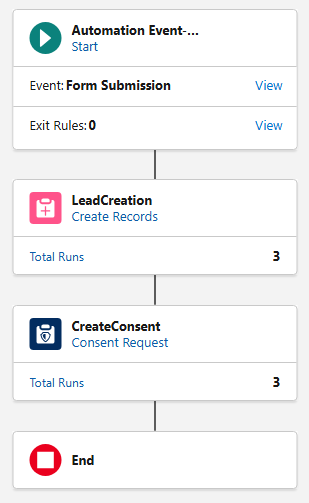
This is the most basic flow and is what’s automatically generated when the Signup Form template is selected during the campaign creation process. No modifications were made to the flow, outside of configuring the “CreateConsent” element.

Test Results 

ScenarioResult
Submitted by new personNew Lead Created
Submitted by existing leadNew Lead Created
Submitted by existing contactNew Lead Created

Summary 

In all three test scenarios, a new lead record was created leading to duplicates in Salesforce. 

OOTB Form-Triggered Flow with Lead Matching

In this test, a very slight, but important, modification was made to the flow—the “Check for Matching Records” option was enabled in the “LeadCreation” element.

Test Results 

ScenarioResult
Submitted by new personNew Lead Created
Submitted by existing leadExisting Lead Updated
Submitted by existing contactNew Lead Created


Summary 

This small update made a significant improvement. The flow now prevents the creation of duplicate leads when an existing lead submits the form. However, a new lead record is still being created when an existing contact submits the form.

This occurs because flows are object-specific, and the OOTB flow only references the lead object. It lacks visibility into the contact object, so it creates a new lead if an existing lead is not found. In short, the flow is performing exactly as it’s designed to.

OOTB Form-Triggered Flows Summary

The OOTB Form-Triggered flows support simple use cases, but it’s important to be aware of the potential for duplicate record creation. These flows are intended as a starting point for marketers and should be customized to meet more specific requirements.

Form-Triggered Flows with Autoresponder Emails

Use Case

Your company just released its latest white paper, which is expected to have great appeal to potential and existing customers alike. The marketing team is posting the white paper on the website as a gated asset. In addition to redirecting users to a “Thank You” page, marketing also wants to send an autoresponder email. The autoresponder not only provides the recipient with easy access to the white paper should they want to view it again later but also serves as a way to validate the email address that was provided.

Why do we need to customize the OOTB flow?

Since the white paper will “appeal to potential and existing customers,” we know that the form will be submitted by new visitors, existing leads, and existing contacts. If we simply added a “Send Email Message” element to the OOTB flow, we could send the autoresponder email, but we would create new leads in Salesforce if an existing contact submitted the form.

The flow needs to be customized to check for existing contacts, in addition to existing leads, before creating a new lead and sending the autoresponder email.

The Finished Product

Before we walk through the build of the flow, let’s first take a look at the finished product. Then, we’ll review each element, discuss its function, and why it’s needed.

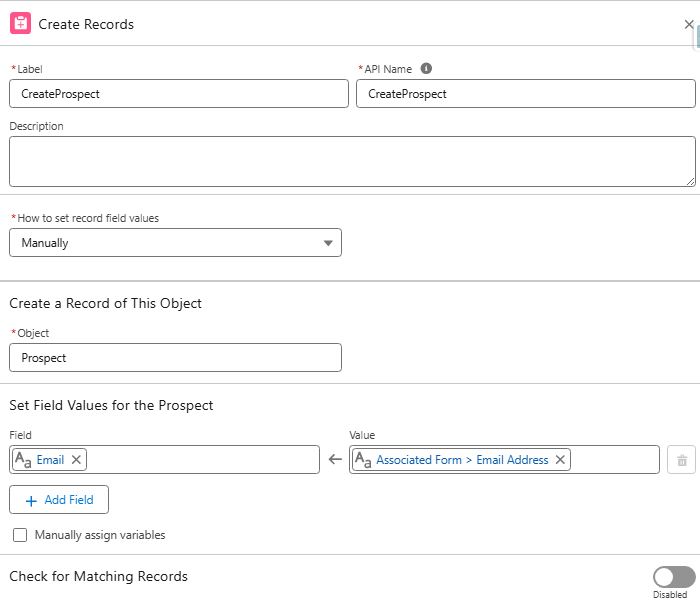
CreateProspect 

Function: Creates a new record on the prospect object for each form submission.
Reason: Flows using the “Send Email Message” element are required to have a “Create Records” element directly after the Start element. The “Create Records” element must create a record on the Contact, Lead, or Prospect object.

If we created records on the Lead object, we would be in the exact same situation as the OOTB flow: we would create duplicate leads when contacts submitted the form. If we created records on the Contact object, we would bypass the Lead object, and submissions from new visitors would be created as contacts.

The Prospect object was introduced as part of the Spring ‘25 release and is designed to keep unqualified prospects unassigned until they meet your organization’s agreed-upon lead requirements. We can satisfy the flow requirement by creating a record on this object without involving the sales team or triggering automations.

GetContacts 

Function: Retrieves all contacts who match the form submission based on the provided email address and last name.
Reason: Before we can check if a form submission is an existing contact, we must first give the flow visibility into contact records so that we have something to compare against in the “Decision” element.

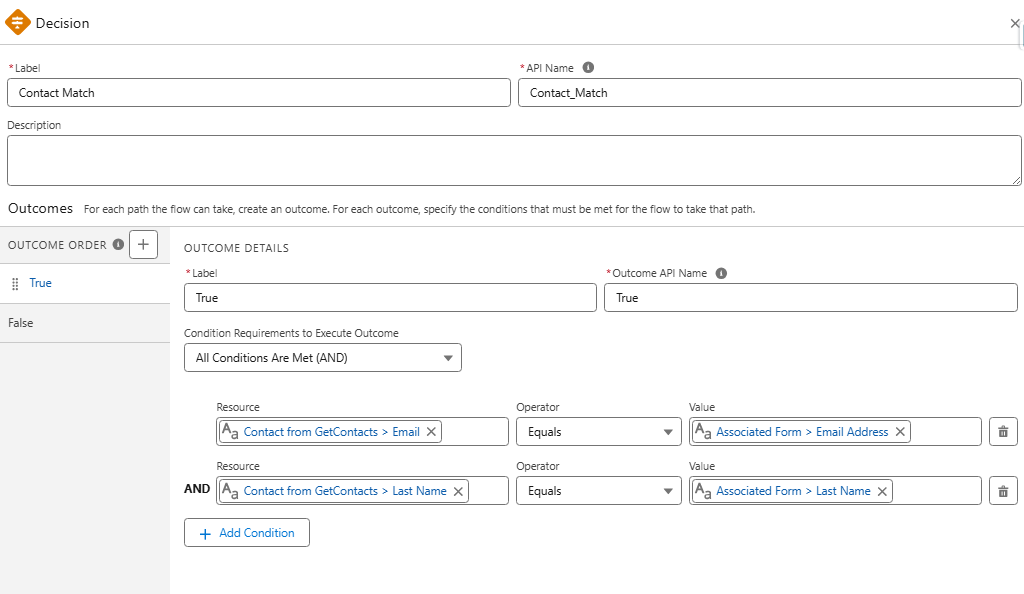
Contact Match 

Function: This “Decision” element is used to check if the form submission is an existing contact. If a match is found, the existing contact record is updated. If a match is not found, the existing lead record is updated (if one is found), or a new lead record will be created.
Reason: Prevent the creation of duplicate leads when existing contacts submit the form.

UpdateContact 

Function: Update existing contact records based on data included in the form submission.

Reason: Update the contact record with the most current data.

LeadCreation 

Function: Create new lead records or update existing lead records based on data included in the form.

  • Important: Make sure “Check for Matching Records” is enabled. 

Reason: Create/update lead record with the most current data.

CreateConsent 

Function: Creates a consent record based on the contact point for the selected channel and subscription.
Reason: Consent records are required for sending promotional emails from Marketing Cloud on Core.

TransactionalEmail 

Function: Transactional emails are non-promotional, immediate, and automated communications sent in response to a user’s action or interaction.
Reason: In this use case, the transactional email is used to send the ungated link to the white paper for future reference. Transactional emails can be used as long as they contain no promotional elements.

DeleteProspect 

Function: Deletes the prospect record created by the first element.
Reason: This step is optional but recommended. Since a prospect record was created solely to satisfy the requirement of having a “Create Records” element first, deleting the record helps keep the org clean. If you are using the prospect record for purposes beyond fulfilling this requirement, you can skip this step.

Other Use Cases & Next Steps

This structure can be applied and adapted to other use cases where there is a need to send autoresponder emails to leads and contacts without creating duplicate records. Examples include flows that create tasks or campaign member records in addition to sending autoresponders. 

Flows might seem challenging at first, but marketers will love them once they gain more experience. The key takeaway is to get hands-on, test, and don’t hesitate to ask for help if needed. Personally, I can say that I received a lot of support from my friends at Sercante when I was starting out, and I still do today!

No more posts to show