Accelerating Marketing Automation with Pre-Built Salesforce Flow Templates
Building effective marketing automation takes time, and staring at a blank canvas can often delay your first campaign. With Agentforce Marketing (aka Marketing Cloud Next), you can bypass those early hurdles with six out-of-the-box flow templates designed to accelerate your path from idea to execution.
Instead of building common campaign patterns from scratch, you can now select a proven framework, customize it to your business needs, and launch faster. These templates don’t replace your marketing strategy—they accelerate it, providing the structure and foundational assets you need to focus on what truly differentiates your brand: messaging, personalization, and customer experience.
Why Flow Templates Matter for Marketers
Marketing automation success is not just about sending emails. It’s about creating relevant, timely experiences that guide customers through their relationship with a brand.
These flow templates help marketers:
- Reduce implementation time: Launch common marketing journeys faster.
- Create consistency across campaigns: Follow proven automation patterns.
- Focus on what matters: Spend less time building and more time optimizing.
For organizations adopting Agentforce Marketing, these templates spark a critical shift in focus: What does this experience need to accomplish now?

Learn how to build your own Flows in Agentforce Marketing with this expert-led workshop. Register here.
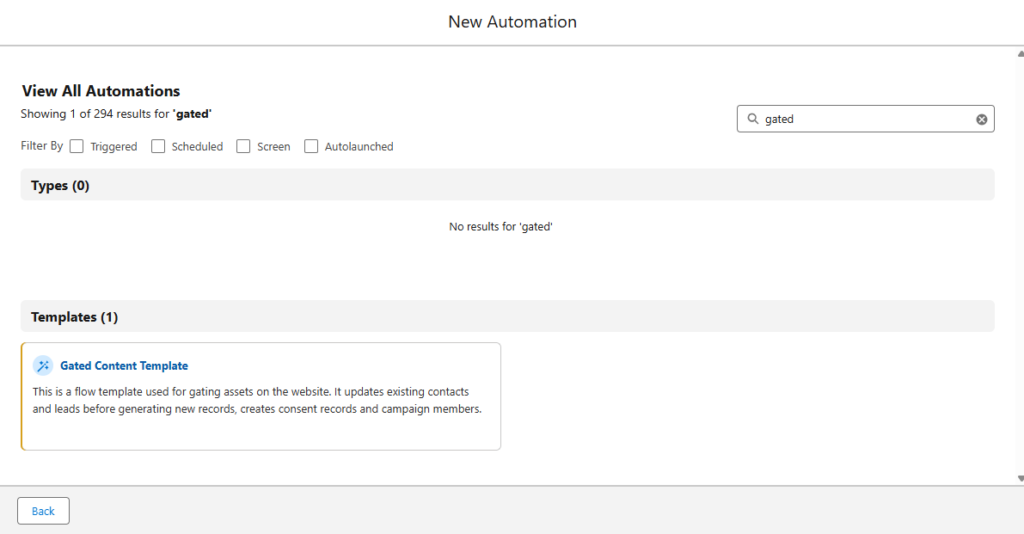
How to Access the New Flow Templates
The new templates are available directly within the campaign creation experience.
To access them:
- Open the Marketing app
- Navigate to Campaigns
- Select Add New to create a campaign
- Fill out details on the campaign creation pop-up window
- Enter your campaign details and check the “Active” box
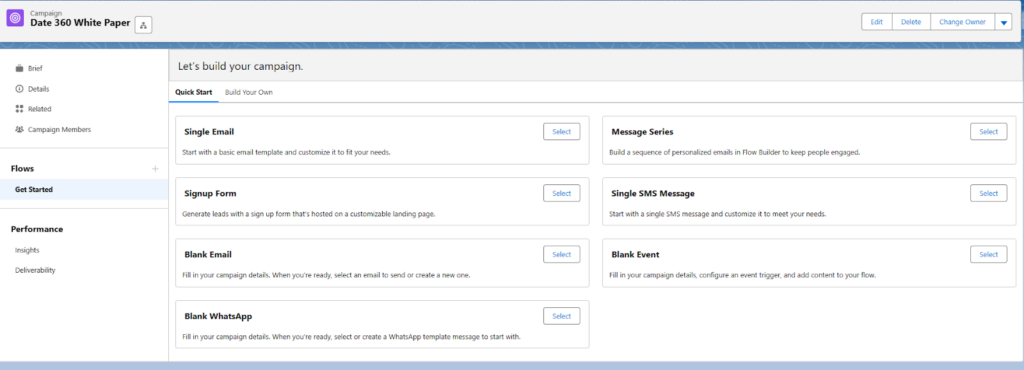
Once in the campaign workspace, look to the “Let’s build your campaign” section, scroll down to “Need a faster start? Browse templates.”
Selecting Browse Templates opens up the available Salesforce-created flow templates.
From here, marketers can select the template that best matches their campaign goal and use it as the foundation for their automation.
After selecting the template, you’ll be guided through the configuration process, including automation settings within the flow template itself.
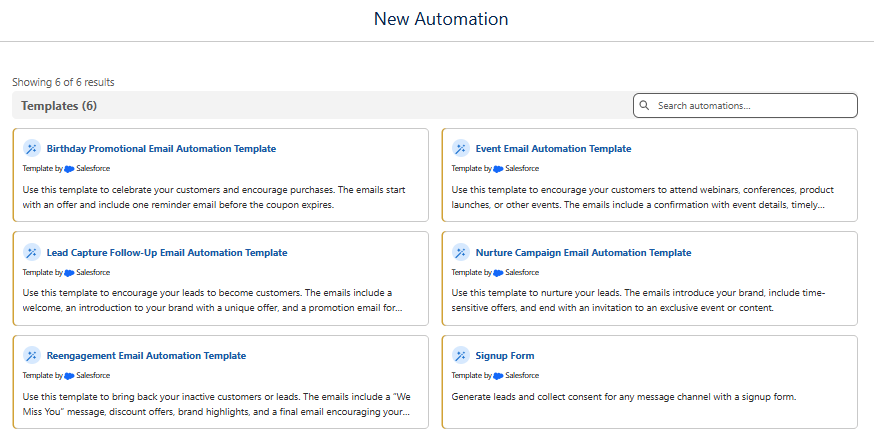
Inside the Templates: Six Salesforce-Designed Marketing Journeys
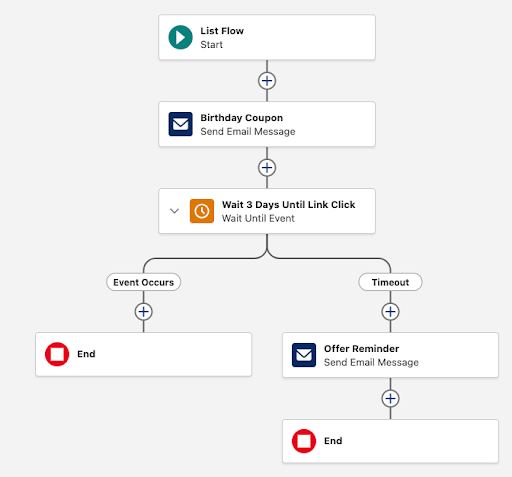
1. Birthday Promotional Email Automation Template
What It Does:
The birthday promotional email automation template helps organizations celebrate customers while encouraging repeat purchases through a personalized promotional experience.
This template for organizations looking to create a simple but effective customer engagement moment to:
- Recognize a customer’s birthday
- Provide an offer
- Encourage action before the promotion expires
Inside the Flow:
This is a segment-triggered flow. The template includes:
- Birthday offer email
- Birthday offer reminder email
Why It Matters:
Birthday campaigns are great examples of personalized lifecycle marketing. They create a meaningful customer touchpoint while encouraging engagement. This template removes the need to build the basic journey structure manually, allowing marketers to focus on the offer, branding, and customer experience.
Pro-Tip: Before activating a birthday automation, validate that your customer birthday data is accurate and consistently maintained. Personalization is only effective when the underlying data is reliable.
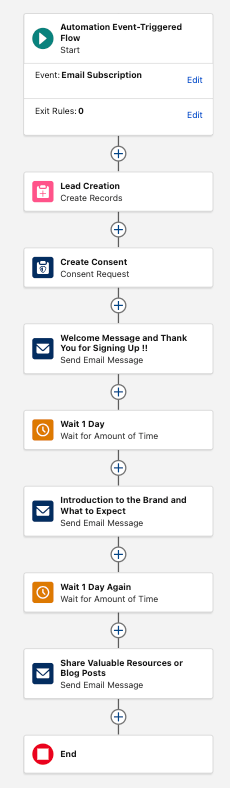
2. Lead Capture Follow-Up Email Automation Template
What It Does:
The lead capture follow-up email automation template helps organizations convert new leads into engaged prospects through an automated welcome and nurture experience. This is one of the templates I expect many B2B organizations will recognize the value of because lead follow-up is one of the most common marketing automation use cases.
Inside the Flow:
This is an event-triggered flow. The template includes:
- Lead capture welcome email
- Lead capture product email
- Lead capture brand value proposition email
Why It Matters:
Many organizations invest heavily in generating leads but struggle with what happens next. This template creates an immediate, consistent follow-up experience by helping organizations welcome new prospects, introduce their brand, highlight products or services, and provide valuable resources.
Pro-Tip: This is one of the templates I would recommend reviewing early during an Agentforce Marketing implementation. It provides a strong foundation for lead nurturing while allowing marketers to focus on content strategy and personalization.
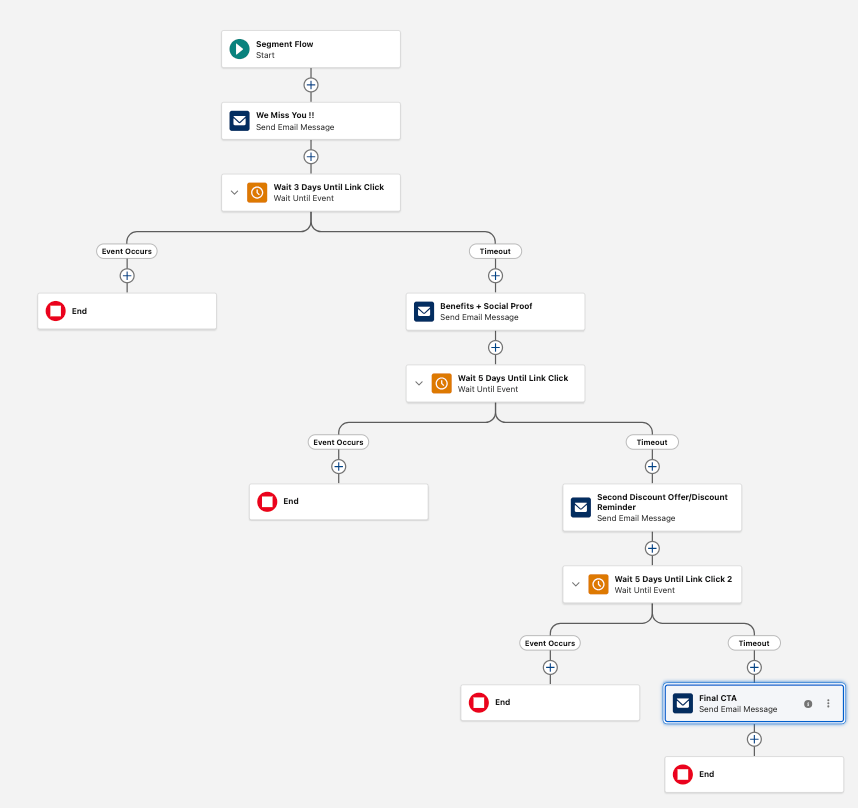
3. Reengagement Email Automation Template
What It Does:
The reengagement email automation template helps organizations reconnect with inactive customers or leads. Instead of continuing to send the same messaging to disengaged audiences, this template creates an intentional journey designed to win customers back.
Inside the Flow:
This is a segment-triggered flow. The template includes:
- “We miss you” email
- Benefits and social proof email
- Second discount offer/reminder email
- Final call to action email
Why It Matters:
A mature marketing strategy is not only about acquiring new customers. It’s also about understanding and improving engagement with existing audiences. This template helps marketers reconnect with inactive contacts using incentives strategically, reduce unnecessary communication, and create clear exit paths.
Pro-Tip: Define what “inactive” means before activating the flow. A customer inactive for 30 days may require a different approach than someone who has not been engaged in over a year.
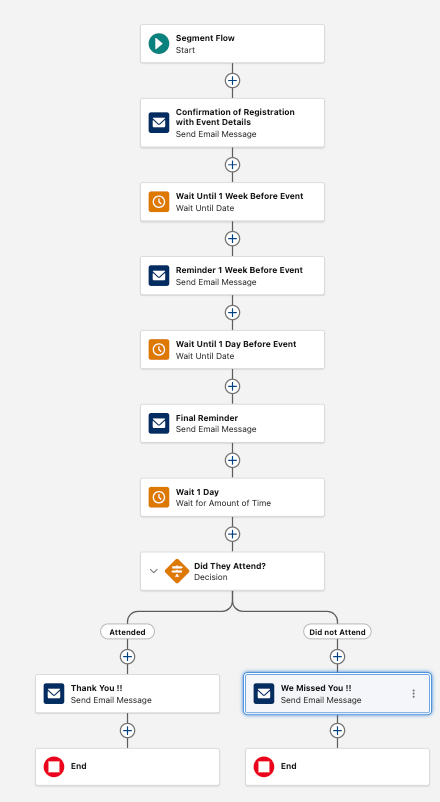
4. Event Email Automation Template
What It Does:
The event email automation template helps marketers manage communications before and after webinars, conferences, product launches, and other events. Successful events require more than registration emails. Customers need reminders, confirmations, and meaningful follow-up.
Inside the Flow:
This is a segment-triggered flow. The template includes:
- Event registration confirmation
- Event one-week reminder
- Event one-day reminder
- Event attended follow-up
- Event did not attend follow-up
Why It Matters:
This template extends the customer experience beyond attendance. We also recommend using Campaign Member and Campaign Member Status to track attendance, creating strong alignment between marketing engagement and CRM reporting.
Pro-Tip: Many teams focus heavily on driving registrations, but underestimate the value of post-event communication. The follow-up experience is often where the strongest conversion opportunities happen.
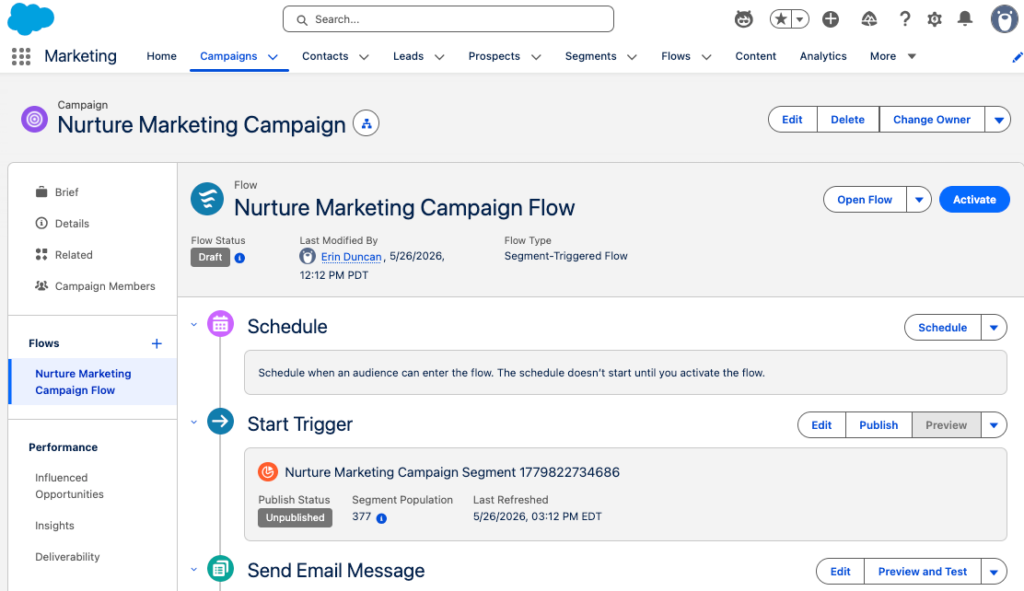
5. Nurture Campaign Email Automation Template
What It Does:
The nurture campaign email automation template helps organizations build ongoing relationships with leads through a structured engagement journey. This is especially valuable for B2B organizations with longer buying cycles, where prospects need education and trust-building before making a decision.
Inside the Flow:
This is a segment-triggered flow. The template includes:
- Welcome to our brand
- Exclusive event or content invitation
- Exclusive offer ends soon
Why It Matters:
Effective nurturing is about responding to customer behavior, not just following a schedule. The built-in decision paths help ensure that engaged prospects do not continue receiving irrelevant communications.
Pro-Tip: Define your entry criteria, engagement signals, and exit strategy before launching a nurture journey. The technology enables automation, but your strategic rules drive its success.

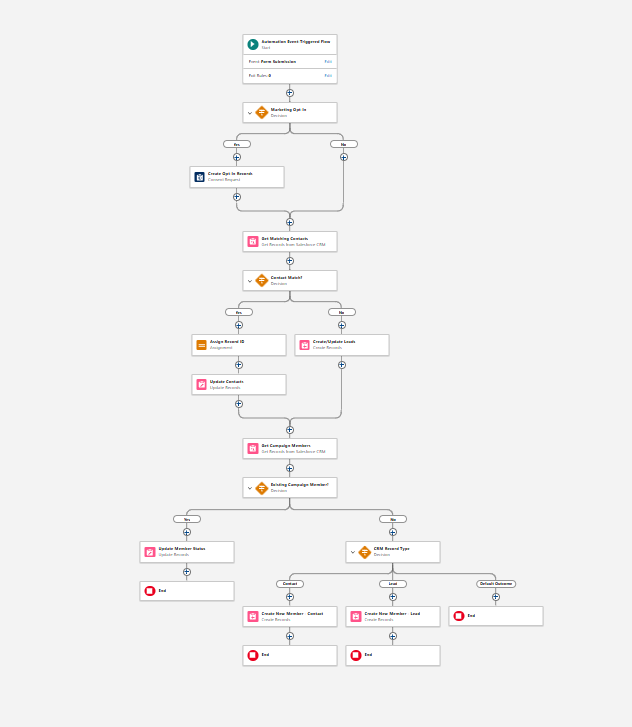
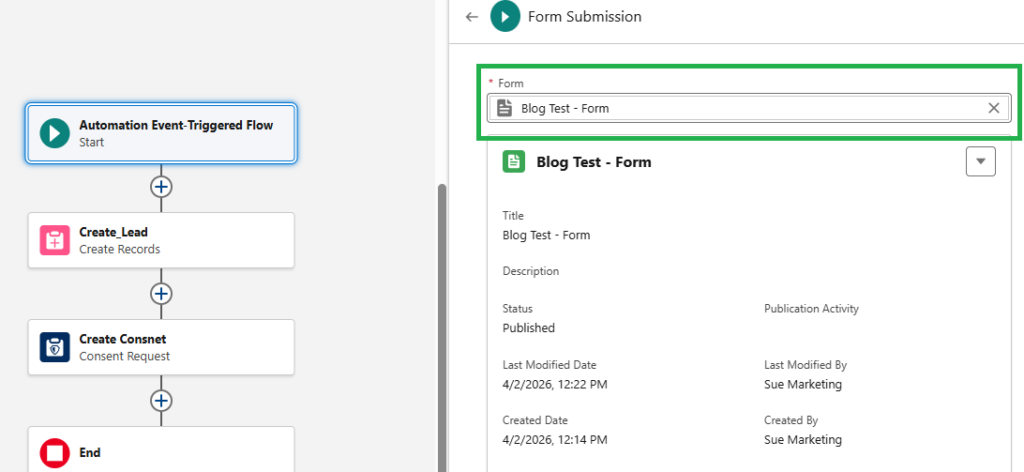
6. Signup Form Automation Template
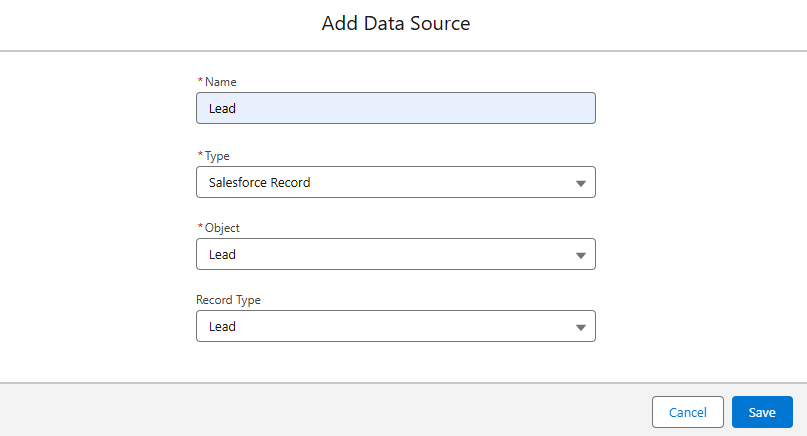
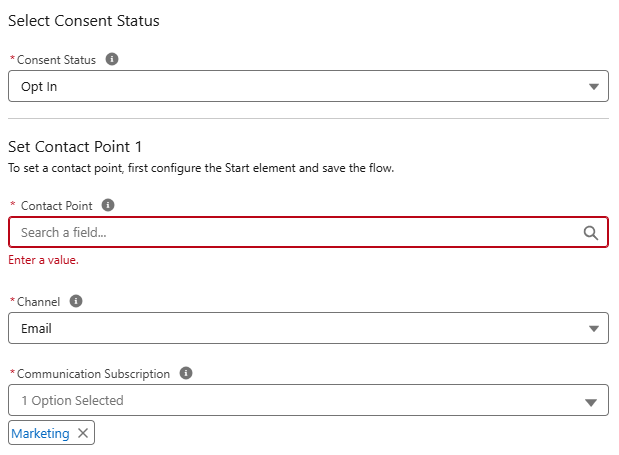
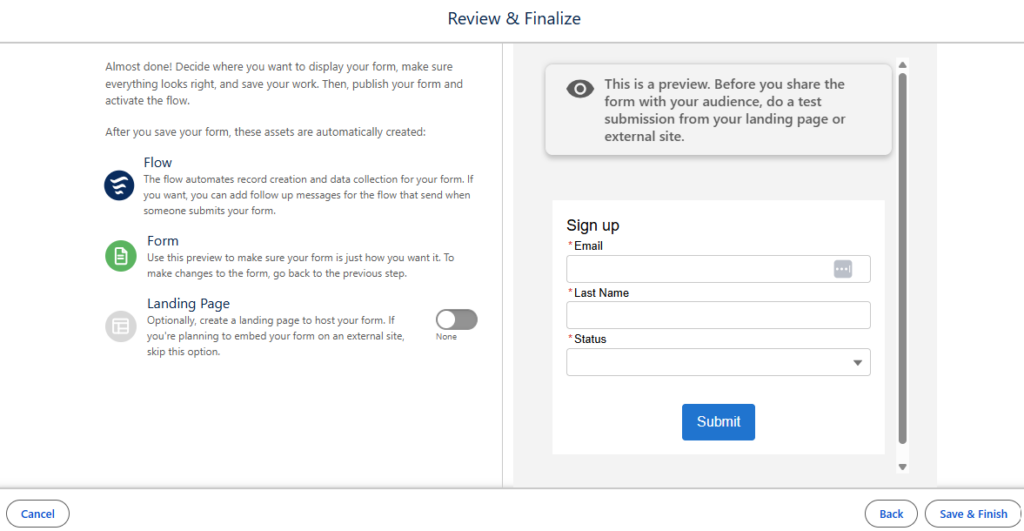
What It Does: The signup form template walks the user through what is needed to build a new form, such as Data Source, Fields, Form Content, and an optional Landing Page. This template also captures consent for communications immediately upon form submission.
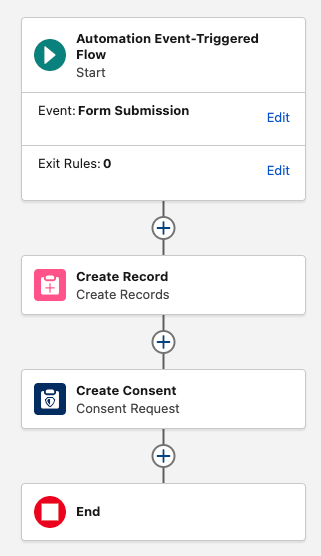
Inside the Flow: This is an event-triggered flow. The journey follows this sequence:
- Customer submits form
- Create record
- Create consent request
- End flow
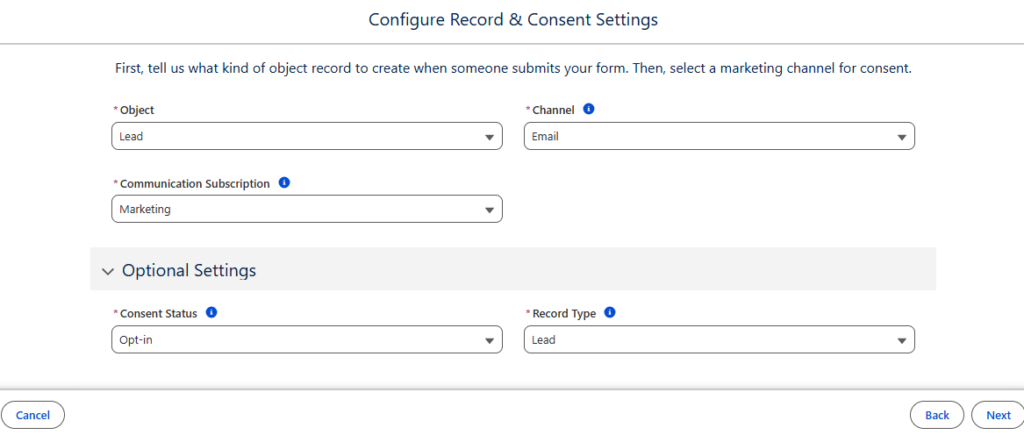
During configuration, marketers define the record type created (options include Lead, Contact, or Account), the marketing channel, the communication channel (Email or SMS), the consent status, and specific record type settings.
Why It Matters: Strong marketing automation starts with strong data practices. This template connects lead generation, data creation, and consent management into one unified, automated process.
Pro-Tip: Before activating this flow, confirm your organization’s data model and consent strategy. Decide what records should be created, what information sales needs, and how communication preferences should be managed.
For more tips on building Agentforce Marketing Forms, check out the Building Better Form Flows with The New Agentforce Marketing Flow Template blog post.
Summary of Flows
| Flow Name | Trigger Type | Primary Benefit |
|---|---|---|
| Birthday Promotional Email Automation | Segment | Celebrates customers and encourages repeat purchases with personalized offers. |
| Lead Capture Follow-Up Email Automation | Event | Converts new leads into engaged prospects via automated welcome and nurture journeys. |
| Reengagement Email Automation | Segment | Reconnects with inactive customers or leads through strategic, incentivized re-engagement. |
| Event Email Automation | Segment | Manages end-to-end communications for webinars, conferences, and product launches. |
| Nurture Campaign Email Automation | Segment | Builds long-term relationships through structured, behavior-based engagement journeys. |
| Signup Form Automation | Event | Captures consent and automates record creation immediately upon form submission. |
Moving from Building Automation to Optimizing Experience
The six flow templates in Agentforce Marketing represent an important shift in how organizations approach marketing automation. Instead of spending hours recreating common journeys, marketers now have pre-designed frameworks that provide a strong starting point. Whether you are launching a lead nurture program, reconnecting with inactive customers, managing an event experience, or capturing new subscribers, these templates help reduce implementation effort and accelerate time to value.
The future of marketing automation is not about removing the marketer from the process. It’s about removing repetitive work so marketers can spend more time where they provide the most value: understanding customers, creating meaningful experiences, and driving business growth. Open the Agentforce Marketing app today, explore the new templates, and see how much faster you can get your next campaign live.
Need Assistance?
If you need any assistance with your Agentforce Marketing platform, please reach out to the Sercante l Trilliad team! We would be happy to help you navigate your next steps in starting to use the platform alongside your existing technology to drive better results.