The recent unveiling of Salesforce Headless 360 marks a significant paradigm shift in the CRM industry, signaling a move away from rigid, UI-bound ecosystems toward a decoupled, “AI-first” infrastructure. For growth leaders, marketing executives, and revenue operations professionals, this means the CRM is no longer a destination users must manually log into, but rather a background engine. This engine can be accessed conveniently via natural language and “agentic” interfaces like Slack, Teams, or custom coding tools, fundamentally changing how teams interact with critical customer data and functionality.
1. Agentic Orchestration and the Model Context Protocol (MCP)
The core of this transformation is the decoupling of the CRM interface from its data layer, opening up the platform with comprehensive external API access. This shift converts Salesforce data, workflows, and business logic into over 60 composable Model Context Protocol (MCP) tools. These tools act as building blocks that allow AI agents to seamlessly interact with Salesforce without a traditional UI.
This agentic approach promises to automate complex workflows. Operational tasks, such as updating a Salesforce record or opportunity, can now be executed through agentic interfaces like Slack, completely bypassing the need to log into the traditional CRM UI. This functionality also supports extending beyond Salesforce-owned products to a wide variety of other interfaces such as Microsoft Teams, custom web and mobile apps, or even communication channels like Voice, WhatApp or SMS, as long as they adhere to the MCP protocol. The ultimate positive evolution is toward improved operational efficiency, giving users a consistent experience wherever they are already working, allowing teams to execute tasks like managing pipeline, building dashboards, and campaign journeys easier and without as many technical barriers.
2. Evolving Skillsets: Prompt Engineering and Data Hygiene
As systems transition to an agentic execution model, this democratizes the platform by transforming how non-developers, such as business users and admins, interact with and build upon the system. This highlights a growing need for a critical emerging competency: prompt engineering. For end users, especially marketers and sales representatives, the ability to write precise instructions are paramount to getting the desired results from AI. This shift necessitates that teams quickly adopt an “AI-first” approach for building solutions.
However, foundational pieces also remain crucial; even Headless 360, requirements like good data quality and metadata hygiene practices are still essential for success. AI does not natively “know” your business; it relies on your data (the facts) and your metadata (the context, rules, and structure) to make real-time decisions. Keeping data clean, deduplicated and up to date, and ensuring fields have descriptions, picklists are organized and accurate, gives AI the correct information, and the business logic and context to understand what it means.
3. Strategic Skepticism and Navigating Release Reality
While the potential for improved operational efficiency is high, leaders should approach the Headless 360 announcement with strategic skepticism. As with many major platform evolutions, the full scope of Headless 360 will likely unfold in phases rather than arriving as an immediate, all-in-one solution. While the announcements focus on a complete platform of tools, all are not generally available at this time, with some features in pilot now or planned for release in the summer and beyond, so customers should prepare for implementation over a phased roadmap. Ultimately, the move to Headless360 is a necessary and welcome alignment with modern market standards, ensuring Salesforce remains competitive as organizations increasingly adopt headless architectures.
Executives should view this development as a positive step forward, particularly for organizations that prioritize prompt engineering training and robust data governance. The headless model offers a more seamless and convenient way to integrate Salesforce functionality where users typically work day-to-day, which is an effective strategy for boosting user adoption. The foundation for this is already emerging, with capabilities such as the Agentic Enterprise Search (also known as Ask Agentforce) feature currently in beta, which uses natural language queries to synthesize summaries from connected systems.
Conclusion
The Headless 360 announcement marks the beginning of a future where growth is driven by a decentralized, AI-first engine. As technical complexity is abstracted away by agentic interfaces, success will hinge on empowering teams to adopt prompt engineering as a new competency and maintaining unwavering data hygiene. Organizations that can adapt their skillsets and navigate the gap between marketing promise and practical application will be best positioned to leverage this evolution for superior operational efficiency and accelerated growth.
With the upcoming June 2026 updates Salesforce has just announced, Salesforce is once again raising the bar for platform security. While these updates are designed to keep your data safer than ever, they do require some proactive heavy lifting from admins to ensure integrations don’t break and user access remains seamless.
In line with the messaging we’ve seen from Salesforce recently—focusing on the intersection of AI, Data, and Trust—these enhancements are mandatory. We want to make sure you’re ahead of the curve. Let’s dive into the core security requirements and what you need to do to prepare.
Email Domain Verification
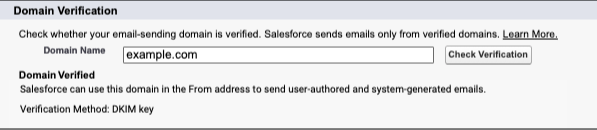
What is changing: Salesforce now strictly requires all outbound email-sending domains to be verified. To verify a domain, you must establish ownership using either DKIM key (recommended) or a verified entry in the authorized email domains list. As part of this change, Salesforce will no longer deliver emails from unverified domains, even if the specific sender’s individual email address was previously verified.
Why it matters: Email deliverability is becoming stricter globally, with major mail providers increasingly filtering or rejecting unauthenticated domains. If your organization attempts to send an email from an unverified domain, the delivery will fail and the email will be silently dropped. It won’t generate a bounce notification or an error message for your automations.
Who is impacted: Any emails sent directly from the Salesforce platform, which includes emails sent via the Email Composer, Apex email, Flow-triggered emails and even system-generated emails like notifications of a new Lead or Opportunity assignment.
Timeline: Enforcement began rolling out to sandboxes in March 2026, and production orgs in April 2026.
How to prepare:
You can check the verification status in your org by going to Deliverability settings in Setup and enter your domain in the Check Domain Verification section.
Ensure your email sending domains are verified using one of the following methods:
Enable a Safety Net: To minimize immediate business disruption while waiting for domain verification, enable “Use a substitute email address for unverified domains” on the Deliverability Setup page.
What is changing: While Multi-Factor Authentication (MFA) has been a contractual “requirement” for some time, Salesforce is moving toward technical enforcement for all UI logins (i.e. the login.salesforce.com page). This means any user logging into the Salesforce UI must use Multi-Factor Authentication. The ability to toggle this off for specific profiles or bypass it via legacy settings is being deprecated.
Why it matters: Data breaches are commonly linked to compromised credentials. Making MFA a technical requirement for every single user, ensures that even if a password is compromised via social engineering, your org remains protected.
Who is impacted: All users logging into Salesforce (direct UI or SSO logins) in production or sandbox orgs and do not have one of these permissions: System Administrator profile, Modify All Data, View All Data, Customize Application, or Author Apex. (Users with these permissions are considered “privileged” and have their own MFA requirements, see the next section)
Timeline: Enforcement is rolling out in waves, starting in Sandboxes on June 22, 2026, and production orgs starting July 20th.
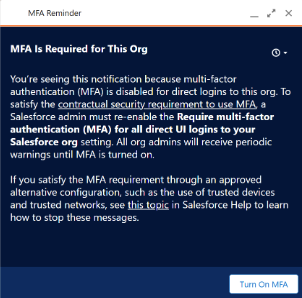
Ahead of enforcement, orgs that have the setting “Require multi-factor authentication (MFA) for all direct UI logins to your Salesforce org” disabled may start seeing this pop-up message as a heads-up on the upcoming enforcement.
Orgs with that have been updated will see the “Require multi-factor authentication (MFA) for all direct UI logins to your Salesforce org” setting (under Setup > Session Settings) enabled and greyed out.
How to prepare:
Audit users still not using MFA to assess who will be impacted. Use the “Identity Verification Methods Report” to view the methods being used by your organization.
Identify users relying on the “Waive Multi-Factor Authentication for Exempt Users” permission. To restore this exemption for valid use cases (e.g., automated testing tools), you can contact Salesforce Support for approval.
If you are using Single Sign-On (SSO) through another identity provider (e.g. Okta, Entra), make sure that provider is using MFA and sending valid signals to validate MFA was used (for more information, see Salesforce’s breakdown of signal requirements).
Ensure users are prepared for the change and how to register their MFA method.
Phishing-Resistant MFA for Admins or Privileged Users
What is changing: Salesforce is introducing a requirement for phishing-resistant MFA for users with “privileged” access. This means moving away from verification codes and toward FIDO2/WebAuthn-based passkeys, hardware security keys (e.g. YubiKeys) or built-in authenticators (e.g. Windows Hello or FaceID) that use FIDO2/WebAuthn standards.
Why it matters: Admins hold the keys to the kingdom. Phishing-resistant methods ensure a stronger protection against identity-based threats, and ensures access is tied to authorized users.
Who is impacted:
This change affects all users logging into Salesforce (direct UI or SSO logins) in production or sandbox orgs who meet any of the following conditions:
Users assigned with the System Administrator profile
Users assigned with any one of these privileged permissions: Modify All Data, View All Data, Customize Application, or Author Apex
Once in effect, users will be prompted to register their phishing-resistant MFA method on their next login.
Timeline: This change will be introduced in sandboxes starting June 22, 2026, and in production orgs starting July 1, 2026
How to prepare:
Audit all users who have the System Administrator profile, or one of these permissions: Modify All Data, View All Data, Customize Application, or Author Apex. You can use Salesforce Reports, User List Views, SOQL, or the User Access and Permissions Assistant.
Identify users relying on the “Waive Multi-Factor Authentication for Exempt Users” permission. To restore this exemption for valid use cases (e.g., automated testing tools), you can contact Salesforce Support for approval.
If you are using Single Sign-On (SSO) through another identity provider (e.g. Okta, Entra), make sure that provider is updated to use phishing-resistant MFA, or enable Salesforce MFA for SSO logins (for more information, see how to configure SSO for MFA compliance).
Ensure users are prepared for the change and how to register their MFA method. Encourage them to pre-register before the enforcement date to avoid disruptions.
What is changing: Salesforce will automatically detect and contain traffic that:
Are from “High-Risk” connections through Connected App or API usage.
Examples of “high risk” connections include anonymizing VPNs (e.g. NordVPN, ExpressVPN, Surfshark, or ProtonVPN), Proxies (e.g. HideMyAss or KProxy) or high-risk IP addresses (e.g. public wifi, blocklisted IPs)
Connected App or API usage may include integrations, plugins (e.g. Salesforce Inspector Reloaded) or use of CLI tools.
Are significant, novel deviations from typical user login activity based on network, client, authentication events, and geolocation. (detected through an AI-driven monitoring system)
If a high risk connection is identified, the following actions will be taken:
The affected user account will be frozen.
All OAuth refresh tokens granted to the user will be revoked.
An email will be delivered to org admins from Salesforce Security (See Administrator Notifications below).
The affected user will need to contact their org admin to restore access to their account.
Why it matters: This enhancement is aimed at protecting against suspicious activity via anonymizing VPNs, proxies, or high-risk IP addresses; credential harvesting; and token theft.
Timeline: This change started April 24, 2026
How to prepare:
Ensure users running integrations, plugins or connects are not doing so from high-risk sources
If automated containment affects a user, review their session and restore access by unfreezing their user
Users will need to avoid connecting from high-risk connections to prevent re-containment. They will also need reauthorize any connected apps
If your only admin account is locked out, contact Salesforce Support by phone to have your account reactivated
What is changing: Salesforce is introducing “Step-Up Authentication.” Even if a user is already logged in, they will be prompted to re-verify their identity (via MFA) when they attempt to run or view reports if a configurable amount of time has passed since their last step-up challenge.
Why it matters: This change is intended to prevent malicious data breaches or unauthorized transfer of data to external locations. Given that report views and exports can be susceptible to scraping or unauthorized external use, the step-up authentication ensures these actions require a stronger authentication challenge.
Who is affected: This change impacts all users (direct login or SSO) who run or export reports.
Timeline: Sandboxes will see this available starting May 27, 026 and enforced starting June 3, 2026. Production orgs will see this available starting May 27, 026 and enforced starting June 10, 2026.
How to prepare:
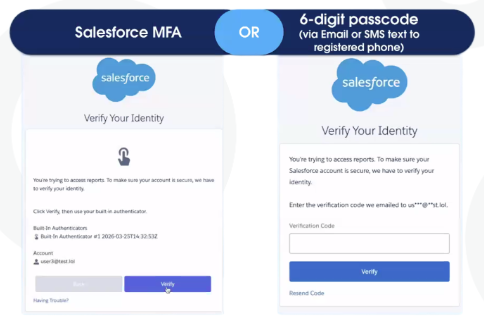
Ensure all users (especially SSO users) have a registered Salesforce MFA method, a valid email, or an SMS phone number, as they will need this to pass the challenge.
Review and Configure the Policy: In Setup, go to Identity Verification settings and adjust the cool-down period threshold if your business requires a timeframe different from the 120-minute default.
The Bottom Line
June 2026 is right around the corner. By leaning into preparing for these enhancements now, you’re not just racing to a deadline—you’re hardening your business against the next generation of digital threats.
As you prepare for the rollout, keep these three steps top of mind:
Audit: Identify which users will be impacted by the permission changes.
Test: Run your critical processes in a Sandbox environment.
Educate: Ensure your stakeholders understand the ‘why’ behind the new security protocols.
With a clear plan in place, the transition to a more secure Salesforce platform will be a seamless one.Need a hand getting your security posture ready for 2026? The Sercante team is ready to help you audit and prepare your org for these upcoming changes and your overall security posture. Reach out today!
Email templates are essential to marketers who want to create emails efficiently and protect the brand consistency of their communications. Agentforce Marketing email templates became available in the Winter ‘26 release but some exciting new features and updates became available in Spring ‘26! Let’s take a look at the features of email templates and some of the quirky aspects of using them that you’ll want to know.
Product Note: In previous blog posts, Agentforce Marketing has also been referred to or known as Marketing Cloud on Core and Marketing Cloud Next. This product may have also been referred to under its Edition names, Marketing Cloud Growth and Marketing Cloud Advanced.
Creating a custom template
To get started with a new email template, navigate to your Content Workspace for Marketing Cloud, then select Add > Email Template.
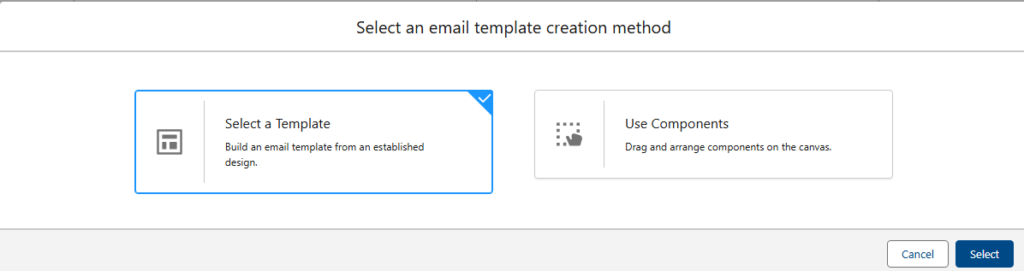
You’ll see two options, “Select A Template” and “Use Components”.
Important: You cannot save an Email as an Email Template, or an Email Template as an Email, so be sure you’re selecting the correct content type before building!
New: Prebuilt Templates
With the Spring ‘26 release came 17 new pre-built email templates (also 17 pre-built Landing Page templates. These templates are customized by use case, your options are:
About Us – Brand Story
Appointment Scheduling
Coming Soon – Launch
Free Trial – Demo Request
Gated Content
Lead Generation
Localized Offer
Newsletter
Offer Promotion
On-Demand Content
Partnership Program
Product – Service Deep Dive
Survey – Feedback
Testimonial – Case Study
Thank You – Confirmation
Waitlist – Early Access
Webinar
You can select each template to get a preview of its layout and components on the right hand side.
Each template has a header component for your logo, a stylized footer, content and image components, and at least one CTA button.
To use a prebuilt template, select the template and then click Select in the bottom right corner. You can also view and access the email templates you’ve saved in your CMS by selecting the Custom Templates header.
Once you’ve selected the email template you’d like to start with, easily stylize the template by applying your brand from the right side menu.
The standard templates can be completely customized like any other template. The stock photos they include are automatically saved in the same location as the email template.
Important: Don’t worry, you cannot overwrite the standard templates. You can customize a standard template to your company and brand and save it as a customized template for future use. This will give you a custom template based on the standard design, but the original standard template is preserved.
New: Change Data Sources
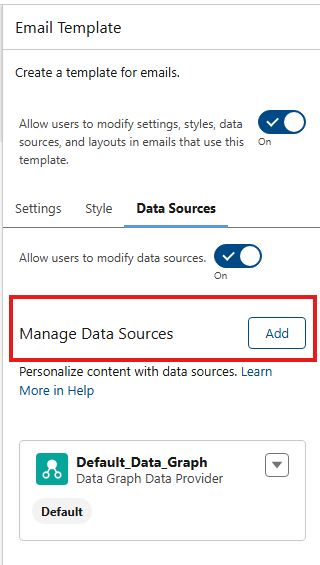
Email templates and Emails can be associated with Data Sources. This allows you to add personalization from a specific data source, including Events.
As of Spring ’26, you can only add one Event Data Provider, meaning you can only add a single unique form (Event) to an email as a data source. By adding an Event Data Provider you’re able to personalize the email with data that was provided in the Event (aka, the form). So if you ask someone their food preference on an event registration form, you can add that field from the form inside the email. This allows you to add the email to an event flow and create a follow-up email in the flow without waiting the standard 24 hours for Unification of the record*.
*Personalization is typically only available in an email for Unified Individuals because the Data Graph (which powers personalization) must run first. So in our example, if a user supplies a food preference in a form, you must wait for the Data Graph to run so the data is added to the Unified Individuals profile and available for use in personalization. Adding an Event Data Provider bypasses the need to do this.
Two important notes: You can only add a single Event Data Provider, you’ll need a unique email for each form you wish to personalize with form data. Furthermore, once you add a data source you cannot remove it! Be careful when adding a data source. If you add the wrong source you’ll need to start a new email to correct your error.
New: Lockable Elements
Marketers and brand managers are going to love the ability to lock elements inside a template! But, this new found power comes with a few quirks.
Newly Created Templates are Automatically Locked!
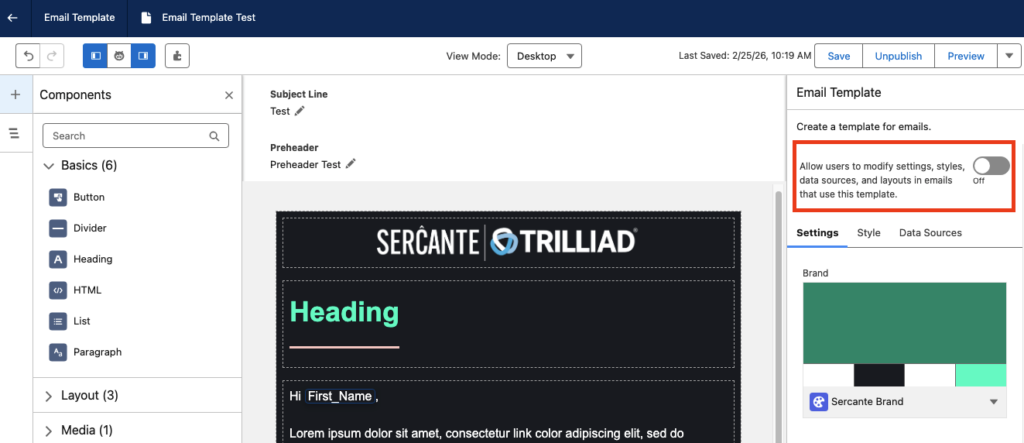
Post Spring ‘26 release, new email templates are locked by default. You’re able to either manually unlock specific sections you would like marketers to be able to edit or use the “Allow users to modify settings, styles, data sources, and layouts in emails that use this template” toggle option found on the settings tab to unlock all sections. When creating a new template, the toggle will be off.
Lock only certain content, but not all
If you wish to restrict users from editing only some content, for example a branded header or footer, but you want to leave the rest of the content open to editing, you have to unlock the sections one at a time. It’s a bit counterintuitive, but everything must be locked first, then sections are individually unlocked.
Step 1: Make sure the “Allow users to modify…” toggle is OFF, meaning no content in the email is currently editable.
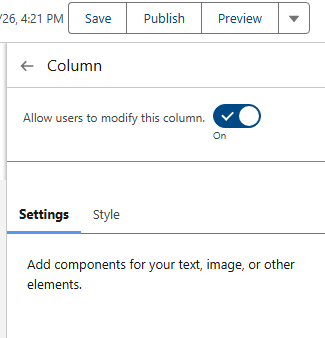
Step 2: Select the individual component you wish to unlock and change the toggle to On. This unlocks the one section component you have selected on the canvas.
Don’t forget your subject line and preheader
If you’re locking down your template and only unlocking certain sections, it’s easy to overlook the Subject line and preheader! On the Email Settings panel, scroll down to the Subject Line and Preheader section and click the lock icon to unlock these settings for your users. This enables your users to change the subject line and preheader when using the template for an email.
Use of templates, important caveats
One final note on using templates, your order of operations is important. As mentioned previously, you cannot save an “Email” as an “Email Template”. Likewise, you cannot save a template as an email. When you’re ready to create an email that’s using a template, make sure you select “Add > Email”, then select a template.
Lastly, something that I learned the hard way after creating a 6-email series for a nurture campaign. Segment Triggered Flows (nurture series) only use Emails, not Email Templates (so the opposite like Account Engagement Engagement Studio Programs). So when you’re adding emails to a flow you will only see Emails, not templates.
Final thoughts
Email templates are a much-needed addition to Agentforce Marketing and I’m excited to see how they grow from here. I love the functionality they offer, like customized data sources and lockable regions. They also did a terrific job creating a large variety of standard templates to get you started!
Agentforce Marketing Form Flows can take time to add all of the elements needed, such as autoresponders, lead notifications, and whatnot. Let’s use a handy Marketing Cloud flow template to solve a few problems with one simple subflow!
Product Note: In previous blog posts, Agentforce Marketing has also been referred to or known as Marketing Cloud on Core and Marketing Cloud Next. This product may have also been referred to under its Edition names, Marketing Cloud Growth and Marketing Cloud Advanced.
What Problem Are We Solving?
When someone fills out a form we need a scaleable, reusable way to determine if the person filling out the form is an existing Lead and/or Contact in Salesforce. If you include an email component to your form flow, such as an autoresponse email, then the first node in your form flow must be a create element. This makes it arduous to check for existing records and send an autoresponder in the same flow.
Form Triggered Flows
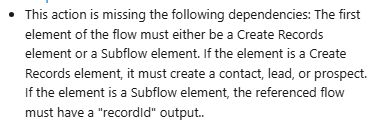
When creating a new form in Agentforce Marketing you may have received the error message below warning you that a form triggered flow must begin with a Create Record.
This can be frustrating because sometimes you want to first check if there is an existing record that matches what was just entered in the form, then decide if you should create or update a record.
Now you can!
Introducing: Upsert a Record for a Person (Flow Template)
This handy flow template makes life easier. It is also the ONLY exception to the rule above about starting with a Create Element. You can also start your form flow with a subflow that uses the “Upsert a Record for a Person” template, which is very useful.
The main benefit of creating a subflow is that you can call the same subflow from multiple form flows, no reinventing the wheel needed to scale. This new flow will handle the following:
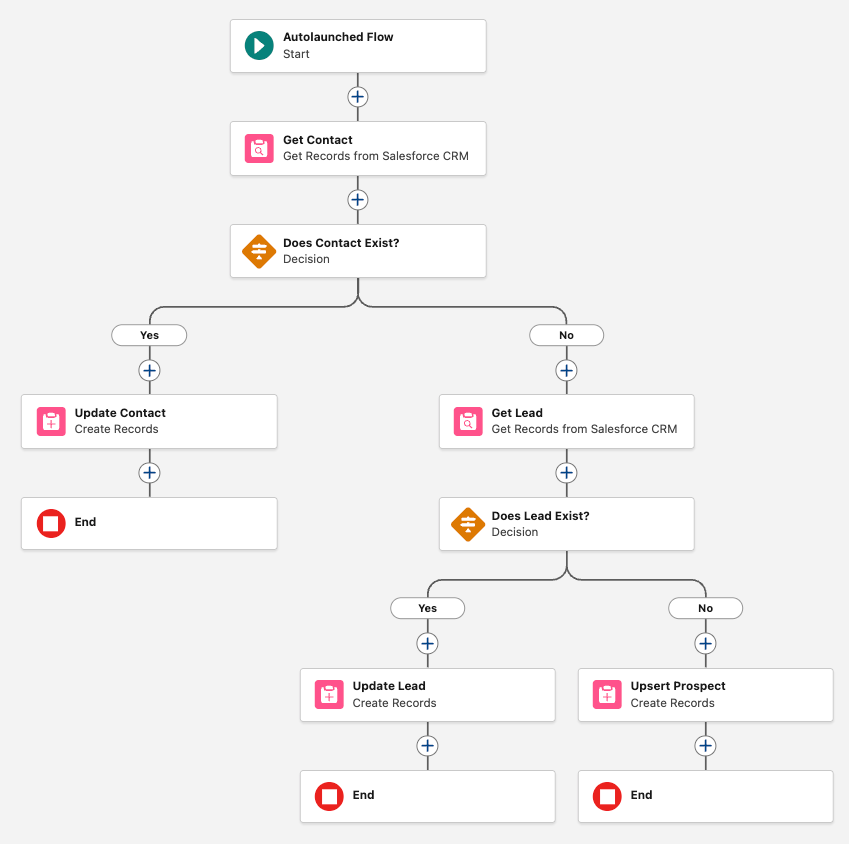
Check if a Contact exists > Update if found
If no Contact exists, check if a Lead exists > Update if found
If no Lead exists, create a new Lead
Optionally we can also add email alerts, add to campaign elements, and more.
Let’s Build the Flow
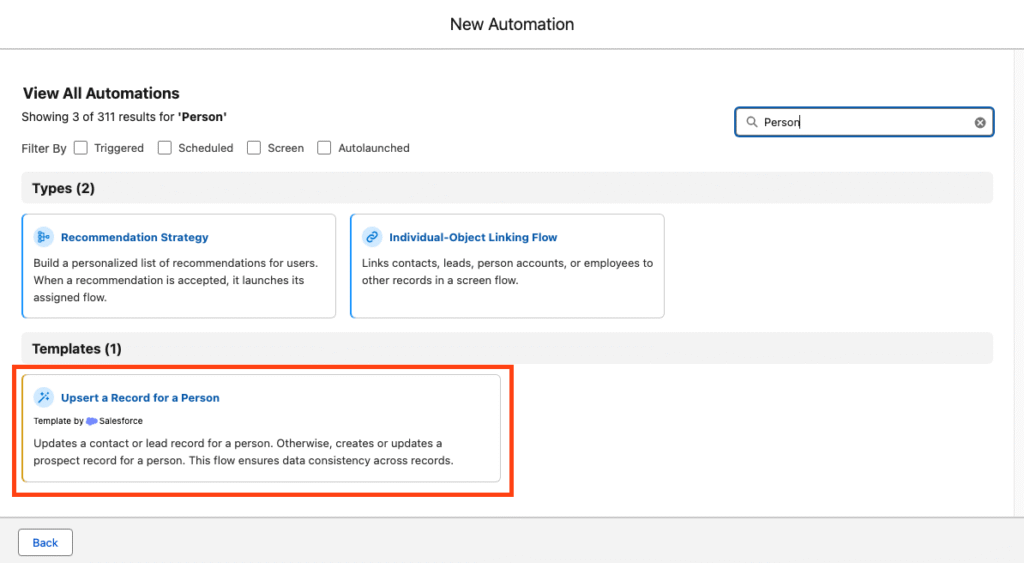
In the Marketing App, select the Flows tab
Click New
In the search window, search for “Person”
Select the template Upsert a Record for a Person
Your flow should open to the following canvas layout.
The flow is autolaunched because we’ll call it from another flow (our form triggered flow).
Click Next
Name the flow “Look for Existing Contact/Lead”
Click Create
This flow will ingest data from your form triggered flow and return a recordId. For this to work, we need to first create the variables in the subflow so that we can send the necessary data.
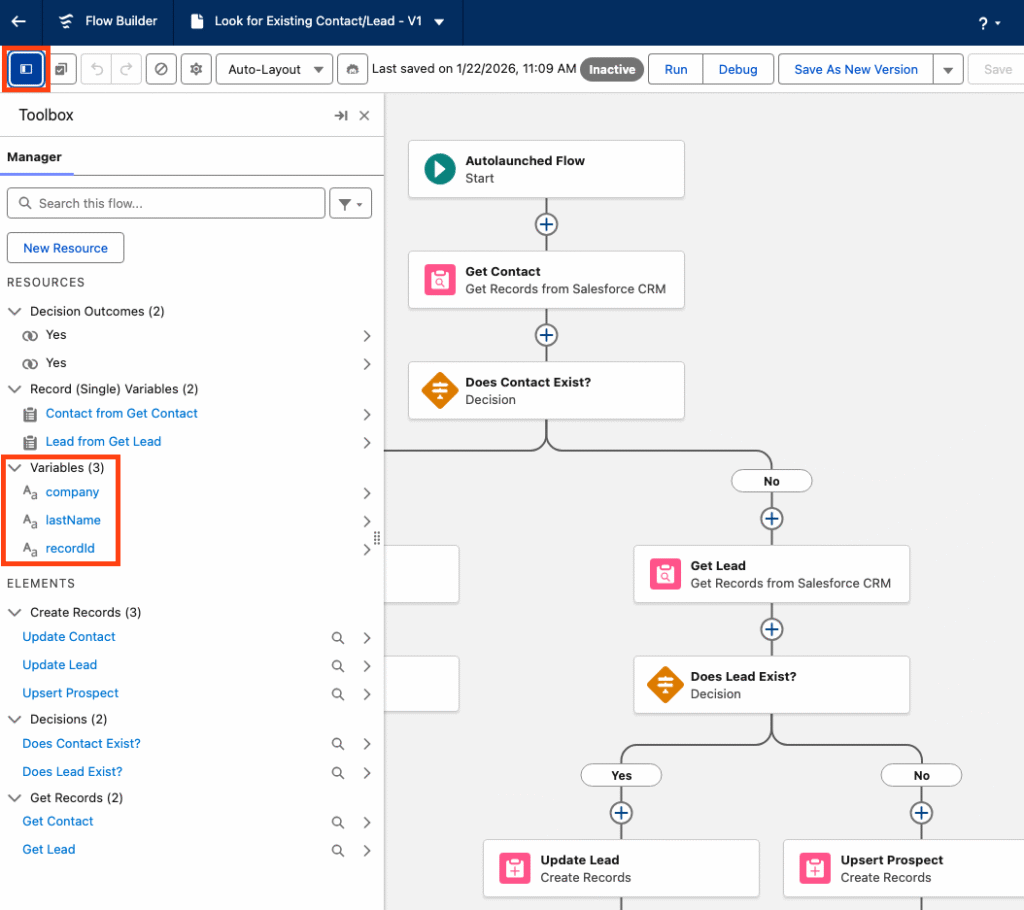
Within the flow builder, select the Toolbox
You should see three variables: company, lastName, recordId. These are the default variables because they’re technically all that’s required to create a record. You certainly will need more than this.
Important: when you add a new variable, like firstName, for example, you’ll need to make sure the checkbox for “Available for Input” is checked. This insures that any new variables you add will be able to accept the data from the form flow that this new flow is connected to. You’ll notice the three default variables already have that option checked.
Next we will create any necessary variables. Any data that your form is going to capture should be a variable for this flow to ingest. For example, firstName, phone, favoriteCandy, whatever!
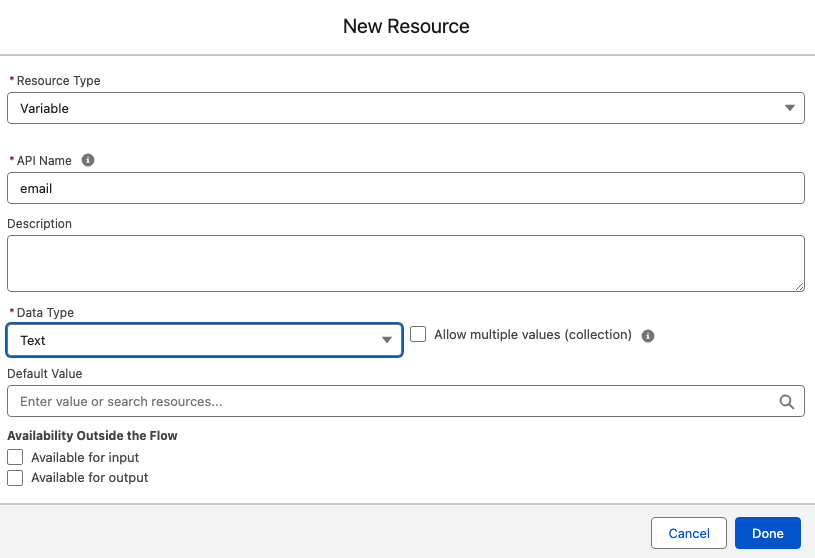
Within the Toolbox, select New Resource
Select the Resource Type Variable
Enter your API Name, well use email for our example
Select your Data Type, this will typically be Text
Select Done
Repeat for any additional variables
Customize the Sub Flow
Now that the basic setup of the sub flow is done we can configure the elements to suit our needs.
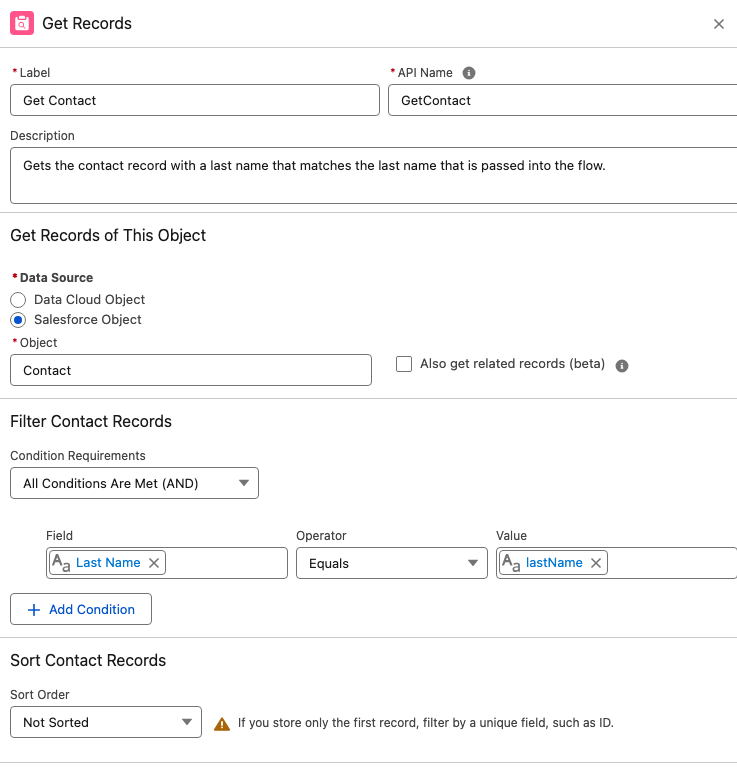
Start by selecting the Get Contact element.
By default the template only looks for lastName to determine if a matching Contact exists. We’ll switch this out for a more reliable unique identifier, email address.
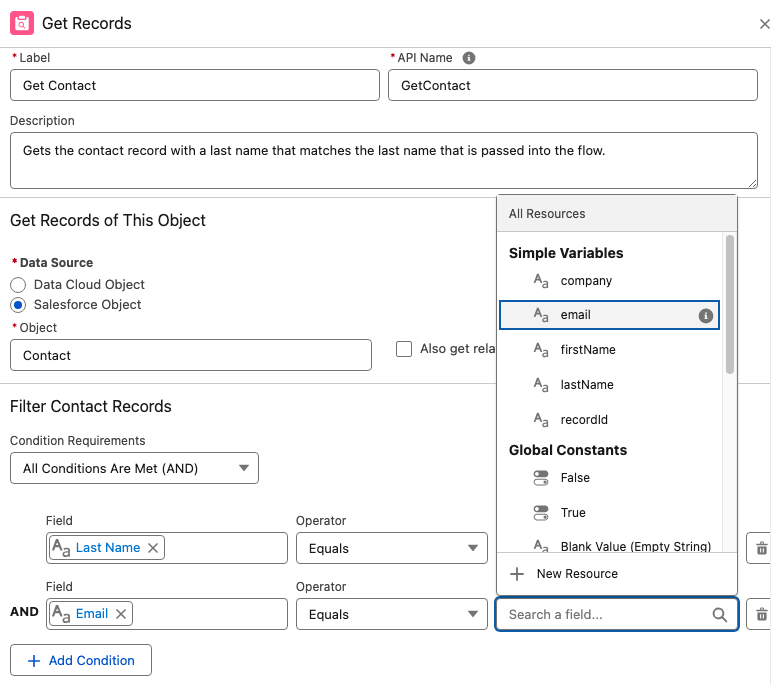
Select + Add Condition
Enter the Record Field Email equals variable Email
Select the trash can icon next to the Last Name condition to remove it
Important: When mapping the fields remember your variables represent the inbound data from your form, the field represents the object’s fields in Salesforce.
5. Once complete, you should be mapping (at least) the Email field with the email variable you created.
2. Next selecting the Decision element.
The Decision element will determine if there is an existing Contact found. Name the element “Does Contact Exists?”.
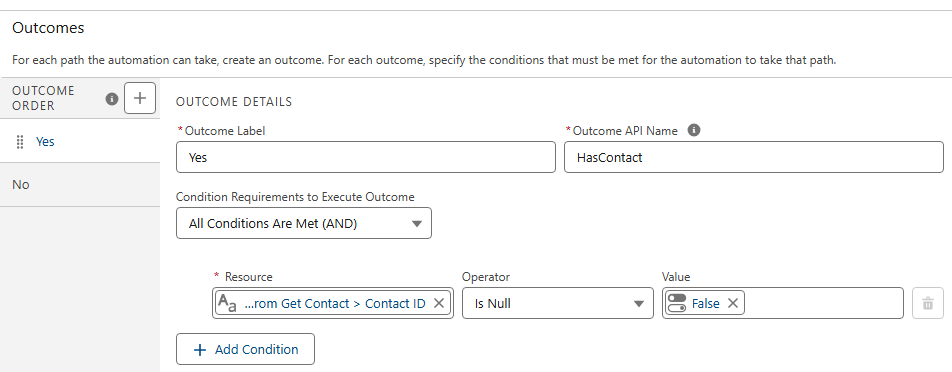
Under Outcomes, let’s name the first outcome “Yes”.
For the Yes outcome, your Resource should be the Contact ID from the Get Contact element. So if the Get Contact found a Contact, there will be a Contact ID present.
Map the Get Contact > Contact ID with the Operator “Is Null” which should equal False.
If a contact is found the Contact ID will not be null.
For the default outcome, simply name it No. There is no criteria needed because either the new record is a contact or it’s not.
3. If it’s NOT a contact.
If your new record is not a Contact you’ll see by how the template is laid out, it will go down the right hand path and hit another set of checks to look for an existing Lead.
A. Configure your Get Lead node the same way you did with your Get Contact, mapping your Lead Email field with the email variable. This means it will look for any lead records that match that email address.
B. Configure the Decision element in the same way you did the Contact Decision element. You want to determine if it found a Lead ID from the Get Lead node above.
Finally, we’re either creating or updating records.
On the left path, where a record will travel if a matching contact record is found, we’ll update the existing Contact with the details from our variables. Remember, the variables represent the data that the person entered into the form. Map the variables to the appropriate Contact fields to update the values.
Important: As of this writing, if a variable has a null value because the form field was optional, and the person did not fill in the field, that null value will overwrite the value on the contact record! For example, if your phone field is optional and a person doesn’t fill that out and their existing contact record does have a phone number, it will be overwritten with a null value and you will lose that data. If you would like to prevent this from happening, see Solution #2 of this blog post for a workaround.
On the right path, records that are not existing contacts will travel to check for an existing Lead. If a Lead is found, you’ll configure the Update Lead node and map your lead fields with the variables.
If a lead is not found, you’ll create a new lead. Configure the Create Lead node, mapping your variables to the lead fields.
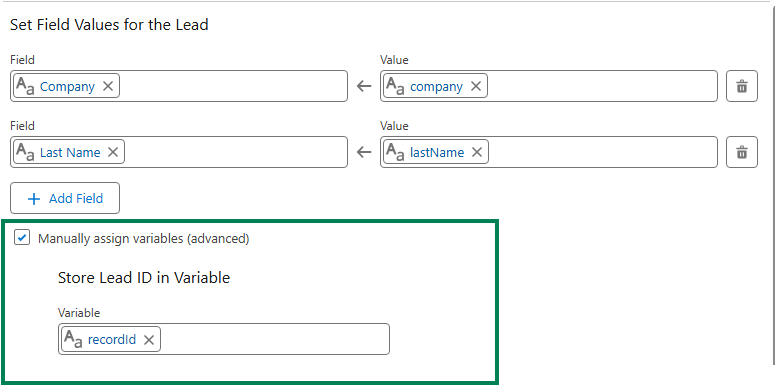
Very important last step for this flow:
For each update or create element at the end of the branches you must check the box for “Manually assign variables (advanced)” and store the variable in your recordId variable. If you don’t do this the flow won’t send the recordId back to your original form flow.
Once all the elements are configured and you’re sure that each exit point (create or update element) will store the recordId, you’re done with this flow and can save and activate. The flow must be activated before returning to your form flow.
Wait a minute, doesn’t the Create Records element include a check for matching records?
Yes, it does! That will work for your forms but you first need to know if the person filling out the form is a lead or contact. This subflow is the only way to first determine if the person filling out the form is an existing contact, lead or brand new.
Let’s go back to our form flow
Now that we’re back in our original form triggered flow, we have much less work to do to create an effective way to check for existing records before we decide if we want to create a lead or contact, or update an existing record.
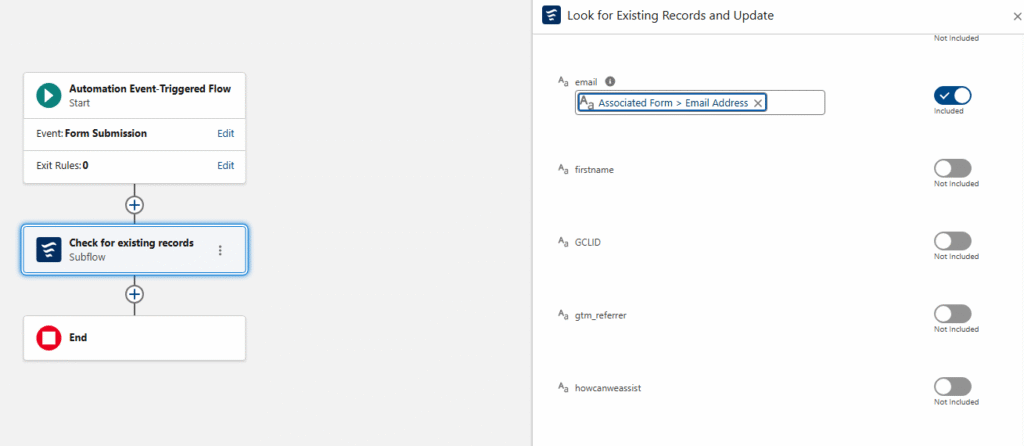
When you start your form flow, instead of using a Create element, add your subflow.
Delete the default “Create Lead” element that’s usually added
Click the plus icon to add an element directly after your start
Select the Interaction element “Subflow”
One the right hand menu of flows, search for the flow you just created. You may have called it “Look for Existing Records” or something similar.
Configuring the subflow node is important. You’ll see a toggle next to each variable you created in the subflow. This allows you to map your Form Fields directly to your variables in the subflow.
Click the toggle and map all of the fields from your form.
Note: you do NOT need to map all of the fields, only the ones you want to use to create or update records in your subflow. You may include extra variables in your subflow to make it scaleable. For example, your subflow may include “favoriteColor” but you may not collect this data in all of your forms. That’s ok, you can toggle it on any of the forms you collect that data.
Using the recordId that was found in the subflow
What’s really nice about this subflow is that your form receives back a recordId for the record that was either found and updated, or the newly created record. There is no 24 hour wait. If you want to take additional steps in your form flow, like adding people to a campaign you’re going to need that recordId.
Final thoughts
Creating and calling a subflow might seem intimidating to newer platform users, but if you take the time to configure it you will have an invaluable, reusable resource. In simplest terms you’re bypassing Data 360’s 24 hour wait period for checking a form submission for existing records and you’re receiving back (almost instantly) the recordId of the existing record or newly created record. This opens up all sorts of options in your form flow and makes them much easier to scale.
I also encourage you to have the subflow do as much work as possible. The more you have your subflow do, the less work your individual form flows need to do which means you’re up and running with new forms really quickly. For example, I recently set up a subflow that checks for existing records, adds the person to a campaign based on the UTM value in their form submission and sends the sales team an email alert, all within that subflow.
One additional added benefit to the subflow strategy is that it’s far easier to deactivate, add-to and debug a regular flow. Form flows are notoriously fickle, so once activated, I like to leave them alone. But the subflow behaves similarly to any other admin flow in Salesforce that can be added to and edited as needed. (eh ahem, in the sandbox, of course). Special thanks to our friend, Francois Perret for his terrific article on the subject.
Product Note:Marketing Cloud Growth and Advanced are editions of Marketing Cloud Next and have also been referred to as Agentforce Marketing.
Since Marketing Cloud Growth was introduced at the beginning of last year, more and more innovations with the platform have been coming out at a rapid pace by the team at Salesforce. The upcoming Winter 26’ release is no exception to this momentum. Note, the Winter ’26 updates will be available starting September 19th.
TL;DR – What’s the point, what do we love the most?
While the Winter 26’ release brings a ton of new features and enhancements, there are definitely some that stand out to us. Here’s a list of our favorites.
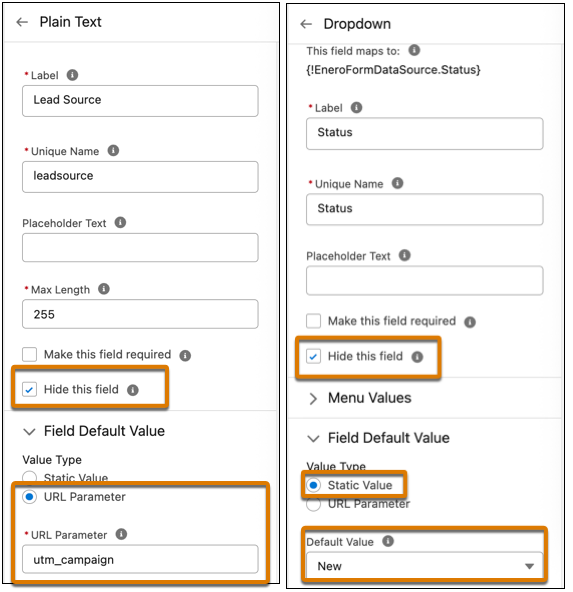
Form fields can be set to “hidden” using a simple checkbox on the configuration screen.
Form fields can be given a default value, and in addition, you can automatically set that value with a URL parameter. No need for JavaScript!
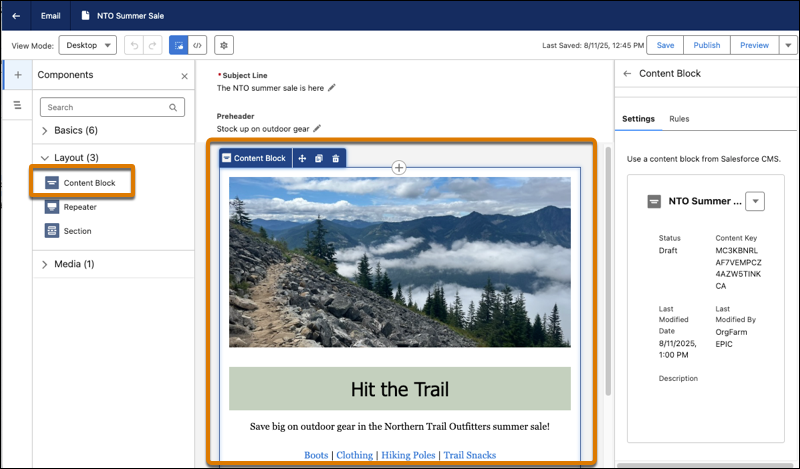
No more reinventing the wheel each time you create a new email layout! Content Blocks are exactly what the name suggests, bits of content you’ll want to use on multiple email assets. For example, banners, specially formatted footers, terms & conditions text, buttons or any other regular content you use often. Or, any combination of this content. For example, a content block can be an image, accompanying text and a CTA button below it. You’ll find the “content block” option under Layout and can easily drag blocks onto the email canvas. Content Blocks are stored in your Marketing Workspace along with your other content.
In addition, you can ramp up your personalization by creating Content Blocks for different audiences and apply variation rules that serve personalized content to the right recipients.
Marketing Cloud Account Engagement users will appreciate the addition of email templates! Email Template Campaigns allow your admins or campaign managers to create standardized, branded email campaigns that your marketers can simply use for their own marketing emails. No more cloning old assets.
With the new Content Builder Agent, users can draft, revise, or optimize content in Marketing Cloud. The new agent helps marketers create assets, like email body copy, subject lines, or SMS messages. Just like other Agents, you help guide the output by providing brand/company information. To get started, from Agent Builder, find and select the new Content Builder Agent template.
Within emails, marketers can now use other data sources that feed merge fields, repeaters, and dynamic content. Instead of using a data graph, which is currently how emails are personalized, users can change the data source within the Data Source panel to select different sources for the personalization.
Users will notice other small UI enhancements to the Email Builder. A few small changes to the names of buttons making the aforementioned personalization experience easier. Furthermore, you can update the Title, API Name, and Description of the email within the Builder instead of needing to click the Settings cog to access those fields.
Salesforce has cited additional UX enhancements regarding email setup and configuration, including branded link management, DNS entry support, and display names, in addition to bug fixes, but details are limited right now.
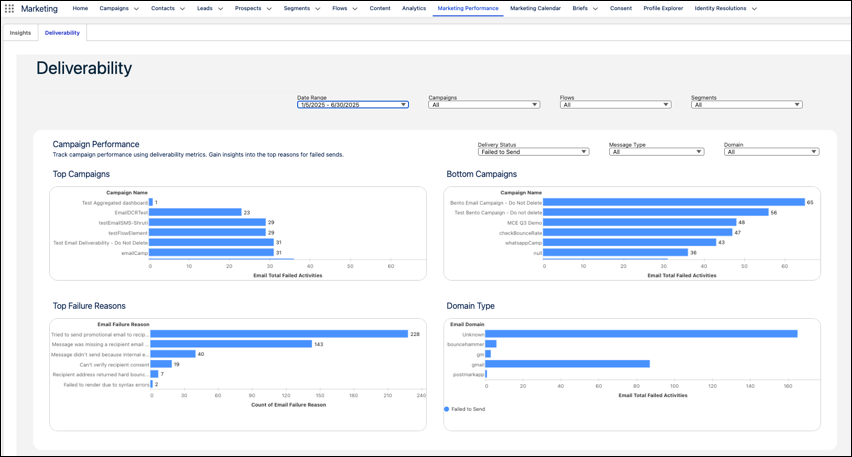
The Deliverability Dashboard has been enhanced to provide deeper insights for your email campaigns. There are new filters available for “domain” so you can review results by recipient domain, useful when reviewing failure reasons.
Additional countries are available for SMS marketing, but remember each of these countries has their own sender codes, compliance regulations, and multipliers. New regions include Hong Kong, Peru, and Singapore. WhatsApp reports metrics got a boost and now include click rate and open rate on the Insights dashboard. You can also filter by Sender Display Name. WhatsApp also includes more interactive messaging options in flows, including location sharing, CTA buttons, carousel messages which can integrate with your real-time product catalog. These new features also enable you to trigger flows based on customer responses!
You’re now able to customize the flow for drafting and creating campaigns and briefs. The underlying flow can be customized by an admin to accommodate business needs. For example, the flow can assign a campaign owner, send notifications to other users, or add business logic like approval steps. Now, your marketing team can simply ask Agentforce to draft a brief or a campaign and adjust as needed. For those marketers who have leaned into the AI capabilities, this is a nice enhancement.
Marketers can also use Agentforce to see improved campaign performance insights. The Agentforce Action, “Generate Campaign Insights” retrieves performance metrics such as message opens, clicks, or unsubscribes, and generates a summary of key insights. Furthermore, your admin can customize this action in Flow Builder to focus on metrics that are most relevant to your users. These insights turn into action when you use the results to make campaign adjustments, like updating the subject line or changing the time between email sends.
Hidden fields – (yay) are now available! Add fields that you want hidden, such as UTMs or Lead Source, and hide them simply by checking a box. Set a default value (another – yay) with two options: a static value (whatever text you want), or pull from a URL parameter! Can you tell, we’re super excited about these form enhancements?
Yes, Marketing Cloud Growth and Advanced now has form handlers, similar to Marketing Cloud Account Engagement, and they are used to capture data from external website forms. You can use them to capture leads, cases, and other records, so they’re more flexible than the form handler that Account Engagement users are used to because the flow can be configured to create different record types, not just Prospects. The form handlers also include a built-in honeypot field for spam protection, custom redirect URLs for successful or failed submissions, and web tracking to monitor user engagement and form performance.
You can now personalize your landing pages using merge fields to include a prospect’s name, company, or other data. In addition, you can set up a real-time data graph in Data Cloud. Similar to enhanced personalization in emails, users can select it from the Data Sources panel while editing the landing page.
In addition to Email templates, you can now add landing page templates as well. The Landing Page Builder also includes additional support for HTML tags and elements.
Engage with your customers using interactive push notifications on their mobile devices. The push types available are one media attachment, customized content, tap actions, Android-specific icons, and interactive buttons. The Carousel push type supports up to 6 swipeable cards, each with media, text, and individual tap actions.
When you add mobile app messaging channels to your campaigns, you’ll see aggregated metrics across all your different messages and campaigns. You can view metrics related to sends, deliveries, views, and interactions related to individual messages or entire campaigns.
You can now set up Marketing Cloud Next in your Sandbox. Create more complex flows and campaigns, test things out, and easily deploy them in production. This feature is available to both Growth and Advanced editions.
You can now create multiple scoring models (think Scoring Categories in MCAE), which allows you to further customize your scoring model for both People and Accounts. Additionally, you can adjust the frequency that the scoring rules run, saving you data credits on unnecessary processing.
As reporting and insights are a must in every marketer’s day-to-day, the Salesforce team is focused on creating easier reporting and enhanced filters, and visualizations. We’re happy to see some nice enhancements in this release.
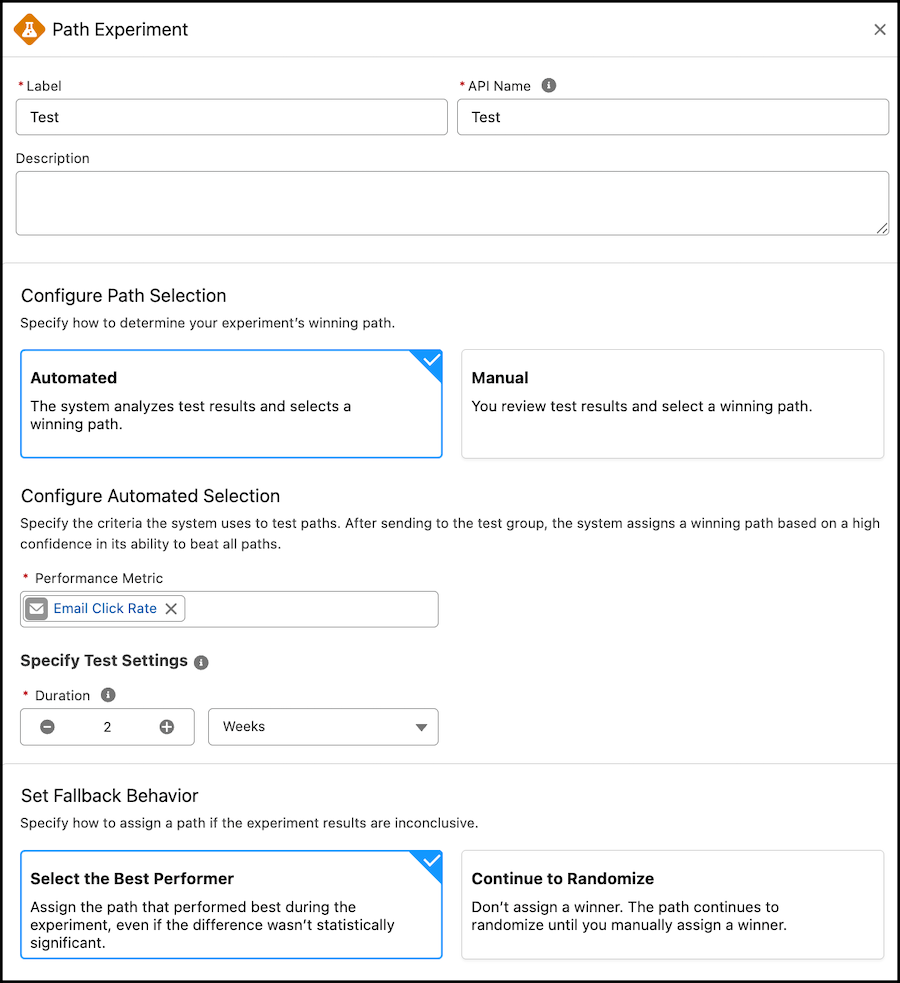
Path Experiment, available with Marketing Cloud Advanced Edition, allows Marketers to maximize engagement with their audience through testing. This feature allows marketers to test variations within marketing content, in channels, and even in cadence. With the Winter ‘26 release, Marketers can now configure automated Path Selection directly within the Path Experiment element. This allows the path to pick a winner based on your selected performance metric, such as email clicks, registrations, or purchases.
Business Units are officially on their way to Marketing Cloud Growth and Advanced. This feature is going to have a limited GA during the Winter ‘26 release, but the Product team is making strides to ensure Business Units work out of the box for Marketers. In this initial release, Marketers can associate data spaces to their automations and flows to ensure data is kept secure and separate.
Final Thoughts
Overall, the Winter 26’ release brings some really nice enhancements to Marketing Cloud Next, with a majority of these terrific features being for Growth and Advanced Edition. Marketers using Account Engagement and Engagement should continue to learn more about these new features, so that they can understand how they can consider applying them to their own campaigns and experiences.
If you’re looking for guidance on how to navigate what’s next for your org with Marketing Cloud Growth/Advanced or Marketing Cloud Next, reach out to the Sercante team. Our experts can help you build a strategy and guide you through the next phase of your journey.
As a marketer, you’re eager to use AI for better segmentation, smarter campaigns, or generative content. But a huge piece that can’t be ignored when you’re getting started with AI is getting your data AI-ready.
Up to 87% of AI projects never make it to production, and the top reason is poor data quality (Akaike Technologies, 2025). On the flipside, companies that invest in data quality see a 50% improvement in AI project success (Deloitte AI Institute, 2024).
Meaning your data matters now more than ever. But this isn’t about letting your data hold you back from innovation. It’s about getting a clear, actionable plan for how to improve your data while you get started with AI, so you’re setting yourself up for success and maximizing its value.
Why data quality can’t be an afterthought
AI is only as effective as your business strategy and your data. Data is at the heart of AI, and is used to learn from and gain insights that it uses to perform tasks.
Therefore, when data quality is an issue, that can mean:
Incorrect predictions and flawed insights
A hit to customer trust when personalization fails
Internal teams losing confidence in the tools and systems they’re using
Therefore, taking the time to prioritize your data is worth it to ensure AI is learning from and pulling in accurate insights to power your analytics, workflows, and customer experiences.
Common culprits of bad data (and how to spot them)
Most data issues fall into a few predictable categories. If you’ve ever built a Salesforce report and wondered, “Why does this feel off?”, one of these is probably the reason.
Duplicate records Multiple versions of the same contact or lead, often with partial or conflicting information. Not only does this skew your reporting, it can lead to awkward missteps in customer communication.
Incomplete data Records missing key fields like title, lead source, or industry. When critical information isn’t captured or required, it limits your ability to segment, personalize, or even report accurately.
Inaccurate data Outdated job titles, incorrect email addresses, or other bad intel that throws off targeting and undermines trust.
Inconsistent formatting Examples: “U.S.” vs. “United States” vs. “USA” in a country field. These inconsistencies might seem small, but they wreak havoc on reporting and automation.
Data silos On average, companies are juggling data across 367 apps. That can create disconnects between your CRM, marketing automation platform, website, support tools, and more, meaning no single source of truth and missed opportunities for smarter AI use.
If you’re reading this and thinking, “I recognize all of these culprits in our org.” and are feeling overwhelmed, let’s take a deep breath. You don’t need to clean your entire data house in one day.
The Step-by-Step Guide to Get Your Data AI-Ready
You can work in manageable chunks. It all starts with framing the first AI use cases you want to get started with, because this will determine the data you need and thus prioritize where you’ll want to focus for optimizing your data.
Step 1: Identify your AI use cases
Think about: what do you actually want AI to help with? Look at your day-to-day. What’s repetitive and time-consuming? Do you find yourself taking a long time to create campaign briefs, segment audiences, or draft variations of copy to personalize communication?
Once you start creating your list of potential opportunities for AI, start to consider who is involved in the process, what is the goal that AI will help you achieve, and are there any dependencies around it?
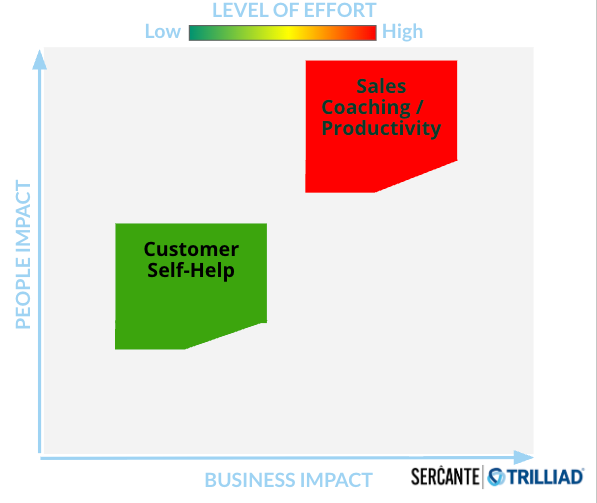
As the Sercante team shared during their session, AI Roadmap: The Strategy for Driving Growth with AI, consider the level of effort involved with each use case and the impact on the people involved. You want to aim to prioritize your first use cases that have a relatively low level of effort and a lower impact on your people. This will enable easier pilots and experimentation, so you can see what the initial results are and then make tweaks or scale from there.
Once you know your top 1–2 use cases, you’ll have a clear view of what data will be needed.
Step 2: Perform a data audit
After you understand the data that will be needed, it’s time to audit that data and check for the common culprits. Are there any duplicates, inconsistencies, inaccuracies, or just data that is missing? Check for the signs of dirty data across the key objects and fields that will need to be used for your AI use case.
Here is my go-to checklist for an audit that starts to get your data AI-ready:
Identify key data objects and fields
Define data quality metrics
Identify & categorize data issues
Document critical data sources and data points
Assess field usage
Review knowledge sources for accuracy and AI accessibility
Review permissions – who can see what
Assign effort levels & quick wins
Some tools that can help with this process are Data Quality Analysis Dashboards (find it on the AppExchange here), OrgCheck, and other third-party tools on the AppExchange that can assess for data quality and field usage.
Step 3: Establish data standards
Once you uncover the issues, you want to put processes and standards in place to prevent future messes. Documentation that has proven to be effective for teams is creating a data dictionary or a style guide.
Whichever you implement, the data documentation should:
Answer who is using this data and what this data is being used for
Establish clear rules based on business requirements
Define acceptable values, formats, and relationships
Foster alignment across teams around the data standards
All teams that are involved in using the data should have an understanding of what the proper usage is and how to maintain clean data now and in the future.
Step 4: Cleanse and normalize the data
Now the cleaning begins. Remember to approach this in manageable chunks. Focus on the data that is needed for your top AI use cases first. The actions you need to take for this step will be determined by what you uncovered in your data audit, but here is a general checklist that you can use as a guide:
Clean up / merge duplicates
Delete obsolete data
Correct missing values, errors, and inconsistencies
Perform mass updates
Leverage data cleaning tools or scripts
Update knowledge sources
Don’t forget to back up your data first!
Tools you can use to help with this process are native duplicate management tools or third-party ones on the AppExchange. There are also third-party tools on the AppExchange for data cleaning and data enrichment that I recommend checking out before diving into this step.
If during your data audit you discovered that silos and disparate systems are a huge issue, and you’re wondering if you’d be a good fit for a customer data platform (CDP) like Data Cloud, reach out to the Sercante team. We can help you navigate what to consider and create your strategy for how to approach the technology in a way that sets your team up for success.
It seems like the work to clean your data is never done, however, you can do your due diligence to put systems and processes in place to prevent major issues in the future that would hinder your team from getting the full value out of AI.
Prevent bad data entry
Where possible, use picklists to help standardize your data and restrict access to maintain data integrity. Make field requirements for records to be saved with helpful error messages to remind teams of your data standards.
Create data validations or automated updates. For example, setting up a Salesforce Flow that automatically checks the format of an email address when a new Lead is created.
Execute training and create enablement
Make sure that all teams involved with the data are educated on data entry best practices and the importance of data quality. Refer back to your data standards to reinforce the alignment among the teams.
Evaluate data integrations
Remember those data silos? If these continue, data issues will persist and cause your team to continue to do manual cleanup, which is what you’re trying to avoid.
Look at the systems that are disconnected and see what integrations can be made to automatically keep data synced. This is also where a CDP may be considered.
Establish a regular data audit cadence
You want to prevent your database from reverting to the original state you found it in when you first started your data audit. Therefore, aside from putting these systems in place to prevent future data issues, you’ll also want to set a regular cadence for yourself to check your data for the common culprits to uncover any small issues before they turn into major ones.
Clean data means smarter, more effective AI-driven marketing
Getting your data AI-ready is a critical piece to getting the most value out of AI. It’s not about achieving perfection to the point where it gets in the way of getting started with AI. It’s about creating a foundation through manageable chunks that will enable the AI to effectively deliver for your team and your customers.
Data quality is essential for any successful AI-driven marketing strategy, and by using this step-by-step guide, you can take practical, ownership-driven steps to collaborate with your Salesforce Administrator, sales, IT, and customer success teams to improve data readiness.