Agentforce Marketing has quickly become a focal point for Salesforce Marketers. However, many Account Engagement customers are still trying to understand how this new platform operates and how it fits alongside their current tools. While Agentforce Marketing is designed to encompass all the features of Account Engagement, it introduces distinct features and a completely new lexicon. To bridge the gap, let’s dive into the Account Engagement that you know and love and how these features are translated, in name and functionality, to Agentforce Marketing.
What’s in a Name?
Let’s start with what initially trips users up – the product name. A common question I get from users is whether this new platform is called “Agentforce Marketing” or “Marketing Cloud Next” and the answer is both!
“Agentforce Marketing” appears to be the name that will stick around in the long term, but “Marketing Cloud Next” is used in most of the help articles and guides about this new platform. My guess is “Marketing Cloud Next” may be phased out as the tool grows and evolves. For the time being, both names are correct and refer to the latest Marketing Automation Tools from Salesforce.
There are also a few other names you may run into, including
- Marketing Cloud Growth: This refers to the “Growth” edition of Agentforce Marketing.
- Marketing Cloud Advanced: This refers to the “Advanced” edition of Agentforce Marketing.
- Marketing Cloud on Core: This name was adopted by the community pre “Marketing Cloud Next”. It helped us designate a difference between OG “Marketing Cloud” (aka Marketing Cloud Engagement) and the new platform. “On Core” designates that this Marketing Platform, unlike Engagement or Account Engagement, is truly built on the core Salesforce platform.
- Account Engagement +: This term is more Salesforce SKU-based and refers to Account Engagement users who are also using the Agentforce Marketing Platform alongside their Account Engagement org.
- Engagement + / Marketing Cloud +: Similar to the above, this is Salesforce SKU-based and refers to Marketing Cloud Engagement customers using the Agentforce Marketing Platform alongside their Engagement org.
Features and Terminology
Prospects
In Account Engagement, a Prospect refers to an identified individual. Prospects can remain solely in Account Engagement or sync to Salesforce Leads and Contacts. The equivalent of a Prospect in Agentforce Marketing is a Unified Individual.
A Unified Individual is a consolidated record of metadata related to multiple Prospect, Lead, and Contact records for the same person. To put this in simpler terms, say you have multiple Lead and Contact records for the same individual within your CRM. Each of these records has different information about said customer and each record retains its own engagement and activity data. This disparate view of your customer gives your teams an incomplete and sometimes incorrect picture of your customer. Data 360 unites these disparate records using Identity Resolution rules and provides your team with a consolidated and complete view of each customer, the Unified Individual.
Learn more about Unified Individuals in the Data and Identity in Data 360 Trailhead Module.
Now, a few releases ago, Salesforce also added a Prospect object to CRM. This means that marketers can create pre-lead or unqualified records directly in Salesforce to mimic the same functionality we have in Account Engagement. Currently the CRM Prospect record cannot sync with Account Engagement Prospects, but I expect functionality around the Prospect CRM object to grow and this could be something we see in a few releases.
Lists
In Account Engagement, there are two main List types:
- Static Lists are built one time and only update with manual changes.
- Dynamic Lists are rule-based and automatically update when a Prospect’s data changes.
The equivalent of a List in Agentforce Marketing is a Data 360 Segment.
Data 360 Segments consist of Unified Individuals that match filtering rule criteria that you set. Similar to Account Engagement Dynamic Lists, you can assign multiple rule criteria to a Segment with AND/OR logic between each rule. You can also match a field against multiple values using the “Is In” operator. The image below shows an example of a Segment using multiple rule criteria in Agentforce Marketing.
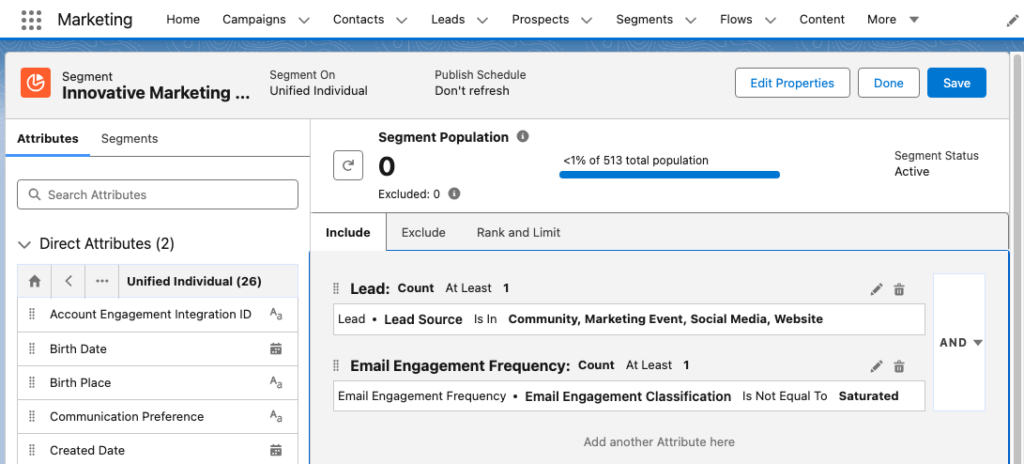
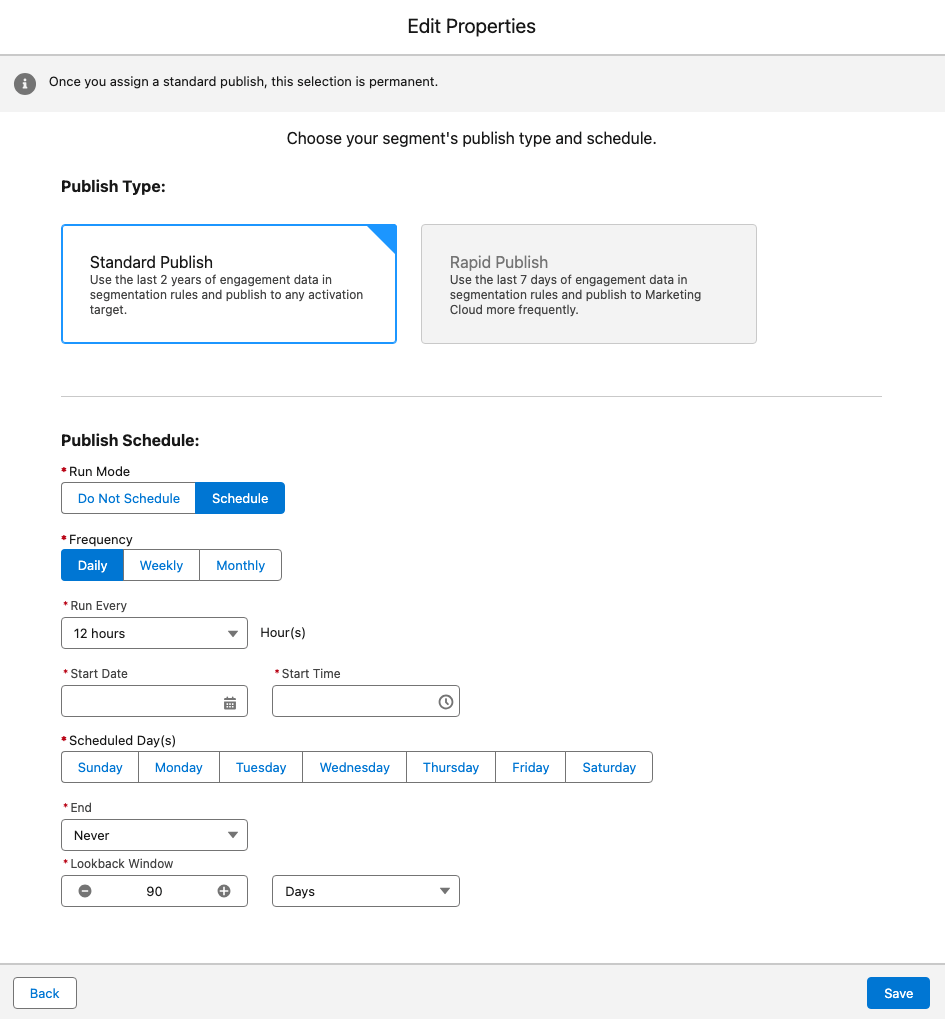
Whether a Data 360 Segment is static or dynamic depends on its publish schedule. You can set a Segment to “Do Not Schedule”, essentially making the list static, or configure a publish schedule to refresh your Segment as needed. The image below depicts the Edit Properties window in Agentforce Marketing where the publish schedule is defined.
Segments can be used in Agentforce Marketing or, with the Data 360 Connector, synced down to Account Engagement as a Dynamic List.
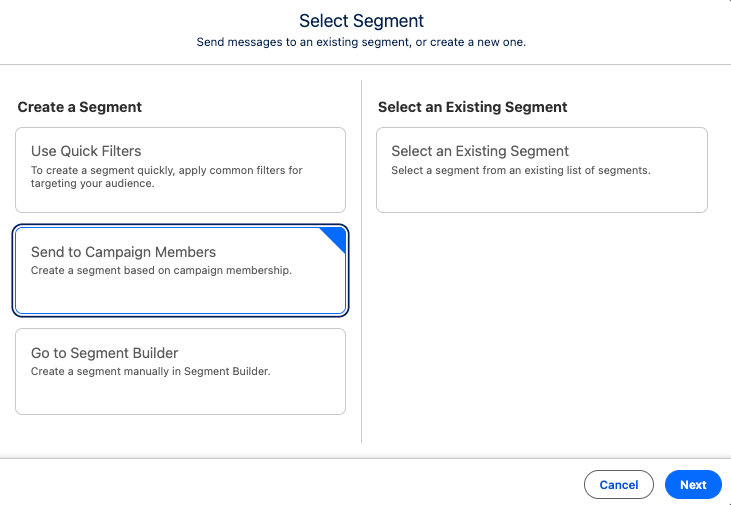
Now, if you prefer to curate your list rather than use Segment rules, you can either add Leads/Contacts to your Campaign and then create a Segment of Campaign Members:
Or, after the Summer ‘26 release, utilize the new List and Audience Flow features to circumvent the need for a Data 360 Segment.
Learn more about segments in the Segmentation in Data 360 Trailhead Module.
Engagement Studio Program
Engagement Studio Programs enable you to automate multi-touch customer journeys using triggers, rules, and actions. These programs nurture Prospects through the sales funnel and ensure timely and relevant communications. The Agentforce Marketing equivalent to Engagement Studio Programs is Flow Builder.
Flow Builder is the automation engine of Agentforce Marketing, helping you build and execute complex, multi-channel marketing campaigns. Engagement Studio Programs and Flow Builder have a lot of overlap: They both have a top-down vertical layout, use elements as steps within the program/flow, and allow you to customize processes down different paths based on conditions.
Learn more about Flows in the Flow Builder Basics Trailhead Module and the Understanding Campaigns and Flows in Marketing Cloud Next help article.
Completion Action
In Account Engagement, Completion Actions trigger when a Prospect takes a specific action, such as filling out a form. The Agentforce Marketing equivalent of this is Automation Event-Triggered Flows.
Automation Event-Triggered Flows, sometimes referred to as Form-Triggered Flows or just Event-Triggered Flows, trigger when an individual takes an action. Automation Event-Triggered Flows allow you to trigger a single action or build an entire customer journey to nurture the individual after an event.
Agentforce Marketing includes several pre-configured events and Engagement Signals can be used to build any additional desired events.
Automation Rule
Account Engagement Automation Rules are repeatable, criteria-based rules that find matching Prospects and apply actions to them. The Agentforce Marketing equivalent to Automation Rules is Flow Builder, but the type of flow depends on your criteria.
- If you are converting Lead records when they meet specific criteria, use a Data 360 Triggered Flow.
- If you are creating consent records when an individual opts into your marketing communications via a form, use an Event-Triggered Flow with a Consent Request Element.
- If you have multiple criteria and/or want more control over when the action fires, create a Segment and use a Segment-Triggered Flow.
Scoring and Grading
Account Engagement uses Scoring and Grading to help you identify, qualify, and prioritize Prospects in your org.
In Account Engagement, Scoring indicates how engaged a Prospect is by assigning numerical points to each activity the Prospect performs, its Agentforce Marketing equivalent is Engagement Scoring. Similar to Account Engagement Scoring, Agentforce Marketing’s Engagement Scoring assigns numerical points to activities. A default scoring system is provided, but you can fully customize the conditions and points.
In Account Engagement, Grading indicates how closely the prospect fits your ideal customer by evaluating pre-configured criteria and assigning a letter grade. The Agentforce Marketing equivalent of Grading is Fit Scoring. Similar to Engagement Scoring, Fit Scoring assigns numerical points to individuals if they match your fit criteria. Fit Scoring conditions and points can also be fully customized.
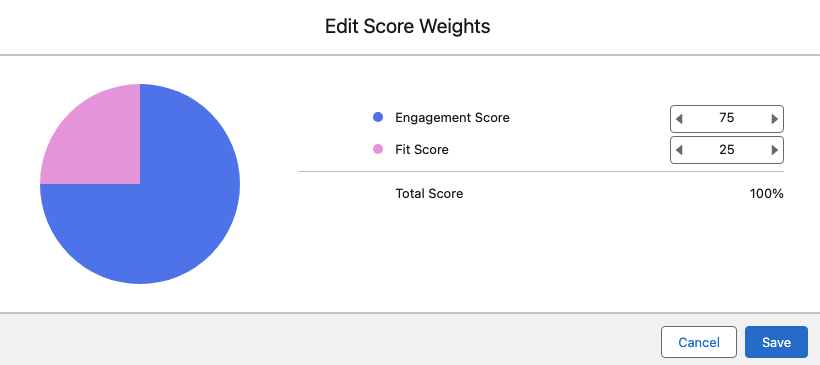
In Account Engagement, Prospects do not have a metric that reflects a combination of the Score and Grade. Score and Grade are kept as completely separate metrics, but can be used together to establish a qualification threshold. In Agentforce Marketing, individuals do have a combined rating called Overall Score. The Overall Score will always be between 0 and 100. The Overall Score is initially 50% Engagement and 50% Fit, but this can be customized as needed as well.
The image below shows how Agentforce Marketing’s score weights can be customized.
With Advanced Edition you can also score the fit, engagement, and intent of your Accounts.
Mailability
In Account Engagement, a prospect’s mailability or mailable status refers to whether or not they can receive marketing emails. If an Account Engagement Prospect has a hard bounce, five soft bounces, has unsubscribed themselves, or has been manually opted out, they are considered unmailable.
Agentforce Marketing uses Consent for a more comprehensive approach to mailability. Within Agentforce Marketing, individuals set their subscription preferences to indicate the channel they want to receive communication within (Email, SMS, WhatsApp) and the subscription (newsletter, events, product updates etc.). For example, an individual may subscribe to receive event updates via SMS and receive your newsletter via email. Agentforce Marketing will create a consent record within Data 360 for each choice.
Learn more about consent differences between the two systems in the Understanding Consent Differences Between Account Engagement and Marketing Cloud Next help article.
If you plan on using Account Engagement and Agentforce Marketing side-by-side, it may be beneficial to align consent between the two systems.
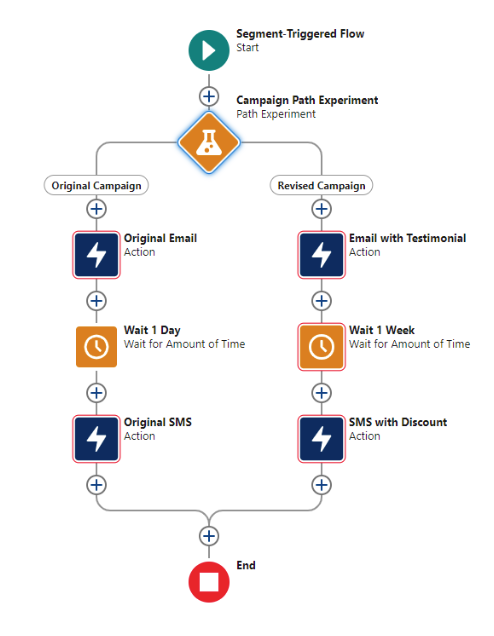
A/B Testing
In Account Engagement, A/B Testing allows you to optimize your email content by sending two versions of an email to a small subset of your recipient list. The engagement data of these two email variations is used to determine a winning version that is then sent to the remaining subset of your recipient list. Agentforce Marketing’s equivalent is Path Experiment, however Path Experiment allows you to do much more than send just two variations of a single email.
Path Experiment, which is available for the Advanced Edition of Agentforce Marketing, allows you to experiment with up to 10 different versions of a customer journey to determine the most effective path. This means you can test content variations (i.e. which subject line gets more opens?), channel variations (i.e. do you get more opens with email or sms?), and even cadence variations (do we get better results sending more or less emails?). Similar to A/B Testing, Path Experiment allows you to test with a subset of your audience before sending your remaining audience members down the winning path.
Learn more about Path Experiment in the Marketing Cloud Flow Element: Path Experiment help article.
Sender Domains
In Account Engagement, Sender Domains define where you can send emails from. For example, if my Sender is [email protected] then Salesforce.com is my Sender Domain. The Agentforce Marketing equivalent is Authenticated Domains. For both sender and authenticated domains you will need to work with your IT team to create DNS records. These records help improve the deliverability of your emails by defining you as a legitimate sender.
Learn more about Authenticated Domains in the Domain Settings in Marketing Cloud Next help article.
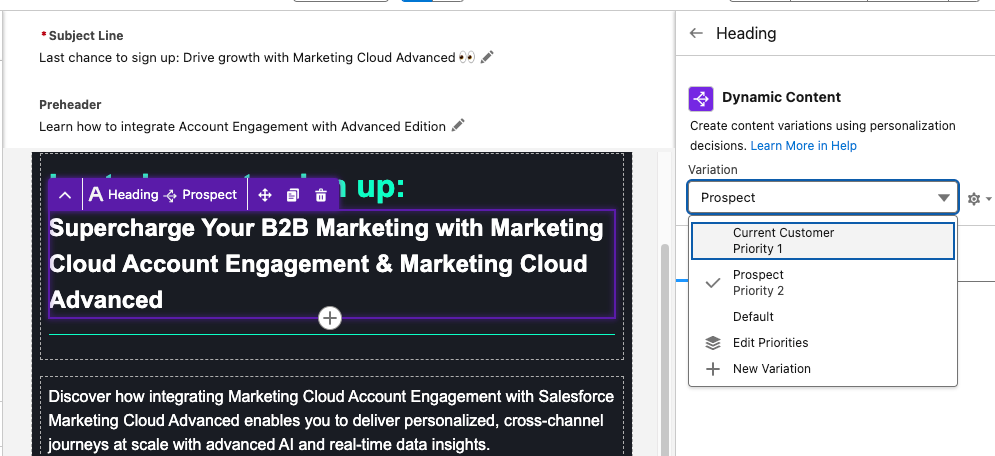
Dynamic Content
In Account Engagement, Dynamic Content enables you to create field-based variations of content. If the Prospect’s field matches the designated field value, then they will see that content variation on your website or within your marketing assets. Agentforce Marketing also has Dynamic Content, but it has more advanced functionality.
Agentforce Marketing’s Dynamic Content functionality allows you to personalize your email based on fields or any data source connected to your individual. For example, you can build the variations based off of Account data or data from an event the recipient recently attended. You can also personalize multiple sections of your marketing assets, or personalization points, within one Dynamic Content variation. This allows you to dynamically update nearly every aspect of an email more efficiently.
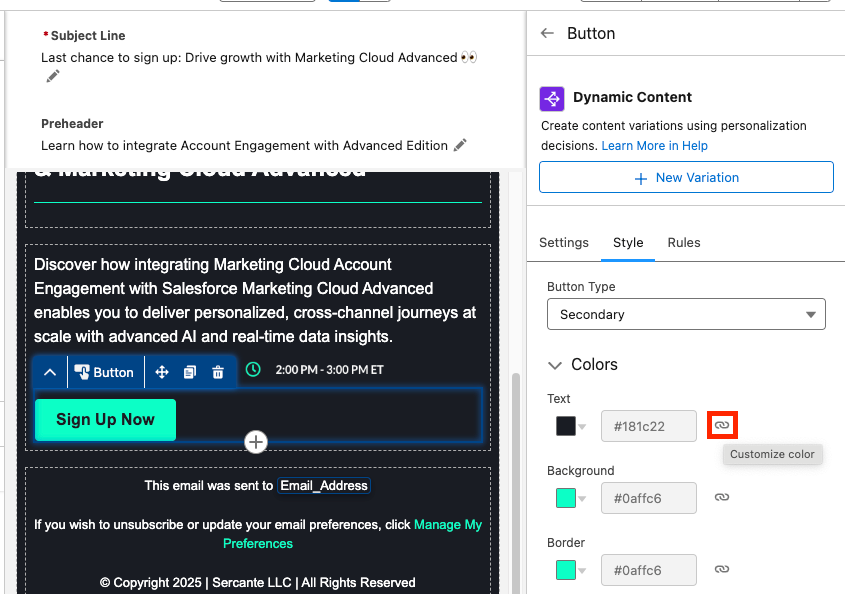
Agentforce Marketing Dynamic Content relies on:
- Personalization Point: An element of content that’s eligible for a personalization decision. For example, an email’s subject line and preheader or an image component within the email are “points” that you can personalize.
- Personalization Decision: Criteria that determines who’s eligible to receive a personalization response.
- Targeting Rule: Conditions for showing a specific variation.
Learn more about Dynamic Content in the How Dynamic Content and Salesforce Personalization Work Together help article.
Page Actions
In Account Engagement, Page Actions trigger additional actions after a Prospect views a specific page of your website. In Agentforce Marketing, you can accomplish the same goal using website tracking and the Website Engagement Data Model Object (DMO).
The Website Engagement DMO records website page views and clicks, and engagement signals can be created to zero in on specific page view activities. For example, you can create an Engagement Signal that records when a visitor lands on your Pricing page, a good indicator that they may be interested in making a purchase. These Engagement Signals can then be used to trigger Automation Event-Triggered Flows so you can further automate next steps.
Learn more about website engagement and Engagement Signals in the Marketing Cloud Next: Custom Event-Triggered Flow blog post.
Campaign
Account Engagement uses both Salesforce and Account Engagement Campaigns. Account Engagement Campaigns are considered thematic touchpoints (similar to a source in other systems), while Salesforce campaigns are a Salesforce CRM object used to plan, manage, and track marketing initiatives. Salesforce and Account Engagement Campaigns are united with the Connected Campaigns feature.
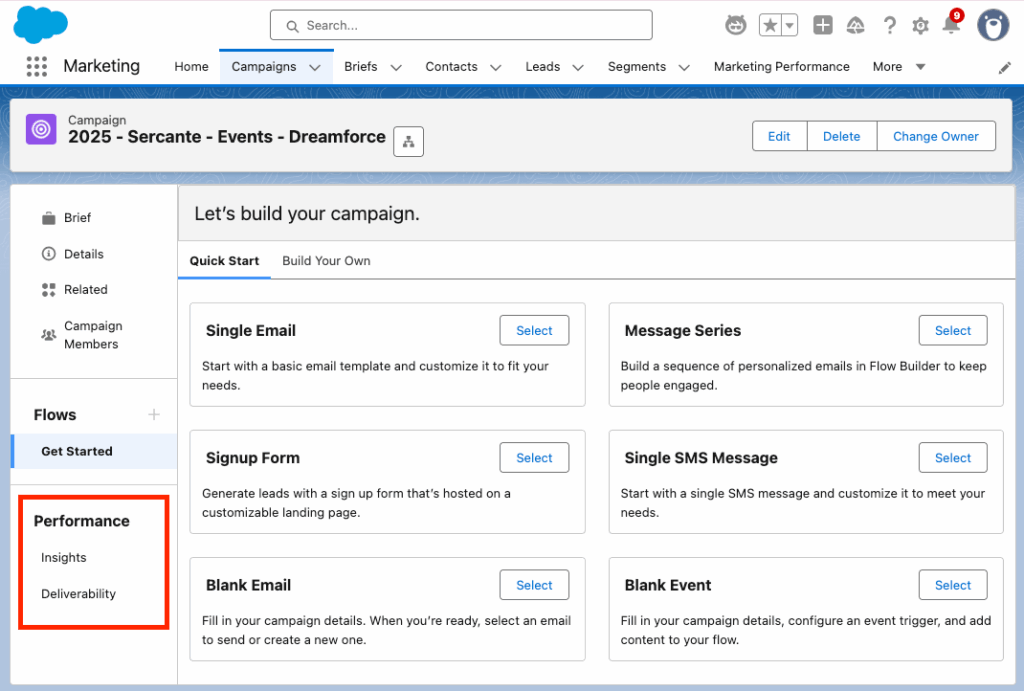
Agentforce Marketing utilizes the Salesforce CRM Campaigns object for both purposes. Campaigns are not only a record that helps organize the audience, assets, and metrics for a specific marketing effort, but they also indicate a touchpoint for your individual.
Campaigns serve as a centralized hub for a marketing initiative within Agentforce Marketing. Within a Campaign you will find all the relevant information for your Campaign including your Campaign Brief, Campaign Members, associated flows, and reports.
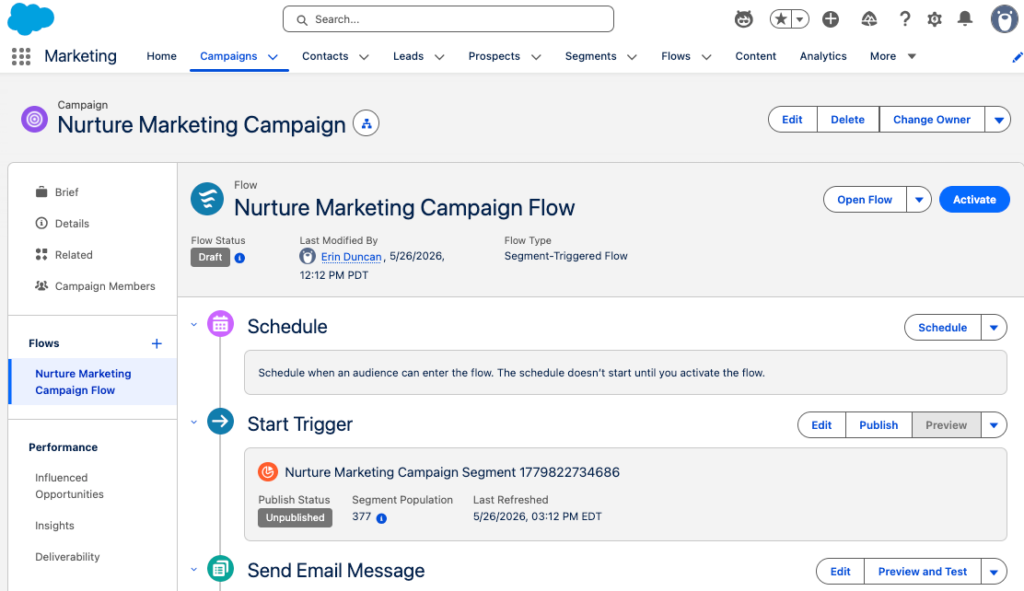
The user interface shown above is unique to viewing Campaigns within the Marketing app. Don’t let the user interface confuse you though, this is the default Salesforce Campaign object that is used by other processes and applications within Salesforce.
Campaign Influence
In Account Engagement, Campaign Influence helps you tie marketing efforts to your opportunities to see which campaigns are the most influential and successful. Account Engagement Campaign Influence can be a little hands-on, requiring you to add all Leads/Contacts that engage with your Campaign as Campaign Members. Agentforce Marketing uses Opportunity Influence to automate and streamline influence. Opportunity Influence uses engagement data to automatically tie Opportunity revenue back to a specific Campaign without the need for Campaign Membership.
Learn more about Opportunity Influence in the Attribute Revenue to a Specific Campaign help article.
AI Assistant
In Account Engagement, AI Assistant is generative AI that assists in drafting forms and landing pages as well as creating email subject lines, headers, and body copy. Agentforce Marketing uses Agentforce and Generative AI to assist with generating copy and so much more. Agentforce Marketing not only helps you generate forms, landing pages, and email content, but can also streamline the entire campaign creation process with the Campaign Creation and Content Builder agents.
Learn more about Agentforce Marketing’s AI features in the AI in Marketing Cloud Next Trailhead Module.The above gives you an overview of how terminology and features translate between Account Engagement and Agentforce Marketing. If you are ready to take the next step in your Agentforce Marketing journey, check out our A Strategic Path to Navigating Marketing Cloud Convergence blog post or contact us!