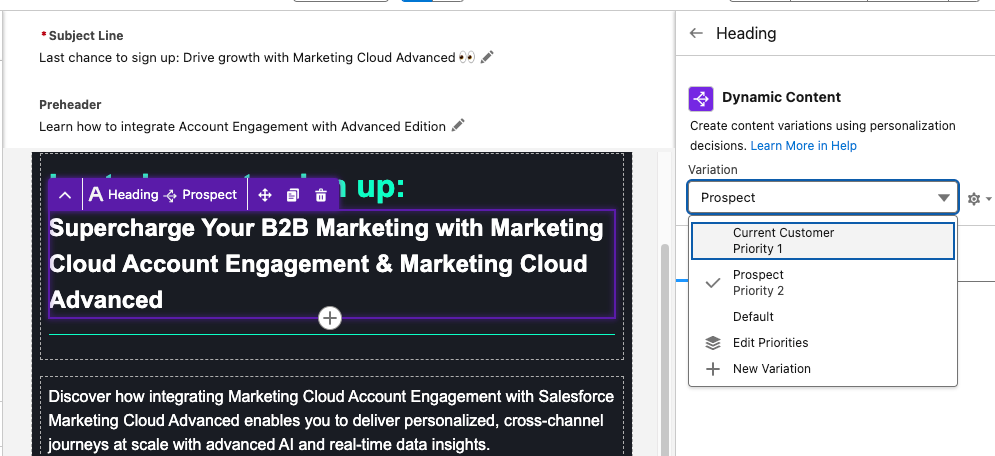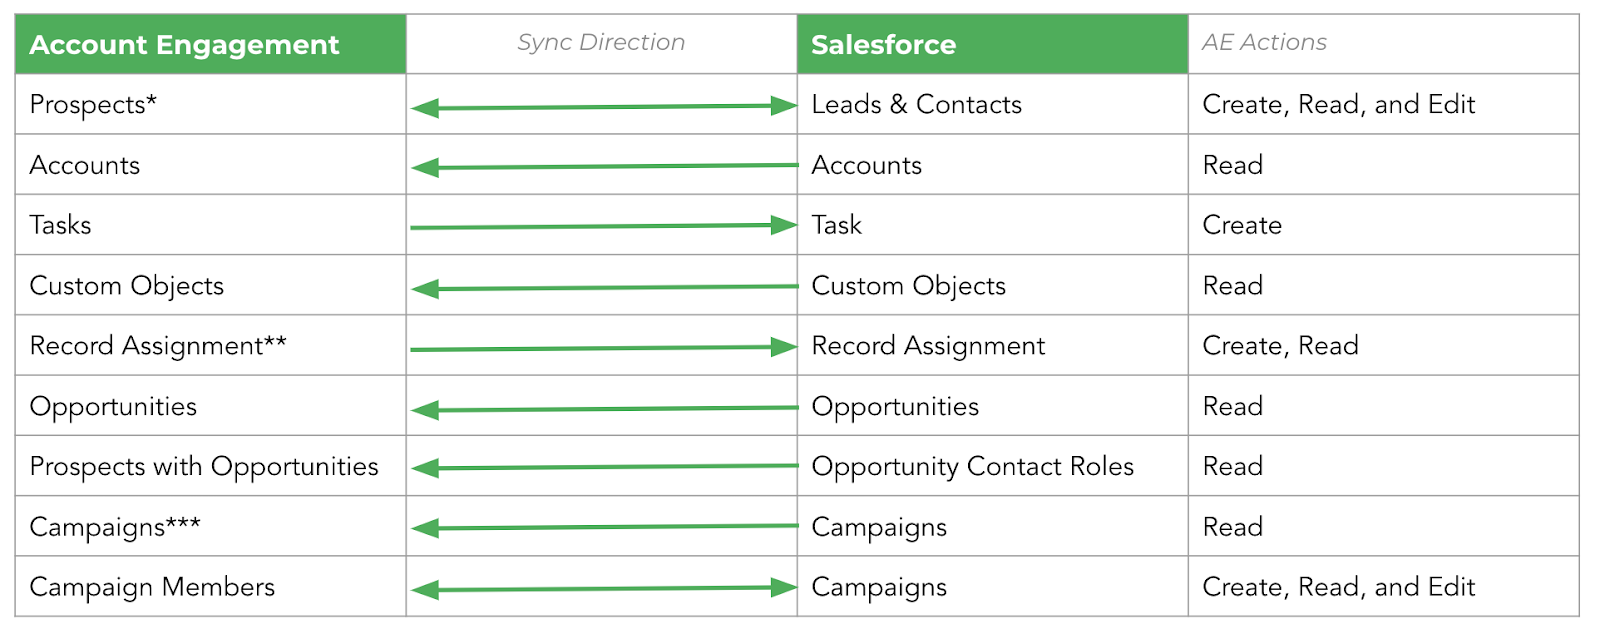
Product Note: Marketing Cloud Growth and Advanced are editions of Marketing Cloud Next and have also been referred to as Agentforce Marketing.
Repeaters are one of the newer features in Marketing Cloud Next (aka as Marketing Cloud Growth or Advanced Edition), and one of the coolest in my opinion. In this post, we’ll review what repeaters are, how to set them up, and look at how Fellowes Brands is using them to simplify the customer experience.
What are Repeaters?
Before we get too deep, let’s talk a bit about what repeaters are and how they function. Repeaters are used to display a series of items in an email. These can include recent purchases, upcoming events, product recommendations, and more. The repeater’s layout can be configured to show images, merge fields, CTA buttons, and links.
The magic of repeaters lies in their configuration. All configuration is done in the first item. Additional items inherit this configuration but display the relevant data based on the associated data source. Their layout also allows for customization of the number of items to display and the number of items included per row.
Learn more about repeaters
The Need
Fellowes is recognized for their innovation in indoor air quality and produces a line of commercial air purifiers scientifically proven to remove COVID, SARS, H1N1 and other harmful viruses. Regular filter changes are key to optimizing the performance of their air quality products.
Fellowes needed a way to improve the customer experience by delivering timely reminders when filter changes were due and by providing relevant filter options based on the specific air purifier. There was also a need to simplify the purchase process by providing direct links to the filters with additional details and purchase options.
The Solution
Data 360, Marketing Cloud Next, and repeaters were utilized to deliver a scalable solution that met the needs of Fellowes and their customers.
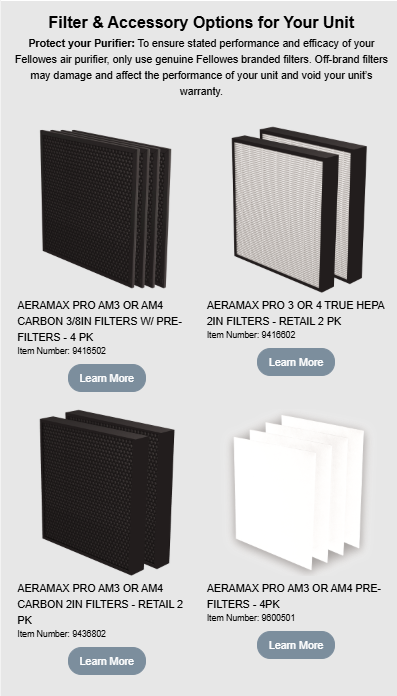
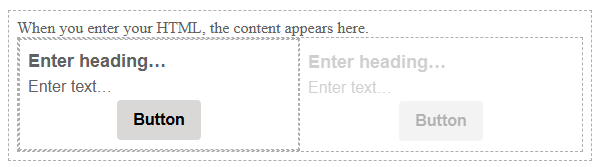
The end result was a tailored email sent to customers based on the expiration date of their current filters. The email offered filter recommendations specific to their air purifier and provided direct links to the corresponding product pages with purchase options and additional details. Below is an image of the repeater section of the final email.
Highlights of note:
- The number of options vary based on the number of related products for the specific unit.
- Images are rendered from base URLs appended with specific product codes using merge fields.
- Images are linked to the product page on the website.
- The product name and item number are merge fields.
- The “Learn More” buttons use dynamic URLs to link to the product page on the website.
The Build
The focus of this post is on repeaters, but it all starts with data. First, the proper relationships must be established in Salesforce. Then, the data must be ingested into Data Cloud, and a link to the unified individual must be established through the data graph. Once the data structure is in place, configuration of the repeater can begin.
Data Structure
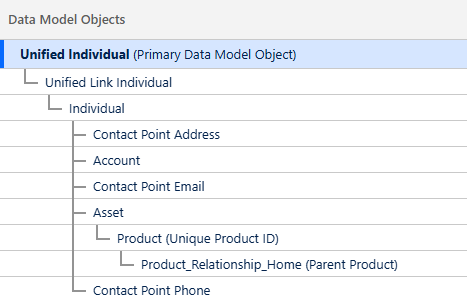
The standard Product object is used to store all product data, including air purifiers and their filters. While this is a great starting point that uses the standard object as intended, it does not include the necessary relationships between the air purifiers and their filters.
A custom junction object named Product Relationships was created to establish these needed connections. This custom object consists of two lookups to the Product object: one for the Parent product and one for the Related product. The custom object also includes several additional “related product” fields used as merge fields, such as Related Product Code and Related Product Name.
Data 360 (Data Cloud)
The Product and Product Relationships objects were ingested into Data 360, and the necessary fields were mapped. The critical step was establishing a relationship between these two Data Model Objects (DMOs).
This was achieved by creating a relationship from the Product Relationship DMO to the Product DMO, using the Product ID as the connecting key.
Data Graph
Data Graphs are essential for enabling personalization and configuring repeaters within Marketing Cloud Next. As stated previously, a relationship was needed between the Related Product and the Unified Individual to deliver upon the requirements of this use case.
The data graph was constructed using several objects to “hop” from the Product Relationship DMO to the Unified Individual record.
Adding the Repeater
The email was built using the Marketing Cloud Next email builder. If you have any questions about this builder, be sure to check out Erin Duncan’s post, “Everything to Know About the Marketing Cloud Next Email Builder.”
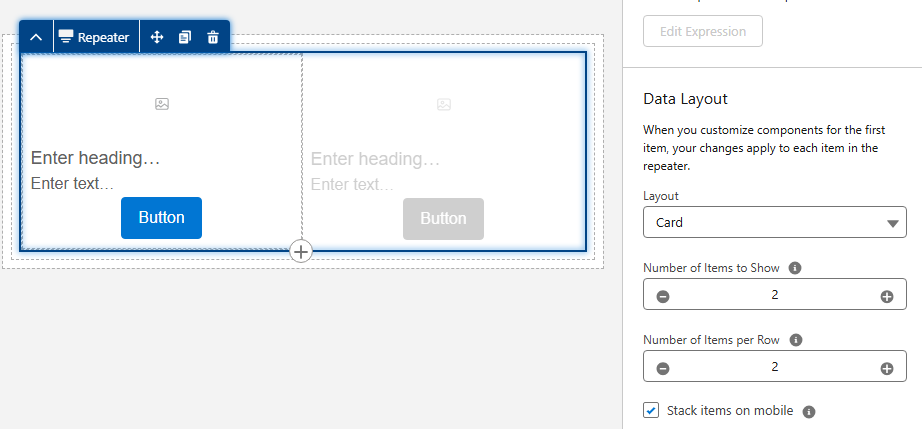
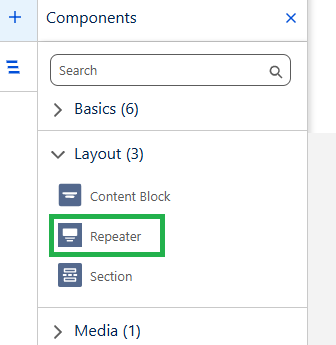
The Repeater component, located in the Layout section of the Components Panel, was dragged onto the canvas where it should appear in the email.
Configuring the Repeater
The Repeater component in this use case includes the following elements:
- Filter image with a corresponding link and alt text
- Filter name and item number
- Call-to-Action (CTA) link that redirects to the filter page on the website
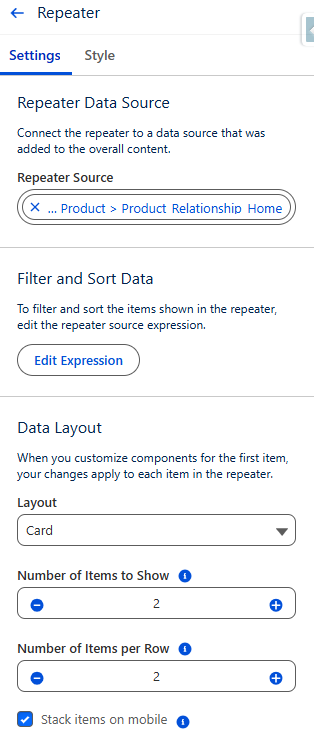
The repeater’s data source was set to use the Product Relationship DMO. The Card layout was selected, and the settings for both the number of items to show and the number of items per row were set to 2.
Adding the Image
There are several options for adding images to a repeater, depending on where the image is hosted. If the image is in Salesforce CMS, it can be added using the Image component and selecting the Salesforce CMS image source option. If the image is not in the CMS, the Image component can still be used with the Merge field option.
In this specific example, more control was desired, so the Image component was replaced with an HTML component.
Here are the steps that were followed:
- The Image component in the first item of the repeater was replaced with an HTML component.
- HTML code was added into the HTML component.
- All images were stored externally and followed a consistent format. Since all image URLs used the same base URL with the product code appended, the base URL could be hardcoded into the HTML, and the product code was appended using a merge field.
- A consistent format was also used for the product page URLs on the website, so the same process was used to generate the product link.
- The alt text was added using a merge field.
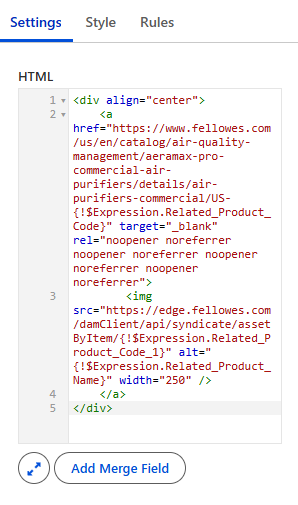
- The product name and item number were populated using merge fields from Product Relationship DMO.
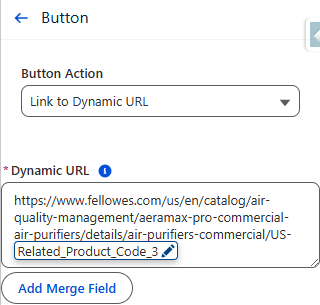
- The Call-to-Action (CTA) button was configured using a Dynamic URL.
- The product code was added to the end of a consistent base URL to generate a unique URL linking to the specific product page on the website.
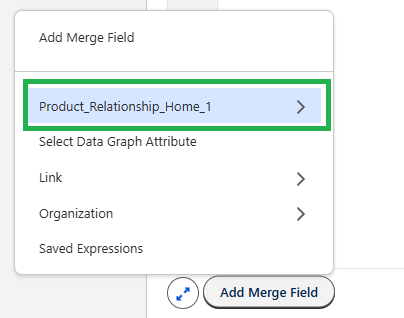
Important:
When adding merge fields into a Repeater component, the fields must be selected from the repeater data source as opposed to the data graph. Since the Product Relationship object serves as the repeater data source in this configuration, all merge fields were added from this source.
Testing
A segment was created that selected unified individuals who had purchased an air purifier. Test emails were sent using the “Preview” feature in Marketing Cloud Next.
Products displayed in the repeaters were checked against the Product Relationship object for accuracy. All links were also tested and confirmed.
How Will You Use Repeaters?
This use case is a great example of how repeaters can improve the customer experience and drive sales of related products. Building this process opened my eyes to the power of this feature, and I can’t wait to use it more. I hope this post has demystified repeaters and inspired you as well.
Let us know how you are using repeaters (or ideas you have for using them), by dropping a note in the comments section.