Category

Cara Weese

If you’ve spent years building Dynamic Lists and Engagement Studio programs, opening Data 360 for the first time can feel overwhelming. Unified Individuals, Segments, Calculated Insights, Data Spaces; it looks like a whole new world. But here’s the thing: it’s not.

At its core, segmentation hasn’t changed. You’re still trying to get the right message to the right person at the right time. What has changed is how much data you have to work with. Instead of building audiences from Prospect records and email engagement alone, Data 360 lets you layer in website activity, CRM data, opportunity history, subscription preferences, and more.

Here’s how to bridge what you already know with what you’ll find in Data 360.

The Biggest Mindset Shift: From Lists to Audiences

In Account Engagement, everything starts with a list.

  • Need a webinar audience? Build a list.
  • Need a re-engagement campaign? Build a list.
  • Need a nurture track? Build a list.

In Data 360, you build reusable audience definitions instead. One segment can power multiple campaigns, journeys, and channels. You’re not creating a new list for every initiative. Think of it this way:

  • Account Engagement: Campaign → Build List → Send Message
  • Data 360: Define Audience → Activate Anywhere

The shift from campaign-specific lists to reusable audiences is the most important concept to internalize before you start building.

Terminology Translation

Before you build anything, here’s the cheat sheet:

Account EngagementData 360 What It Means
ProspectUnified IndividualThe person you’re marketing to
Dynamic ListSegmentA reusable audience built from defined criteria
Dynamic List RulesSegment CriteriaThe logic used to determine audience membership
List MemberSegment MemberSomeone who qualifies for the audience
Prospect ActivityEngagement DataBehavioral data used for targeting
Marketing ListPublished SegmentA ready-to-use audience for activation
Score & GradeAttributesSignals used to identify high-intent audiences

Once that mapping clicks, the platform becomes a lot less intimidating.

Before You Build: Know Your Data

One thing that surprises most Account Engagement users is how much data is available in Data 360. Depending on your setup, you may have access to:

  • Prospect data
  • CRM data
  • Email engagement
  • Forms
  • Landing Pages
  • Website activity
  • Preference center subscriptions
  • Opportunity data
  • External data sources

This is where Data 360 starts to shine.

In Account Engagement, we ask: “Who opened my email in the last 30 days?”

In Data 360, we ask: “Who opened my email in the last 30 days, visited my pricing page, and doesn’t currently have an open opportunity?”

That’s a fundamentally more sophisticated audience, and it’s exactly why organizations are investing in Data 360.

One important caveat: Not every org has the same data sources connected. Before building complex segments, take time to understand what’s actually flowing into Data 360 and how frequently it refreshes. Knowing your data inventory upfront will save you a lot of troubleshooting later.

Building Your First Segment 

Navigate to Data Cloud > Segments and select New. You’ll see four segment types:
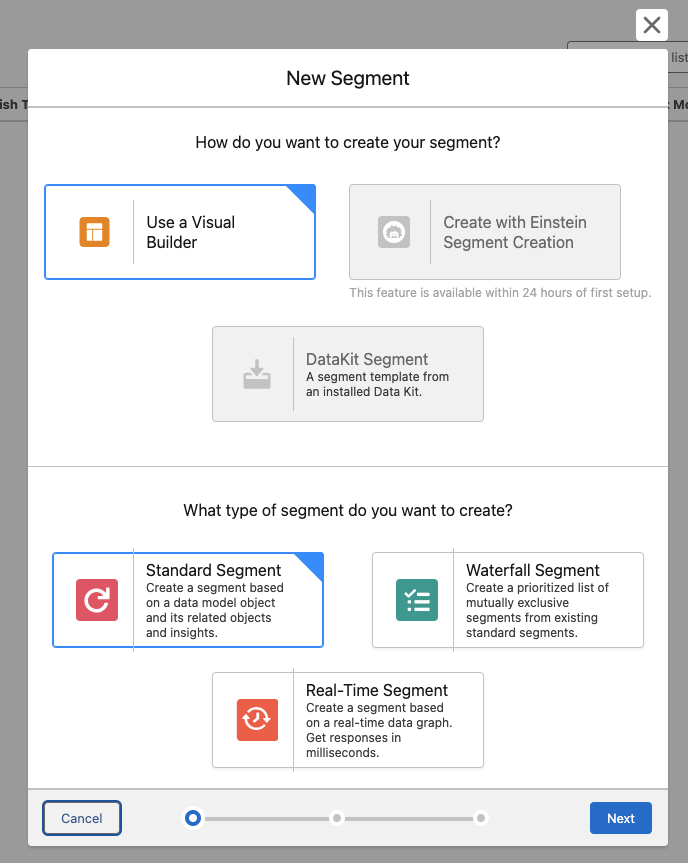
How to build your first segment

Standard Segments are your go-to. These are the closest equivalents to Account Engagement Dynamic Lists and support the vast majority of marketing use cases. Start here.

Waterfall Segments let you prioritize audiences and prevent contacts from qualifying for multiple competing campaigns simultaneously — useful when running multiple offers at once.

Real-Time Segments evaluate audiences on demand for use cases requiring immediate qualification. Powerful, but they come with limitations.

Once you’ve selected Standard Segment, there are four ways to build your audience.

Option 1: Use the Visual Builder 

The Visual Builder offers the most flexibility and is where most marketers spend the majority of their time. The process is straightforward:

  1. Create a New Segment
  2. Select your Data Space (most often your Default Data Space)
  3. Choose the object you want to segment on (most often Unified Individual)
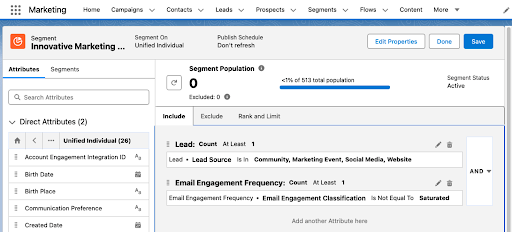
Using the Visual Builder when creating a new segment
  1. Name your Segment
  2. Configure your publishing settings
  3. Drag attributes onto the canvas and define your criteria
  4. Save and publish

Understanding Direct Attributes vs. Related Attributes

This is one of the biggest mindset shifts for Account Engagement users.

When building criteria in the Visual Builder, you’ll typically see two types of attributes:

Direct Attributes

Direct Attributes live directly on the object you’re segmenting against.

For example, if you’re building a segment on the Unified Individual object, direct attributes might include:

  • First Name
  • Last Name
  • Country
  • State
  • Preferred Language

Think of these as fields that belong directly to the person.

Example: Country = United States

This is a simple, direct attribute filter.

Related Attributes

Related Attributes come from connected objects that are related to the object you’re segmenting on.

Examples include:

  • Email engagement activity
  • Opportunities
  • Campaign Membership
  • Website activity
  • Orders
  • Cases

Think of these as records associated with the person rather than fields that live directly on the person.

Example: Opened an email in the last 30 days

The email open isn’t stored directly on the Unified Individual record. It’s stored on a related engagement object.

When Should You Use Each?

A simple rule:

  • Use Direct Attributes when filtering on profile or demographic information.
  • Use Related Attributes when filtering on behavior, engagement, transactions, or relationships.

If you’re asking “Who is this person?” you’re usually looking at Direct Attributes.

If you’re asking “What has this person done?” you’re usually looking at Related Attributes.

Understanding that distinction makes segment building much easier and helps explain why some criteria appear in different areas of the builder.

Option 2: Use Quick Filters 

Need a common audience fast? Quick Filters offer predefined criteria for standard scenarios like:

  • New Contacts created today
  • New Leads created today
  • Recent Campaign Members
  • Contacts related to a won Opportunity

Access Quick Filters by navigating to Campaign while in the Marketing Cloud Next app. Open a campaign and select Select Segment. It’s a great starting point if you’re brand new to the platform.
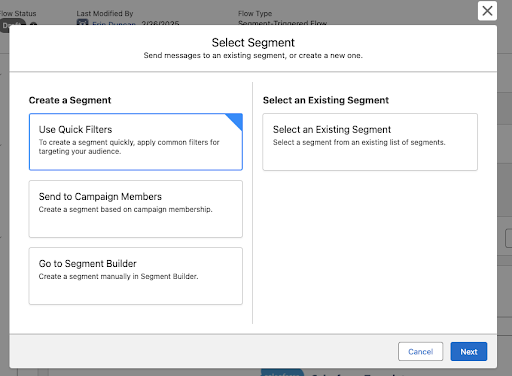
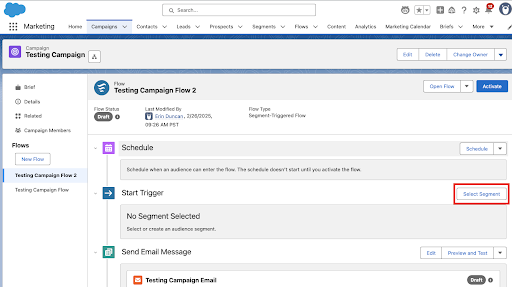
Accessing quick filters by going to Campaign
Once in campaign select "Select Segment."

Option 3: Use Einstein to Build a Draft 

Not sure where to begin? Einstein Segment Creation lets you describe the audience you want in plain language:
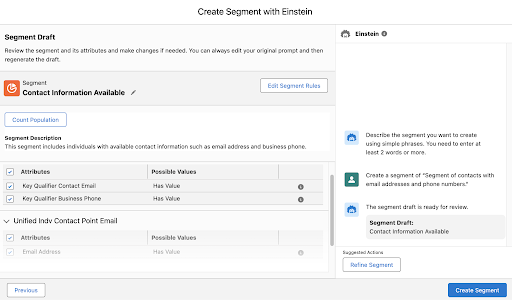
How to build a draft using Einstein Segment Creation

Show me subscribers who opened an email in the last 30 days, visited our pricing page, and are subscribed to product updates. 

Einstein generates a draft segment you can review, refine, and publish. Think of it as a shortcut to a first draft and always validate the output before going live.

Option 4: Use a Dynamic Segment

If you find yourself creating the same types of audiences repeatedly, Dynamic Builders can help streamline the process. Instead of starting from scratch each time, Dynamic Builders let you create reusable audience templates with configurable criteria. Marketers can then generate new segments from those templates by simply selecting or updating a few values, helping ensure consistency across campaigns while reducing manual effort. They’re especially useful for organizations with standardized audience definitions or recurring segmentation needs, allowing teams to scale segmentation without rebuilding the same logic over and over.

Which option should you choose? If you’re just getting started, use Quick Filters for common audiences or the Visual Builder for custom logic. Einstein Segment Creation is a great way to generate a first draft from natural language, while Dynamic Builders are best when your organization wants to standardize and reuse the same audience patterns across multiple campaigns.

Tips, Gotchas, and Things I Tell Every Client

Use the IN Operator Instead of Stacking OR Conditions

If your CRM has multiple versions of the same value, the IN operator saves you a lot of time. Instead of building three separate OR conditions, write: 

Country IN (USA, US, United States)

It supports up to 100 values. Clean, readable, and much easier to maintain.

Understand Measurements, Operators, and Values

When working with behavioral data, Data 360 often asks you to combine three pieces:

  • Measurement
  • Operator
  • Value

For example: Email Opens → Count → At Least → 1

This translates to: “The person has opened at least one email.”

Another example: Email Clicks → Count → Greater Than → 5

This translates to: “The person has clicked more than five emails.”

Think of it like a sentence: Measurement + Operator + Value = Audience Rule

Examples:

  • Count At Least 1
  • Count Equals 0
  • Sum Greater Than 1000
  • Count Between 5 and 10

If a segment returns unexpected results, this combination is often the first place I investigate. The measurement may be correct, but the operator or value may not align with the business requirement.

Use Include and Exclude Intentionally

One of the most common mistakes I see is placing all data requirements into the “Include” section. Instead, think of Include as those who belong and Exclude as those who don’t belong. Separating those concepts creates cleaner segments and makes troubleshooting much easier.

Include Criteria: Country IN (USA, US, United States)

Exclude Criteria: Emailed in the last 3 days

Use EQUALS When Your Data Is Clean

When a field is standardized, and you only need one exact match, EQUALS is the right call. Country EQUALS USA will only return records where the value is exactly “USA.” No flexibility, but that’s the point.

Build Frequency and Recency Into Your Logic

This is where Data 360 starts to feel genuinely different from Account Engagement. You can filter by:

  • Has been emailed X times in the last Y days is great for suppression. If someone has received 3 emails in the last 7 days, you probably don’t want to send them a fourth.
  • Has not engaged in X days is your re-engagement and deliverability workhorse. Use it to identify lapsed subscribers before they become a problem.
  • Subscribed to [Preference] will build audiences based on what contacts have explicitly opted into. Increasingly important for compliance and deliverability.

Always Preview Before You Publish

Segment Preview lets you check audience size, sample records, and whether your include/exclude logic is working as intended. A few minutes here can save hours of troubleshooting later.

Account for Processing Time

Data 360 isn’t always instantaneous. Initial data ingestion can take days, depending on volume. Segment calculations take time and Dynamic Lists connected to a Data 360 Segment can take up to three hours to populate the first time. If nothing shows up immediately, give it time before assuming something is broken.

Not All Account Engagement Activity Is Automatically Available

A common misconception: not every historical activity flows into Data 360 by default. What’s available depends on your connector configuration and the Filter By Date you set when connecting. Before building complex engagement-based segments, confirm what data is actually being ingested.

Data 360 Doesn’t Honor CRM Visibility Rules

This one surprises many Salesforce Admins. Users can segment records in Data 360 that they can’t see in the CRM. If access control matters for your org, address it before rolling out segmentation broadly. The most reliable controls are user permissions and Business Units.

From Segment to Activation

One of the biggest misconceptions I encounter: adopting Data 360 means abandoning Account Engagement. It doesn’t. One of my favorite use cases is building sophisticated audiences in Data 360 and activating them directly through Account Engagement via the Data 360 Connector. To connect a Data 360 Segment to Account Engagement:

  1. Navigate to Account Engagement → Segmentation → Lists
  2. Create a Dynamic List
  3. Select Data Cloud Segment as the Dynamic List Type
  4. Choose your published segment

The first sync takes up to three hours. After that, membership updates automatically whenever the segment refreshes. Once connected, the Dynamic List works anywhere in Account Engagement, including Engagement Studio, Automation Rules, List Emails, Completion Actions, and Reporting. Data 360 identifies the audience. Account Engagement engages it. That’s where the value compounds.

Three Segments to Build First

Not sure where to start? These three are worth building in almost every org.

Recently Engaged Contacts: people actively interacting with your brand. Use for webinar invitations, product launches, or newsletters.

  • Opened an email in the last 30 days, OR
  • Clicked an email in the last 30 days, OR
  • Visited your website in the last 30 days

Inactive Subscribers (90+ Days): Subscribers who’ve gone quiet. Use for re-engagement campaigns, deliverability cleanup, or preference center outreach. This audience frequently surfaces new pipeline.

  • Opted in, AND
  • No opens in 90 days, OR
  • No clicks in 90 days

Preference Center Subscribers: Contacts who’ve told you exactly what they want. Use for targeted newsletters, product announcements, or event promotions.

  • Opt in to Product Updates

Data 360 segmentation isn’t replacing the skills you’ve built in Account Engagement; it’s extending them. You’re still defining criteria, building audiences, and activating campaigns. The difference is you now have richer data and more ways to use it. Start simple. Build a Quick Filter segment, get comfortable with the interface, then move into the Visual Builder. Before long, you’ll stop asking how to recreate Dynamic Lists and start asking what was possible all along.

I don’t usually use the word transformational when discussing content blocks for an email, but this one deserves it. Recently, our team at Sercante had the opportunity to partner with one of our long-term automotive clients to find a solution to a big problem—overstocked inventory. 

This project began like many others. An innovative, creative brand trying to bridge the gap between what customers want and what they can have. Buyers were spending time configuring their perfect vehicles, carefully choosing every option and detail, and then either abandoning their cart or waiting months for the car to be built.

What they didn’t realize was that their dream car, or something close to it, was already built. Already available for them. Already on the lot. It just wasn’t being shown to them.

The Problem: They Had the Cars, But No One Knew

The brand had a recommendation engine on their website, which enabled customers to browse their available inventory. However, this only happened if a customer actively sought it out. Meanwhile, their emails weren’t showing in-stock options, but rather driving them to the configurator to design their vehicle. The inbox experience focused on brand, features, and specs, but not on availability.

There was a disconnect between digital engagement and physical inventory. And it was costing time, resources, and ultimately, conversions. Through several brainstorming sessions and collaborative work, we had to ask ourselves what would happen if we started surfacing what customers could get today?

The Approach: Make the Data Work in Email and Web

Working with the brand’s Salesforce team, we built a dynamic content block that connects their existing vehicle recommendation API with Salesforce Marketing Cloud. At send time, the block pulls in the top two vehicles available near each subscriber’s zip code.

That means:

  • Real-time pricing and availability
  • Personalized images and trim-level specs
  • A “View Details” CTA that drives them to the inventory page
  • And dynamic scripting to auto-generate it all without a manual lift

The block works anywhere—in journeys, newsletters, promotions, event invitations, and more. We added fallback logic, Einstein Send Time Optimization, and throttling to ensure performance even for high-volume sends. We evaluated alternative approaches, such as daily lookup tables, but for this use case, true real-time was worth it. It wasn’t just about showing inventory, it was about giving the customer a path forward. 

What Happened Next

This shift didn’t just make the email more useful. It changed how the brand saw its role in the customer journey and the results showed the impact:

  • Click-through rates on the monthly newsletter more than doubled from 1.02% to 2.26%.
  • Journey emails with the content block saw a 119% higher click-through rate in A/B testing.
  • Build time dropped from over 40 hours for their monthly newsletter campaign to 10 hours.
  • The time to purchase fell from 107 days to 5 days, and their inventory began to decline.

And, perhaps most importantly, the marketing team began thinking differently. The inbox became a place of momentum. Of relevance. Of action. As their marketing director put it, “This helped us rethink how we use email. Not just to inform, but to move customers forward in their journey.”

Check out the full case study related to this customer story here

Going Beyond Automotive

This isn’t just a car story. If you’re in an industry with inventory, long buying cycles, or complex consideration paths, this kind of approach has ripple effects:

  • Are you surfacing what’s ready now or just what’s aspirational?
  • Are your marketing channels connected to real-time availability?
  • Are your emails helping customers act, not just learn?

We’re all sitting on data that can do more. It’s not about overwhelming customers. It’s about removing friction, aligning on timing, and making it easier to say yes.

This project reminded me that sometimes the most effective marketing move isn’t adding more. It’s making what you already have more visible. Your customers don’t need a better configurator. They need a clearly defined next step. Let’s give them one.
If you’d like an expert’s insights on how to maximize the data you have to build more personalized experiences for your audience, that result in clear next steps and impact on the funnel, reach out to Sercante. The team is all about helping you create seamless experiences for your team and your customers.

When your product is built on precision and luxury, your marketing should reflect this same level of refinement. That was the challenge for one electric vehicle manufacturer that I’ve been working with. Their customer experience was world-class, and they desired their email communications to give customers this same level of engagement. They had Salesforce Marketing Cloud Engagement implemented, but journey building and email production were manual, tedious, and personalization was minimal. In addition, their processes weren’t set up to scale globally, causing growing pains.

The following is a story of how we collaborated to:

  • Transform how they approach their email strategy with a customer-centric view
  • Create a seamless solution that provides personalized email communication based on the customer’s preferences, location, and history which led to faster purchase cycles
  • Streamline their email creation process, increasing efficiency to focus on high-impact initiatives
  • Scale their email strategy for a global presence with localized content and compliance

Check out the full case study here.

A Premium Brand with Patchwork Processes

The product was sleek. The customer base was growing. The global roadmap was ambitious. But behind the curtain, the email engine was sputtering. Here’s what the team was dealing with:

  • Email builds took up to 14 hours (yes, per email).
  • There were no reusable templates or shared content blocks.
  • Teams were operating in silos, often duplicating efforts.
  • Launch timelines were tight, and testing didn’t fit in the schedule.
  • Their Salesforce Marketing Cloud instance hadn’t kept pace with their international growth. 

It wasn’t just inefficient. It was exhausting, especially for a small team trying to achieve big goals.

Partnering for Progress

The first ask was simple: help reduce production time and bring some order to the madness. But once we stabilized their workflows and introduced modular templates, it became clear: this wasn’t just a matter of execution. It was an opportunity to build strategically. So, we shifted gears. Together, we designed a plan to scale personalization, enhance performance, and build a marketing engine that could keep up with the brand’s momentum.

What We Built Together

To bring their vision to life, we focused on four areas that would have the biggest ripple effect across their teams, regions, and customer journeys.

Smarter Templates

  • Dynamic AMPScript footers
  • Multilingual content blocks
  • Modular design system
75% reduction in build time, dropping from 14 hours to under 3 hours.

Journey Automation

Click-through rates more than doubled on journey-based campaigns.

Better Analytics 

  • A/B testing strategy
  • Executive dashboards
  • Cross-regional KPI reporting
Data clarity that informed both creative and strategic decisions.

Global Enablement

Global consistency + local agility without extra lift.

Faster, Smarter, More Strategic

This wasn’t a technical win, but rather a transformation. We didn’t just help them send better emails. We helped them build a more innovative, more scalable way to grow, and the results proved it:

  • 54.18% open rate vs. industry average of 30.9%
  • 3.0% click-through rate, with some offer journeys reaching up to 33%
  • 10+ hours saved per email, freeing teams for strategic work
  • Expansion into new regions with localized content and compliance
  • 50% of retainer hours now dedicated to strategic work

“We’re not just working with Sercante. We’re working alongside
them. They’ve helped us move faster and think bigger.”
– Technology Leader at EV Automotive Company

The brand’s emails now do more than just deliver, they connect, inspire, and scale. When your communications are set up this way, it becomes a powerful lever for growth. If your team is stuck in the email weeds or burning out trying to keep up, you’re not alone. And you don’t have to stay there. Reach out to the Sercante team. Our experts can help partner alongside you just as we did for this electric vehicle manufacturing company to streamline processes, optimize campaigns, and make your experiences seamless to drive lasting growth.

Product Note: Marketing Cloud Growth and Advanced are editions of Marketing Cloud Next and have also been referred to as Agentforce Marketing.

The Summer ‘25 release for Marketing Cloud Growth and Advanced Editions is here, and it’s packed with updates designed to turbocharge your team’s efforts. Think of it as a toolbox upgrade: we’re talking AI-powered reporting, slick campaign automation, revamped content tools, and stronger consent tracking. Let’s dive into what’s new and how these features can make your work smoother and your customer experiences much more impactful.

Work Smarter with Einstein

With Summer ‘25 Einstein in Marketing Cloud takes a big leap forward, offering marketers real-time insights and more innovative automation options. If you ever wished you had more time to analyze engagement or fine-tune your campaigns, this update is for you!

New Einstein Predictive Features

New Data Cloud reports enable you to dive into Einstein Engagement Frequency (EEF) and Einstein Engagement Scoring (EES) without needing to export or manually assemble data. Marketers can now create reports directly in Data Cloud using the Email Engagement Frequency and Email Engagement Score objects. Whether you’re trying to reduce fatigue by adjusting send frequency or prioritize highly engaged audiences for your next campaign, these reports help you make data-backed decisions faster and with more confidence.

Automate Flows with Einstein

You can now automate journey paths based on predicted engagement using the new Einstein Decision element in Flow. By leveraging scores from Einstein Engagement Scoring and Engagement Frequency, marketers can direct contacts down the most effective path. For example, you can send fewer messages to at-risk audiences or prioritize highly engaged contacts for conversion. Once you create a supporting data graph, just drop the Einstein Decision element into your flow and configure conditions using your data graph’s engagement fields. It’s a powerful way to build smarter, more responsive campaigns that respect your customers’ engagement signals.

Build Data Graphs for Einstein Send Time Optimization

Einstein Send Time Optimization (STO) is now more customizable thanks to updates to the underlying data model. After disabling and re-enabling STO in Einstein for Marketing Setup, you can build a custom data graph to personalize send time predictions based on your unique business data. This added flexibility lets you capture the signals that matter most to your audience, helping Einstein determine not just the best time to send, but the best time for your customers.

Use Agentforce to Get Scores for Record IDs

Agentforce users can now tap into deeper insights with the new “Get Score for Record ID” action. This feature retrieves engagement and fit scores for individual leads, contacts, and prospects, enabling marketers and sales representatives to prioritize follow-ups and personalize outreach based on real-time data. You’ll also get account-level scores, including overall and intent scores, for a more complete view of customer readiness. To get started, enable the action in the Agent Actions section of Agentforce within Salesforce Setup.

Campaign Creation Made Easy

This release introduces significant enhancements to how marketers create and manage campaigns in Marketing Cloud, providing greater flexibility and control with fewer clicks.

Explore Campaign Designer (Beta)

Marketing Cloud Advanced Edition is launching new Campaign Designer (beta) functionality, enabling you to generate multi-touch marketing briefs more quickly. All of which is powered by AI and your trusted customer data. This new functionality helps you plan campaigns that span multiple channels and moments, all grounded in the context of your existing data. When reviewing a draft brief, you can select an existing campaign to build from, and use AI to refine messaging and channel selection, making it easier to align teams, drive consistency, and launch with confidence.

Build Your Own Campaign

Looking to start from scratch? With the new “Build Your Own Campaign” option, marketers are no longer tied to quick-start templates. You can now select “Build Your Own: when creating a campaign, choose your flow type, and build as you go. Add message elements directly from the campaign record or dive into Flow Builder to design a more curated customer experience that is tailored to your goals, audiences, and data.

Edit Your Flow from the Campaign

Managing and updating your campaign flow is now easier and more seamless. If your flow includes five or fewer elements, you can add messages and wait steps directly from the campaign record without switching to Flow Builder. You can also configure key message details, like Einstein Send Time Optimization and tracking options, all within the same view, making it easier to keep everything aligned as your campaign evolves.

Streamlined Content Personalization

If content is the heart of your marketing strategy, this release gives you the tools to keep it beating stronger. From fine-tuned control over HTML and data sources to more innovative personalization powered by recommendations and dynamic elements, Summer ’25 is all about helping you create more meaningful, relevant content, without adding complexity to your workflow.

Gain Control of Your Email HTML

Gain complete control over your email design with the new HTML code view. You can now convert existing emails to HTML, make detailed structural or styling edits, and build fully customized, responsive emails all within the editor. Whether you’re troubleshooting, refining layouts, or adding advanced formatting, this feature gives marketers and developers the flexibility to go beyond drag-and-drop.

Review Your Updated Data Sources Tab

Working with dynamic content just got more intuitive. The updated Data Sources tab gives you better visibility and control over the data powering your emails. Now, instead of jumping between tools, you can add, update, and view all available data sources, including your default data graph or unified individual, directly within the email editor. This makes it easier to ensure your personalization is accurate and aligned before hitting publish.

Check Out Repeater for Email

Advanced Edition users can now take email relevance to the next level with Personalization Recommendations and the new Repeater for Email component. This feature lets you dynamically showcase recent purchases, popular products, or personalized content in a consistent card, list, or custom layout. Simply connect the repeater to a data source and utilize merge fields to display product names, images, descriptions, etc. This ensures that every message reflects what matters most to each recipient.

Personalize Links and Images in Every Email

You can now dynamically personalize images and buttons in your emails by using merge fields or dynamic URLs. This allows you to tailor visuals and calls-to-action for each audience segment, creating more relevant and engaging experiences across your campaigns.

Explore New Field Types for Forms

New form field types provide greater precision and flexibility when capturing data. You can now use Date, Date/Time, Time, Number, and Text Area (Long) fields to support more detailed, structured inputs—perfect for scheduling, time-sensitive actions, numerical data, and open-ended responses. The updated Long Text Area also features a larger input box with a draggable corner, providing users with a more seamless experience when submitting longer responses. Whether you’re collecting preferences, running surveys, or managing gated content, these enhancements make your forms smarter and more user-friendly.

Expand Your Brand Identity

The expanded Brand Identity field in Content Builder now gives you up to 1,000 characters to describe your brand’s voice, values, and unique positioning. This added detail helps Agentforce generate AI-powered content that’s more aligned with your brand’s style, whether you’re drafting emails, landing pages, or SMS messages. The result? More consistent, on-brand messaging with less manual editing.

Delete CMS Workspaces

Need to declutter your content library? Content admins can now delete outdated or unused CMS Workspaces to keep things organized. First, remove any sharing relationships and unpublish existing content. This cleanup option makes it easier to manage your content at scale and maintain a more streamlined workspace. (Note: the default Marketing Cloud workspace can’t be deleted.)

Simplify Consent Tracking and Compliance

Consent isn’t just a compliance checkbox, it’s a critical part of building trust with your audience. The Summer ’25 release introduces several updates that enable marketers to collect, manage, and format consent data more effectively across campaigns and systems.

Automate Consent Updates with Flow Actions

Consent management is now more flexible and automated. You can collect and update consent using the new Create Consent flow action in both event-triggered and Data Cloud–triggered flows. For example, when someone clicks a custom link, including a double opt-in email, you can automatically update their consent status to Opted Out or Subscribed, with no manual steps required. This update makes it easier to keep consent data current and automate compliance across your marketing programs.

Improved Consent Imports

Consent imports just got more accurate and easier to manage, especially for mobile messaging. You can now include a country code column when importing SMS or WhatsApp consent data, helping ensure that records are correctly classified by region. This is especially valuable for supporting country-specific compliance requirements. Additionally, updated phone consent formatting guidelines make it easier to standardize values during import, reducing errors and helping you maintain clean, reliable consent records across your messaging channels.

Move Faster with Smarter Marketing Automations

The Summer ’25 release introduces a set of powerful automation enhancements designed to streamline how marketers engage leads and manage campaign activity. These updates bring core actions, such as sending emails, tracking link clicks, and managing prospect lifecycles, closer to your day-to-day workflows, making it easier to move fast, stay organized, and respond to customer behavior in real-time.

Send Emails Directly from Lead and Contact List Views

You can now send marketing emails directly from any list view of Leads or Contacts. Simply click ‘Send Email’, select the ‘Marketing Email’ option, and follow the guided steps to build and send your message. Behind the scenes, Salesforce automatically creates the campaign, flow, and audience segment for you, making it easier than ever to launch quick follow-ups or targeted nurtures with minimal setup.

Attribute Clicks Beyond the Inbox

Looking to understand what happens after someone clicks through your email or ad? With Summer ’25, you can now track links to your external website and attribute that activity back to the source, whether it’s an ad, email, or other campaign asset. This provides you with deeper visibility into off-platform engagement, helping you connect the dots across the customer journey. If you set up external tracking before this release, you’ll need to update your Behavioral Events data stream to start using the enhanced tracking features.

Convert Prospects to Contacts

You can now convert qualified Prospects to Contacts in Marketing Cloud, either manually or by using automated Flows. This enhancement provides you with more control over how and when individuals progress through the sales cycle. Whether you’re ready to hand off a lead to Sales or building an automated nurture, this feature helps streamline the sales process, personalize communication, and drive higher conversion rates by associating each new contact with the correct account at the right time.

Move Faster with Smarter Marketing Automations

Every successful marketing campaign starts with a strong foundation, and that begins with how your platform is set up. In the Summer ’25 release, Marketing Cloud focuses on making setup and configuration simpler, faster, and more intuitive, so teams can spend less time managing infrastructure and more time launching impactful campaigns. Whether you’re provisioning channels, organizing data spaces, or fine-tuning identity resolution, these updates are designed to help you hit the ground running with confidence.

Unified Messaging Data Kit

Setting up messaging channels is now easier than ever. The Unified Messaging data kit installation and update process has been improved, making it faster and more intuitive to get started. Whether you’re enabling new channels or updating existing ones, the streamlined setup reduces manual steps, allowing you to focus on activating your messaging strategy, not troubleshooting the installation.

Improved SMS Provisioning Process

SMS setup is now more guided and error-proof. In Unified Messaging Setup, you’ll find clear, country-specific instructions for requesting SMS codes, registering brands, and provisioning campaigns. These updates help reduce confusion, minimize errors, and speed up approvals. If a request is rejected, you will receive a detailed explanation, allowing you to resolve issues and resubmit with confidence quickly.

Custom Data Spaces Support

New Marketing Cloud customers now have the option to set up a custom data space during initial configuration, bringing more structure and clarity to how marketing data is managed in Data Cloud. This update is beneficial for organizations managing multiple brands, teams, or product lines, as it offers enhanced data security, faster retrieval and processing, and improved overall data quality. Previously, all marketing data defaulted to a single space; however, with Summer ’25, segmentation and governance can begin on your terms, right from day one.

Identity Licenses Now Available

Marketing Cloud now supports Identity Licenses, giving you a more flexible way to add users to your marketing team without assigning full Salesforce licenses. Users with the Identity License can log in via SSO and access most Marketing Cloud features, including campaigns, segments, flows, and shared analytics reports, when granted the Marketing Cloud Manager permission set. This update makes it easier to scale access securely, while keeping centralized control over who can work in your instance. Note: Identity users will not have access to Marketing Cloud setup or Opportunity Influence features.

New Identity Resolution Rules

Salesforce now recommends adding two new custom rules to your Identity Resolution ruleset to enhance the matching and unification of customer records. These rules are designed to improve accuracy during the conversion process and help identify visitors to your tracked external websites. By refining how identities are resolved across systems, you strengthen your data foundation, supporting more personalized marketing and building greater trust with your audience.

The Summer ’25 release for Marketing Cloud Growth and Advanced Editions delivers exactly what modern marketing teams need: more speed, smarter automation, and greater personalization, all built on a stronger, more scalable foundation. From Einstein-powered insights and flexible campaign design to enhanced consent tracking and setup improvements, these updates are designed to help you move faster and create more meaningful experiences at every touchpoint.

Ready to see how these features can drive real results for your team? Reach out to the Sercante experts for a Marketing Cloud audit or consultation to assess your current setup and identify opportunities to leverage the latest capabilities. Whether you’re just getting started or looking to optimize what you already have, we’re here to help you make the most of Summer ’25.

Product Note: Marketing Cloud on Core is now known as Marketing Cloud Next. Marketing Cloud Growth and Advanced are editions of Marketing Cloud Next and have also been referred to as Agentforce Marketing.

Your messages are doing their job, but are they working it?

If your campaigns are feeling a little too copy-paste, a little too “blah,” it might be time for a serious glow-up. You’ve got the data. You’ve got the content. Now it’s time to use the tools inside Marketing Cloud on Core (aka Growth and Advanced Edition) to turn that good-enough messaging into something that shines!

This blog will teach you how Dynamic Content and Expressions can transform your messages from basic to brilliant. You’ll learn what these new features are, how they work, and how to use them to make every send feel personal, polished, and powerful!

Let’s Start with the Basics

Before we dig into the tools, let’s talk about transformation. A glow-up for your marketing means:

  • Less copy-paste, more customization
  • Making use of the data you already have
  • Messages that speak directly to the recipient, not the crowd

Marketing Cloud on Core gives you two powerful tools to make it happen. Ready to transform your messages? Let’s learn how to master Dynamic Content and Expressions.

Introducing Your Email’s Style Squad

Give your emails a fresh look without starting from scratch. Think of Dynamic Content like your email’s glam squad; each part makes your email stand out. Consider giving your email different “outfits” based on who’s opening it.

  • Personalization Point: This is the part of your email where you give a mini makeover. It could be a subject line, preheat, hero image, or CTA – any element that could use extra sparkle.
  • Personalization Decision: This is the brains behind the beauty. It figures out who should see what based on the rules you set.
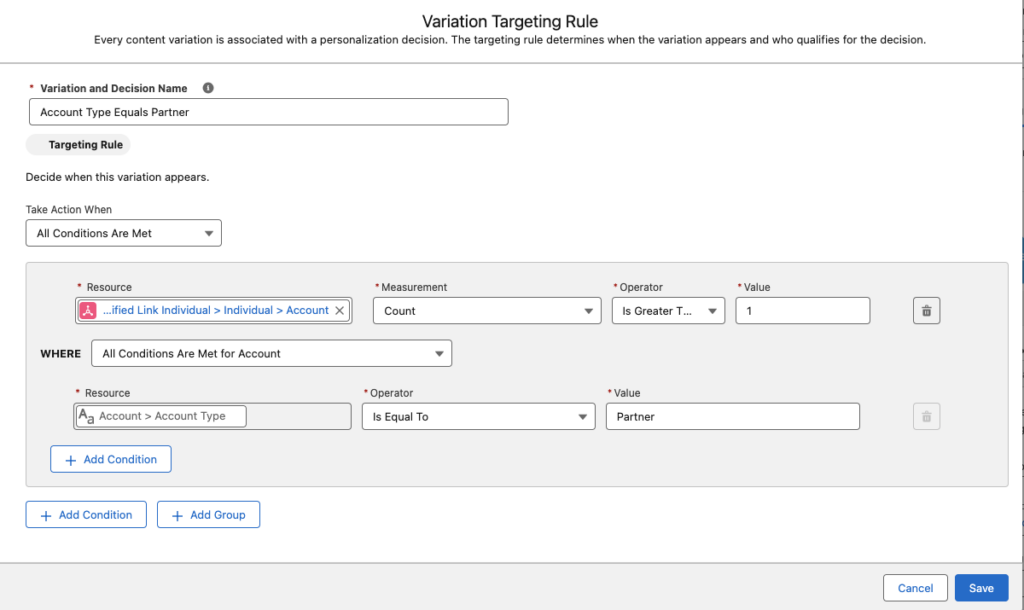
  • Targeting Rule: Your custom-fit formula. It defines “if this, then show that” logic. For example, “if account type = VIP, show gold banner.”

Pro Tip: Already built a variation you love? You can reuse it in other emails using recent Personalization Points.

How to Apply the Glow-Up: Creating Dynamic Content

Let’s walk through giving your content a dynamic makeover:

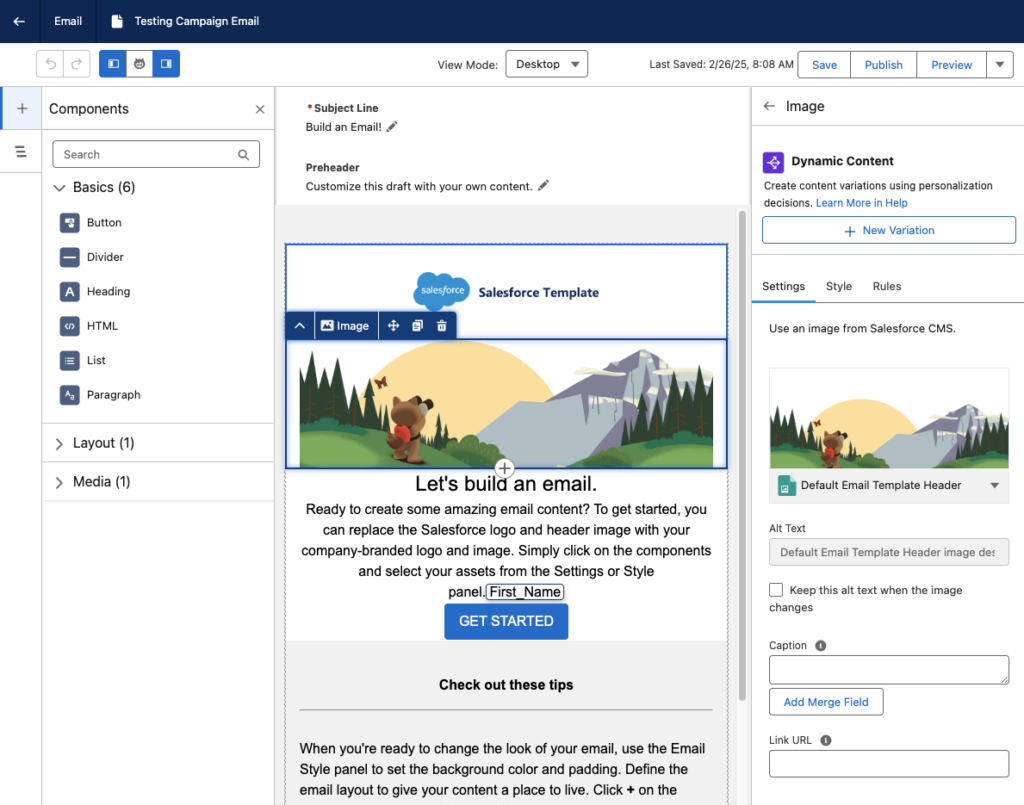
  • Open your email in the editor and select the content block you want to glam up.
  • Head to the Dynamic Content section and click Add Variation.
    • You can use the Variation dropdown to access NewVariations if you’ve already got some variations.
  • When the Create or Reuse Personalization Settings window pops up, select New Variation.
    Heads up: Your message has to save first, so give it 10-20 seconds.
  • Name your variation and create your Targeting Rule.
  • Click Save, then customize your content within that variation, like updating a header image or swapping out messaging for a specific audience.
  • Use the Variation dropdown to preview how your message looks for each version.

Pro Tip: Use dynamic blocks sparingly at first. Target high-impact spots like hero images or CTAs, and test frequently to ensure each variation shines.

The Finishing Touch for Personalized Flair

Once your content’s dressed to impress, it’s time to fine-tune the details, and that’s where Expressions come in. They’re like your behind-the-scenes styling tool that ensures every message feels personal, even when the data isn’t perfect. Here’s how Expressions keeps your messages looking polished:

  • Saved Expression: Think of this as your go-to styling shortcut. It’s a reusable logic block you create once and drop into multiple campaigns; it’s less work with the same wow factor.
  • Attribute Selection: This is where you tell the Expression what data to look at, such as PreferredName, LoyaltyStatus, or FavoriteProduct.
  • Fallback Value: No data? No problem. Expressions let you set a backup so your message stays smooth. Instead of “Hi,” you get “Hi there!”

Expressions ensure every message feels intentional and on-brand like you planned that way (because you did). 

Adding the Ultimate Accessory: Creating Expressions

Here’s how to build your first Expression and set your messages up for consistent, reusable personalization:

  1. Head to Content > Content Workspace in Marketing Cloud.
  2. Click Add, then choose Content.
  3. Select Expression, then click Create. (Yes, you’re about to create something fabulous.)
  4. Give your Expression a name that clearly describes what it does (like “PreferredName Fallback” or “GoldMemberStatus”).
  5. Use the Attribute field to choose the customer data you want to reference.
  6. (Optional) Add a filter if you need to narrow down conditions, like only using this Expression when someone’s location is “US.”
  7. Click Save.
  8. Don’t forget to hit Publish to start using your Expression in your messages.

Pro tip: Once created, Expressions can be used repeatedly across campaigns, saving you time while keeping your personalization game strong.

Using Your Expression in a Message

Now that you’ve created your personalized shortcut, it’s time to drop it into your message for that final glow-up touch.

  1. Open the email, SMS, or WhatsApp message where you want to use your Expression.
  2. Select the content block where you want your personalization to appear.
  3. Click the [] Add a merge field symbol.
  4. Choose Saved Expressions from the dropdown menu.
  5. Pick the Expression you created earlier.
  6. Add a default value (like “there” or “friend”) in case your data field is empty.
  7. Click Done and admire your work.

Pro Tip: This ensures your message always reads naturally, even if a customer’s name or info is missing the data.

Use Them Together for a Full-On Email Glow-Up

You’ve got the tools! Now it’s time to layer them like a pro stylist would. Dynamic Content and Expressions are great on their own, but when used together? That’s when the real transformation happens!

Think of Dynamic Content as your email’s wardrobe, changing outfits based on who’s reading. Then think of Expressions as the accessories, adding that personalized sparkle like someone’s name, product interest, or membership level.

Real-World Example

Let’s say you’re sending a promotional email:

  • You use Dynamic Content to show one banner for loyalty members and another for new subscribers.
  • Inside each banner block, you drop in an Expression to greet the user by name (with a fallback like “their” in case their name isn’t available).
  • You also use Expression to highlight their preferred product category, so the CTA feels totally tailored.

The result? An email that looks like you custom-designed it for every person without cloning templates or managing a million logic paths.

Why This Combo Works

  • You reduce manual work by creating fewer, smarter assets.
  • You create hyper-relevant emails without sacrificing time or scalability.
  • You build a customer experience that feels seamless, polished, and personal, even if you’re sending to thousands at once.

Using Dynamic Content and Expressions is the email marketing equivalent of putting on a fresh outfit, doing your hair, and finishing with the perfect accessory.

Ready to Give Your Emails a Glow-Up?

You don’t need a whole new wardrobe of emails, just the right tools to style them smarter. With Dynamic Content and Expressions in Marketing Cloud on Core, you can transform basic batch-and-blast messages into personalized, polished experiences that connect with your audience.

From targeting rules to fallback names, you have everything you need to bring out the best in your campaigns without doubling your workload. Whether you’re just dipping your toes into personalization or looking to scale with style, this glow-up is just the beginning.

Want help applying what you learned?

Book a consultation with Sercante’s Marketing Cloud experts to review your personalization strategy or sign up for one of our hands-on workshops. Let’s glow up your next campaign together!

Product Note: Marketing Cloud Growth and Advanced are editions of Marketing Cloud Next and have also been referred to as Agentforce Marketing.

Welcome to your Masterclass in Account Scoring – where we take your Salesforce skills from good to guru-level! With the Spring ‘25 release, Salesforce introduces Account Scoring, a smart, customizable, and easy-to-manage scoring solution within Marketing Cloud Growth and Advanced Editions (aka “Marketing Cloud on Core” or just “Marketing Cloud”). So, grab your virtual whiteboard, and let’s dive in!

Account Scoring 101: The Fundamentals

Account Scoring is a brand-new feature in Marketing Cloud on Core, designed to give businesses deeper insights into which accounts are most likely to convert. Unlike People Scoring, which evaluates individual leads and contacts based on engagement and fit, Account Scoring takes a broader approach, analyzing entire organizations. This is especially valuable for Account-Based Marketing (ABM) strategies, where sales and marketing teams focus on targeting high-value accounts rather than individual leads.

How Does Account Scoring Differ from People Scoring?

  • People Scoring is focused on individual engagement and fit. Individuals are scored based on how well they fit your ideal persona and how often they engage with your Marketing initiatives.
  • Account Scoring aggregates data from all contacts within an organization, providing a more holistic view of an account’s likelihood to convert.
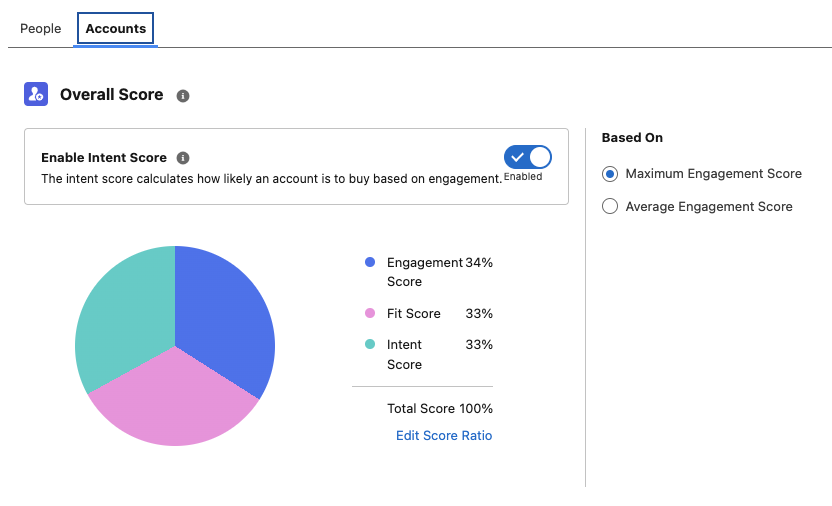
  • Intent Scoring (optional in Account Scoring) identifies buying signals, making it easier to target accounts actively considering a purchase.

Account Scoring is a game-changer for ABM-focused campaigns, where teams need to evaluate an entire company rather than just a single decision-maker. With this new feature, marketing and sales teams can prioritize high-value accounts, personalize outreach at the account level, and drive stronger conversion rates.

Let’s break down the core curriculum of Account Scoring in Marketing Cloud on Core:

  1. Engagement Scoring – Think of this like a participation grade. The more someone interacts (emails, website visits, messages), the higher the score.
  2. Fit Scoring: This is your compatibility test. Does the account match your ideal customer profile? If so, your points will increase.
  3. Intent Scoring – This one’s all about purchase signals. If an account drops hints they are ready to buy, the score reflects that.

Now let’s discuss how to elevate your Account Scoring skills to an expert level.

Take Control of Calculated Insights

Previously, once you published scoring rules, the system would auto-refresh Calculated Insights every six hours – whether you wanted it or not. With Spring ‘25, Salesforce has introduced the power to unschedule or reschedule Calculated Insights. Now, you control when and how often your scores refresh, ensuring you’re optimizing Data Cloud service credits and keeping your system running efficiently.

Customize Your Scoring Model Like a Pro

Say goodbye to one-size-fits-all scoring. Account Scoring allows you to adjust the weighting of Engagement, Fit, and Intent Scores to align with your business strategy and ensure the scoring model fits your unique needs. 

  • Need Engagement to weigh 70% instead of 50%? You got it.
  • Want Intent to be the biggest factor? Done.
  • Would you prefer Fit to lead the charge? No problem.

Activating Account Scoring

To start using Account Scoring:

  1. Create a Unified Account Identity ruleset
    1. Account Identity rulesets allow you to target contacts related to accounts as well as segments based on Account attributes.
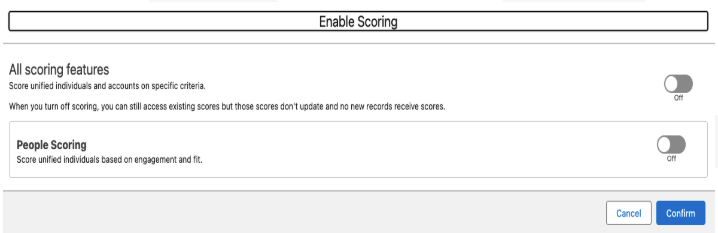
  2. Enable Account Scoring
    • You can also enable Intent Scoring at this stage if you wish to use this feature.

3. Customize your scoring rules and your score ratio. Don’t forget to republish your rules once your changes are saved.

Smarter Rule Management and Publishing

No more accidental rule mishaps! Now, when you tweak your scoring rules, you’ll need to publish them again for the changes to take effect. Here’s your checklist for success:

  • uncheckedCustomize Fit and Engagement Scoring under Setup > Scoring Rules.
  • uncheckedFine-tune Account Scoring under the Account tab.
  • uncheckedRepublish once all your changes are set.
  • uncheckedRemember, once published, rules cannot be unpublished – only modified.
  • uncheckedKeep case sensitivity in mind (“Example” ≄ “example”)

Time to Put Your Skills to the Test

Congratulations, you’ve just completed your Spring ‘25 Account Scoring Masterclass! Now, it’s time to put your knowledge to work. Whether refining your scoring model or just getting started, these updates give you everything you need to optimize and win more deals. 

Want expert guidance? The Sercante team is here to help. Contact us, and let’s make your scoring strategy a success!

No more posts to show