
We’ve all seen email personalization mishaps.
The power of Marketing Cloud Account Engagement (Pardot) is really in its capacity to leverage data coming in from Salesforce and Pardot to create tailored experiences of all types for the end audience.
But what happens when this automation doesn’t work how we intend to use it? This is particularly concerning when it comes to email.
Follow along with this blog to learn a few tricks you can use to test your Pardot org for possible email mishaps and prevent them before they happen.
Solution #1: Validate your Salesforce & Pardot User Mappings
The first solution for avoiding email sending fails is to validate your user mappings. Doing so will help you avoid awkward email segmentation and user notification issues.
It is important to know that if Salesforce Users are not mapped into Pardot, then you will not be able to leverage their relationship with Leads/Contacts in Pardot.
Mapping a User to Pardot DOES NOT give them access — you need permission sets and other configurations for that to happen. This is often the main reason why Users are not mapped.
The remainder of this blog will reference the User object. If this does not 100% line up with your process within Pardot, neither will the rest of what we will cover.
How to validate Salesforce and Pardot user mappings
Here are some ways to validate if all your users are mapped:
- In Salesforce, create a report of active Users.
- In Salesforce, compare which Users actually manage Leads/Contacts and review their profiles.
- In Pardot, go to the Pardot settings tab in your navigation, then head over to the Pardot Connector Settings tab and review your Salesforce profile to Pardot role mappings.
- If you have any missing, this is the time to add them.
- In Pardot, go to the Prospects tab in your navigation, and select the Unassigned Prospects filter on the filter dropdown.
- If you see any with blue Salesforce clouds, that means the Prospect may be assigned in Salesforce but the mapping is not clear in Pardot.
- Click on any records you found and open the record up in Salesforce. Then, make a list of who the owner is.
- Compare this list to the report of Active Users. If there are any missing, they may be deactivated.
- In Salesforce, update any records that reference deactivated Users to the appropriate User. This would trigger a sync event and update the record.
- In Salesforce, go to Marketing Setup and for your business unit/account, click on the Manage Users button and add any missing users to the appropriate section to sync over to Pardot.
- In Pardot, update the Prospect database view to include Assign User and keep the Unassigned Prospect filter to see if you are missing any.
- You may need to click the Sync With CRM button on the Prospect page to get it to sync.
The result of mapping all your Users is having Pardot and Salesforce be in sync in addition to being able to leverage this datapoint for segmentation. It also allows you to provide the appropriate person with email or Slack notifications.
Solution #2: Create an identity user for your Pardot email sender backup
Previously we covered how to use and experiment with email sender types for emails that are sent from Pardot. If you are not familiar with email sender types, then go read that post and come back after you do. We’ll wait.
Dynamic versus static email user sender types
We would like to put these User sender options into two buckets: Dynamic and static.
Dynamic are options such as Assigned User, Account Owner, or any custom options for the sender information that changed based on the relationship the User has to the Prospect.
Static are options such as General or Specific User options for the sender information that is the same for all Prospects who get the email. No relationship needed between User and Prospect
All the options “pull” data from the User information setup in Salesforce that is then pulled into Pardot.
One of the biggest pitfalls that can happen here is when you use dynamic sender options. If a Prospect does not have an assigned user or account owner, then you have to have a backup sender. Pardot enforces this by making you add an alternative sender.
Many times you will have a default general User you manually add over and over again — such as [email protected] or [email protected]. This leaves room for error and cannot be used in automations, like completion actions, to notify this email address from form submissions, for example.
How to create a Salesforce Identity License User for your Pardot email sender backup
Did you know you can save yourself from headaches caused by human error by turning this email into an Identity User?
The result is an Identity User that can be used as a backup specific User and also for notifications in completion actions throughout the system.
Identity Users can be used for Single Sign-On or Pardot-centric purposes. However, you cannot assign to an Identity User. For more details on identity licenses, check out this Salesforce resource.
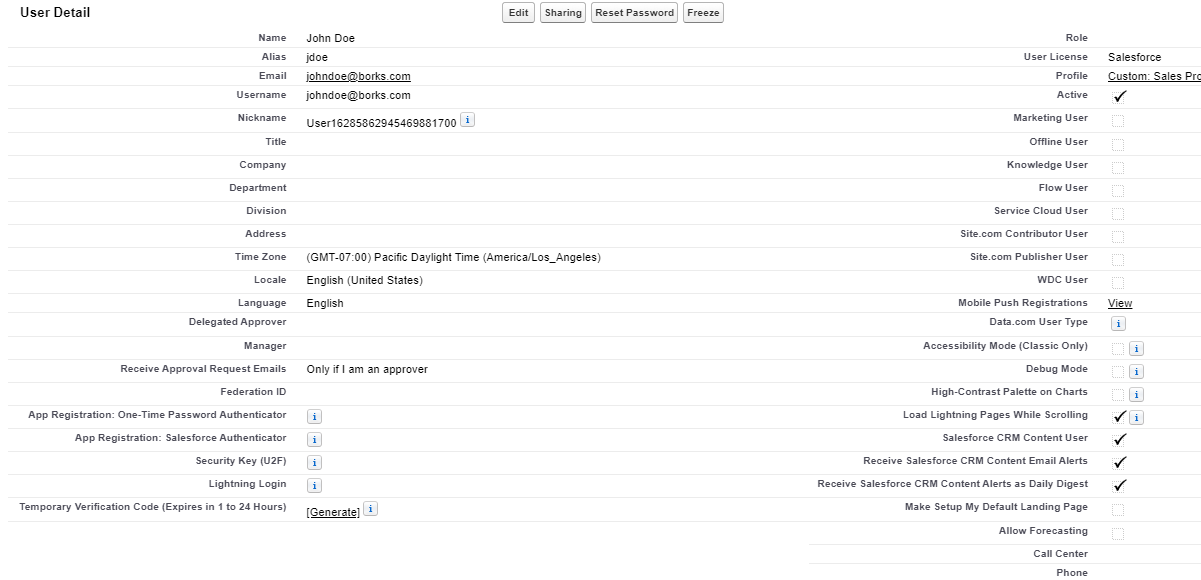
Solution #3: Update user records and check token types for email sender signatures
When you get ready to build your emails, you may want to include sales rep signatures in the email body.
Here are the fields you have access to inject into your emails from the User object:
- First Name
- Last Name
- Full Name
- Job Title
- Phone
- URL
- ID
- Signature
All of these details are managed in Salesforce under the User Settings (view Solution #1 above). If these are not filled out, then the row where you have the Handlebars Merge Language (HML) tag on your email will be awkwardly blank.
To resolve this, simply update the User record. Seems easy enough, right?
You are correct!
However, let me call out a common mistake we see when using these HML tokens — there are two different sets of tokens.
Tokens: Sender versus Owner
The owner fields pull directly from the Assigned User, which is one person for the Lead/Contact.
The sender fields pull directly from who you choose as a Sender User on the email. This can be an Account Owner, an Identity User, or a custom CRM user lookup.
Note: Depending on the scenario, you may want to use one over the other. But we use the Sender tokens to play it safe.

Lastly, we would like to note that general Users do not have titles, phones, signatures, or additional URLs. For best results, use an Identity User and make sure you fill in those fields. This will result in a more consistent experience for everyone.
As always, test your tokens!
Solution #4: Create a company-wide backup to avoid blank prospect data when you use queues
One of the main use cases for queues is to help with Lead assignments and send the Prospect to Pardot. If you are using queues for these cases, then there is one thing you have to know.
Queues do not have job titles, companies, or “people” names.
You may be thinking…
Yes, that is correct. So what’s your point?
Well, if you are sending emails on behalf of assigned users, for example, technically Prospects owned by a queue are owned — but not by a person.
This means when you send emails out trying to use “dynamic” sender options, you may not be actually showing a signature or other details in your emails when queues are involved.
How to avoid email awkwardness caused by having Prospects owned queues
For these scenarios where you know you may have Prospects owned by queues we recommend two options:
Option 1: Ensure your backup Sender is a specific User (try an Identity User). Do not use a general User if you are adding signatures to your email copy.
OR
Option 2: Use HML to create conditional logic to create a backup to blank User fields. Be careful with the extra spacing around HML tokens.
This is what the final syntax looked like for the default in the event John Doe (User) didn’t have a phone number: we added a general corporate number.
{{#if Sender.Phone}}Contact us at {{Sender.Phone}}{{else}}Contact us at 1800 – Sercante{{/if}}
You can use this format to create syntax for other fields you need on your email signatures.
The end result is having a customizable backup for User or organization-specific details to make sure no one sees missing data or has a less than favorable experience.
Solution #5: Set global and default field values as a backup when you use HML in emails
Finally, we come to mail merge fields. We have all seen use cases of subject lines not rendering and showing as {Recipient.FirstName}} because someone forgot to add the extra “curly bracket” that you didn’t notice was missing earlier in this sentence or forgot to test altogether.
Here are some of the more common HML options used in an email:
- First Name
- Company Name
- Job Title
- City
- View Online
- Email Preferences Center
- Unsubscribe Page
For a list of all the out-of-the-box mail merge fields click here.
How to set global and default field values as a backup when you use HML in emails
If a Prospect does not have data on a field and you use mail merges (HML), it will be displayed as a blank.
We have two options to solve this issue:
- Set a global field value.
If you do this, anywhere where the field is used will display the same text IF there is no existing data. - Set a default value on the email template using HML.
If you do this, the default text will only work for this one email template, but you can customize it across any email template (check out solution #4). However, if you selected the global field value option, this solution isn’t going to work.
Take action now to avoid awkward marketing email fails later
If you are new to Pardot and don’t know much about how you can use Prospect fields in emails or if you want to take your email personalization game beyond mail merge fields, we recommend you review Content Personalization: Using Dynamic Content, Pardot HML, and Pardot Snippets.
In the end, you have less awkward endings in your sentences and more customized messaging you can leverage to wow your audience(s) by taking these precautionary steps. Pardot can provide many tools to improve your email marketing. But your data flow has to be working properly to take full advantage of everything it has to offer.
The key thing we would love for you to walk away with is, in the words of our colleague Mike Creuzer, to remember to “test all the things”!
Feel free to contact us if you have any questions about how to improve your useability of Pardot.