Category

Jenna Molby

Salesforce Surveys is now available with the Spring ’18 release! This new feature allows you to create easy-to-use forms for collecting feedback and data by using a simple editor. All the survey data you collect is stored within your org. You can then use Salesforce to view survey data, create reports and dashboards, and share insights with your company. I’m going to walk through how to enable, customize and activate your first Salesforce Survey.

Availability

Salesforce Surveys is available by default in: Developer, Enterprise, Performance, and Unlimited Editions with Health Cloud. If you have Developer, Enterprise, Performance, and Unlimited Editions without Health Cloud, you can still create a one survey for no additional cost. However, if you want to create multiple surveys, there’s an additional fee.

1. Enable Surveys within your Org

Navigate to Setup > Feature Settings > Survey > Survey Settings and toggle the setting to Enabled
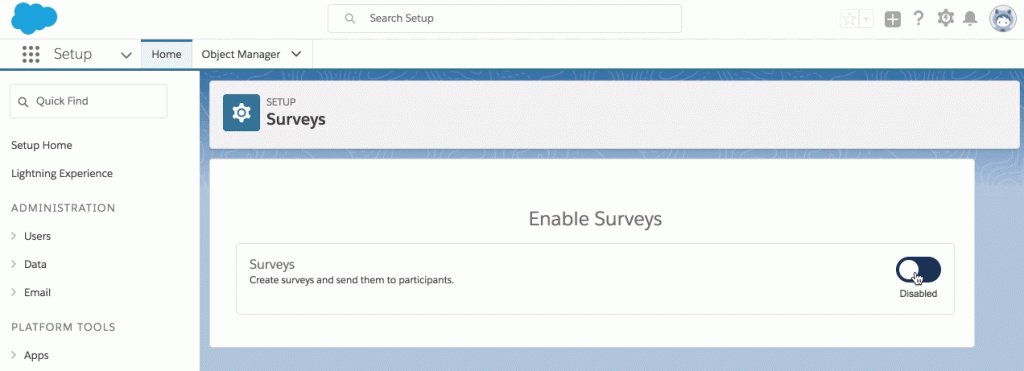
Enable Surveys within your Org

2. Give users permission to create surveys

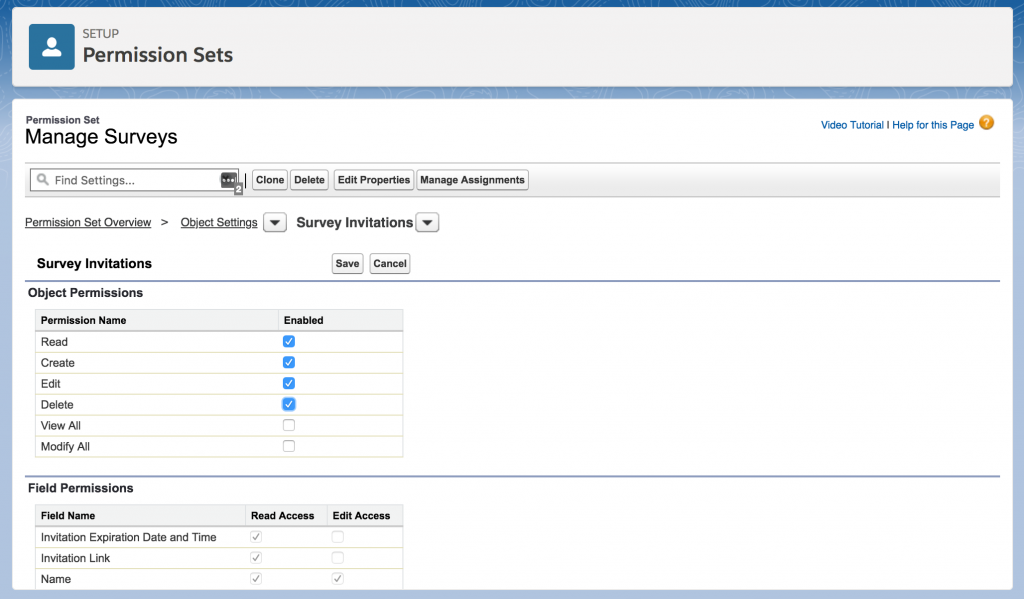
Now that you have enabled Surveys within your org, you will need to give users permissions to create surveys. According to the Salesforce documentation, there should be a permission set called Survey Creator, which you can clone. In my testing, I haven’t seen this permission set available. So, you will need to create your own permission set and give users Read, Create, Edit, Delete permissions to the Surveys and Survey Invitation objects.
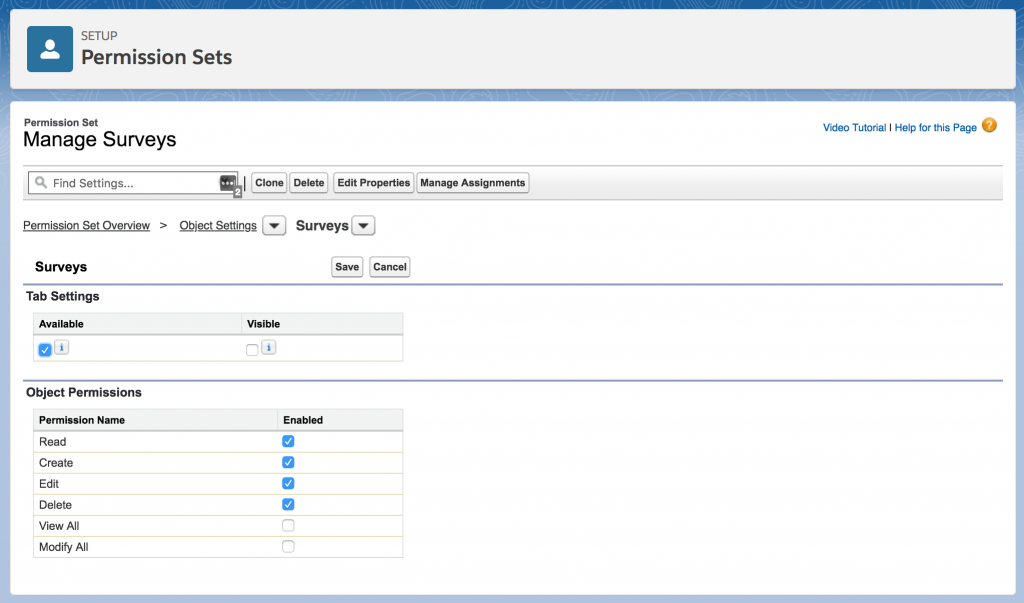
Set Survey object permissions
Set Survey Invitation object permissions

Assign the new permission set to the users who will create surveys.

3. Customize your start page

When you create a survey the first page that appears in the start page. This will be the first thing your respondents see when clicking on the survey link. You can add some header text and a description for your survey.
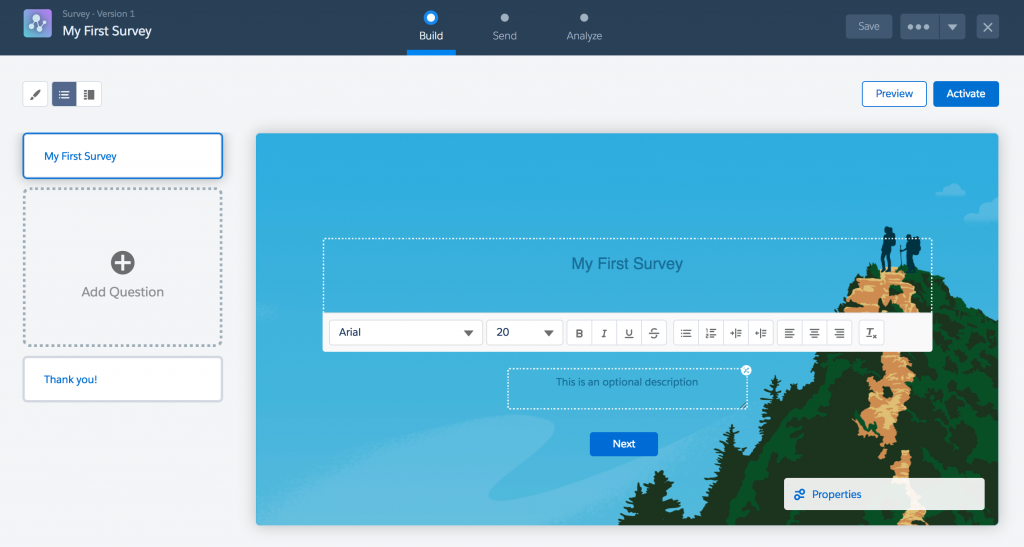
Customize Survey Start Page

4. Add your Questions

You can choose from 5 different question types when creating a survey:

  1. Radio: Only one answer can be selected
  2. Multiple: Multiple answers can be selected
  3. Text: a free-form text response
  4. Rating: a custom rating from a scale
  5. Date: a date from a calendar

To add a question, click the add a question button and select your question type. You will be prompted to enter your question, an optional description, and any values depending on the field type you selected.
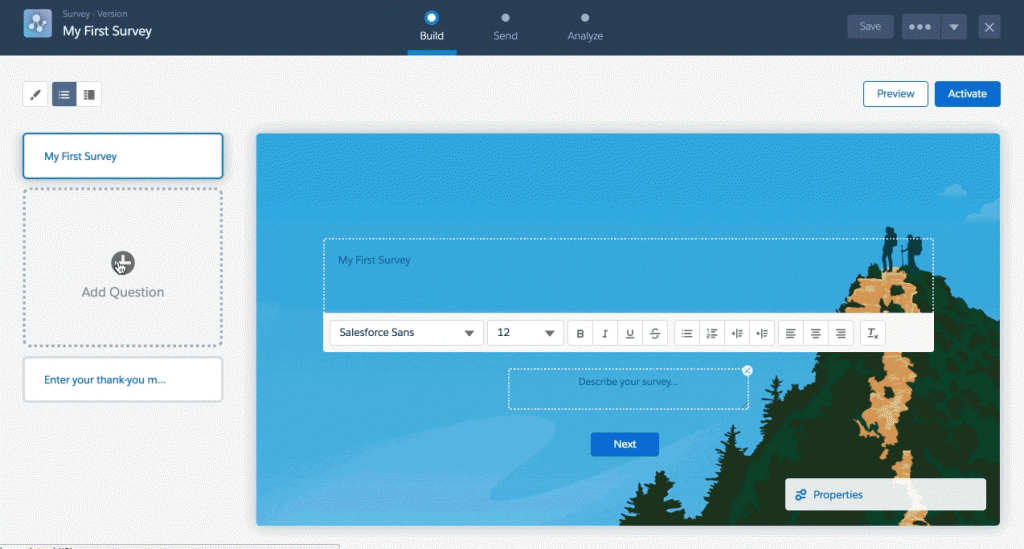
Add survey questions

You can turn off the description by click the “x” in the top right corner of the description box or by clicking on properties and unchecking description. The properties box is also where you can mark the field as required. By default none of the questions are marked as required.
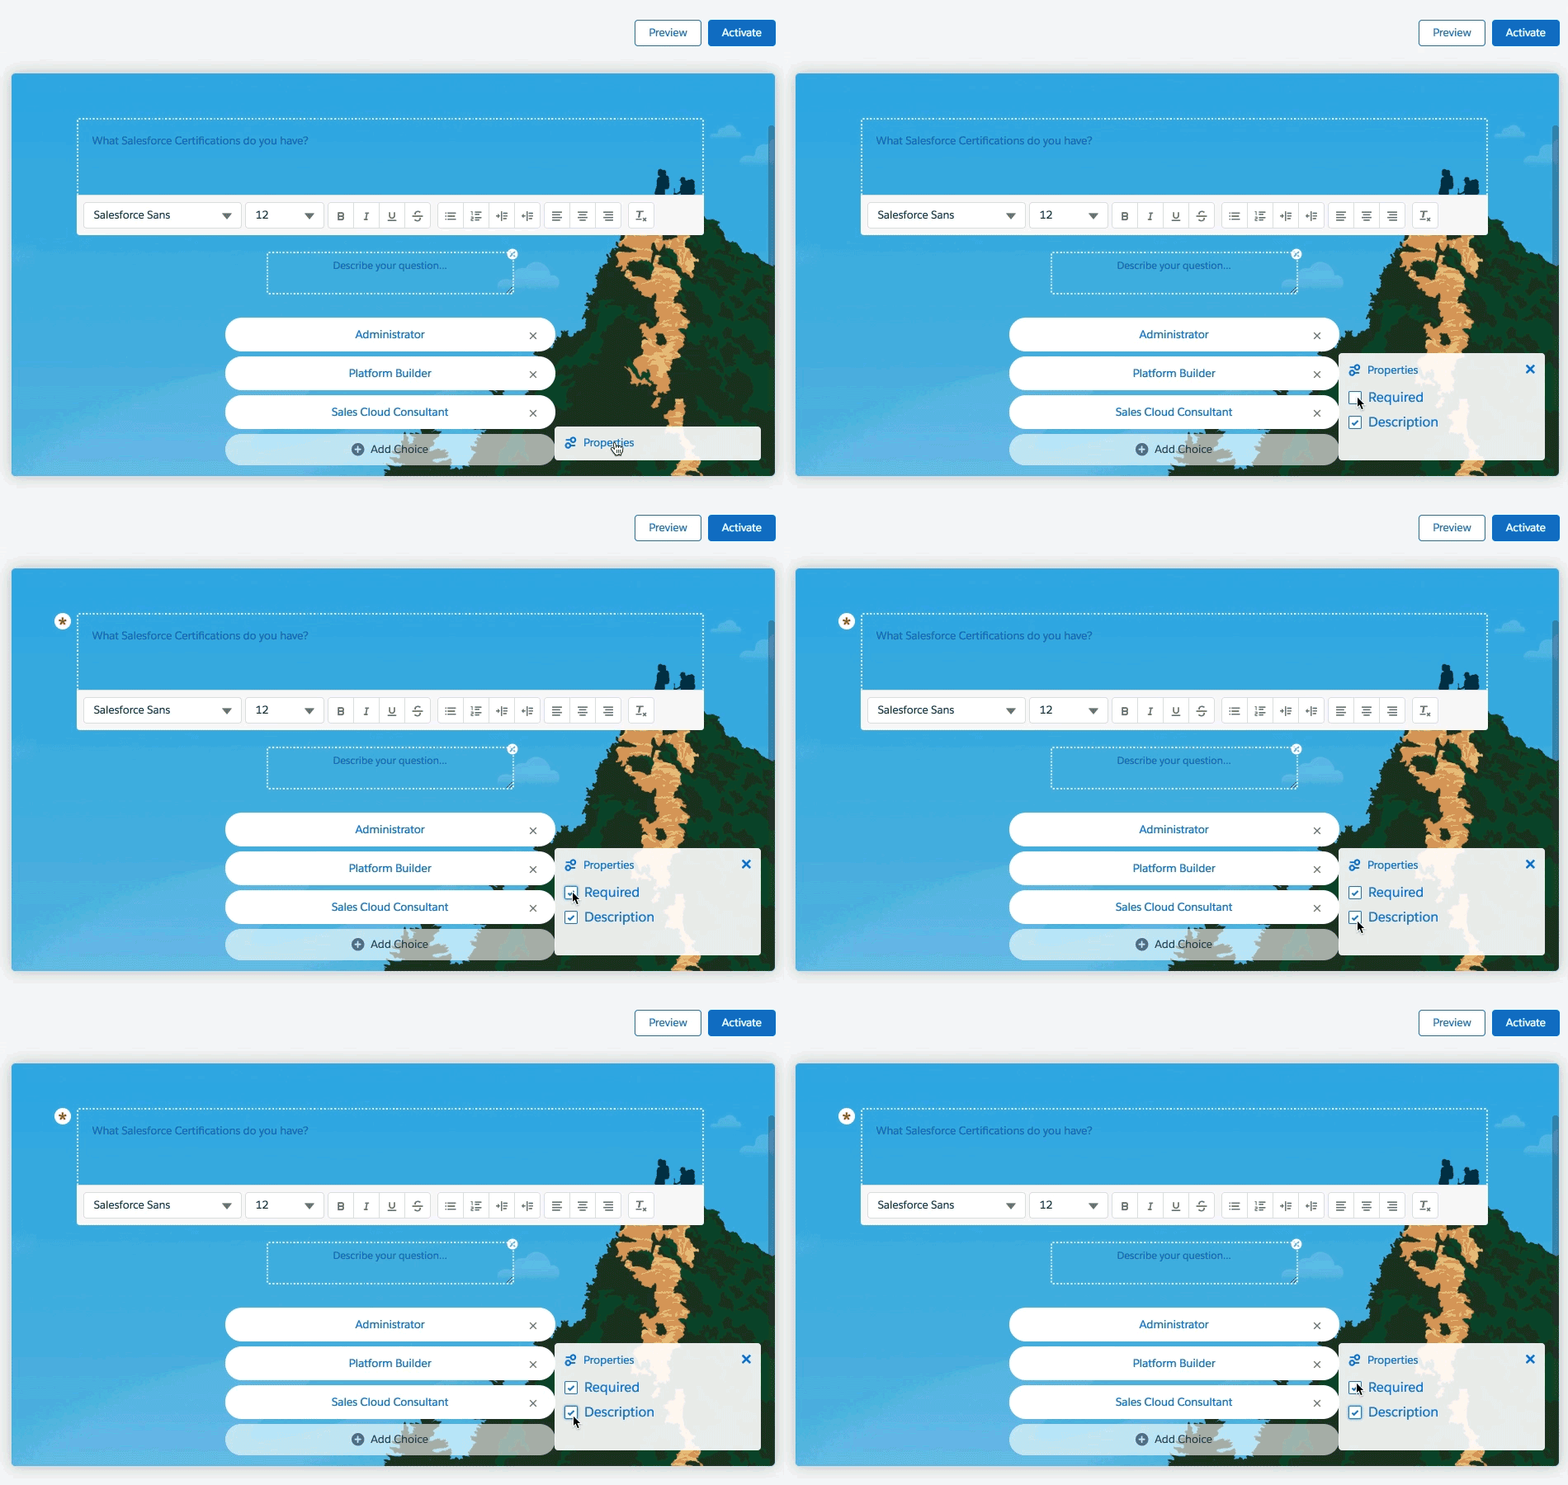
Toggle required and description

Questions are listed down the left sidebar. You can also click on a question within the sidebar to copy or delete the question.

6. Update the ‘Thank You’ Page

Click on the last card in the sidebar to customize your ‘thank you’ message.
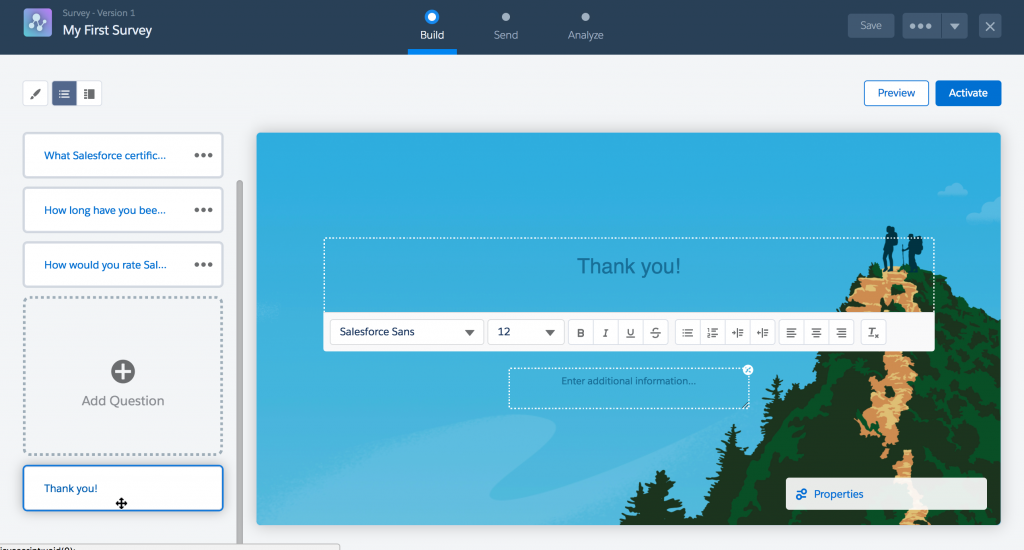
Update survey thank you page

5. Customize the survey to match your brand

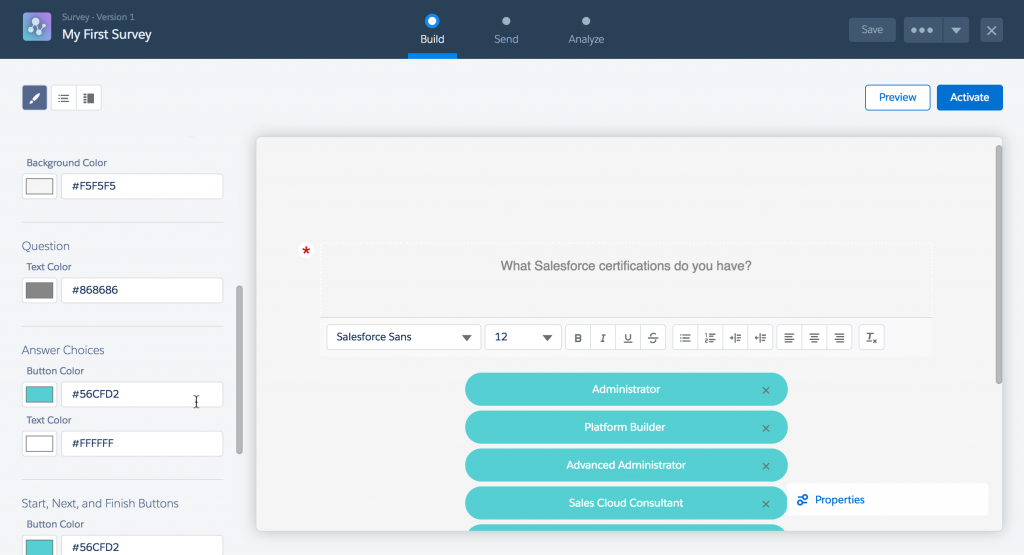
Click on the paint brush icon to update font colors, button colors, background images and colors. If you choose to upload a background image the image size cannot be more than 750KB.
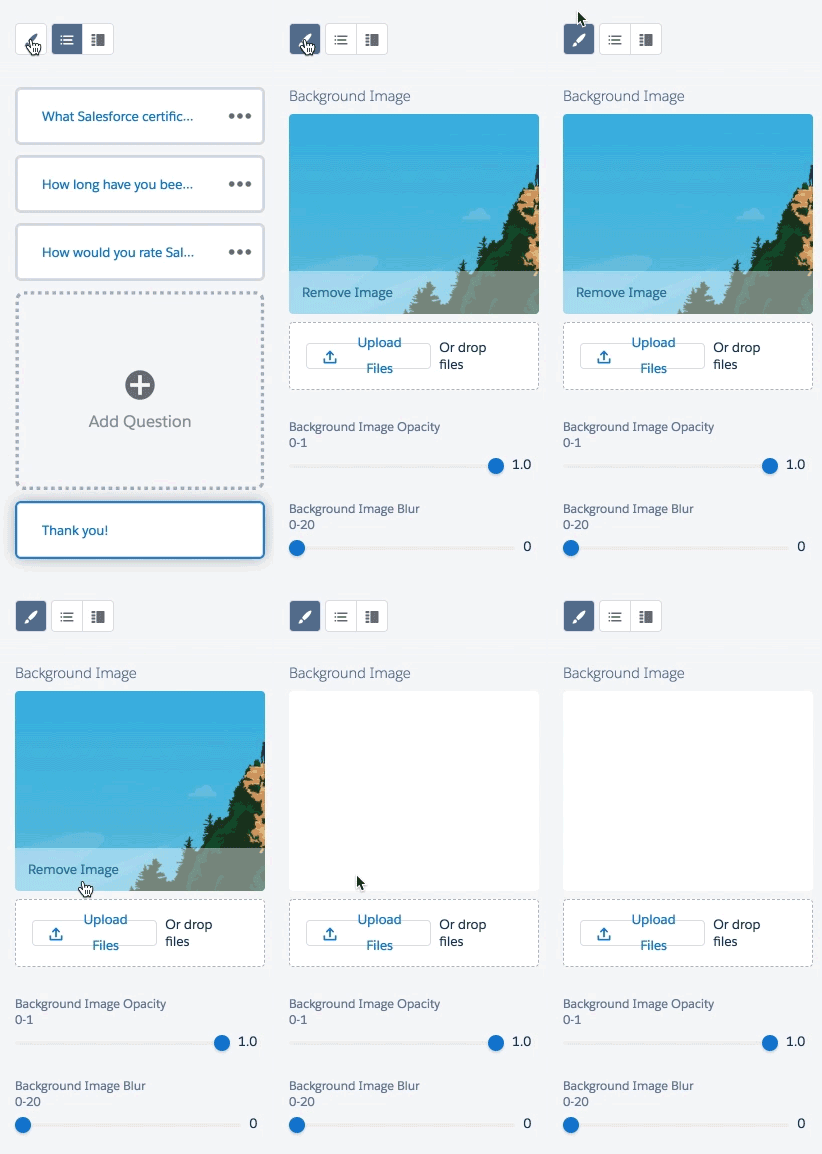
Update survey background image
Update survey styles

Font sizes and font families must be updated using the WYSIWYG editor provided for each question, thank you page and start page.

6. Activate it!

When you’re happy with your Survey or if you want to test it, click the activate button in the top right corner of the page.
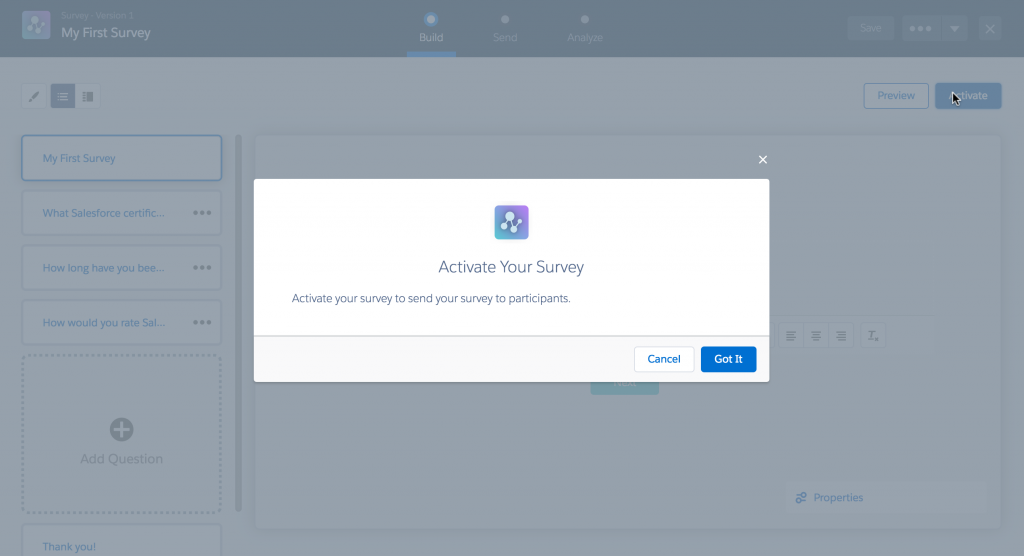
Activate your survey

7. Get your link and send out your Survey

Click on the Send tab to get the link of your new Survey. Select whether you want to send your survey to participants within your company or outside your company. To enable participants to take the survey without logging in, make sure that you have Communities are enabled in your org and public access is enabled for the community.
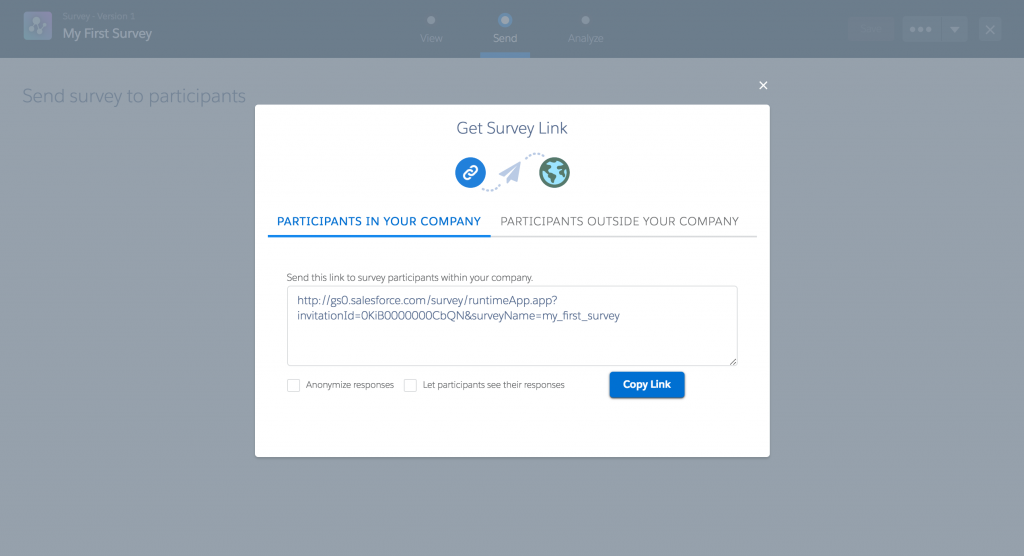
Get survey link

Select anonymize responses if you want to participants to take the survey without revealing their name or other identifying information.

Select let participants see their responses if you want to allow participants with Salesforce accounts in your org to access their response records after completing the survey.

8. View the responses

Survey responses can be viewed by clicking on the analyze tab within the survey builder.
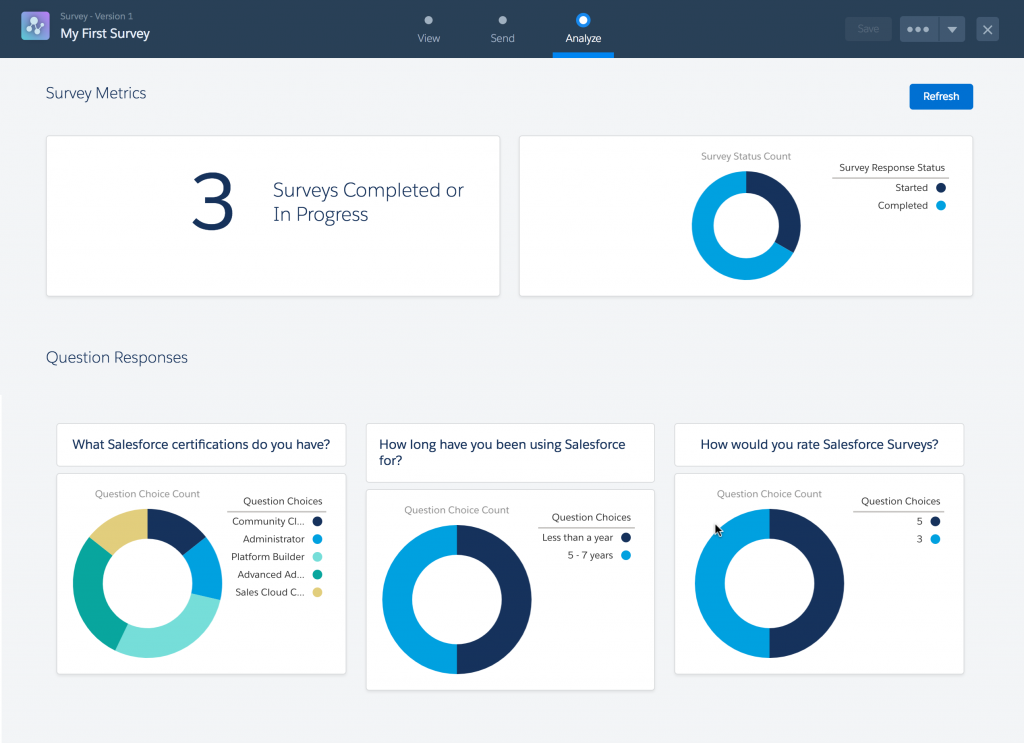
See survey responses

If the Analyze page in the Survey Builder doesn’t give you the information that you need, you can create a custom report type for survey responses.

Questions?

Send me a tweet @jennamolby, or contact the Sercante team for help.

There are many ways to include a Pardot form on your WordPress website. And choosing the best method depends on your specific use case. For example, you can use a plugin, write custom code, or integrate it using a third-party tool.

In this blog post, we’ll cover each of the methods and provide tips for using them to include Pardot forms on a WordPress website.

How to Include Pardot Forms on a WordPress Website

Here are five methods that we’ve used and tested, along with a detailed breakdown of how each method works.

1. Add the embed code directly in WordPress

The first option to embed Pardot forms on your WordPress site is to simply copy the HTML embed code Pardot provides you with and paste it into a page or post.

This is definitely one of the easier methods. However, if you often toggle between the visual and text (HTML) editor within WordPress, I’ve found sometimes it strips out code.

If you use this method, just make sure you test your form if you make any updates to your page or post.

2. Install the Pardot WordPress plugin

Another option is to install and configure the Pardot WordPress plugin. The plugin securely connects your Pardot instance with your WordPress installation. You will be able to track visitors, embed forms and dynamic content without touching a singe line of code.

How it works

Install the plugin and connect your Pardot account

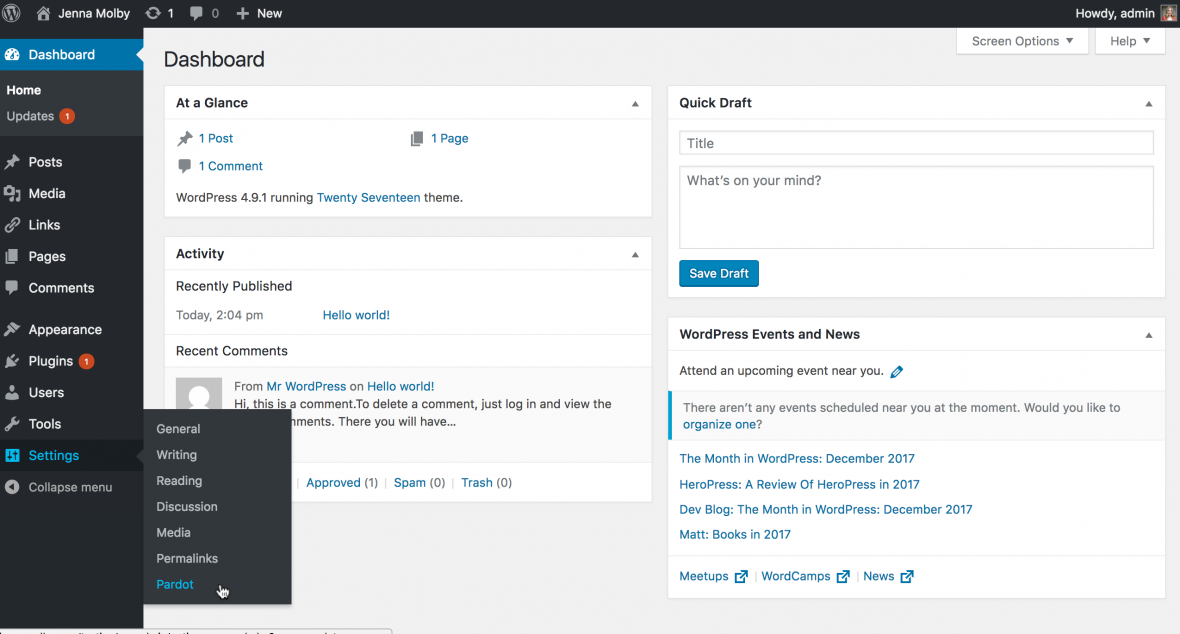
Install the Pardot WordPress Plugin and activate it within WordPress. This will create a new menu item under Settings > Pardot

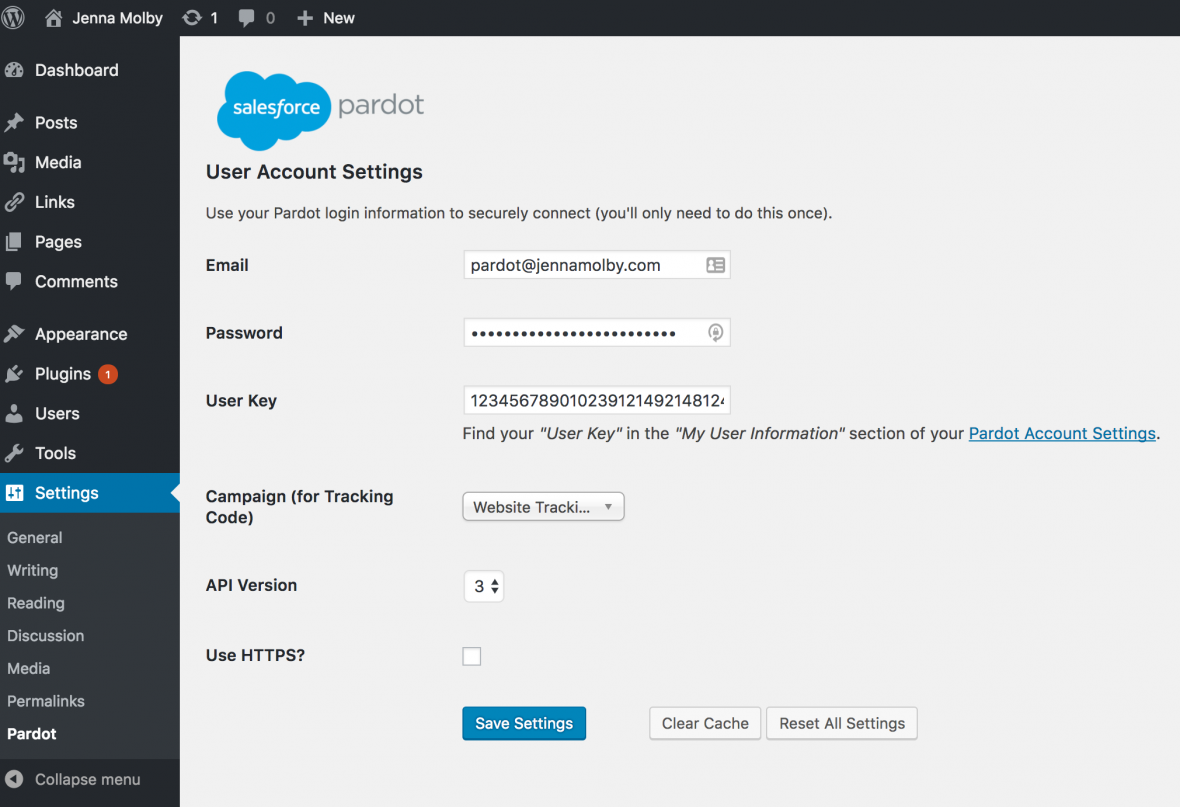
Enter in your Pardot credentials along with your user key and save the settings.

Add forms to your pages, posts, and widgets

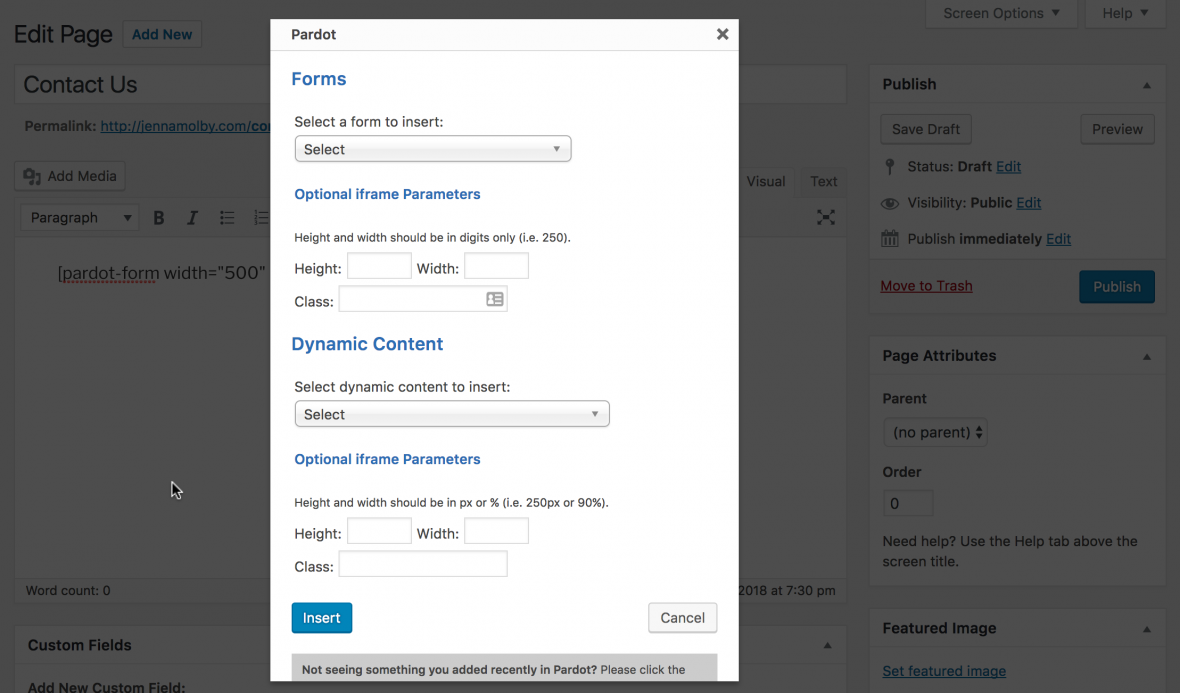
Once the plugin is configured you will be able to use short codes to insert Pardot forms within posts, pages and widgets. Short codes can be generated by clicking on the Pardot icon within the WYSIWYG editor or by following their short code syntax located in the FAQ section of this page

3. Install a Short Code WordPress Plugin

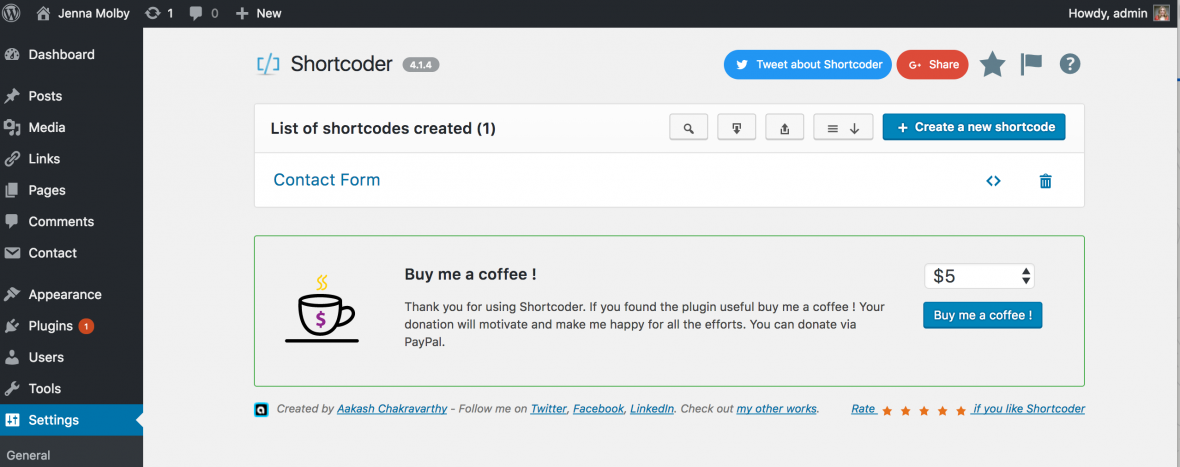
Another option is to download a short code WordPress plugin such as Shortcoder. This won’t give you as many features as using the Pardot WordPress plugin, since it doesn’t connect with your Pardot account and it won’t pull in all the forms within your account. However, Shortcoder has many other uses beyond including Pardot forms within your WordPress website, so it’s a good option if you want to limit the number of installed plugins within WordPress.

How it Works

Download and activate the plugin

Download and activate the Shortcoder Plugin. This will create a new menu item under Settings > Shortcoder.

Copy & Paste Your Pardot Form Code

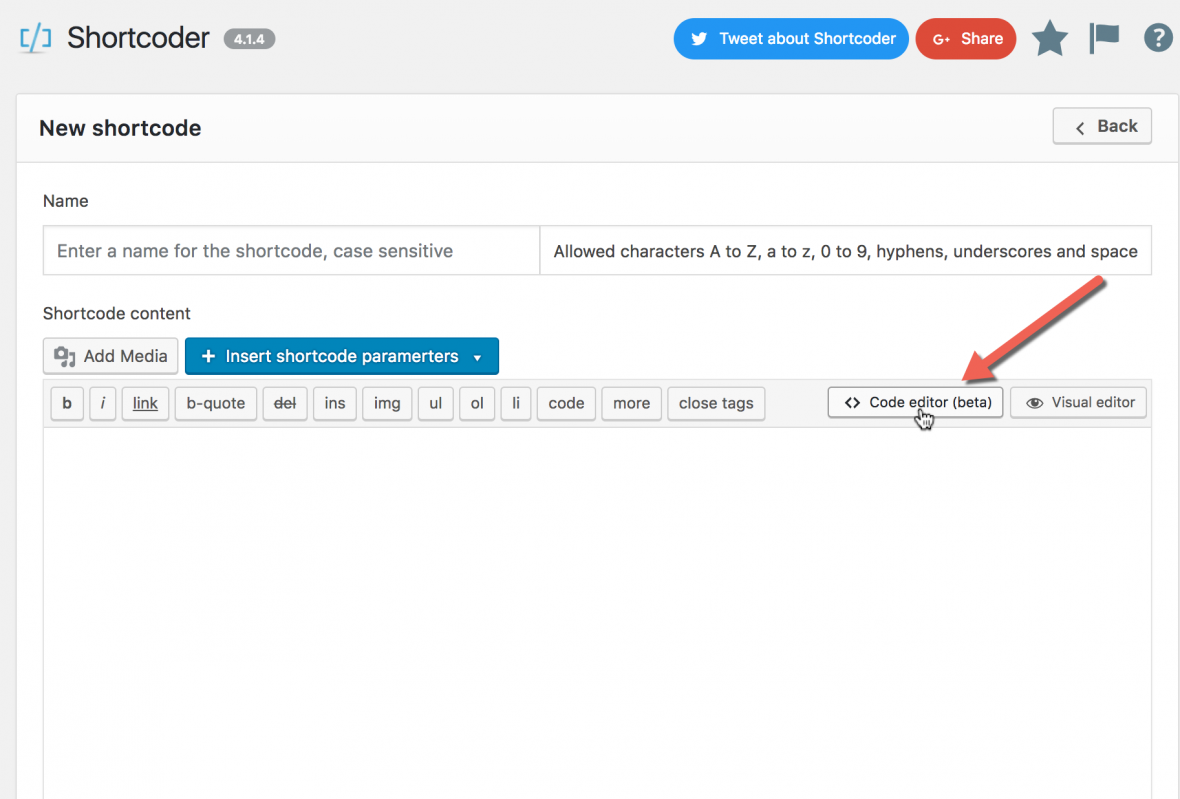
Create a new shortcode and give it a name. Make sure you select the code editor option.

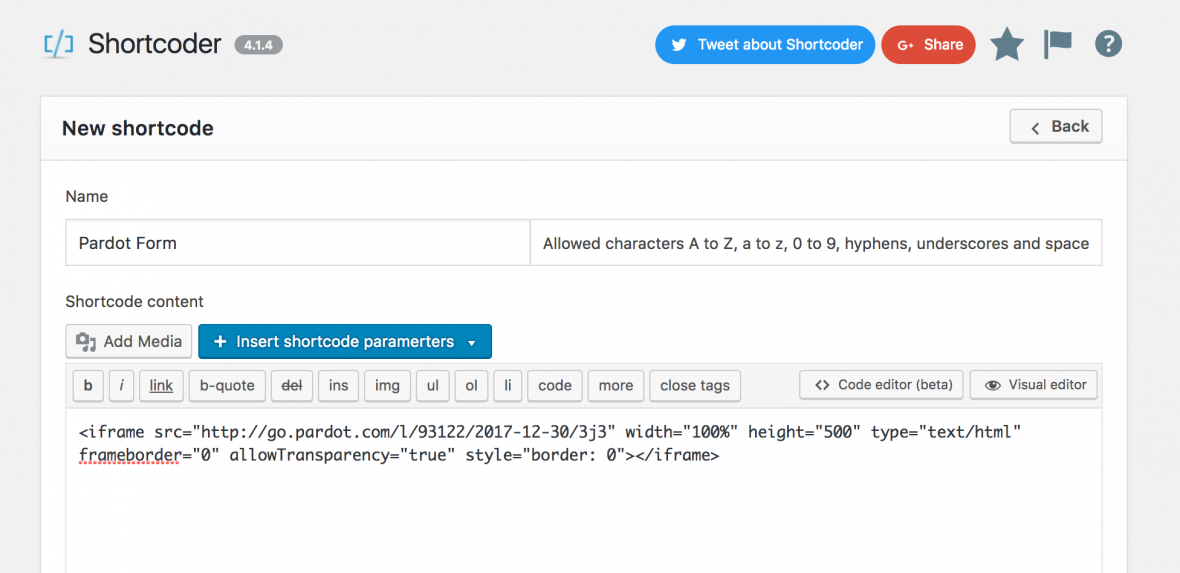
Copy and paste the HTML for your Pardot form in the shortcode editor and save.

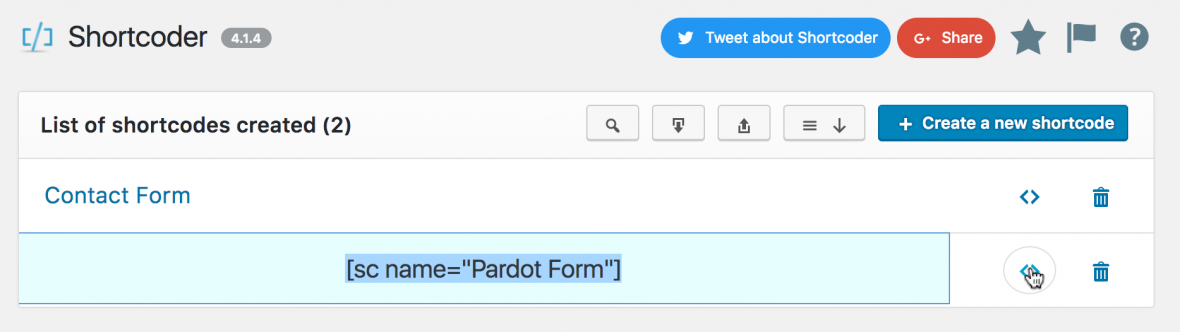
Your Shortcode is ready to use!

Now, you can use the shortcode to place your Pardot form on any page, post, and widget within WordPress.

4. Integrate Contact Form 7 Plugin with Pardot Form Handlers

With a bit of config work you can integrate the Contact Form 7 Plugin with Pardot form handlers. This method is great since Contact Form 7 is a popular WordPress plugin which you might already have installed. The form will also inherit any form styles you already have included on your website.

How it Works

Install and activate the plugins

Install the Contact Form 7 Plugin and activate it. You will also need to install and activate the 3rd Party Integration Plugin in order to integrate Pardot.

Create a new Contact 7 Form

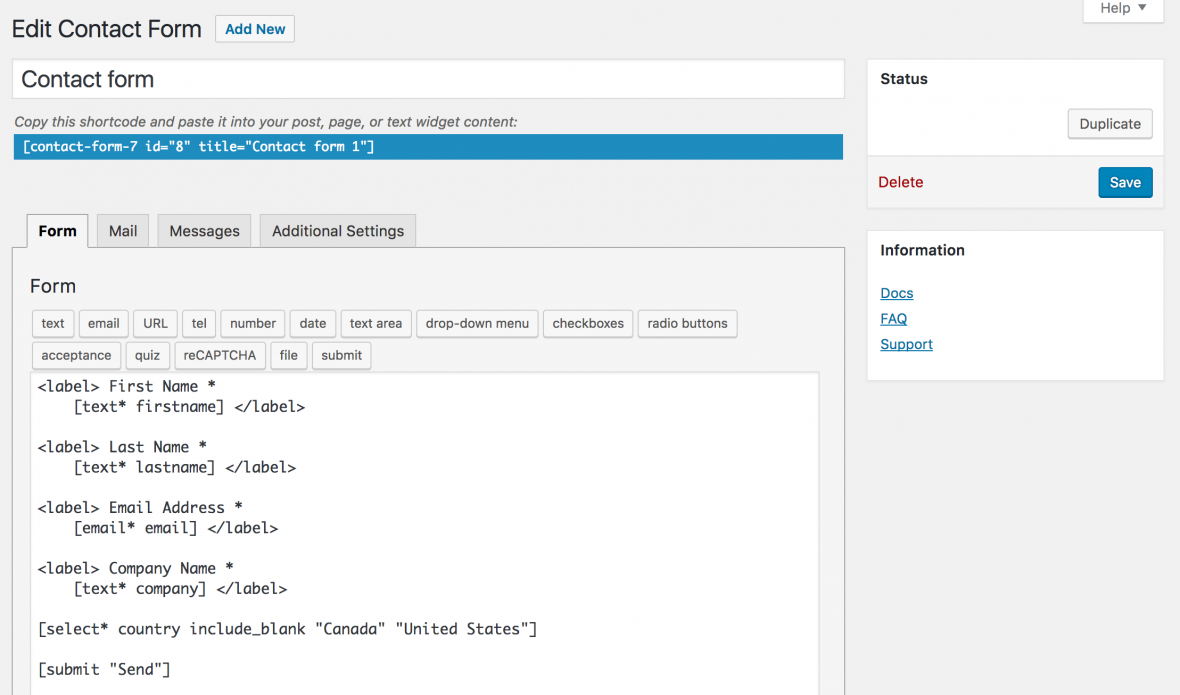
Under Contact create a new form or edit the default form that’s provided.

Create a new Pardot Form Handler

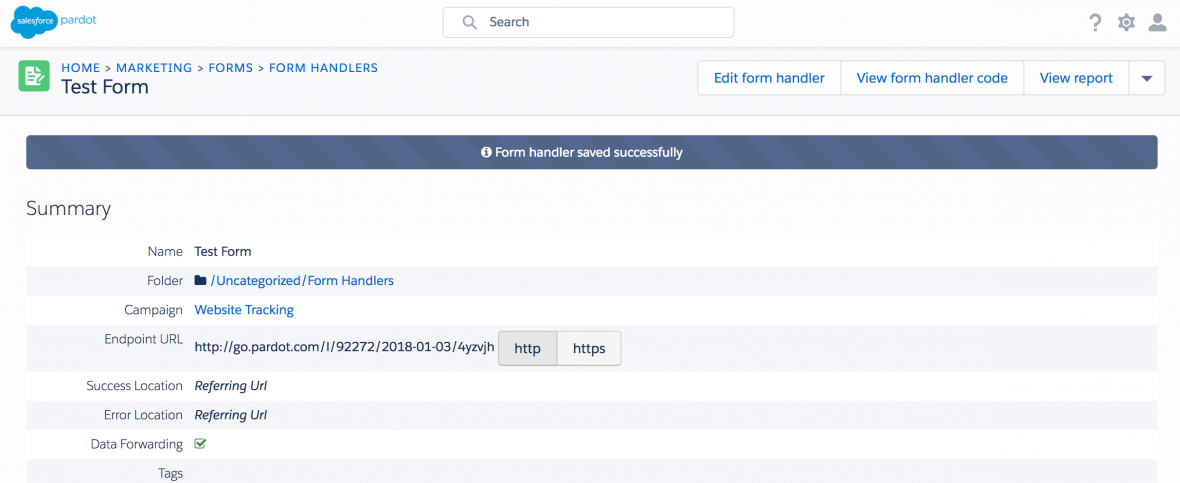
Create a new form handler in Pardot. The form will not use the success and error locations configured in the form handler settings, so you can leave those blank.

Set up the Integration

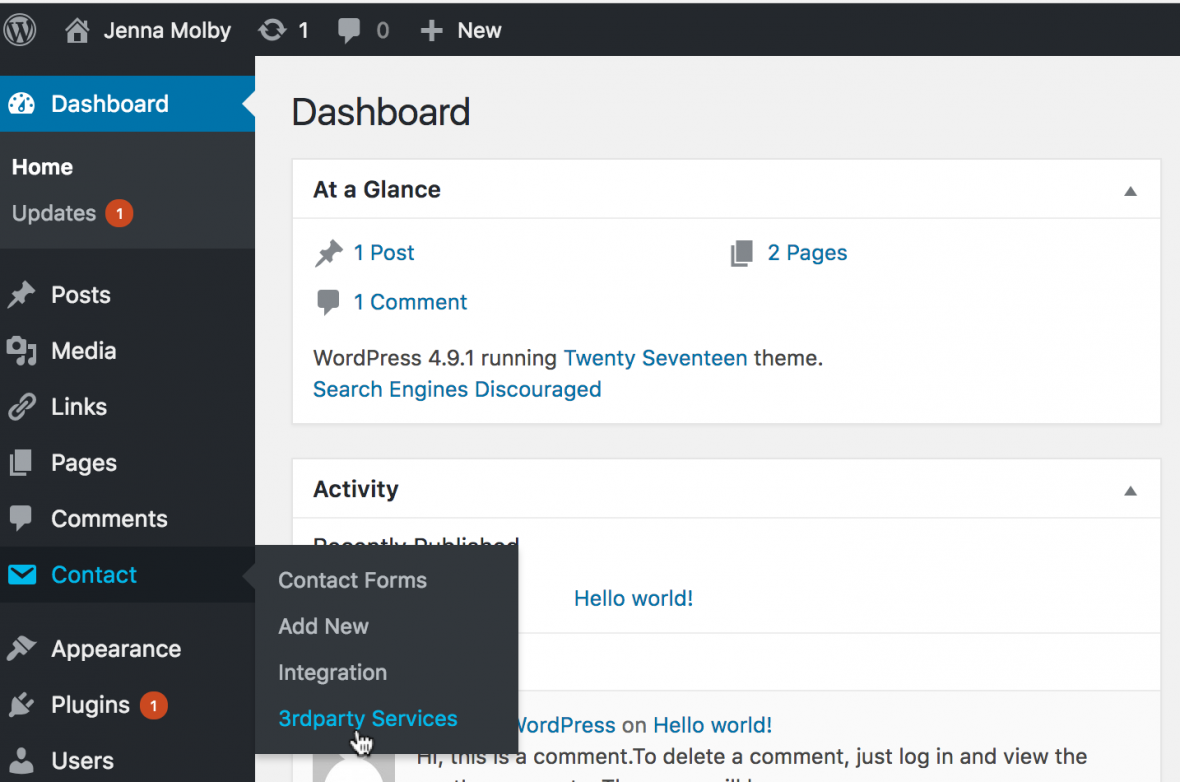
In WordPress, navigate to Contact > 3rd Party Services.

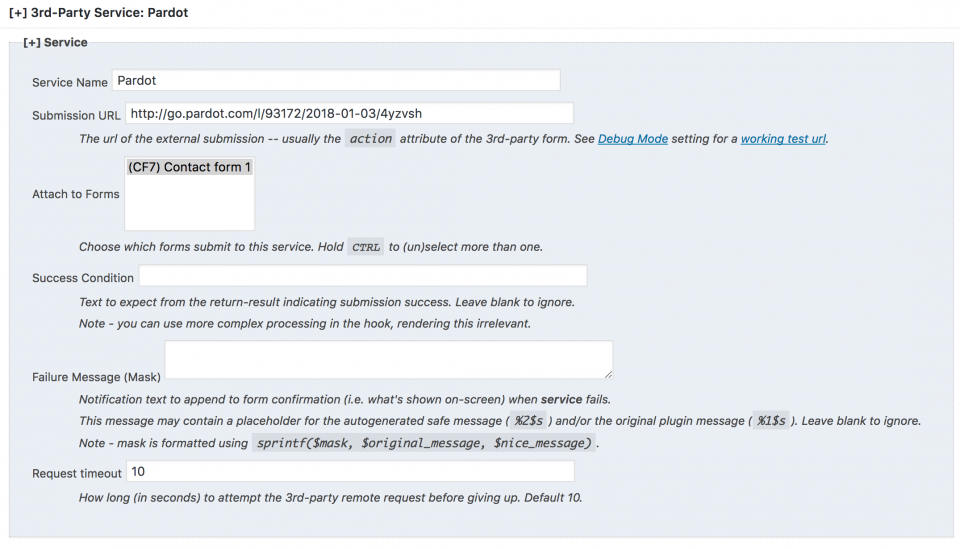
Add a new 3rd Party Service. Service name can be anything you want. Submission URL should be the URL Pardot provides for your form handler. Select the form you want to attach the Pardot form handler to. You can leave the success condition and the failure message blank to keep the Contact Form 7 defaults.

Map your fields

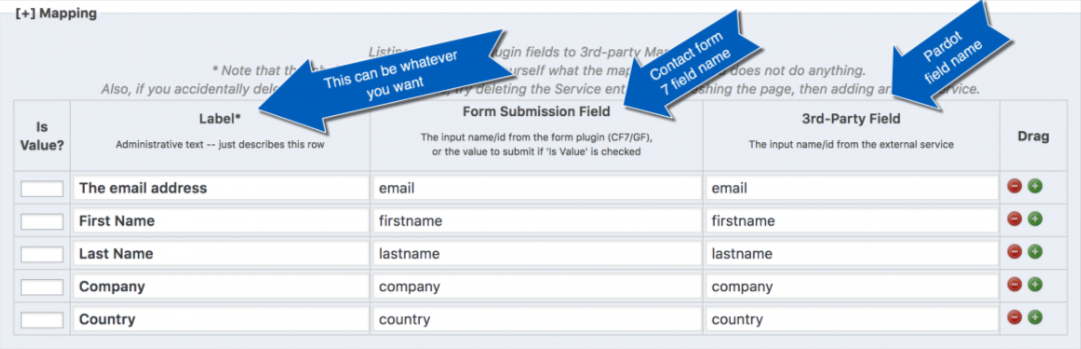
The last piece is to map the fields within Contact Form 7 to your Pardot form handler. I like to keep the names for both the same.

5. Popup Builder Plugin

This Popup Builder plugin allows you to create highly customizable popups that can be used with any of the methods outlined in this post. Perfect for gating assets on your website with Pardot forms, blog subscription popups and more!

How it works

Install and activate the plugin

Install and activate the Popup builder plugin. This will create a new navigation item called Popup Builder.

Create a new popup

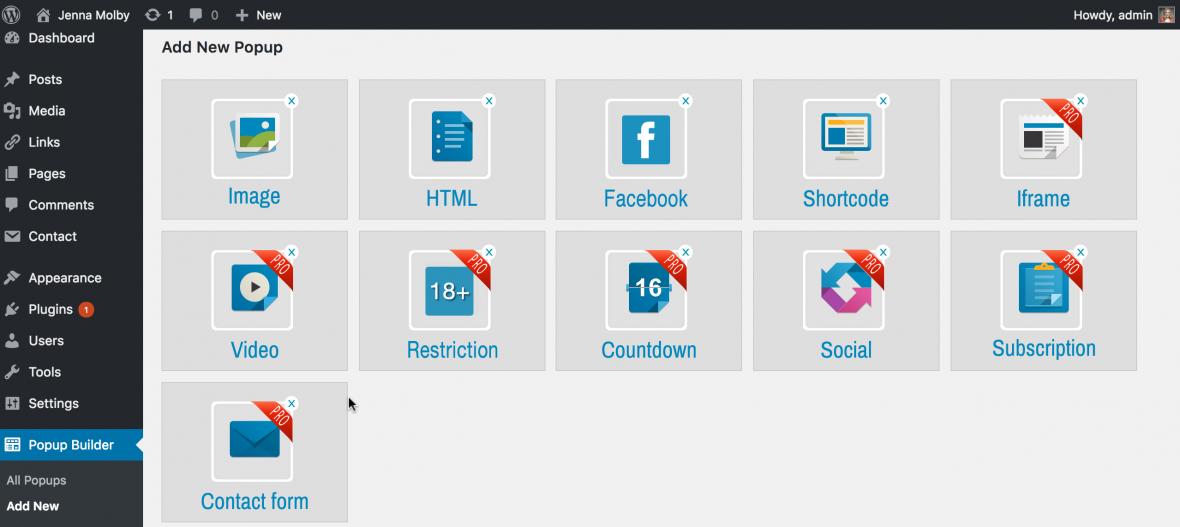
Create a new popup and select the type. You can select HTML if you want to copy & paste the iFrame code Pardot provides directly into WordPress. You can also use the short code option if you want to use the popup plugin in conjunction with another plugin, such as the Pardot WordPress Plugin.

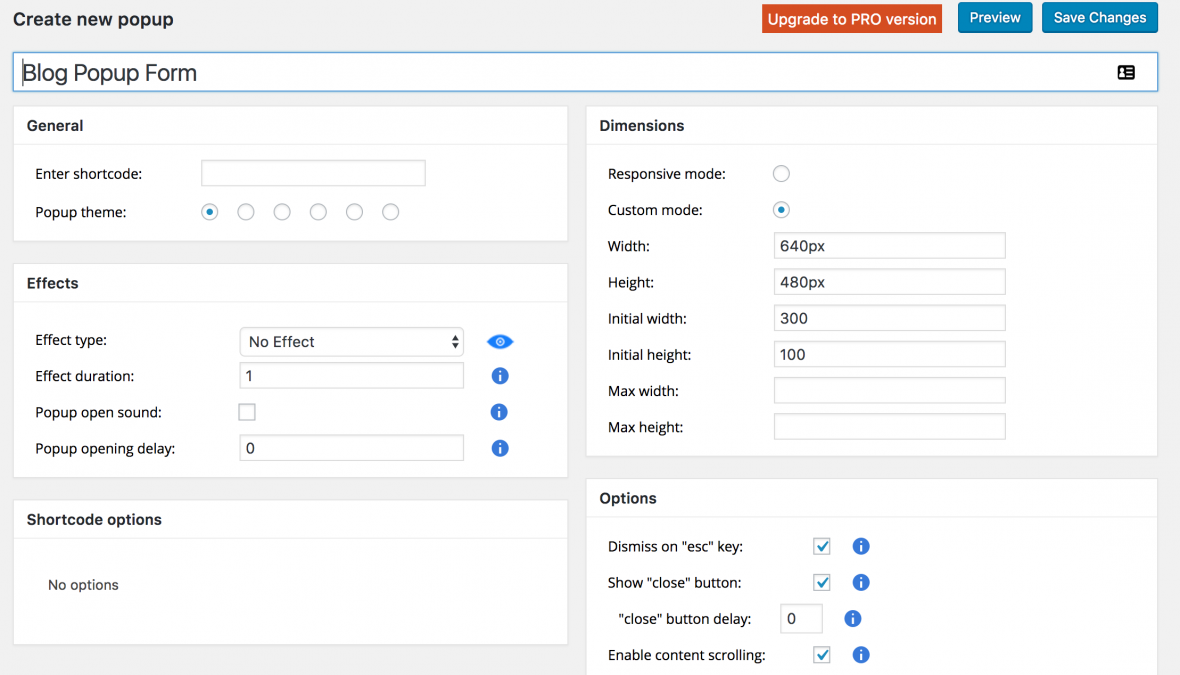
Configure the popup

Configure your popup using one of the many options available and save.

Add it to your pages

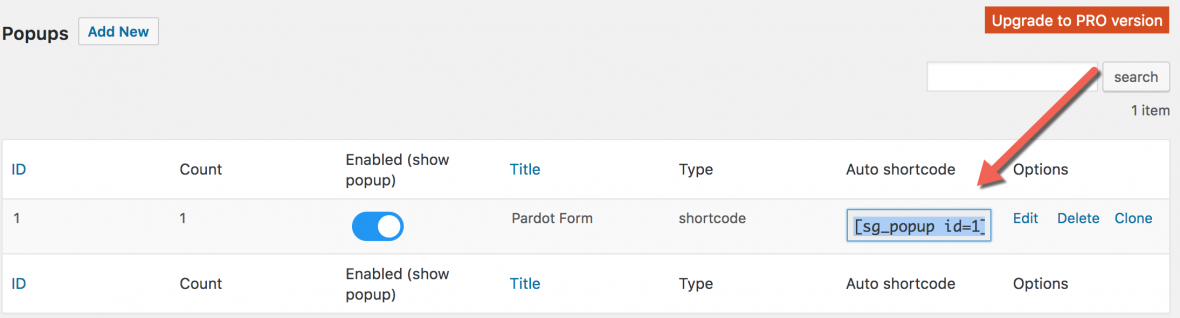
The plugin will generate a shortcode which can be added to you post and pages.

Questions?

Send me a tweet @jennamolby, or contact the Sercante team for help.
Standard campaign statuses are essential to have consistent reports within Salesforce, but there’s no easy way to bulk create new statuses within the UI. In this tutorial, I’ll show you how to bulk create campaign member statuses in Salesforce using the Data Loader.

Pull a campaign report

The first step is to create a Salesforce report of all the campaigns you want to update. You will need all the campaign IDs as well as the campaign type (online advertising, webinar, email blast, etc) if you want to update the statuses based on campaign type. Export the report as a CSV file.

Prep the CSV file

Next, you need to prep your CSV file for upload. The Campaign Member Status object contains 5 fields:

  1. Campaign ID
  2. Responded (True or False)
  3. Is Default (True or False)
  4. Member Status (Text)
  5. Sort Order (Number)

I recommend using all 5 of these fields, but only Campaign ID and Member Status will be required to create the statuses.

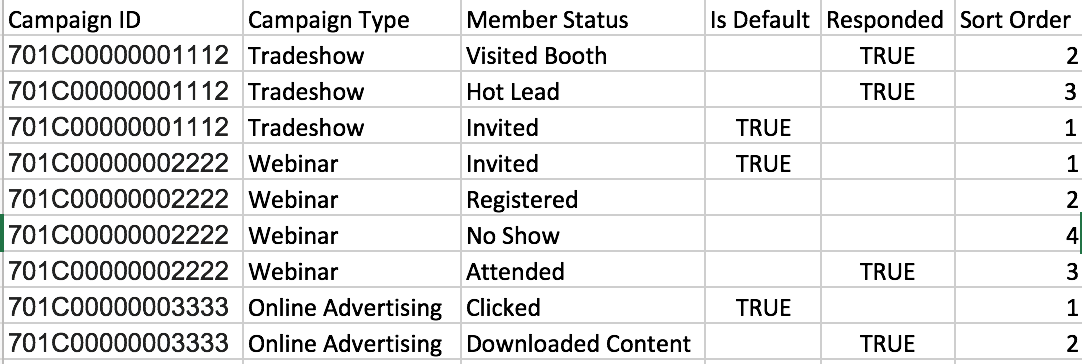
Here’s an example of a file that is ready to be uploaded.

Upload Using Data Loader

If you don’t already have Data Loader installed on your computer, login to your Salesforce instance navigate to setup and search Data Loader using the quick find. Follow the instructions to install Data Loader on your computer.

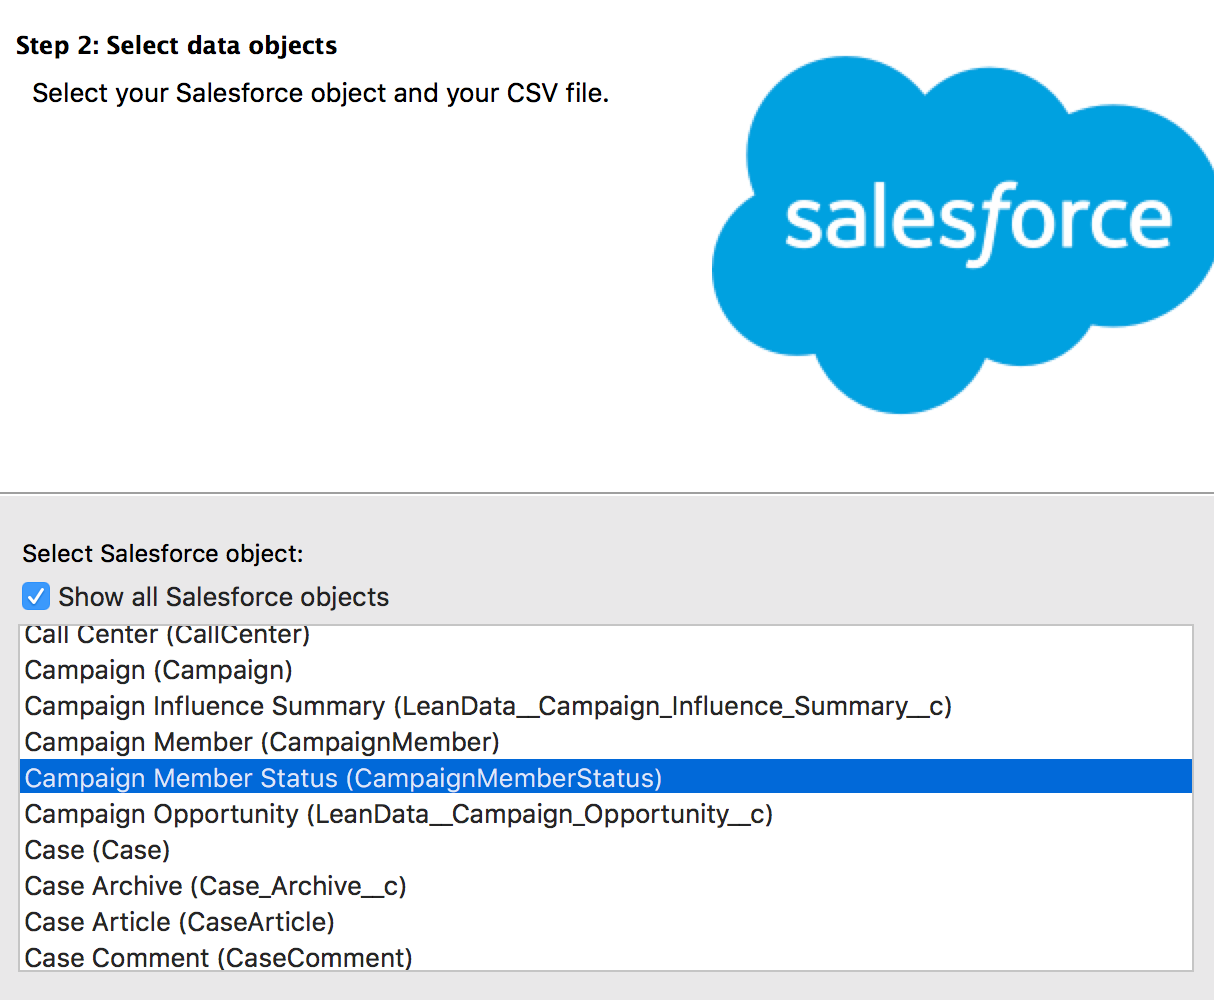
Once you have Data Loader installed, you can upload your campaign member statuses. To do this, click on the Insert button and login using your Salesforce credentials. When prompted to select your Salesforce data object, check “Show all Salesforce objects” and select Campaign Member Status as your object.

Select your CSV file and click next. Map the available fields to the columns in your CSV file and click next to start the import.

Questions?

Send them to me via email, send me a tweet @jennamolby, or contact the Sercante team for help.
Identifying which campaigns and channels have influenced an opportunity is a key piece of information to see which marketing campaigns are the most effective. In this tutorial, I’ll walk you through how I use Salesforce campaigns in Pardot to track campaign influence.

Planning

Create a naming convention

If you already have a standard naming convention in Pardot, great! You can use the same naming convention for you Salesforce campaigns. Otherwise, here’s an idea on how you can set it up.

[Campaign Type]_[4-digit Year]-[2-digit Month]-[2-digit date]_[Campaign Description]

Examples:
Email-Blast_2017-03-02_Product-Newsletter
Webinar_2017-02-12_Pardot-Best-Practices

Nail down your campaign types & statuses

Standard campaign statuses are essential to have consistent reports within Salesforce. Here are some suggestions on what campaign types and statuses you might want to use.

Campaign TypeCampaign Member Statuses
Online AdvertisingClickedConverted
Email BlastSentOpenedClickedUnsubscribed
TradeshowAttendedRegisteredVisited BoothNo Show
WebinarRegisteredAttendedNo ShowInvited

The Salesforce Setup

Once you have figured out what your naming convention, campaign types, and statuses should be it’s time to get started with the Salesforce setup.

First, we need to set up 1 campaign for each campaign type. These will act as ‘templates’ for all your campaigns going forward. When you create a new campaign in Salesforce, you will ‘clone’ one of the campaign ‘templates’ instead of creating a new campaign each time. This will ensure that all you campaign statuses are consistent throughout all campaigns and make reporting MUCH easier.

How to create campaign ‘templates’

Create a campaign and give it the a descriptive name to indicate the type of campaign and that it’s a template.

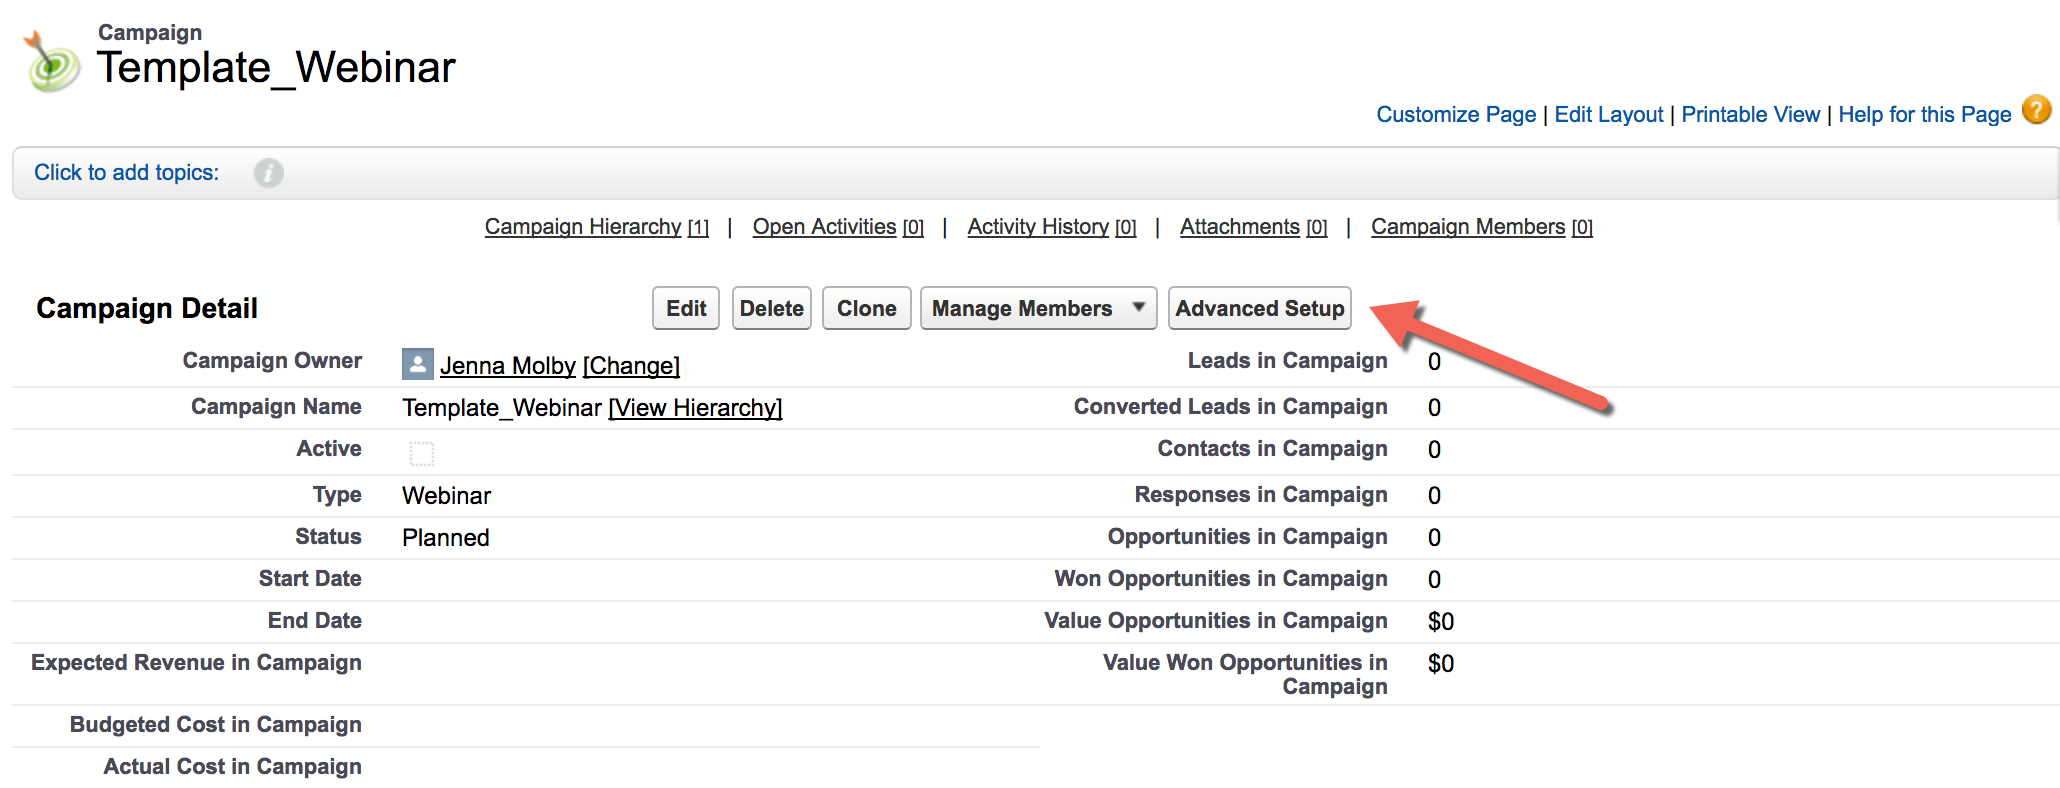
Go to the campaign and click advanced setup to create and modify your campaign statuses.

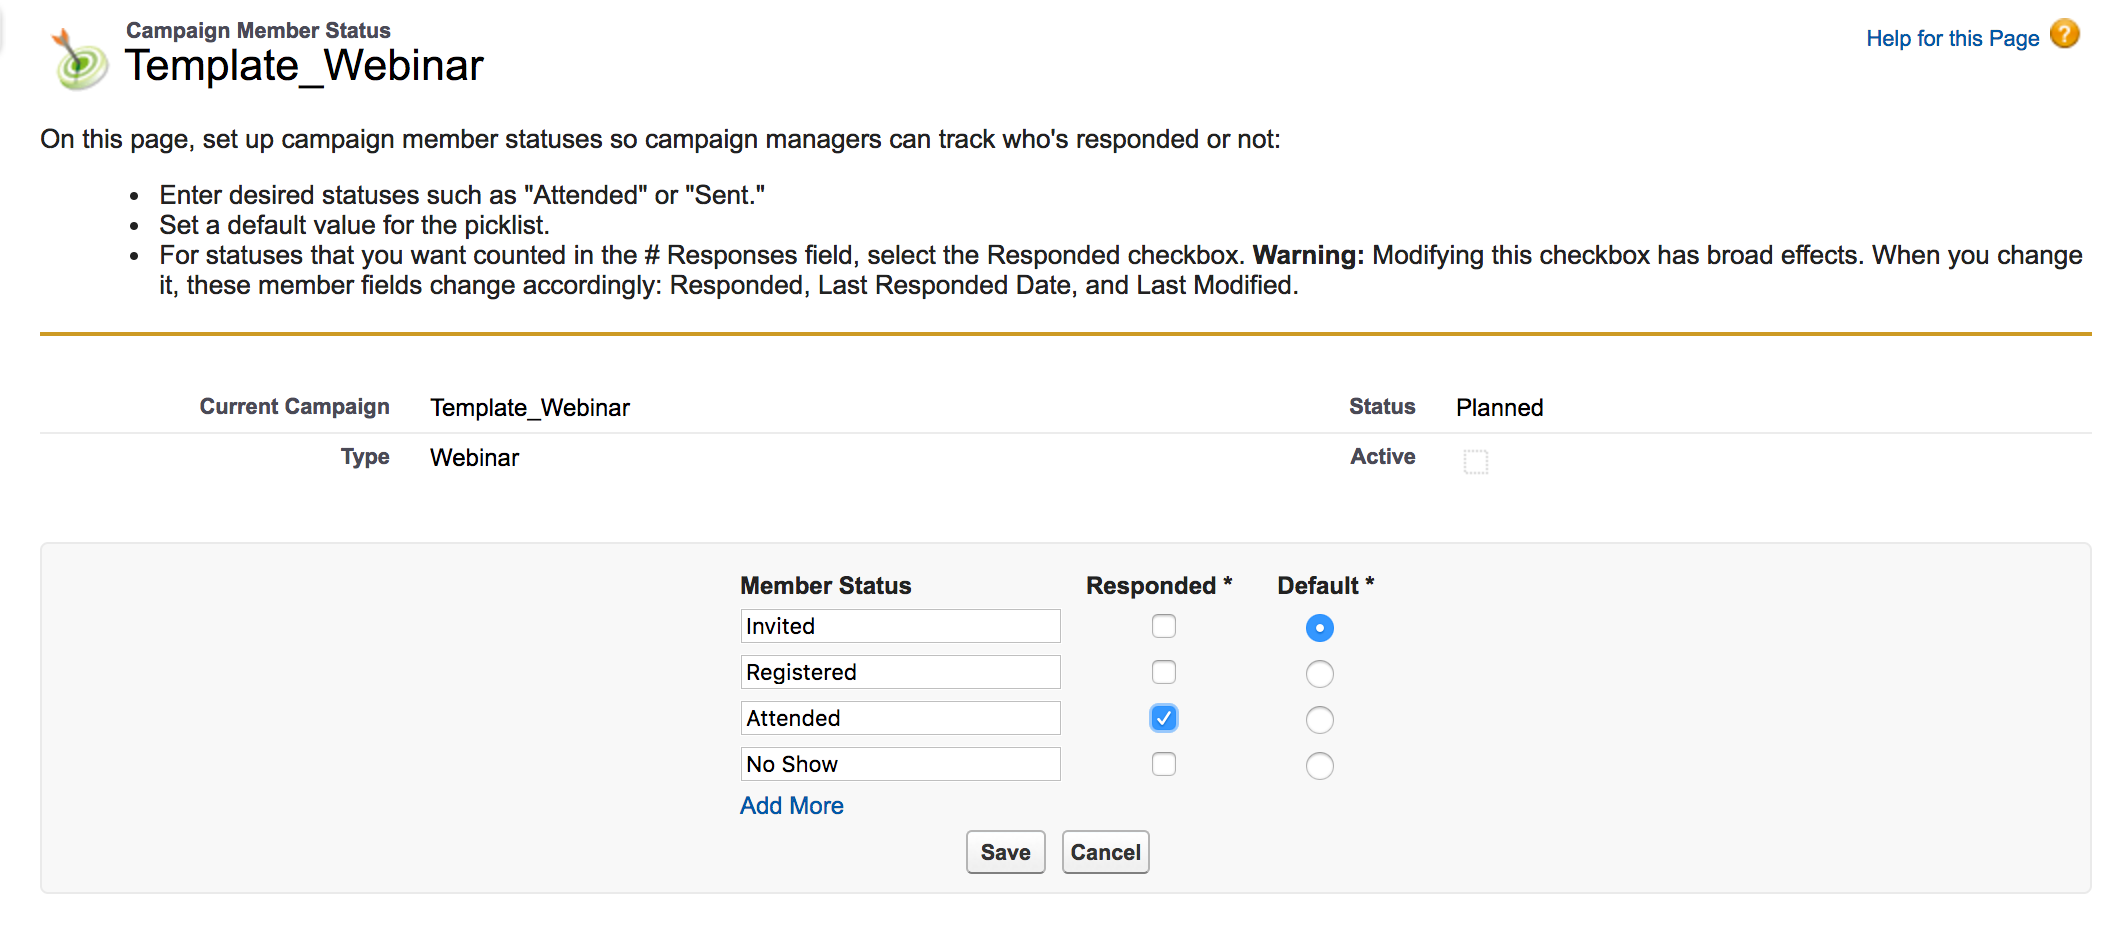
Add each one of your statues and select one or more statuses as ‘responded’.

Repeat this process until you have all your campaign template setup

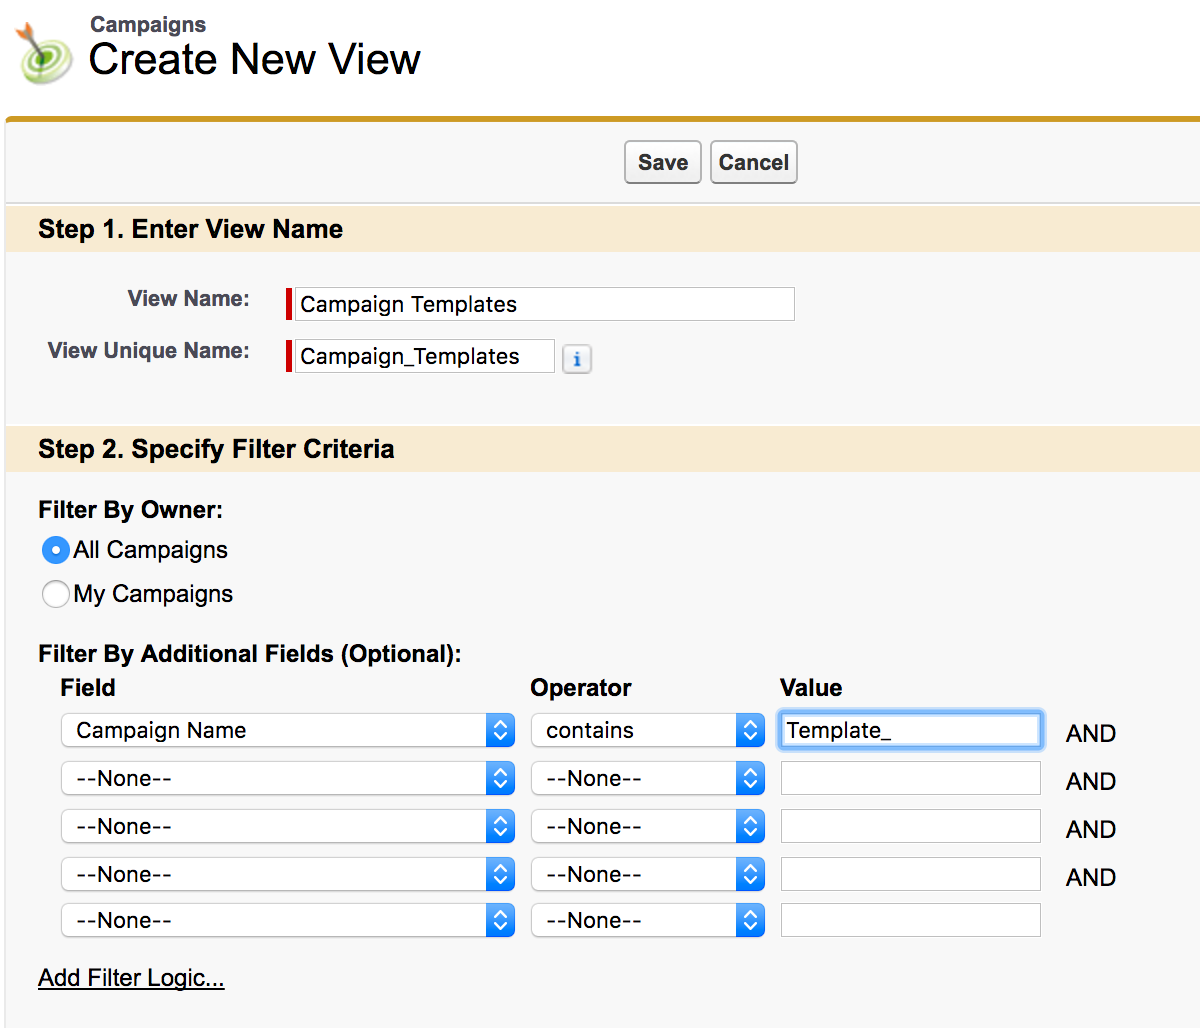
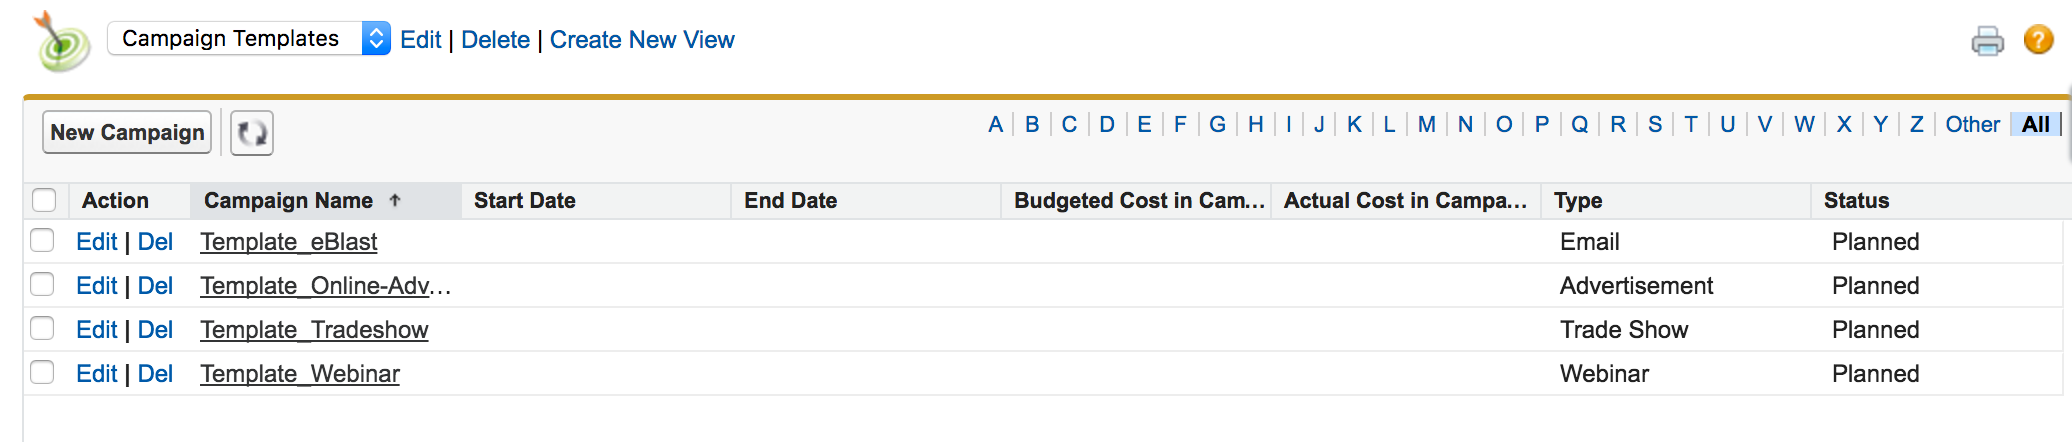
Once your campaign templates are setup you can create a new view, so you can easily locate your campaign templates.

How to create new campaigns

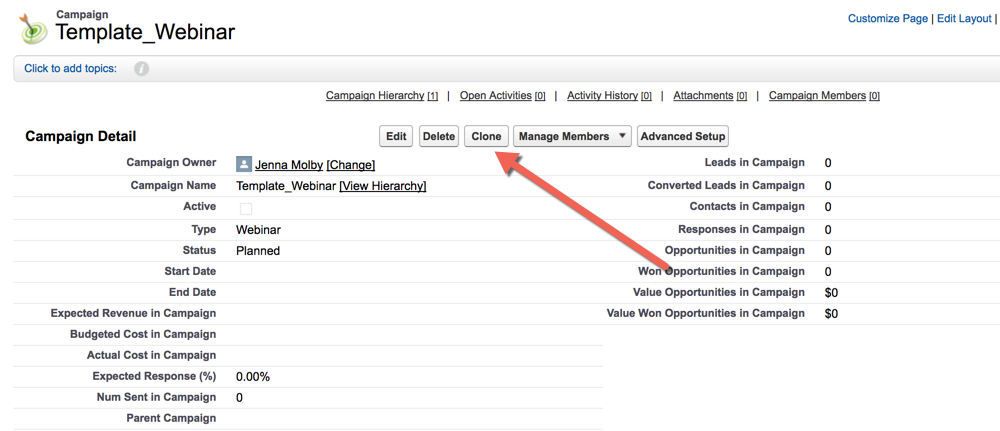
Find one of your campaign templates, click on the name and clone the campaign.

Name your campaign according to your naming convention and update the rest of the fields.

The Pardot Setup

Now that you have everything set up in Salesforce, it’s time to use these campaigns in Pardot.

Adding prospects to a Salesforce campaign in Pardot

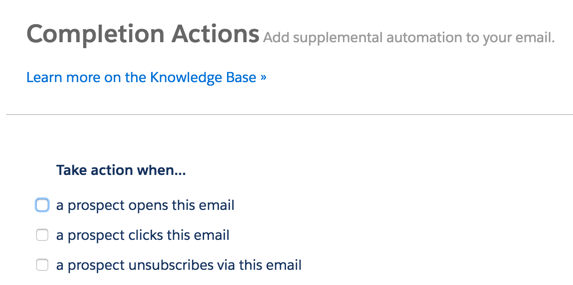
Prospects are not automatically pushed into a Salesforce campaign. They will only sync to a Salesforce campaign if you set up an automation rule, segmentation rule, completion action, an engagement or drip program. This Pardot knowledge article explains in detail on when to use each one of these methods and here’s a breakdown of which method I recommend for each campaign type and status.

Email Blast Campaign
Campaign StatusPardot Action
SentAutomation Rule
Update by creating an automation rule and include everyone that’s in your emailing list. You can also go to Reports > Marketing Assets > Emails > List Emails, scroll down to the total sent and click on the link. Select all the prospects and add a tag to them. Then you can create an automation rule based on the prospects who have that tag and sync them with your Salesforce campaign.
Opened
Clicked
Unsubscribed
Completion Action
Update using a completion action when scheduling the email.

Online Advertising Campaign

Campaign StatusPardot Action
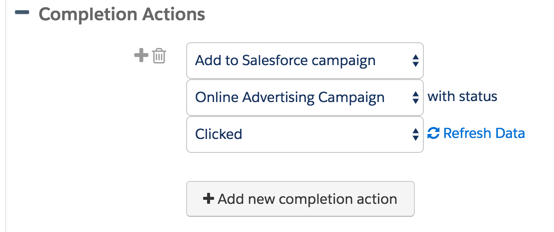
ClickedCompletion Action
Setup custom redirects and use completion actions to update the Salesforce campaign status to clicked.
DownloadedCompletion Action
Use a completion action on your Pardot form or handler to update the Salesforce campaign status to downloaded

Tradeshow Campaign

Campaign StatusPardot Action
AttendedAutomation Rule
Use an automation rule to track who attended a tradeshow.
RegisteredCompletion Action or Automation Rule
Dependent on how the registration for your tradeshow is set up. You might use a completion action on a form or form handler to manage this status update, or have an automation rule running if you’re uploading a list of prospects.
Visited BoothAutomation Rule
Dependent on how you manage badge scans at a booth. Most likely you will need to use an automation rule to update the status to visited booth.
No ShowAutomation Rule
An automation rule will need to be created to update the status to no show.

Webinar Campaign

Campaign StatusPardot Action
RegisteredCompletion Action
Use a completion action within your registration form or form handler to update the Salesforce campaign status to Registered.
Attended
No Show
Automation Rule
Use an automation rule to update the statuses to attended or no show.
InvitedAutomation Rule
Update by creating an automation rule and include everyone that’s in your emailing list. You can also go to Reports > Marketing Assets > Emails > List Emails, scroll down to the total sent and click on the link. Select all the prospects and add a tag to them. Then you can create an automation rule based on the prospects who have that tag and sync them with your Salesforce campaign.

Reporting

Salesforce has campaign reports already set up for you, which is a great starting point. Standard reports include:

  • Campaign ROI Analysis Report: How are each of your campaigns performing?
  • Campaign Call Down Report: Shows all the members of a specific campaign.
  • Campaign Member Report: Shows all the members of your campaigns.
  • Campaign Member Analysis Report: Who has responded to your campaigns?
  • Campaign Leads: Which leads have been marketed to in the past?
  • Campaign Contacts: Which contacts have been marketed to in the past?
  • Campaign Revenue Report: Shows the revenue generated from your campaigns.
  • Campaigns with Influenced Opportunities: Shows the opportunities influenced by your campaigns.

Questions?

Send me a tweet @jennamolby, or contact the Sercante team for help.

In this tutorial you will learn how to use a Pardot form to gate content on a page. Gated content allows you to capture a lead’s information, by asking them to provide contact details before accessing a piece of content that is valuable. Instead of creating more than one page for the gated content and form, this tutorial will focus on creating a popup on the page that contains the asset.

Gated Content via Pardot Form: The Concept

Here’s a high-level overview of what the user will experience when visiting the gated page:

  1. The user visits the page and is greeted with a popup containing the Pardot form.
  2. The user must complete the form in order to view the entire page.
  3. Once the user fills out the form, they are redirected to the asset page.

View Demo

Gated Content via Pardot Form: The Setup

Create the Pardot Form

First, create the form in Pardot, select the fields you want to use, select the form layout and save. Don’t worry about the ‘thank you’ messages yet, this will be edited later.

Add code to your web page

We will be using Magnific Pop-up jQuery Plugin to create the pop-up in Pardot.

Add the necessary plugins to the page

!-- Magnific Popup core CSS file -->
<link rel="stylesheet" href="https://cdnjs.cloudflare.com/ajax/libs/magnific-popup.js/1.1.0/magnific-popup.min.css">
 
<!-- Load jQuery -->
<script src="http://ajax.googleapis.com/ajax/libs/jquery/1.9.1/jquery.min.js"></script>
 
<!-- Magnific Popup core JS file -->
<script src="https://cdnjs.cloudflare.com/ajax/libs/magnific-popup.js/1.1.0/jquery.magnific-popup.min.js"></script>

Now this is the tricky part. In order to have the popup form and the gated content all on the same page, we need to tell the page when to show the form and when to hide the form. We can do this by using a URL parameter called ‘access’.

When the page is loaded the script will look for a parameter in the URL that looks like this:

http://yourlandingpageurl.com?access=yes

If the URL contains the parameter, the form won’t show on the page. If the URL doesn’t contain the parameter, then the Pardot form will show.

<script type="text/javascript">
$(document).ready(function() {
// Parse the URL
function getParameterByName(name) {
    name = name.replace(/[\[]/, "\\[").replace(/[\]]/, "\\]");
    var regex = new RegExp("[\\?&]" + name + "=([^&#]*)"),
        results = regex.exec(location.search);
    return results === null ? "" : decodeURIComponent(results[1].replace(/\+/g, " "));
}
// Give the URL parameters variable names
var access = getParameterByName('access');
 
// if access does not = yes then display the popup
if (access != 'yes') {
$.magnificPopup.open({
  items: {
    src: 'http://info.jennamolby.com/x/xxxxxx/xxxx-xx-xx/xx'
  },
  type: 'iframe', modal: true
});
}
});
</script>

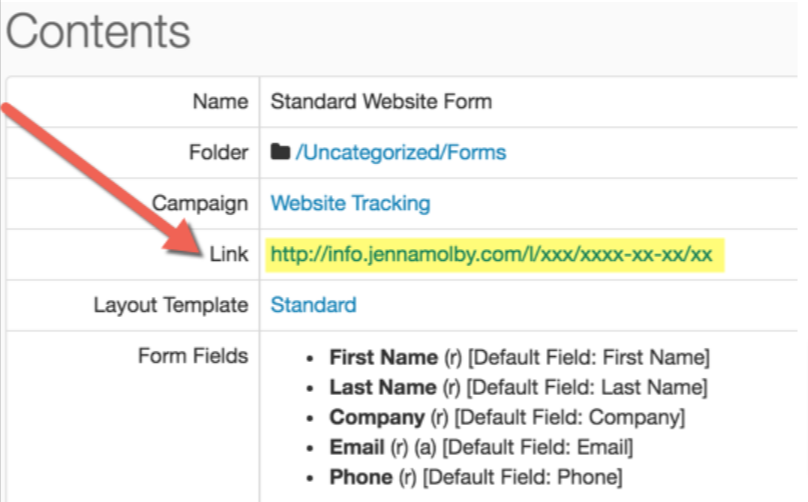
Update the http://info.jennamolby.com/x/xxxxxx/xxxx-xx-xx/xx with the link to your Pardot form. This can be found by navigating to your form in Pardot and copying the URL under Contents > Link.

Update the ‘thank you’ page settings

Now that the web page is setup, you can add in the ‘thank you’ page details in Pardot. Check the setting for Redirect the prospect instead of showing the form’s Thank You Content‘and set the redirect location to be the URL of your webpage PLUS the URL parameter.

View Demo

Questions?

Send me a tweet @jennamolby, or contact the Sercante team for help.
When building Lightning Components, using the HTML script markup is not supported. However, there’s an alternative that is easy to implement. Follow these step-by-step instructions to learn how to use external JavaScript or jQuery libraries within Salesforce Lightning Components.

Upload a Static Resource

Before you can use the jQuery library within your Lightning Component, you need to create a static resource for the JavaScript files.

Static resources can be uploaded as a single file or a group of files in a ZIP folder. To upload a static resource go to Setup > Custom Code > Static Resources.

Loading a Single JS File

When building Lightning Components, using the HTML script markup is not supported and will result in this error message: “script tags only allowed in templates”. The alternative way is to use ltng:require which enables you to load external JavaScript libraries.

<aura:component>
    <ltng:require scripts="{!$Resource.yourResourceName + '/yourFileName.js'}" />
</aura:component>

Static resources can be included using the standard syntax: {!$Resource.yourResourceName + ‘/yourFileName.js’}.

Loading Multiple JS Files

If you have more than one JavaScript file the syntax is a bit different due to a quirk in the way $Resource is parsed in expressions.

<aura:component>
<ltng:require scripts="{!join(',',
    $Resource.yourResourceName + '/yourFileName1.js',
    $Resource.yourResourceName + '/yourFileName2.js')}" />
</aura:component>

Use the jQuery library within a component

Once the jQuery libraries are loaded on the page, to utilize the library include the afterScriptsLoaded event and place the method within your client-side controller.

Component markup

<aura:component>
    <ltng:require scripts="{!$Resource.yourResourceName + '/yourFileName.js'}" afterScriptsLoaded="{!c.doInit}" />
</aura:component>

Client-side controller markup

({
 
  doInit : function(component, event, helper) {
        
      jQuery("document").ready(function(){
          console.log('loaded');
          
      });
        
}
})

Example

Here’s a example of using jQuery One Page Nav within a Lightning Component:

Component

<aura:component>
   <ltng:require scripts="{!join(',',
    $Resource.myLightingComponent + '/jquery-3.3.1.min.js',
    $Resource.myLightingComponent+ '/jquery.nav.js')}" afterScriptsLoaded="{!c.doInit}"/>
</aura:component>

Client-side controller

({
 
  doInit : function(component, event, helper) {
        
      jQuery("document").ready(function(){
          $('#cmp-nav').onePageNav({
              scrollSpeed: 750,
scrollThreshold: 0.5,
filter: '',
easing: 'swing',  
          });
          
      });
        
}
})

Questions?

Send me a tweet @jennamolby, or contact the Sercante team for help.
No more posts to show