Building landing pages in Pardot can be an interesting challenge because, depending on your needs and the skillset of your team, there are multiple ways to go about it. (more…)



Date stamping can be used in Salesforce to record the date or date/time when a particular field is changed. This is used frequently for capturing the date the lead entered a particular stage or when a lead was first actioned. These fields can be used in reports and dashboards. Let’s dive into how to set this up and some example use cases.
The basics
The best way to date stamp in Salesforce is to create a workflow rule to update the field.
- Create the date field
The first step is to create the field on the object. You can choose either the date field type or the date/time field type. - Create the workflow rule
Create a new workflow rule (Setup > Proceess Automation > Workflow Rules > New Rule). Select the object you where you just created the field and add the rule criteria. - Add a workflow action to update the field
Create a workflow action to update the date field. Use a formula field to set the value. If your field type is DATE/TIME use NOW() as your formula. If the field type is DATE use TODAY() as your formula.
Examples
Date stamp a field when a checkbox is checked
Create a workflow rule and select “created, and any time it’s edited to subsequently meet criteria” for your evaluation criteria. Next, add the filters for your rule criteria. In this example, I’m going to date stamp a field when the checkbox for “MQL is Accepted” is checked.
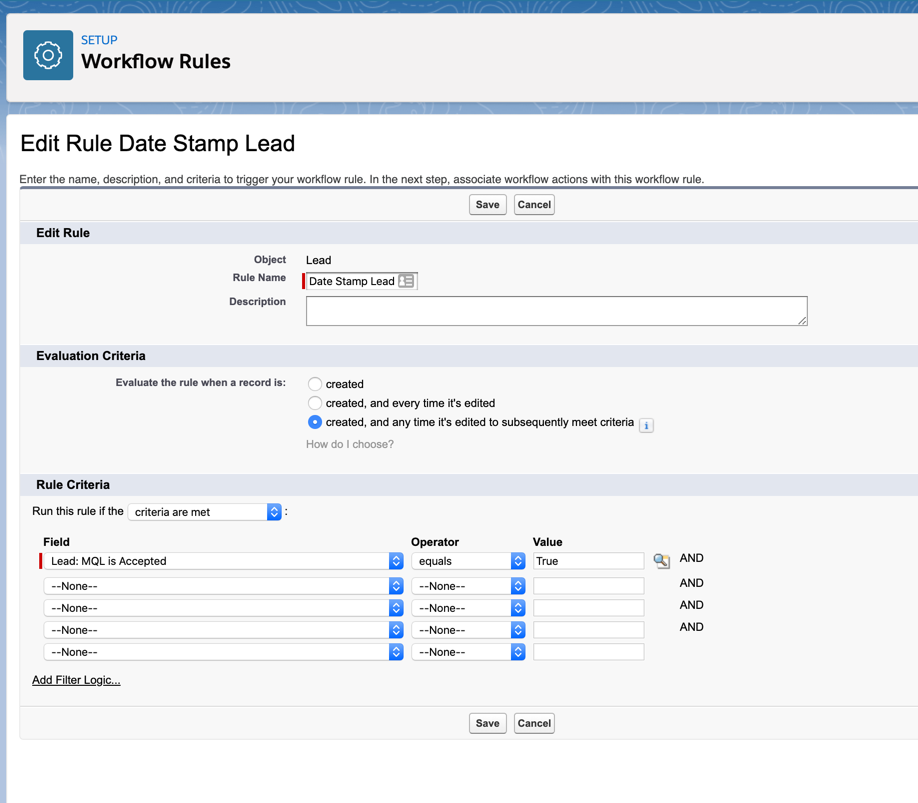
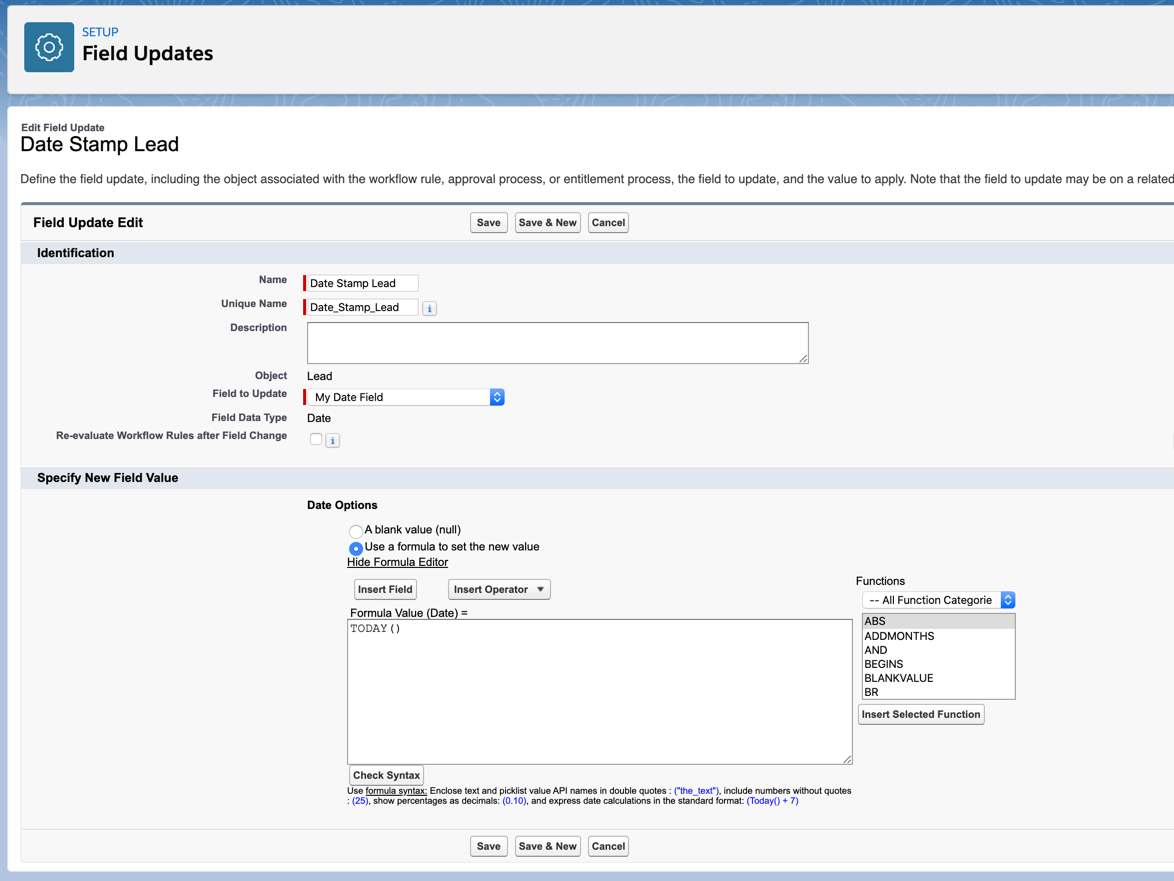
Add a workflow action to update your date field. Select “Use a formula to set the new value”. Your formula should be set to TODAY() unless your field is a DATE/TIME field. In that case, it should be set to NOW().
Now all you need to do is activate your workflow rule and test! Here’s what my completed workflow rule looks like.


Date stamp a field when a picklist value is updated
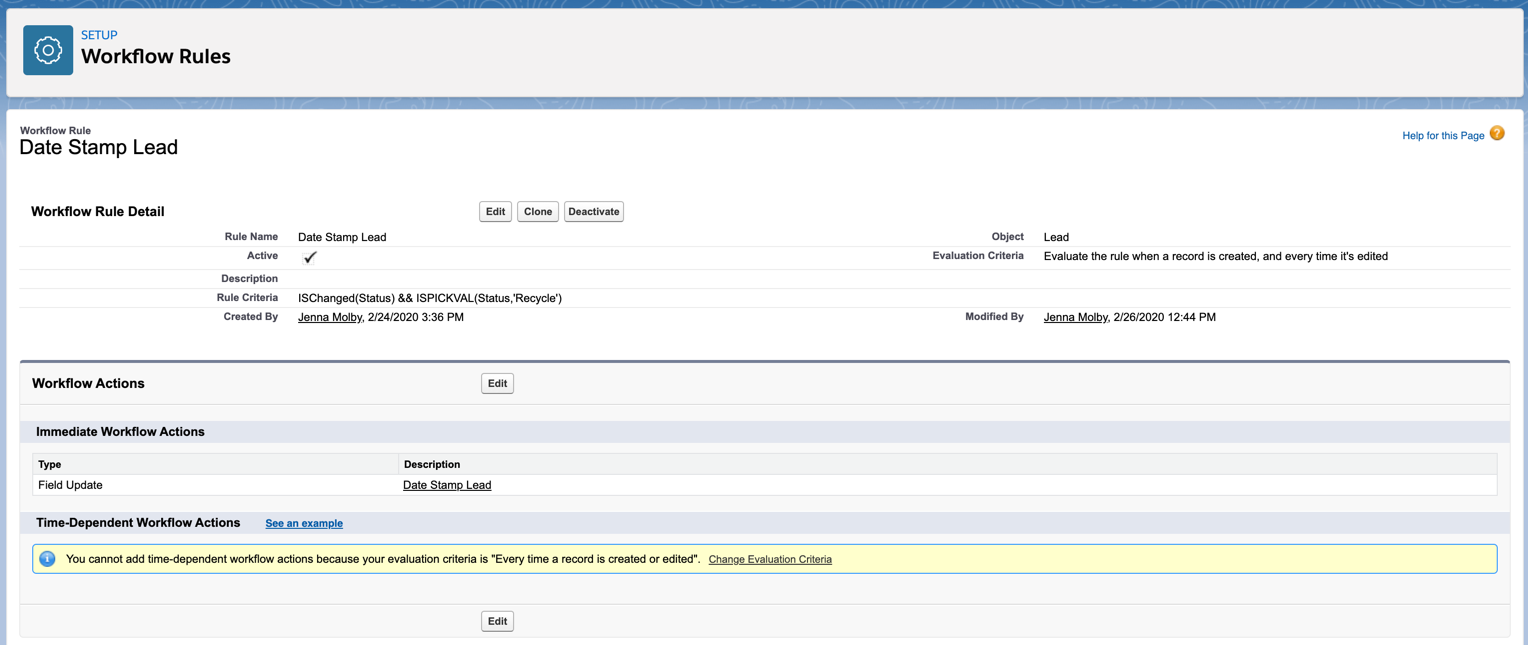
Create a workflow rule and select “created, and every time it’s editeda” for your evaluation criteria. Select run this workflow if the formula evaluates to TRUE and add your formula. In this example, I want to date stamp my field when the Stage for the lead is updated to Recycle, so my formula looks like this ISChanged(Status) && ISPICKVAL(Status,’Recycle’).

Add a workflow action to update your date field. Select “Use a formula to set the new value”. Your formula should be set to TODAY() unless your field is a DATE/TIME field. In that case, it should be set to NOW().
Now all you need to do is activate your workflow rule and test! Here’s what my completed workflow rule looks like.
Only date stamp the field if the field is currently empty
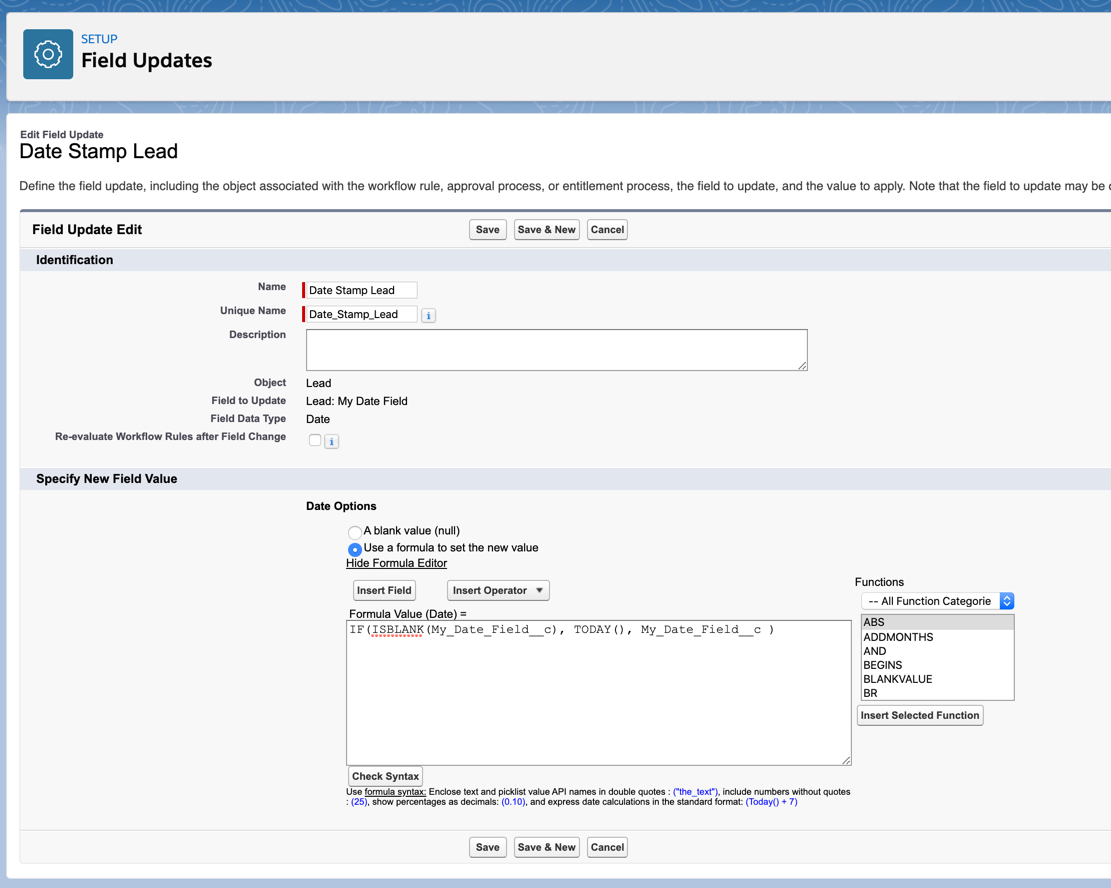
If you want to date stamp the date field ONLY if it’s currently empty, you can modify the formula in your workflow action.
IF(ISBLANK(My_Date_Field__c), TODAY(), My_Date_Field__c )
Bonus tip: Calculate the number of days between dates
Now that you are a date stamping pro, you can create formula fields to calculate the number of days between dates. These fields can be used in reports to show how many days a lead was in a particular stage, or how long it took sales to action the lead. Here’s an example of what a formula field looks like to calculate the number of days between when the lead was created and the MQL date:
MQL_Date__c – CreatedDate
Questions?
Send me a tweet @jennamolby, or contact the Sercante team for help.



For the past year, my marketing team has had the joy of testing half LinkedIn lead gen forms and half Pardot Landing Pages with LinkedIn’s Sponsored Posts.
Let’s revisit our old friend the A/B test. Because the results surprised us…
LinkedIn Lead Gen 101
If you’ve clicked on a sponsored ad on LinkedIn recently, you may have noticed that the click took you to a form where your information had already been pre-populated prior to form submit. That’s most likely a Linkedin Lead Gen Form at work.
Or, if the click took you to a much fancier and dynamic landing page, it was more than likely not a LinkedIn lead gen form, but instead a landing page created outside of LinkedIn by a hip & cool marketer.
Where LinkedIn Lead Gen Forms win: Quantity
Here’s a sample of the Linkedin Lead Gen forms we tested:
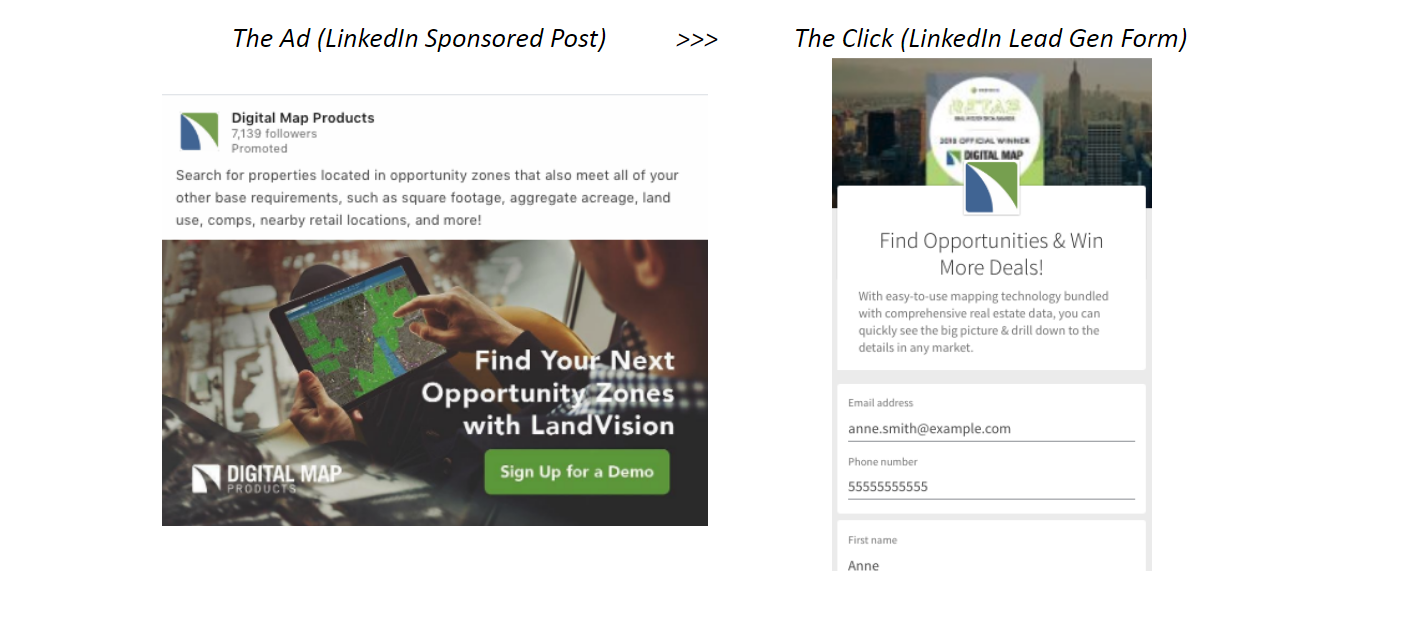
From a prospect’s user experience perspective, the pre-populated lead gen form can go a few different ways:
- Wow that’s creepy, how does it already know my email address, and my phone number, oh crazy — and my title!
- Awesome, great, wonderful — I only had to click twice and not fill out any information to download this handy dandy checklist on how to train my new sales team.
- Oops, I clicked once to look at the checklist, tried to exit, and fat fingered it to submit the form. I actually have zero interest in the content — and now a BDR won’t stop calling me, perfect.
In my team’s experience, we saw all of the above happening regularly at a pretty consistent pace, no matter how long we ran our campaign.
The lead gen forms converted at a significantly higher rate compared to other landing pages used in the campaign, with a lower cost per lead. Another key advantage is the ease of creating the form – it’s quick and easy, simple to duplicate, and all managed with the LinkedIn interface.
Where Pardot Landing Pages Win: Quality
So, we should all switch our landing pages to LinkedIn Lead Ads?
Not so fast. Let’s look at the other half of the experiment.
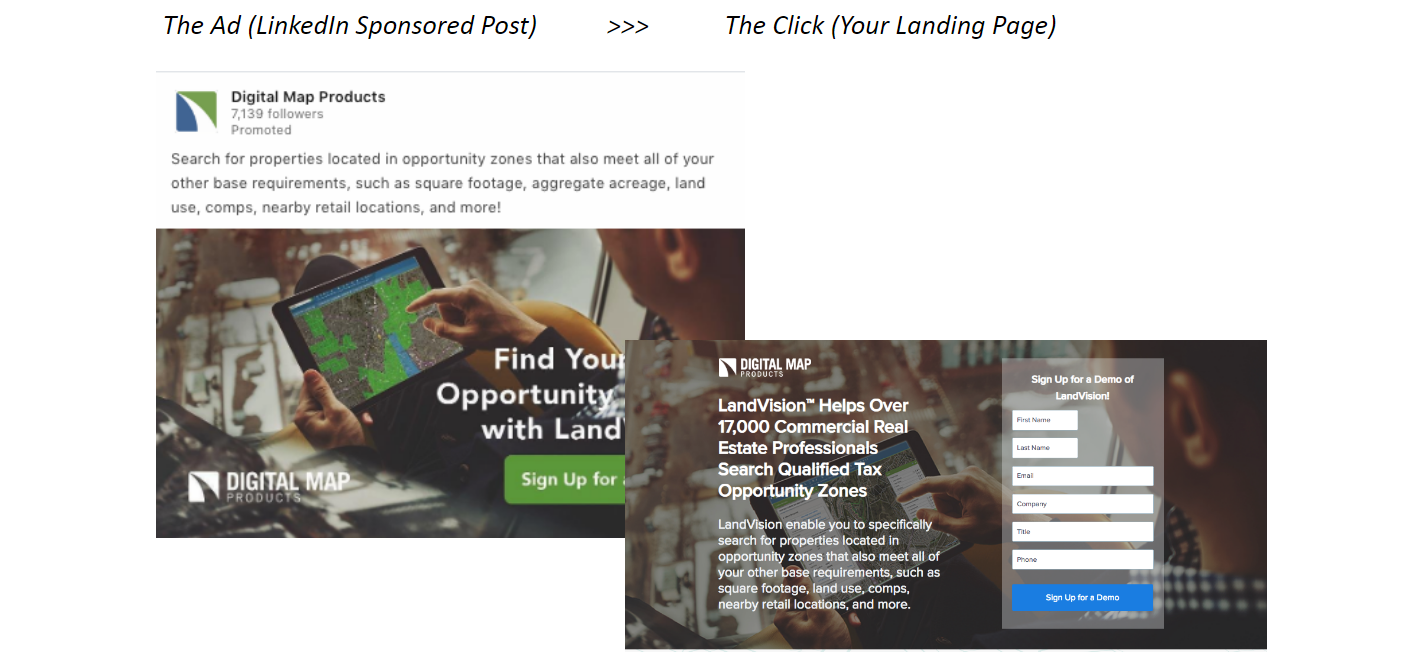
Within a couple of months of testing, we noticed the volume of prospects created was significantly less on Pardot landing pages. The dip in conversions was especially true when a brand-new prospect was viewing your Landing Page (with no pre-population from Pardot).
But from our initial testing, these prospects have been higher quality and progressed further down the funnel.
LinkedIn Lead Gen Forms vs. Pardot Landing Pages: Our conclusion, so far
LinkedIn Lead Gen forms seems to be the obvious answer when promoting content through sponsored posts for the high volume of top of funnel leads they will create.
Pardot Landing Pages seem to be the right answer for LinkedIn retargeting campaigns. For example, if you’re promoting a brand-new campaign for a promotional discount and want them to learn more – this is a great fit for a Pardot landing page. This allows you to use progressive Pardot forms on the landing pages to collect even more data on your already targeted prospect, or know they are ready for bottom of funnel content like a demo or free trial.
(ProTip: retarget audiences from your CRM data and enable lookalike audience within LinkedIn’s Campaign Manager, this will lower your CPL as opposed to Landing Pages typically having a higher CPL.)
Another bonus of Pardot Landing Pages is the ability for your UTM parameter tracking to carry through on your form submit on the Pardot Landing Page. With these hidden fields you can track off the click if they then convert on the website – very helpful for proving LinkedIn ROI.
At the end of the day, many variables come into play in digital marketing, and there are always tradeoffs. Advertising and LinkedIn Sponsored Posts are no different. I highly suggest you try both approaches, A/B test, track everything — and keep an open line of communication with your sales team on which campaigns are producing the higher quality leads or are re-engaging existing prospects.