I don’t usually use the word transformational when discussing content blocks for an email, but this one deserves it. Recently, our team at Sercante had the opportunity to partner with one of our long-term automotive clients to find a solution to a big problem—overstocked inventory.
This project began like many others. An innovative, creative brand trying to bridge the gap between what customers want and what they can have. Buyers were spending time configuring their perfect vehicles, carefully choosing every option and detail, and then either abandoning their cart or waiting months for the car to be built.
What they didn’t realize was that their dream car, or something close to it, was already built. Already available for them. Already on the lot. It just wasn’t being shown to them.
The Problem: They Had the Cars, But No One Knew
The brand had a recommendation engine on their website, which enabled customers to browse their available inventory. However, this only happened if a customer actively sought it out. Meanwhile, their emails weren’t showing in-stock options, but rather driving them to the configurator to design their vehicle. The inbox experience focused on brand, features, and specs, but not on availability.
There was a disconnect between digital engagement and physical inventory. And it was costing time, resources, and ultimately, conversions. Through several brainstorming sessions and collaborative work, we had to ask ourselves what would happen if we started surfacing what customers could get today?
The Approach: Make the Data Work in Email and Web
Working with the brand’s Salesforce team, we built a dynamic content block that connects their existing vehicle recommendation API with Salesforce Marketing Cloud. At send time, the block pulls in the top two vehicles available near each subscriber’s zip code.
That means:
Real-time pricing and availability
Personalized images and trim-level specs
A “View Details” CTA that drives them to the inventory page
And dynamic scripting to auto-generate it all without a manual lift
The block works anywhere—in journeys, newsletters, promotions, event invitations, and more. We added fallback logic, Einstein Send Time Optimization, and throttling to ensure performance even for high-volume sends. We evaluated alternative approaches, such as daily lookup tables, but for this use case, true real-time was worth it. It wasn’t just about showing inventory, it was about giving the customer a path forward.
What Happened Next
This shift didn’t just make the email more useful. It changed how the brand saw its role in the customer journey and the results showed the impact:
Click-through rates on the monthly newsletter more than doubled from 1.02% to 2.26%.
Journey emails with the content block saw a 119% higher click-through rate in A/B testing.
Build time dropped from over 40 hours for their monthly newsletter campaign to 10 hours.
The time to purchase fell from 107 days to 5 days, and their inventory began to decline.
And, perhaps most importantly, the marketing team began thinking differently. The inbox became a place of momentum. Of relevance. Of action. As their marketing director put it, “This helped us rethink how we use email. Not just to inform, but to move customers forward in their journey.”
Check out the full case study related to this customer story here.
Going Beyond Automotive
This isn’t just a car story. If you’re in an industry with inventory, long buying cycles, or complex consideration paths, this kind of approach has ripple effects:
Are you surfacing what’s ready now or just what’s aspirational?
Are your marketing channels connected to real-time availability?
Are your emails helping customers act, not just learn?
We’re all sitting on data that can do more. It’s not about overwhelming customers. It’s about removing friction, aligning on timing, and making it easier to say yes.
This project reminded me that sometimes the most effective marketing move isn’t adding more. It’s making what you already have more visible. Your customers don’t need a better configurator. They need a clearly defined next step. Let’s give them one. If you’d like an expert’s insights on how to maximize the data you have to build more personalized experiences for your audience, that result in clear next steps and impact on the funnel, reach out to Sercante. The team is all about helping you create seamless experiences for your team and your customers.
Product Note:Marketing Cloud Growth and Advanced are editions of Marketing Cloud Next and have also been referred to as Agentforce Marketing.
Marketing Cloud Growth and Advanced Edition (aka Marketing Cloud on Core or just Marketing Cloud) offers incredible capabilities to marketers in so many areas. From AI powered segmentation, scheduling and sending SMS in a nurture campaign, and unprecedented abilities to tailor your marketing content to the audience viewing it, Marketing Cloud Growth and Advanced Edition can help marketing teams large and small automate their marketing efforts. All of these amazing capabilities rely on the power of one key feature of Data Cloud – the Data Graph.
Data Graphs allow you to combine and transform data from multiple Data Cloud Data Model Objects (DMOs) into a single view. This read-only Data Graph can then be used in a variety of ways through API, automations, and Salesforce applications, like Marketing Cloud. In fact, a Data Graph is a requirement for using personalization (and some automations) within Marketing Cloud – the objects and fields you select when creating this graph are the same objects and fields that you’ll have access to when adding personalization to your marketing content or powering your automations.
Your Data Graph needs to have a specific shape to successfully send your emails. If you have Marketing Cloud Advanced Edition, you’ll also need to ensure that Einstein Engagement Scoring and Einstein Engagement Frequency features have been enabled before building. This blog will help you understand the steps needed to take to create and edit your Data Graph for Marketing Cloud.
Things to Consider Before Building a Data Graph
Once upon a time editing a data graph wasn’t possible, which meant gathering all of the information you’d need to reference in your marketing efforts before building your first graph. Now it’s entirely possible to edit your data graph, but I’d still highly recommend you gather your requirements ahead of time, so let’s think about what you’ll need.
What fields do you need for personalization?
Personalized marketing content is the name of the game, so the first thing to consider is what fields you’ll want to reference in any personalized marketing content. This should include things like First Name, Last Name, Title, and Account but you should also consider what custom fields you may want to reference, like the name of a product or webinar they’ve attended.
Are there any fields you’ll need for segmentation?
The segmentation capabilities in Marketing Cloud rely on the fields that are included in your data graph, so next up it’s time to think about how you’re planning on segmenting your prospects for email, SMS, and/or WhatsApp sends and automations. Common things to include could be industry, region, and address data. Make note of the fields and the object that those fields are on. For example, if you want to pull in industry, that field is likely on the Account Object. Keep in mind that anything you include here must have some relationship to the individual included in the segment.
What will you need for your automations?
The last thing you’ll need to consider is any information you might need for your flows. What information will you be basing your automation decisions on? Things to consider include campaign membership or status, email engagement, and geographical information.
Have Advanced edition? Turn on Einstein Features (if applicable)
Marketing Cloud Advanced Edition includes Einstein Engagement Scoring and Einstein Engagement Frequency. Be sure to enable these features before building your data graph!
Confirm the fields are in Data Cloud
Now that you have your field requirements determined, the next step is to make sure all these fields are mapped to your Data Streams. These field mappings take the new information ingested in the data stream and map it to the appropriate fields and objects in the Data Model Object (DMO) to create or update the appropriate records. Head to the Data Streams tab in Data Cloud and confirm all the fields you listed earlier are mapped to the appropriate DMOs. Check out this help article for some data mapping best practices.
Be sure the Data Cloud Connector can View All fields
One of Salesforce’s core tenets is trust, and that extends across all layers of the Salesforce ecosystem. This means that the connector between Data Cloud and Sales Cloud has minimum access to information in your Salesforce system. Make sure all the fields you’re including in your data graph are visible to Data Cloud by going to the Data Cloud Salesforce Connector Permission Set and updating the object settings to include the View All and Read permissions for every object you’ve listed. This ensures that all objects and fields are able to be ingested into Data Cloud.
Building the Standard Data Graph for Marketing Cloud
We have a step by step blog on building a data graph for personalization, but as a quick refresher, here are the steps you’ll need to take and things to keep in mind.
Go to Salesforce Setup > Marketing Cloud > Assisted Setup > Reporting and Optimization > Customer Engagement
Click on “Go to Data Graphs”
Create a new data graph from scratch
Use the default data space
Select the Unified Individual as your Primary Data Model Object
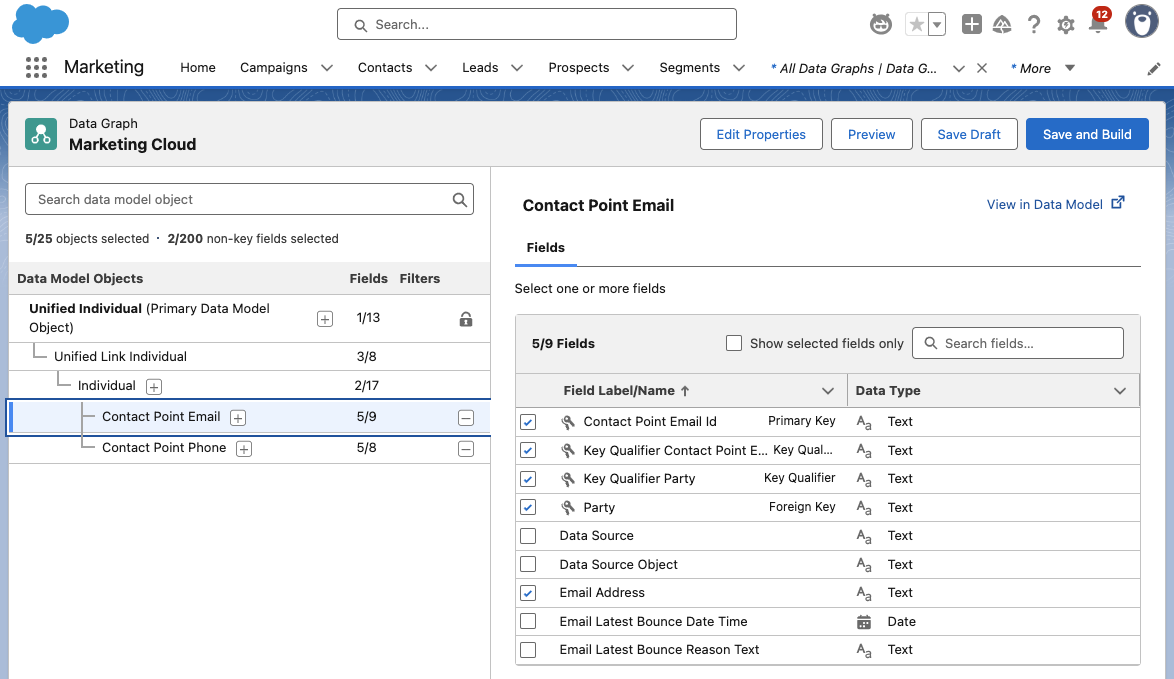
Ensure your data graph has the following shape:
Unified Individual (Primary Data Model Object)
Unified Link Individual
Individual
Contact Point Email
Contact Point Phone
Make sure all the objects and fields on your lists are included in the data graph
The following fields must be selected during the Data Graph setup:
Individual ID from ‘Individual’
Email Address from ‘Contact Point Email’
Telephone Number from ‘Contact Point Phone’
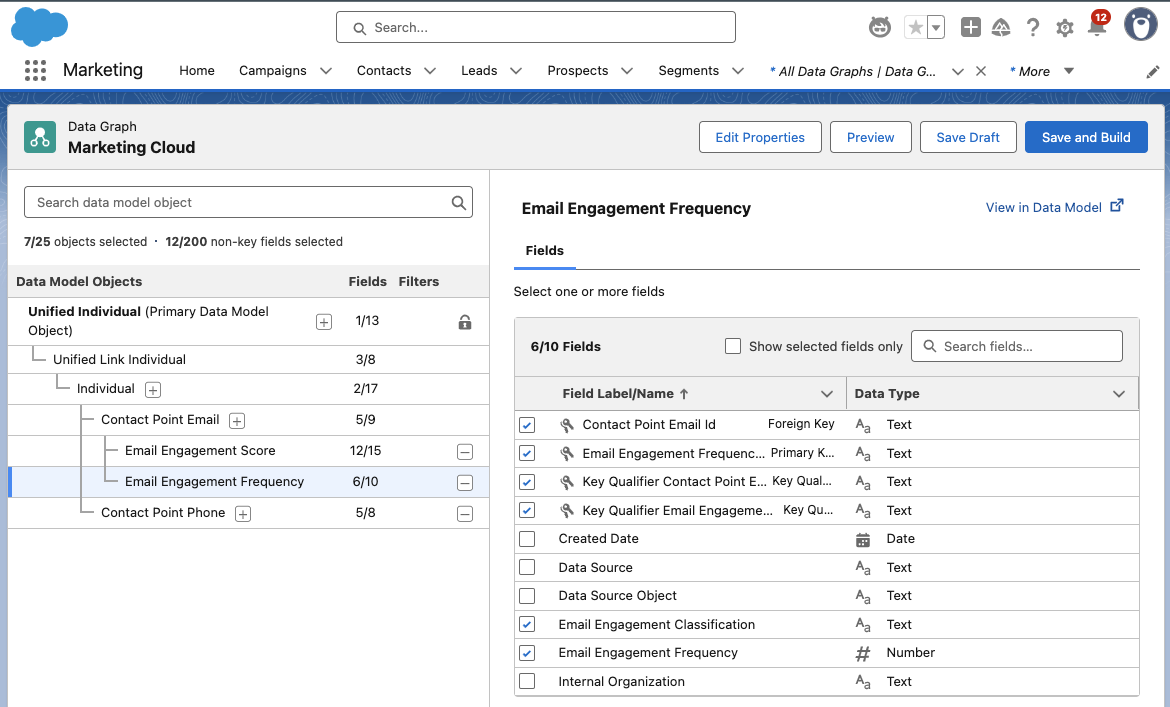
But what if you have Advanced?
If you’re using Marketing Cloud Advanced Edition, be sure to include the Email Engagement Score (Unified Individual > Unified Link Individual > Contact Point Email) and Email Engagement Frequency (Contact Point Email & Contact Point Phone).
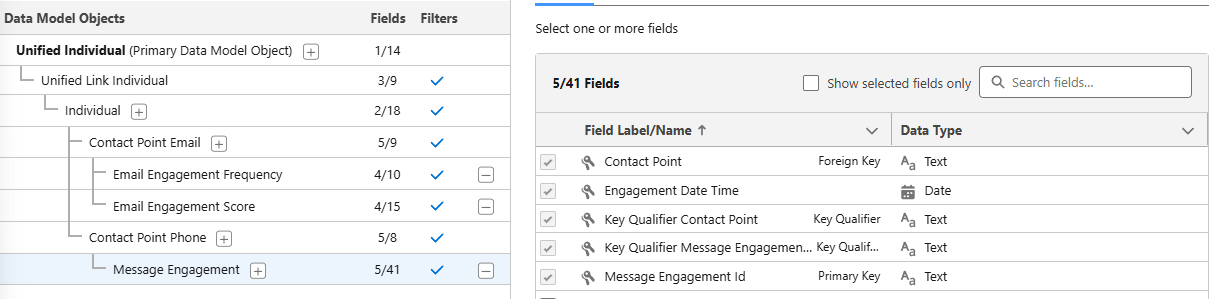
Add in SMS
By now, your data graph should look something like this, give or take the Email Engagement Score, Email Engagement Frequency, and SMS options. To include SMS in your Data Graph, be sure to include the Contact Point Phone and the Message Engagement options, as shown below.
Message Engagement gives you lots of options for monitoring how your SMS marketing is doing. Use this to monitor engagement with your SMS messages, the messages you’re sending, links, subscription information and more!
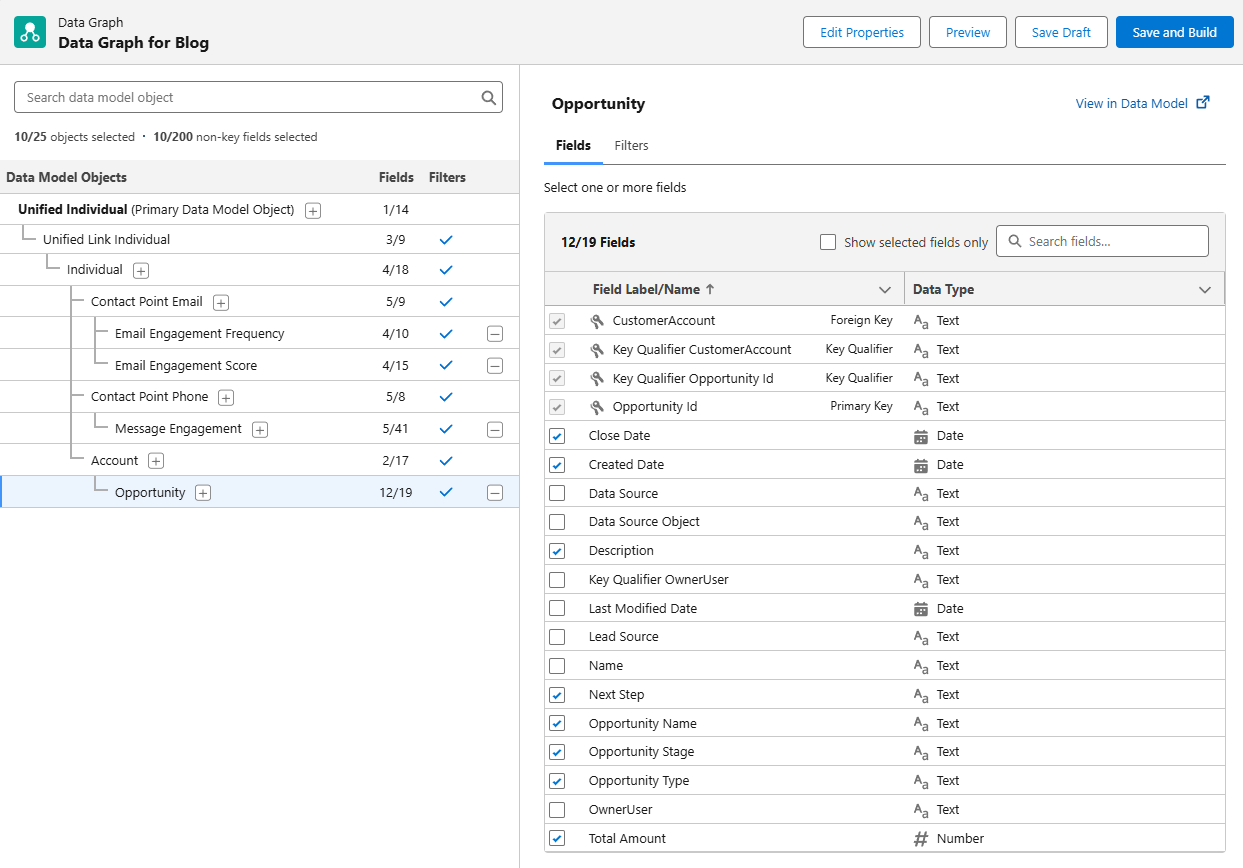
Bringing in Custom Fields and Objects
Okay, so we’ve covered adding in all the standard objects and fields you’ll need for your standard personalization and automation needs, but what about the custom objects that you may have in your organization? These may be objects from integrations, or ones you’ve created to help manage campaigns or customer orders.
To bring this information into your Data Graph for use in your marketing, you’ll need to ensure that there’s a connection to the Individual in some manner. What does that mean? An easy example is an Opportunity – Opportunities are connected to the Individual via their Account in Salesforce. Select the top level item in your Data Graph, then use the + option to drill down to the object you’re looking for. Once you’ve gotten your object added on the graph, use the right side of the screen to select the fields you want to include in the graph.
Deploy Your Data Graph
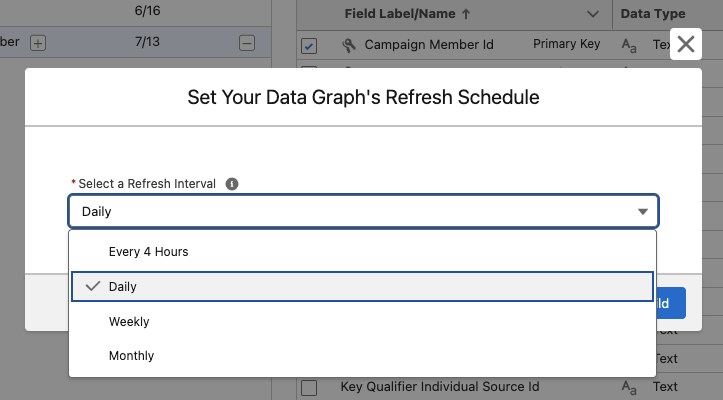
Now that you’ve built your graph, the next step is to save and build, then deploy your graph. Click on Save and Build then choose your refresh interval. Keep in mind that every refresh will consume credits! The right refresh interval will depend on how you’re planning on using the Data Graph, but typically the daily refresh rate works well for marketing needs.
Head Back to Setup to Deploy Your Graph
From Salesforce Setup, type Reporting and Optimization in the Quick Find box and navigate to the Customer Engagement option. In the Configure Basic Personalization section, use the drop down menu to select the Data Graph you just created.
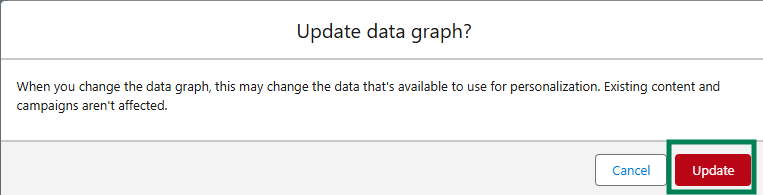
If prompted, confirm that you want to update your data graph by clicking the Update button.
Get Personalizing with Your Data Graph!
Now that you’ve built and deployed your Data Graph, you’re able to use the information in your personalization and automation efforts across Marketing Cloud. This powerful tool combines information from across your Salesforce organization into a single place of reference for Marketing Cloud to use that will update automatically on a planned schedule.
Product Note:Marketing Cloud Growth and Advanced are editions of Marketing Cloud Next and have also been referred to as Agentforce Marketing.
The Summer ‘25 release for Marketing Cloud Growth and Advanced Editions is here, and it’s packed with updates designed to turbocharge your team’s efforts. Think of it as a toolbox upgrade: we’re talking AI-powered reporting, slick campaign automation, revamped content tools, and stronger consent tracking. Let’s dive into what’s new and how these features can make your work smoother and your customer experiences much more impactful.
Work Smarter with Einstein
With Summer ‘25 Einstein in Marketing Cloud takes a big leap forward, offering marketers real-time insights and more innovative automation options. If you ever wished you had more time to analyze engagement or fine-tune your campaigns, this update is for you!
New Einstein Predictive Features
New Data Cloud reports enable you to dive into Einstein Engagement Frequency (EEF) and Einstein Engagement Scoring (EES) without needing to export or manually assemble data. Marketers can now create reports directly in Data Cloud using the Email Engagement Frequency and Email Engagement Score objects. Whether you’re trying to reduce fatigue by adjusting send frequency or prioritize highly engaged audiences for your next campaign, these reports help you make data-backed decisions faster and with more confidence.
Automate Flows with Einstein
You can now automate journey paths based on predicted engagement using the new Einstein Decision element in Flow. By leveraging scores from Einstein Engagement Scoring and Engagement Frequency, marketers can direct contacts down the most effective path. For example, you can send fewer messages to at-risk audiences or prioritize highly engaged contacts for conversion. Once you create a supporting data graph, just drop the Einstein Decision element into your flow and configure conditions using your data graph’s engagement fields. It’s a powerful way to build smarter, more responsive campaigns that respect your customers’ engagement signals.
Build Data Graphs for Einstein Send Time Optimization
Einstein Send Time Optimization (STO) is now more customizable thanks to updates to the underlying data model. After disabling and re-enabling STO in Einstein for Marketing Setup, you can build a custom data graph to personalize send time predictions based on your unique business data. This added flexibility lets you capture the signals that matter most to your audience, helping Einstein determine not just the best time to send, but the best time for your customers.
Use Agentforce to Get Scores for Record IDs
Agentforce users can now tap into deeper insights with the new “Get Score for Record ID” action. This feature retrieves engagement and fit scores for individual leads, contacts, and prospects, enabling marketers and sales representatives to prioritize follow-ups and personalize outreach based on real-time data. You’ll also get account-level scores, including overall and intent scores, for a more complete view of customer readiness. To get started, enable the action in the Agent Actions section of Agentforce within Salesforce Setup.
Campaign Creation Made Easy
This release introduces significant enhancements to how marketers create and manage campaigns in Marketing Cloud, providing greater flexibility and control with fewer clicks.
Explore Campaign Designer (Beta)
Marketing Cloud Advanced Edition is launching new Campaign Designer (beta) functionality, enabling you to generate multi-touch marketing briefs more quickly. All of which is powered by AI and your trusted customer data. This new functionality helps you plan campaigns that span multiple channels and moments, all grounded in the context of your existing data. When reviewing a draft brief, you can select an existing campaign to build from, and use AI to refine messaging and channel selection, making it easier to align teams, drive consistency, and launch with confidence.
Build Your Own Campaign
Looking to start from scratch? With the new “Build Your Own Campaign” option, marketers are no longer tied to quick-start templates. You can now select “Build Your Own: when creating a campaign, choose your flow type, and build as you go. Add message elements directly from the campaign record or dive into Flow Builder to design a more curated customer experience that is tailored to your goals, audiences, and data.
Edit Your Flow from the Campaign
Managing and updating your campaign flow is now easier and more seamless. If your flow includes five or fewer elements, you can add messages and wait steps directly from the campaign record without switching to Flow Builder. You can also configure key message details, like Einstein Send Time Optimization and tracking options, all within the same view, making it easier to keep everything aligned as your campaign evolves.
Streamlined Content Personalization
If content is the heart of your marketing strategy, this release gives you the tools to keep it beating stronger. From fine-tuned control over HTML and data sources to more innovative personalization powered by recommendations and dynamic elements, Summer ’25 is all about helping you create more meaningful, relevant content, without adding complexity to your workflow.
Gain Control of Your Email HTML
Gain complete control over your email design with the new HTML code view. You can now convert existing emails to HTML, make detailed structural or styling edits, and build fully customized, responsive emails all within the editor. Whether you’re troubleshooting, refining layouts, or adding advanced formatting, this feature gives marketers and developers the flexibility to go beyond drag-and-drop.
Review Your Updated Data Sources Tab
Working with dynamic content just got more intuitive. The updated Data Sources tab gives you better visibility and control over the data powering your emails. Now, instead of jumping between tools, you can add, update, and view all available data sources, including your default data graph or unified individual, directly within the email editor. This makes it easier to ensure your personalization is accurate and aligned before hitting publish.
Check Out Repeater for Email
Advanced Edition users can now take email relevance to the next level with Personalization Recommendations and the new Repeater for Email component. This feature lets you dynamically showcase recent purchases, popular products, or personalized content in a consistent card, list, or custom layout. Simply connect the repeater to a data source and utilize merge fields to display product names, images, descriptions, etc. This ensures that every message reflects what matters most to each recipient.
Personalize Links and Images in Every Email
You can now dynamically personalize images and buttons in your emails by using merge fields or dynamic URLs. This allows you to tailor visuals and calls-to-action for each audience segment, creating more relevant and engaging experiences across your campaigns.
Explore New Field Types for Forms
New form field types provide greater precision and flexibility when capturing data. You can now use Date, Date/Time, Time, Number, and Text Area (Long) fields to support more detailed, structured inputs—perfect for scheduling, time-sensitive actions, numerical data, and open-ended responses. The updated Long Text Area also features a larger input box with a draggable corner, providing users with a more seamless experience when submitting longer responses. Whether you’re collecting preferences, running surveys, or managing gated content, these enhancements make your forms smarter and more user-friendly.
Expand Your Brand Identity
The expanded Brand Identity field in Content Builder now gives you up to 1,000 characters to describe your brand’s voice, values, and unique positioning. This added detail helps Agentforce generate AI-powered content that’s more aligned with your brand’s style, whether you’re drafting emails, landing pages, or SMS messages. The result? More consistent, on-brand messaging with less manual editing.
Delete CMS Workspaces
Need to declutter your content library? Content admins can now delete outdated or unused CMS Workspaces to keep things organized. First, remove any sharing relationships and unpublish existing content. This cleanup option makes it easier to manage your content at scale and maintain a more streamlined workspace. (Note: the default Marketing Cloud workspace can’t be deleted.)
Simplify Consent Tracking and Compliance
Consent isn’t just a compliance checkbox, it’s a critical part of building trust with your audience. The Summer ’25 release introduces several updates that enable marketers to collect, manage, and format consent data more effectively across campaigns and systems.
Automate Consent Updates with Flow Actions
Consent management is now more flexible and automated. You can collect and update consent using the new Create Consent flow action in both event-triggered and Data Cloud–triggered flows. For example, when someone clicks a custom link, including a double opt-in email, you can automatically update their consent status to Opted Out or Subscribed, with no manual steps required. This update makes it easier to keep consent data current and automate compliance across your marketing programs.
Improved Consent Imports
Consent imports just got more accurate and easier to manage, especially for mobile messaging. You can now include a country code column when importing SMS or WhatsApp consent data, helping ensure that records are correctly classified by region. This is especially valuable for supporting country-specific compliance requirements. Additionally, updated phone consent formatting guidelines make it easier to standardize values during import, reducing errors and helping you maintain clean, reliable consent records across your messaging channels.
Move Faster with Smarter Marketing Automations
The Summer ’25 release introduces a set of powerful automation enhancements designed to streamline how marketers engage leads and manage campaign activity. These updates bring core actions, such as sending emails, tracking link clicks, and managing prospect lifecycles, closer to your day-to-day workflows, making it easier to move fast, stay organized, and respond to customer behavior in real-time.
Send Emails Directly from Lead and Contact List Views
You can now send marketing emails directly from any list view of Leads or Contacts. Simply click ‘Send Email’, select the ‘Marketing Email’ option, and follow the guided steps to build and send your message. Behind the scenes, Salesforce automatically creates the campaign, flow, and audience segment for you, making it easier than ever to launch quick follow-ups or targeted nurtures with minimal setup.
Attribute Clicks Beyond the Inbox
Looking to understand what happens after someone clicks through your email or ad? With Summer ’25, you can now track links to your external website and attribute that activity back to the source, whether it’s an ad, email, or other campaign asset. This provides you with deeper visibility into off-platform engagement, helping you connect the dots across the customer journey. If you set up external tracking before this release, you’ll need to update your Behavioral Events data stream to start using the enhanced tracking features.
Convert Prospects to Contacts
You can now convert qualified Prospects to Contacts in Marketing Cloud, either manually or by using automated Flows. This enhancement provides you with more control over how and when individuals progress through the sales cycle. Whether you’re ready to hand off a lead to Sales or building an automated nurture, this feature helps streamline the sales process, personalize communication, and drive higher conversion rates by associating each new contact with the correct account at the right time.
Move Faster with Smarter Marketing Automations
Every successful marketing campaign starts with a strong foundation, and that begins with how your platform is set up. In the Summer ’25 release, Marketing Cloud focuses on making setup and configuration simpler, faster, and more intuitive, so teams can spend less time managing infrastructure and more time launching impactful campaigns. Whether you’re provisioning channels, organizing data spaces, or fine-tuning identity resolution, these updates are designed to help you hit the ground running with confidence.
Unified Messaging Data Kit
Setting up messaging channels is now easier than ever. The Unified Messaging data kit installation and update process has been improved, making it faster and more intuitive to get started. Whether you’re enabling new channels or updating existing ones, the streamlined setup reduces manual steps, allowing you to focus on activating your messaging strategy, not troubleshooting the installation.
Improved SMS Provisioning Process
SMS setup is now more guided and error-proof. In Unified Messaging Setup, you’ll find clear, country-specific instructions for requesting SMS codes, registering brands, and provisioning campaigns. These updates help reduce confusion, minimize errors, and speed up approvals. If a request is rejected, you will receive a detailed explanation, allowing you to resolve issues and resubmit with confidence quickly.
Custom Data Spaces Support
New Marketing Cloud customers now have the option to set up a custom data space during initial configuration, bringing more structure and clarity to how marketing data is managed in Data Cloud. This update is beneficial for organizations managing multiple brands, teams, or product lines, as it offers enhanced data security, faster retrieval and processing, and improved overall data quality. Previously, all marketing data defaulted to a single space; however, with Summer ’25, segmentation and governance can begin on your terms, right from day one.
Identity Licenses Now Available
Marketing Cloud now supports Identity Licenses, giving you a more flexible way to add users to your marketing team without assigning full Salesforce licenses. Users with the Identity License can log in via SSO and access most Marketing Cloud features, including campaigns, segments, flows, and shared analytics reports, when granted the Marketing Cloud Manager permission set. This update makes it easier to scale access securely, while keeping centralized control over who can work in your instance. Note: Identity users will not have access to Marketing Cloud setup or Opportunity Influence features.
New Identity Resolution Rules
Salesforce now recommends adding two new custom rules to your Identity Resolution ruleset to enhance the matching and unification of customer records. These rules are designed to improve accuracy during the conversion process and help identify visitors to your tracked external websites. By refining how identities are resolved across systems, you strengthen your data foundation, supporting more personalized marketing and building greater trust with your audience.
The Summer ’25 release for Marketing Cloud Growth and Advanced Editions delivers exactly what modern marketing teams need: more speed, smarter automation, and greater personalization, all built on a stronger, more scalable foundation. From Einstein-powered insights and flexible campaign design to enhanced consent tracking and setup improvements, these updates are designed to help you move faster and create more meaningful experiences at every touchpoint.
Ready to see how these features can drive real results for your team? Reach out to the Sercante experts for a Marketing Cloud audit or consultation to assess your current setup and identify opportunities to leverage the latest capabilities. Whether you’re just getting started or looking to optimize what you already have, we’re here to help you make the most of Summer ’25.
Product Note:Marketing Cloud on Core is now known as Marketing Cloud Next. Marketing Cloud Growth and Advanced are editions of Marketing Cloud Next and have also been referred to as Agentforce Marketing.
Your messages are doing their job, but are they working it?
If your campaigns are feeling a little too copy-paste, a little too “blah,” it might be time for a serious glow-up. You’ve got the data. You’ve got the content. Now it’s time to use the tools inside Marketing Cloud on Core (aka Growth and Advanced Edition) to turn that good-enough messaging into something that shines!
This blog will teach you how Dynamic Content and Expressions can transform your messages from basic to brilliant. You’ll learn what these new features are, how they work, and how to use them to make every send feel personal, polished, and powerful!
Let’s Start with the Basics
Before we dig into the tools, let’s talk about transformation. A glow-up for your marketing means:
Less copy-paste, more customization
Making use of the data you already have
Messages that speak directly to the recipient, not the crowd
Marketing Cloud on Core gives you two powerful tools to make it happen. Ready to transform your messages? Let’s learn how to master Dynamic Content and Expressions.
Introducing Your Email’s Style Squad
Give your emails a fresh look without starting from scratch. Think of Dynamic Content like your email’s glam squad; each part makes your email stand out. Consider giving your email different “outfits” based on who’s opening it.
Personalization Point: This is the part of your email where you give a mini makeover. It could be a subject line, preheat, hero image, or CTA – any element that could use extra sparkle.
Personalization Decision: This is the brains behind the beauty. It figures out who should see what based on the rules you set.
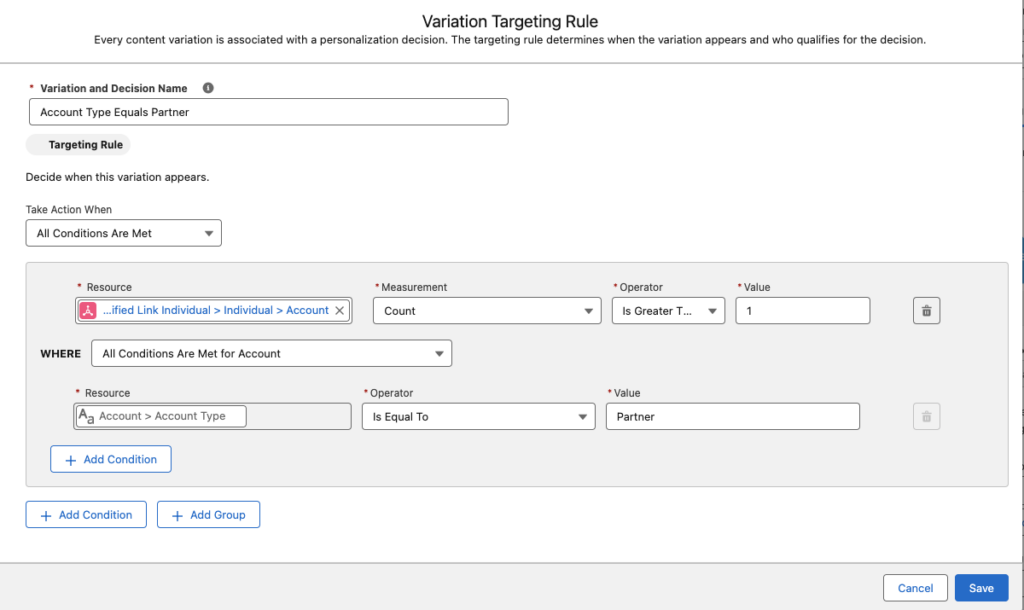
Targeting Rule: Your custom-fit formula. It defines “if this, then show that” logic. For example, “if account type = VIP, show gold banner.”
Pro Tip: Already built a variation you love? You can reuse it in other emails using recent Personalization Points.
How to Apply the Glow-Up: Creating Dynamic Content
Let’s walk through giving your content a dynamic makeover:
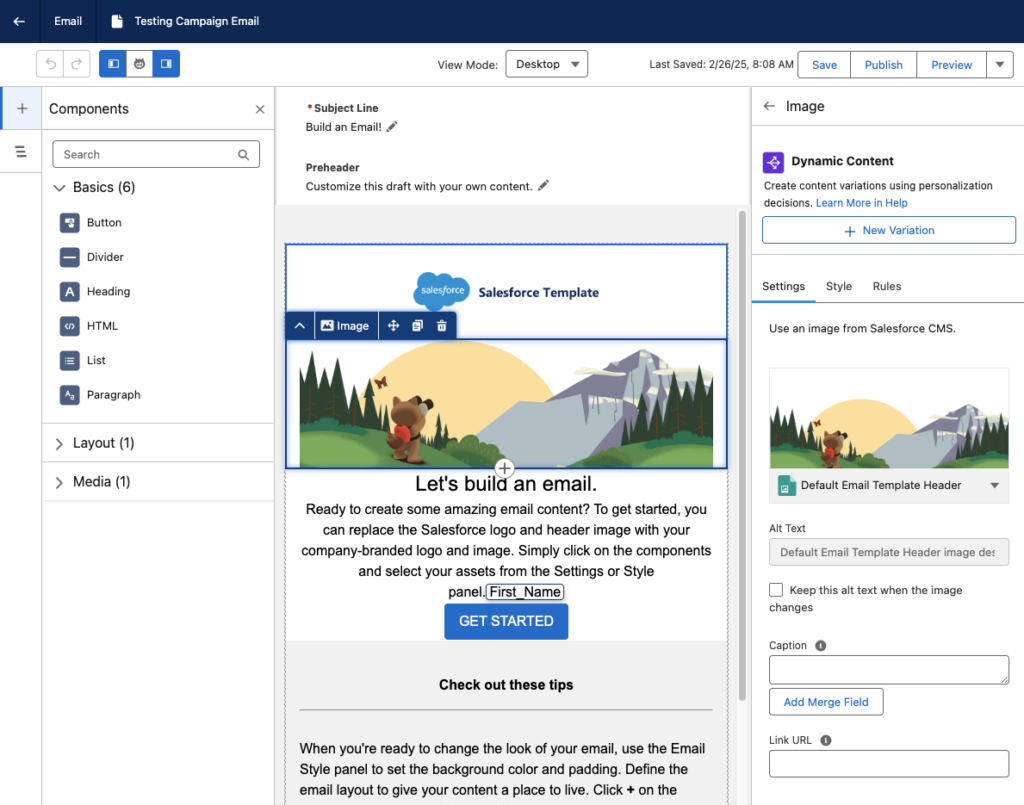
Open your email in the editor and select the content block you want to glam up.
Head to the Dynamic Content section and click Add Variation.
You can use the Variation dropdown to access NewVariations if you’ve already got some variations.
When the Create or Reuse Personalization Settings window pops up, select New Variation. Heads up: Your message has to save first, so give it 10-20 seconds.
Name your variation and create your Targeting Rule.
Click Save, then customize your content within that variation, like updating a header image or swapping out messaging for a specific audience.
Use the Variation dropdown to preview how your message looks for each version.
Pro Tip: Use dynamic blocks sparingly at first. Target high-impact spots like hero images or CTAs, and test frequently to ensure each variation shines.
The Finishing Touch for Personalized Flair
Once your content’s dressed to impress, it’s time to fine-tune the details, and that’s where Expressions come in. They’re like your behind-the-scenes styling tool that ensures every message feels personal, even when the data isn’t perfect. Here’s how Expressions keeps your messages looking polished:
Saved Expression: Think of this as your go-to styling shortcut. It’s a reusable logic block you create once and drop into multiple campaigns; it’s less work with the same wow factor.
Attribute Selection: This is where you tell the Expression what data to look at, such as PreferredName, LoyaltyStatus, or FavoriteProduct.
Fallback Value: No data? No problem. Expressions let you set a backup so your message stays smooth. Instead of “Hi,” you get “Hi there!”
Expressions ensure every message feels intentional and on-brand like you planned that way (because you did).
Adding the Ultimate Accessory: Creating Expressions
Here’s how to build your first Expression and set your messages up for consistent, reusable personalization:
Head to Content > Content Workspace in Marketing Cloud.
Click Add, then choose Content.
Select Expression, then click Create. (Yes, you’re about to create something fabulous.)
Give your Expression a name that clearly describes what it does (like “PreferredName Fallback” or “GoldMemberStatus”).
Use the Attribute field to choose the customer data you want to reference.
(Optional) Add a filter if you need to narrow down conditions, like only using this Expression when someone’s location is “US.”
Click Save.
Don’t forget to hit Publish to start using your Expression in your messages.
Pro tip: Once created, Expressions can be used repeatedly across campaigns, saving you time while keeping your personalization game strong.
Using Your Expression in a Message
Now that you’ve created your personalized shortcut, it’s time to drop it into your message for that final glow-up touch.
Open the email, SMS, or WhatsApp message where you want to use your Expression.
Select the content block where you want your personalization to appear.
Click the [] Add amerge field symbol.
Choose Saved Expressions from the dropdown menu.
Pick the Expression you created earlier.
Add a default value (like “there” or “friend”) in case your data field is empty.
Click Done and admire your work.
Pro Tip: This ensures your message always reads naturally, even if a customer’s name or info is missing the data.
Use Them Together for a Full-On Email Glow-Up
You’ve got the tools! Now it’s time to layer them like a pro stylist would. Dynamic Content and Expressions are great on their own, but when used together? That’s when the real transformation happens!
Think of Dynamic Content as your email’s wardrobe, changing outfits based on who’s reading. Then think of Expressions as the accessories, adding that personalized sparkle like someone’s name, product interest, or membership level.
Real-World Example
Let’s say you’re sending a promotional email:
You use Dynamic Content to show one banner for loyalty members and another for new subscribers.
Inside each banner block, you drop in an Expression to greet the user by name (with a fallback like “their” in case their name isn’t available).
You also use Expression to highlight their preferred product category, so the CTA feels totally tailored.
The result? An email that looks like you custom-designed it for every person without cloning templates or managing a million logic paths.
Why This Combo Works
You reduce manual work by creating fewer, smarter assets.
You create hyper-relevant emails without sacrificing time or scalability.
You build a customer experience that feels seamless, polished, and personal, even if you’re sending to thousands at once.
Using Dynamic Content and Expressions is the email marketing equivalent of putting on a fresh outfit, doing your hair, and finishing with the perfect accessory.
Ready to Give Your Emails a Glow-Up?
You don’t need a whole new wardrobe of emails, just the right tools to style them smarter. With Dynamic Content and Expressions in Marketing Cloud on Core, you can transform basic batch-and-blast messages into personalized, polished experiences that connect with your audience.
From targeting rules to fallback names, you have everything you need to bring out the best in your campaigns without doubling your workload. Whether you’re just dipping your toes into personalization or looking to scale with style, this glow-up is just the beginning.
Want help applying what you learned?
Book a consultation with Sercante’s Marketing Cloud experts to review your personalization strategy or sign up for one of our hands-on workshops. Let’s glow up your next campaign together!
Product Note:Marketing Cloud on Core is now known as Marketing Cloud Next. Marketing Cloud Growth and Advanced are editions of Marketing Cloud Next and have also been referred to as Agentforce Marketing.
Marketing Cloud on Core (aka Growth and Advanced Edition) offers simple out-of-the-box form-triggered flows that are great for lead generation and straightforward scenarios, but today we’re going to dive into something more complex! In this post, I’ll walk you through the process of building a flow that checks for existing contacts and leads before creating a new lead, creates consent records, and sends an autoresponder email. Let’s get started.
Setup Notes
All testing was conducted after the Spring ‘25 release in a demo org. The standard lead duplicate rule was active and configured to allow the creation of duplicate records with alerts.
OOTB Form-Triggered Flows
Before we begin customizing the out-of-the-box flow, it’s important to understand the capabilities and limitations of Form-Triggered Flows. This helps guide decisions concerning when customization is necessary.
OOTB Form-Triggered Flow without Lead Matching
This is the most basic flow and is what’s automatically generated when the Signup Form template is selected during the campaign creation process. No modifications were made to the flow, outside of configuring the “CreateConsent” element.
Test Results
Scenario
Result
Submitted by new person
New Lead Created
Submitted by existing lead
New Lead Created
Submitted by existing contact
New Lead Created
Summary
In all three test scenarios, a new lead record was created leading to duplicates in Salesforce.
OOTB Form-Triggered Flow with Lead Matching
In this test, a very slight, but important, modification was made to the flow—the “Check for Matching Records” option was enabled in the “LeadCreation” element.
Test Results
Scenario
Result
Submitted by new person
New Lead Created
Submitted by existing lead
Existing Lead Updated
Submitted by existing contact
New Lead Created
Summary
This small update made a significant improvement. The flow now prevents the creation of duplicate leads when an existing lead submits the form. However, a new lead record is still being created when an existing contact submits the form.
This occurs because flows are object-specific, and the OOTB flow only references the lead object. It lacks visibility into the contact object, so it creates a new lead if an existing lead is not found. In short, the flow is performing exactly as it’s designed to.
OOTB Form-Triggered Flows Summary
The OOTB Form-Triggered flows support simple use cases, but it’s important to be aware of the potential for duplicate record creation. These flows are intended as a starting point for marketers and should be customized to meet more specific requirements.
Form-Triggered Flows with Autoresponder Emails
Use Case
Your company just released its latest white paper, which is expected to have great appeal to potential and existing customers alike. The marketing team is posting the white paper on the website as a gated asset. In addition to redirecting users to a “Thank You” page, marketing also wants to send an autoresponder email. The autoresponder not only provides the recipient with easy access to the white paper should they want to view it again later but also serves as a way to validate the email address that was provided.
Why do we need to customize the OOTB flow?
Since the white paper will “appeal to potential and existing customers,” we know that the form will be submitted by new visitors, existing leads, and existing contacts. If we simply added a “Send Email Message” element to the OOTB flow, we could send the autoresponder email, but we would create new leads in Salesforce if an existing contact submitted the form.
The flow needs to be customized to check for existing contacts, in addition to existing leads, before creating a new lead and sending the autoresponder email.
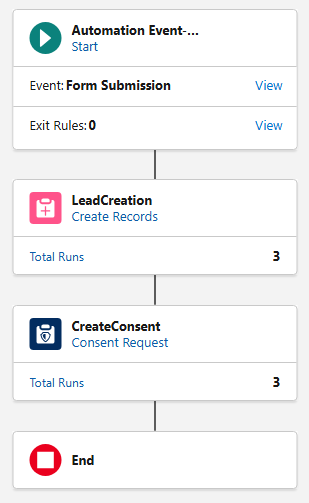
The Finished Product
Before we walk through the build of the flow, let’s first take a look at the finished product. Then, we’ll review each element, discuss its function, and why it’s needed.
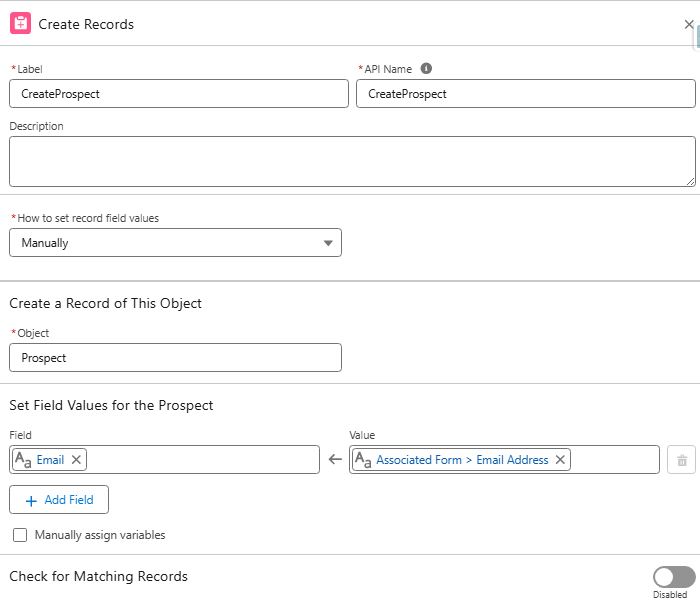
CreateProspect
Function: Creates a new record on the prospect object for each form submission. Reason: Flows using the “Send Email Message” element are required to have a “Create Records” element directly after the Start element. The “Create Records” element must create a record on the Contact, Lead, or Prospect object.
If we created records on the Lead object, we would be in the exact same situation as the OOTB flow: we would create duplicate leads when contacts submitted the form. If we created records on the Contact object, we would bypass the Lead object, and submissions from new visitors would be created as contacts.
The Prospect object was introduced as part of the Spring ‘25 release and is designed to keep unqualified prospects unassigned until they meet your organization’s agreed-upon lead requirements. We can satisfy the flow requirement by creating a record on this object without involving the sales team or triggering automations.
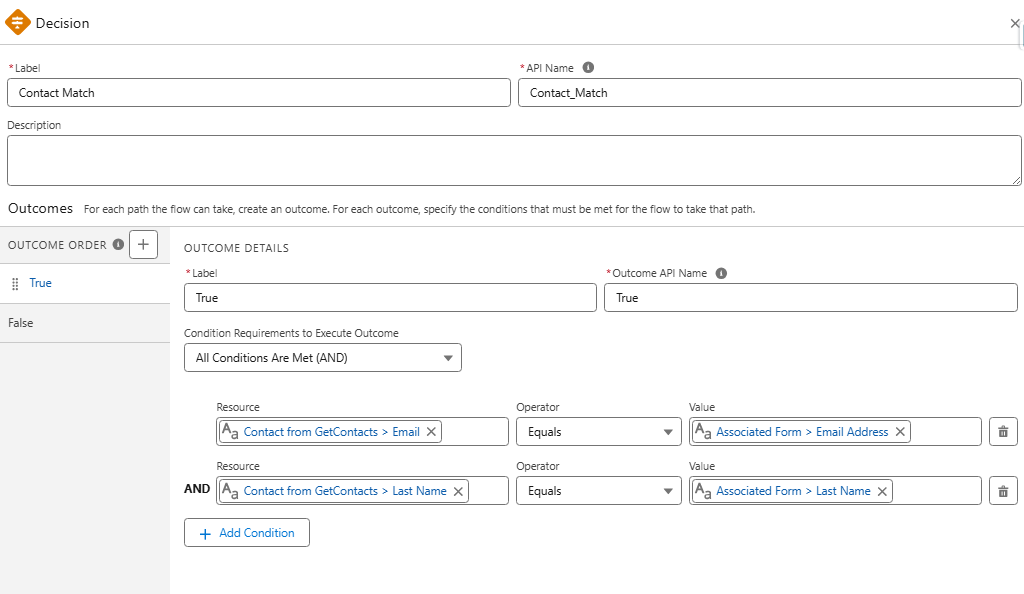
GetContacts
Function: Retrieves all contacts who match the form submission based on the provided email address and last name. Reason: Before we can check if a form submission is an existing contact, we must first give the flow visibility into contact records so that we have something to compare against in the “Decision” element.
Contact Match
Function: This “Decision” element is used to check if the form submission is an existing contact. If a match is found, the existing contact record is updated. If a match is not found, the existing lead record is updated (if one is found), or a new lead record will be created. Reason: Prevent the creation of duplicate leads when existing contacts submit the form.
UpdateContact
Function: Update existing contact records based on data included in the form submission.
Reason: Update the contact record with the most current data.
LeadCreation
Function: Create new lead records or update existing lead records based on data included in the form.
Important: Make sure “Check for Matching Records” is enabled.
Reason: Create/update lead record with the most current data.
CreateConsent
Function: Creates a consent record based on the contact point for the selected channel and subscription. Reason: Consent records are required for sending promotional emails from Marketing Cloud on Core.
TransactionalEmail
Function: Transactional emails are non-promotional, immediate, and automated communications sent in response to a user’s action or interaction. Reason: In this use case, the transactional email is used to send the ungated link to the white paper for future reference. Transactional emails can be used as long as they contain no promotional elements.
DeleteProspect
Function: Deletes the prospect record created by the first element. Reason: This step is optional but recommended. Since a prospect record was created solely to satisfy the requirement of having a “Create Records” element first, deleting the record helps keep the org clean. If you are using the prospect record for purposes beyond fulfilling this requirement, you can skip this step.
Other Use Cases & Next Steps
This structure can be applied and adapted to other use cases where there is a need to send autoresponder emails to leads and contacts without creating duplicate records. Examples include flows that create tasks or campaign member records in addition to sending autoresponders.
Flows might seem challenging at first, but marketers will love them once they gain more experience. The key takeaway is to get hands-on, test, and don’t hesitate to ask for help if needed. Personally, I can say that I received a lot of support from my friends at Sercante when I was starting out, and I still do today!
Product Note:Marketing Cloud Growth and Advanced are editions of Marketing Cloud Next and have also been referred to as Agentforce Marketing.
Welcome to your Masterclass in Account Scoring – where we take your Salesforce skills from good to guru-level! With the Spring ‘25 release, Salesforce introduces Account Scoring, a smart, customizable, and easy-to-manage scoring solution within Marketing Cloud Growth and Advanced Editions (aka “Marketing Cloud on Core” or just “Marketing Cloud”). So, grab your virtual whiteboard, and let’s dive in!
Account Scoring 101: The Fundamentals
Account Scoring is a brand-new feature in Marketing Cloud on Core, designed to give businesses deeper insights into which accounts are most likely to convert. Unlike People Scoring, which evaluates individual leads and contacts based on engagement and fit, Account Scoring takes a broader approach, analyzing entire organizations. This is especially valuable for Account-Based Marketing (ABM) strategies, where sales and marketing teams focus on targeting high-value accounts rather than individual leads.
How Does Account Scoring Differ from People Scoring?
People Scoring is focused on individual engagement and fit. Individuals are scored based on how well they fit your ideal persona and how often they engage with your Marketing initiatives.
Account Scoring aggregates data from all contacts within an organization, providing a more holistic view of an account’s likelihood to convert.
Intent Scoring (optional in Account Scoring) identifies buying signals, making it easier to target accounts actively considering a purchase.
Account Scoring is a game-changer for ABM-focused campaigns, where teams need to evaluate an entire company rather than just a single decision-maker. With this new feature, marketing and sales teams can prioritize high-value accounts, personalize outreach at the account level, and drive stronger conversion rates.
Let’s break down the core curriculum of Account Scoring in Marketing Cloud on Core:
Engagement Scoring – Think of this like a participation grade. The more someone interacts (emails, website visits, messages), the higher the score.
Fit Scoring: This is your compatibility test. Does the account match your ideal customer profile? If so, your points will increase.
Intent Scoring – This one’s all about purchase signals. If an account drops hints they are ready to buy, the score reflects that.
Now let’s discuss how to elevate your Account Scoring skills to an expert level.
Take Control of Calculated Insights
Previously, once you published scoring rules, the system would auto-refresh Calculated Insights every six hours – whether you wanted it or not. With Spring ‘25, Salesforce has introduced the power to unschedule or reschedule Calculated Insights. Now, you control when and how often your scores refresh, ensuring you’re optimizing Data Cloud service credits and keeping your system running efficiently.
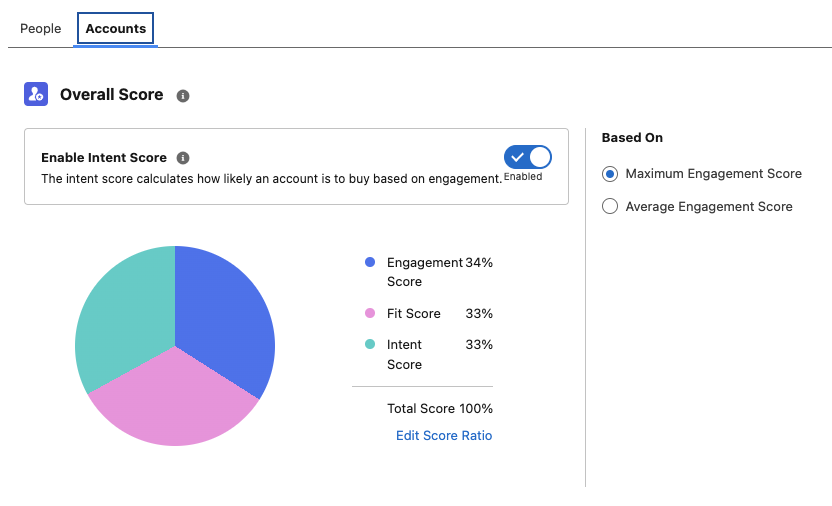
Customize Your Scoring Model Like a Pro
Say goodbye to one-size-fits-all scoring. Account Scoring allows you to adjust the weighting of Engagement, Fit, and Intent Scores to align with your business strategy and ensure the scoring model fits your unique needs.
Need Engagement to weigh 70% instead of 50%? You got it.
Want Intent to be the biggest factor? Done.
Would you prefer Fit to lead the charge? No problem.
Account Identity rulesets allow you to target contacts related to accounts as well as segments based on Account attributes.
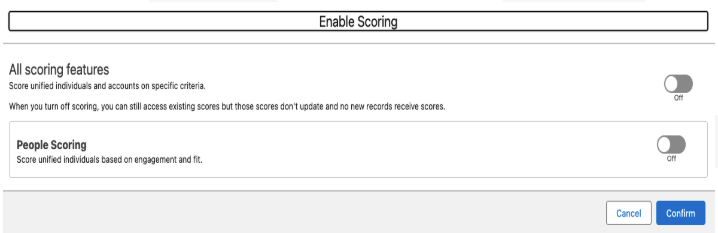
Enable Account Scoring
You can also enable Intent Scoring at this stage if you wish to use this feature.
3. Customize your scoring rules and your score ratio. Don’t forget to republish your rules once your changes are saved.
Smarter Rule Management and Publishing
No more accidental rule mishaps! Now, when you tweak your scoring rules, you’ll need to publish them again for the changes to take effect. Here’s your checklist for success:
Customize Fit and Engagement Scoring under Setup > Scoring Rules.
Fine-tune Account Scoring under the Account tab.
Republish once all your changes are set.
Remember, once published, rules cannot be unpublished – only modified.
Keep case sensitivity in mind (“Example” ≄ “example”)
Time to Put Your Skills to the Test
Congratulations, you’ve just completed your Spring ‘25 Account Scoring Masterclass! Now, it’s time to put your knowledge to work. Whether refining your scoring model or just getting started, these updates give you everything you need to optimize and win more deals.
Want expert guidance? The Sercante team is here to help. Contact us, and let’s make your scoring strategy a success!