AI has the potential to fundamentally change the way we work—not just in theory, but in the day-to-day rhythms of marketing, sales ops, RevOps, and customer experience teams. At its best, AI can help us scale what works, automate what drains us, and create seamless customer journeys that feel personal, not robotic.
Every organization wants to implement AI, because they know the value, but teams are navigating real challenges: unclear use cases, disconnected data, limited internal expertise, and a natural hesitation that comes with change.
A recent Gartner survey found that 77% of executives believe AI will give them a competitive edge—but only 44%, meaning less than half, feel confident in their roadmap to get there.
To help teams navigate AI adoption, the experts at Sercante put together an AI Starter Kit filled with demos, real-life examples, expert recommendations, and insightful how-tos for overcoming the most common AI adoption obstacles, which is what inspired this article.
Here are the six most common AI adoption roadblocks the team has seen firsthand—and some practical, no-nonsense ways to work through them.
Obstacle #1 Data silos are stalling progress
You might be feeling this if…
Your team is using multiple tools that don’t talk to each other, reporting feels unreliable and takes forever, and you’re not quite sure where all your customer data even lives.
How to move forward:
AI can’t do its job if it doesn’t have access to clean, connected data. Start with a simple audit: where is your data, and who owns each piece? From there, focus on one high-impact use case and use integration tools (like a customer data platform or middleware) to bring data together. Keep it focused—you don’t have to solve the whole thing in one go.
Obstacle #2 Lack of trust in accurate results
You might be feeling this if…
There’s skepticism around AI recommendations, hesitation to take action on outputs, or concerns about compliance, bias, or lack of transparency.
How to move forward:
This isn’t just about proving that AI “works”—it’s about making people feel safe using it. Prioritize tools that show their work (think explainable outputs). Run small pilots to validate results and let the data do the convincing. Also appoint internal champions who can model responsible, thoughtful AI use.
You might be feeling this if… AI feels too technical or intimidating for the team, and you’re relying on one or two people to drive all the innovation.
How to move forward: You don’t need a team of data scientists to start using AI. Launch basic AI literacy training by role—what should a CX leader know about AI vs. someone in RevOps? Create safe spaces for learning and experimentation. And if there are areas where you need deeper expertise, don’t be afraid to lean on partners while your team ramps up.
Obstacle #4 No clear use cases
You might be feeling this if…
Your team has a shiny new AI tool, but no one knows what it’s for—or conversations are stuck at the “someday” level. Or conversations around AI remain at the hypothetical level, but no one is actually taking the plunge to use it daily and point to how it is helping them scale and be more efficient.
How to move forward:
Bring AI down to earth. Host simple workshops by function and explore high-impact, low-effort use cases: AI-generated email copy or campaign briefs, summarization, agentic lead qualification and routing, FAQ case deflection through knowledge article references. Document small wins and share them internally—that success story from the marketing team might inspire the sales org to try something next.
Obstacle #5 Resistance to change
You might be feeling this if…
There’s pushback from users or leaders who feel uneasy, or concerns that AI might replace jobs or change the nature of their work. Or you’re hearing team members say “But we’ve always done it this way.”
How to move forward:
There’s no way around it, change will always evoke emotions—discomfort, worry, anger, excitement—you get it. However, how we choose to respond is what is in our control, and we can either choose to keep our shields up with AI or we can see it as an opportunity to innovate, scale what we do best, and create even better experiences for customers.
For conversations with your team, consider reframing AI as a co-pilot that takes on the repetitive tasks, not a replacement for human expertise. Involve employees early and let them help shape how AI gets used. Highlight wins that make daily work easier and more efficient.
Obstacle #6 ROI concerns
You might be feeling this if…
Budget holders want to see results before approving spend, or it’s unclear how success will even be measured.
How to move forward:
In the beginning, when you’re identifying use cases, consider the metrics that will be used for each one to evaluate success and tie these to clear business outcomes.
In the beginning, it may be as small as time saved during campaign building, but when you multiply that time saved over the course of the year, and the amount of team members it affects, that will add up to big results. Then, as Sercante VP of Growth & Alliances, Lauren Noonan, shared on the Connections Recap session, answer the bigger question, “What are you going to do with the time you get back and how will it impact the organization?” When you answer that question, it will show leadership the existing gap between where you are now and the level of growth that could be reached if your team was using AI.
When you’re building your AI roadmap, include the expected short-term wins that will come with your initial low-level of effort use cases and the long-term goals the team is after to give your team a big picture that everyone can align on.
Overcoming to get started with AI
The road to AI adoption isn’t about flipping a switch. It’s about taking deliberate, doable steps—ones that meet your team where they are and build toward where you want to go.
Start by acknowledging what obstacles you and your organization align with the most and then work through the steps above to start to overcome. And if you’d like a third-party expert’s insight, the Sercante team can help. We’ve partnered with dozens of teams to move past the blockers and build AI strategies that actually work in the real world, and have guided them on the path toward driving growth with AI at their organization.
It’s not a secret, so many growth teams, marketing, sales, and customer success, want to be using AI to streamline processes and elevate customer experiences, but when it comes to adoption, they’re a little stuck on how to get started with AI.
After hearing a few of the experts at Sercante share their insights and having conversations with marketing leaders who have taken the plunge on applying AI to their initiatives, plus some first-hand experience with our own marketing, I was able to create this collection of tips for how to get started with AI.
For those thinking, TLDR, let’s cut to the chase, I recommend downloading Sercante’s AI Starter Kit.
Tip 1: Pinpoint the pain
After attending a Connections 2025 Recap Webinar, Sercante’s Salesforce Product Director, Heather Rinke, advised the audience to get started with AI by writing down the biggest pain points they have today.
What is a manual, repetitive, and mundane task, sucking up your bandwidth?
Then consider, of those pain points, which is the lowest barrier to entry? What might have dependencies that might need a little more technology configuration, data setup, or the involvement of multiple departments?
Focus on the low lift, but quick-win initiatives first. Often, this would be an internal process that you could see how it performs, measure impact, and then scale from there.
As Laura Curtis, Senior CRM & Marketing Automation Strategist at Sercante said on the Connections Recap, “You don’t know what you don’t know.”
In fact, 71.7% of non-adopters say “lack of understanding” is their biggest barrier to AI adoption (Influencer Marketing Hub AI in Marketing Benchmark Report). So if you’re feeling overwhelmed, you’re not alone. But it’s also fixable.
There’s zero need to spin up a complex custom solution to get started. Many platforms—especially Salesforce Agentforce—already have out-of-the-box agents and AI functionality you can activate right now.
Use them.
Start small. Test how it works. See how it helps. Then decide if you want to scale or customize.
Tip 4: Get your data house in order (but don’t wait for perfect)
As Sercante VP of Growth & Alliances, Lauren Noonan, shared on the Connections Recap, “Very few people buy a home and it’s perfect.”
You can start with AI even if your data isn’t a 10/10. But the better your data hygiene, the better your AI output.
Start by asking:
What data is critical for our first use case?
Where does it live?
What’s messy that could block us?
Then clean it as you go. Consider what other data optimizations you can make along the way to support the future AI initiatives on your roadmap. Like updating the kitchen before you renovate the whole house, and then mapping out what renovations make sense to do next.
Tip 5: Measure what matters
But what metrics are worth tracking to measure the impact of AI?
It depends on your use case, but as an example, Noonan shared the idea of using AI to generate a campaign brief instead doing it manually.
How long does it take you to do it manually versus using AI?
Before getting started with using AI internally, get benchmarks for how long it typically takes your team do the processes you’ll be using AI for and then measure how long it takes after.
Now, the bigger question that Noonan posed is “What are you going to do with the time you get back and how will it impact the organization?”
If you’re trying to champion AI in your organization and get your leaders on board to support the initiative, answering questions like these can be a huge part of the business case—other than the increased efficiency, maximized output, and better customer experiences that’ll lead to growth.
“One of the biggest things we learned was, it’s okay to slow down and take a crawl, walk, run, approach to AI. Take a step back, look at the infrastructure that we need to deploy, and what we’re trying to do with these agents. Be okay with having a phased approach with expectations of how it’s going to be implemented, and if you put that infrastructure together and have a team that is dedicated to the strategy behind it, the results come fast.”
This aligns with Rinke’s advice of starting with an initiative that is low-barrier-to-entry, perhaps something internal where you can point to productivity gains.
A customer in the healthcare industry’s story of getting started with AI
For example, one of Sercante’s customers in the healthcare industry serving multiple practices implemented Service Agents with Salesforce Agentforce.
The Service Agents were set up to help the human agents query knowledge faster to support them in their calls to better serve patients and providers.
The solution has been rolled out to one practice area first, so the team can continue to learn and adapt the solution as needed before scaling to their other practice areas.
This is a great instance of a team starting small, with rolling out an AI-powered solution in one area of their business to then evaluate and see how it can be applied to the other areas of their business..
Tip 7: Build your AI roadmap
Once you’ve dipped your toe in, it’s time to zoom out.
As the Director of Marketing at Mogli, Evan Thomas shared on the Innovator Series:
“AI is the next evolution of technology and like all the tools that came before it, you have to have a plan. Just getting AI into your org isn’t going to fix it. You have to have a plan for that AI. What is it going to do for you? What is the process it is going to supplement or help your team focus on? What is the reason you’re doing it?”
Creating your AI Roadmap for quick wins and long-term success
Therefore, the next step is creating your plan or your AI roadmap. Identifying your pain points and use cases is the first step of this. The other piece of this is evaluating the customer lifecycle through the lens of the customer and identifying points of friction that could benefit from a solution to help your team scale and make the engagement seamless. However, as this can be overwhelming for teams to do, experts have started collaborating to put together resources for this.
considers dependencies and how to address roadblocks
outlines key metrics to track for measuring success
clearly defines your path for quick wins and long-term success
Take advantage of training opportunities for creating your AI plan
Another option for getting started with creating your AI Roadmap is to get training. According to SurveyMonkey, 70% of employers don’t provide training on AI, even though 70% of marketers say it’s essential. Therefore, any time you can get training and advance your skills on how to approach AI or how to use it, take advantage!
One training offered is Sercante’s AI Workshop: Building your roadmap for real impact. This is the deep dive where the experts will guide you through creating your 30-60-90 day plan to help your organization get started with AI and scale for the future.
One last thing: Pick yourself in this era
CEO of Sercante, Andrea Tarrell, shared this sentiment during her opening keynote at MarDreamin’ Summit, encouraging the community to take action asking, “If not you, then who?”
This technology is at our fingertips, and it’s up to us to decide how we’re going to use it to streamline processes, meet customers where they are at scale, and create a truly seamless experience.
Person Accounts, an organizational feature of Salesforce, can be a powerful way to differentiate between a business contact (think Cate Godley who works at Sercante) and an individual you do business with that is not associated with a company (think Yuki Godley, shown below).
The reality is that Person Accounts are actually not that scary, but the fact that once they have been enabled they cannot be disabled is likely what causes a lot of that trepidation. This permanent enablement is also present when deciding to sync Marketing Cloud Account Engagement (Pardot) Prospects with Person Accounts in Salesforce, and there are definitely a few things that should be considered before enabling this option in your (or your clients’) Account Engagement organization. Read on to learn more about how to prepare for this setup.
Okay, but what’s a Person Account anyway?
Before we get into the things you’ll want to consider before enabling Person Accounts with Pardot Marketing Cloud Account Engagement (I’m a sucker for alliteration, always) let’s talk about what a Person Account in Salesforce actually is.
Person Accounts allow for a business to accurately track and manage relationships with customers if they’re in a B2C driven space, like education, health care, or non-profits. There are several considerations for Person Accounts inside the Salesforce platform, but here’s a quick summary:
Store information about individuals instead of businesses
Combines Account fields and Contact fields into one record and page layout – the Person Account
Takes up twice the Salesforce storage space due to having a backend Account and Contact record
Once Person Accounts are enabled, you’ll have the option to create a Business Account or a Person Account when creating a new Account from scratch in Salesforce. If you’re converting a lead using the standard Salesforce conversion process, you can create a Person Account by ensuring that the Company field on the lead is blank. No Company? Person Account. Company? Business Account.
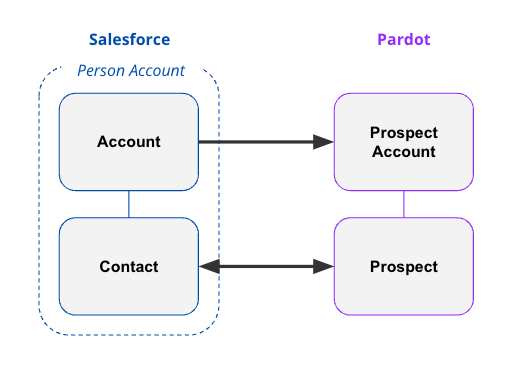
The important thing to note here is that a Person Account is like two kids in a trenchcoat, Account & Contact, wearing a sign that says Person Account. In the backend of Salesforce, there is a Contact record and an Account record that are combined to show you the single Person Account record.
Great, but what about Marketing Cloud Account Engagement?
Now that we’ve got the initial details out of the way, it’s time to talk Person Accounts with Marketing Cloud Account Engagement. Just like in Salesforce, once you enable syncing with Person Accounts in Account Engagement you are not able to disable it. Additionally, when you sync a Person Account record with Account Engagement you’ll get a Prospect record and a Prospect Account record which will remain separate in Account Engagement (more on that later). The Prospect record will impact your mailable database number, but there are not any Prospect Account data limitations that you need to keep in mind.
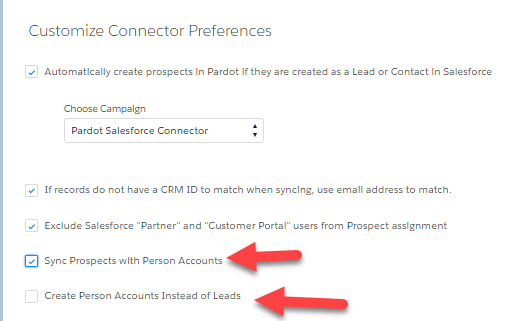
Account Engagement Setup Options
When I first started out as a consultant, syncing Person Accounts with Pardot Account Engagement required reaching out to Salesforce Support to have the feature enabled. With recent updates to the Account Engagement Settings options, Admins are now able to turn on “Sync Prospects with Person Accounts” from within the setup menu.
Create Person Accounts on Assignment (instead of Leads)
In addition to enabling the option to sync Prospects with Person Accounts, you’re also able to tell the system to “Create Person Accounts Instead of Leads”. Turning this functionality on will tell the system to never create a lead when sending a Prospect to Salesforce and is irreversible. This is a good option if you never use leads, however if your organization does use leads or you are using both Business Accounts and Person Accounts you should leave this setting turned off.
Syncing Records Between Salesforce and Account Engagement
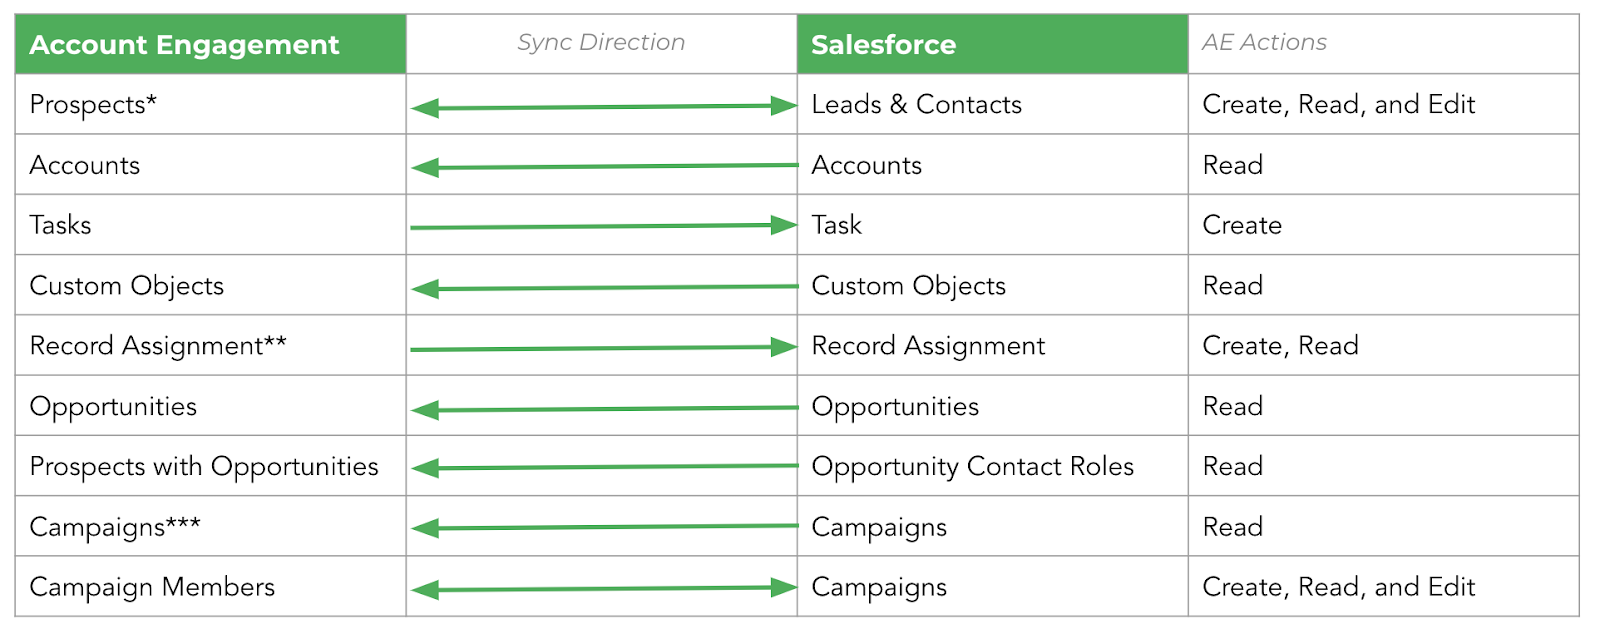
One of the biggest considerations with Person Accounts is how you set up your fields in Salesforce and in Account Engagement. Most of the Salesforce literature will tell you to create new custom fields on the Account record to have them added to the Person Account record and page layout. There’s nothing wrong with this setup, however if you’re going to be syncing Person Accounts with Pardot Account Engagement you should keep the Salesforce Connector sync directions in mind.
The Salesforce Connector for Account Engagement has Read & Write permissions for the Lead and Contact objects in Salesforce, and Read Only permissions for the Account object.
If you’re just starting out with Person Accounts in Salesforce, my recommendation is that you create any custom fields that you’ll want Account Engagement to be able to change on the Contact object in Salesforce. This will mean that when creating your custom field in Account Engagement, you’ll be able to do so on the Prospect object and use the standard Salesforce Connector sync options. If you have custom fields for the Person Account already created on the Account object in Salesforce, check out the section on automations below for how to keep these fields in sync.
In the Account Engagement system, the Prospect record that is synced with a Person Account will show the Prospect Name and Prospect Account as the same name. The Prospect record will have any Contact level fields you have added to Account Engagement showing, as well as a Record Type ID of a Person Account. The Prospect Account page will show you any Account level fields you have added to Account Engagement (remember, these are Read Only fields). Both the Prospect and Prospect Account records will show the owner as the Account Owner from Salesforce.
Other Gotchas to Know About
Person Accounts do not support scoring categories in Account Engagement, so if that’s a major player in your marketing strategy, you may need to think about other ways to achieve your goals. In addition to this, the Person Account will only sync to a single record type (the Person Account record type).
Finally, the Prospect Owner will always be the Account Owner in Salesforce. Crucially, this owner cannot be assigned from Account Engagement as we do not have write permissions to the Account record via the Salesforce connector.
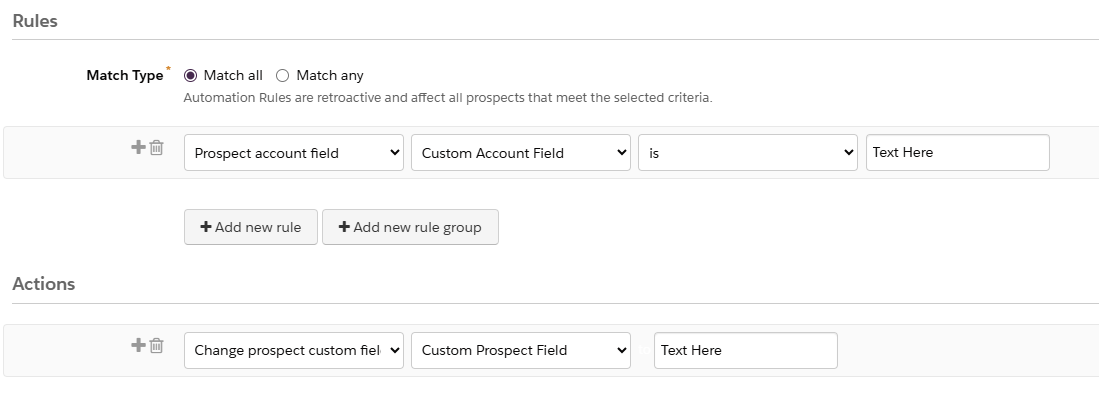
Automations for Data Integrity
My earlier recommendation of creating any custom fields that you’d like to be updated by Account Engagement should be created on the Contact record in Salesforce. But what if you’ve already created custom fields on the Account level that you need to update and keep in sync in the Account Engagement system?
The best practice here is to create custom fields on the Prospect record in Account Engagement to hold this information, then create Automation Rules to keep it in sync with Salesforce. This will ensure that custom field information appears at the Account and Prospect levels and keeps bi-directional sync on the Prospect records active.
Enable Person Accounts without Fear
Did I write this entire blog post to get my dog’s photo online? Maybe, maybe not. But I did write this post after helping to answer questions about implementing Person Accounts in Pardot Marketing Cloud Account Engagement many, many times. I, too, used to be filled with trepidation at the idea of using Person Accounts both in Salesforce and in Account Engagement.
Once I understood the fundamentals of how this functionality works in both systems, I felt a lot more confident about getting this set up for clients in multiple business types. I hope this blog post helps you to feel more comfortable with this setup yourself! If you’ve still got questions, comment below or reach out to the team at Sercante and we’ll see how we can help.
I don’t usually use the word transformational when discussing content blocks for an email, but this one deserves it. Recently, our team at Sercante had the opportunity to partner with one of our long-term automotive clients to find a solution to a big problem—overstocked inventory.
This project began like many others. An innovative, creative brand trying to bridge the gap between what customers want and what they can have. Buyers were spending time configuring their perfect vehicles, carefully choosing every option and detail, and then either abandoning their cart or waiting months for the car to be built.
What they didn’t realize was that their dream car, or something close to it, was already built. Already available for them. Already on the lot. It just wasn’t being shown to them.
The Problem: They Had the Cars, But No One Knew
The brand had a recommendation engine on their website, which enabled customers to browse their available inventory. However, this only happened if a customer actively sought it out. Meanwhile, their emails weren’t showing in-stock options, but rather driving them to the configurator to design their vehicle. The inbox experience focused on brand, features, and specs, but not on availability.
There was a disconnect between digital engagement and physical inventory. And it was costing time, resources, and ultimately, conversions. Through several brainstorming sessions and collaborative work, we had to ask ourselves what would happen if we started surfacing what customers could get today?
The Approach: Make the Data Work in Email and Web
Working with the brand’s Salesforce team, we built a dynamic content block that connects their existing vehicle recommendation API with Salesforce Marketing Cloud. At send time, the block pulls in the top two vehicles available near each subscriber’s zip code.
That means:
Real-time pricing and availability
Personalized images and trim-level specs
A “View Details” CTA that drives them to the inventory page
And dynamic scripting to auto-generate it all without a manual lift
The block works anywhere—in journeys, newsletters, promotions, event invitations, and more. We added fallback logic, Einstein Send Time Optimization, and throttling to ensure performance even for high-volume sends. We evaluated alternative approaches, such as daily lookup tables, but for this use case, true real-time was worth it. It wasn’t just about showing inventory, it was about giving the customer a path forward.
What Happened Next
This shift didn’t just make the email more useful. It changed how the brand saw its role in the customer journey and the results showed the impact:
Click-through rates on the monthly newsletter more than doubled from 1.02% to 2.26%.
Journey emails with the content block saw a 119% higher click-through rate in A/B testing.
Build time dropped from over 40 hours for their monthly newsletter campaign to 10 hours.
The time to purchase fell from 107 days to 5 days, and their inventory began to decline.
And, perhaps most importantly, the marketing team began thinking differently. The inbox became a place of momentum. Of relevance. Of action. As their marketing director put it, “This helped us rethink how we use email. Not just to inform, but to move customers forward in their journey.”
Check out the full case study related to this customer story here.
Going Beyond Automotive
This isn’t just a car story. If you’re in an industry with inventory, long buying cycles, or complex consideration paths, this kind of approach has ripple effects:
Are you surfacing what’s ready now or just what’s aspirational?
Are your marketing channels connected to real-time availability?
Are your emails helping customers act, not just learn?
We’re all sitting on data that can do more. It’s not about overwhelming customers. It’s about removing friction, aligning on timing, and making it easier to say yes.
This project reminded me that sometimes the most effective marketing move isn’t adding more. It’s making what you already have more visible. Your customers don’t need a better configurator. They need a clearly defined next step. Let’s give them one. If you’d like an expert’s insights on how to maximize the data you have to build more personalized experiences for your audience, that result in clear next steps and impact on the funnel, reach out to Sercante. The team is all about helping you create seamless experiences for your team and your customers.
Product Note:Marketing Cloud Growth and Advanced are editions of Marketing Cloud Next and have also been referred to as Agentforce Marketing.
Marketing Cloud Growth and Advanced Edition (aka Marketing Cloud on Core or just Marketing Cloud) offers incredible capabilities to marketers in so many areas. From AI powered segmentation, scheduling and sending SMS in a nurture campaign, and unprecedented abilities to tailor your marketing content to the audience viewing it, Marketing Cloud Growth and Advanced Edition can help marketing teams large and small automate their marketing efforts. All of these amazing capabilities rely on the power of one key feature of Data Cloud – the Data Graph.
Data Graphs allow you to combine and transform data from multiple Data Cloud Data Model Objects (DMOs) into a single view. This read-only Data Graph can then be used in a variety of ways through API, automations, and Salesforce applications, like Marketing Cloud. In fact, a Data Graph is a requirement for using personalization (and some automations) within Marketing Cloud – the objects and fields you select when creating this graph are the same objects and fields that you’ll have access to when adding personalization to your marketing content or powering your automations.
Your Data Graph needs to have a specific shape to successfully send your emails. If you have Marketing Cloud Advanced Edition, you’ll also need to ensure that Einstein Engagement Scoring and Einstein Engagement Frequency features have been enabled before building. This blog will help you understand the steps needed to take to create and edit your Data Graph for Marketing Cloud.
Things to Consider Before Building a Data Graph
Once upon a time editing a data graph wasn’t possible, which meant gathering all of the information you’d need to reference in your marketing efforts before building your first graph. Now it’s entirely possible to edit your data graph, but I’d still highly recommend you gather your requirements ahead of time, so let’s think about what you’ll need.
What fields do you need for personalization?
Personalized marketing content is the name of the game, so the first thing to consider is what fields you’ll want to reference in any personalized marketing content. This should include things like First Name, Last Name, Title, and Account but you should also consider what custom fields you may want to reference, like the name of a product or webinar they’ve attended.
Are there any fields you’ll need for segmentation?
The segmentation capabilities in Marketing Cloud rely on the fields that are included in your data graph, so next up it’s time to think about how you’re planning on segmenting your prospects for email, SMS, and/or WhatsApp sends and automations. Common things to include could be industry, region, and address data. Make note of the fields and the object that those fields are on. For example, if you want to pull in industry, that field is likely on the Account Object. Keep in mind that anything you include here must have some relationship to the individual included in the segment.
What will you need for your automations?
The last thing you’ll need to consider is any information you might need for your flows. What information will you be basing your automation decisions on? Things to consider include campaign membership or status, email engagement, and geographical information.
Have Advanced edition? Turn on Einstein Features (if applicable)
Marketing Cloud Advanced Edition includes Einstein Engagement Scoring and Einstein Engagement Frequency. Be sure to enable these features before building your data graph!
Confirm the fields are in Data Cloud
Now that you have your field requirements determined, the next step is to make sure all these fields are mapped to your Data Streams. These field mappings take the new information ingested in the data stream and map it to the appropriate fields and objects in the Data Model Object (DMO) to create or update the appropriate records. Head to the Data Streams tab in Data Cloud and confirm all the fields you listed earlier are mapped to the appropriate DMOs. Check out this help article for some data mapping best practices.
Be sure the Data Cloud Connector can View All fields
One of Salesforce’s core tenets is trust, and that extends across all layers of the Salesforce ecosystem. This means that the connector between Data Cloud and Sales Cloud has minimum access to information in your Salesforce system. Make sure all the fields you’re including in your data graph are visible to Data Cloud by going to the Data Cloud Salesforce Connector Permission Set and updating the object settings to include the View All and Read permissions for every object you’ve listed. This ensures that all objects and fields are able to be ingested into Data Cloud.
Building the Standard Data Graph for Marketing Cloud
We have a step by step blog on building a data graph for personalization, but as a quick refresher, here are the steps you’ll need to take and things to keep in mind.
Go to Salesforce Setup > Marketing Cloud > Assisted Setup > Reporting and Optimization > Customer Engagement
Click on “Go to Data Graphs”
Create a new data graph from scratch
Use the default data space
Select the Unified Individual as your Primary Data Model Object
Ensure your data graph has the following shape:
Unified Individual (Primary Data Model Object)
Unified Link Individual
Individual
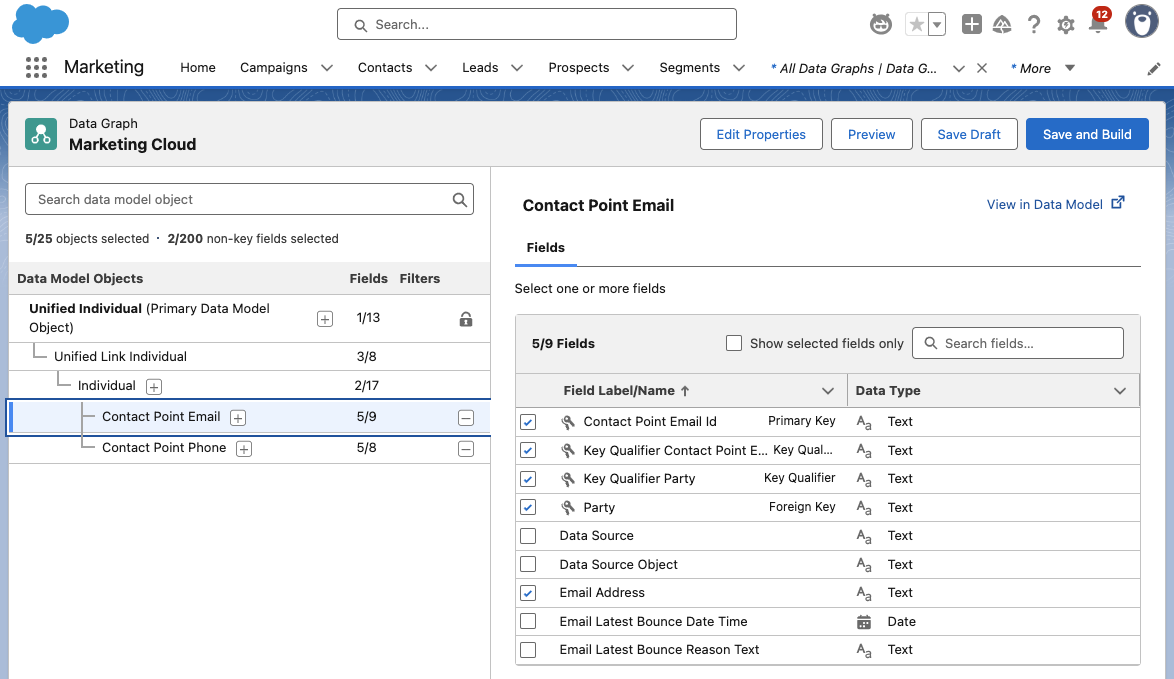
Contact Point Email
Contact Point Phone
Make sure all the objects and fields on your lists are included in the data graph
The following fields must be selected during the Data Graph setup:
Individual ID from ‘Individual’
Email Address from ‘Contact Point Email’
Telephone Number from ‘Contact Point Phone’
But what if you have Advanced?
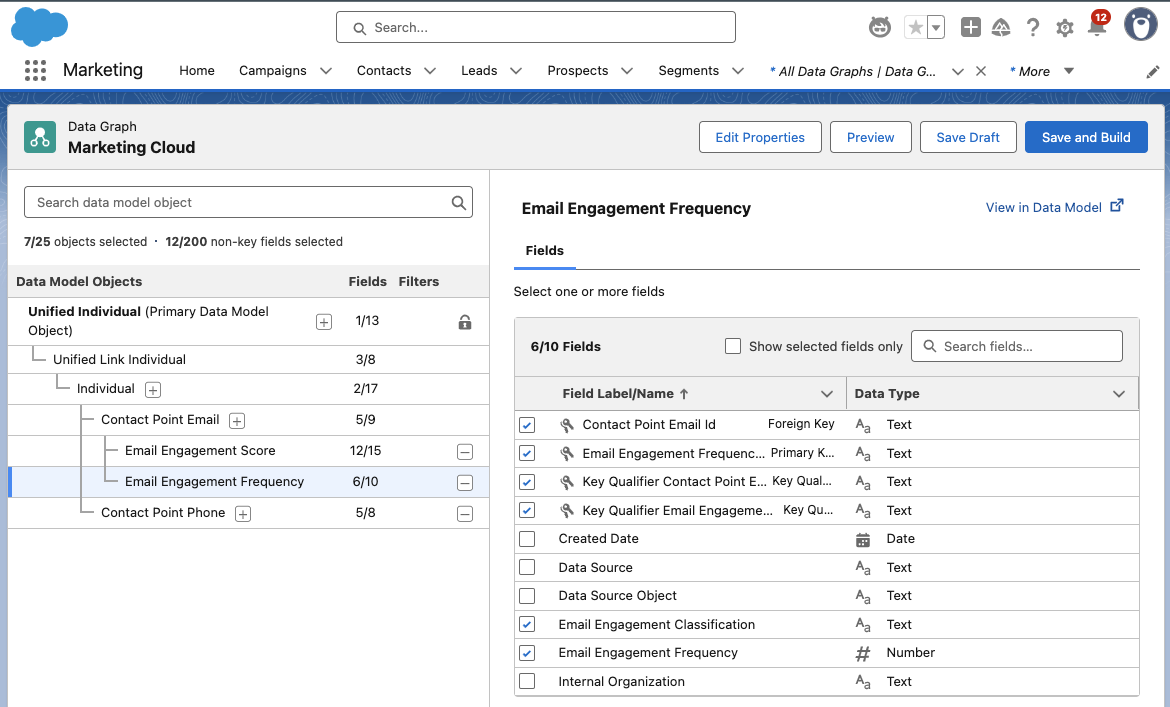
If you’re using Marketing Cloud Advanced Edition, be sure to include the Email Engagement Score (Unified Individual > Unified Link Individual > Contact Point Email) and Email Engagement Frequency (Contact Point Email & Contact Point Phone).
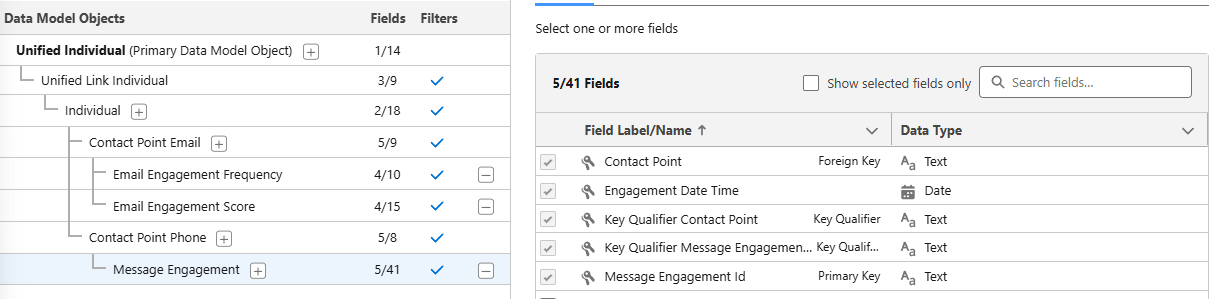
Add in SMS
By now, your data graph should look something like this, give or take the Email Engagement Score, Email Engagement Frequency, and SMS options. To include SMS in your Data Graph, be sure to include the Contact Point Phone and the Message Engagement options, as shown below.
Message Engagement gives you lots of options for monitoring how your SMS marketing is doing. Use this to monitor engagement with your SMS messages, the messages you’re sending, links, subscription information and more!
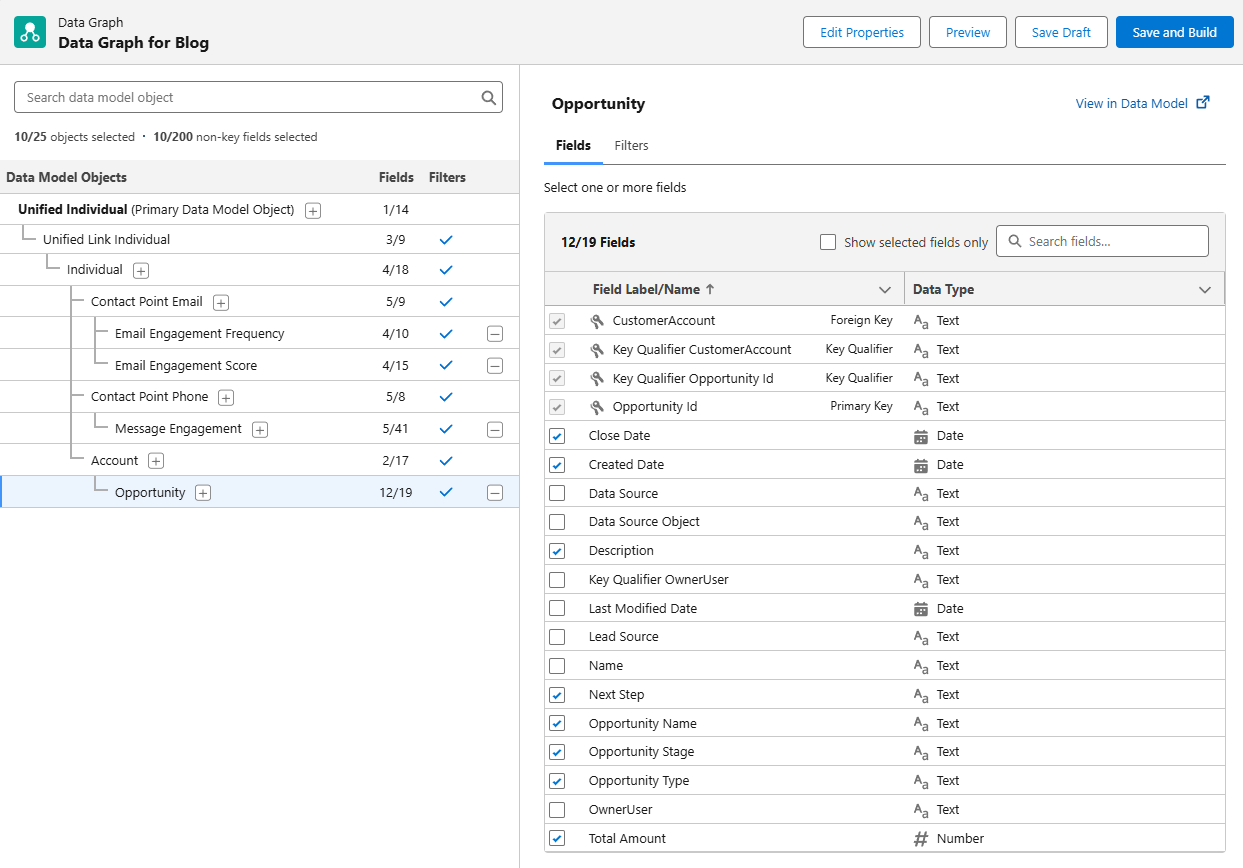
Bringing in Custom Fields and Objects
Okay, so we’ve covered adding in all the standard objects and fields you’ll need for your standard personalization and automation needs, but what about the custom objects that you may have in your organization? These may be objects from integrations, or ones you’ve created to help manage campaigns or customer orders.
To bring this information into your Data Graph for use in your marketing, you’ll need to ensure that there’s a connection to the Individual in some manner. What does that mean? An easy example is an Opportunity – Opportunities are connected to the Individual via their Account in Salesforce. Select the top level item in your Data Graph, then use the + option to drill down to the object you’re looking for. Once you’ve gotten your object added on the graph, use the right side of the screen to select the fields you want to include in the graph.
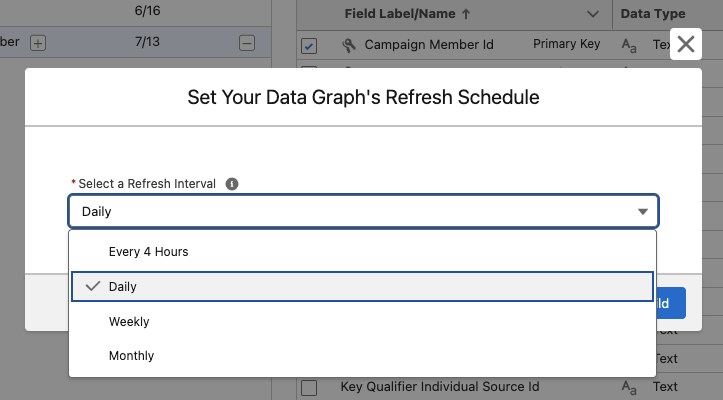
Deploy Your Data Graph
Now that you’ve built your graph, the next step is to save and build, then deploy your graph. Click on Save and Build then choose your refresh interval. Keep in mind that every refresh will consume credits! The right refresh interval will depend on how you’re planning on using the Data Graph, but typically the daily refresh rate works well for marketing needs.
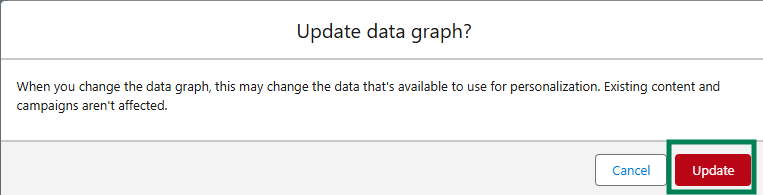
Head Back to Setup to Deploy Your Graph
From Salesforce Setup, type Reporting and Optimization in the Quick Find box and navigate to the Customer Engagement option. In the Configure Basic Personalization section, use the drop down menu to select the Data Graph you just created.
If prompted, confirm that you want to update your data graph by clicking the Update button.
Get Personalizing with Your Data Graph!
Now that you’ve built and deployed your Data Graph, you’re able to use the information in your personalization and automation efforts across Marketing Cloud. This powerful tool combines information from across your Salesforce organization into a single place of reference for Marketing Cloud to use that will update automatically on a planned schedule.
Product Note:Marketing Cloud Growth and Advanced are editions of Marketing Cloud Next and have also been referred to as Agentforce Marketing.
The Summer ‘25 release for Marketing Cloud Growth and Advanced Editions is here, and it’s packed with updates designed to turbocharge your team’s efforts. Think of it as a toolbox upgrade: we’re talking AI-powered reporting, slick campaign automation, revamped content tools, and stronger consent tracking. Let’s dive into what’s new and how these features can make your work smoother and your customer experiences much more impactful.
Work Smarter with Einstein
With Summer ‘25 Einstein in Marketing Cloud takes a big leap forward, offering marketers real-time insights and more innovative automation options. If you ever wished you had more time to analyze engagement or fine-tune your campaigns, this update is for you!
New Einstein Predictive Features
New Data Cloud reports enable you to dive into Einstein Engagement Frequency (EEF) and Einstein Engagement Scoring (EES) without needing to export or manually assemble data. Marketers can now create reports directly in Data Cloud using the Email Engagement Frequency and Email Engagement Score objects. Whether you’re trying to reduce fatigue by adjusting send frequency or prioritize highly engaged audiences for your next campaign, these reports help you make data-backed decisions faster and with more confidence.
Automate Flows with Einstein
You can now automate journey paths based on predicted engagement using the new Einstein Decision element in Flow. By leveraging scores from Einstein Engagement Scoring and Engagement Frequency, marketers can direct contacts down the most effective path. For example, you can send fewer messages to at-risk audiences or prioritize highly engaged contacts for conversion. Once you create a supporting data graph, just drop the Einstein Decision element into your flow and configure conditions using your data graph’s engagement fields. It’s a powerful way to build smarter, more responsive campaigns that respect your customers’ engagement signals.
Build Data Graphs for Einstein Send Time Optimization
Einstein Send Time Optimization (STO) is now more customizable thanks to updates to the underlying data model. After disabling and re-enabling STO in Einstein for Marketing Setup, you can build a custom data graph to personalize send time predictions based on your unique business data. This added flexibility lets you capture the signals that matter most to your audience, helping Einstein determine not just the best time to send, but the best time for your customers.
Use Agentforce to Get Scores for Record IDs
Agentforce users can now tap into deeper insights with the new “Get Score for Record ID” action. This feature retrieves engagement and fit scores for individual leads, contacts, and prospects, enabling marketers and sales representatives to prioritize follow-ups and personalize outreach based on real-time data. You’ll also get account-level scores, including overall and intent scores, for a more complete view of customer readiness. To get started, enable the action in the Agent Actions section of Agentforce within Salesforce Setup.
Campaign Creation Made Easy
This release introduces significant enhancements to how marketers create and manage campaigns in Marketing Cloud, providing greater flexibility and control with fewer clicks.
Explore Campaign Designer (Beta)
Marketing Cloud Advanced Edition is launching new Campaign Designer (beta) functionality, enabling you to generate multi-touch marketing briefs more quickly. All of which is powered by AI and your trusted customer data. This new functionality helps you plan campaigns that span multiple channels and moments, all grounded in the context of your existing data. When reviewing a draft brief, you can select an existing campaign to build from, and use AI to refine messaging and channel selection, making it easier to align teams, drive consistency, and launch with confidence.
Build Your Own Campaign
Looking to start from scratch? With the new “Build Your Own Campaign” option, marketers are no longer tied to quick-start templates. You can now select “Build Your Own: when creating a campaign, choose your flow type, and build as you go. Add message elements directly from the campaign record or dive into Flow Builder to design a more curated customer experience that is tailored to your goals, audiences, and data.
Edit Your Flow from the Campaign
Managing and updating your campaign flow is now easier and more seamless. If your flow includes five or fewer elements, you can add messages and wait steps directly from the campaign record without switching to Flow Builder. You can also configure key message details, like Einstein Send Time Optimization and tracking options, all within the same view, making it easier to keep everything aligned as your campaign evolves.
Streamlined Content Personalization
If content is the heart of your marketing strategy, this release gives you the tools to keep it beating stronger. From fine-tuned control over HTML and data sources to more innovative personalization powered by recommendations and dynamic elements, Summer ’25 is all about helping you create more meaningful, relevant content, without adding complexity to your workflow.
Gain Control of Your Email HTML
Gain complete control over your email design with the new HTML code view. You can now convert existing emails to HTML, make detailed structural or styling edits, and build fully customized, responsive emails all within the editor. Whether you’re troubleshooting, refining layouts, or adding advanced formatting, this feature gives marketers and developers the flexibility to go beyond drag-and-drop.
Review Your Updated Data Sources Tab
Working with dynamic content just got more intuitive. The updated Data Sources tab gives you better visibility and control over the data powering your emails. Now, instead of jumping between tools, you can add, update, and view all available data sources, including your default data graph or unified individual, directly within the email editor. This makes it easier to ensure your personalization is accurate and aligned before hitting publish.
Check Out Repeater for Email
Advanced Edition users can now take email relevance to the next level with Personalization Recommendations and the new Repeater for Email component. This feature lets you dynamically showcase recent purchases, popular products, or personalized content in a consistent card, list, or custom layout. Simply connect the repeater to a data source and utilize merge fields to display product names, images, descriptions, etc. This ensures that every message reflects what matters most to each recipient.
Personalize Links and Images in Every Email
You can now dynamically personalize images and buttons in your emails by using merge fields or dynamic URLs. This allows you to tailor visuals and calls-to-action for each audience segment, creating more relevant and engaging experiences across your campaigns.
Explore New Field Types for Forms
New form field types provide greater precision and flexibility when capturing data. You can now use Date, Date/Time, Time, Number, and Text Area (Long) fields to support more detailed, structured inputs—perfect for scheduling, time-sensitive actions, numerical data, and open-ended responses. The updated Long Text Area also features a larger input box with a draggable corner, providing users with a more seamless experience when submitting longer responses. Whether you’re collecting preferences, running surveys, or managing gated content, these enhancements make your forms smarter and more user-friendly.
Expand Your Brand Identity
The expanded Brand Identity field in Content Builder now gives you up to 1,000 characters to describe your brand’s voice, values, and unique positioning. This added detail helps Agentforce generate AI-powered content that’s more aligned with your brand’s style, whether you’re drafting emails, landing pages, or SMS messages. The result? More consistent, on-brand messaging with less manual editing.
Delete CMS Workspaces
Need to declutter your content library? Content admins can now delete outdated or unused CMS Workspaces to keep things organized. First, remove any sharing relationships and unpublish existing content. This cleanup option makes it easier to manage your content at scale and maintain a more streamlined workspace. (Note: the default Marketing Cloud workspace can’t be deleted.)
Simplify Consent Tracking and Compliance
Consent isn’t just a compliance checkbox, it’s a critical part of building trust with your audience. The Summer ’25 release introduces several updates that enable marketers to collect, manage, and format consent data more effectively across campaigns and systems.
Automate Consent Updates with Flow Actions
Consent management is now more flexible and automated. You can collect and update consent using the new Create Consent flow action in both event-triggered and Data Cloud–triggered flows. For example, when someone clicks a custom link, including a double opt-in email, you can automatically update their consent status to Opted Out or Subscribed, with no manual steps required. This update makes it easier to keep consent data current and automate compliance across your marketing programs.
Improved Consent Imports
Consent imports just got more accurate and easier to manage, especially for mobile messaging. You can now include a country code column when importing SMS or WhatsApp consent data, helping ensure that records are correctly classified by region. This is especially valuable for supporting country-specific compliance requirements. Additionally, updated phone consent formatting guidelines make it easier to standardize values during import, reducing errors and helping you maintain clean, reliable consent records across your messaging channels.
Move Faster with Smarter Marketing Automations
The Summer ’25 release introduces a set of powerful automation enhancements designed to streamline how marketers engage leads and manage campaign activity. These updates bring core actions, such as sending emails, tracking link clicks, and managing prospect lifecycles, closer to your day-to-day workflows, making it easier to move fast, stay organized, and respond to customer behavior in real-time.
Send Emails Directly from Lead and Contact List Views
You can now send marketing emails directly from any list view of Leads or Contacts. Simply click ‘Send Email’, select the ‘Marketing Email’ option, and follow the guided steps to build and send your message. Behind the scenes, Salesforce automatically creates the campaign, flow, and audience segment for you, making it easier than ever to launch quick follow-ups or targeted nurtures with minimal setup.
Attribute Clicks Beyond the Inbox
Looking to understand what happens after someone clicks through your email or ad? With Summer ’25, you can now track links to your external website and attribute that activity back to the source, whether it’s an ad, email, or other campaign asset. This provides you with deeper visibility into off-platform engagement, helping you connect the dots across the customer journey. If you set up external tracking before this release, you’ll need to update your Behavioral Events data stream to start using the enhanced tracking features.
Convert Prospects to Contacts
You can now convert qualified Prospects to Contacts in Marketing Cloud, either manually or by using automated Flows. This enhancement provides you with more control over how and when individuals progress through the sales cycle. Whether you’re ready to hand off a lead to Sales or building an automated nurture, this feature helps streamline the sales process, personalize communication, and drive higher conversion rates by associating each new contact with the correct account at the right time.
Move Faster with Smarter Marketing Automations
Every successful marketing campaign starts with a strong foundation, and that begins with how your platform is set up. In the Summer ’25 release, Marketing Cloud focuses on making setup and configuration simpler, faster, and more intuitive, so teams can spend less time managing infrastructure and more time launching impactful campaigns. Whether you’re provisioning channels, organizing data spaces, or fine-tuning identity resolution, these updates are designed to help you hit the ground running with confidence.
Unified Messaging Data Kit
Setting up messaging channels is now easier than ever. The Unified Messaging data kit installation and update process has been improved, making it faster and more intuitive to get started. Whether you’re enabling new channels or updating existing ones, the streamlined setup reduces manual steps, allowing you to focus on activating your messaging strategy, not troubleshooting the installation.
Improved SMS Provisioning Process
SMS setup is now more guided and error-proof. In Unified Messaging Setup, you’ll find clear, country-specific instructions for requesting SMS codes, registering brands, and provisioning campaigns. These updates help reduce confusion, minimize errors, and speed up approvals. If a request is rejected, you will receive a detailed explanation, allowing you to resolve issues and resubmit with confidence quickly.
Custom Data Spaces Support
New Marketing Cloud customers now have the option to set up a custom data space during initial configuration, bringing more structure and clarity to how marketing data is managed in Data Cloud. This update is beneficial for organizations managing multiple brands, teams, or product lines, as it offers enhanced data security, faster retrieval and processing, and improved overall data quality. Previously, all marketing data defaulted to a single space; however, with Summer ’25, segmentation and governance can begin on your terms, right from day one.
Identity Licenses Now Available
Marketing Cloud now supports Identity Licenses, giving you a more flexible way to add users to your marketing team without assigning full Salesforce licenses. Users with the Identity License can log in via SSO and access most Marketing Cloud features, including campaigns, segments, flows, and shared analytics reports, when granted the Marketing Cloud Manager permission set. This update makes it easier to scale access securely, while keeping centralized control over who can work in your instance. Note: Identity users will not have access to Marketing Cloud setup or Opportunity Influence features.
New Identity Resolution Rules
Salesforce now recommends adding two new custom rules to your Identity Resolution ruleset to enhance the matching and unification of customer records. These rules are designed to improve accuracy during the conversion process and help identify visitors to your tracked external websites. By refining how identities are resolved across systems, you strengthen your data foundation, supporting more personalized marketing and building greater trust with your audience.
The Summer ’25 release for Marketing Cloud Growth and Advanced Editions delivers exactly what modern marketing teams need: more speed, smarter automation, and greater personalization, all built on a stronger, more scalable foundation. From Einstein-powered insights and flexible campaign design to enhanced consent tracking and setup improvements, these updates are designed to help you move faster and create more meaningful experiences at every touchpoint.
Ready to see how these features can drive real results for your team? Reach out to the Sercante experts for a Marketing Cloud audit or consultation to assess your current setup and identify opportunities to leverage the latest capabilities. Whether you’re just getting started or looking to optimize what you already have, we’re here to help you make the most of Summer ’25.