Category

Jenna Molby

Your event or webinar has finished and now it’s time for sales to follow up on those leads. A great way to automate sales follow up is to create an automated engagement program in Pardot to send out emails on the sales rep’s behalf and create follow up tasks automatically in Salesforce.

Creating the content

The first step is to create the content for your series of follow up emails. Here are some great resources for helping you come up with the content for your emails.

Creating the emails in Pardot

The goal for the emails is to make it look like it’s coming from a Sales rep. This means that you might need to set up a new standard email template that looks like a personal email. You will also need to customize the sender to be a Sales user rather than a general user. The email is going to contain a couple of different components:

  1. Personalized with the recipient’s first name.
  2. The email signature of the Sales Rep.
  3. A link to unsubscribe.

Creating the Sales Rep’s signature

The Sales Rep’s signature should be dynamic, so you don’t have to create a new email template for each Sales Rep. There are three different ways to make this dynamic, depending on what content you want to display.

Creating the Sales Rep’s signature: Option 1

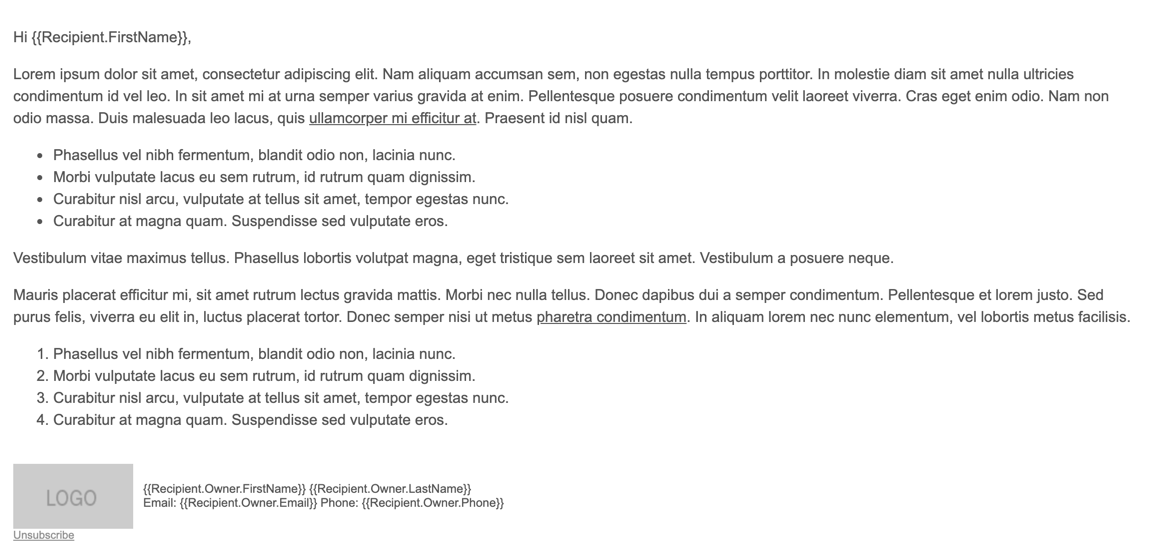
The first way to create the Sales Rep’s signature is to use the merge fields for the Recipient Owner.

Example:
{{Recipient.Owner.FirstName}} {{Recipient.Owner.LastName}}
Email: {{Recipient.Owner.Email}} Phone: {{Recipient.Owner.Phone}}

This will pull in the first name, last name, phone number and email address of the prospect’s owner in Salesforce. The downside to this is if you want to include job title in the Rep’s email signature there is no way to display it using this method.

Template preview
Template HTML
<!DOCTYPE html>
<html xmlns="http://www.w3.org/1999/xhtml"
xmlns:v="urn:schemas-microsoft-com:vml"
xmlns:o="urn:schemas-microsoft-com:office:office">
<head>
 
<!--[if gte mso 9]><xml>
<o:OfficeDocumentSettings>
  <o:AllowPNG/>
  <o:PixelsPerInch>96</o:PixelsPerInch>
</o:OfficeDocumentSettings>
</xml><![endif]-->  
	<meta charset="utf-8">
    <meta content="text/html; charset=utf-8" http-equiv="Content-Type">
    <meta name="x-apple-disable-message-reformatting" />
	<meta content="width=device-width, initial-scale=1" name="viewport">
    
    <style type="text/css">
        body, p, ul li, ul, ol, ol li {
            font-size:15px;
            font-family:Arial,Verdana,Sans-serif;
            color:#555555;
            line-height:22px;
        }
        a {
            color:#555555;
        }
    </style>
</head>
<body style="margin:0;padding:0;">
<table border="0" cellpadding="0" cellspacing="0" width="100%">
	<tbody>
		<tr>
			<td style="padding:10px;" class="">
			<p>Hi {{Recipient.FirstName}},</p>
 
			<p>Lorem ipsum dolor sit amet, consectetur adipiscing elit. Nam aliquam accumsan sem, non egestas nulla tempus porttitor. In molestie diam sit amet nulla ultricies condimentum id vel leo. In sit amet mi at urna semper varius gravida at enim. Pellentesque posuere condimentum velit laoreet viverra. Cras eget enim odio. Nam non odio massa. Duis malesuada leo lacus, quis <a href="#">ullamcorper mi efficitur at</a>. Praesent id nisl quam.</p>
 
			<ul>
				<li>Phasellus vel nibh fermentum, blandit odio non, lacinia nunc.</li>
				<li>Morbi vulputate lacus eu sem rutrum, id rutrum quam dignissim.</li>
				<li>Curabitur nisl arcu, vulputate at tellus sit amet, tempor egestas nunc.</li>
				<li>Curabitur at magna quam. Suspendisse sed vulputate eros.</li>
			</ul>
 
			<p>Vestibulum vitae maximus tellus. Phasellus lobortis volutpat magna, eget tristique sem laoreet sit amet. Vestibulum a posuere neque.</p>
 
			<p>Mauris placerat efficitur mi, sit amet rutrum lectus gravida mattis. Morbi nec nulla tellus. Donec dapibus dui a semper condimentum. Pellentesque et lorem justo. Sed purus felis, viverra eu elit in, luctus placerat tortor. Donec semper nisi ut metus <a href="#">pharetra condimentum</a>. In aliquam lorem nec nunc elementum, vel lobortis metus facilisis.</p>
 
			<ol>
				<li>Phasellus vel nibh fermentum, blandit odio non, lacinia nunc.</li>
				<li>Morbi vulputate lacus eu sem rutrum, id rutrum quam dignissim.</li>
				<li>Curabitur nisl arcu, vulputate at tellus sit amet, tempor egestas nunc.</li>
				<li>Curabitur at magna quam. Suspendisse sed vulputate eros.</li>
			</ol>
			&nbsp;
 
			<table border="0" cellpadding="0" cellspacing="0" width="100%">
				<tbody>
					<tr>
						<td width="120" class=""><img src="https://via.placeholder.com/120x65?text=LOGO"></td>
						<td style="padding-left:10px; font-size:12px;" class="">{{Recipient.Owner.FirstName}} {{Recipient.Owner.LastName}}<br>
Email:&nbsp;{{Recipient.Owner.Email}} Phone: {{Recipient.Owner.Phone}}</td>
					</tr>
				</tbody>
			</table>
			<span style="font-size:11px;color:#8f8f8f;"><a href="{{Unsubscribe}}" rel="nofollow,noreferrer" style="color:#8f8f8f;">Unsubscribe</a></span></td>
		</tr>
	</tbody>
</table>
</body>
</html>

Creating the Sales Rep’s signature: Option 2

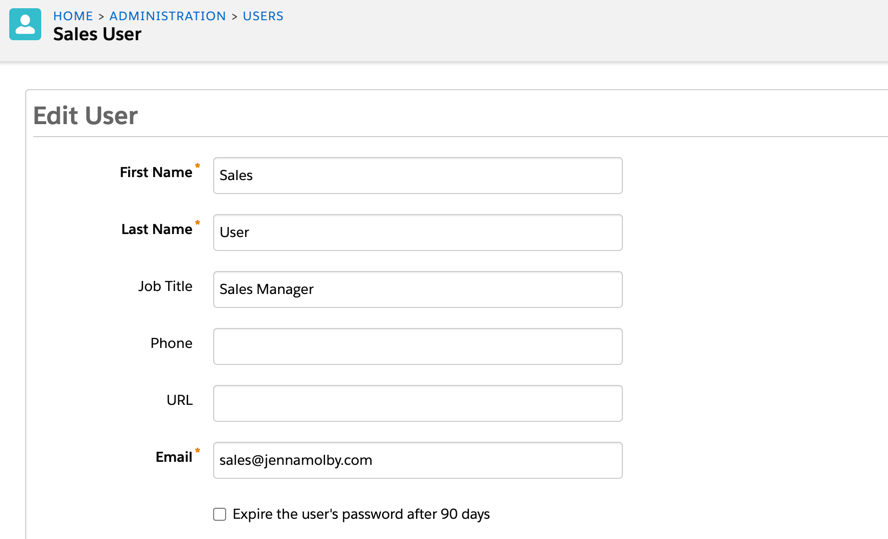
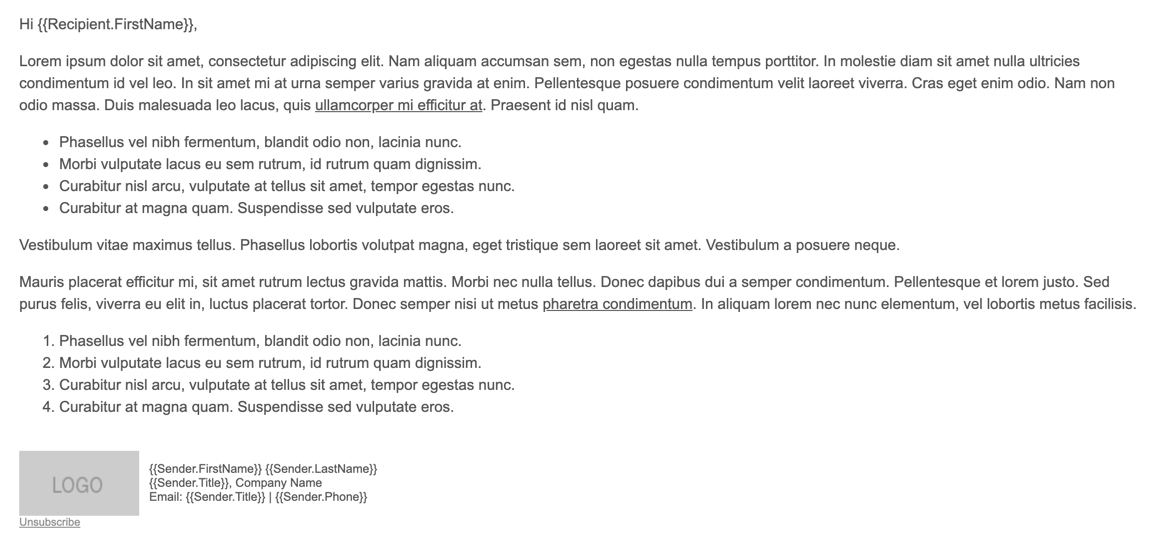
The second way to create the Sales Rep’s signature, is to use the sender merge tags.

Example:
{{Sender.FirstName}} {{Sender.LastName}}
{{Sender.Title}}, Company Name
Email: {{Sender.Title}} | Phone: {{Sender.Phone}}

These fields are pulled from the Pardot user when the email is sent.
Template preview
Template HTML
<!DOCTYPE html>
<html xmlns="http://www.w3.org/1999/xhtml"
xmlns:v="urn:schemas-microsoft-com:vml"
xmlns:o="urn:schemas-microsoft-com:office:office">
<head>
 
<!--[if gte mso 9]><xml>
<o:OfficeDocumentSettings>
  <o:AllowPNG/>
  <o:PixelsPerInch>96</o:PixelsPerInch>
</o:OfficeDocumentSettings>
</xml><![endif]-->  
	<meta charset="utf-8">
    <meta content="text/html; charset=utf-8" http-equiv="Content-Type">
    <meta name="x-apple-disable-message-reformatting" />
	<meta content="width=device-width, initial-scale=1" name="viewport">
    
    <style type="text/css">
        body, p, ul li, ul, ol, ol li {
            font-size:15px;
            font-family:Arial,Verdana,Sans-serif;
            color:#555555;
            line-height:22px;
        }
        a {
            color:#555555;
        }
    </style>
</head>
<body style="margin:0;padding:0;">
<table border="0" cellpadding="0" cellspacing="0" width="100%">
	<tbody>
		<tr>
			<td style="padding:10px;" class="">
			<p>Hi {{Recipient.FirstName}},</p>
 
			<p>Lorem ipsum dolor sit amet, consectetur adipiscing elit. Nam aliquam accumsan sem, non egestas nulla tempus porttitor. In molestie diam sit amet nulla ultricies condimentum id vel leo. In sit amet mi at urna semper varius gravida at enim. Pellentesque posuere condimentum velit laoreet viverra. Cras eget enim odio. Nam non odio massa. Duis malesuada leo lacus, quis <a href="#">ullamcorper mi efficitur at</a>. Praesent id nisl quam.</p>
 
			<ul>
				<li>Phasellus vel nibh fermentum, blandit odio non, lacinia nunc.</li>
				<li>Morbi vulputate lacus eu sem rutrum, id rutrum quam dignissim.</li>
				<li>Curabitur nisl arcu, vulputate at tellus sit amet, tempor egestas nunc.</li>
				<li>Curabitur at magna quam. Suspendisse sed vulputate eros.</li>
			</ul>
 
			<p>Vestibulum vitae maximus tellus. Phasellus lobortis volutpat magna, eget tristique sem laoreet sit amet. Vestibulum a posuere neque.</p>
 
			<p>Mauris placerat efficitur mi, sit amet rutrum lectus gravida mattis. Morbi nec nulla tellus. Donec dapibus dui a semper condimentum. Pellentesque et lorem justo. Sed purus felis, viverra eu elit in, luctus placerat tortor. Donec semper nisi ut metus <a href="#">pharetra condimentum</a>. In aliquam lorem nec nunc elementum, vel lobortis metus facilisis.</p>
 
			<ol>
				<li>Phasellus vel nibh fermentum, blandit odio non, lacinia nunc.</li>
				<li>Morbi vulputate lacus eu sem rutrum, id rutrum quam dignissim.</li>
				<li>Curabitur nisl arcu, vulputate at tellus sit amet, tempor egestas nunc.</li>
				<li>Curabitur at magna quam. Suspendisse sed vulputate eros.</li>
			</ol>
			&nbsp;
 
			<table border="0" cellpadding="0" cellspacing="0" width="100%">
				<tbody>
					<tr>
						<td width="120" class=""><img src="https://via.placeholder.com/120x65?text=LOGO"></td>
						<td style="padding-left:10px; font-size:12px;" class="">{{Sender.FirstName}}&nbsp;{{Sender.LastName}}<br>
						{{Sender.Title}}, Company Name<br>
						Email:&nbsp;{{Sender.Title}} | Phone: {{Sender.Phone}}</td>
					</tr>
				</tbody>
			</table>
			<span style="font-size:11px;color:#8f8f8f;"><a href="{{Unsubscribe}}" rel="nofollow,noreferrer" style="color:#8f8f8f;">Unsubscribe</a></span></td>
		</tr>
	</tbody>
</table>
</body>
</html>

Creating the Sales Rep’s signature: Option 3

The third option for creating the Sales Rep’s signature is to configure the signature within the user’s settings within Pardot and use the {{{Sender.Signature}}} merge tag within your email template.
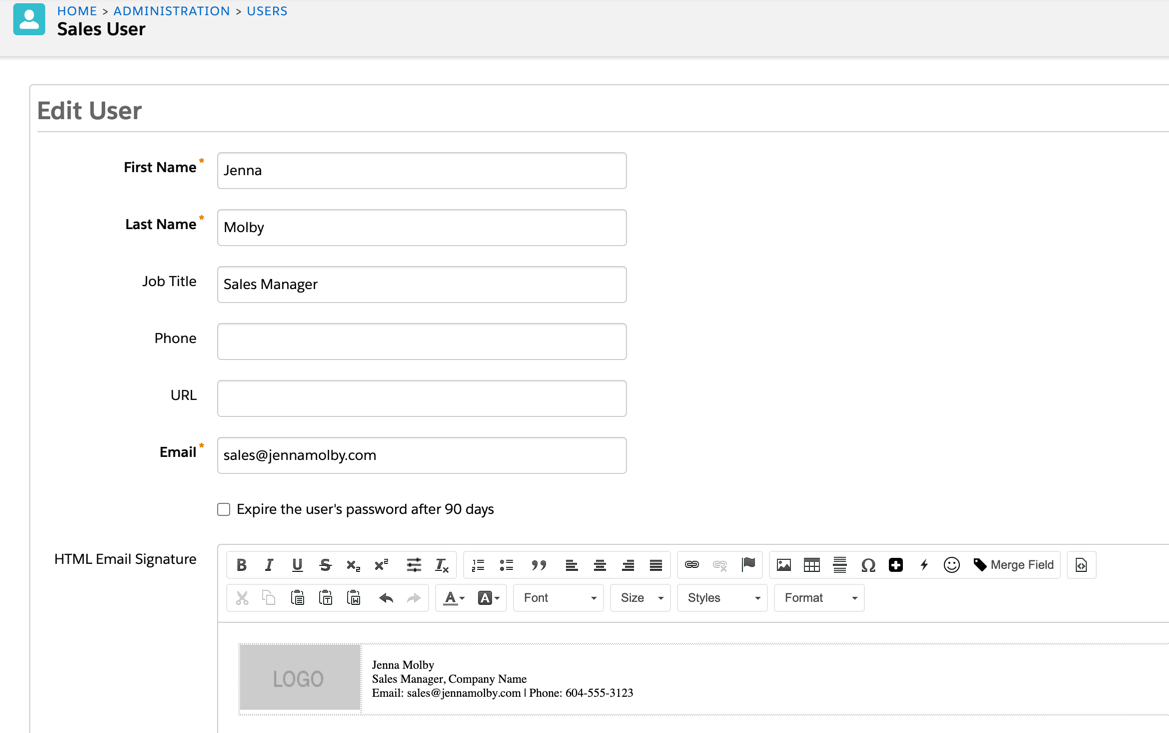
Template preview
Template HTML
<!DOCTYPE html>
<html xmlns="http://www.w3.org/1999/xhtml"
xmlns:v="urn:schemas-microsoft-com:vml"
xmlns:o="urn:schemas-microsoft-com:office:office">
<head>
 
<!--[if gte mso 9]><xml>
<o:OfficeDocumentSettings>
  <o:AllowPNG/>
  <o:PixelsPerInch>96</o:PixelsPerInch>
</o:OfficeDocumentSettings>
</xml><![endif]-->  
	<meta charset="utf-8">
    <meta content="text/html; charset=utf-8" http-equiv="Content-Type">
    <meta name="x-apple-disable-message-reformatting" />
	<meta content="width=device-width, initial-scale=1" name="viewport">
    
    <style type="text/css">
        body, p, ul li, ul, ol, ol li {
            font-size:15px;
            font-family:Arial,Verdana,Sans-serif;
            color:#555555;
            line-height:22px;
        }
        a {
            color:#555555;
        }
    </style>
</head>
<body style="margin:0;padding:0;">
<table border="0" cellpadding="0" cellspacing="0" width="100%">
	<tbody>
		<tr>
			<td style="padding:10px;" class=""><p>Hi {{Recipient.FirstName}},</p>
 
<p>Lorem ipsum dolor sit amet, consectetur adipiscing elit. Nam aliquam accumsan sem, non egestas nulla tempus porttitor. In molestie diam sit amet nulla ultricies condimentum id vel leo. In sit amet mi at urna semper varius gravida at enim. Pellentesque posuere condimentum velit laoreet viverra. Cras eget enim odio. Nam non odio massa. Duis malesuada leo lacus, quis <a href="#">ullamcorper mi efficitur at</a>. Praesent id nisl quam.</p>
 
<ul>
	<li>Phasellus vel nibh fermentum, blandit odio non, lacinia nunc.</li>
	<li>Morbi vulputate lacus eu sem rutrum, id rutrum quam dignissim.</li>
	<li>Curabitur nisl arcu, vulputate at tellus sit amet, tempor egestas nunc.</li>
	<li>Curabitur at magna quam. Suspendisse sed vulputate eros.</li>
</ul>
 
<p>Vestibulum vitae maximus tellus. Phasellus lobortis volutpat magna, eget tristique sem laoreet sit amet. Vestibulum a posuere neque.</p>
 
<p>Mauris placerat efficitur mi, sit amet rutrum lectus gravida mattis. Morbi nec nulla tellus. Donec dapibus dui a semper condimentum. Pellentesque et lorem justo. Sed purus felis, viverra eu elit in, luctus placerat tortor. Donec semper nisi ut metus <a href="#">pharetra condimentum</a>. In aliquam lorem nec nunc elementum, vel lobortis metus facilisis.</p>
 
<ol>
	<li>Phasellus vel nibh fermentum, blandit odio non, lacinia nunc.</li>
	<li>Morbi vulputate lacus eu sem rutrum, id rutrum quam dignissim.</li>
	<li>Curabitur nisl arcu, vulputate at tellus sit amet, tempor egestas nunc.</li>
	<li>Curabitur at magna quam. Suspendisse sed vulputate eros.</li>
</ol>
<br>
{{{Sender.Signature}}} &nbsp; <span style="font-size:11px;color:#8f8f8f;"><a href="{{Unsubscribe}}" rel="nofollow,noreferrer" style="color:#8f8f8f;">Unsubscribe</a></span></td>
		</tr>
	</tbody>
</table>
</body>
</html>

Sender settings

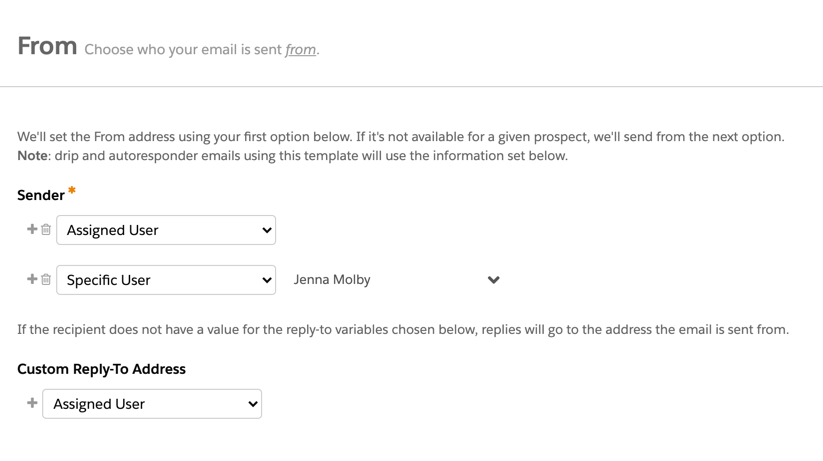
Since the email should come from the assigned Sales Rep, the sender settings need to be configured to come from the Assigned User. It’s also required that a Specific User is selected when choosing this option.
Creating the list

Create your list based on your requirements. Not sure where to start? Here are some tips for planning your list.

  1. How should prospects enter the engagement program?
    • Should prospects be added automatically after an event or webinar?
    • Will Sales Rep’s add prospects manually to the engagement program?
  2. When should prospects be removed from the engagement program?
    • When the prospect’s lead status is updated?
    • When the prospect has an open opportunity?
    • When the prospect replies to an email?
    • When the Sales Rep has a live conversation with the prospect?
  3. Should some prospects be excluded from the engagement program?
    • Should ALL prospects who attended the webinar or event be put in the engagement program?
    • Should certain job titles or job levels be excluded?
    • If there is an open opportunity with the prospect, should the prospect be added to the engagement program?

Example list criteria

Here are some list examples to get you started.

List example #1: Automatically add all prospects to the engagement program list
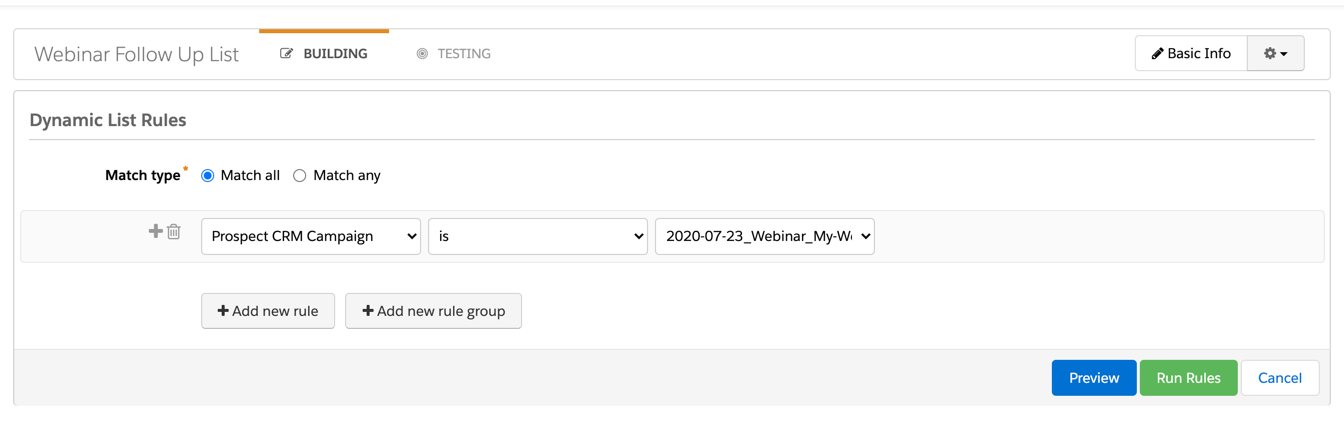
List example #2: Automatically add all prospects who attended the webinar to the engagement program list
List example #3: Automatically add all prospects to the engagement program list if Lead Status is not = working
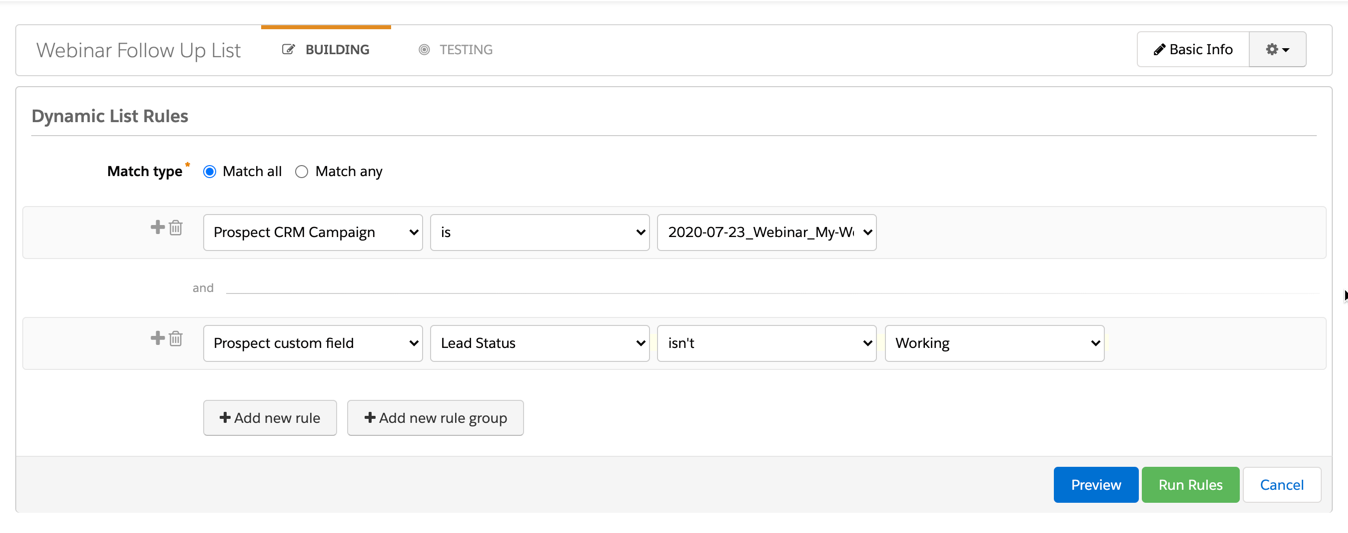
Creating the Engagement Program in Pardot

Now that all the emails and lists have been created, it’s time to set up the engagement program. In this example, I’m going to send 2 emails and create 2 tasks in Salesforce for the Sales Rep’s to complete.

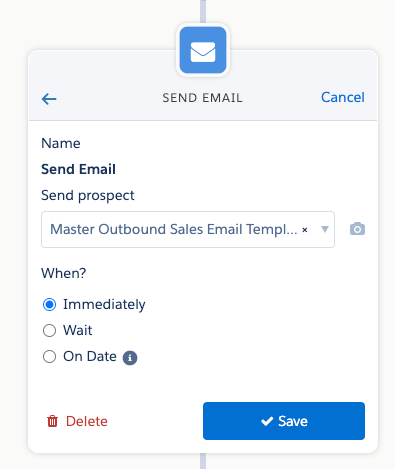
The first step in the program is to send out one of the personalized emails, coming from the assigned Sales Rep.
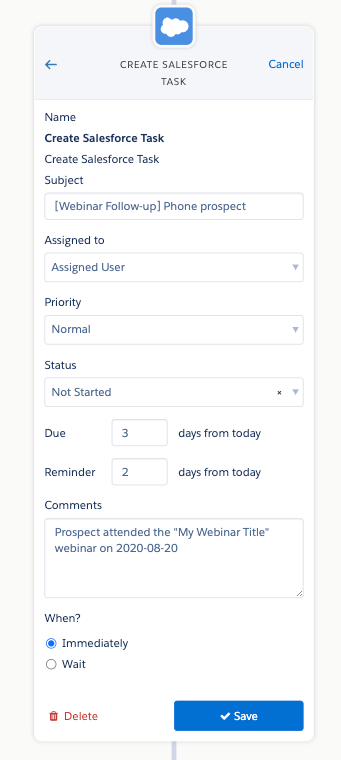
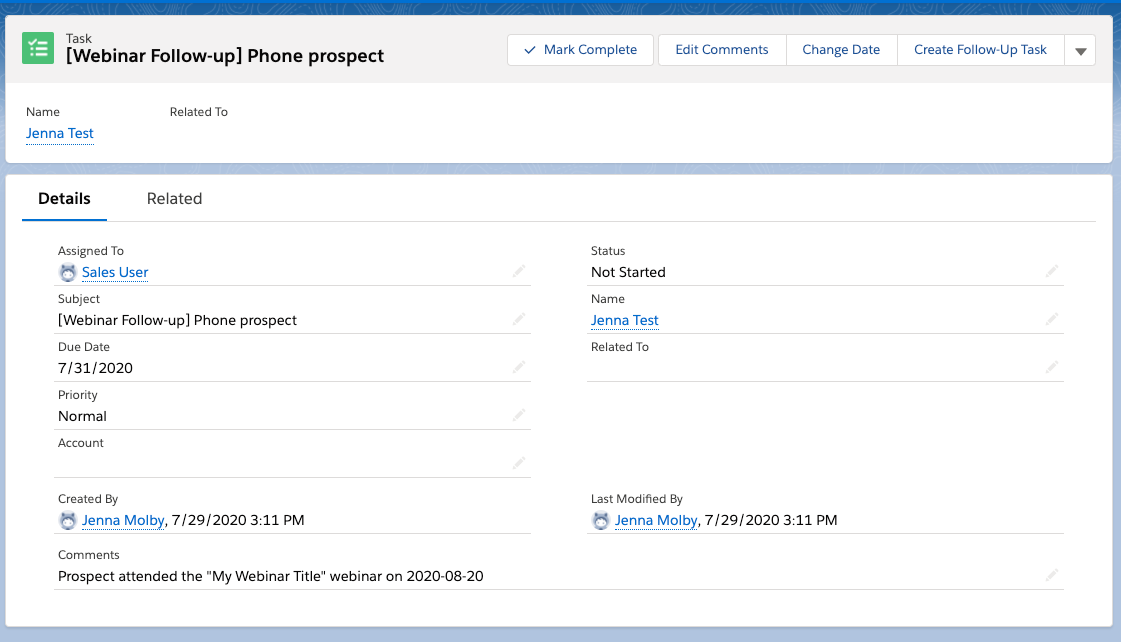
The second step is to create a task in Salesforce for the Sales Rep to give the prospect a call. The task is created automatically following the send of the email. The task is due within 3 days of the task created date and the Rep will receive a reminder 2 days from the created date.
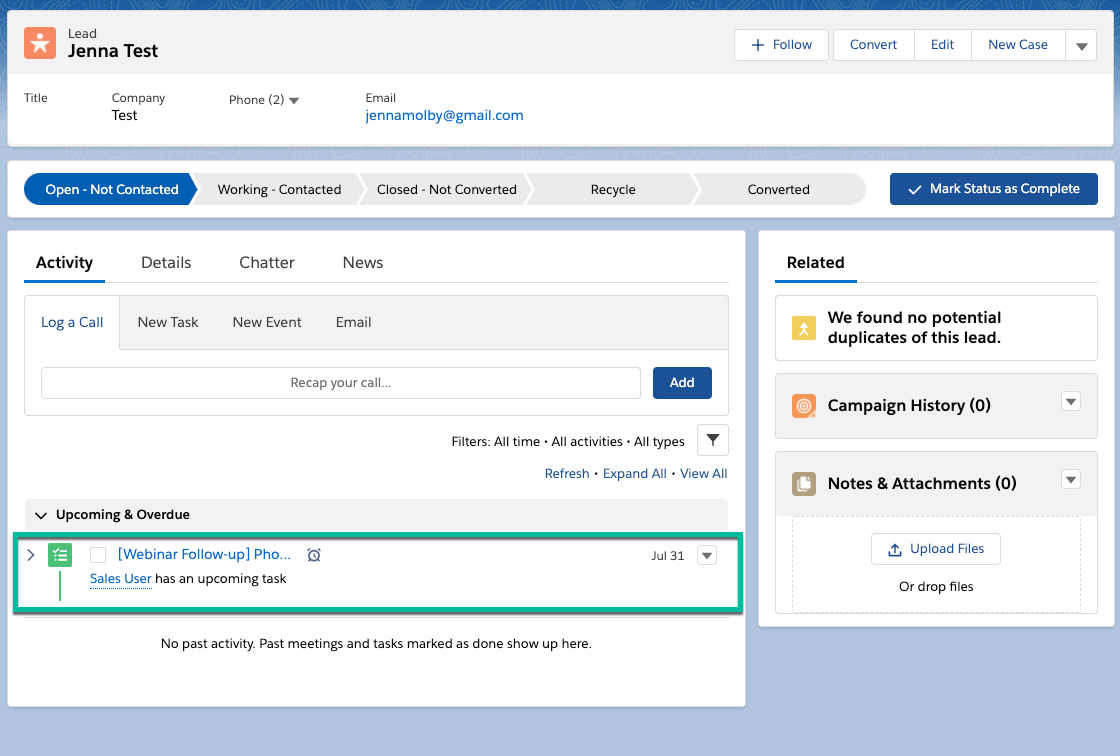
Once the task is created, this is what the Sales Rep will see in Salesforce.
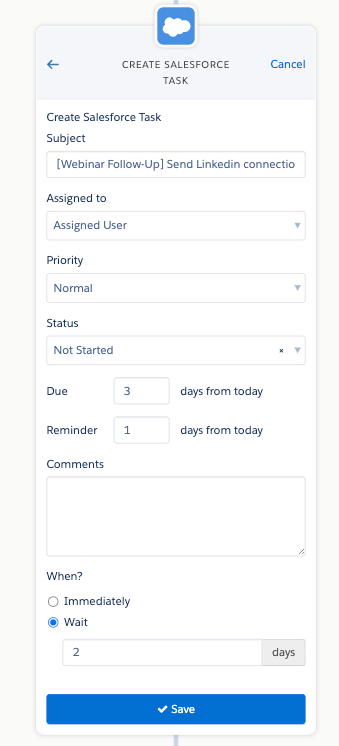
The third step is to create a task in Salesforce to prompt the Sales Rep to connect with the prospect on Linkedin.
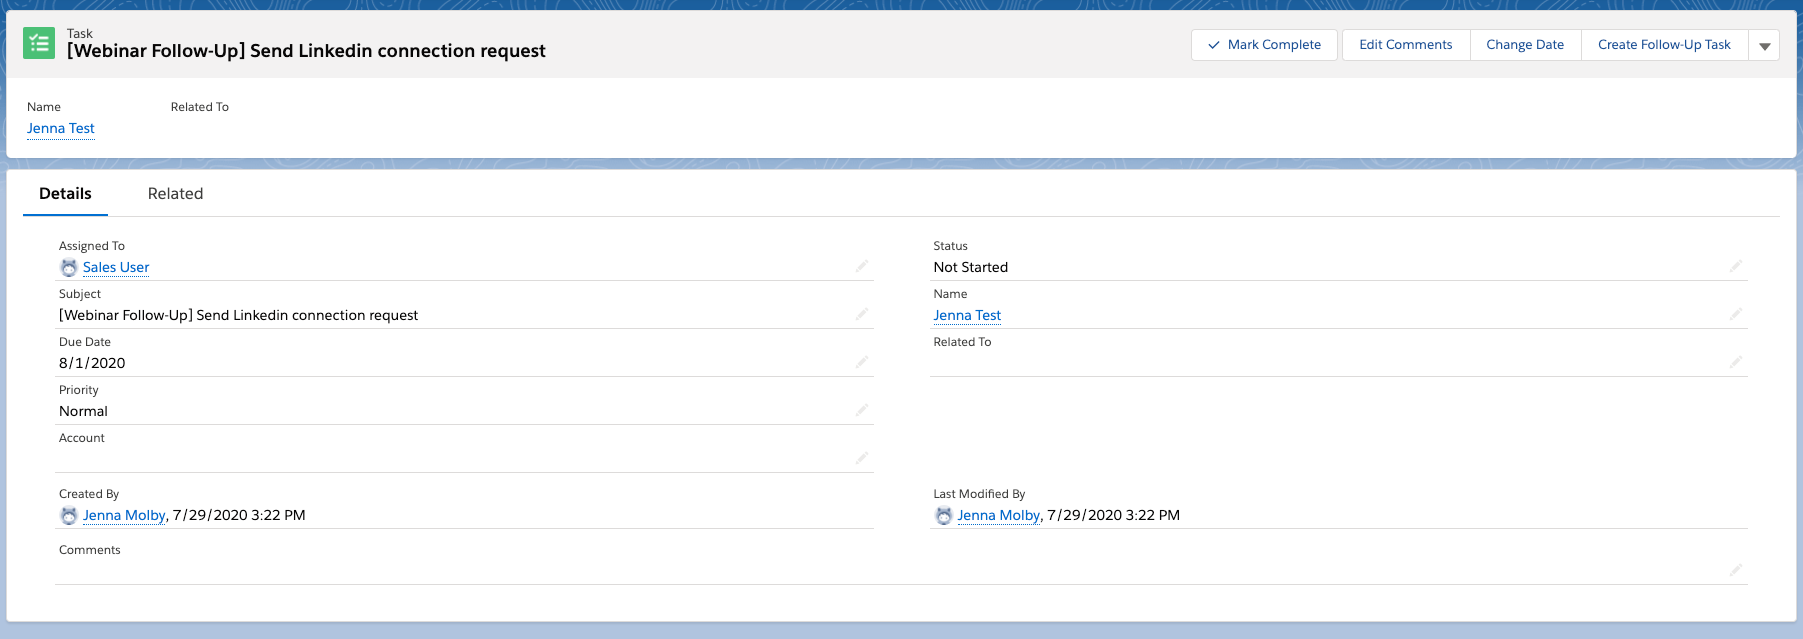
Once the task is created, this is what the Sales Rep will see in Salesforce.

The last step in the example engagement program is to send a follow-up email.

Considerations for setting up the engagement program

  • Should there be separate paths for prospects who attended the event vs did not attend the event?
  • Should all job titles and job levels be followed up with a phone call?
  • What is a realistic time frame for this program to be active? (this will help determine the cadence and how many tasks and emails to set up)
  • Will the tasks for the Sales Rep’s be manageable with the amount of attendees?

Questions?

Send me a tweet @jennamolby, or contact the Sercante team for help.

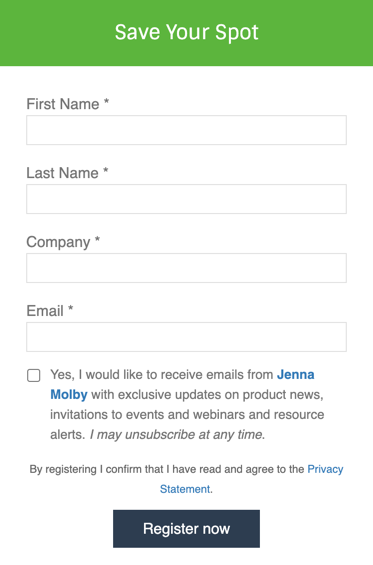
GDPR and CASL compliance are just a few reasons to add an explicit opt-in message or a privacy policy to your Pardot forms. In this post, I’ll show you how to add a custom opt-in message to your form and a privacy consent message above the form submit button.

Adding an opt-in checkbox

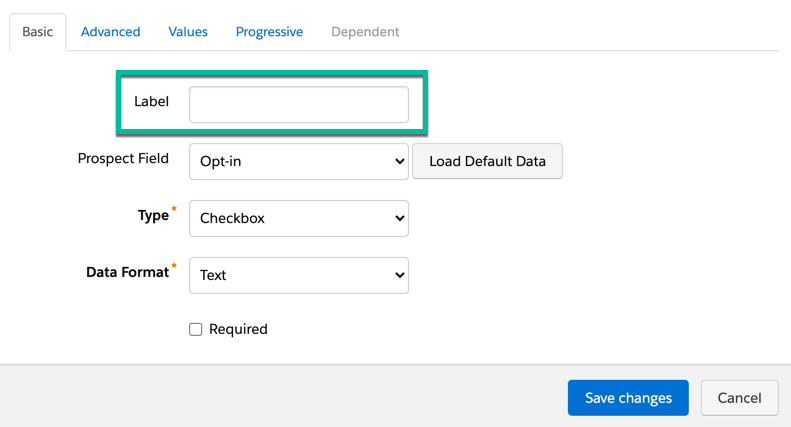
Add your opt-in field to your form and remove the label text.

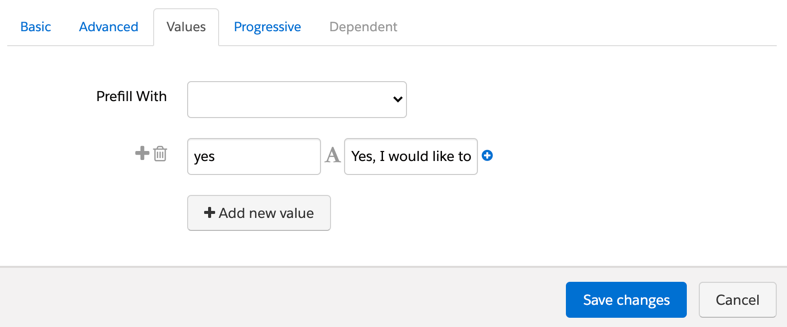
Navigate to the values tab and input the values for the checkbox. The first box contains the value that will be stored in the Pardot database (in my form the stored value is yes). The second box contains the value that will be displayed to the prospect completing the form. In this case, it’s the opt-in message.

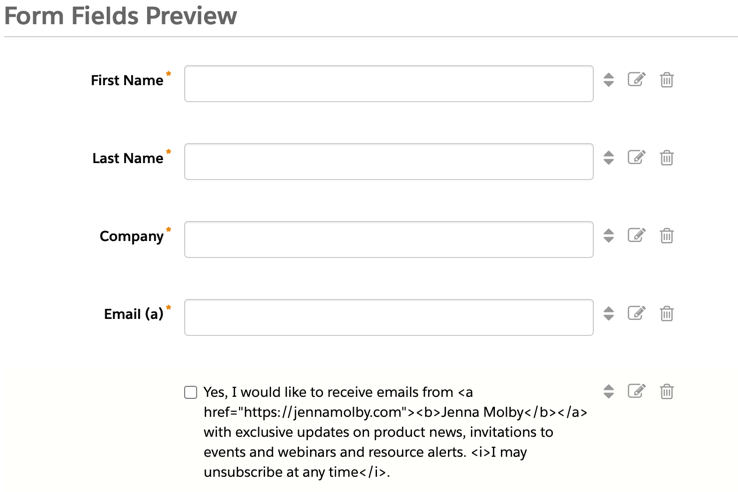
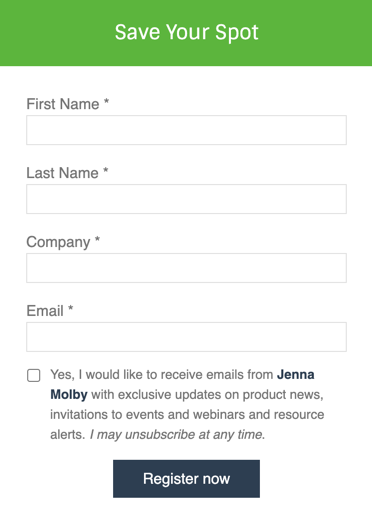
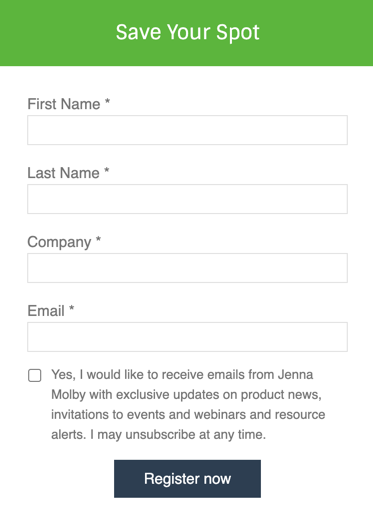
Save and preview your opt-in message. Here’s what mine looks like.

Add links and other formatting

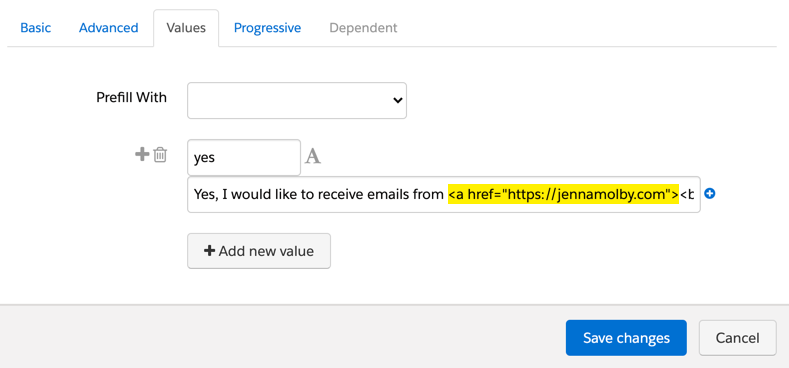
You can add HTML to your opt-in message to include links, bold text, etc, by adding it directly as the display value.

Yes, I would like to receive emails from <a href="https://jennamolby.com"><b>Jenna Molby</b></a> with exclusive updates on product news, invitations to events and webinars and resource alerts. <i>I may unsubscribe at any time</i>.

When you preview the message within the editor, it will show the HTML tags, but when you view the live form, it will display the correct HTML.

Adding a privacy policy message

Before the submit button

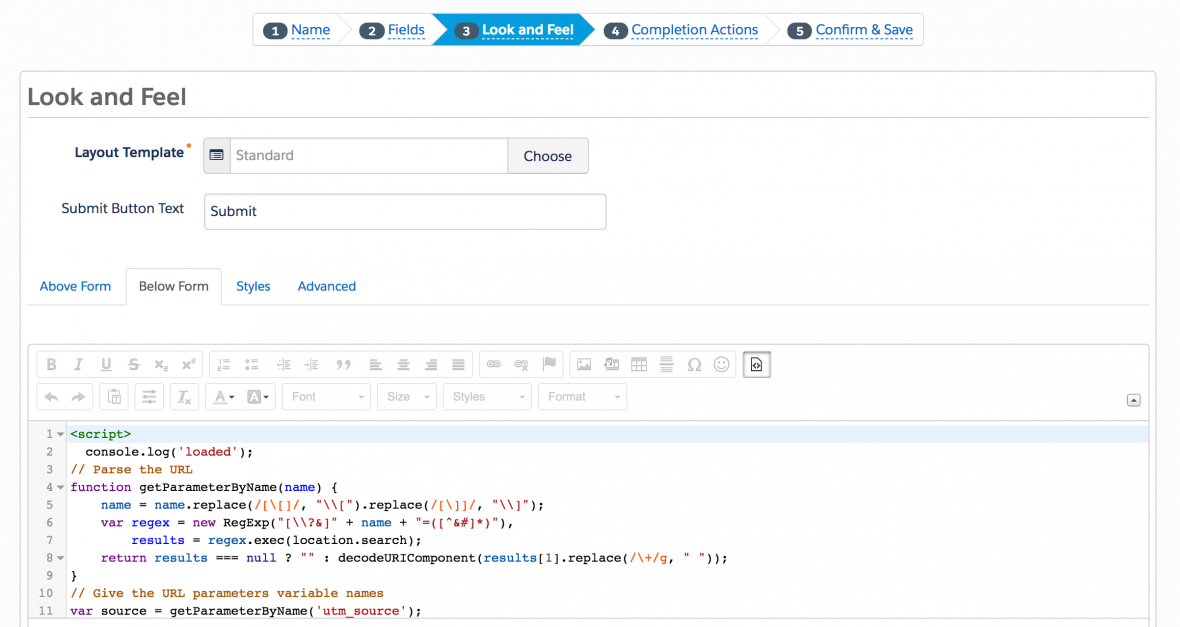
You can add a privacy policy above the submit button by adding javascript to your form.

Custom JavaScript can be placed within your Pardot forms under Look and Feel > Below Form. Click on the HTML button within the WYSIWYG editor and add in the JavaScript.

Edit the javascript below to include your privacy policy message.

<script type="text/javascript">
function insertBefore(el, referenceNode) {
    referenceNode.parentNode.insertBefore(el, referenceNode);
}
var newEl = document.createElement('div');
// replace this line with your message
newEl.innerHTML = '<span id="privacy-policy-msg">By registering I confirm that I have read and agree to the <a href="https://jennamolby.com/privacy-policy/" target="_blank">Privacy Statement</a>.</span>';
var ref = document.querySelector('p.submit');
insertBefore(newEl, ref);
</script>

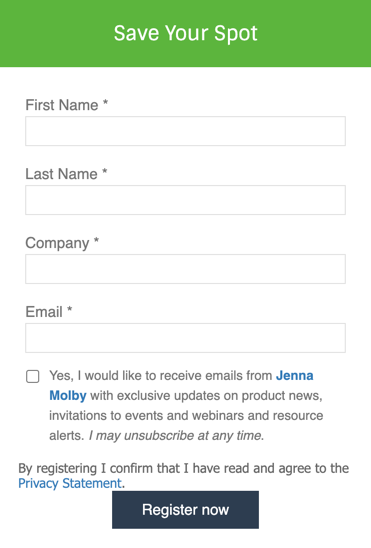
Here’s what my form looks like once the privacy policy message has been added.

Some CSS can be added to the form to style the privacy policy message.

<style type="text/css">
#privacy-policy-msg {
    font-size:11px;
    line-height:20px;
    font-family: 'Open Sans', sans-serif;
    margin-bottom:10px;
    display:inline-block;
    text-align:center;
}
</style>

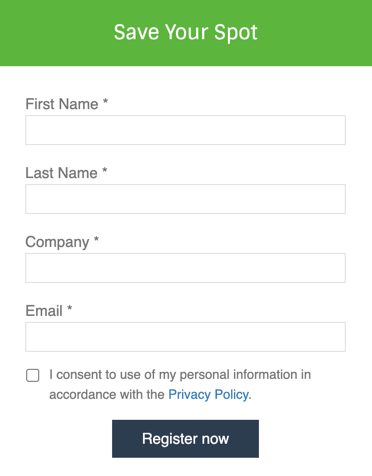
As a consent checkbox

You might require prospects to “check” a privacy consent checkbox in order to submit the form. This can be added the same way the opt-in checkbox was configured above.

Questions?

Send me a tweet @jennamolby, or contact the Sercante team for help.
Want to be able to report on how many marketing touchpoints have occurred your leads and contacts? With some help from an App from the Salesforce App Exchange, you can rollup the number of marketing campaigns a lead has responded to with a couple of clicks.

Install Rollup Helper

Rollup summary fields only work if there is a master-detail relationship, so to rollup the number campaigns Rollup Helper will need to be installed from the Salesforce AppExchange. Follow the instructions to install the free app in your Salesforce Org.

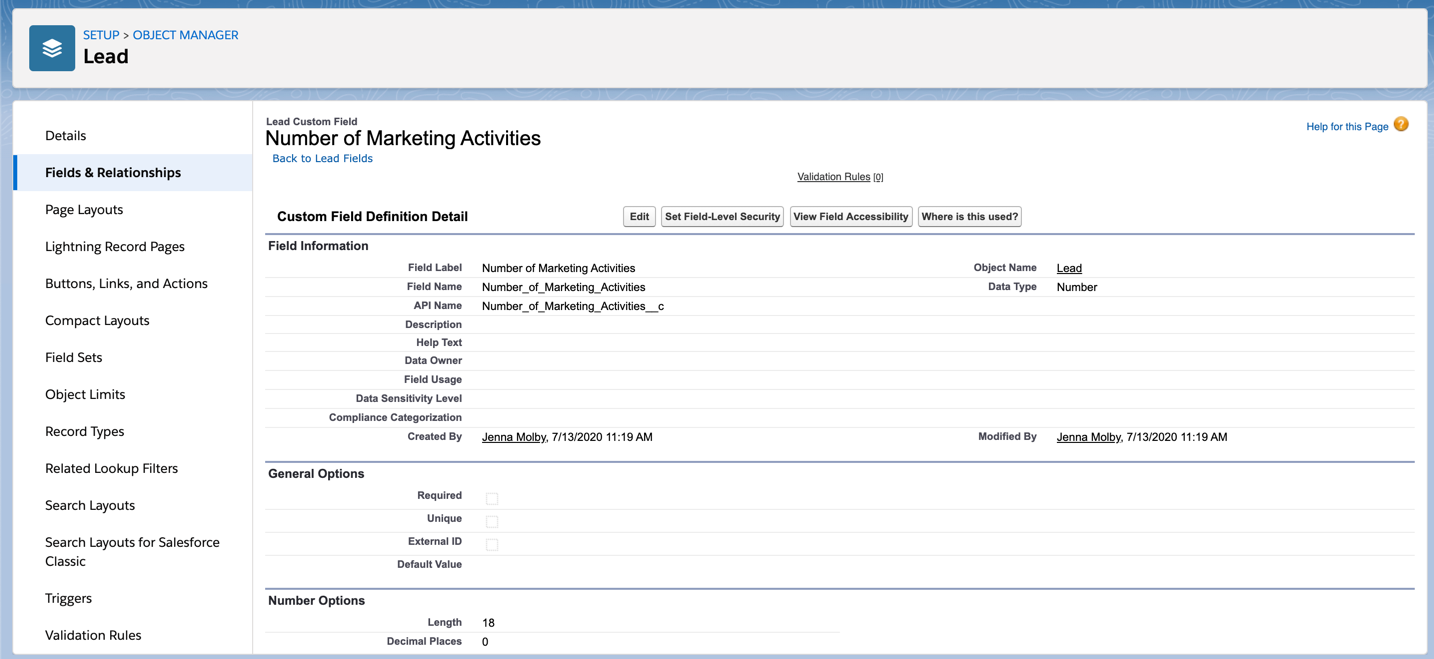
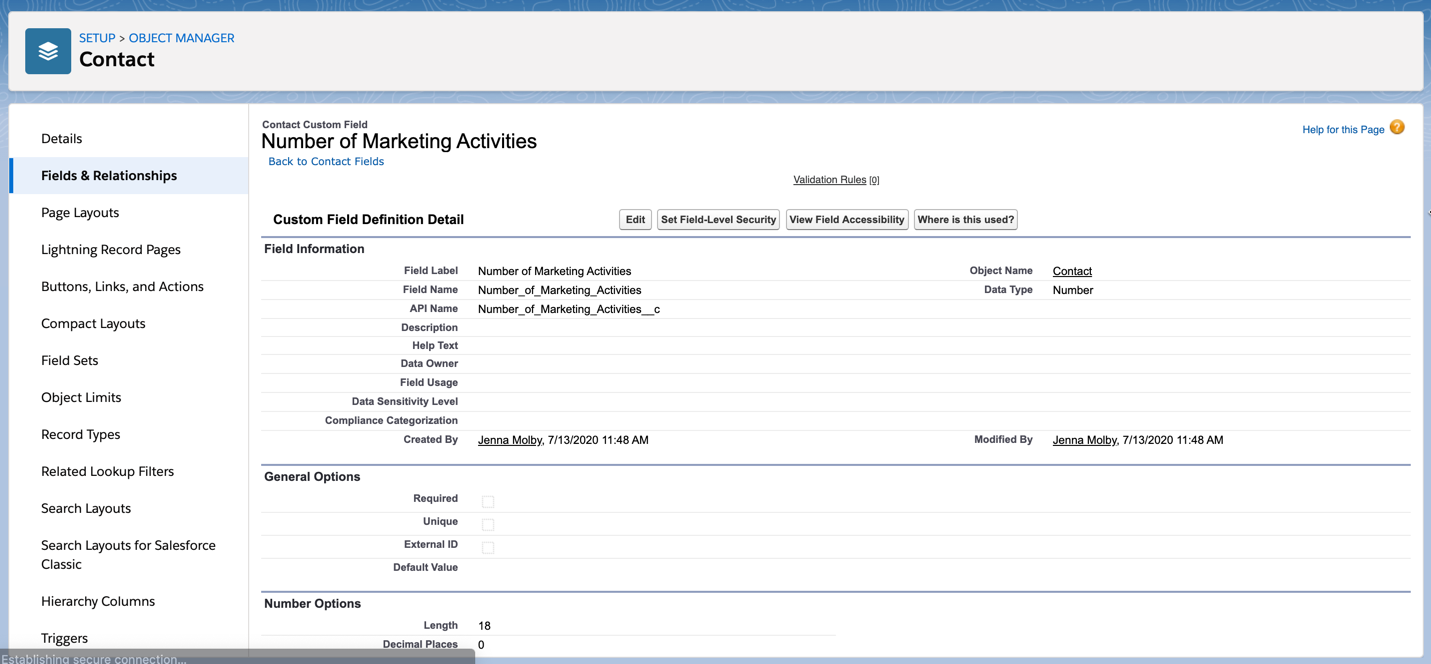
Create fields for Leads & Contacts

Create a number field for leads and contacts.

Create a rollup for leads

Naviate to the Rollup Helper app and click on create a new rollup. Select Lead for where you would like your rollup results to reside.

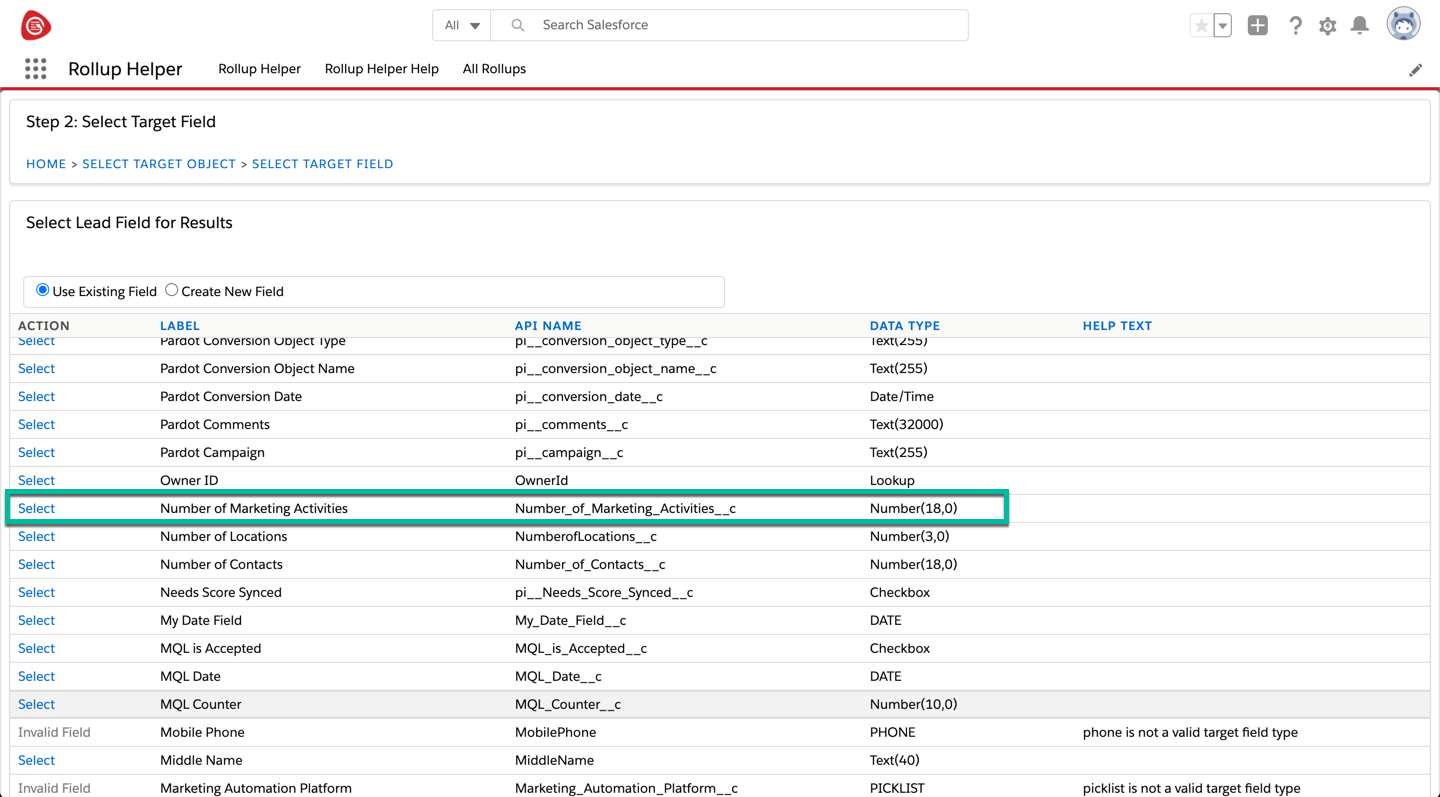
Select your new field from the list for where you want the results to reside.

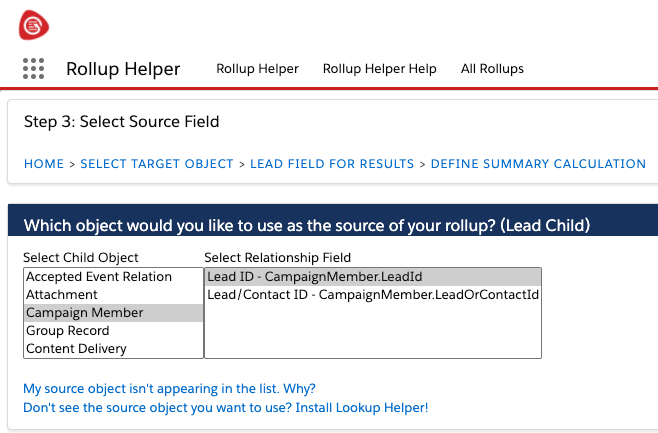
Select the Campaign Member as the object would you like to use as the source of your rollup and Lead ID – CampaignMember.LeadId as the relationship field.

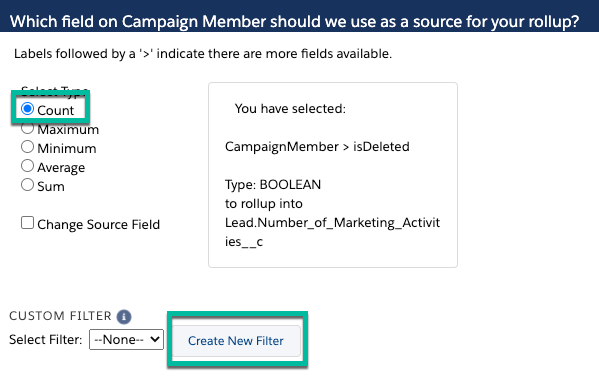
Select count as the source type of the roll up and click add new filter.

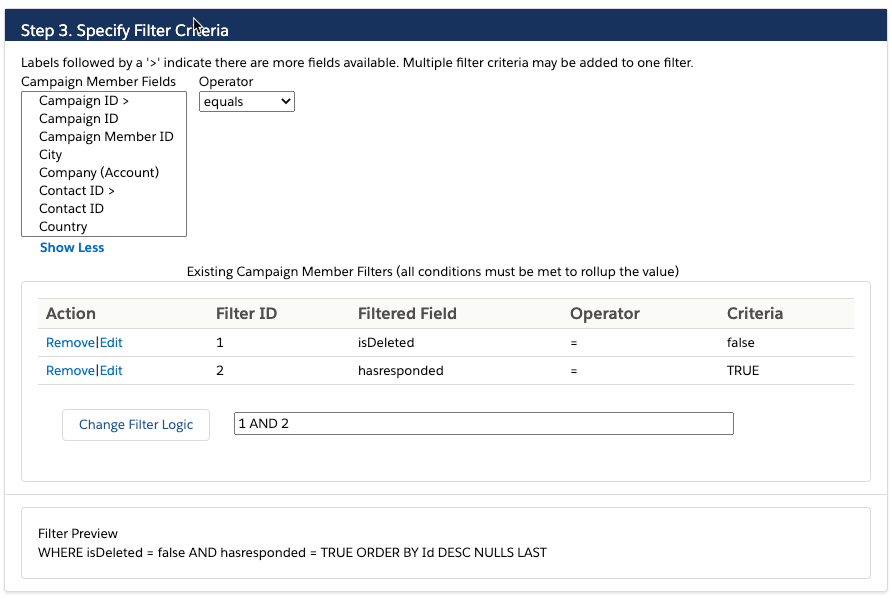
Now, add any filters for campaigns that you want to include or exclude from the rollup field. For my campaigns, I’m only going to count campaigns where Responded = TRUE. You can also use filters to exclude certain campaign types, or certain dates.

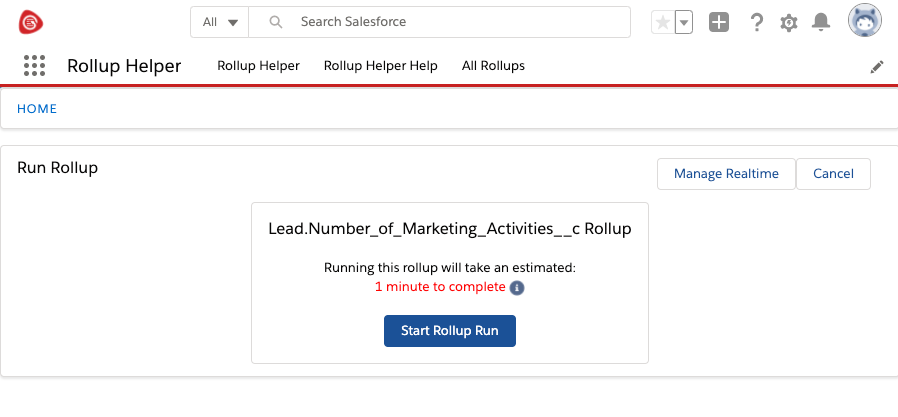
Save and run your rollup. Depending on how many leads and campaigns you have, this might take a while.

Create a rollup for contacts

Repeat the same process for contacts by creating a new rollup helper with Contact as the option for where you would like your rollup results to reside.

Questions?

Send me a tweet @jennamolby, or contact the Sercante team for help.
Are you already a Salesforce Certified Pardot Specialist? Do you have around 12 months or more of hands-on experience implementing and administering the Pardot Lightning App and Salesforce platform? The next step in your Pardot certification journey is to take the Salesforce Certified Pardot Consultant exam.

In this post, I share how I prepared for the exam, what study resources I used and share the flashcards I created to pass the exam.

How I prepared for the exam

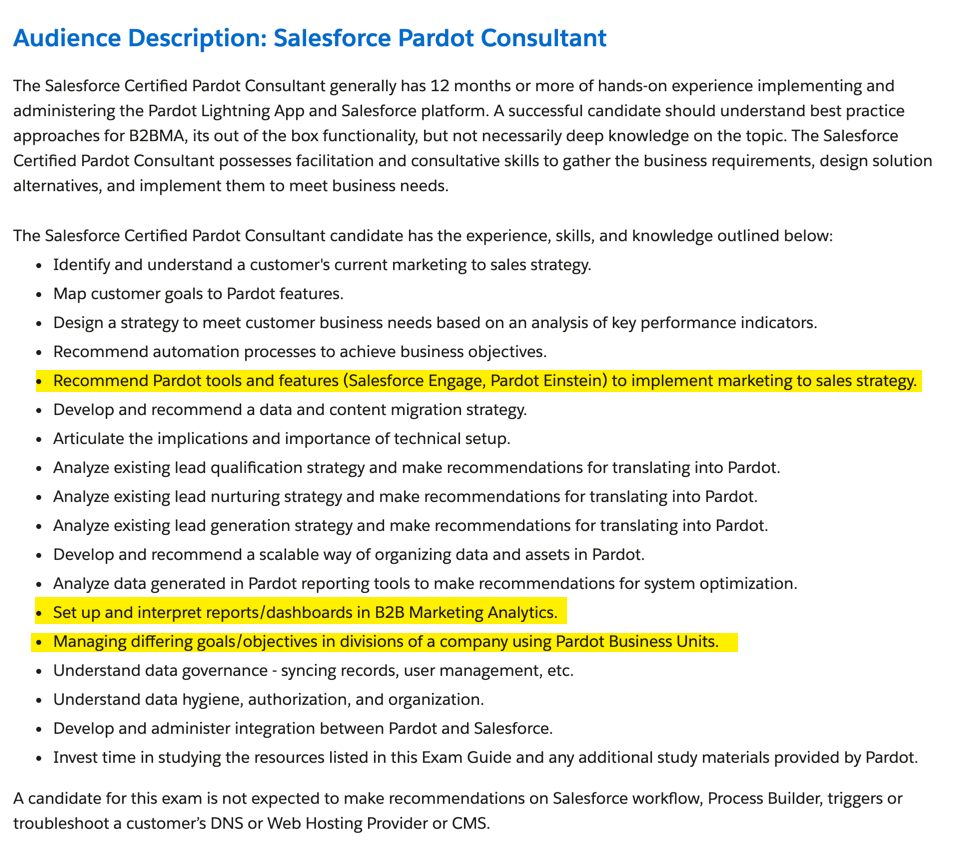
First, I reviewed the Salesforce Certified Pardot Consultant exam guide and highlighted the concepts that I’m not very familiar with.

Once I identified what concepts I needed to study, I put together a list of resources for each topic. These included blog posts, release notes and knowledgebase articles.

B2B Marketing Analytics resources

Pardot Business Units resources

Salesforce Engage resources

Pardot Einstein resources

I read through all the resources and created a flashcard for any term or concept that I needed to study.

Refreshing my knowledge on other core concepts

I also refreshed my knowledge of core concepts that were in the exam outline. I reviewed all the modules within the Prepare for your Pardot Specialist Credential Trailmix again. Since I completed the Trailmix a while ago, there were several new modules. I completed the remaining modules and reviewed all the modules I completed previously. I couldn’t figure out how to view the practice questions at the end of each module since they were already completed, so I opened up an incognito window to view them. I added those questions to my flashcards as well.

Lastly, I skimmed through the Salesforce Help Docs to study any remaining topics that weren’t covered in the Trailmix.

Studying tips

  • Review the exam outline and highlight the topics you aren’t familiar with. Focus the majority of your studying efforts on those topics.
  • Create a list of resources that cover your selected topics.
  • Create your own set of flashcards to study.
  • Review all Pardot Trailhead modules – even the topics you’re familiar with.
  • Review the Pardot Help Docs

How did you study for the Salesforce Certified Pardot Consultant Exam?

Leave a comment below to share your tips and resources.

Pardot form handlers allow you to use your forms to post your data to Pardot. A Form handler is a great alternative to use instead of Pardot iFrame forms. They allow you to fully customize the look of your form and submit data to more than one database. In this tutorial, you will learn how to create a form handler from scratch.

Create a new form handler in Pardot

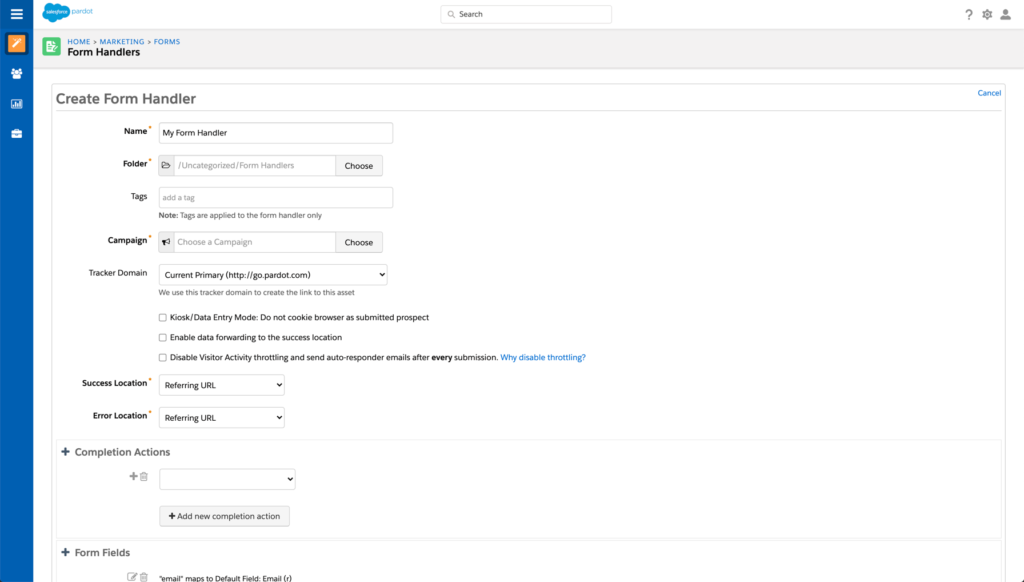
First you need to create a new form handler in Pardot under Marketing > Forms > Form Handlers.

Add the all the standard Pardot required information.

  • Give the form handler a name
  • Select a folder and add tags
  • Choose your campaign

Choose your other custom settings.

  • Kiosk/Data Entry Mode: Do you want the prospect to be cookied when they fill out the form?
  • Enable data forwarding to the success location: Does you data need to submit to another database other than Pardot?
  • Disable Visitor Activity throttling: Do you want to disable Pardot’s spam protection and generate a distinct visitor activity and auto-responder email for all form handler submissions?
  • Success &amp Error Location: Choose an Error page and a Thank you page URL.
  • Completion Actions: Add the any actions that should happen when a prospect fills out the form.

Here are the settings I have selected for this tutorial:

Add form fields

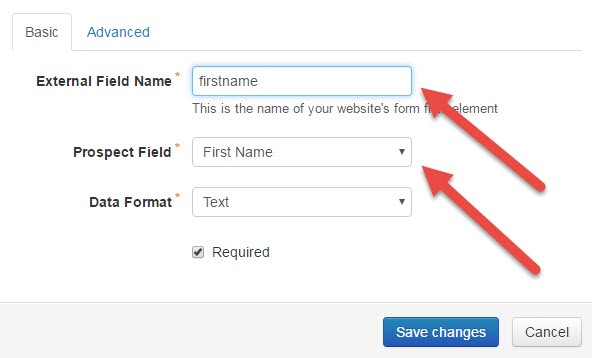
Add any fields you want to capture through your Pardot form handler.

TIP: Name the external field name the same as your prospect field name, but without the spaces, to avoid confusion in the next steps.

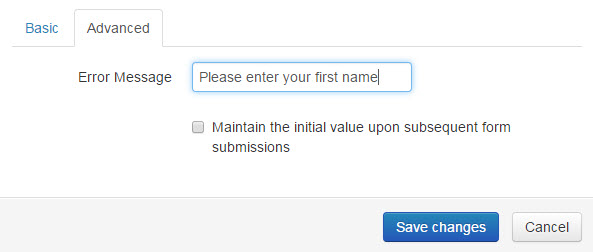
Optionally, you can add custom error message text under the advanced tab.

Create the form HTML

Now that the form handler is created, the form HTML needs to be created to embed it on your website. In this tutorial, I will be going over basic markup. Feel free to add your own styling/structure that matches your website.

Copy the endpoint URL

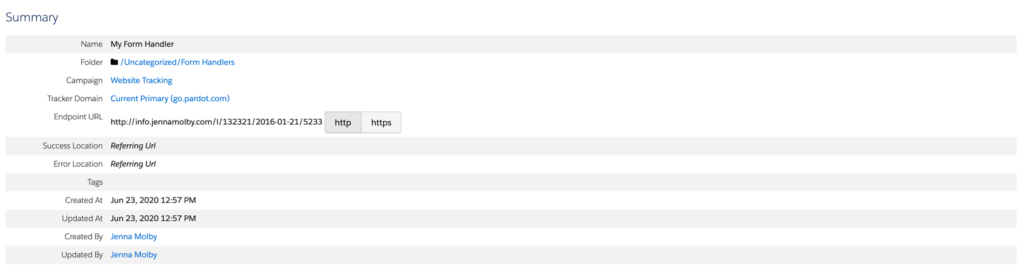
Navigate to your Pardot form handler summary page and copy the endpoint URL.

Basic HTML structure

Here’s the basic structure to create a Pardot form using a Pardot form handler.

<form action="http://info.jennamolby.com/l/132321/2016-01-21/52334" method="post">
    <label>First Name</label>
    <input type="text" name="firstname" />
    <label>Last Name</label>
    <input type="text" name="lastname" />
    <label>Email Address</label>
    <input type="email" name="email" />
    <label>Company</label>
    <input type="text" name="company" />
    <input type="submit" value="submit" required="required" />
</form>
  • Action: Must be the endpoint url for your Pardot form handler.
  • Method: Must = POST
  • Input: Add all the form fields you mapped while creating you Pardot form handler.
  • Name: Must equal the external field name you specified when you created the Pardot form handler.
  • Type: Specify the type (text, email, etc) to help with field validation.

Add Field Validation (Optional)

Optionally, you can add some front-end validation to your form. If you marked the fields as “required” when creating your form handler, Pardot would create some form validation to direct a user to another page. If you don’t want the prospect to leave the page, follow these instructions.

Add required=”required” to each of your required form fields. These should match what you specified in Pardot to avoid confusion.

<form action="http://info.jennamolby.com/l/132321/2016-01-21/52334" method="post">
    <label>First Name</label>
    <input type="text" name="firstname" required="required" />
    <label>Last Name</label>
    <input type="text" name="lastname" required="required" />
    <label>Email Address</label>
    <input type="email" name="email" required="required" />
    <label>Company</label>
    <input type="text" name="company" required="required" />
    <input type="submit" value="submit" required="required" />
</form>

Troubleshooting tips

Is your data not making its way into Pardot? Here are some troubleshooting tips to help you diagnose the issue.

  • Try submitting the form with just email address required. If the prospect is created in Pardot without any issues, you might have a field type or a field mapping incorrect within your form handler.
  • Check Enable data forwarding to the success location. Try checking or unchecking the option for “Enable data forwarding to the success location” within your Pardot form handler settings. Depending on how you are connecting your form handler to your web form, this may or may not need to be enabled.
  • Double-check your field names are correct. The external field name you set within your form handler needs to be the EXACT SAME as what is in your HTML. Double-check that the HTML for your form fields is using the right name and remember, the name is different than an ID or CLASS.
  • Use the HTTPS endpoint if your website is HTTPS. Using an HTTP endpoint for your form handler when your website is HTTPS will cause the browser to give security warnings. Update the form handler endpoint to HTTPS to resolve the issue.

Pardot Form Handlers + WordPress

There are many different ways to use Pardot Form Handlers with WordPress. Here are some resources to help you get started with using Pardot Form Handlers with WordPress:

Questions?

Send me a tweet @jennamolby, or contact the Sercante team for help.
Bulk creating campaigns in Salesforce is a great way to plan your marketing initiatives for the month or the quarter. You can upload your campaign targets as custom fields, set your estimated pipeline, and create Salesforce reports for visibility into your marketing campaigns. Uploading campaigns in Salesforce can be done using Salesforce Data loader. All you need to do is prep your CSV file and upload it into Salesforce.

Prep the CSV file

Create a CSV file with all the fields you want to include in your campaign. The following fields should be included at a minimum.

Field NameField TypeAccepted Values
ActiveCheckboxTrue or False
Start DateDateyyyy-mm-dd
End DateDateyyyy-mm-dd
Campaign NameText (80) 
Campaign OwnerLookup (user)The SFDC User ID (starts with 005)
TypePicklistA valid campaign type from the picklist
StatusPicklistDefault picklist values are planned, in progress, completed and aborted

For easier uploads I recommend saving a CSV file as a template for future campaign uploads.

Upload using Data Loader

Download Data Loader if you don’t already have it installed. Data Loader can be installed on for Mac or for Windows. Once installed, launch the application and login using your Salesforce credentials.

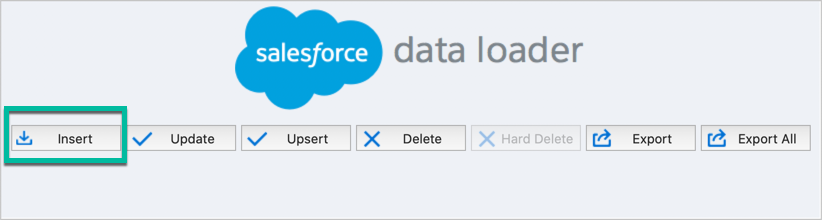
To insert new campaigns into Salesforce using Data Loader, click on the insert button.

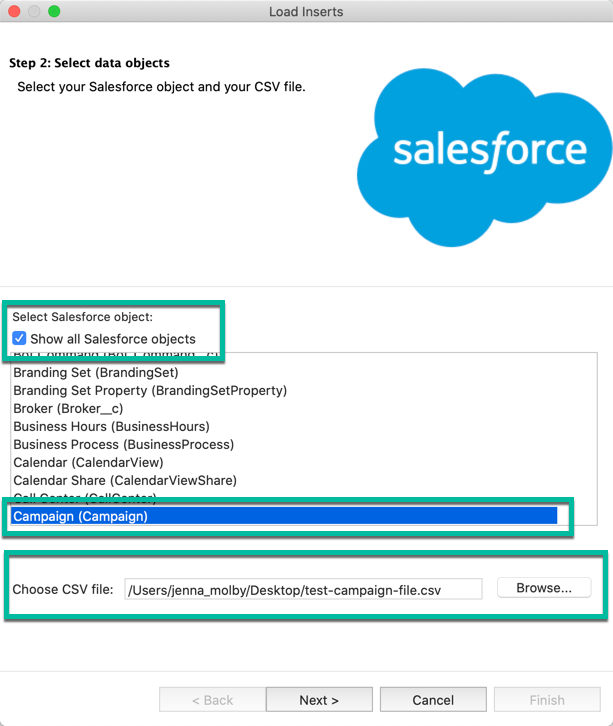
Select the checkbox for “show all Salesforce objects” in order to view and select the Campaigns option from the list of options. Select the CSV file to upload.

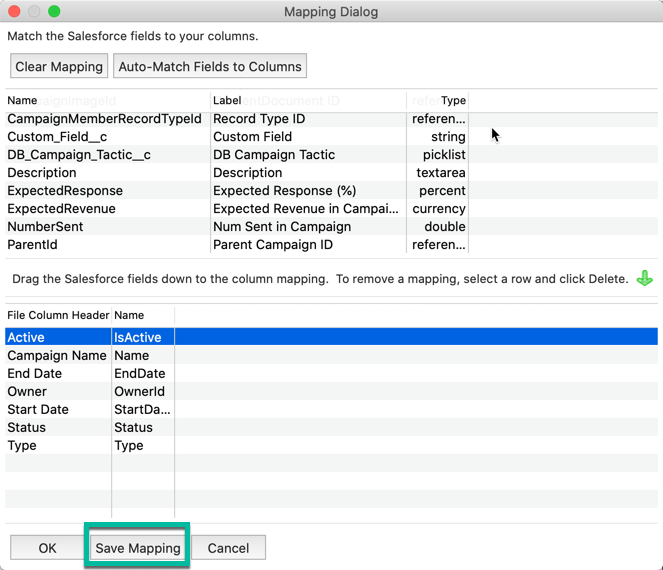
Map the columns in your CSV file to your SFDC fields in step 3 and save your mapping for future uploads.

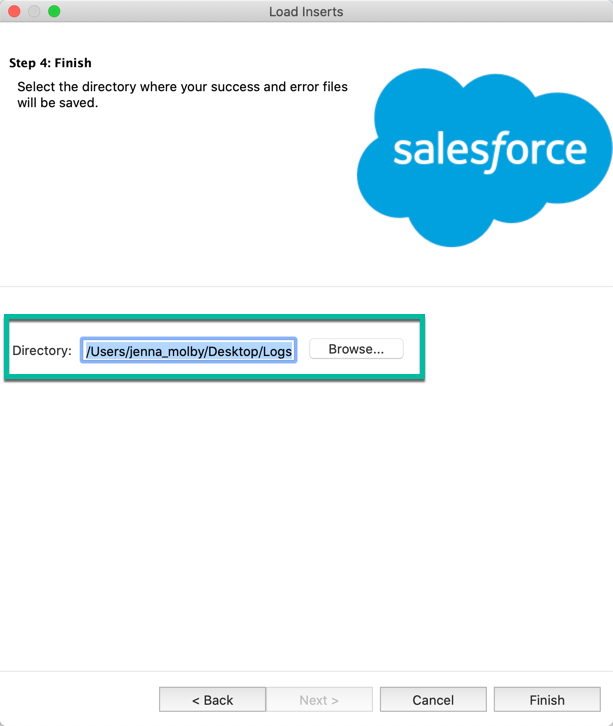
Choose a folder on your computer to save the success and error log files. You will need these for reference in case some campaigns do not upload correctly.

Click finish to start the upload. Once the upload is completed, a window will show you how many campaigns were uploaded successfully and how many were not uploaded due to an error. Here are some common error messages you might run into when uploading campaigns.

  • Invalid number: If you have numeric values in your campaign file ensure that the values do not include commas.
  • Bad value for restricted picklist field: There is a picklist value in your CSV file that does not exist in Salesforce. Sometimes this can be a spelling mistake or a missing space or special character.
  • Error converting value to correct data type: FALSE: Try using the value “0” for the field instead of FALSE.

Bulk upload statuses

Unless you use the default campaign member statuses of “sent” and “responded” you will probably want to bulk create campaign member statuses as well. Here’s how to easily do this via Data Loader.

Questions?

Send me a tweet @jennamolby, or contact the Sercante team for help.
No more posts to show