Category

Jenna Molby

As a Marketing Operations Manager, one of my responsibilities is managing Outreach.io for the sales development team and the marketing team. Our marketing team runs a ton of trade shows and webinars, all of which need to be followed up by one of our SDRs efficiently in Outreach.

Part of post-event follow up includes creating sequences that give the salesperson the freedom to personalize touchpoints on their own and identifying the prospects that need follow up. Let’s dive into how to set this up in Outreach and some tips for a successful event follow-up.

Get your sequences ready

The first step is to get the follow-up sequence ready to go. The steps in your sequence depend on how you want to follow up on your event.

What level of personalization do you want? Do you want to build fully automated email sequences? Task-based sequences? Or both?

However, you want to do it, I recommend building sequences into a cadence of manual tasks that give the salesperson the freedom to personalize each touchpoint on their own.

Need some inspiration? Check out these Three Winning Sequences Formulas You Can Implement Today

Tips

  1. Outreach Blueprints can be a great starting point for your post-event sequence.
  2. Check the settings within your Outreach rulesets. These settings determine if a prospect can be on more than one sequeunce at once and if the prospect can be put on the same sequence more than one. These settings are important to note if you want to reuse sequences for events or if you notice the number of prospects on your sequence is lower than expected.
  3. When following up with a high volume of prospects, consider creating a high-value sequence that is highly personalized and another sequence that is more automated.

Flag prospects in Outreach

It’s important to flag to your Sales team what event or webinar the prospect attended. There are a couple of different ways to do it depending on how many events you run at once, what your Salesforce instance looks like, and how you want your Sales team to put the prospects on a sequence.

Option 1: Use a custom field and a smart view

The first option is to use a custom field to track the name of the last event the prospect attended. The custom field can be named something like “last marketing event” and should be created in Salesforce and mapped to Outreach. This custom field can then be populated via a list upload in Salesforce or through your marketing automation platform.

Once the field is created, you can use it as a filter to create a Smart View in Outreach.

You can save the Smart View as “Latest Event Prospects” and edit the view’s filters each time you have an event, or you can create new Smart Views for each event and delete the Smart Views once the event follow up is complete.

You might want to split out prospects that attended the event and prospects who did not attend the event. In that case, the “last marketing event” field would need to have two different values and you would need to create two different Smart Views in Outreach to filter them.

Tips
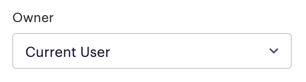
  1. Make sure when you create the Smart View, the Owner is set to the Current User. When your Sales team uses the Smart View, they will only see the prospects that they own.
  2. The Smart View should be shared with the whole Org
  3. If you are a Marketo user, use the “last interesting moment description” as your filter instead of creating a new field.
  4. If you have more than one event happening at the same time, then you might want to consider using tags instead of field updates with Smart Views.
  5. Create a naming convention for the values of the custom field.

Option 2: Use a custom tag

The second option is to add a tag to prospects in Outreach to flag if they attended an event.

To tag prospects in Outreach, you need to pull a list in Salesforce or your marketing automation system to get the email addresses of the prospects. Depending on your sync settings, these prospects should already exist in Outreach. So, by pulling a list and importing it into Outreach, you are not creating new prospects, you are selecting the prospects you want to tag.

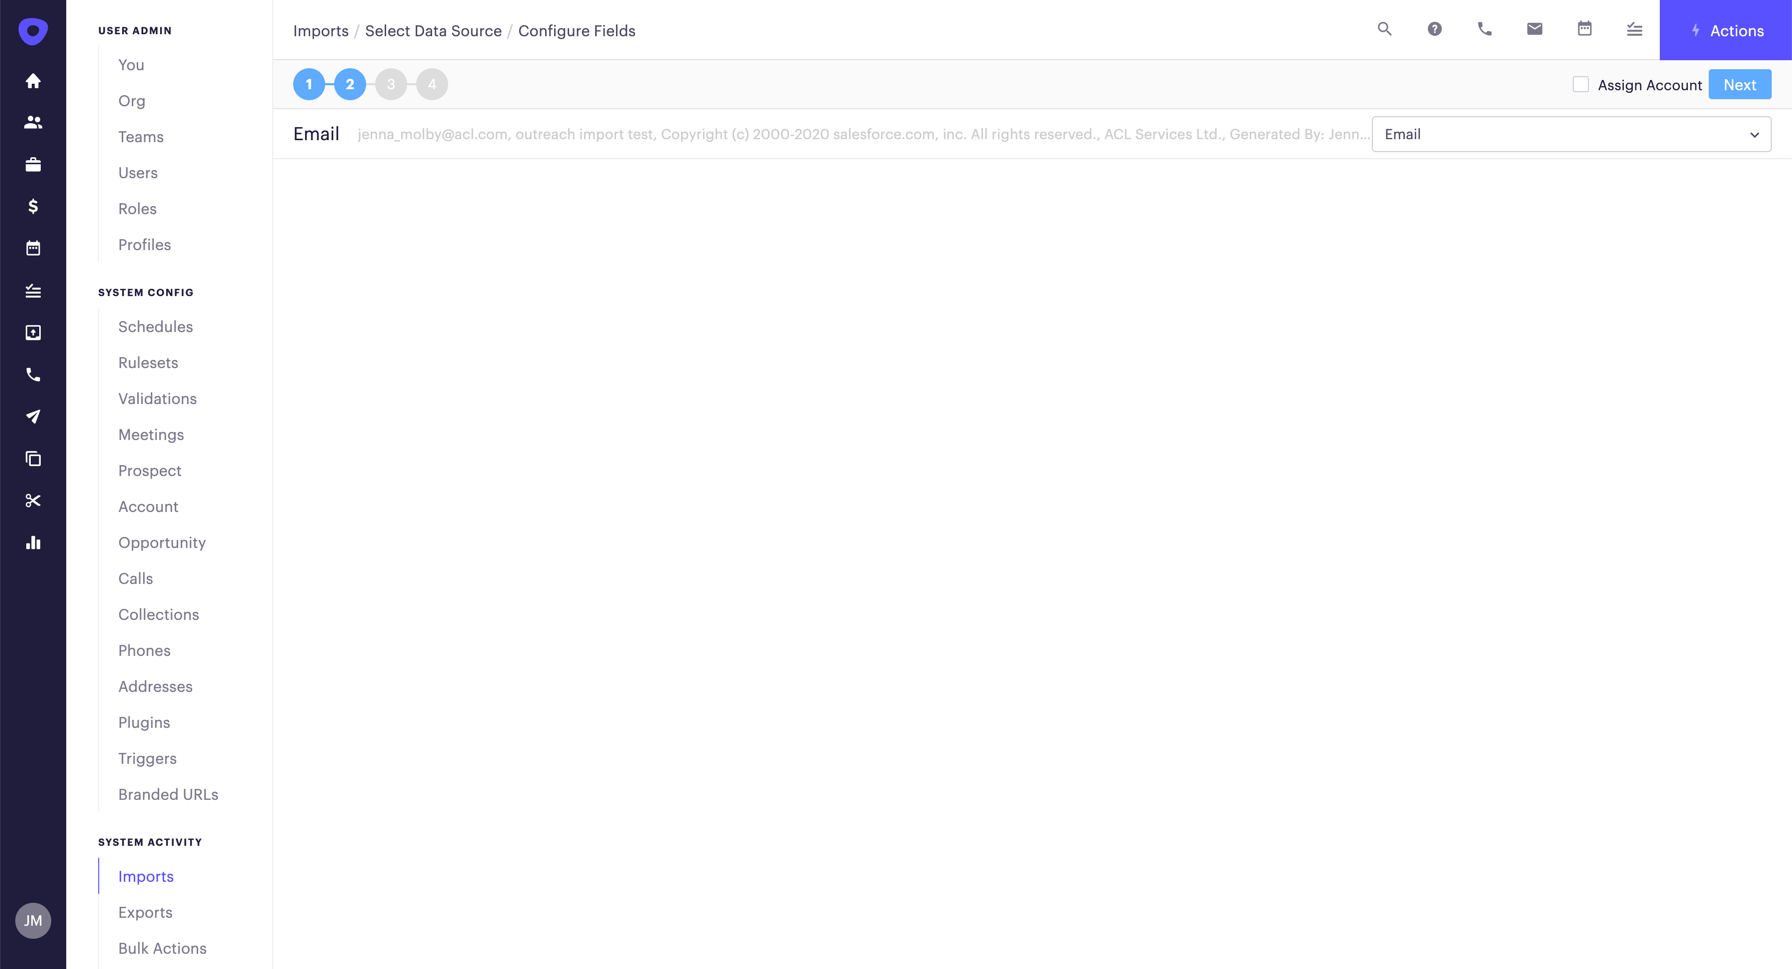
If you track events using Salesforce Campaigns, you can pull a report of Campaigns with Campaign Members. Select the name of the campaign and filter by campaign member status to get the list. Add email address as the only column in the report and export the report as a CSV. In Outreach, navigate to Admin > Imports > Add and select Prospects Comma-Separated Values File from the dropdown.
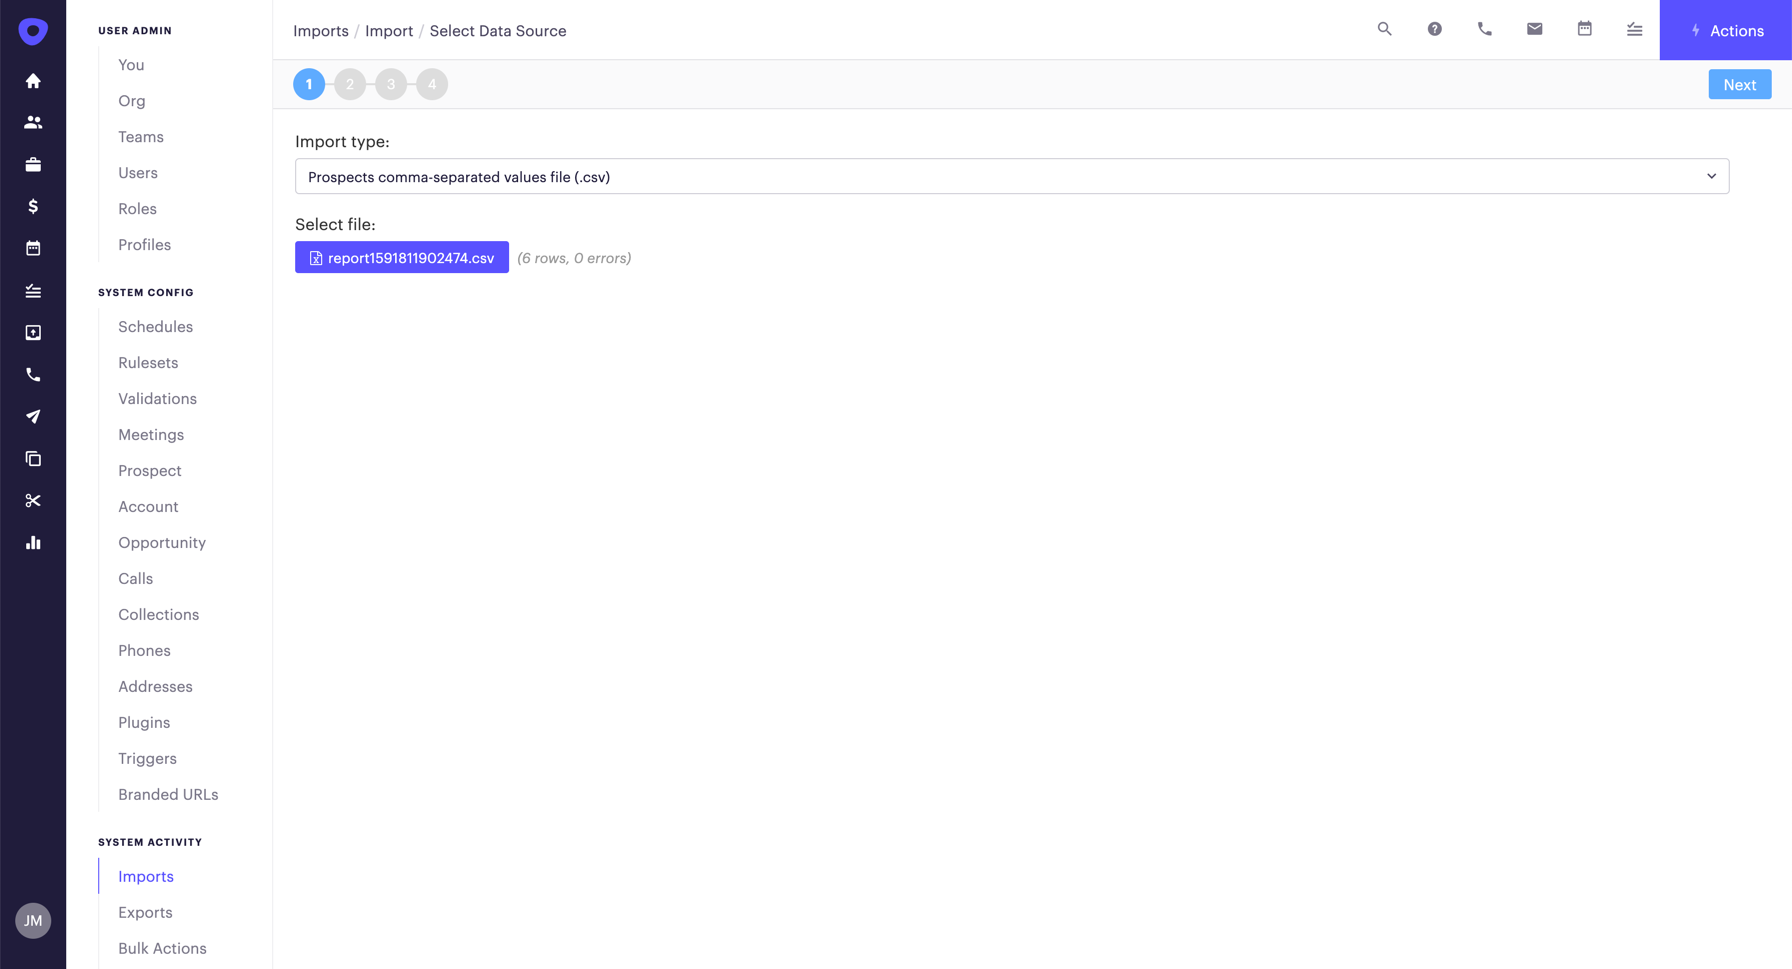
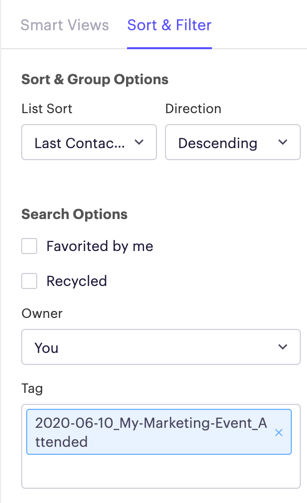
In step 3, the owner should be use owner from data. This will ensure that the owner of the prospect in Salesforce is the owner of the prospect in Outreach. Selecting a different owner from the dropdown will reassign prospects in Salesforce if your sync settings allow this. Add the tag for these prospects in the Additional Tag setting. The tag should include the date of the event, the event name, and any other filters (attended, no show, etc) to quickly highlight to Sales the event details.

Once the tag is added, Sales can filter based on the tag using the Sort & Filter sidebar within the prospects tab. They will also see the tag when they view the prospect record directly.
Tips
  1. If you have many duplicates in your Salesforce Org you might want to consider importing prospects based on Salesforce ID instead. This can be done by creating two Salesforce reports for each campaign. 1) Campaigns with Leads 2) Campaigns with Contacts. Add the 18-Digit Lead ID or 18-Digit Contact ID depending on the report type and save the report in the Unfiled Public Reports folder in Salesforce. Select the Prospect Salesforce Report option from the dropdown when uploading into Outreach and follow the steps to import. This is also a good solution if you don’t want marketing mangers to be exporting data from Salesforce.
  2. You can reuse the same reports after each event. Create a report named “Post-Event Attendees” or “Post Event No Shows” and update the campaign name each time.
  3. If you do not use Salesforce campaigns, you can export a CSV of email addresses directly from your marketing automation system and import them into Outreach to tag them.
  4. Review and remove old tags regularly.
  5. Create a naming convention for you tags, so Sales knows exactly what they are looking for.

Monitor follow up in Salesforce

You can view post-event follow up in Salesforce by syncing engagement status data from Outreach to Salesforce. Once this is enabled, you can pull reports based on Campaign membership, sequence name, and actively being sequenced. You can also view a lead or a contact record and see if the lead is currently on a sequence.

Tips

  1. Engagement status fields can be synced with your marketing automation system and used as a filter for your email lists.
  2. If you don’t sync Outreach engagement status data to Salesforce, you can pull reports using completed activities (tasks). However, this will not show you the name of the sequence the prospect is currently active.

Monitor follow up in Outreach

You can view post-event follow up in Outreach by navigating to the sequence and clicking on the insights tab. This will show you the performance metrics of your sequence, including how many prospects are active on the sequence, how many prospects are paused and the number of prospects contacted.

The overview tab of the sequence will show you how your prospects are moving through your sequence. This is a great tool to see if how prospects are moving through the sequence and if there are any roadblocks along the way. For example, if there is a phone call step that Sales is not completing, which is causing prospects not to move further in the sequence or if there is a particular email in the sequence that has a high unsubscribe rate. These are all indications that your sequence might need to be tweaked for future events.

Questions?

Send me a tweet @jennamolby, or contact the Sercante team for help.

Salesforce campaigns can help you track each of your marketing initiatives in detail. These can include online advertisements, emails, or more specialized marketing events such as demos and tradeshows. You can use campaigns to analyze how many leads you are generating, how much pipeline you are building, and how many deals are closing as a result of your marketing efforts. However, to track and analyze your Salesforce campaigns effectively, you need to have an organizational structure in place.

Whether you are setting up campaigns for the first time or looking for a way to get more out of campaigns, here are 7 tips to help you get started with your Salesforce campaign organization.

1. Have a naming convention

Have a standard campaign naming convention and stick with it. A good naming convention will make it easy for you to search for campaigns and make it easy for sales and marketing to get an idea on the campaign details at a glance.

Naming convention tips

  • Include the date of the campaign launch or event
  • Include a short description of the topic or the name of the webinar, asset, etc.
  • If you have multiple regions, include the region
  • Include the type of campaign (webinar, tradeshow, eBlast, etc)

Also, check out this blog post for a solution to automate Salesforce campaign naming conventions.

2. Narrow down your Salesforce campaign types

The Type field on campaigns defines the general types of campaigns you run. Standard values include Advertising, Direct Mail, Email, Telemarketing, Banner Ads, Seminar/Conference, Public Relations, Partners, Referral Program, and Other.

Campaign type tips

  1. Make a list of the types of campaigns your organization runs and modify the Type picklist to include only the values you need.
  2. Keep the total number of type values to no more than 10 and include general types of campaigns rather than specific types.
  3. Think about how you want to be able to report on your campaigns. Are you going to want to calculate a subtotal based on “Advertising” to determine the overall effectiveness of all advertisements rather than one particular subcategory?
  4. To report on specific campaign types, create subcategories using dependent picklists.

3. Standardize your member statuses

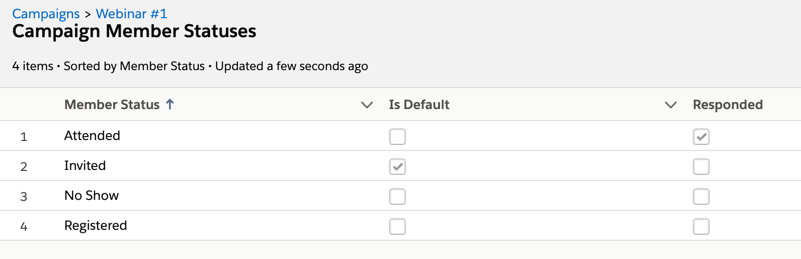
It’s important to remember to limit yourself and your org to one set of campaign member statuses for each type of campaign that you run. Member statuses are very useful for reporting on the response rate of your campaigns. But if different email campaigns use different statuses to indicate that the email was sent, it’s not easy to get a single report of how many emails have been sent for all your campaigns.

Standardize your member statuses

Salesforce Campaign member status examples

Campaign TypeCampaign Member Statuses
Online AdvertisingClicked
Converted
Email BlastSent
Opened
Clicked
Unsubscribed
TradeshowAttended
Registered
Visited Booth
No Show
WebinarRegistered
Attended
No Show
Invited

Pro tip: You can bulk edit/create campaign member statuses using Salesforce Data Loader.

4. Create custom fields

Custom fields can be used to enhance your campaign reporting. Are there ways you want to slice the campaign data based on values that aren’t in the standard fields? Here are examples of custom fields that might be useful to add to you campaigns:

  • Region
  • Product or solution
  • Live date
  • Landing page URL (for eBooks, white papers, webinars, etc)
  • Buyer persona
  • Expected pipeline
  • Target number of MQLs
  • Target number of leads
  • Advertising partner
  • Subtype

5. Have a campaign hierarchy

Creating a campaign hierarchy, will allow you to group your campaigns into categories that suit your business. There are a few different ways hierarchies can be applied to your marketing practice. Here are three common approaches to campaign hierarchy.

Three common approaches to campaign hierarchy

  1. Group campaigns by marketing strategy

    The top level can represent an overall strategic focus, such as selling a new product, or building brand awareness. The second level can be for the different aspects of that focus, like the product launch or upselling previous customers. Finally, the third level can represent individual marketing efforts, like an email, an online ad, invitations to demos, or the demo itself.
  2. Group campaigns by time period

    In this approach, the top level can be for the marketing efforts for the entire year, the second level can be for each fiscal quarter, and the third level for individual campaigns in each quarter.
  3. Group by event, asset, webinar, etc

    Use the first level for a large event, such as an annual conference. The second level can then be for supporting marketing efforts like the registration and emails.

Tips for selecting the campaign hierarchy

  1. Figure out how you want to report on the success of your campaigns.
  2. The top level of the hierarchy can be used to see the campaign metrics at-a-glance. Consider what metrics you would want to see there.
  3. Consider how custom fields can be used to track things such as product to figure out if this should play into the hierarchy or not.
  4. The hierarchy can have as many levels as she wants, but three levels work well for many companies.

6. Use campaign record types

Campaign record types can be used to track different detail for different kinds of marketing efforts. For example, you can have one record type for email campaigns and another for events, and so on. Your email campaign record type can include a field for the email template used, while the event record type can have a custom field for things like location, timing, equipment needed, etc.

7. Set up campaign influence

Campaign influence can be configured to automatically attach campaigns to opportunities. When the association is enabled influential campaigns are added to opportunities when a campaign is related to a contact that is assigned a contact role on the opportunity prior to the close date of the opportunity.

You can set up a campaign influence time frame that specified the maximum number of days between the campaign’s first associated date and the opportunity created date. For example, if you specify a Campaign Influence Time Frame of 15 days and one of your contacts becomes a member of a campaign on June 1, the campaign is considered influential to any opportunity that is created and associated with the contact by June 15. Use the association rules to configure additional criteria that campaigns must meet to be automatically associated to an opportunity.

Set up campaign influence

Pro Tip: If you are a Pardot user you can also set up a Pardot Campaign Influence Attribution Model. you can learn more about Pardot and Salesforce connected campaigns in this blog post.

Questions?

Send me a tweet @jennamolby, or contact the Sercante team for help.
Want to be able to restrict the date range of a date picker within your Pardot forms? The default date picker with Pardot does not provide this option, but with a couple of lines of JavaScript, you can enhance the functionality of the date picker. In this tutorial, I’ll show you how to use the jQuery UI date picker within your Pardot form.

Step 1: Add the field to your form

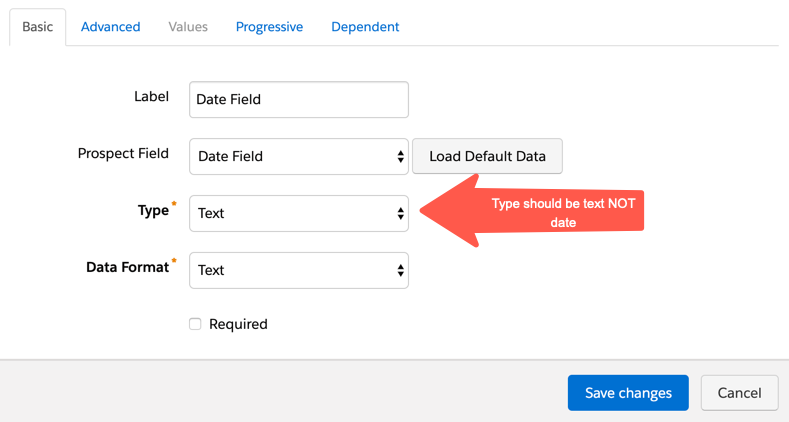
Add the field to your form. Since we won’t be using the default date picker leave the type as TEXT.

Step 2: Add the JavaScipt to your form

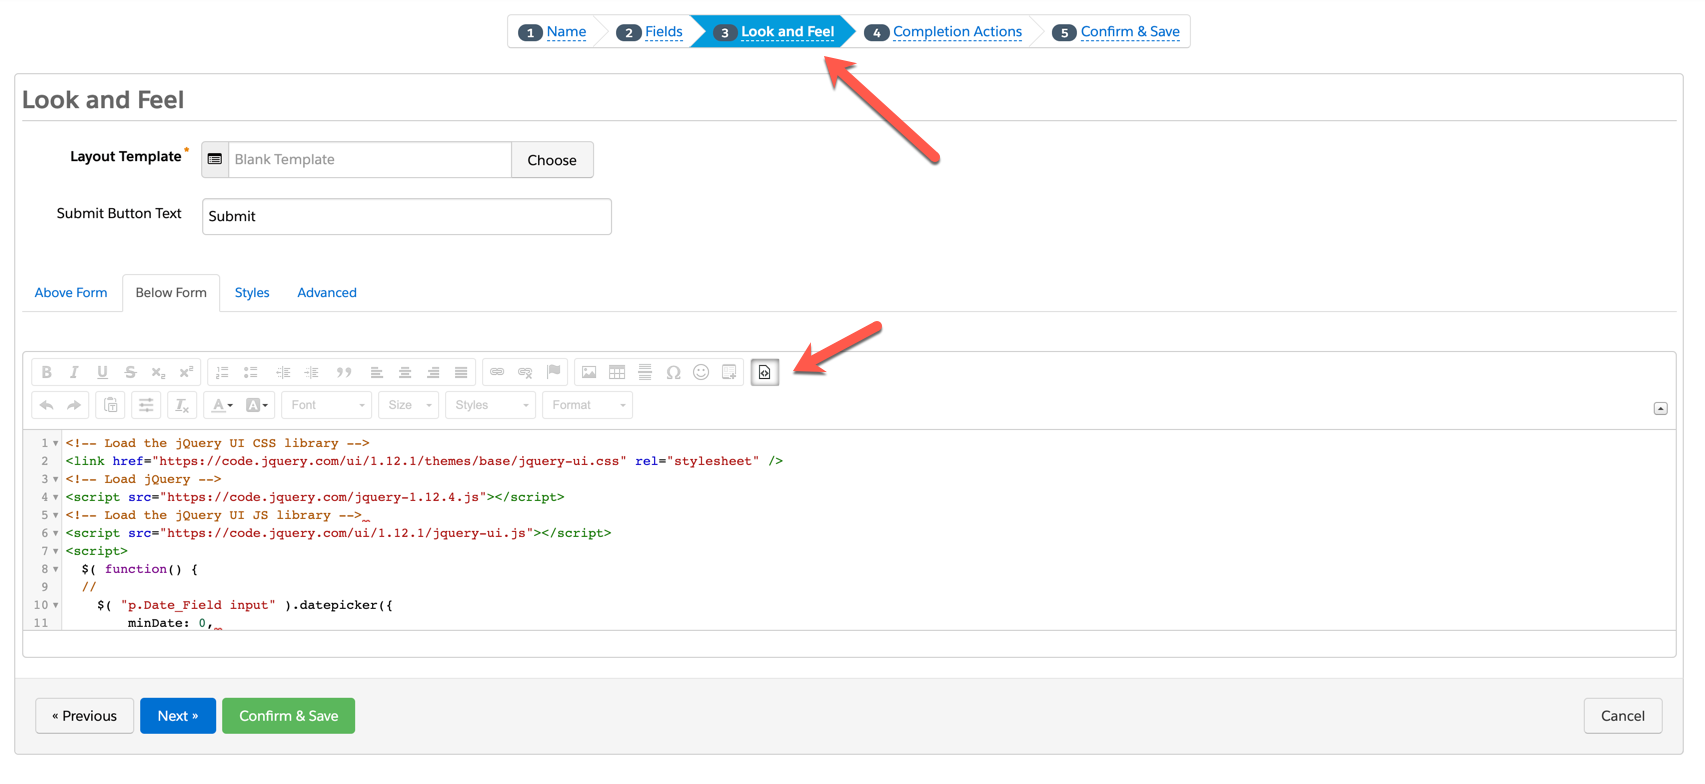
In the form editor, go to step #3 – look & feel and click on the below form section. Copy & paste this JavaScript in the HTML editor.

<!-- Load the jQuery UI CSS library -->
<link href="https://code.jquery.com/ui/1.12.1/themes/base/jquery-ui.css" rel="stylesheet" />
<!-- Load jQuery -->
<script src="https://code.jquery.com/jquery-1.12.4.js"></script>
<!-- Load the jQuery UI JS library -->
<script src="https://code.jquery.com/ui/1.12.1/jquery-ui.js"></script>
<script>
  $( function() {
  // update YOURDATEFIELDNAME with the name of your date field
    $( "p.YOURDATEFIELDNAME input" ).datepicker({
     // Update minDate with how far back the date picker should go
     minDate: 0,
     // Update maxDate with how far in the future the date picker should go
     maxDate: "+1M",
     // This formats the date so it's valid within Salesforce/Pardot
     dateFormat: "yy-mm-dd"
    });
});
</script>

Step 3: Edit the script

There are a couple of changes you need to make to the script in order for it to work with your form:

  1. Update YOURDATEFIELDNAME with the name of your Pardot field that should launch the date picker.
  2. Update minDate with the number of days in the past the user should be able to see and select. For example “0” would not show any dates in the past. “-20” would allow the user to select up to 20 days in the past.
  3. Update maxDate with the number of days in the future the user should be able to select. For example, “+1M” would allow the user to select a date that is 1 month in the future.

Step 4:

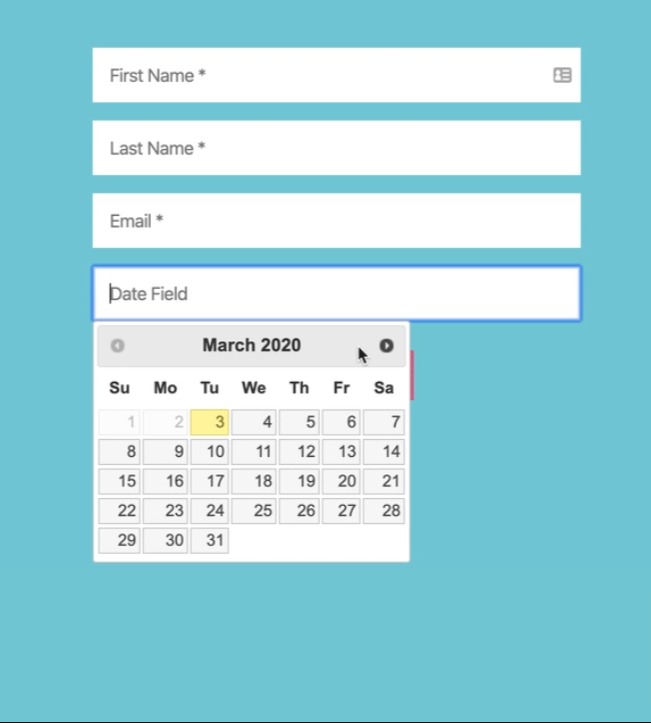
Save and test! Your date picker should look like the one below and if you fill out the form the date should populate within Pardot in the yyyy-mm-dd format.

Questions?

Send me a tweet @jennamolby, or contact the Sercante team for help.

Date stamping can be used in Salesforce to record the date or date/time when a particular field is changed. This is used frequently for capturing the date the lead entered a particular stage or when a lead was first actioned. These fields can be used in reports and dashboards. Let’s dive into how to set this up and some example use cases.

The basics

The best way to date stamp in Salesforce is to create a workflow rule to update the field.

  1. Create the date field
    The first step is to create the field on the object. You can choose either the date field type or the date/time field type.
  2. Create the workflow rule
    Create a new workflow rule (Setup > Proceess Automation > Workflow Rules > New Rule). Select the object you where you just created the field and add the rule criteria.
  3. Add a workflow action to update the field
    Create a workflow action to update the date field. Use a formula field to set the value. If your field type is DATE/TIME use NOW() as your formula. If the field type is DATE use TODAY() as your formula.

Examples

Date stamp a field when a checkbox is checked

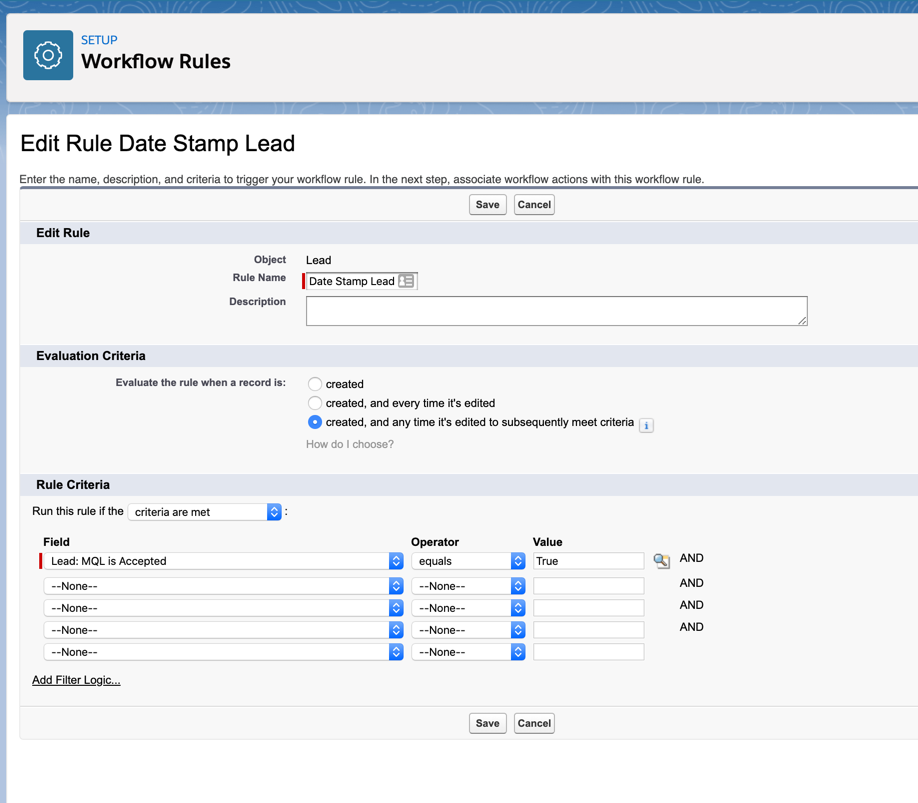
Create a workflow rule and select “created, and any time it’s edited to subsequently meet criteria” for your evaluation criteria. Next, add the filters for your rule criteria. In this example, I’m going to date stamp a field when the checkbox for “MQL is Accepted” is checked.

Date stamp a field when a checkbox is checked

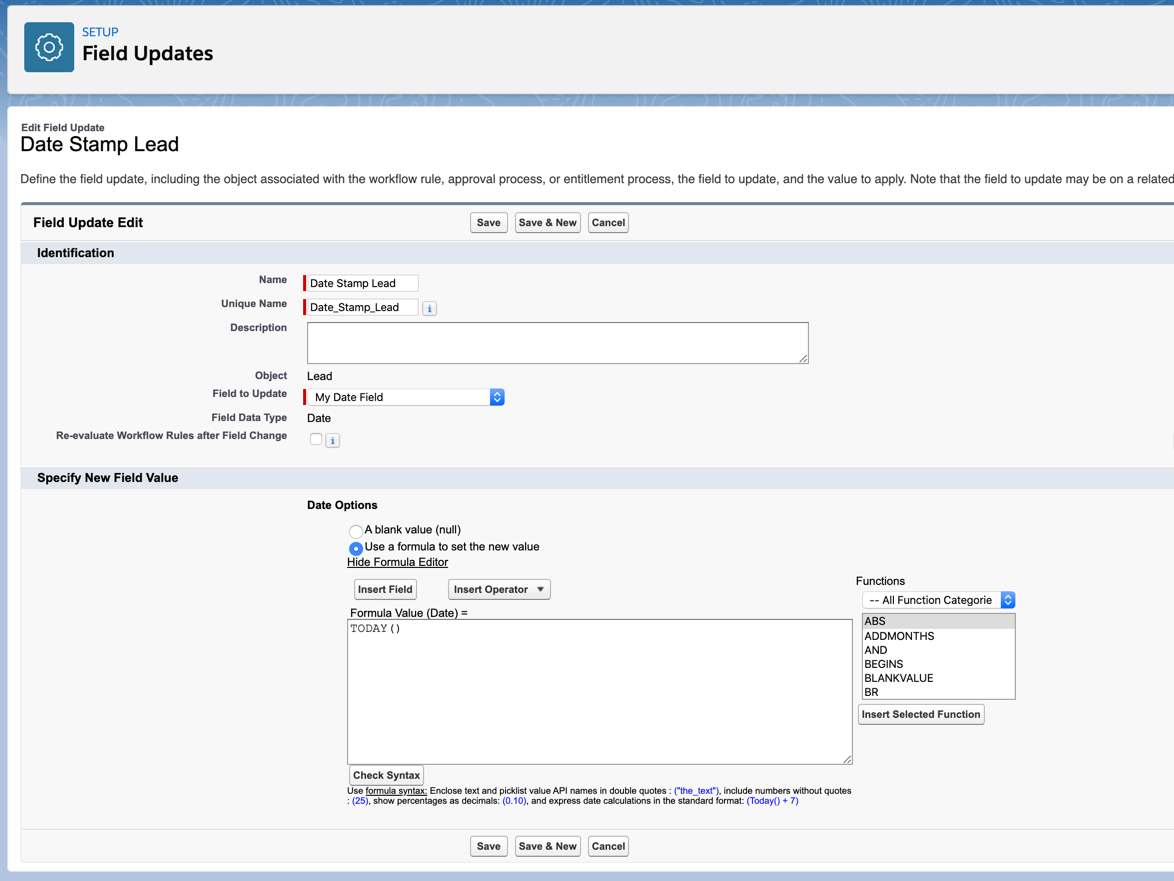
Add a workflow action to update your date field. Select “Use a formula to set the new value”. Your formula should be set to TODAY() unless your field is a DATE/TIME field. In that case, it should be set to NOW().

Use a formula to set the new value

Now all you need to do is activate your workflow rule and test! Here’s what my completed workflow rule looks like.

completed workflow rule
Flow test

Date stamp a field when a picklist value is updated

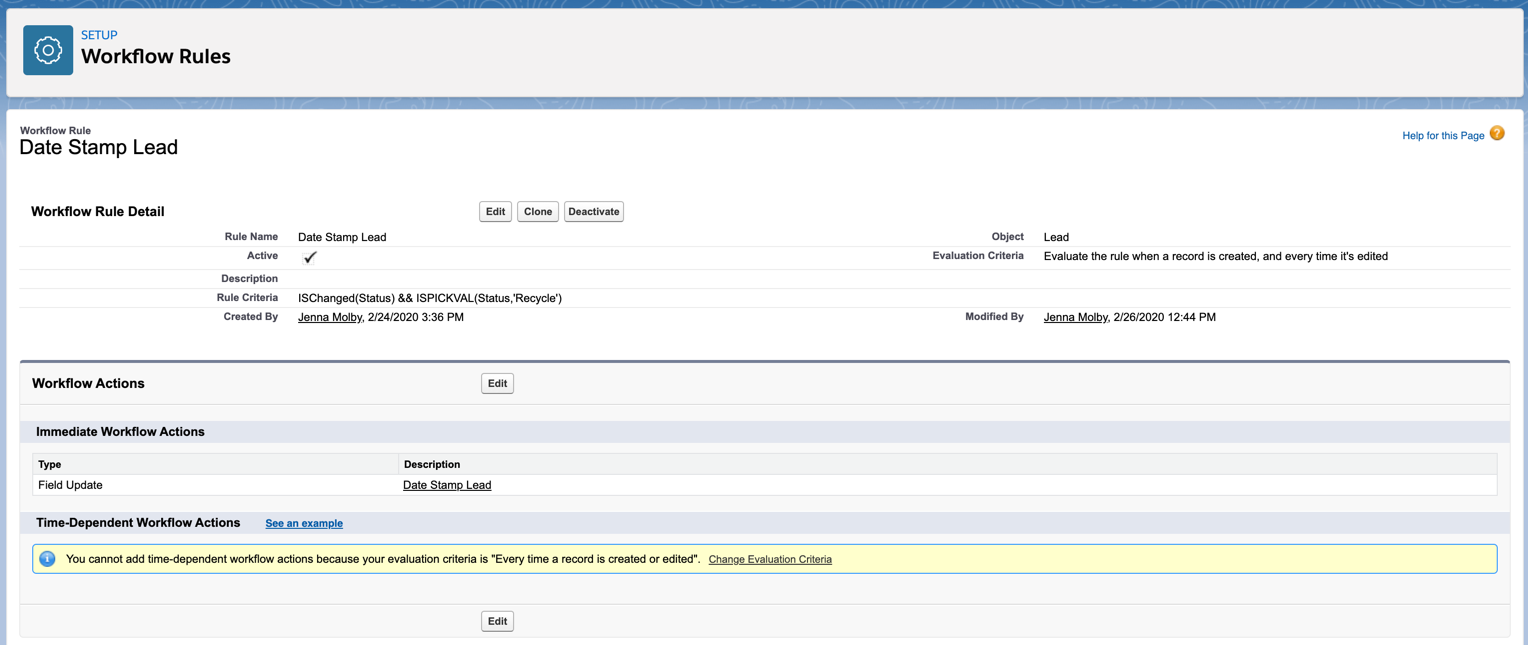
Create a workflow rule and select “created, and every time it’s editeda” for your evaluation criteria. Select run this workflow if the formula evaluates to TRUE and add your formula. In this example, I want to date stamp my field when the Stage for the lead is updated to Recycle, so my formula looks like this ISChanged(Status) && ISPICKVAL(Status,’Recycle’).

Date stamp a field when a picklist value is updated

Add a workflow action to update your date field. Select “Use a formula to set the new value”. Your formula should be set to TODAY() unless your field is a DATE/TIME field. In that case, it should be set to NOW().

Now all you need to do is activate your workflow rule and test! Here’s what my completed workflow rule looks like.

completed workflow

Only date stamp the field if the field is currently empty

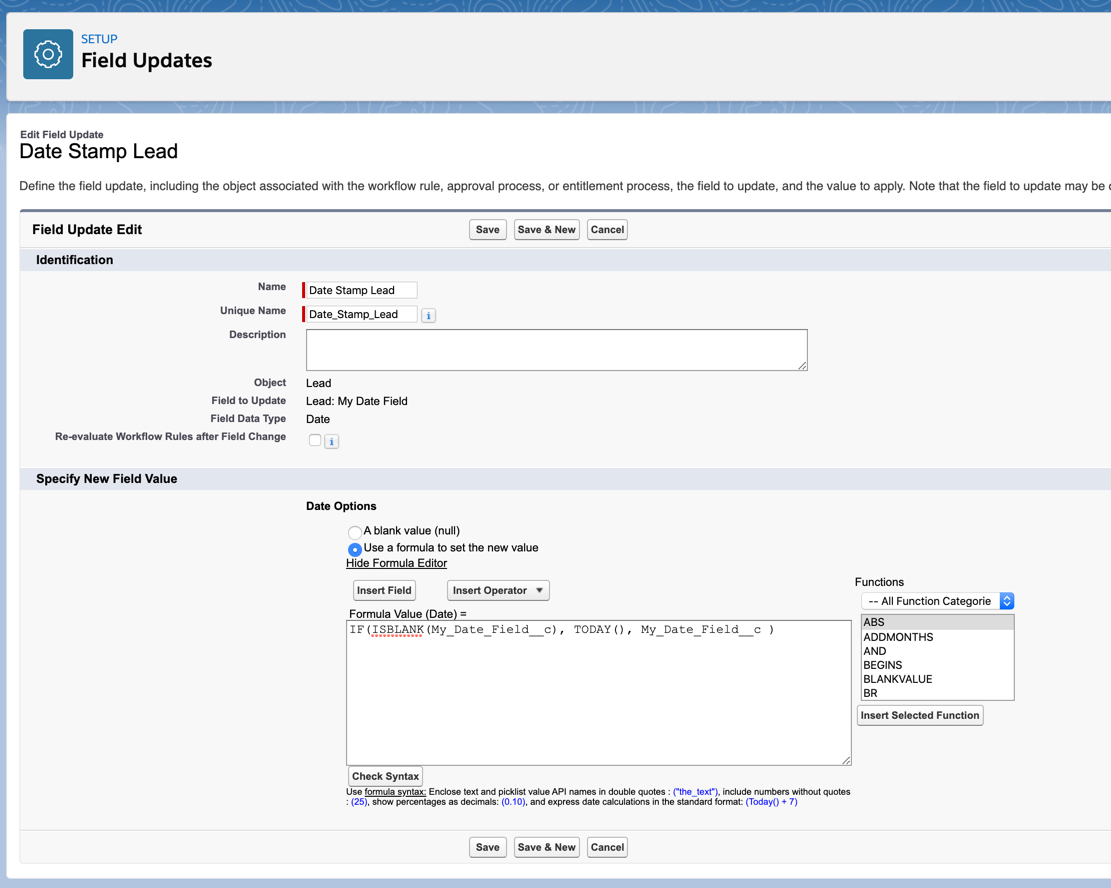
If you want to date stamp the date field ONLY if it’s currently empty, you can modify the formula in your workflow action.

IF(ISBLANK(My_Date_Field__c), TODAY(), My_Date_Field__c )

Only date stamp the field if the field is currently empty

Bonus tip: Calculate the number of days between dates

Now that you are a date stamping pro, you can create formula fields to calculate the number of days between dates. These fields can be used in reports to show how many days a lead was in a particular stage, or how long it took sales to action the lead. Here’s an example of what a formula field looks like to calculate the number of days between when the lead was created and the MQL date:

MQL_Date__c – CreatedDate

Questions?

Send me a tweet @jennamolby, or contact the Sercante team for help.

The 2nd part of the form customization series is finally here! In part 1, I showed you how to implement the popular floating label technique and how to create searchable, user-friendly dropdowns. In this post, I will show you how to create a conversational, paragraph-style form and how to create a form on a single line.

This is part 2 of the 3 part series. Have you come accross a form recently and didn’t know to replicate the functionality in Pardot? Share it with me in a tweet @jennamolby, or in the comments.

Create a paragraph-style form

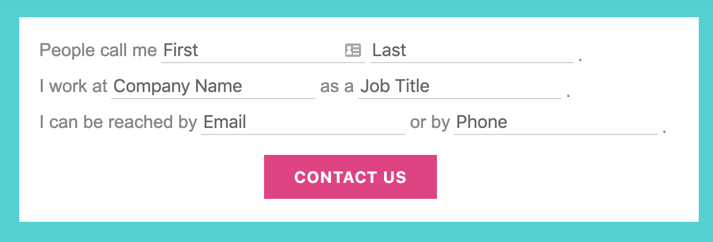
This “conversational”, paragraph-style form is a unique way to display your Pardot form. It requires editing your layout template and adding some custom javascript and CSS. Here’s a preview of what it looks like.

Edit your layout template

In order for this method to work, you need to make some updates to your layout template. Navigate to your layout template and click on the FORM tab. Replace the code with the code below.

<form accept-charset="UTF-8" method="post" action="%%form-action-url%%" class="form" id="pardot-form">
%%form-opening-general-content%%

%%form-if-thank-you%%
    %%form-javascript-focus%%
    %%form-thank-you-content%%
    %%form-thank-you-code%%
%%form-end-if-thank-you%%

%%form-if-display-form%%

    %%form-before-form-content%%
        %%form-if-error%%
            <p class="errors">Please correct the errors below:</p>
        %%form-end-if-error%%
        
        %%form-start-loop-fields%%
            <div class="form-field %%form-field-css-classes%% %%form-field-class-type%% %%form-field-class-required%% %%form-field-class-hidden%% %%form-field-class-no-label%% %%form-field-class-error%% %%form-field-dependency-css%%">
                %%form-if-field-label%%
                    <label class="field-label" for="%%form-field-id%%">%%form-field-label%%</label>
                %%form-end-if-field-label%%
                    %%form-if-field-description%%
                    <span class="description">%%form-field-description%%</span>
                %%form-end-if-field-description%%
                
                %%form-field-input%%
            
            
            <div id="error_for_%%form-field-id%%" style="display:none"></div>
            %%form-field-if-error%%
                <p class="error no-label">%%form-field-error-message%%</p>
            %%form-field-end-if-error%%
            </div>
        %%form-end-loop-fields%%
        
        %%form-spam-trap-field%%
        
        <!-- forces IE5-8 to correctly submit UTF8 content  -->
        <input name="_utf8" type="hidden" value="&#9731;" />
        
        <p class="submit">
            <input type="submit" accesskey="s" value="%%form-submit-button-text%%" %%form-submit-disabled%%/>
        </p>
    %%form-after-form-content%%
    
%%form-end-if-display-form%%

%%form-javascript-link-target-top%%
</form>

What has changed?
The paragraph tags surrounding the inputs have been replaced with DIVs and the description code has been moved from after the input to before the input.

Edit your form

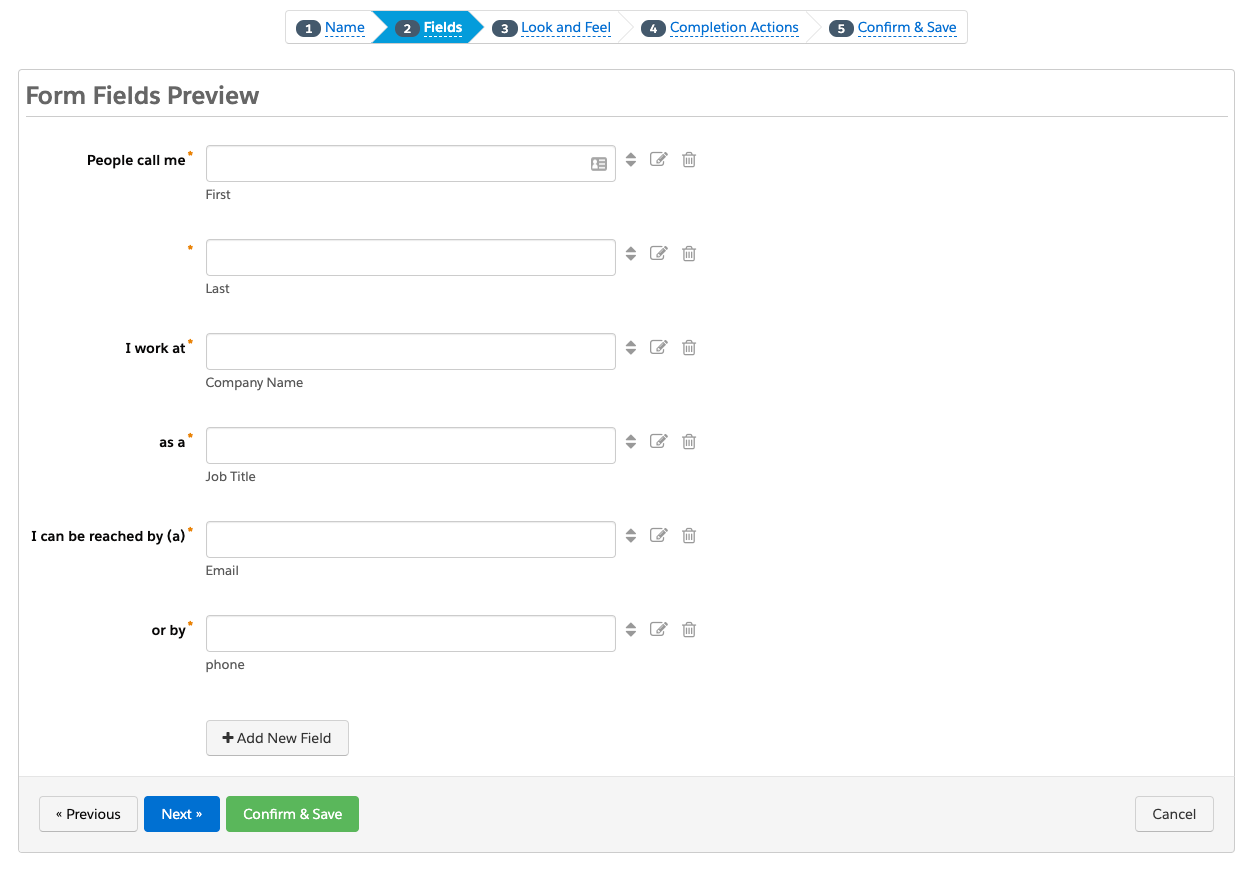
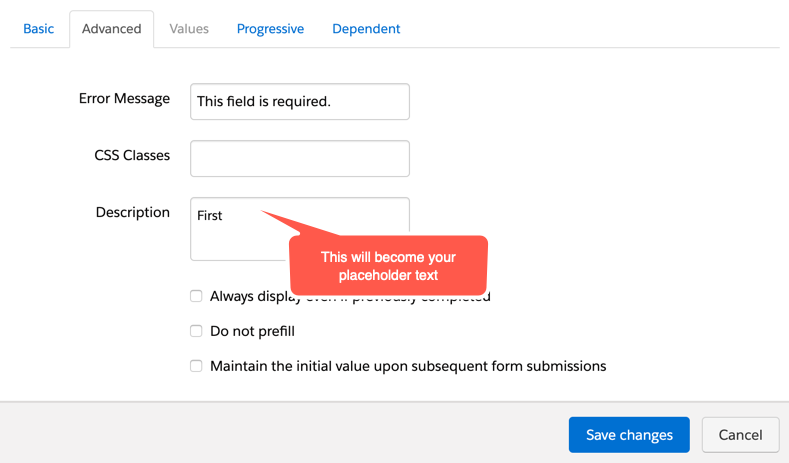
Since this is an advanced technique, the form setup is a bit unique. The labels within the form will act as the “paragraph text” and the description option will be used as the placeholders within the fields.

Here’s what the set up of my form looks like once the labels are updated and the description text is added.

Add the Javascript

This JavaScript will take the description text from the form and turn them into placeholder text.

<script type="text/javascript">
var labels = document.querySelectorAll("span.description");
var i = labels.length;
while (i--) {
    var label = labels.item(i);
    var text = label.textContent;
    label.parentNode.classList.contains("required") && (text += "");
    var nextElement = label.nextElementSibling;
    if (nextElement) {
        if (nextElement.tagName == 'SELECT') {
            nextElement.options[0].text = text;
        } else {
            nextElement.setAttribute("placeholder", text);
        }
        label.parentNode.removeChild(label);
    }
}
</script>

Add the CSS

The CSS is pretty straightforward. Float all the labels and inputs to the left, style the placeholder text and error messages.

<style type="text/css">

/* put the input fields on the same line */
form.form .form-field {
    float:left;
    clear:none;
    margin-right:5px;
    padding-bottom:10px;
}
form.form .field-label {
    font-size:18px;
    color:#888;
    font-family:Arial,Verdana,Sans-serif;
}
/* style the text inputs */
form.form input.text {
    border-bottom:solid 1px #ccc;
    border-top:none;
    border-left:none;
    border-right:none;
    font-size:18px;
    color:#888;
    outline:none;
}
/* style the select inputs */
form.form select {
    border-bottom:solid 1px #ccc;
    border-top:none;
    border-left:none;
    border-right:none;
    font-size:18px;
    color:#888;
    outline:none;
    -webkit-appearance: none;
   -moz-appearance: none;
   appearance: none;  
   background:none;
   border-radius:0;
   width:200px;
   
}
/* insert line breaks */
form.form .form-field.line-break {
    clear:left;
}
/* insert periods at the end of sentences */
form.form .end:after {
    content:".";
    color:#888;
    font-size:15px;
    display:inline-block;
    top:5px;
    position:relative;
}
/* change the color of the placeholder text */
::-webkit-input-placeholder { /* Chrome/Opera/Safari */
  color: #888;
}
::-moz-placeholder { /* Firefox 19+ */
  color:  #888;
}
:-ms-input-placeholder { /* IE 10+ */
  color:  #888;
}
:-moz-placeholder { /* Firefox 18- */
  color:  #888;
}
/* center the submit button */
.form.form p.submit {
  margin-left:0;
  text-align:center;
}
/* give the form a width */
.form.form {
  width:100%;
  max-width:640px;
  margin:0 auto;
}
/* style the error messages */
form.form div.error {
    margin-left:0 !important;
    padding-left:0 !important;
}
form.form p.no-label, 
form.form p.email-pref {
    margin:0 !important;
    text-align:right;
    font-size:11px;
}
form.form .error input.text {
    border-bottom:solid 1px #8b0000;
}
form.form .error input.text::-webkit-input-placeholder { /* Chrome/Opera/Safari */
  color: #8b0000;
}
form.form .error input.text::-moz-placeholder { /* Firefox 19+ */
  color:  #8b0000;
}
form.form .error input.text:-ms-input-placeholder { /* IE 10+ */
  color:  #8b0000;
}
form.form .error input.text:-moz-placeholder { /* Firefox 18- */
  color:  #8b0000;
}
</style>

Extra customizations

Bump the text to a different line

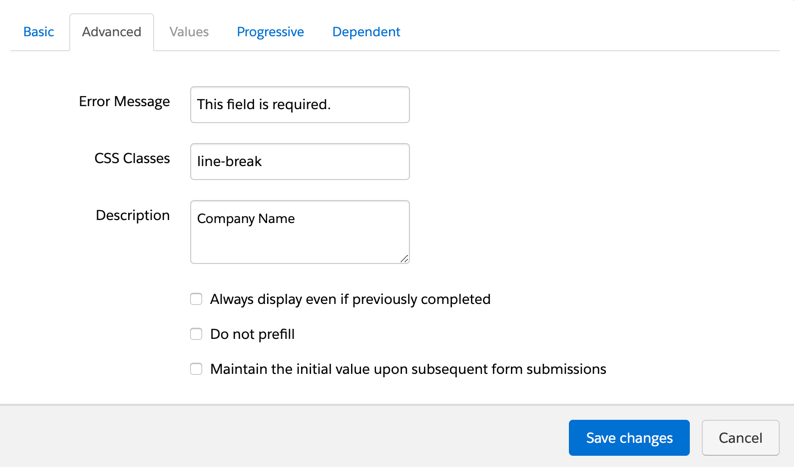
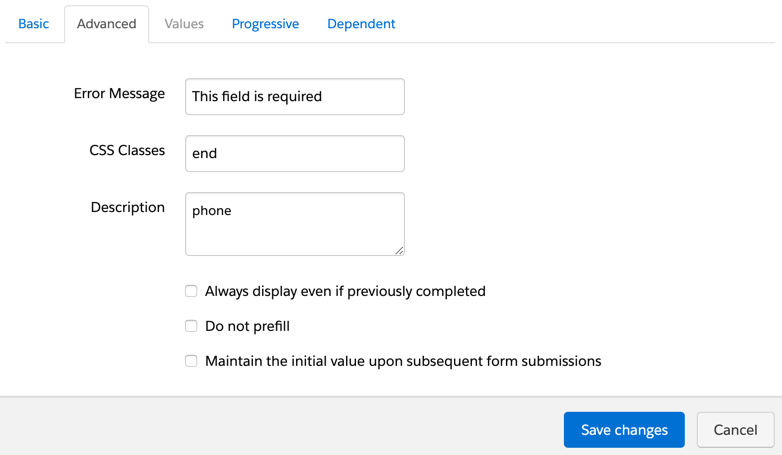
By default, the form fields will appear on a different line and wrap based on the width of your form. If you want to force a new line, navigate the form field that should start on a new line within the editor. Click on the advanced tab and add the class line-break as shown below.

Add a period to the end of a sentence

You can also add a period at the end of a sentence. Simply, add the class end where you want the period to appear.

The result

Minimal styling

First
Last
Company Name
Job Title
phone

Styled version

First
Last
Company Name
Job Title
Phone

Create a form on a single line

I get a lot of inquiries on how to put form fields and the submit button on a single line. Now I have finally found the time to document it. Here’s an example of what the form will look like.

Edit your layout template

For this method to work, you need to make some updates to your layout template. Navigate to your layout template and click on the FORM tab. Replace the code with the code below.

<form accept-charset="UTF-8" method="post" action="%%form-action-url%%" class="form" id="pardot-form">
%%form-opening-general-content%%

%%form-if-thank-you%%
    %%form-javascript-focus%%
    %%form-thank-you-content%%
    %%form-thank-you-code%%
%%form-end-if-thank-you%%

%%form-if-display-form%%

    %%form-before-form-content%%
        %%form-if-error%%
            <p class="errors">Please correct the errors below:</p>
        %%form-end-if-error%%
        
        %%form-start-loop-fields%%
            <div class="form-field %%form-field-css-classes%% %%form-field-class-type%% %%form-field-class-required%% %%form-field-class-hidden%% %%form-field-class-no-label%% %%form-field-class-error%% %%form-field-dependency-css%%">
                %%form-if-field-label%%
                    <label class="field-label" for="%%form-field-id%%">%%form-field-label%%</label>
                %%form-end-if-field-label%%
                
                %%form-field-input%%
                %%form-if-field-description%%
                    <span class="description">%%form-field-description%%</span>
                %%form-end-if-field-description%%
        
            <div id="error_for_%%form-field-id%%" style="display:none"></div>
            %%form-field-if-error%%
                <p class="error no-label">%%form-field-error-message%%</p>
            %%form-field-end-if-error%%
                </div>
        %%form-end-loop-fields%%
        
        
        %%form-spam-trap-field%%
        
        <!-- forces IE5-8 to correctly submit UTF8 content  -->
        <input name="_utf8" type="hidden" value="&#9731;" />
        
        <p class="submit">
            <input type="submit" accesskey="s" value="%%form-submit-button-text%%" %%form-submit-disabled%%/>
        </p>
    %%form-after-form-content%%
    
%%form-end-if-display-form%%

%%form-javascript-link-target-top%%
</form>

What has changed?
The paragraph tags surrounding the inputs have been replaced with DIVs.

Add the CSS

<style type="text/css">
/* put the input fields and the submit button on the same line */
form.form .form-field {
    float:left;
    clear:none;
    margin-right:10px; /* add some spacing between the fields */
}
form.form p.submit {
    float:left;
    clear:none;
    margin-left:2px !important;
    margin-top:0 !important;
}
</style>

The result

Minimal styling with one field

Minimal styling with multiple fields

Styled with one field

Styled with multiple fields

Questions?

Send me a tweet @jennamolby, or contact the Sercante team for help.

Gravity Forms is one of the easiest tools to create advanced forms for your WordPress website and with some customization they can be integrated with Pardot. In this post, I will show you how to integrate Gravity Forms using Pardot Form Handlers.

Step 1: Create your Gravity form

The first step is to create your Gravity form. I won’t be diving into how to set up the Gravity form, but if you’re new to this WordPress plugin take a look at their product documentation to get started.

Step 2: Create your Pardot form handler

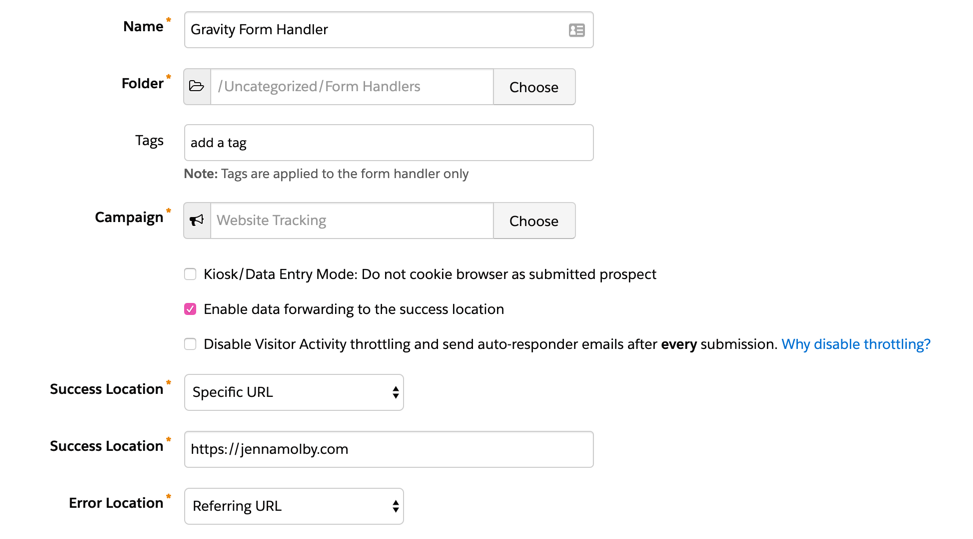
In Pardot, navigate to Marketing > Forms > Form Handlers and create a new form handler. Enter a name for the form handler, select your campaign and set your the rest of the settings to the following:

  1. Kiosk/Data Entry Mode: Do not cookie browser as submitted prospect should be UNCHECKED
  2. Enable data forwarding to the success location should be CHECKED
  3. Enable data forwarding to the success location should be CHECKED
  4. Disable Visitor Activity throttling and send auto-responder emails after every submission. Why disable throttling? should be UNCHECKED
  5. SUCCESS LOCATION should be the URL of your thank you page.
  6. ERROR LOCATION should be the referring URL.

Here’s a screenshot of the settings within my form handler.

Step 3: Add your fields

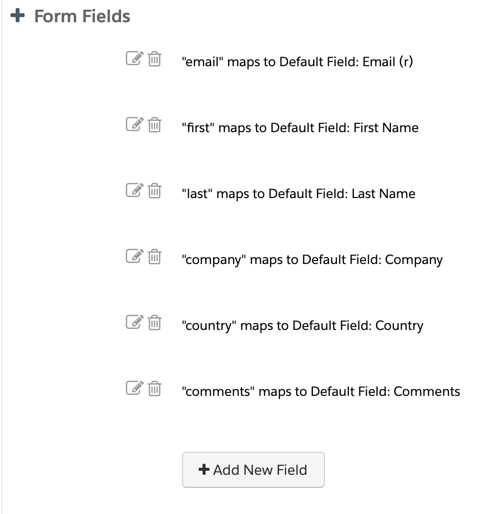
Next step is to add your form fields to your form handler. I recommend only making email address required. The validation for the other required fields will be handled via Gravity Forms.

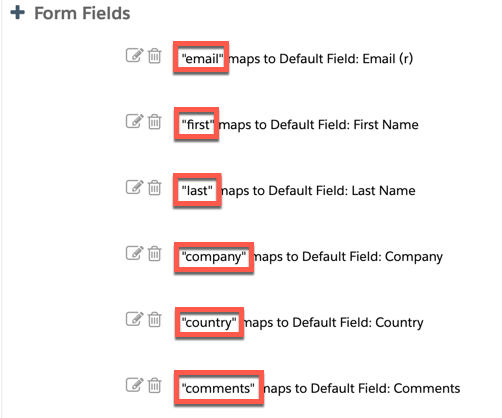
Here’s what the fields in my form handler look like.

Step 4: Update the settings in your Gravity Form

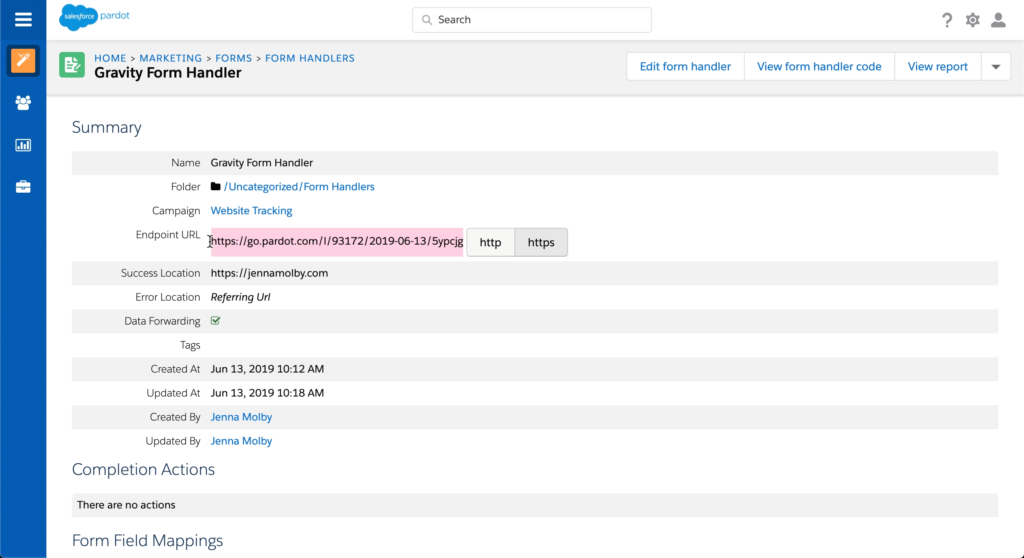
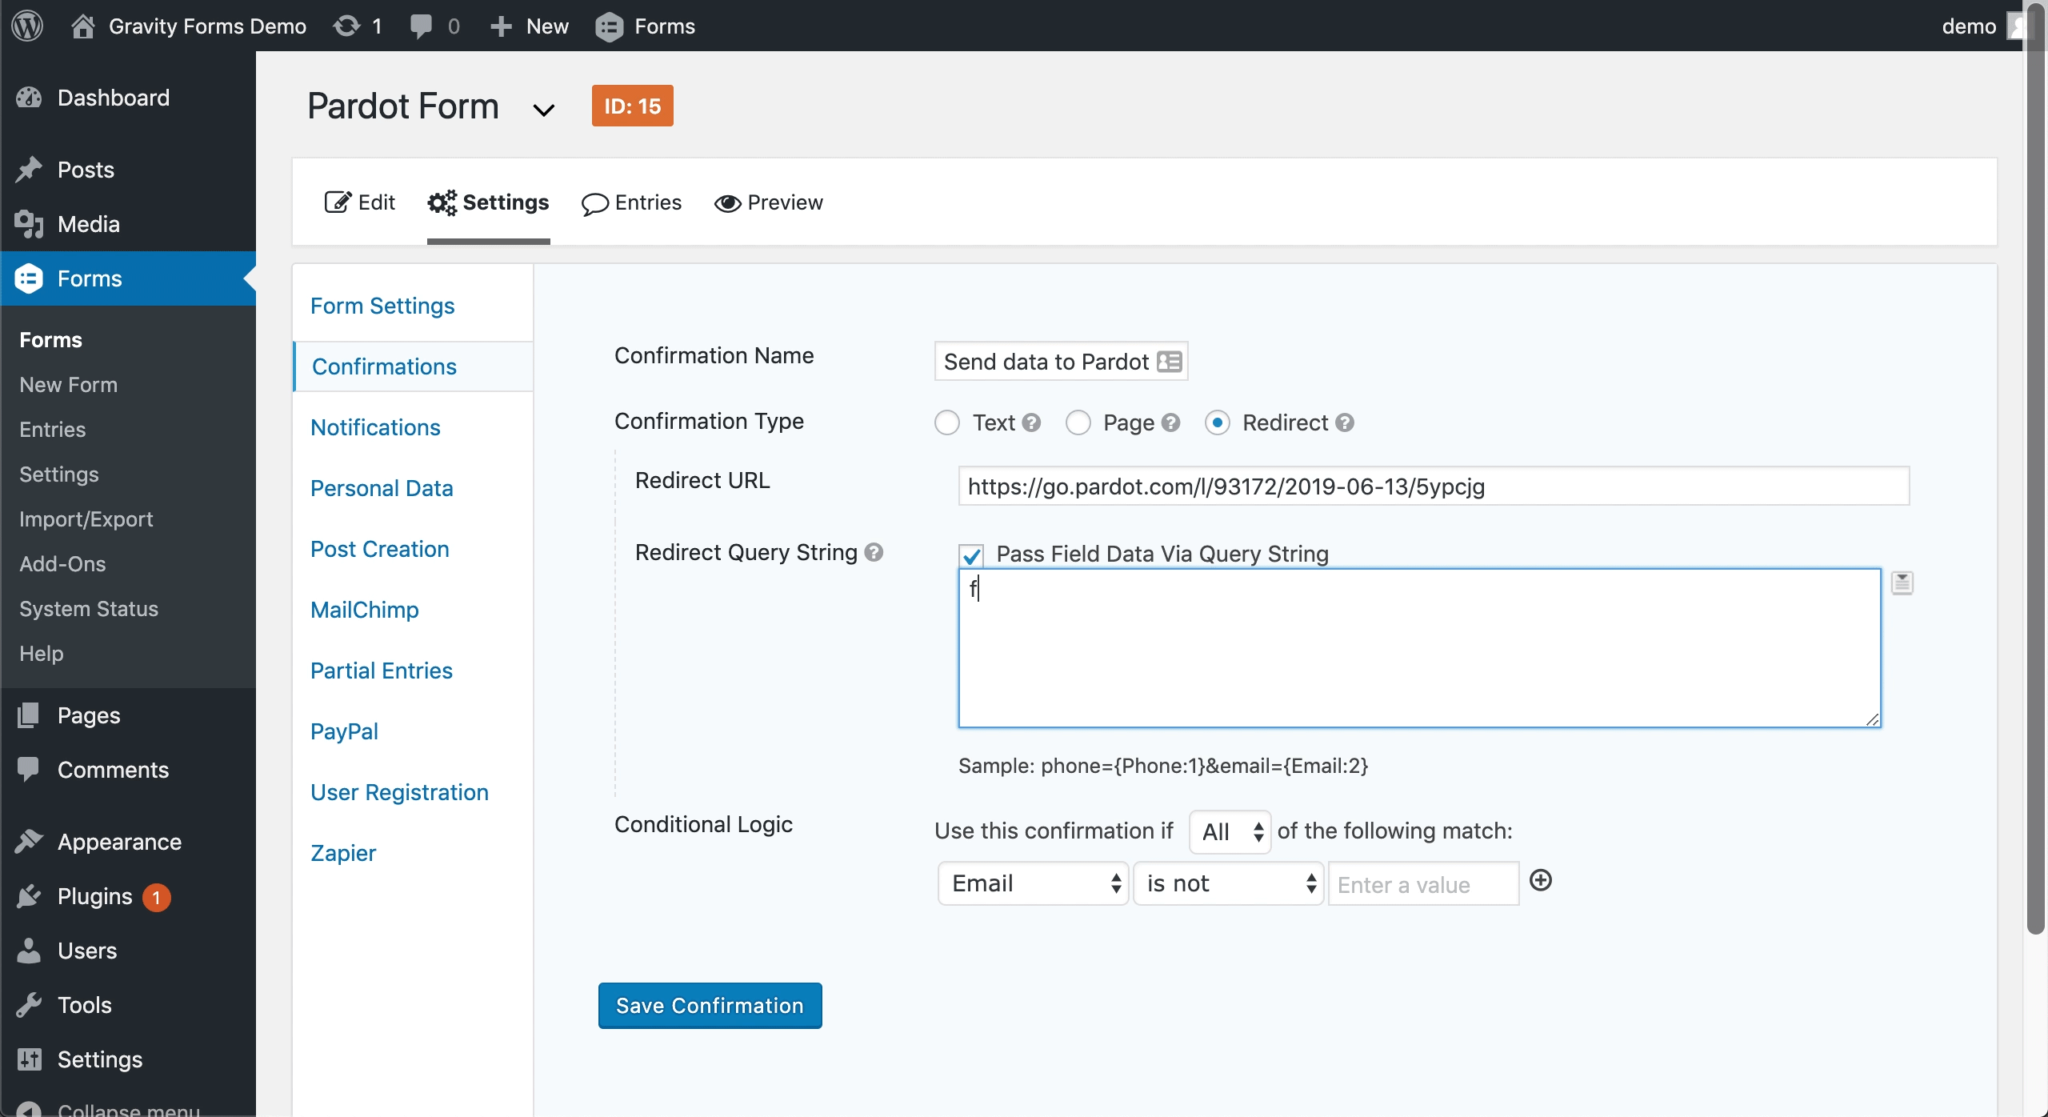
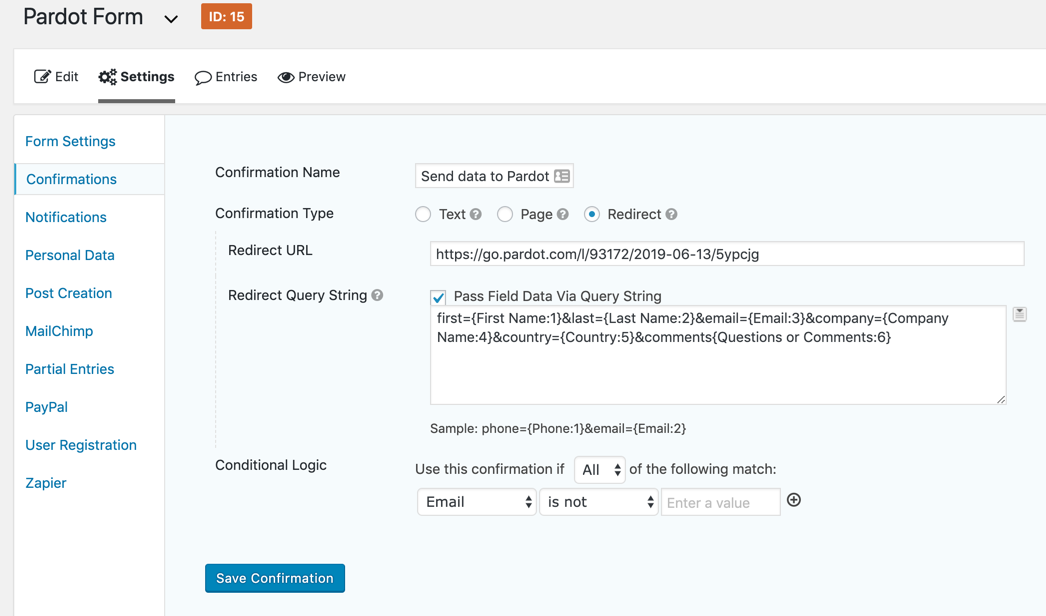
Navigate to your form within the Gravity Forms plugin and click on Settings > Confirmations > Add New. Give it a name and select the confirmation type as redirect. Copy & paste your form handler URL into the redirect URL box.

Now here comes the tricky part, in order for the data from the Gravity form to sync to Pardot, the fields need to be mapped. Select Pass Field Data Via Query String and a textarea will appear. This is where you will input the field names in your Pardot Form Handler and select the corresponding Gravity form field.

The syntax for this query string looks like this:

You can find the field names for your Pardot Form Handler, by editing your form handler and scrolling down to Form Fields.

You can find the field names for your Gravity form, by selecting the arrow that appears next to text box within your Gravity form settings.

The last setting you need to update is the conditional logic. I’m not sure why the Gravity form doesn’t give the option to remove the conditional logic completely, but for this part, you can select email is not empty.

Here’s what my settings look like all together.

Step 5: Test, Test, Test

Last but not least, test your Gravity form and make sure the data is going into Pardot.

Questions?

Send me a tweet @jennamolby, or contact the Sercante team for help.

No more posts to show