
Gravity Forms is one of the easiest tools to create advanced forms for your WordPress website and with some customization they can be integrated with Pardot. In this post, I will show you how to integrate Gravity Forms using Pardot Form Handlers.
Step 1: Create your Gravity form
The first step is to create your Gravity form. I won’t be diving into how to set up the Gravity form, but if you’re new to this WordPress plugin take a look at their product documentation to get started.
Step 2: Create your Pardot form handler
In Pardot, navigate to Marketing > Forms > Form Handlers and create a new form handler. Enter a name for the form handler, select your campaign and set your the rest of the settings to the following:
- Kiosk/Data Entry Mode: Do not cookie browser as submitted prospect should be UNCHECKED
- Enable data forwarding to the success location should be CHECKED
- Enable data forwarding to the success location should be CHECKED
- Disable Visitor Activity throttling and send auto-responder emails after every submission. Why disable throttling? should be UNCHECKED
- SUCCESS LOCATION should be the URL of your thank you page.
- ERROR LOCATION should be the referring URL.
Here’s a screenshot of the settings within my form handler.

Step 3: Add your fields
Next step is to add your form fields to your form handler. I recommend only making email address required. The validation for the other required fields will be handled via Gravity Forms.
Here’s what the fields in my form handler look like.
Step 4: Update the settings in your Gravity Form
Navigate to your form within the Gravity Forms plugin and click on Settings > Confirmations > Add New. Give it a name and select the confirmation type as redirect. Copy & paste your form handler URL into the redirect URL box.

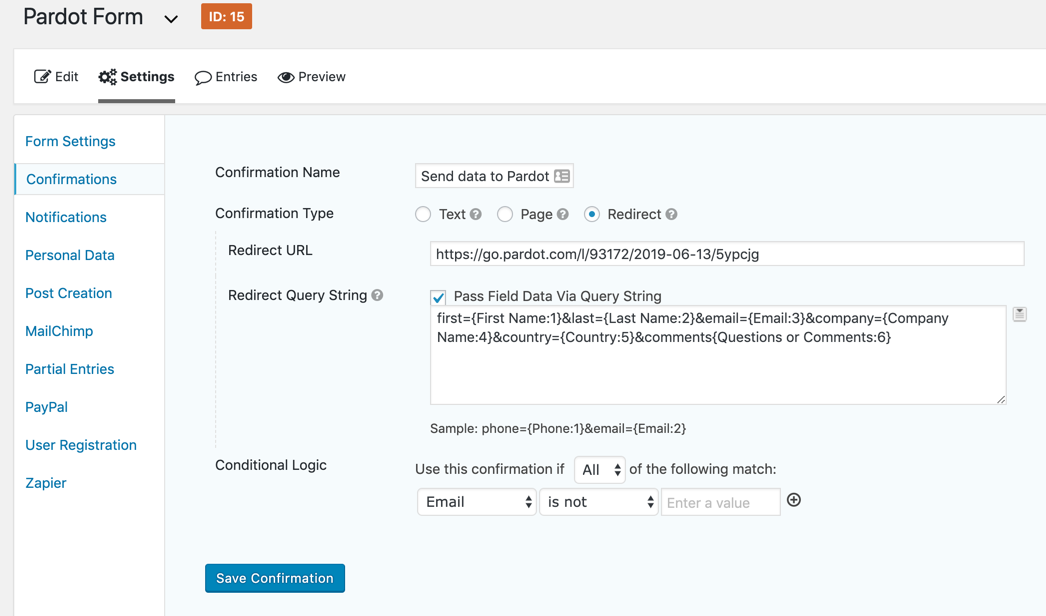
Now here comes the tricky part, in order for the data from the Gravity form to sync to Pardot, the fields need to be mapped. Select Pass Field Data Via Query String and a textarea will appear. This is where you will input the field names in your Pardot Form Handler and select the corresponding Gravity form field.
The syntax for this query string looks like this:

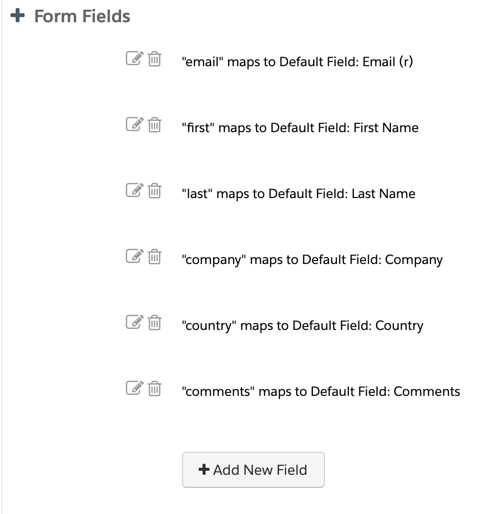
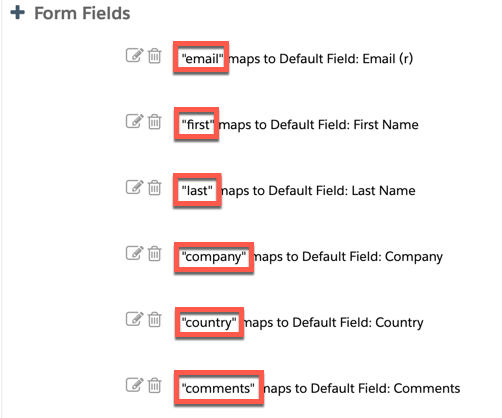
You can find the field names for your Pardot Form Handler, by editing your form handler and scrolling down to Form Fields.
You can find the field names for your Gravity form, by selecting the arrow that appears next to text box within your Gravity form settings.
The last setting you need to update is the conditional logic. I’m not sure why the Gravity form doesn’t give the option to remove the conditional logic completely, but for this part, you can select email is not empty.

Here’s what my settings look like all together.
Step 5: Test, Test, Test
Last but not least, test your Gravity form and make sure the data is going into Pardot.
Questions?
Send me a tweet @jennamolby, or contact the Sercante team for help.