Salesforce campaigns can help you track each of your marketing initiatives in detail. These can include online advertisements, emails, or more specialized marketing events such as demos and tradeshows. You can use campaigns to analyze how many leads you are generating, how much pipeline you are building, and how many deals are closing as a result of your marketing efforts. However, to track and analyze your Salesforce campaigns effectively, you need to have an organizational structure in place.
Whether you are setting up campaigns for the first time or looking for a way to get more out of campaigns, here are 7 tips to help you get started with your Salesforce campaign organization.
1. Have a naming convention
Have a standard campaign naming convention and stick with it. A good naming convention will make it easy for you to search for campaigns and make it easy for sales and marketing to get an idea on the campaign details at a glance.
Naming convention tips
- Include the date of the campaign launch or event
- Include a short description of the topic or the name of the webinar, asset, etc.
- If you have multiple regions, include the region
- Include the type of campaign (webinar, tradeshow, eBlast, etc)
Also, check out this blog post for a solution to automate Salesforce campaign naming conventions.
2. Narrow down your Salesforce campaign types
The Type field on campaigns defines the general types of campaigns you run. Standard values include Advertising, Direct Mail, Email, Telemarketing, Banner Ads, Seminar/Conference, Public Relations, Partners, Referral Program, and Other.
Campaign type tips
- Make a list of the types of campaigns your organization runs and modify the Type picklist to include only the values you need.
- Keep the total number of type values to no more than 10 and include general types of campaigns rather than specific types.
- Think about how you want to be able to report on your campaigns. Are you going to want to calculate a subtotal based on “Advertising” to determine the overall effectiveness of all advertisements rather than one particular subcategory?
- To report on specific campaign types, create subcategories using dependent picklists.
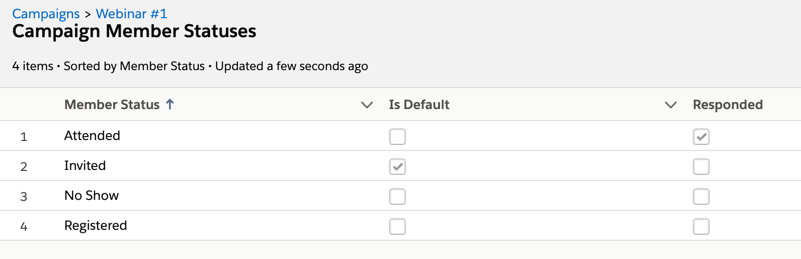
3. Standardize your member statuses
It’s important to remember to limit yourself and your org to one set of campaign member statuses for each type of campaign that you run. Member statuses are very useful for reporting on the response rate of your campaigns. But if different email campaigns use different statuses to indicate that the email was sent, it’s not easy to get a single report of how many emails have been sent for all your campaigns.
Salesforce Campaign member status examples
| Campaign Type | Campaign Member Statuses |
| Online Advertising | Clicked Converted |
| Email Blast | Sent Opened Clicked Unsubscribed |
| Tradeshow | Attended Registered Visited Booth No Show |
| Webinar | Registered Attended No Show Invited |
Pro tip: You can bulk edit/create campaign member statuses using Salesforce Data Loader.
4. Create custom fields
Custom fields can be used to enhance your campaign reporting. Are there ways you want to slice the campaign data based on values that aren’t in the standard fields? Here are examples of custom fields that might be useful to add to you campaigns:
- Region
- Product or solution
- Live date
- Landing page URL (for eBooks, white papers, webinars, etc)
- Buyer persona
- Expected pipeline
- Target number of MQLs
- Target number of leads
- Advertising partner
- Subtype
5. Have a campaign hierarchy
Creating a campaign hierarchy, will allow you to group your campaigns into categories that suit your business. There are a few different ways hierarchies can be applied to your marketing practice. Here are three common approaches to campaign hierarchy.
Three common approaches to campaign hierarchy
- Group campaigns by marketing strategy
The top level can represent an overall strategic focus, such as selling a new product, or building brand awareness. The second level can be for the different aspects of that focus, like the product launch or upselling previous customers. Finally, the third level can represent individual marketing efforts, like an email, an online ad, invitations to demos, or the demo itself.
- Group campaigns by time period
In this approach, the top level can be for the marketing efforts for the entire year, the second level can be for each fiscal quarter, and the third level for individual campaigns in each quarter. - Group by event, asset, webinar, etc
Use the first level for a large event, such as an annual conference. The second level can then be for supporting marketing efforts like the registration and emails.


Tips for selecting the campaign hierarchy
- Figure out how you want to report on the success of your campaigns.
- The top level of the hierarchy can be used to see the campaign metrics at-a-glance. Consider what metrics you would want to see there.
- Consider how custom fields can be used to track things such as product to figure out if this should play into the hierarchy or not.
- The hierarchy can have as many levels as she wants, but three levels work well for many companies.
6. Use campaign record types
Campaign record types can be used to track different detail for different kinds of marketing efforts. For example, you can have one record type for email campaigns and another for events, and so on. Your email campaign record type can include a field for the email template used, while the event record type can have a custom field for things like location, timing, equipment needed, etc.
7. Set up campaign influence
Campaign influence can be configured to automatically attach campaigns to opportunities. When the association is enabled influential campaigns are added to opportunities when a campaign is related to a contact that is assigned a contact role on the opportunity prior to the close date of the opportunity.
You can set up a campaign influence time frame that specified the maximum number of days between the campaign’s first associated date and the opportunity created date. For example, if you specify a Campaign Influence Time Frame of 15 days and one of your contacts becomes a member of a campaign on June 1, the campaign is considered influential to any opportunity that is created and associated with the contact by June 15. Use the association rules to configure additional criteria that campaigns must meet to be automatically associated to an opportunity.

Pro Tip: If you are a Pardot user you can also set up a Pardot Campaign Influence Attribution Model. you can learn more about Pardot and Salesforce connected campaigns in this blog post.
Questions?
Send me a tweet @jennamolby, or contact the Sercante team for help.