
If your company’s sales teams are organized by region, you’ve probably gone down a long and winding road as a Pardot admin, asking the question: How can I auto-magically assign Salesforce Leads based on a prospect’s location?
I say long and winding because, eventually, you’ll reach the conclusion that you have to get all those region, state, and country values into Pardot and organized…somehow.
The good news here is that after setting everything up the first time, you can use Pardot’s automation tools to do the heavy lifting from then on. Read on to see how you can use Pardot lists and automations to route Leads to the right salesperson based on prospect location data.
Forms, Lists & Lead Assignment – The Pardot Process
If you’re collecting location data in Pardot fields, you’re already in great shape. In a nutshell, you’ll use that data to build dynamic lists that sort prospects based on state, province (hey there Canada), and country information. As your leads convert on forms or through other methods, as long as the location fields are populating, prospects will be pulled into dynamic lists based on those location field values. You’ll then use those lists in automations to assign them to the right person.
This process has three simple steps:
- Update and standardize your forms
- Create dynamic lists
- Map out where prospects should go (person, team, queue, etc.)
Step 1 – Align Your Forms
As a first step, you’ll want to make sure all your forms use consistent fields and picklist values so your location data matches across platforms. For example, if you want to assign leads based on state, make sure you’re capturing a state value using a picklist with the same options on all your forms.
When it comes to forms, be aware that Salesforce and Pardot (or another marketing automation tool) could be revealing different picklist options to users. This is especially important for Lead routing because the process depends on good location data. If your data isn’t consistent across platforms, it could create pockets of Leads being routed improperly or not at all due to sync issues between tools. Make sure you audit picklist values and past location data before you set up any automation for Lead territory management in Pardot.
When you’re setting up form fields, it is highly recommended that you use picklist fields. This is the best way to ensure you have consistent data. If you’re currently using text fields in Pardot or Salesforce, then I suggest you change it to a dropdown by changing the field “Type”:

Next, navigate to the “Values” tab and prefill with Country values.
Note: You’ll need to make this update one-by-one on every form that uses the text field.
You can also make the update to use picklist country values at the global field level, but you will still need to update existing forms as the change will only impact new forms.
Step 2 – Create Your Lists
Once you have your forms set up with consistent location fields and picklist values, you’re ready to build out dynamic lists.
Here are some pointers before you begin building dynamic lists:
- When defining rules in Pardot, you must use semicolons to create a string of values
- There is a 250 character limit per row
- To give yourself the flexibility to make adjustments later, use rule groups so you can add more rules down the line
- To easily build dynamic lists without having to manually type in values, I recommend the Creuz Your Data App, which allows you to split values with commas or semicolons and with the right row limits for use in Pardot and Salesforce rule criteria.
Domestic Routing
In this domestic U.S. routing example, let’s say you want to route Leads from specific northeastern states. Here’s how you’d create the list:
Prospect Default Field – “State” – is – “Connecticut; Maine; Massachusetts; New Hampshire; New Jersey; New York; Vermont”
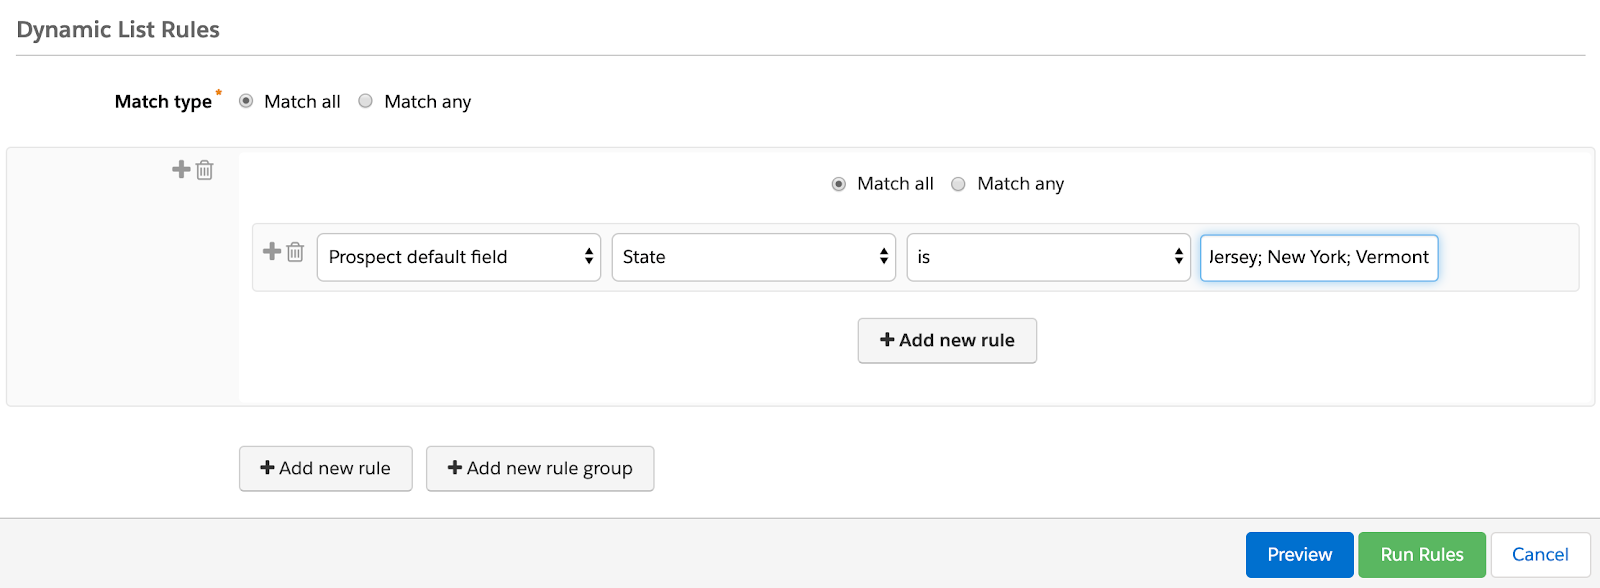
This will pull prospects with those Northeastern state values into the list.
Here’s a cheat sheet of all the US states broken out by the 250 character Pardot grouping size:
Alabama; Alaska; Arizona; Arkansas; California; Colorado; Connecticut; Delaware; Florida; Georgia; Hawaii; Idaho; Illinois; Indiana; Iowa; Kansas; Kentucky; Louisiana; Maine; Maryland; Massachusetts; Michigan; Minnesota; Mississippi; Missouri;
Montana; Nebraska; Nevada; New Hampshire; New Jersey; New Mexico; New York; North Carolina; North Dakota; Ohio; Oklahoma; Oregon; Pennsylvania; Rhode Island; South Carolina; South Dakota; Tennessee; Texas; Utah; Vermont; Virginia; Washington;
West Virginia; Wisconsin; Wyoming; American Samoa; District of Columbia; Guam; Marshall Islands; Puerto Rico; Virgin Islands;
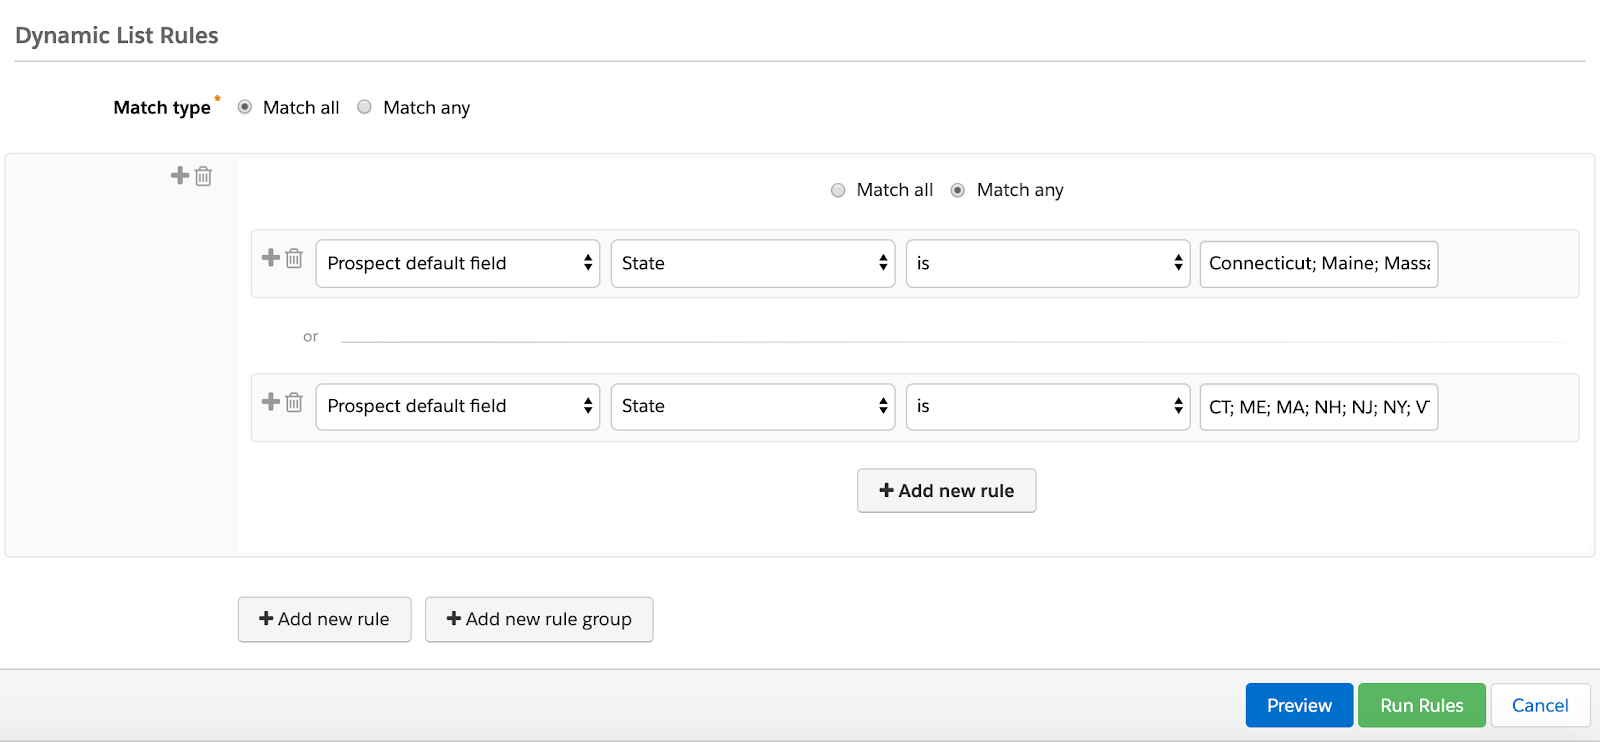
Alternatively, if Sales Cloud uses state abbreviations, you can also swap the full state names with abbreviated 2-letter codes or include them as an “or” rule in your list so you can collect either value.
Here’s how your list would look if you want to pull in either the full state name or the 2-code abbreviation for that Northeast example
For your reference, here’s a list of all 2-code U.S. state abbreviations.
AL; AK; AZ; AR; CA; CO; CT; DC; DE; FL; GA; HI; ID; IL; IN; IA; KS; KY; LA; ME; MD; MA; MI; MN; MS; MO; MT; NE; NV; NH; NJ; NM; NY; NC; ND; OH; OK; OR; PA; RI; SC; SD; TN; TX; UT; VT; VA; WA; WV; WI; WY;
Your list can also combine both full state name and 2-code abbreviation if you aren’t sure what data your integrations are collecting or if you have the Pardot auto-fill geolocation feature on (and want to fix it).
Global Routing by Region
If you’re a global organization, you may want to break out your list by global region or country. Here are some quick examples you could copy into Pardot.
North America Audience


United States; Canada;
LATAM Audience

Antigua and Barbuda; Argentina; Bahamas; Barbados; Belize; Bolivia; Brazil; Chile; Colombia; Costa Rica; Cuba; Dominican Republic; Dominica; Ecuador; El Salvador; Grenada; Guatemala; Guyana; Haiti; Honduras; Jamaica; Mexico;
Nicaragua; Panama; Paraguay; Peru; Santa Lucia; Federation of Saint Kitts and Nevis; Saint Vincent and the Grenadines; Suriname; Trinidad and Tobago; Uruguay; Venezuela;
EMEA Audience
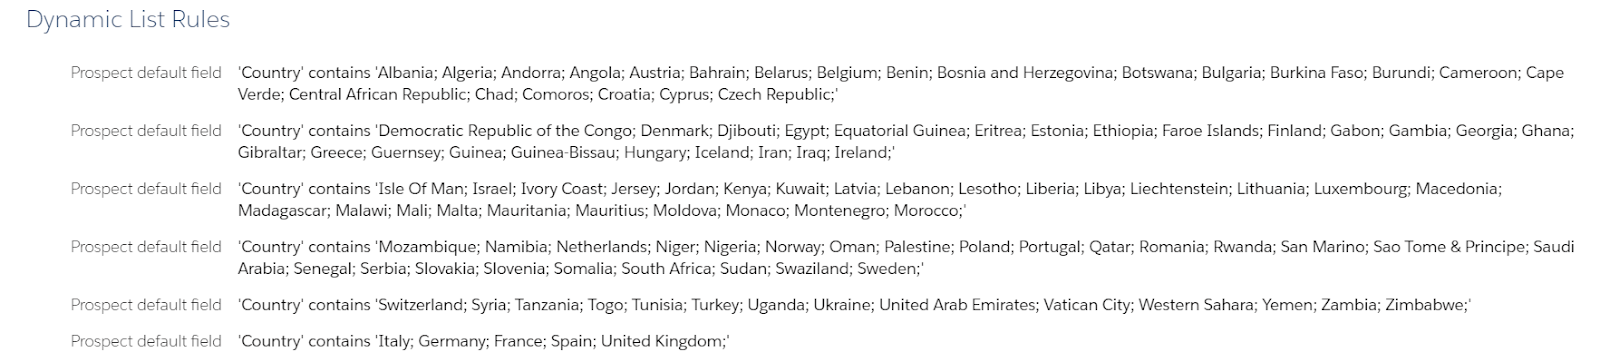
Italy; Germany; France; Spain; United Kingdom;
Albania; Algeria; Andorra; Angola; Austria; Bahrain; Belarus; Belgium; Benin; Bosnia and Herzegovina; Botswana; Bulgaria; Burkina Faso; Burundi; Cameroon; Cape Verde; Central African Republic; Chad; Comoros; Croatia; Cyprus; Czech Republic;
Democratic Republic of the Congo; Denmark; Djibouti; Egypt; Equatorial Guinea; Eritrea; Estonia; Ethiopia; Faroe Islands; Finland; Gabon; Gambia; Georgia; Ghana; Gibraltar; Greece; Guernsey; Guinea; Guinea-Bissau; Hungary; Iceland; Iran; Iraq; Ireland;
Isle Of Man; Israel; Ivory Coast; Jersey; Jordan; Kenya; Kuwait; Latvia; Lebanon; Lesotho; Liberia; Libya; Liechtenstein; Lithuania; Luxembourg; Macedonia; Madagascar; Malawi; Mali; Malta; Mauritania; Mauritius; Moldova; Monaco; Montenegro; Morocco;
Mozambique; Namibia; Netherlands; Niger; Nigeria; Norway; Oman; Palestine; Poland; Portugal; Qatar; Romania; Rwanda; San Marino; Sao Tome & Principe; Saudi Arabia; Senegal; Serbia; Slovakia; Slovenia; Somalia; South Africa; Sudan; Swaziland; Sweden;
Switzerland; Syria; Tanzania; Togo; Tunisia; Turkey; Uganda; Ukraine; United Arab Emirates; Vatican City; Western Sahara; Yemen; Zambia; Zimbabwe; Russia; Russian Federation;
You may notice there are several “Russian”, “Congo”, and other values that you may not see in Salesforce. This is because Salesforce and Pardot may label them differently depending on how you’ve set up the field.
APAC Audience

Afghanistan; Bangladesh; Bhutan; Brunei; Darussalam; Cambodia; Hong Kong; Macao; Cook Islands; Democratic People’s Republic of Korea; Fiji; India; Indonesia; Japan; Kiribati; Lao People’s Democratic Republic; Malaysia; Maldives;
Mongolia; Myanmar; Nauru; Nepal; New Zealand; Pakistan; Palau; Papua; New Guinea; Philippines; Republic of Korea; Samoa; Singapore; Solomon Islands;
Sri Lanka; South Korea; Korea; Taiwan; Thailand; Timor; Leste Tonga; Tuvalu; Vanuatu; Vietnam; China; Australia;
Unknown & Proxy

Country is empty; Country contains Anonymous Proxy
It is important to have this list to catch what may not be routed as you may not be collecting country data at all or one of your forms/integrations may not enable you to do so. This would result in a bunch of prospects staying in Pardot [forever] and never making it to the Sales team.
Note: If someone is using VPN you will likely get an “Anonymous Proxy” as the Country value.
Other Known Audience

This list will allow you to catch any additional Country data that you might not initially catch, identify patterns, decide how to manage them and avoid awkward encounters with prospects.
And, without further ado, let’s get into how you set up assignment through Pardot automations.
Step 3 – Automating Assignment
Now that your forms are consistent and your lists are segmented based on how you want to route your Leads, you’re ready to design automation rules or even engagement studios to automate sending your Leads to the right people. You might even choose to route your inbound Leads using this round robin set up in Pardot.
If you know who you want each list to go to, here are some options for automating their assignment.
Friendly reminder: Pardot respects the owner of the Lead or Contact in Salesforce first, and will not re-assign leads or contacts that have been previously assigned. These routing rules will only affect net new prospects or those who were never assigned.
Option 1: Automation Rules
Once you’re ready to create the automation rules, the set up is a cinch. Just use the dynamic list you created as the rule and the person, group, or queue you want to assign prospects from that list to as the action.
Automation rules are one of the faster automations in the Pardot universe. You can assign to a user, group of users (round robin), or Salesforce Queue and add additional criteria to ensure you are forwarding the right leads.
The downside to automation rules is that you can run into usage limits. Depending on how granular your lists are, you would have to run from four to 15 different automation rules.
Automation Rules can also make it hard to prioritize one over the other, so be aware, if one prospect could potentially match criteria from multiple lists, you won’t have control over which criteria is triggered first.
Option 2: Engagement Studio

Engagement Studios is one of the most versatile features in the Pardot platform, and although they are typically used for email nurturing, they can be used for other processes, like Lead assignment, as well.
For example, you can combine all of your lead routing, domestic and international, into one constantly-running ESP. This gives you one place in Pardot to manage all routing from, as opposed to several automation rules. ESPs also allow you to prioritize one rule over another (if someone matches criteria earlier in the program, they’ll be assigned the first time they match).
The downside to using an ESP is timing. They can be slower to start than automation rules, sometimes up to 10 minutes after a form conversion. As long as you take this wait time into account if you’re doing other automations based on Lead assignments, using an ESP is a great way to assign Leads.
And there you have it, Lead routing in Pardot. Give it a try and let us know what you think.
While Pardot can be a great place for Marketing to set up the Lead hand-off, there are a couple of alternatives to Lead routing you could use instead.
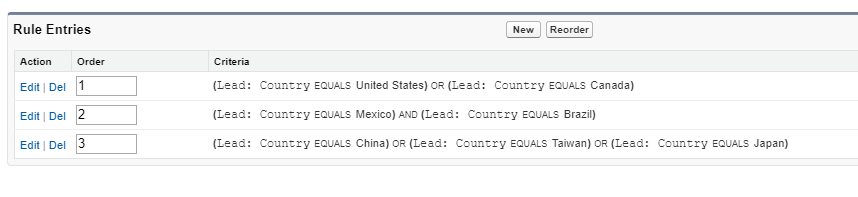
Alternative to Lead Routing in Pardot #1: Set Up Assignment Rules in Sales Cloud
Sometimes it’s just easier to set up your Lead routing rules in Sales Cloud. Queues and assignment rules can become great allies, especially if you need additional actions to happen upon assignment that can only be managed via Sales Cloud.
The cool thing about Salesforce assignment rules is that you can rank them and easily see the cascade of priorities (similar to an Engagement Studio Program).
Note: If you want additional actions, like field updates or task creation, you will likely need to develop a process builder.
Once you have assignment rules set up and activated, you can add the completion action “Assign via Salesforce active assignment rules” to Pardot’s forms and form handlers. This automation will essentially push people into Salesforce in a “waiting area” after which they’ll get assigned based on the Lead assignment criteria you created in Sales Cloud.
Alternative to Lead Routing in Pardot #2: Third Party Integrations
There are some great external solutions to support all business sizes and processes. Tools like Lean Data, Engagio, and RingLead can help solve lead routing issues without a lot of effort. In fact, many provide helpful training and resources to get you up to speed. Of course, there is an additional cost to these tools, but if you have complex requirements, investing in one may be worth the time savings.
Getting Your Lead Routing Machine Humming
Through the power of Pardot’s dynamic lists, automation, and a little forethought, you can set up a repeatable process for Lead assignment based on prospects’ location that will save your team a lot of time.
If this seems complicated, it isn’t. You just need a little patience, lots of testing, and a solid process on paper.
What are some creative ways you’ve set up Lead routing? Let us know in the comments.
Need a little help getting your Leads assigned to the right salespeople through Pardot or Salesforce? Give us a shout here.