Category

Mike Morris

You can keep your free snacks and ping pong tables. If we’ve learned one thing from the pandemic, it would be that employees really want the ability to work remotely — at least part of the time. While organizations have become more accepting of this new reality, IT departments are facing security challenges.  

In this post, we’re looking at Salesforce Marketing Cloud security best practices for hybrid and remote work environments. We’ll review some of the security settings in Marketing Cloud that will allow your remote employees to work safely and take some of the stress off of your IT team.

Marketing Cloud security for remote and hybrid work models

Since the onset of the pandemic, the number of remote workers has grown exponentially and the hybrid work model is becoming the new norm. A 2021 Mckinsey & Company survey found that 52% of workers prefer a more flexible working model moving forward. And listening to those wishes is helping many employers to avoid the effects of the Great Resignation at their companies.

Luckily, Marketing Cloud is built with security in mind and it can be configured to allow your employees to work securely — wherever they may be. 

Let’s take a look at some ways you can protect your data in addition to using multi-factor authentication (MFA).

Security Tip #1: Limit the Data in Salesforce Marketing Cloud

Salesforce Marketing Cloud is not a data warehouse. So don’t treat it like one. 

When bringing data into SFMC, ask yourself how it will be used for segmentation. If data will not be used for segmentation, don’t import or sync it over. Data like credit card numbers should NEVER be stored in Marketing Cloud.

Special attention also needs to be applied when handling Personally Identifiable Information (PII). The Department of Homeland Security defines PII as:

As any information that permits the identity of an individual to be directly or indirectly inferred, including any information that is linked or linkable to that individual, regardless of whether the individual is a U.S. citizen, lawful permanent resident, visitor to the U.S., or employee or contractor to the Department.

Linked PII is information that can be used by itself to identify an individual (ex. Social Security number) and linkable PII is information that can be used in combination with other information to identify an individual. Depending on the type of data in your account and the industries you serve, additional security measures like data at rest encryption, field level encryption and tokenized sending might be necessary.

Security Tip #2: Control Access with Marketing Cloud Business Units

Even before creating users, I like to see how organizations are structured. If your organization operates in several regions, all users might not need access to all the data. The best way to secure data is to not grant access to it in the first place!

This is where business units come in. Business units in Marketing Cloud allow you to control access to information by creating a hierarchical structure. They also allow you to control branding elements including email display name, email reply address, and physical mailing address at the business unit level. You can even control the settings to allow unsubscribe at the business unit level or the enterprise.
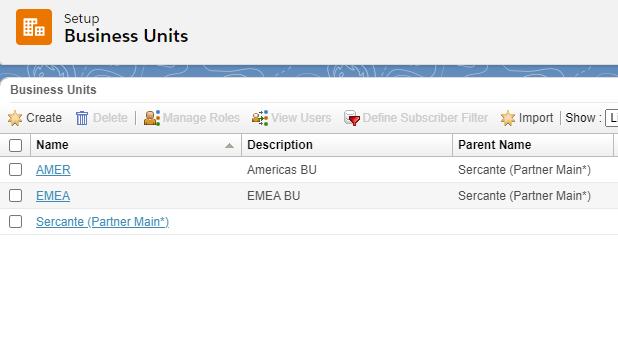

Business units don’t have to be limited to geography. Your hierarchy can be built based on your unique needs. Building a hierarchy based on products is a great use case.

Note: Business Units are available in Enterprise and Enterprise 2.0 accounts.


Security Tip #3: Provide Users with the Correct Access Based on Need

Now that we’ve established our hierarchy and determined where users should be included, the next question is access level. Let’s start by talking about the differences between roles and permissions.

  • Permissions are micro-level security.
  • Roles are macro-level security.
    • They are a collection of permissions.

Permissions in Marketing Cloud are very granular. For this reason, the good folks at Salesforce have included default roles within Marketing Cloud based on common needs/scenarios (similar concept to the default user roles in Pardot). These are divided into Marketing Cloud and Email Studio Roles. I would highly recommend using these roles and limiting the creation of custom roles.

Marketing Cloud RoleDescription
Marketing Cloud AdministratorThis role assigns Marketing Cloud roles to users and manages channels, apps, and tools.
Marketing Cloud ViewerThis role views cross-channel marketing activity results in Marketing Cloud.
Marketing Cloud Channel ManagerThis role creates and executes cross-channel interactive marketing campaigns and administers specific channels like Email Studio.
Marketing Cloud Security AdministratorThis role maintains security settings and manages user activity and alerts.
Marketing Cloud Content Editor/PublisherThis role creates and delivers messages through applicable channel apps.
Email Studio RoleDescription
AdministratorAccess to all Email Studio functions including Setup, email creating, and creating data extensions.
Content CreatorAccess to all content, shared folders, and tracking in Email Studio, but no access to data or administrative features.
Data ManagerAccess to everything in Email Studio except email content
AnalystAccess to tracking features in Email Studio.

Marketing Cloud Roles and Permissions

When assigning roles to users, you should always start with the lowest level that permits the individual to do their job. I’m always amazed when I log into an account for the first time and see all users have the Marketing Cloud Administrator and Administrator roles assigned. There’s simply no reason for this. I generally like to have two admins in an organization. It’s always good to have a backup in the event of an emergency!

It’s also worth noting that SFMC defaults to the most restrictive value when multiple roles are assigned to a user. For example, if a user was assigned the Content Creator, Marketing Cloud Channel Manager, and the Marketing Cloud Viewer roles, they would not be able to send an email. This is due to the fact that the Marketing Cloud Viewer is the most restrictive of the three roles and does not permit email sending.

It’s very possible that the same user will have access to multiple business units, but perform different functions in each. That’s perfectly fine and SFMC has you covered. Roles can be assigned at the business unit level so the same user could have admin access in one and view only in another. This is very handy and should be utilized if users don’t need full access to all the BUs that they are part of.

Security Tip #4: Follow Login and Password Best Practices

Marketing Cloud allows admins to set security policies very easily within the Security Setting under setup. However, I’m really surprised by how often I see accounts where the standard Salesforce recommendations are not followed. Take a minute to audit your account to ensure that they comply with the recommended account settings from Salesforce included below.

FieldRecommended Setting
Session Timeout20 minutes
Login Expires After Inactivity90 days or less
Invalid Logins Before Lockout3
Count Invalid Logins Across SessionsYes
Minimum Username Length8 characters
Minimum Password Length8 characters or more
Enforce Password History8 passwords remembered
User Passwords Expire In90 days
Send Password Change Confirmation EmailEnable
Enable Audit Logging Data CollectionEnable

Security Tip #5: Limit Logins by IP Address

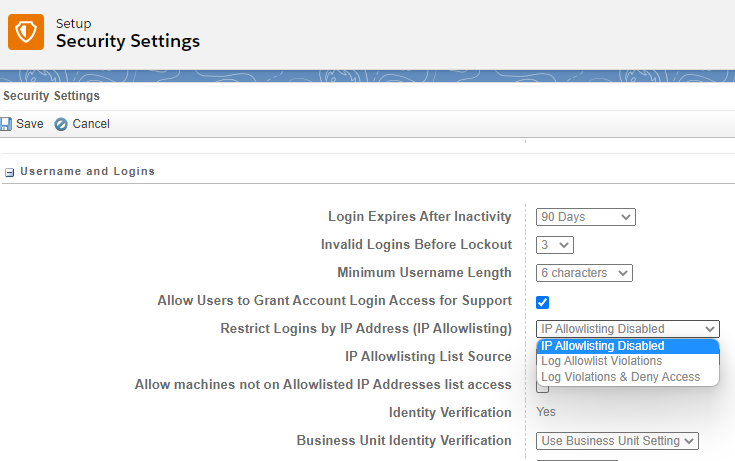
The Restrict Logins by IP Address (IP Allowlisting) setting allows you to define a list of IP addresses that can access your account.

This feature is optional and is set to Off by default, but can quickly be activated under Setup > Security Setting > Username and Logins. When activating, you’ll have the option to log non-allowed IP addresses and permit access or log non-allowed IP addresses and block access. Don’t forget to add IP addresses to your allowlist under Setup > Security > Login IP Allowlist if you choose to use this feature. 

Security Tip #6: Limit Exports

Ask yourself this simple question…

Does this user need to extract data from SFMC to do their job?

If the answer is “no,” then don’t allow them to export. It’s that easy!

Data extracts are a security risk that I see in most accounts. While data in the hands of a user can be risky, the real concern is data sitting on a computer that is not properly secured. Once the data leaves SFMC, all bets are off. This is a huge risk with remote workers. Let’s mitigate this risk by limiting exports.

Data can be exported from SFMC using Data Extract activities in Automation Studio, from tracking in Email Studio, and from reports in Analytics Studio. While some reports can be viewed onscreen or downloaded as PDFs, email and file transfer locations are the primary ways that data is exported. 

Email Export 

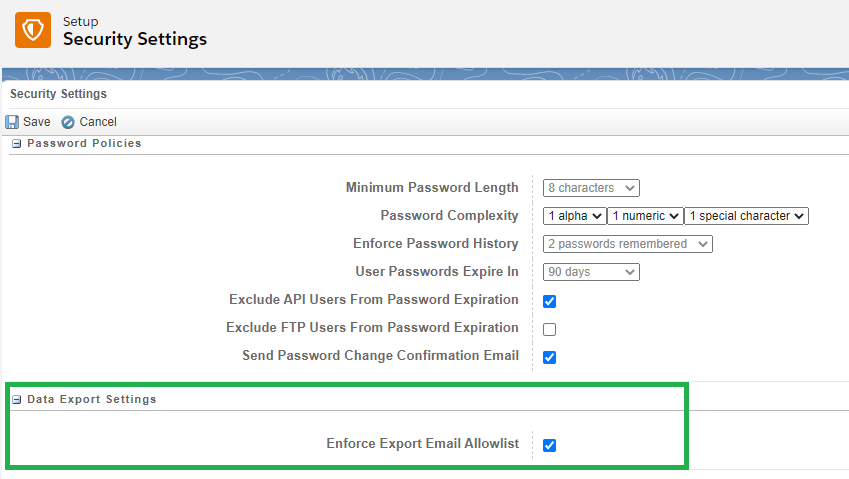
Your data is sent from SFMC via email. This is pretty scary, but can be controlled with Export Email Allowlists. The email allowlist includes individual email addresses or domains that are authorized to receive email exports from your account.

Export Email Allowlists must be activated in your SFMC account by first selecting the Enforce Export Allowlist in Security Setting. You will then need to specify the individual email addresses and domains that are authorized to receive email exports within your Export Email Allowlist (Setup > Security > Export Email Allowlist).
File Transfer Locations 

Marketing Cloud also makes use of file transfer locations to import and export data. The most common location is the Enhanced FTP Account, but you can also add additional locations under Setup > Administration > Data Management > File Locations.
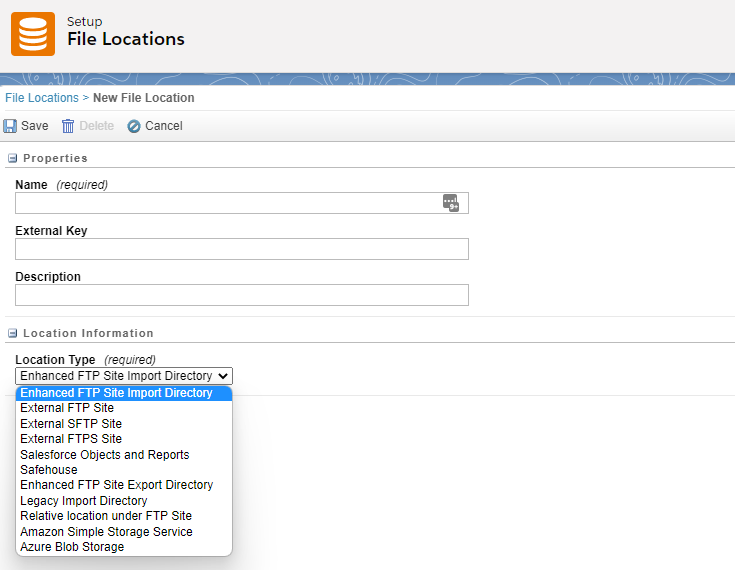
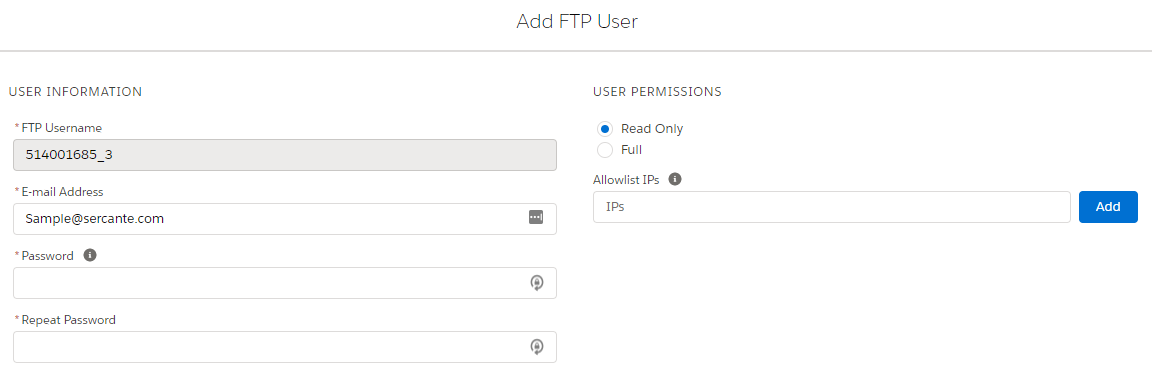
To access data from the Enhanced FTP Site, users must login. Access to the data can be controlled by limiting users and not sharing login credentials. Marketing Cloud allows up to 10 FTP users per MID, allocate them wisely! Users can be granted Read Only or Full access.
Security Tip #7: Automate and Review Audit Trails

Audit Trails in Marketing Cloud can be used to track account access and activity. Reports can be automated through Automation Studio or through REST API extracts.

Before audit trails can be exported, the following actions must be taken to enable them in your account.

  • Enable Audit Trail Data Collection under Setup > Security > Security Settings
  • Assign the Marketing Cloud Security Administrator role to the user who will be extracting the data

Once these requirements are met, automations can be created in Automation Studio to extract the access and activity logs. Salesforce recommends that audit trail data be retrieved periodically based on a rolling window.

There are a couple of things to keep in mind when creating your automations.

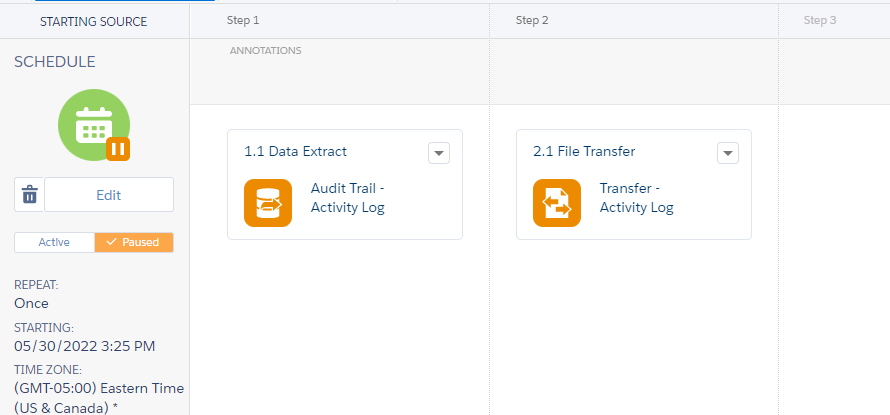
  • You must create a Data Extract activity and select the desired extract type (Audit Trail Access Log or Audit Trail Activity Log).
  • Data is extracted to the Marketing Cloud Safehouse, so a File Transfer activity is needed to securely transfer files to the FTP location of your choice.

The automation is pretty simple and will look like this when complete.
The Basic Audit Trails are a great place to start. They are included in your account and have a 30-day retention period. Advanced Audit Trails, which can be purchased for an additional fee, extend the retention period to 60-days and include additional data related to Email Studio, CloudPages, MobileConnect, and more. Learn more about Basic and Advanced Audit Trails. 

Take Action to Secure your Marketing Cloud account

This post includes some recommendations to help secure your Marketing Cloud account with the rise in remote workers. However, it is not inclusive of all the security capabilities of SFMC. 

For more information, check out the following Trailhead modules or post your questions in the comments section. We’re here to help you succeed with Marketing Cloud! You can contact us with any questions.

Passing the Salesforce Marketing Cloud Administrator exam demonstrates that you have the skills to configure and administer Marketing Cloud products using industry and product best practices. And having that distinction puts you in a position where employers will compete to welcome you to their team.

That’s because people with Marketing Cloud skills are among the most difficult to find and retain, according to research by 10K. Based on supply and demand, there are great opportunities for those who put in the time and energy to develop these skills.  

Use these tips to pass the Salesforce Marketing Cloud Administrator exam

There are a lot of Salesforce-approved exam prep resources available. So, we’re not going to dive too deeply into them (we’ll touch on them a bit in tip #3). 

This post will instead focus on eight tips that helped me pass the Marketing Cloud administrator exam — and I hope they will help you too.

Tip #1: Pregame with the Marketing Cloud Email Specialist Certification 

While there is not an official practice exam for the Salesforce Marketing Administrator exam, the Marketing Cloud Email Specialist Certification is a worthy stand-in. There’s a fair amount of crossover between the email specialist and administrator exams. Sure, the weights are different and the admin exam goes into more depth, but the overall concepts are similar.

There are different schools of thought as to the order in which the marketing cloud exams should be taken. But I firmly believe you should not take the Marketing Cloud Administrator exam until you’ve passed the specialist exam. It will ensure that you have a solid foundation in place and it will let you beef up your LinkedIn profile with another cool certification!

Tip #2: Setup is king in the Marketing Cloud admin exam

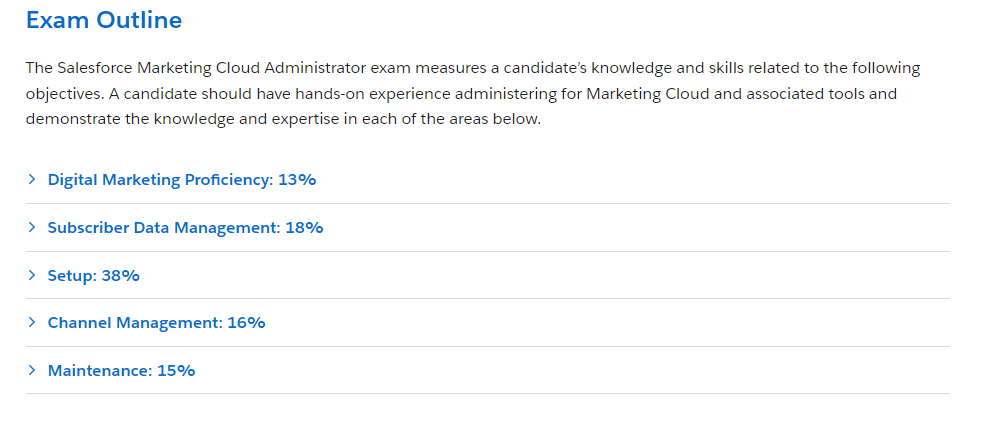
Setup is a whopping 38% percent of the Marketing Cloud Administrator exam. The next closest section is  Subscriber Data Management at 18%. This is basically make it or break it territory. Ace the Setup section, and you are well on your way to adding a new credential to your collection. 

With that said, I take a very methodical approach to exam preparation. I study the exam guide, make sure I understand the weight of each section, and then budget my study time accordingly. This may seem like common sense, but I see people stressing over sections with low weighting all too often.

Tip #3: Don’t trust the internet

We all know the policy about exam dumps and questions floating around on the internet. In short, don’t use them. If you have any questions about this topic, be sure to review the Salesforce Credential Code of Conduct.

Not only is the use of exam dumps and non-approved study materials in violation of the code of conduct, they are often wrong. The only thing worse than studying for hours is studying the wrong information for hours! 

Do yourself a favor (and the right thing) and stick to Salesforce-approved materials.

Here are Salesforce-approved resources I found to be helpful.

Tip #4: Focus on key Marketing Cloud terminology 

I’ve taken my share of Salesforce exams, and I would classify the Marketing Cloud Administrator Exam to be more straightforward than most. If you’ve taken any of the Salesforce Administrator certification exams, you’ve no doubt seen the scenario based questions that are about a paragraph long! 

The questions on the Marketing Cloud Administrator Exam are pretty simple and to the point. The point of confusion lies in the list of answers provided. Outside of a random term here and there, most are terms that you’ve seen in Marketing Cloud. This tends to lead to second guessing as you’ll be telling yourself “Yeh. I remember that one.”

 My advice is to create a list of key terms and know it like the back of your hand. These questions become VERY easy — if you know the terminology and can quickly eliminate the wrong answers.

Here’s a list of terms I made for myself. I compiled these from a variety of Salesforce-approved resources. This list is NOT inclusive of all the terms you’ll see on the exam. Use this as a starting point and add more terms based on your experience level with Marketing Cloud.

TermDefinition
Access LogList of non-allowlisted IP addresses and login names logged into Marketing Cloud accounts for network.
Audit TrailAllows security admin users to view Marketing Cloud access and activity records.
Burst SendingBurst Sending allows you to send emails fast. The audience is locked down and the emails are built when the schedule send time is set. Use this feature for flash sales or emergency messaging.
ContactIn Contact Builder, it is an individual added to any contact database. A contact is also any other individual to whom you sent a message via any channel using Marketing Cloud.
Contact IDA system defined, unique identifier representing a Contact.
Contact KeyA user defined attribute that is used as a unique identifier for the contact model, and other models (Journey Builder) except Email Studio.
Content DetectiveTool in Email Studio that will identify spam triggers in your email content. Scans the preheader, the subject line, the body copy for words, patterns, and phrases that it views as spam.
Delivery ProfilesSpecifies the delivery information for a message (Company, IP Address, Header and Footer).
Domain AllowlistTrust all email addresses within that domain to receive your data.
Export Email AllowlistIndividual email addresses that can receive exports via email from your Marketing Cloud account.
Identity VerificationRequires you to authenticate the browser or app used to access the application.
IP AllowlistRange of IP addresses who can access your account to prevent unauthorized logins.
Multi-factor AuthenticationAnother layer of protection so users must provide two factors when logging in.
Primary KeyA unique field on a data extension that identifies a specific and unique data point. Often this is the contact key, but it can be something unique to that data.
Reply Address DefinitionConfigure reply-to info like email display name, reply subdomain, and email reply address.
Reply RulesHow reply mail management identifies and responds to the replies that subscribers send.
Routing AddressEmail address that replies are sent to when the reply is not defined in the Reply Rules.
SafehouseDecrypt or encrypt files before import or extract without exposing these files to the Enhanced FTP directories. Only authenticated users can access the Safehouse, which resides on highly redundant, highly available central storage servers.
Send ClassificationComposed of Sender Profile, Delivery Profile, and CAN-SPAM classification
Sender Authentication Package (SAP)Purchased from Salesforce and includes a collection of products, including a private domain with link and image wrapping, a dedicated IP address, and reply mail management (RMM).
Sender ProfileSpecifies the From information for a send in a central location (from name).
SFTPA secure method for transferring data from one computer to another over the Internet.
SubscriberA person who opted in to receive communications from your organization.
Subscriber IDA system defined, unique identifier representing a Subscriber.
Subscriber KeyA user defined text field that contains a value that uniquely identifies a subscriber. Shouldn’t contain email addresses.
Tokenized SendingUsed to send contact data that is too sensitive to store in your Marketing Cloud account database. Instead of storing sensitive information in your Marketing Cloud account database, your account stores a single token per send attribute. Support must activate this feature.
Web Analytics Connector (WAC)Free feature that appends a ‘string’ to every Email Studio email link. Simply put, it adds data to the end of your links for tracking purposes. The string is typically used to add Google Analytics UTM Parameters, but it can really be used for anything you want.

Tip #5: The devil is in the details 

Pay attention to details when taking your exam, and be sure to read all options before selecting your answer. I noticed several questions on the exam that had several answers that were seemingly correct.

Here’s an example of what I’m talking about.

How would a Marketing Cloud Administrator add new users in EMEA to the correct business unit?

  1. Setup > Users > Edit Business Units
  2. Setup > Business Units > Manage Business Units
  3. Setup > Users > Manage Business Units

There are a couple things to note when looking at this question. The first is the navigation path. Can you add users to BUs under Business Units? Nope! This is where you would go to set up your business units. We can now cross answer B off the list.

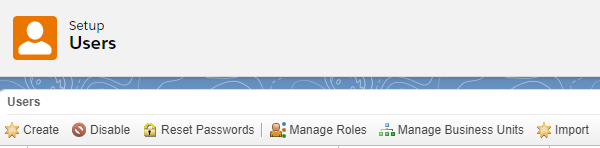
The second thing to note is the action referenced in the answer. “Edit Business Units” and “Manage Business Units” both sound correct, but you have to choose one. This is where paying attention to details is really important. Inside Marketing Cloud, “Manage” is the action that’s used to add users to business units (and roles).  


So the answer to our relatively straightforward looking question is “C”. You would add users to the EMEA business unit by navigating to Setup > Users > Manage Business Units

Tip #6: Pay attention to product names  — new and old

Salesforce recently updated the names of several products, and Marketing Cloud was impacted (Salesforce Name Changes: Pardot & Marketing Cloud Get A Rebrand). When I took the Marketing Cloud Administrator exam, these changes had not yet been integrated. I’m sure this will be addressed quickly in the next release, but it’s worth mentioning as every question counts! Don’t be too surprised if you see something like this.

The Marketing team would like to be able to pick the next best action based on real-time interaction data. Which Marketing Cloud add-on best addresses this purpose?

  1. Journey Builder
  2. Interaction Studio
  3. Automation Studio
  4. None of the above

So where’s Personalization? We all know that the correct answer is Marketing Cloud Personalization, but it’s not included in the list. The first instinct would be to select answer D “None of the above,” but that would be incorrect. 

The correct answer is B “Interaction Studio.” This was the name of that add-on at the time the exam was written. Be sure to know the new and old names — just in case!

Tip #7: Activate those Einstein features 

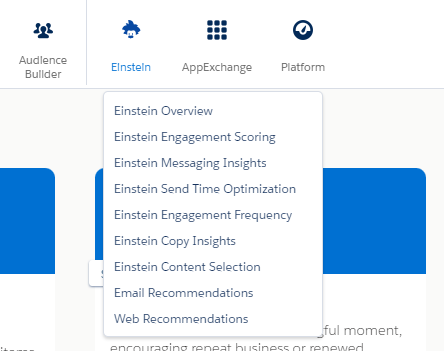
Salesforce is really excited about the Einstein features in Marketing Cloud (as they should be). A lot of time and effort has gone into enabling marketers with AI, and you are going to be asked about these features.

To make sure that you understand the capabilities of Einstein, activate ALL the features available in your account. I guarantee that you’ll learn something you didn’t know! 

Keep in mind that data is not instantly available in your account after activation. Depending on the feature, it could take 24 to 72 hours.

Tip #8: Get hands-on practice! 

This exam focuses a lot on how to DO things in Marketing Cloud. If you are anything like me, the best way to learn is by doing. There are a lot of great Trailhead modules on Marketing Cloud, but no hand-on challenges. It’s really easy to read the content and answer a couple of questions to get your badge, but did you really learn anything?

My advice is to make those modules hands-on. Login to your Marketing Cloud account and follow along. You don’t need to save all your work in your account, but the act of navigating to the correct sections and clicking the buttons will reinforce your learning. Sure, it’s going to take you a lot longer to complete the modules, but it’s not a race!

As I said  in tip #4, the devil is in the details. You are going to need to know how to navigate Marketing Cloud to pass this exam. If you don’t know your way around (very well), save your $200 and don’t take the exam until you have more hands-on experience.

You can do it — now go pass the Marketing Cloud admin exam!

I would not rate the Marketing Cloud Administrator Exam as one of the toughest Salesforce exams that I’ve taken (that honor goes to the Salesforce Advanced Administrator exam). But it should not be taken lightly.  

You’ll have 105 minutes to take the exam, which I found to be very generous. Don’t rush and take the time to read the question and all the answers before making your selection. With adequate preparation and a good amount of hands-on experience, you’ll pass this exam.

If you don’t pass on your first try, don’t be discouraged. Look at it as a learning opportunity. While exam results don’t show results by individual questions, the section level scoring is a great way to see your strengths and areas for improvement.

If you have any specific questions about the exam or just want to talk Marketing Cloud, drop a note in the comments section or hit me up on LinkedIn.

Good luck — you got this!

Twice in the span of less than a week, two different clients had questions or issues related to Salesforce campaign activation. I had my fair share of questions and assumptions about that little checkbox when I was in a marketing role and it seems like I’m not the only one. 

With the help of a very simple Salesforce flow (that we’ll build in this post), we can automate the Salesforce campaign activation (and deactivation) process for Marketing Cloud Account Engagement (formerly Pardot), and let the marketing folks get back to marketing!

What does that “active” checkbox even do?

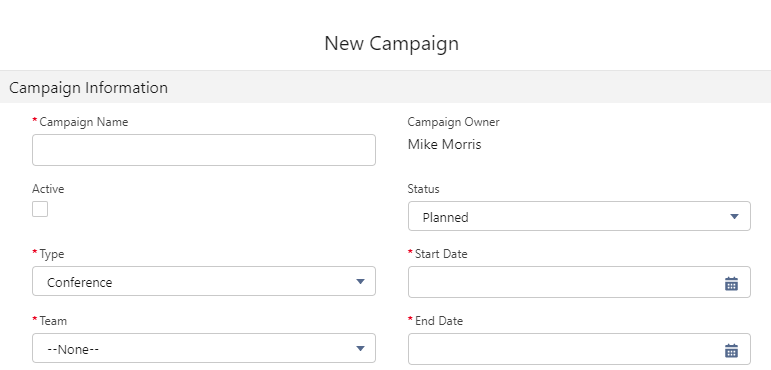
When creating a Salesforce campaign, we’ve all robotically checked that standard “Active” checkbox and never given it a second thought (because that’s what we were told to do). Well, for every good marketer who “checks the box,” there are plenty who don’t — and it does matter. 

Campaign activation implications in Marketing Cloud Account Engagement (Pardot) 

Just about all MCAE (Pardot) assets REQUIRE a campaign to be selected upon creation including: 

  • Custom redirects
  • Emails
  • Forms
  • Form handlers

When the Active box is checked, you’ll be able to see your campaign and correctly associate it with your MCAE (Pardot) asset. If it’s not checked, then you are out of luck!

Additionally, imports into MCAE (Pardot) also require a campaign and play by the same rules. And completion actions? You guessed it. Only active campaigns can be selected and used.

Campaign deactivation implications in Marketing Cloud Account Engagement (Pardot) 

Scrolling through long lists of campaigns in MCAE (Pardot) is not one of my favorite things. Deactivating campaigns helps by limiting visibility and shortening lists.

However, deactivating a campaign will NOT remove associations to assets that were made when the campaign was active.

If there’s an Add to CRM Campaign completion action set, it will continue to add members after the campaign has been deactivated. However, you will not be able to create new completion actions that reference the deactivated campaign.

I thought that box was automatically checked

I’ve been there too! Seems like a logical assumption. 

If you’re going to ask me for the campaign start date and end date, then why the hell don’t you put it to use! 

We’re going to do just that with a simple flow.

Enter Salesforce Flows

For MCAE (Pardot) Admins, think of Flow Builder as the Salesforce equivalent of Engagement Studio. With Flow Builder, just about anything in Salesforce can be automated using a graphical user interface and no code. 

For Salesforce Admins, you should be getting comfortable with flow as Salesforce is retiring Workflow Rules and Process Builder at the end of 2022.

Let’s build our Flow to automate Salesforce campaign activation

Prerequisite Requirements 

Before we start building, we need to ensure that we have all the necessary data to power the flow. Take a moment to look at your campaign page layout and make sure the following fields are present and required. 

  • Start Date (Make required)
  • End Date (Make required)

We recommend you build and test your flow in a Sandbox environment. After testing and validation, deploy to production.

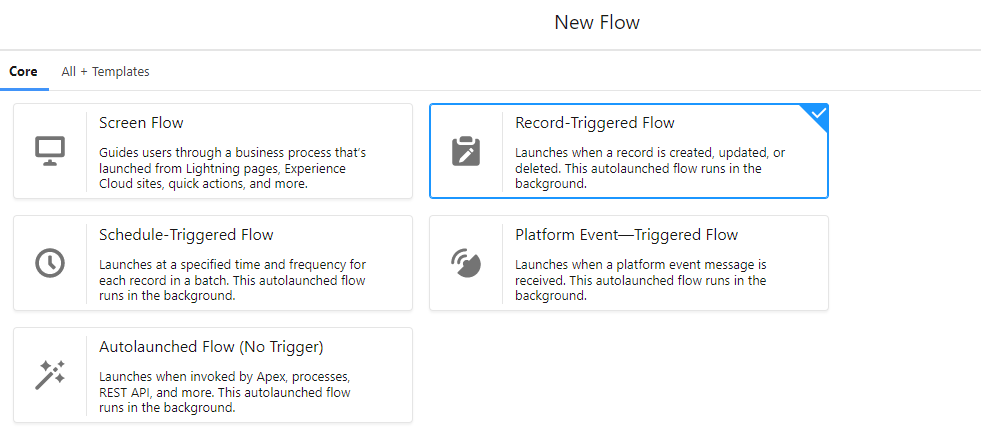
Step 1: Create a new Salesforce Flow 

We will be using a Record-Triggered Flow for this use case. The flow will launch when a record is created, updated, or deleted.


Step 2: Configure start 

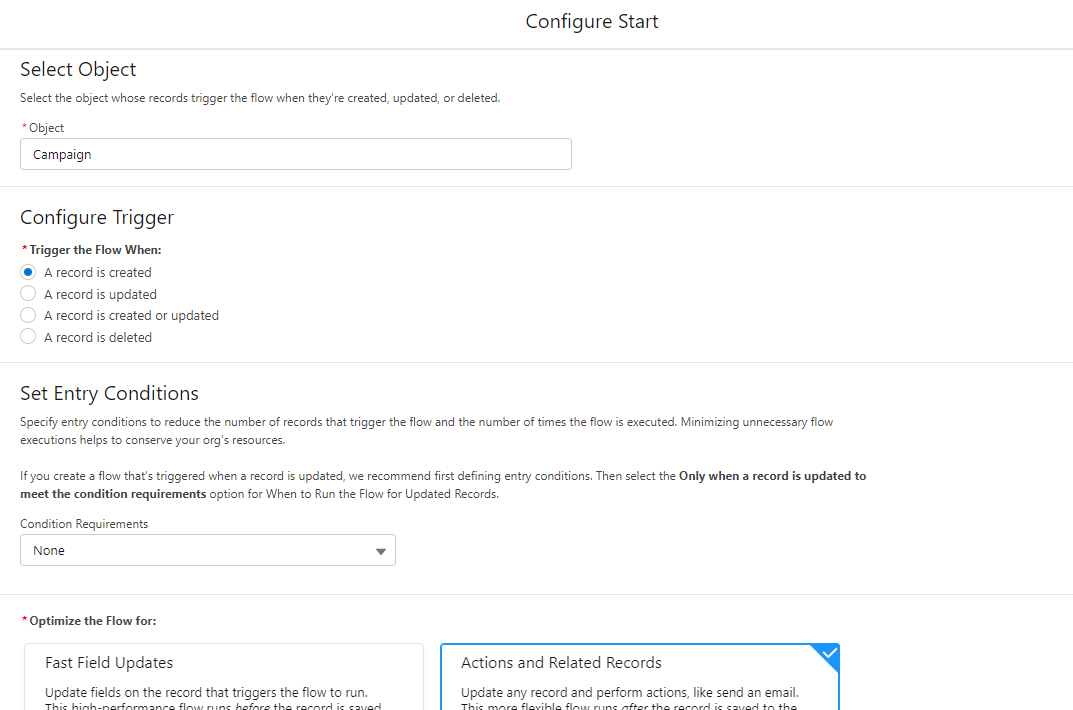
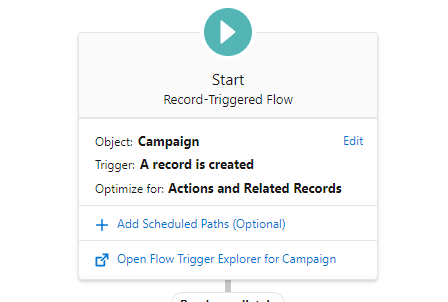
In this step, you’ll be selecting the object and configuring the trigger. We’ll be using the Campaign object in this example and we’ll be triggering the flow when a record is created. 

We won’t be adding any entry conditions, but you might want to based on how your organization is set up. For example, you could set the Flow to only trigger for marketing record types.


Step 3: Configure the immediate path

We’ll be using two paths in this flow. We’re going to address the first path in this step and we’ll tackle the second path later.

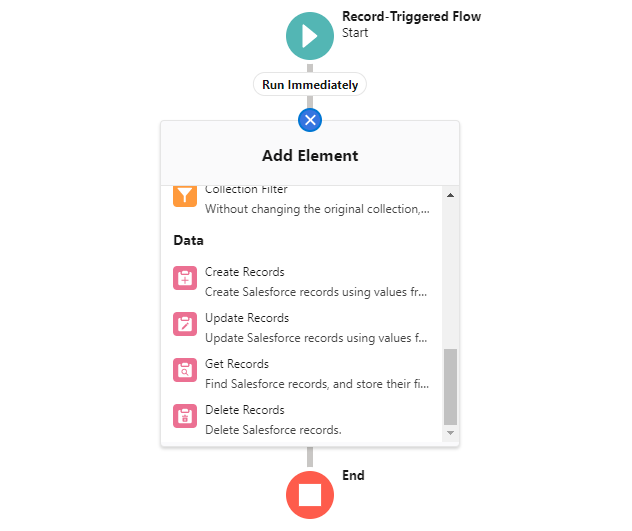
The first path will run immediately (hence the “Run Immediately”) label. All we need this path to do is check the active box once our campaign is created. 

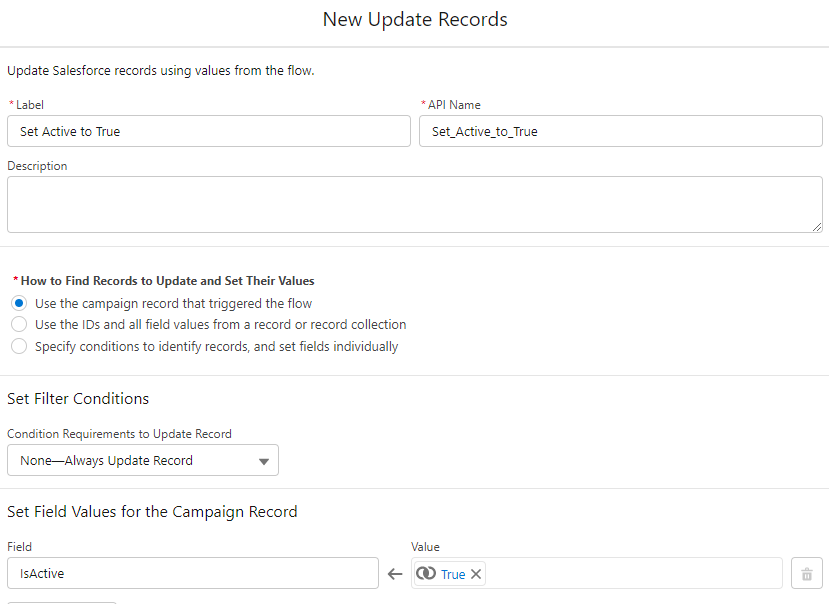
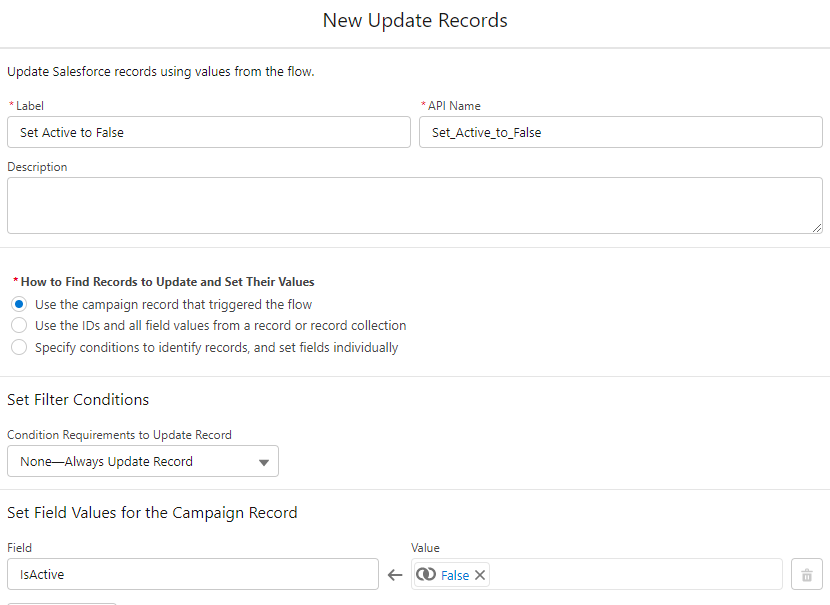
To do this, we’ll be using the Update Records element. Add this by clicking the + sign under the Run Immediately label and selecting Update Records.

You’ll then want to add a descriptive label and set the field values. In this case, a good label is “Set Active to True.” 

The field that we’ll be updating is the IsActive field. Since this is a checkbox, we’ll be using the $GlobalConstant.True to “check the box.”

Step 4: Configure the second path

To add a second path to your flow, select the “Add Scheduled Paths” option. If you don’t see this, you’ll need to click on the “Start” trigger to open the editing section.

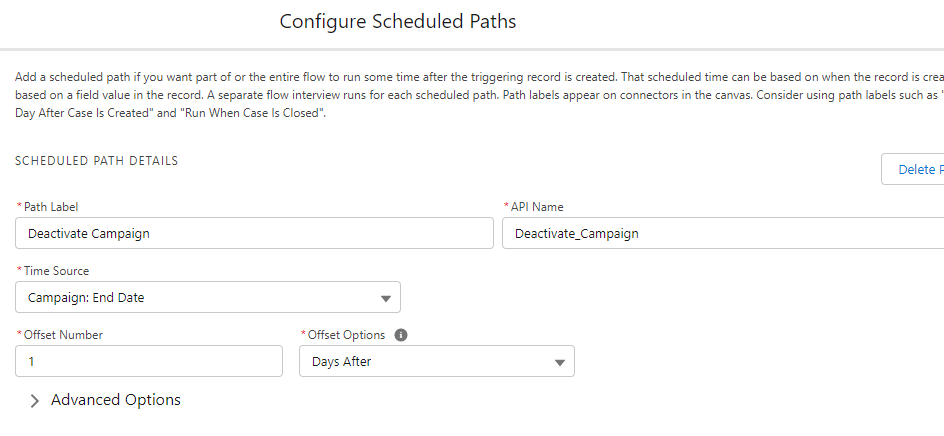
After adding the scheduled path, we’ll need to configure it. Below are the key elements:

  • Path Label – Name/description of the path
  • Time Source – The time element that will trigger the path
  • Offset Number – The length of the delay
  • Offset Option – Specify the measure of time (minutes, hours, or days) and if the path should activate before or after the Time Source

In this example, the scheduled path will run one day after the campaign end date. If you would prefer to have your campaigns visible for a longer period of time, you can increase the Offset Number.

After configuring our scheduled path, we’ll need to add another Update Records element. This will look very familiar from the Run Immediately path. The only difference is that we will be using the $GlobalConstant.False value to uncheck the Active box.


Step 5: Save, Activate and Test

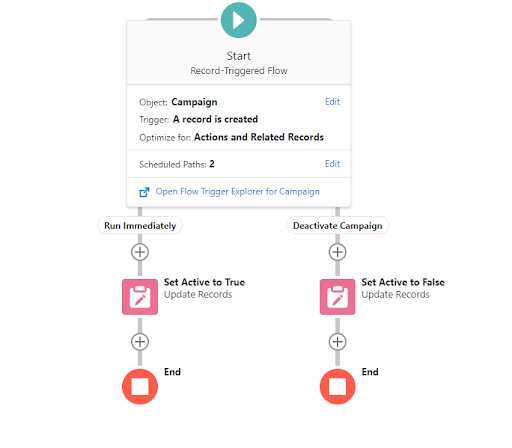
Your flow should look like the image below at this point. 

If you are anything like me, you don’t want to sit around waiting days to see if your flow works as expected. To speed up your testing, simply update the setting in your scheduled path. 

You can set the Time Source to Campaign: Created Date, Offset Number to 5, and Offset Options to Minutes After. With this configuration, your campaign will be deactivated 5 minutes after it’s created.

You can test your flow by creating a campaign (be sure the flow has been saved and activated), verifying that the Active box has been checked, and then checking the campaign again in 5 minutes to confirm that the Active box has been unchecked.

Once your testing is complete, don’t forget to update your scheduled path options back to the original settings.

Step 6: Deploy to Production

Once your flow has been tested, deploy to production using a change set, and sit back and relax! 

Full Salesforce campaign management

The flow we built today was very basic and served a single purpose — to automate the activation of campaigns. However, it does not need to end there. 

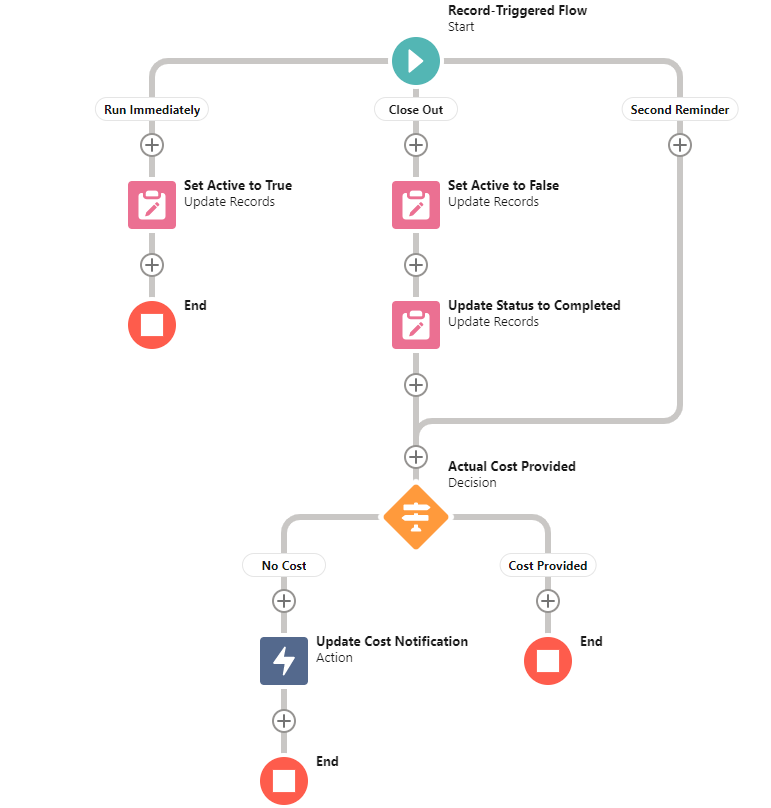
This flow can be enhanced to automatically update campaigns to “Completed” when they end and to send reminder emails to the campaign owner if they fail to enter the Actual Cost in Campaign.

Automate your Salesforce campaigns with Flow 

Campaign management does not need to be manual. And it’s an essential piece when reporting on your efforts as a marketer. With the help of a simple Salesforce Flow, automation can be used to simplify the process and make things easier for your marketing team. 

If you have questions about the simple flow detailed in this post or would like to look under the hood of the full campaign management solution, drop us a note in the comments section or reach out to the team at Sercante.

A common theme that I’m hearing from clients is the need to show demonstrated ROI related to their marketing initiatives. Sound like anybody you know?

I recently posted about the importance of auto-association and the role that it plays in properly attributing opportunities to the campaigns (What Successful Marketers Know About Salesforce Auto-Association). While this is a critical element in the accuracy of your reports, it does not magically solve all your reporting needs.

That’s where the wizards at Secante Labs come in.

The team at Sercante has a free Campaign Influence Starter Pack, which does, in fact, magically solve your marketing reporting needs.

OK — it’s not magic, it’s a lot of hard work by some really smart people. And it will likely require customization to fit your processes and data… but it’s a place to start.

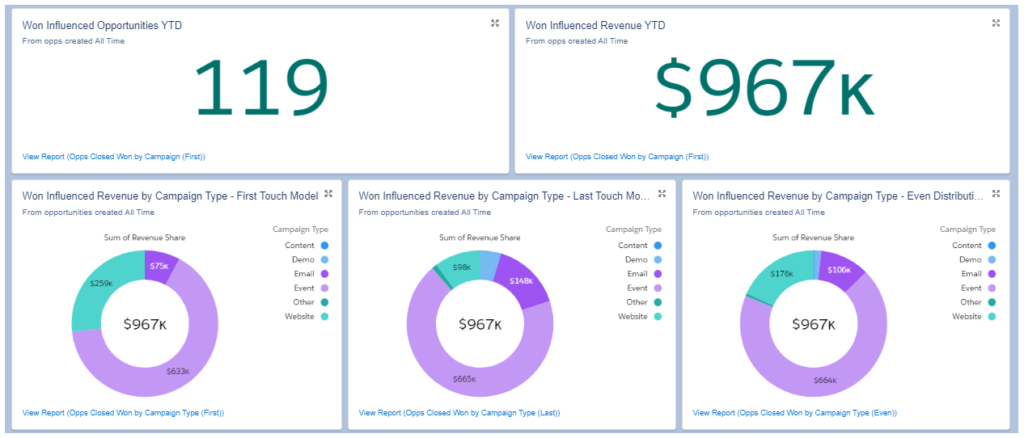
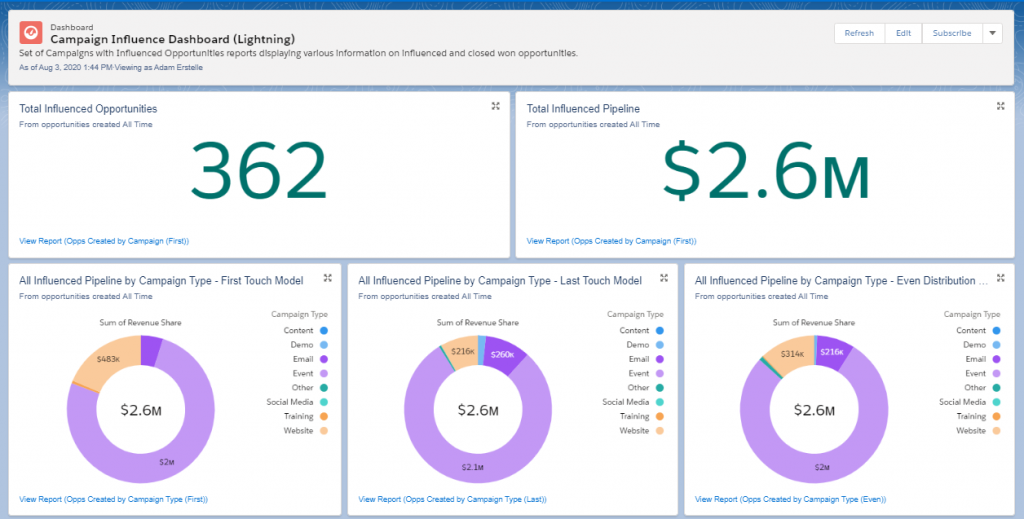
Once installed in your Salesforce org, the Campaign Influence Starter pack will generate a series of reports and a campaign influence dashboard that can be used to show just how awesome you are!

The core components of the Campaign Influence Starter Pack include

  • Total Influenced Opportunities
  • Total Influenced Pipeline
  • All Influenced Pipeline by Campaign Type (First Touch, Last Touch, and Even Distribution Models)
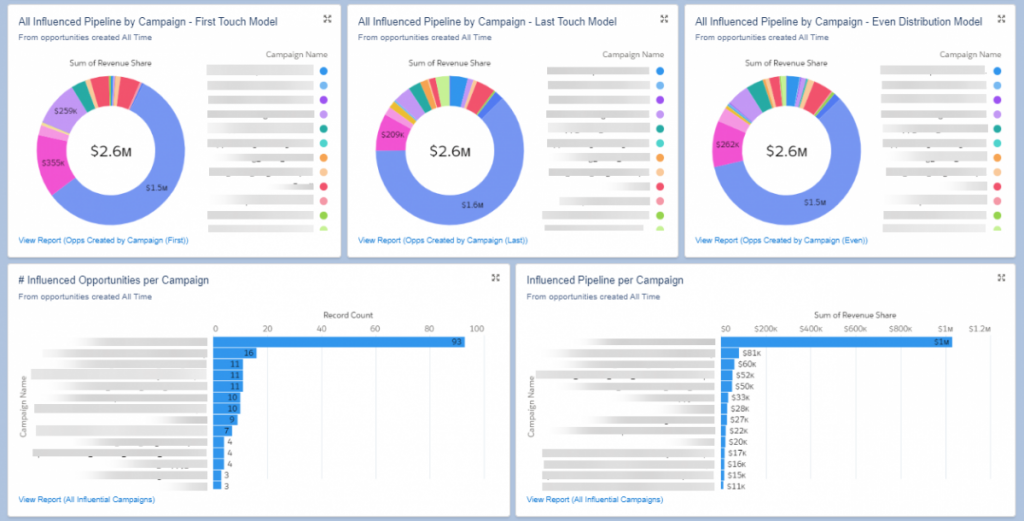
  • All Influenced Pipeline by Campaign (First Touch, Last Touch, and Even Distribution Models)
  • # Influenced Opportunities per Campaign
  • Influenced Pipeline per Campaign
  • Won Influenced Opportunities YTD
  • Won Influenced Revenue YTD
  • Won Influenced Pipeline by Campaign Type (First Touch, Last Touch, and Even Distribution Models)
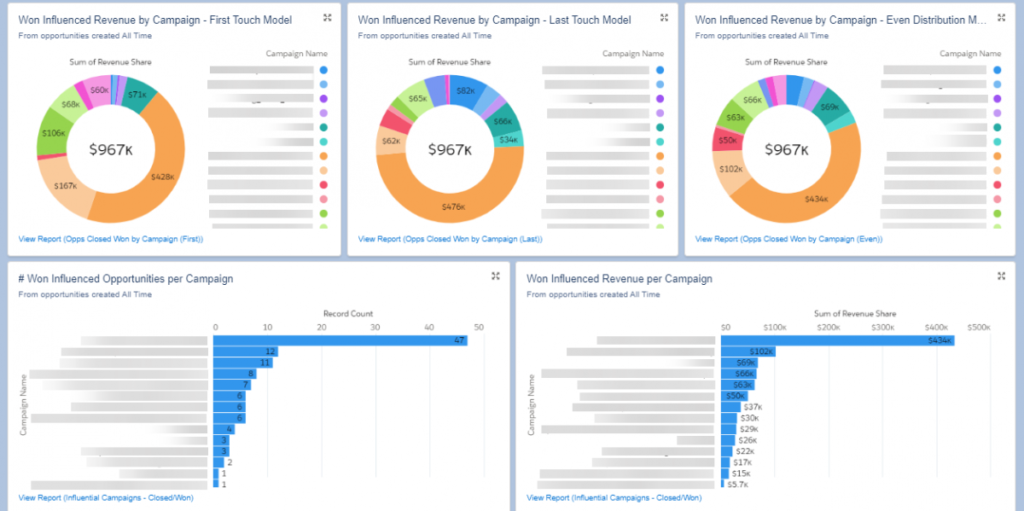
  • Won Influenced Pipeline by Campaign (First Touch, Last Touch, and Even Distribution Models)
  • # Won Influenced Opportunities per Campaign
  • Won Influenced Pipeline per Campaign

A look at the actual dashboards…

Quick note… if you are not using Salesforce Lightning, here’s your excuse to upgrade! The images above are actual samples from the Campaign Influence Starter Pack installed in Lightning. We do offer a Classic version — but the overall reporting and dashboard capabilities are far superior in Lightning.

How to download the Campaign Influence Starter Pack

The best thing about the Campaign Influence Starter Pack is the price.

We know the importance of showing demonstrated ROI, so this product is available for free. We offer two install options:

1. Self Service

Just download from GitHub and install in your org. Request the details and download link on the bottom of this page.

2. Guided Setup

If you’re a GitHub newbie and/or would appreciate someone riding shotgun on your install, fill out the request form on our website or email [email protected].

A word on data

Secante Labs can deliver a great looking dashboard with powerful reports, but your data is at the core. “Garbage in, garbage out” definitely applies here.

One of the most common data issues that we see is missing contact roles on opportunities. Remember — contact roles are needed to connect opportunities to your campaigns. No contact role, no revenue. If your sales team uses the New button to create opportunities directly from the opportunities app, I can all but guarantee that you have missing contact roles. 

Fortunately, the team at Secante Labs has you covered there too. Be sure to check out our Automated Opportunity Contact Roles app in the appexchange. This app with get you the data that you need and save your sales team precious time by automatically associating contacts to their opportunities.

More on Pardot reporting

Let us know what you think of the Campaign Influence Starter Pack. Is it helpful? Are there reports and visualizations you’d like to see added to the next version? Let us know in the comments!

(And, of course, if you need a bit more than the starter pack can offer, the team at Sercante is here for you. We can help you set up Connected Campaigns & Campaign Influence Reporting — all the way from data clean-up to building ROI reports. Ping me at [email protected] if you’d like to discuss.)

BY MIKE MORRIS

What you don’t know about auto-association could be completely ruining your campaign influence reports in Salesforce. 

Let that sink in. 

Now that I have your attention, let’s talk about this auto-association thing.  (more…)

Let’s start by saying that if you’re not using scoring categories in Pardot, you probably should be.

If you offer more than one solution or service or have multiple topics represented on your website, scoring categories are for you. These little gems allow you to break down your total score and identify your prospects’ specific areas of interest. This is huge when it comes to tailoring your marketing messaging and directing your sales team’s efforts.

To get started with scoring categories, check out Erin Duncan’s post: Pardot Scoring Category Basics: What, How & Why.

Another super cool feature in Pardot that you may not be utilizing is Handlebars Merge Language (HML). HML, rolled out in August 2019, expands the personalization capabilities of Pardot well beyond Pardot Merge Language (PML) and introduces the ability to use conditional statements (among other capabilities). (more…)

No more posts to show