Category

Scoring & Grading

Scores in Marketing Cloud Account Engagement play a critical role in getting the right lead to the right person at the right time. However, scores can become unreliable and actually distract sales if they are not periodically decayed. In this post, we’ll address the importance of score decay and provide several methods that can be used in your organization. 


A Primer on Scoring

Before we get into score decay, let’s level set on Account Engagement scores. Account Engagement scores are a measure of calculating engagement with your account engagement assets. Prospects with higher scores have had greater engagement and are therefore more sales-ready.

Base Scoring

All Account Engagement accounts come with base scoring rules configured. These rules add and subtract points for actions like email opens, form submissions, page views, link clicks, and more and are intended to be a starting point. It’s highly recommended that you customize these rules based on your organizational needs and conduct periodic reviews to ensure that prospects are not scoring up too slowly or too quickly. 

Review Your Scoring Rules 

Account Engagement Settings > Automation Settings > Scoring

Additional Scoring

Scores can also be increased in Account Engagement manually at the prospect level, using automations (automation rules, completion actions, and engagement studio programs), or in bulk when importing prospects into Account Engagement (by mapping to “Add to Score”).
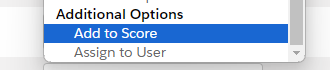
Suggested Reading 

If you want to learn more about scoring and grading, check out the following posts:

The Importance of Score Decay

Time is possibly the most important consideration that influences the quality of leads.

Think of leads as fresh-baked cookies. Who doesn’t want a chocolate chip cookie hot out of the oven? Those same cookies are still pretty good after they’ve cooled a bit, but they get a bit stale after sitting around for a few days. The same applies to your leads.

It’s important to make sure the hot leads get to sales as quickly as possible and that they are easy to identify. Let’s say that 100 points is your threshold for passing a lead to sales. Which lead would you want to call?

  • “Roy” has a score of 150, but his last engagement was 30 days ago.
  • “Katie” has a score of 101, but engaged today and passed the 100-point mark as a result.

It’s pretty clear that “Katie” is the better lead in this scenario, but we have all the facts. The reality is that your sales team has a lot of leads assigned to them and they don’t have time to learn the story behind each. It’s very possible that sales could prioritize “Roy” over “Katie” based on score alone. This would be logical, but incorrect. We can take the guesswork out of this situation by applying score decay so that “Roy’s” score falls below the 100-point threshold based on his inactivity.

Score Decay Methods

There are two primary ways that scores can be decayed –  Activity Based Decay and User Based Decay.

  • Activity Based Decay is based on activity (or inactivity in Account Engagement). This method simply decays scores to a set value (or reduces by a set amount) based on the last activity date of the prospect. 
  • User Based Decay is score decay that’s triggered by internal Salesforce users based on updates to the contact or lead record. This could be actions like updating the status or any other field.  

Activity-Based Decay

Activity-Based Decay is very simple to implement but requires a few decisions to be made in advance.

  •  When should a lead be decayed?
  • By how much should the score be decayed?

The “when” question differs greatly between organizations and is often related to the length of sales cycles. Organizations with longer sales cycles tend to tolerate longer periods of inactivity while those that are more “transactional” in nature tend to decay scores quicker.

The decay amount is also based on the organization and its scoring model, but I can offer some guidance and best practices based on experience.

  • Tip #1 – Don’t decay all the way to 0. I like to keep some points associated with the prospect as an indicator of past engagement. As a starting point, I would recommend decaying by 50% of your threshold for passing leads to sales. If 100 is your threshold, decay to 50. 
  • Tip #2 – Decay to a set number vs. by a specific amount. Scores in Account Engagement continue to increase over time – if measures are not taken. It’s not uncommon to see some older prospects with very high point values. As an example, if a prospect has a score of 275 and you reduce by 50 points, you still have a lead with a score of 225 points who has not been active in an extended period of time. This really does not help at all. My recommendation is to reduce it to a set value so you can be assured that the lead drops off the radar or your sales team – until new engagement is recorded.

Implementing Activity-Based Decay

  1. Create an automation rule in Account Engagement with a descriptive name.
    • Example: Score Decay – Last Activity > 45 Days Ago
  2. Make use of the “Description” section to summarize what actions the rule will take and when.
    • Example: Decays scores that are greater than 50 to 50 if the last activity is greater than 45 days ago. 
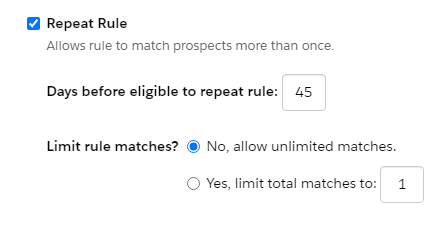
  3. Set the rule to repeat and specify the number of days before eligible to repeat.
  1. Configure the rules and actions.
    • The example below is very simple, but you can add additional rules as needed. For example, you can omit records that have open opportunities or are being worked by sales so their scores are not decayed.
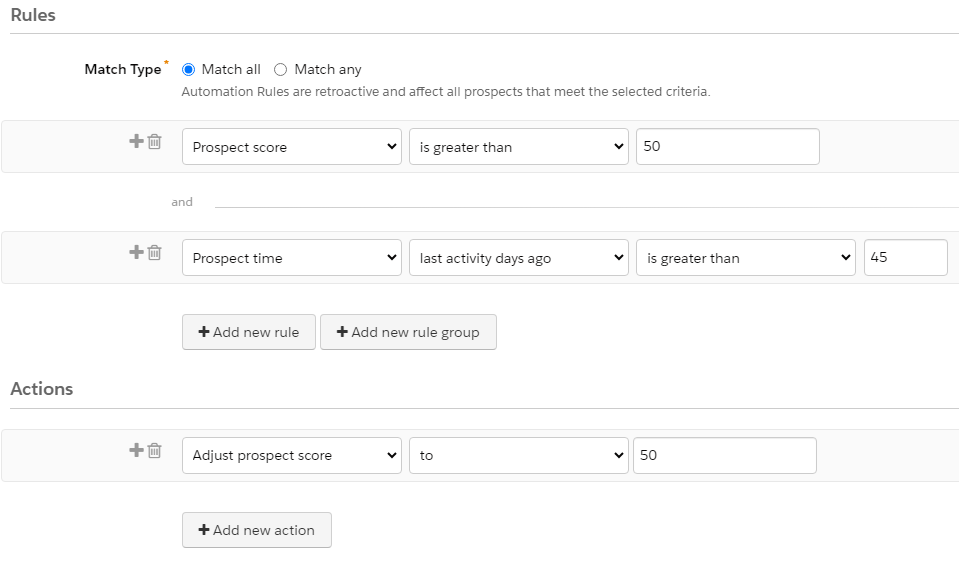
  1. Since this rule will be altering the scores of prospects, be sure to preview the matches before activating. Also, be sure to review all automations in Account Engagement and Salesforce that could be triggered as a result of score adjustments.
     

User-Based Decay

Account Engagement scores are intended as an indicator of engagement within Account Engagement. Since scores can only be changed in Account Engagement, decaying scores based on actions taken in Salesforce requires a bit of ingenuity and a “handshake” between the platforms. The goal is to tell Account Engagement to decrease the score based on an action that occurred in Salesforce.

In this example, we are going to use flows and custom fields to trigger score decay in Account Engagement from Salesforce. I like this option due to the ability to easily set the criteria that triggers the action and the fact that code is not required.

Scenario

Scores should be decayed to 50 if the status is changed to “Nurture” by a user in Salesforce.

Implementing User-Based Decay

  1. Create “Trigger Score Decay” custom fields on the contact and lead objects in Salesforce.
    • Data type = Checkbox
    • Default value = Unchecked
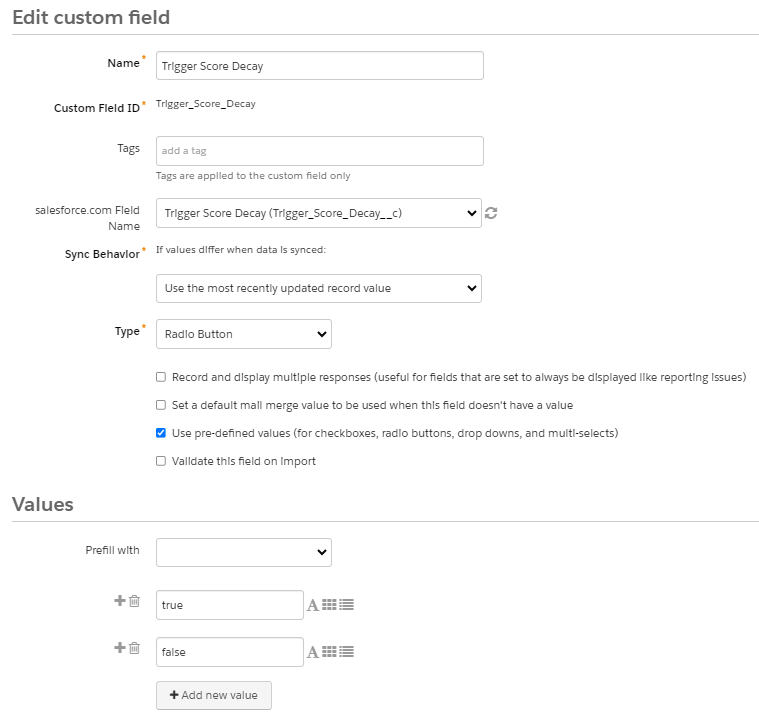
  2. Create a “Trigger Score Decay” custom field in Account Engagement.
    • Type = Radio Button
    • Sync behavior = Use the most recently updated record value
    • Values (these are case sensitive)
      • true
      • false
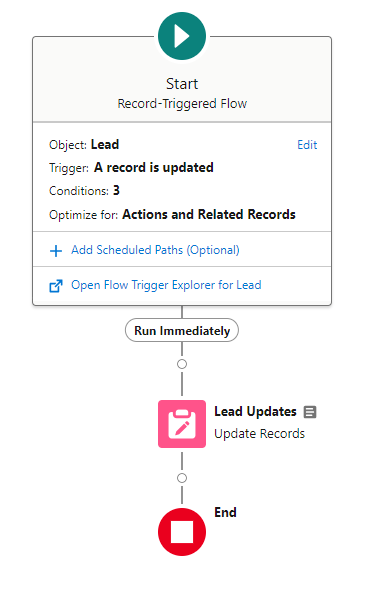
  1. Create flows on the contact and lead objects to update the “Trigger Score Decay” checkbox based on the defined entry criteria. This is a straightforward flow that uses a single element to update a checkbox field. The checkbox will later be used to trigger an automation rule in Account Engagement.

Full Flow

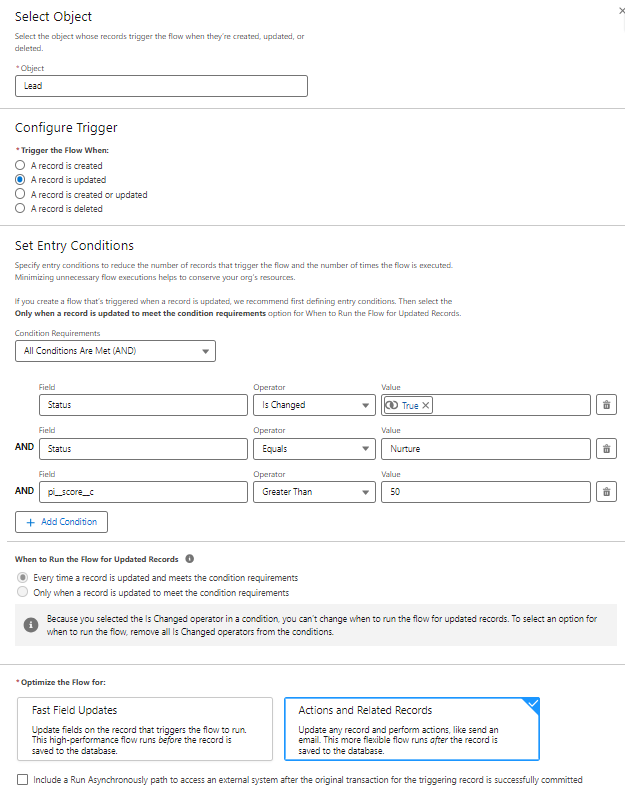
Entry Conditions Configuration

Update Triggering Records Element

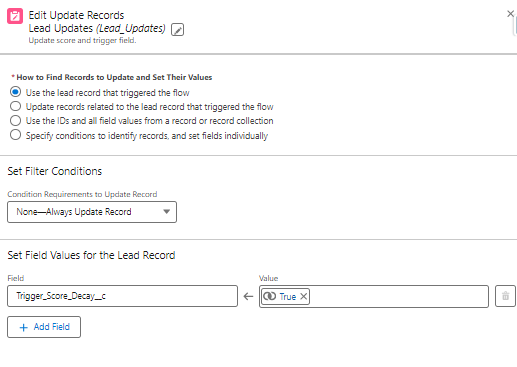
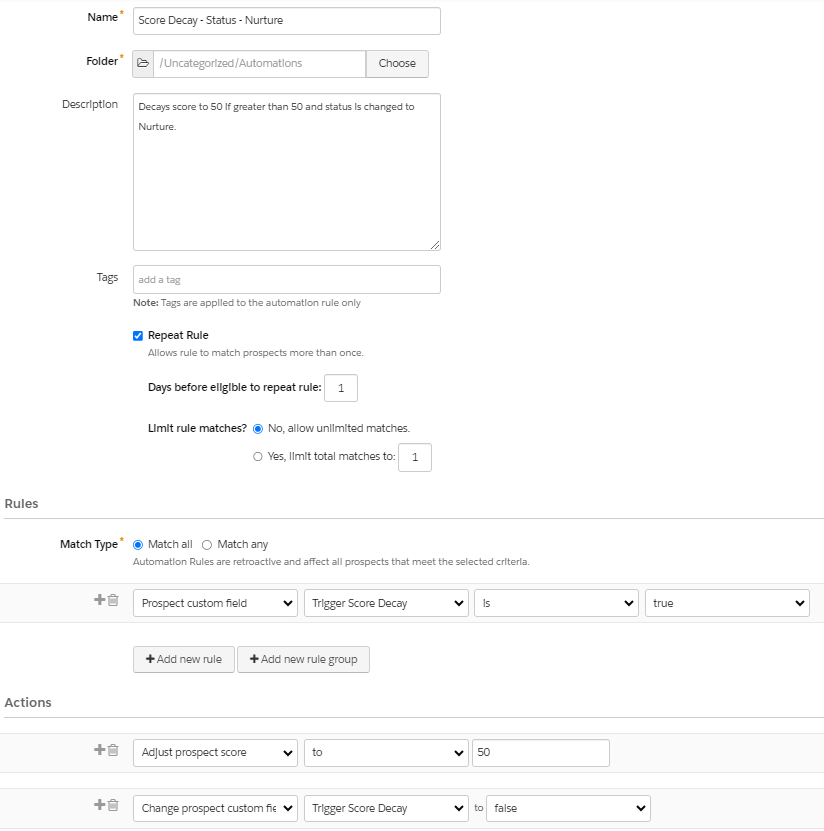
  1. The final step is to create an automation rule in Account Engagement that will decay the score if the “Trigger Score Decay” checkbox is checked. The rule will also need to uncheck the box as a way of “resetting” the record. 

Score Decay – Status – Nurture Automation Rule

  1. Test, validate, and activate. As with all automations, be sure to test by debugging your flows and previewing automation rule matches before activation.

Address Overinflated Scores

Scores in Account Engagement are meant to identify prospects that are actively engaging with your marketing. If scores are not decayed, identifying prospects with recent activity can become a challenge and lead to confusion for your sales teams.

Score decay is fairly simple to implement, but should not be done in a vacuum. It’s very likely that there are processes in your Salesforce or Account Engagement orgs that could be triggered when the score of a contact or lead is decayed. For this reason, it’s highly recommended that testing is conducted in a sandbox organization prior to implementation in production and that key stakeholders are included in the process. 

Need help along the way? Send us a message to see how we can help you reach your goals.

Imagine this — your marketing team is generating more leads than ever before. And at the same time, you’re facing a reduction in sales team staff. 

Sounds impossible to overcome, right? 

With the best tools, like Marketing Cloud Account Engagement (Pardot), and a winning lead prioritization strategy, you can tackle these obstacles head-on and turn them into opportunities for success. 

As a marketing consultant who has worked with numerous sales teams, I understand the challenges that can arise with lead prioritization and management. Let me tell you, there’s nothing more exhilarating than overcoming those challenges! 

Here are five lead prioritization strategies lean sales teams can follow to maximize their impact.

Lead Prioritization Strategy #1. Rank Your Leads with Scoring and Grading

One of the most effective ways to prioritize your leads is through scoring and grading criteria. By setting up a system that assigns points based on the level of engagement demonstrated by each lead, you can quickly identify those with the highest potential for conversion. 

For example, a lead who has visited your website multiple times, downloaded whitepapers, and attended webinars may be given a higher score than one who has only filled out a form. In addition to assigning scores, you can also use grading criteria to evaluate the overall quality of a lead based on factors such as company size, industry, and location.

Lead Prioritization Strategy #2. Fast-Track Urgent Leads with Qualifying Questions

Another strategy to prioritize your leads is by adding a qualifying question to your lead capture forms. This can help fast track leads that are urgent or ready to close, while the remaining leads can be put into a lead nurture campaign that includes emails from your sales staff to keep them engaged and interested. 

For example, a qualifying question could ask whether the lead is actively seeking a solution for their problem or if they are just researching their options. By segmenting your leads based on their level of intent, you can ensure that your sales team is focusing their efforts on those with the greatest potential for conversion.

Lead Prioritization Strategy #3. Automate Lead Follow-Up with Autoresponders

Setting up autoresponders is another strategy to keep your leads engaged and ensure that they don’t fall through the cracks. Autoresponders are automated emails that are triggered by specific actions, such as filling out a form or downloading a whitepaper. 

Layer in a custom redirect behind a CTA button to track which converts the most.  These emails can acknowledge and thank leads for their interest, and provide them with additional information and resources to keep them engaged. 

Lead Prioritization Strategy #4. Qualify and Prioritize Leads with Chatbot Technology

Another tool to consider when managing the influx of leads is through chatbot technology. Chatbots are automated messaging platforms that can be integrated into your website or messaging apps to provide immediate responses to leads and qualify them before transferring them to your sales team.

 By using chatbots, you can provide a personalized experience for your leads, answering their questions and guiding them through the sales process, all while gathering important information about their needs and preferences. 

This can help reduce the workload on your sales team by providing a pre-qualified lead before they even reach out. Furthermore, chatbots can operate 24/7, allowing you to capture leads even when your sales team is not available. With the help of chatbot technology, you can improve your lead generation efforts and ensure that your sales team is focusing on the most promising opportunities.

Lead Prioritization Strategy #5. Maximize Lead Contact with a BDR Agency

If your sales team is still struggling to keep up with the volume of leads, you may want to consider using a Business Development Representative (BDR) agency to handle initial contact with leads and prioritize the most promising ones to send to your sales team. A BDR agency can help ensure that each lead is contacted promptly and that priority ones are directed to your sales team for follow-up.

Use Strategies That Focus on the Hottest Leads

We all know managing the influx of leads can be a challenge, but with the right strategies and tools, you can streamline your team’s efforts and focus on the most promising leads. Marketing Cloud Account Engagement (Pardot) offers several features that can help you score and grade leads, add qualifying questions to form and set up autoresponders. You might even consider outsourcing a BDR agency if necessary. 

By prioritizing and automating effectively, you can maximize your sales team’s productivity, convert more leads, and save money by cutting out ineffective practices. 
Need help building your lead prioritization strategy? Drop us a line to chat about it.

Lead nurturing programs play a critical role in the sales process. That’s because nurtured leads have a shorter sales cycle and generate more sales-ready leads at a significantly lower cost. Luckily for you, the Marketing Cloud platform has extensive capabilities to create a sophisticated, multi-channel, automated lead nurturing program.

Here are five tips to take your lead nurture program to the next level utilizing the best of breed marketing automation capabilities in Salesforce Marketing Cloud.

Tip 1: Put lead scoring and grading to work

With Marketing Cloud, you have lots of options for lead scoring. 

This is especially true with the Marketing Cloud Account Engagement (Pardot) platform. The lead scoring and grading that comes out of the box has endless capability and flexibility.

Check out this blog post for a deeper dive into lead scoring and grading in Pardot.

But we’re going to focus on lead scoring and grading in Marketing Cloud Engagement here.

Marketing Cloud Engagement (SFMC) Users

If your Marketing Cloud setup doesn’t use the Account Engagement platform, there are other third-party resources that can provide both lead and account ranking scoring.

Third-party lead scoring and grading tools

SalesWings provides an easy to install, cost effective solution to deliver real-time lead scoring based on web activity and other factors. Once installed you can visually see a predictive score of Hot, Warm or Cold based on a wide variety of criteria right in the platform.

SalesWings Sales Console

And don’t forget to consider account-based ranking as well. Utilizing platforms like Demandbase you can take the lead ranking to the next level by understanding how that account or company converts. For example, Demandbase can provide key stats like number of engaged people, sales touches all bubbling up to a tier ranking to help add additional color to your ranking system.

Demandbase dashboard

Tip 2: Use CASE function to simplify rankings

This one is for Marketing Cloud Engagement (SFMC) users. If you have multiple scoring variables like a lead and account ranking, utilize the CASE SQL function in your automation to consolidate rankings into one simple rank.

The multiple scoring variables could be generated from third-party platforms like Saleswings/Demandbase or internally through a custom lead/account scoring process.

Take this example below on how you could approach taking the two rankings and determining one combined ranking of Hot, Warm and Cold.

To execute this in Marketing Cloud Engagement Automation Studio, use the CASE function to do the IF/THEN (or in this case WHEN/THEN) to populate the “Lead_Ranking_Simple” field in the Journey data extension with the combined ranking.

If you are not comfortable with SQL check out the DESelect application where you can quickly and easily create this custom relationship without having any SQL knowledge.

 Source: DeSelect

Note: For more information on how to use the CASE statement in a variety of ways, check out Mateusz Dabrowski’s site, which goes into great detail on this function.

Tip 3: Focus on essential lead nurture journey functionality

There are three essential activities or areas of functionality in Journey Builder: 

  1. The entry event
  2. The decision split
  3. Object activity

Focusing on these areas will have the greatest impact on the overall performance and scalability of your automation solutions. 

Note: Read this blog post from Kirsten Schlau for more info about using Journey Builder.

The Entry Event

Here’s a typical lead nurture journey in Marketing Cloud Engagement where you can see these activities in action. Let’s take a closer look at the most important of these three activities, the Entry Event.

The Entry Event functionality determines the list of contacts  who will enter the Journey. It’s the start of any journey and determines the capability of all functions that follow. A poorly set up entry event will limit functionality and cause problems down the road so spend your time to ensure a proper set up.

Let’s take a look at the two most populated entry event types: 

  1. Data Extension
  2. Salesforce Data Entry Event

Data Extension Entry Event is the most commonly used version. In this variation typically a SQL query based automation is running behind the scenes pulling in leads from synchronized data extensions based on a variety of filter criteria across multiple objects.

Advantages

The advantage to using a Data Extension Entry Event is the flexibility and complete customization of the subscriber segments to be pulled into the journey.

Disadvantages

The disadvantage is you are limited by the minimum 15-minute sync timeframe of records from the Salesforce CRM environment. So the fastest you’ll be able to enter in a subscriber based on Salesforce data is once every 15 minutes. Another small disadvantage is this entry event requires your team to be comfortable with SQL and it creates a separate marketing automation asset to support.

Another popular option is the Salesforce Data Entry Event which pulls in any object that has a contact, lead or user to be used as a subscriber for sending.

Advantages

Advantages of this entry event is that it’s pretty close to real time (1-2 minutes). As soon as a lead is created or updated based on the criteria designated, the subscriber will enter the journey. This option is also easier to support as it eliminates the need for the automation solution working in the background.

Disadvantages to this event is that you are limited by the filter settings in this entry event setup. If your filtering criteria involves multiple fields across multiple objects a SQL based automation fed entry event might be the better path.

Tip 4: One-to-one content personalization

Here are three ways to deliver a 1-to-1 customization of your journey content utilizing Content Builder functionality and simple ampscript and HTML coding.

First method – Personalization of subscriber values

In each email send you can populate an unlimited number of data about your subscriber in data extensions. To leverage those data points in the content simply add %% before and after the data point. 

For example to render the first name in the subject line:

Enter in %%FirstName%% right in the subject line block:

Or if you’re not sure what the exact data point is called or the exact format you can use click on the Personalization Icon in your editor toolbar.

Second Method – Dynamic Content Blocks

Utilize out-of-the-box functionality in Content Builder to vary entire sections of content in an email using Dynamic Content Blocks.

In this example, the focus of the email content changes based on the product selected by each lead indicated on the lead record. 

The end user will see custom content in the email:

Dynamic Content Block Example

In Content Builder, first create separate content blocks for each product featuring a photo and copy points. Then drag over a dynamic content block onto your email canvas.

And follow the steps to (1) select a default content to appear and (2) content variations based on the data coming from the lead object. In this case, if the “Product__c” field contains “401K” or “Credit Card Processing,” then the content will change.

Third Method – Custom links

Utilize ampscript and HTML to create custom links that add value to the recipient.

In this example, we’re creating a hot lead notification that will be sent to the owner of the lead. We’re populating this email with all the relevant data points in the data extension using the %% functionality mentioned above. We also have custom links so that when the lead owner clicks on the link it will take them right into the Salesforce CRM environment.

To execute this type of functionality utilize ampscript inside of the email content in the following approach:

  1. Set your Lead ID variable based on the field value in the send data extension.
  2. Use the CONCAT function to pull in the remaining part of the standard Salesforce lead record url.
  3. The first part of the Lead url.
  4. The variable set above.
  5. The last part of the Lead url.

And then to make the link clickable utilize a standard A Tag in HTML combined with the RedirectTo ampscript function.

Tip 5: Notify sales of hot leads in multiple ways ways

Marketing Cloud Engagement has a variety of options to creatively notify sales right in the Salesforce CRM platform through tasks and or sending highly personalized “Hot Lead” emails as mentioned above. 

Let’s walk through utilizing the Object Activity in Journey Builder to either create or update records in the Salesforce CRM environment, in this example creating custom tasks.

Select the Object Activity and select the task

(1) Select “Task” in the search and (2) select Task. You’ll want to “Create New” task.

Then (1) Fill in all required fields and utilize the data binding functionality to personalized fields where necessary.

For a higher complexity of field personalization (2) utilize what is called “data binding” in the Journey Builder UI to personalize each task and pull in the lead rank score.

To grab these “data bindings” for any variable to personalize follow these steps:

Step 1. Create your subject line defining the variables that will be brought in to personalize: “Attention!, you have a HOT Rank lead for Company: XYZ”

Step 2. In a separate document like in Notepad, create a template for the subject line identifying each of the variables needed to populate in your variable code.

Step 3. Select the Subject field in the Task.

Step 4. To create the handle bar “data binding” code for the lead score variable (1) Select the Journey Data dropdown, (2) Select the variable and (3) the handle bar code will appear in the subject.

Step 5. Copy the code and paste it into your notepad. Repeat the process for the Company and any other variable to be personalized. 

The syntax in the Notepad should look like the following:

Step 6. Copy this line of code and paste it into the Subject Line space and Save.

When you generate a task it should look something like this:

Step 7. Paste this syntax into the Subject field to populate a custom 1-to-1 subject that will help the Sales team cut through the clutter in all their tasks. 

Here’s an example of documentation on “data bindings” in this blog article from Rafal Wolsztyniak titled SFMC Tips and Tricks Challenge. You’ll need to scroll through the article as it covers a variety of tips. 

Start Nurturing Leads Like a Salesforce Pro

Hopefully this article has given you a few tips on how to take your lead nurture programs to the next level in the Salesforce Marketing Cloud Engagement platform.

There are limitless possibilities in this platform, and we’re all eager to learn and improve our programs. Please share any discoveries you find as you explore ways to build successful automation solutions for nurturing sales leads.

I’ll admit, I’ve been neglecting looking into Einstein for Pardot (us admins have enough to do!). And I was somehow under the impression Einstein for Pardot came with an additional cost per tool (spoiler: they don’t). 

However, recently I dug into all the Einstein tools that work with Pardot and was blown away by how far they’ve come. These tools enable marketers to do really cool things and access even cooler insights! 

This blog goes in depth into the Pardot Einstein solutions that affect Lead identification and scoring, as well as how to use them in your everyday marketing.

Note: The three Einstein solutions below are only available to Advanced and Premium Editions of Pardot. 

Predict purchase intent with Einstein Behavior Scoring

Einstein Behavior Scoring uses machine learning to predict which Prospects are ready to purchase by analyzing how they engage with your marketing efforts. 

Unlike standard Pardot Scoring, the Einstein Behavior Scoring model changes over time as it learns to more accurately score Prospects. 

If you’re using Einstein Behavior Scoring, I wouldn’t scrap your Pardot Scoring model. It’s still a great indicator of how engaged a Prospect is with your marketing efforts overall, and it also has the added benefit of Scoring Categories. 

Einstein Behavior Scoring zeros in Prospects who are specifically ready to buy, and it takes into consideration how much they’ve engaged recently. However, I recommend reviewing your Pardot Lead qualification automations to see how Einstein Behavior Score can be incorporated to send better Leads to Sales. 

Note: Einstein Behavior Scoring does not currently work with Person Accounts or Cross Business Unit implementations (where a Lead/Contact is synced to multiple Prospects in multiple Pardot Business Units. 

What data do you need to use Einstein Behavior Scoring?

Salesforce recommends at least 6 months of Prospect engagement data and at least 20 Prospects linked to Opportunities (via Contact Roles). 

This gives Einstein Behavior Scoring enough data to start analyzing which behaviors indicate a Prospect is ready to buy. An individual Prospect needs to have engagement activity within the past year in order to be scored. 

Enabling Einstein Behavior Scoring

Enable Einstein Behavior Scoring by going to Setup > Einstein Pardot > Einstein Behavior Scoring

Once enabled, add “Einstein Scoring” to your Lead and Contact Lightning Pages. 

To use this feature in Pardot, ensure your Salesforce Connector user is assigned either the CRM User, Sales User, or Service User permission set. 

Within Pardot, you can view the Behavior Score on the Prospect page:

You can also use this information in Automations and within Engagement Studio Programs

Pinpoint ideal prospects with Einstein Lead Scoring

Einstein Lead Scoring uses machine learning to analyze patterns in your Lead conversion process and prioritize Leads. So, if Einstein Behavior Score determines how much a Prospect likes you, then Einstein Lead Scoring determines how much you like the Prospect (similar to Pardot Grading). 

Every 10 days, Einstein Lead Scoring reanalyzes your Lead data to identify new trends and determine which Leads have the most in common with those that have previously converted. 

My only drawback with Einstein Lead Scoring is that it doesn’t connect with Pardot. It only gives Leads a score once they sync with Salesforce. 

However, you can use Lead Scoring as a way to prioritize all the amazing Leads you just sent over with Einstein Behavior Scoring. Talk to your sales team about what Einstein Behavior Scoring and Einstein Lead Scoring mean, where to view these measures, and how this information will help them convert better Leads faster. 

What data do you need for Einstein Lead Scoring?

To use Einstein Lead Scoring, you need at least 1,000 Leads created in the last 200 days and at least 120 of the Leads need to have been converted. 

If you don’t have enough data, Einstein Lead Scoring will use a global model until you accumulate enough converted Leads for a customized model. 

How to enable Einstein Lead Scoring

You’ll enable Einstein Behavior Scoring by going to Setup > Einstein Pardot > Einstein Lead Scoring

Here you can enable Lead Scoring as well as customize your settings. You may want to customize your settings if there are specific Lead types or Lead fields that you want to exclude from the model.

Once enabled, a Prospect’s Lead Score can be viewed in the same “Einstein Scoring” section mentioned above. 

Note: Lead Score is only available on Leads, but Behavior Score is on both Leads and Contacts. 

Support account-based marketing with Einstein Key Accounts Identification

Einstein Key Account Identification supports your account-based marketing efforts by analyzing which Accounts are most likely purchase ready. Einstein Key Account Identification analyzes your accounts and the opportunities associated with them to identify trends and key factors. 

Einstein Key Account Identification has two parts:

  1. Account Tier: Account tiers range from A to D (A being the most likely to convert) and are based on your Account data and the custom model Einstein builds for you. 
  2. Uplift Value: An uplift value is assigned per Account Tier and indicates the likelihood to have an opportunity opened in the next 6 months for Accounts in this tier.

Note: Einstein Key Account Identification does not currently work with Person Accounts

The Account Tier can be connected with Pardot (more details below) and be used to support your account-based marketing efforts. 

For example, say you’re holding a swanky event and your sales team needs to know which Accounts would be most advantageous to invite and which Contacts at those Accounts they should send the invites to. 

What data do you need?

Salesforce recommends having 200 Accounts with won opportunities and 200 Accounts with lost opportunities within the last 2 years. 

Enabling Einstein Key Account Identification

Enable Einstein Key Account Identification by going to Setup > Einstein Pardot > Einstein Key Account Identification. Once enabled, it can take up to 72 hours to analyze your data and create your initial custom model. You’ll also want to add the Einstein Key Accounts component to your Lightning record page. 

Account Tier can be pulled into Pardot to be used in Engagement Studio Programs, Automation Rules, and Dynamic Lists. To pull in this field, add a new custom Account field in Pardot and sync it with the Salesforce field “Tier.”

Einstein + Pardot = ultimate pipeline power

When used by both your sales and marketing teams, Einstein Lead Scoring, Einstein Behavior Scoring, and Einstein Key Account Identification can easily increase the quality and number of Leads to supercharge your pipeline. 

What other use cases can you think of for these three tools? Let us know in the comments!

Already have lead scoring set up and want to take it a step further? Lead scores can be summarized for all related Leads and Contacts to the Account with some help from an App from the Salesforce App Exchange. You can then create reports in Salesforce, lists, and triggers within your marketing platform to target these Accounts based on the Account Score.

A prerequisite for summarizing lead score on the Account

In order to populate Account Lead Score on the Account, you will need to create a relationship between Leads and Accounts. This is not available in Salesforce without custom configuration or help from an App on the Salesforce AppExchange. Want to set this up without installing an App? Learn how to set this up using Process Builder and Flow.

If you do not create a relationship between Leads and Accounts, you can still follow along to learn how to create an Account Score field to summarize Contact scores.

Create the Account fields

To populate the account score for leads and contacts within the account, you will need to create 3 fields:

  1. Account Contact Score: A number field that will display the sum of the score for all Contacts within the Account.
  2. Account Lead Score **: A number field that will display the sum of the score for all Leads within the Account.
    ** see post prerequisite
  3. Account Score: A formula field that will calculate the sum of the Account Contact Score and the Account Lead Score.

Account Contact Score field creation

Account Lead Score field creation

Account Score field creation

Note: I recommend making all 3 of these fields read-only.

Install Rollup Helper

Rollup summary fields only work if there is a master-detail relationship, so to rollup the lead and contact scores Rollup Helper will need to be installed from the Salesforce AppExchange. Follow the instructions to install the free app in your Salesforce Org.

Create a roll-up helper for lead score

Navigate to the Rollup Helper app and click on create a new rollup. Select Account for where you would like your rollup results to reside.

Select Lead as your child object and select your related field. Select sum for the field type and select the score field you want to summarize.

Optionally, add some custom filters to exlcude leads from this rollup. For example, you might want to exclude certain email domains (employees) or certain lead statuses (rejected, bad data, etc).

Create a roll-up helper for contact score

Naviate to the Rollup Helper app and click on create a new rollup. Select Account for where you would like your rollup results to reside.

Select Contact as your child object and select your relationship field. Select sum for the field type and select the score field you want to summarize.

Optionally, add some custom filters to exlcude contacts from this rollup. For example, you might want to exclude certain email domains (employees) or certain statuses (rejected, bad data, etc).

Create Account Score Reports

Once the roll-ups have finished running. You can now create Account score reports by selecting the Account report type and pulling in your new custom fields. You also might want to create a bucket column using Account Score, to categorize the Account Scores into warm and hot Accounts.

Questions?

Send me a tweet @jennamolby, or contact the Sercante team for help.

Have you updated your scoring & grading recently? This is one of the most impactful and often underutilized areas of Pardot.

In a recent blog post, I broke down Pardot Grading 101: How to Rate The Quality of Your Prospects. This article will do a deep dive on another critical area: Scoring Categories. (more…)

No more posts to show