
Lead nurturing programs play a critical role in the sales process. That’s because nurtured leads have a shorter sales cycle and generate more sales-ready leads at a significantly lower cost. Luckily for you, the Marketing Cloud platform has extensive capabilities to create a sophisticated, multi-channel, automated lead nurturing program.
Here are five tips to take your lead nurture program to the next level utilizing the best of breed marketing automation capabilities in Salesforce Marketing Cloud.
Tip 1: Put lead scoring and grading to work
With Marketing Cloud, you have lots of options for lead scoring.
This is especially true with the Marketing Cloud Account Engagement (Pardot) platform. The lead scoring and grading that comes out of the box has endless capability and flexibility.
Check out this blog post for a deeper dive into lead scoring and grading in Pardot.
But we’re going to focus on lead scoring and grading in Marketing Cloud Engagement here.
Marketing Cloud Engagement (SFMC) Users
If your Marketing Cloud setup doesn’t use the Account Engagement platform, there are other third-party resources that can provide both lead and account ranking scoring.
Third-party lead scoring and grading tools
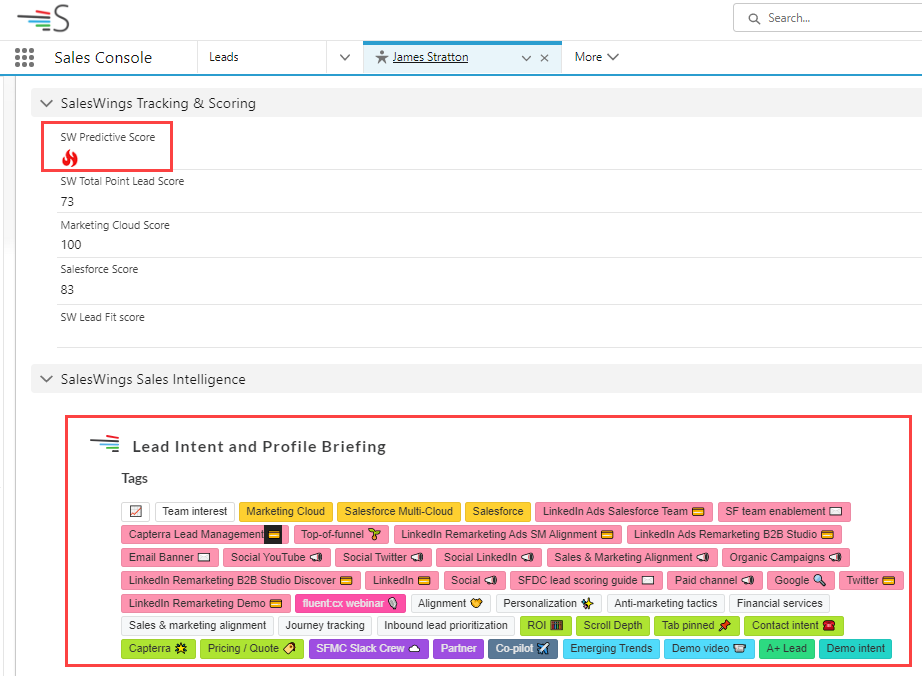
SalesWings provides an easy to install, cost effective solution to deliver real-time lead scoring based on web activity and other factors. Once installed you can visually see a predictive score of Hot, Warm or Cold based on a wide variety of criteria right in the platform.
And don’t forget to consider account-based ranking as well. Utilizing platforms like Demandbase you can take the lead ranking to the next level by understanding how that account or company converts. For example, Demandbase can provide key stats like number of engaged people, sales touches all bubbling up to a tier ranking to help add additional color to your ranking system.

Tip 2: Use CASE function to simplify rankings
This one is for Marketing Cloud Engagement (SFMC) users. If you have multiple scoring variables like a lead and account ranking, utilize the CASE SQL function in your automation to consolidate rankings into one simple rank.
The multiple scoring variables could be generated from third-party platforms like Saleswings/Demandbase or internally through a custom lead/account scoring process.
Take this example below on how you could approach taking the two rankings and determining one combined ranking of Hot, Warm and Cold.
To execute this in Marketing Cloud Engagement Automation Studio, use the CASE function to do the IF/THEN (or in this case WHEN/THEN) to populate the “Lead_Ranking_Simple” field in the Journey data extension with the combined ranking.![]()
If you are not comfortable with SQL check out the DESelect application where you can quickly and easily create this custom relationship without having any SQL knowledge.
Source: DeSelect
| Note: For more information on how to use the CASE statement in a variety of ways, check out Mateusz Dabrowski’s site, which goes into great detail on this function. |
Tip 3: Focus on essential lead nurture journey functionality
There are three essential activities or areas of functionality in Journey Builder:
- The entry event
- The decision split
- Object activity
Focusing on these areas will have the greatest impact on the overall performance and scalability of your automation solutions.
| Note: Read this blog post from Kirsten Schlau for more info about using Journey Builder. |
The Entry Event
Here’s a typical lead nurture journey in Marketing Cloud Engagement where you can see these activities in action. Let’s take a closer look at the most important of these three activities, the Entry Event.

The Entry Event functionality determines the list of contacts who will enter the Journey. It’s the start of any journey and determines the capability of all functions that follow. A poorly set up entry event will limit functionality and cause problems down the road so spend your time to ensure a proper set up.

Let’s take a look at the two most populated entry event types:
- Data Extension
- Salesforce Data Entry Event
Data Extension Entry Event is the most commonly used version. In this variation typically a SQL query based automation is running behind the scenes pulling in leads from synchronized data extensions based on a variety of filter criteria across multiple objects.
Advantages
The advantage to using a Data Extension Entry Event is the flexibility and complete customization of the subscriber segments to be pulled into the journey.

Disadvantages
The disadvantage is you are limited by the minimum 15-minute sync timeframe of records from the Salesforce CRM environment. So the fastest you’ll be able to enter in a subscriber based on Salesforce data is once every 15 minutes. Another small disadvantage is this entry event requires your team to be comfortable with SQL and it creates a separate marketing automation asset to support.
Another popular option is the Salesforce Data Entry Event which pulls in any object that has a contact, lead or user to be used as a subscriber for sending.
Advantages
Advantages of this entry event is that it’s pretty close to real time (1-2 minutes). As soon as a lead is created or updated based on the criteria designated, the subscriber will enter the journey. This option is also easier to support as it eliminates the need for the automation solution working in the background.
Disadvantages to this event is that you are limited by the filter settings in this entry event setup. If your filtering criteria involves multiple fields across multiple objects a SQL based automation fed entry event might be the better path.
Tip 4: One-to-one content personalization
Here are three ways to deliver a 1-to-1 customization of your journey content utilizing Content Builder functionality and simple ampscript and HTML coding.
First method – Personalization of subscriber values
In each email send you can populate an unlimited number of data about your subscriber in data extensions. To leverage those data points in the content simply add %% before and after the data point.
For example to render the first name in the subject line:
Enter in %%FirstName%% right in the subject line block:![]()
Or if you’re not sure what the exact data point is called or the exact format you can use click on the Personalization Icon in your editor toolbar.
Second Method – Dynamic Content Blocks
Utilize out-of-the-box functionality in Content Builder to vary entire sections of content in an email using Dynamic Content Blocks.
In this example, the focus of the email content changes based on the product selected by each lead indicated on the lead record.
The end user will see custom content in the email:

In Content Builder, first create separate content blocks for each product featuring a photo and copy points. Then drag over a dynamic content block onto your email canvas.
And follow the steps to (1) select a default content to appear and (2) content variations based on the data coming from the lead object. In this case, if the “Product__c” field contains “401K” or “Credit Card Processing,” then the content will change.

Third Method – Custom links
Utilize ampscript and HTML to create custom links that add value to the recipient.
In this example, we’re creating a hot lead notification that will be sent to the owner of the lead. We’re populating this email with all the relevant data points in the data extension using the %% functionality mentioned above. We also have custom links so that when the lead owner clicks on the link it will take them right into the Salesforce CRM environment.

To execute this type of functionality utilize ampscript inside of the email content in the following approach:
- Set your Lead ID variable based on the field value in the send data extension.
- Use the CONCAT function to pull in the remaining part of the standard Salesforce lead record url.
- The first part of the Lead url.
- The variable set above.
- The last part of the Lead url.
And then to make the link clickable utilize a standard A Tag in HTML combined with the RedirectTo ampscript function.
Tip 5: Notify sales of hot leads in multiple ways ways
Marketing Cloud Engagement has a variety of options to creatively notify sales right in the Salesforce CRM platform through tasks and or sending highly personalized “Hot Lead” emails as mentioned above.
Let’s walk through utilizing the Object Activity in Journey Builder to either create or update records in the Salesforce CRM environment, in this example creating custom tasks.

Select the Object Activity and select the task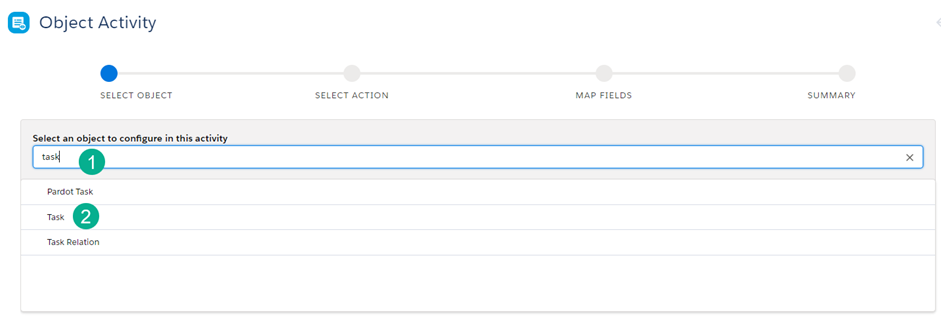
(1) Select “Task” in the search and (2) select Task. You’ll want to “Create New” task.
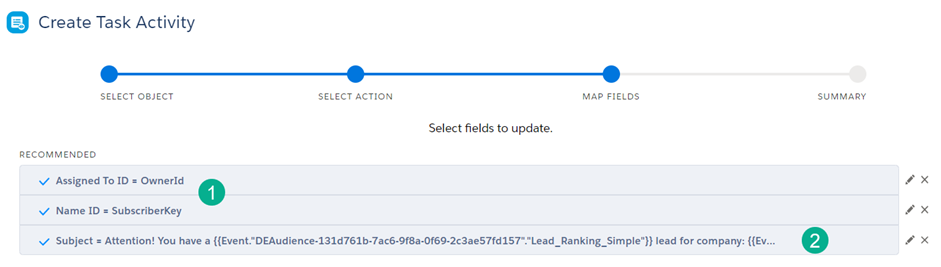
Then (1) Fill in all required fields and utilize the data binding functionality to personalized fields where necessary.
For a higher complexity of field personalization (2) utilize what is called “data binding” in the Journey Builder UI to personalize each task and pull in the lead rank score.
To grab these “data bindings” for any variable to personalize follow these steps:
Step 1. Create your subject line defining the variables that will be brought in to personalize: “Attention!, you have a HOT Rank lead for Company: XYZ”
Step 2. In a separate document like in Notepad, create a template for the subject line identifying each of the variables needed to populate in your variable code.

Step 3. Select the Subject field in the Task.
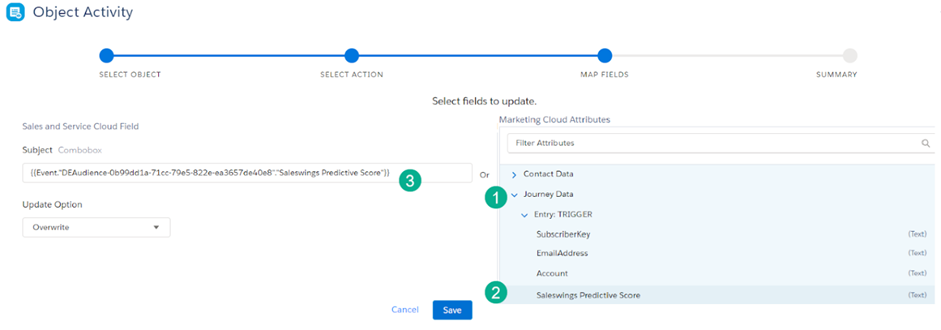
Step 4. To create the handle bar “data binding” code for the lead score variable (1) Select the Journey Data dropdown, (2) Select the variable and (3) the handle bar code will appear in the subject.
Step 5. Copy the code and paste it into your notepad. Repeat the process for the Company and any other variable to be personalized.
The syntax in the Notepad should look like the following:

Step 6. Copy this line of code and paste it into the Subject Line space and Save.

When you generate a task it should look something like this: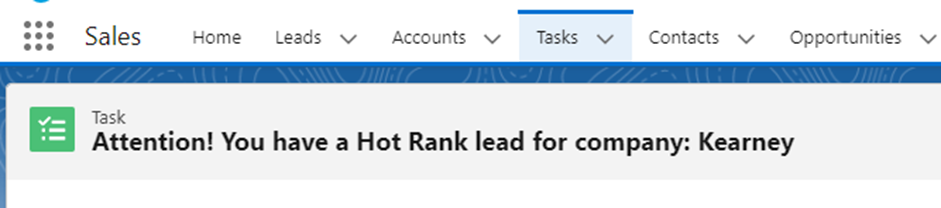
Step 7. Paste this syntax into the Subject field to populate a custom 1-to-1 subject that will help the Sales team cut through the clutter in all their tasks.
Here’s an example of documentation on “data bindings” in this blog article from Rafal Wolsztyniak titled SFMC Tips and Tricks Challenge. You’ll need to scroll through the article as it covers a variety of tips.
Start Nurturing Leads Like a Salesforce Pro
Hopefully this article has given you a few tips on how to take your lead nurture programs to the next level in the Salesforce Marketing Cloud Engagement platform.
There are limitless possibilities in this platform, and we’re all eager to learn and improve our programs. Please share any discoveries you find as you explore ways to build successful automation solutions for nurturing sales leads.