
One of the most common assignment needs for Salesforce leads and cases is to circulate these via a round robin assignment process. But assignment in the marketing, sales or any other team for that matter does not necessarily stop at these objects.
A common way to round-robin assign items is by using an auto number field and formula to create a round robin ID, which can be used in case or lead assignment rules or with other automation tools.
But, this can sometimes be difficult to maintain when users leave the organization or change roles and responsibilities. It may also fall short when you have other process complexities, like handling holidays and PTO.
What if there was another way to manage the assignment of standard and custom Salesforce objects like leads, tasks, or opportunities?
This blog will walk you through a custom opportunity Salesforce round-robin process. And what’s even better is that this solution can be used for lots of objects in Salesforce, which do not typically have assignment rules (or do!)
Create Two New Salesforce Custom Objects
A custom assignment process can be created using multiple components and is intended to be more accessible to manage than other solutions with the help of two new custom objects.
To make the assignment of an object more manageable; we first need to create two custom objects; Assignment Group and Assignment Group Members.
Assignment Group
First create a new custom object called “Assignment Group.”
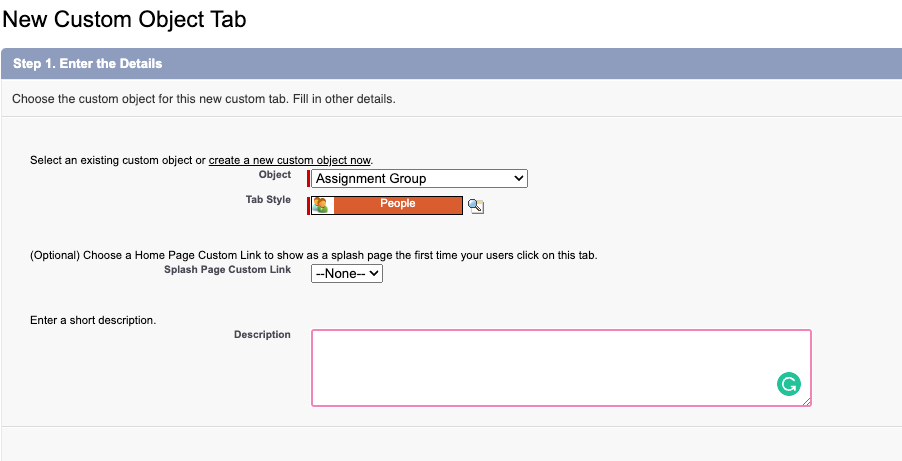
A record of this custom object signifies a group or team that you would like to round robin through to assign specific records (i.e. North America Sales Team).
Assignment Group Member
Create a second custom object called “Assignment Group Member” and create a Master-Detail Relationship on this custom object so that this is the detail record in the master detail relationship with Assignment Group.
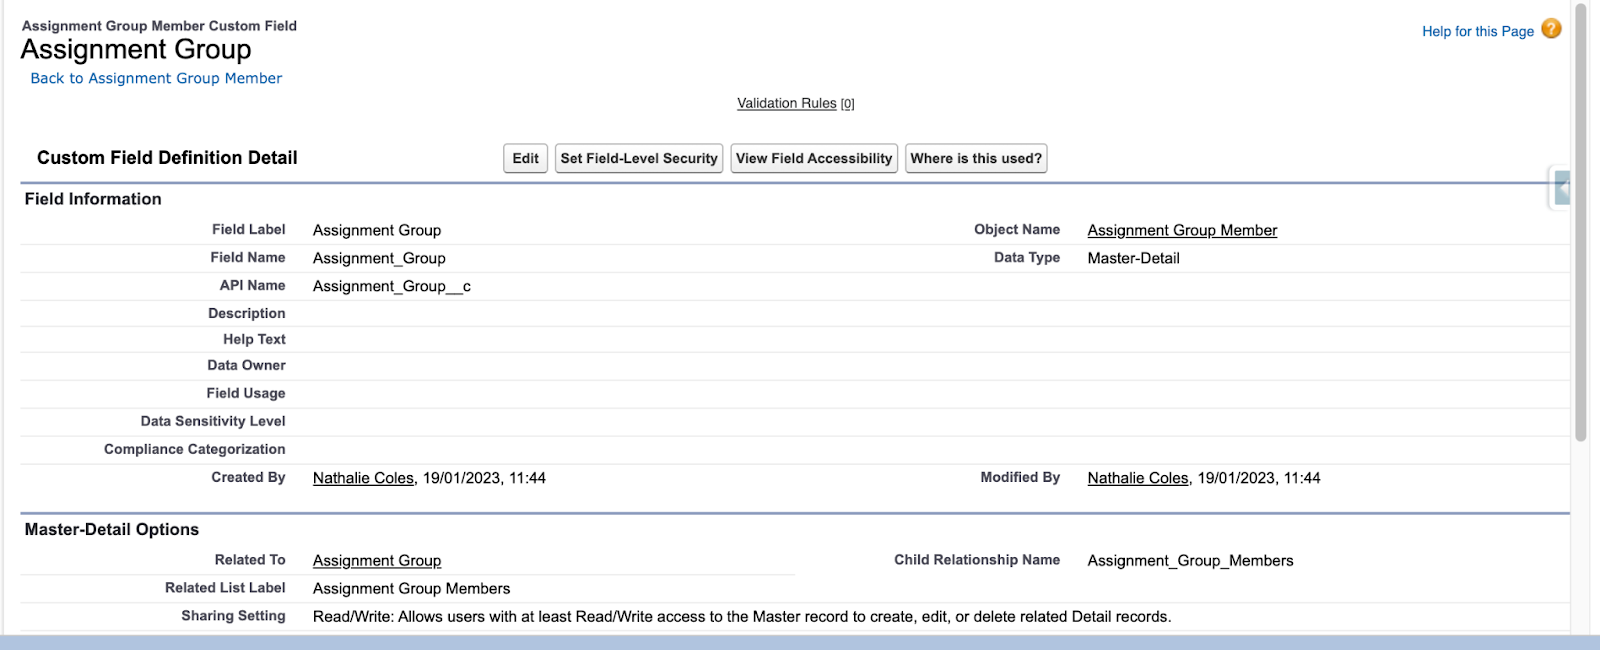
Next, add a lookup field to the Assignment Group Member to the User object and the following fields:
- “Last Assignment Date” : Data Type: Date/Time
- “Out of Office Start” : Data Type: Date
- “Out of Office End” : Data Type: Date
- “Active” : Data Type: Formula
- IF(
- Out_of_Office_Start__c <= TODAY() && TODAY() <= Out_of_Office_End__c,
- FALSE,
- TRUE)
TODAY()<= Out_of_Office_Start__c )
Create Your Assignment Groups & Members
Now that you have your custom objects built, you can create your Assignment Group Records. You may have one Assignment Group or Multiple; depending on the objects or groups that you like to assign. For example; you may have an Onboarding Assignment Group to Round Robin Onboarding Tasks within the Onboarding team and a Regional Sales Team to distribute opportunities to your Sales Reps in a particular region.
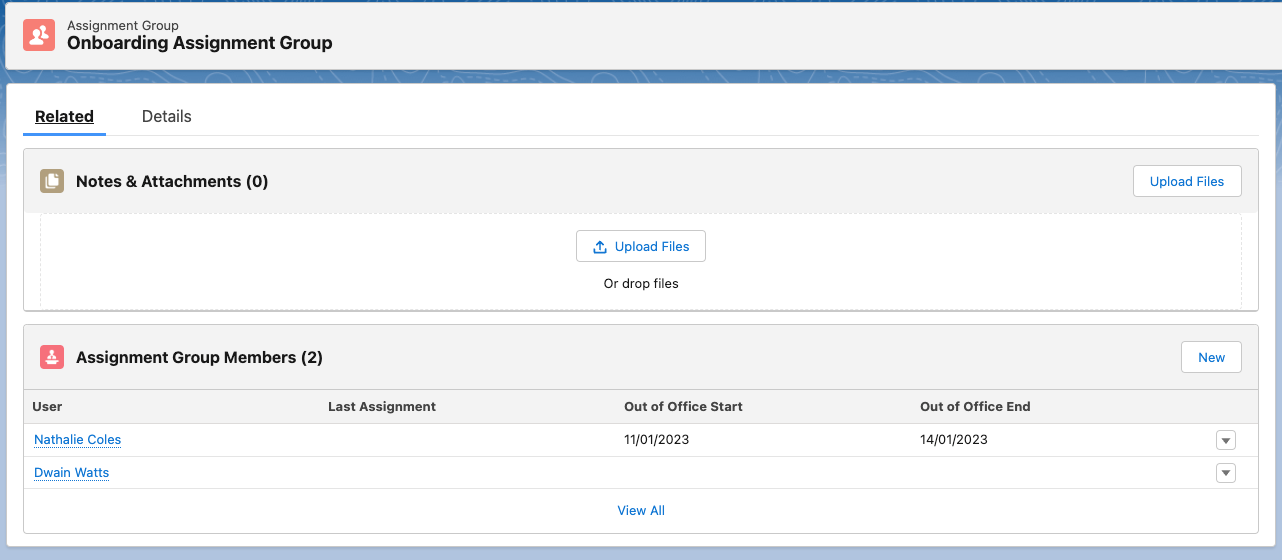
Once the groups have been created; you can add your Group Members. For a user to be part of the assignment queue, they must be part of the Assignment Group with their own Assignment Group Member record.
Users must be related to the Assignment Group Member Record through the custom lookup field on the object. Additionally, the member will not be assigned records if the custom checkbox of “Active” is false. This checkbox is calculated based on the formula which assesses whether the current date/time is within the Out of Office Start and End dates.
The last assignment date can be manually edited but is filled in automatically within the Round Robin Assignment Flow.
Round Robin Assignment Flow
The final step to facilitate the assignment for a flow that is triggered when the record you are looking to assign is created (in most cases, although this could be triggered when a field is updated).
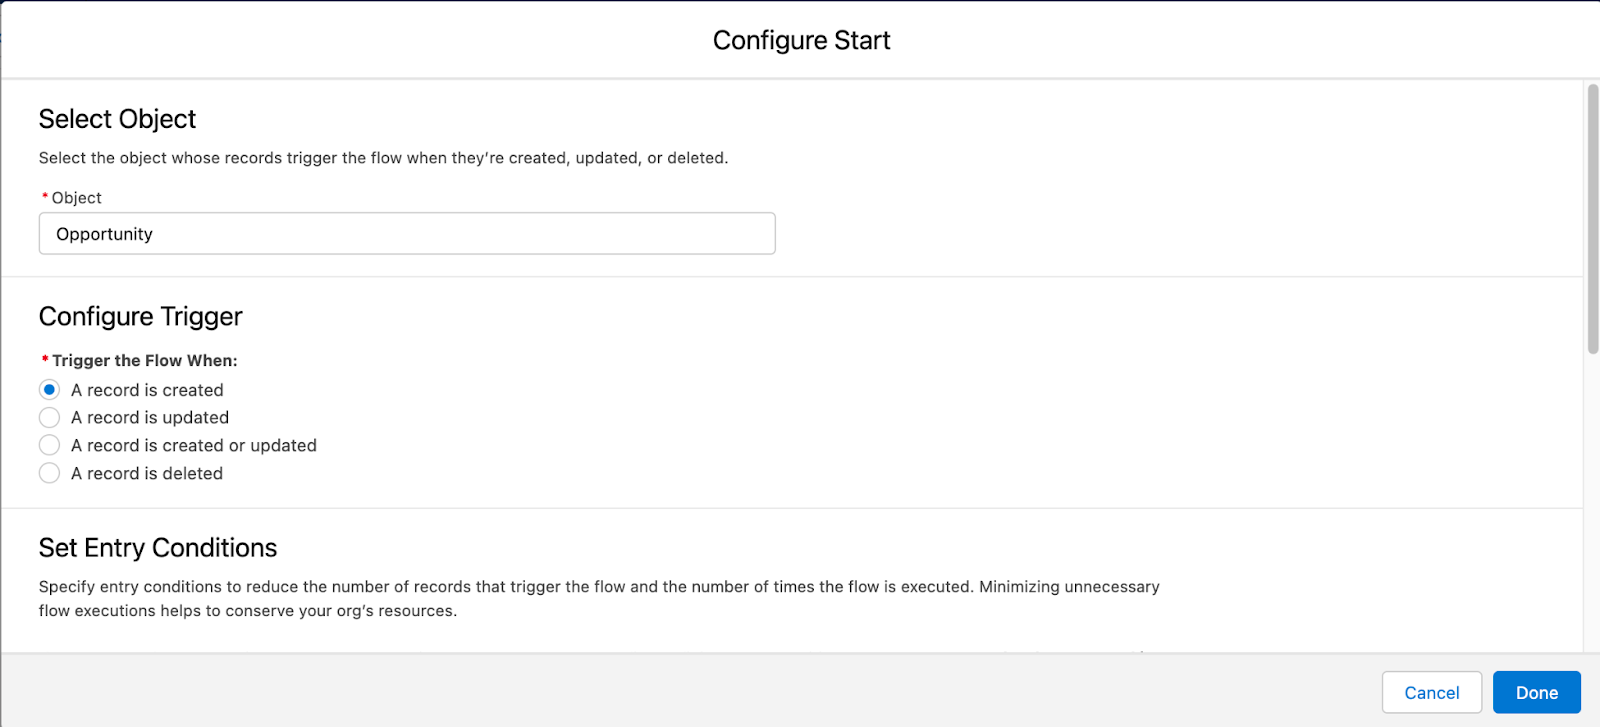
Create a record triggered flow
You can set this up by creating a record triggered flow, and selecting the object you would like this to be triggered on. Set your entry criteria for the flow, whether that is for a task with a certain subject or an opportunity at a certain stage.
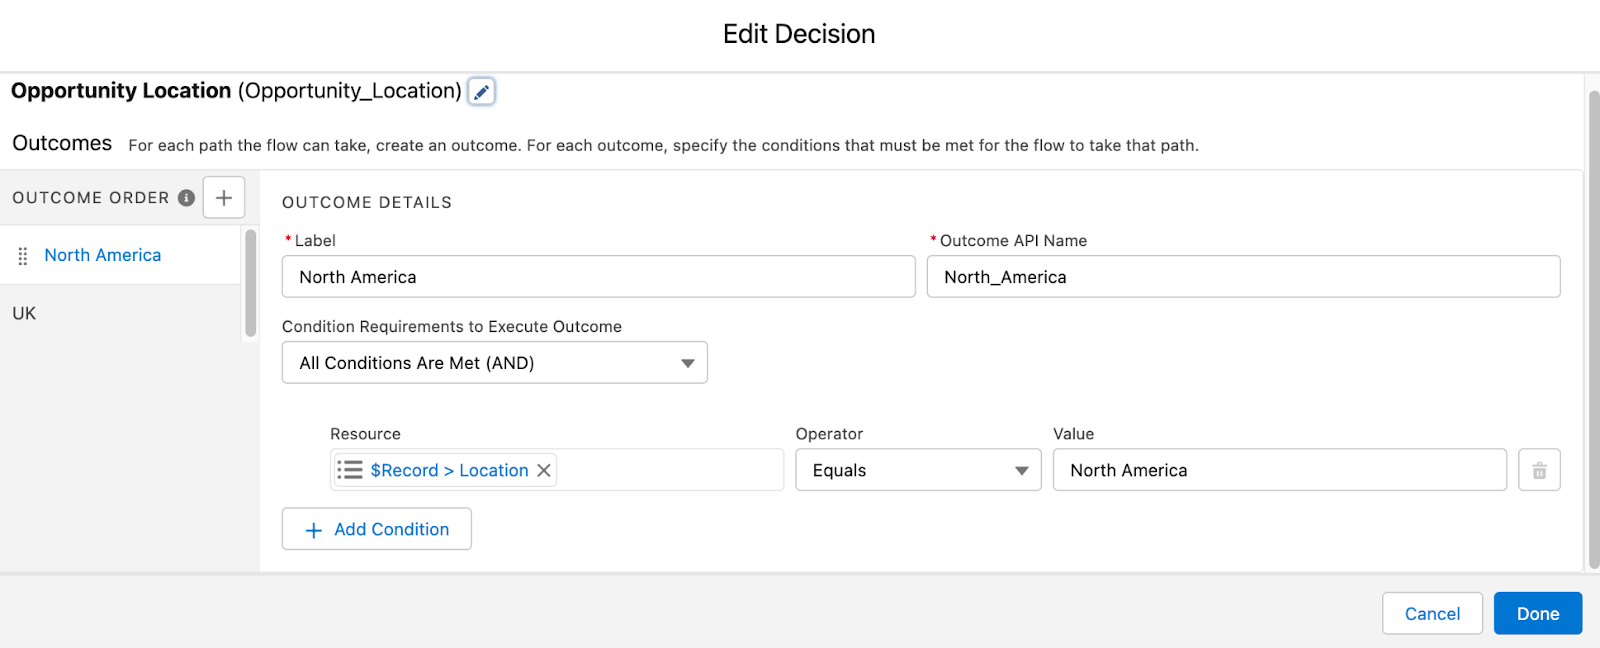
The second element in the flow is a decision element, which you can select by clicking on the plus under the entry criteria. This decision element has been added to decide the team/group to round robin and branch into two paths based on the opportunity location. If you only have one Assignment Group for this object, you can move onto the next stage without adding the decision element.
Add a Get Records element
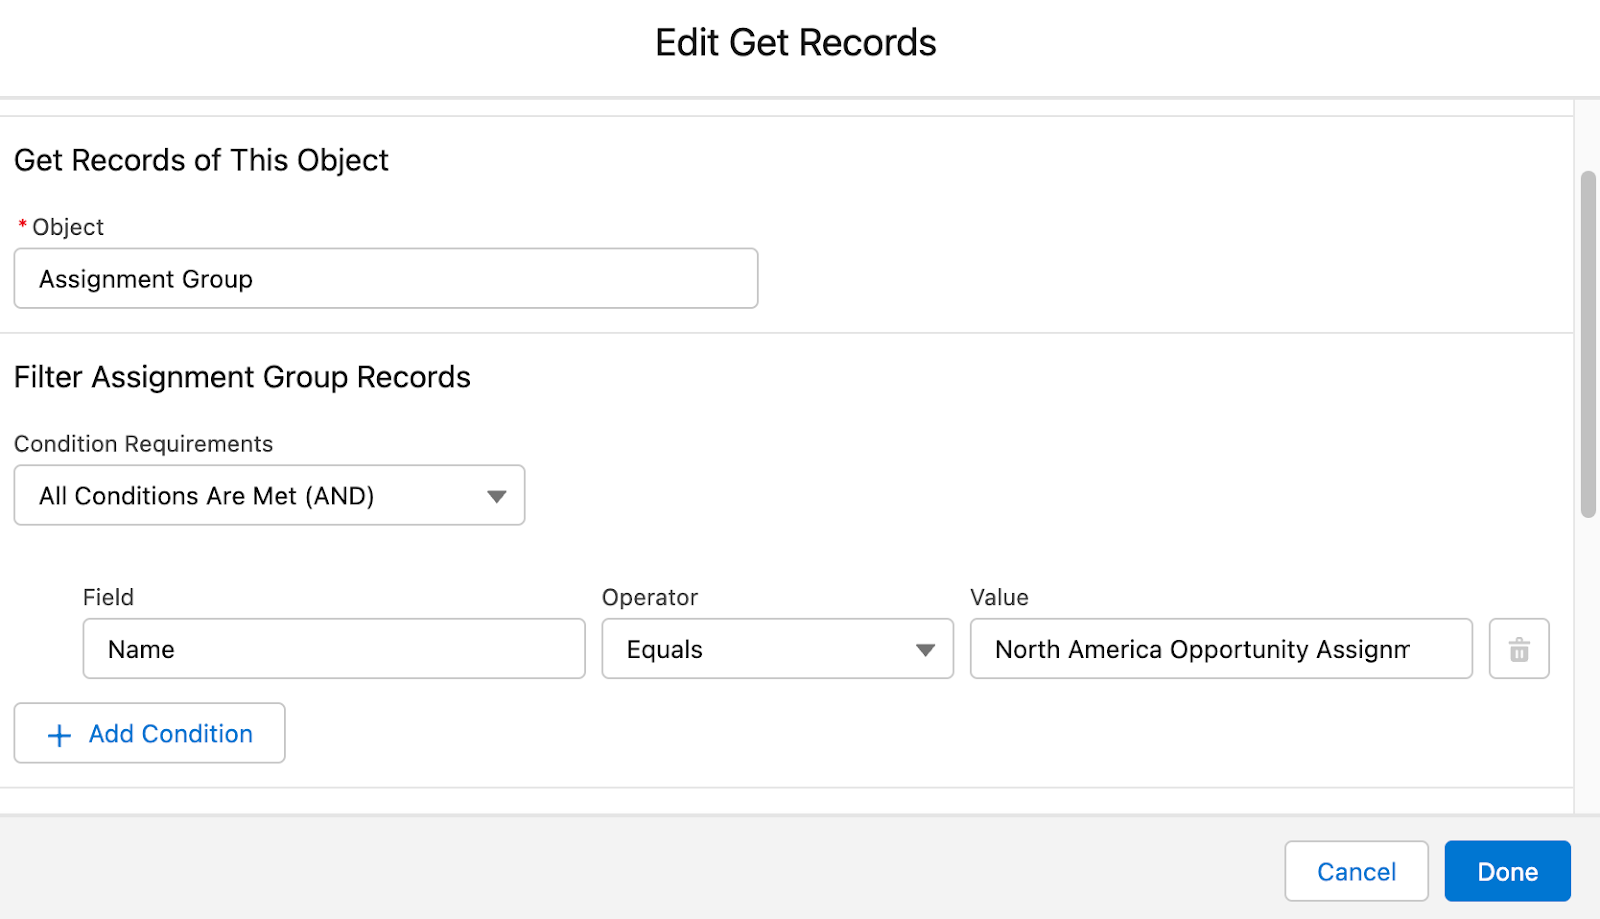
The next step in the flow is to add a Get Records element to find the relevant Opportunity group for the North America path. Add a filter to retrieve the Assignment Group record where the “Name” of the Assignment Group equals the relevant Group name which you would like to retrieve and store the first record only and store all fields.
Add second Get Records element
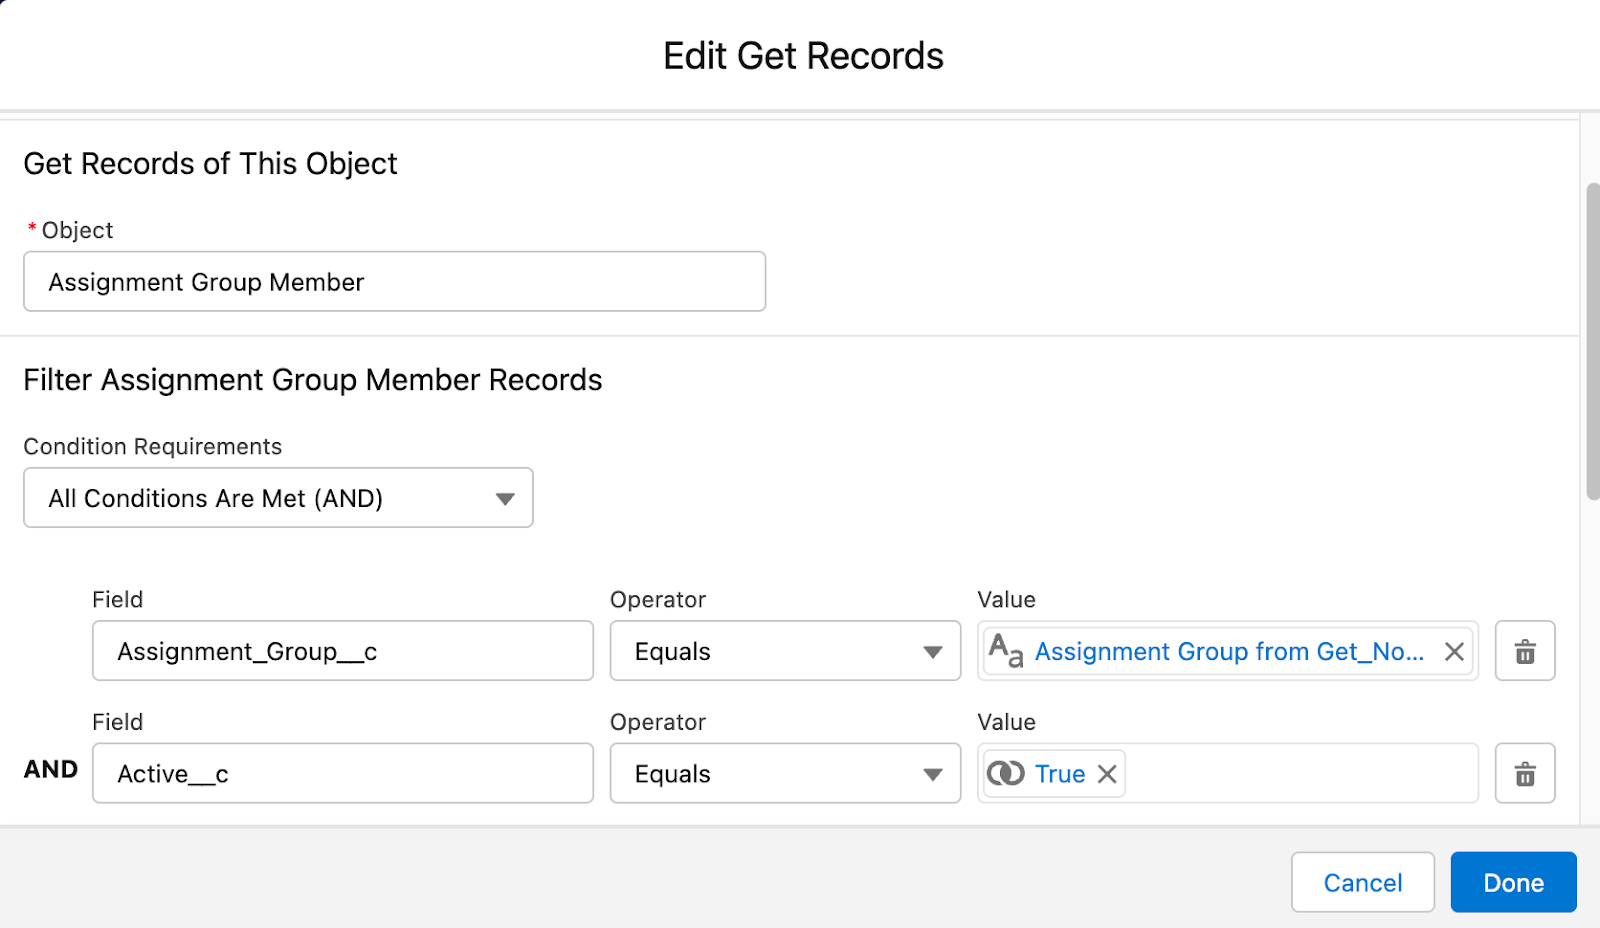
Next, add a second Get Records element after this to retrieve the Assignment Group Members in this assignment group.
You can do this by selecting the object Assignment Group Member and entering the “Assignment Group” field, with the operator “equals” and the Assignment Group record Id from the previous Get records element.
Add an additional filter to only return Assignment Group Members that are active (eliminating any Assignment Group Members on Annual Leave or Unavailable for Assignment).
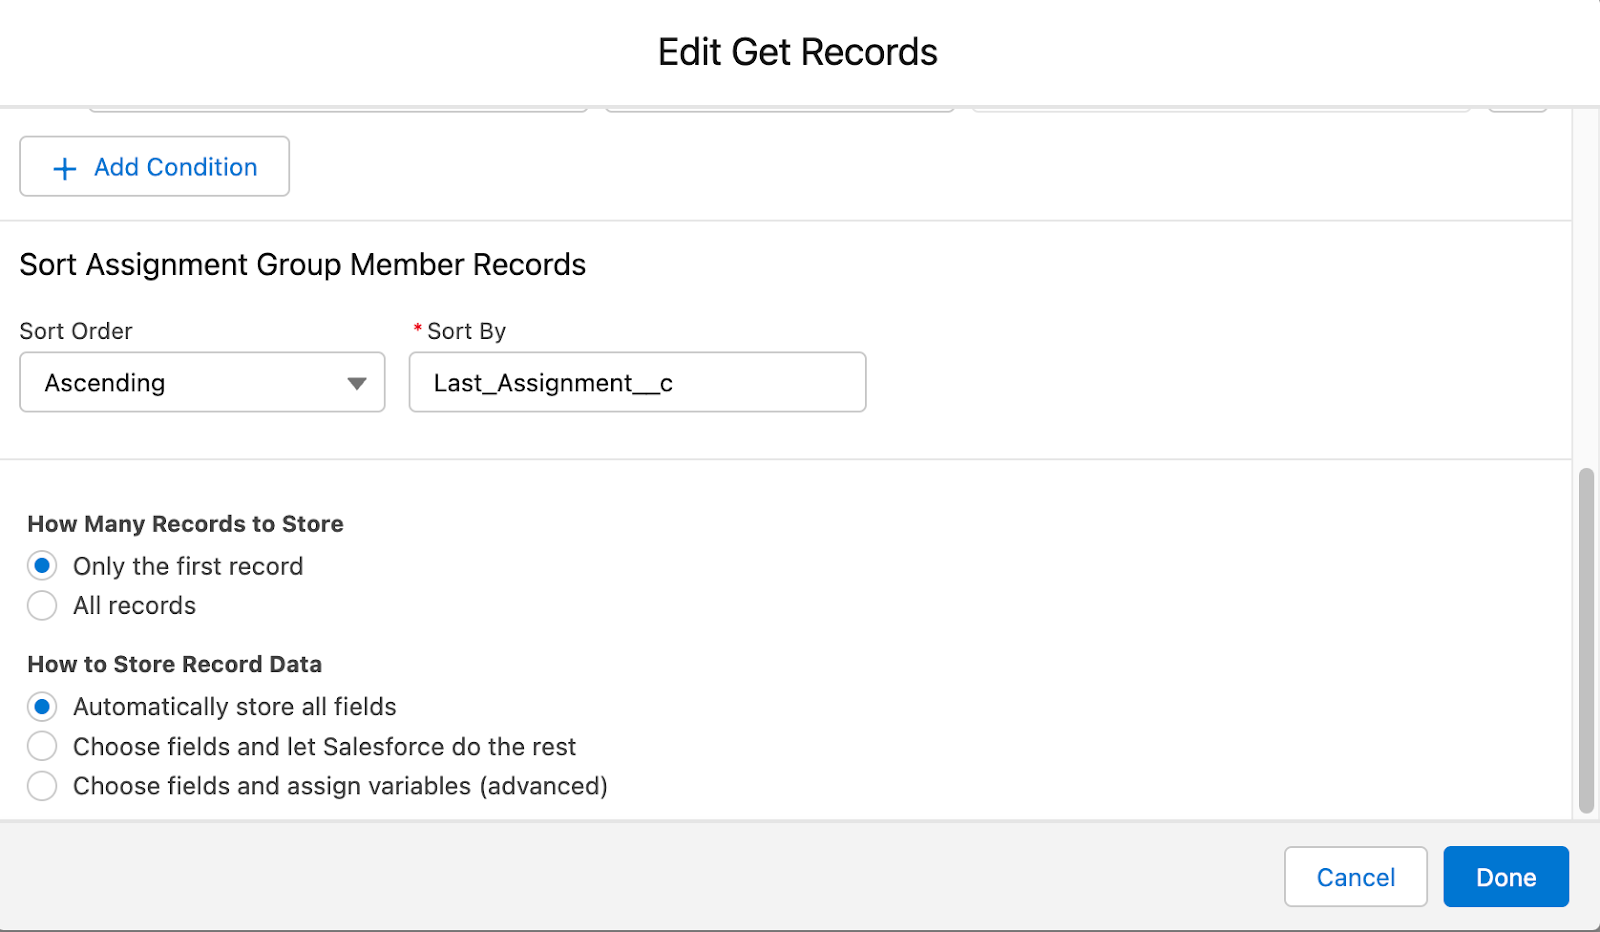
This time, we will still retrieve the first record, but the sort order is key here to ensure that the round robin works as expected and the oldest recently assigned member is selected. You can do this by setting the sort order as “Ascending” and Sort by as “Last Assignment Date.”
Update the owner of the record
The final steps in this path are to update the owner of the record to be the retrieved user from this Get element and update their Last Assigned Date on their member record.
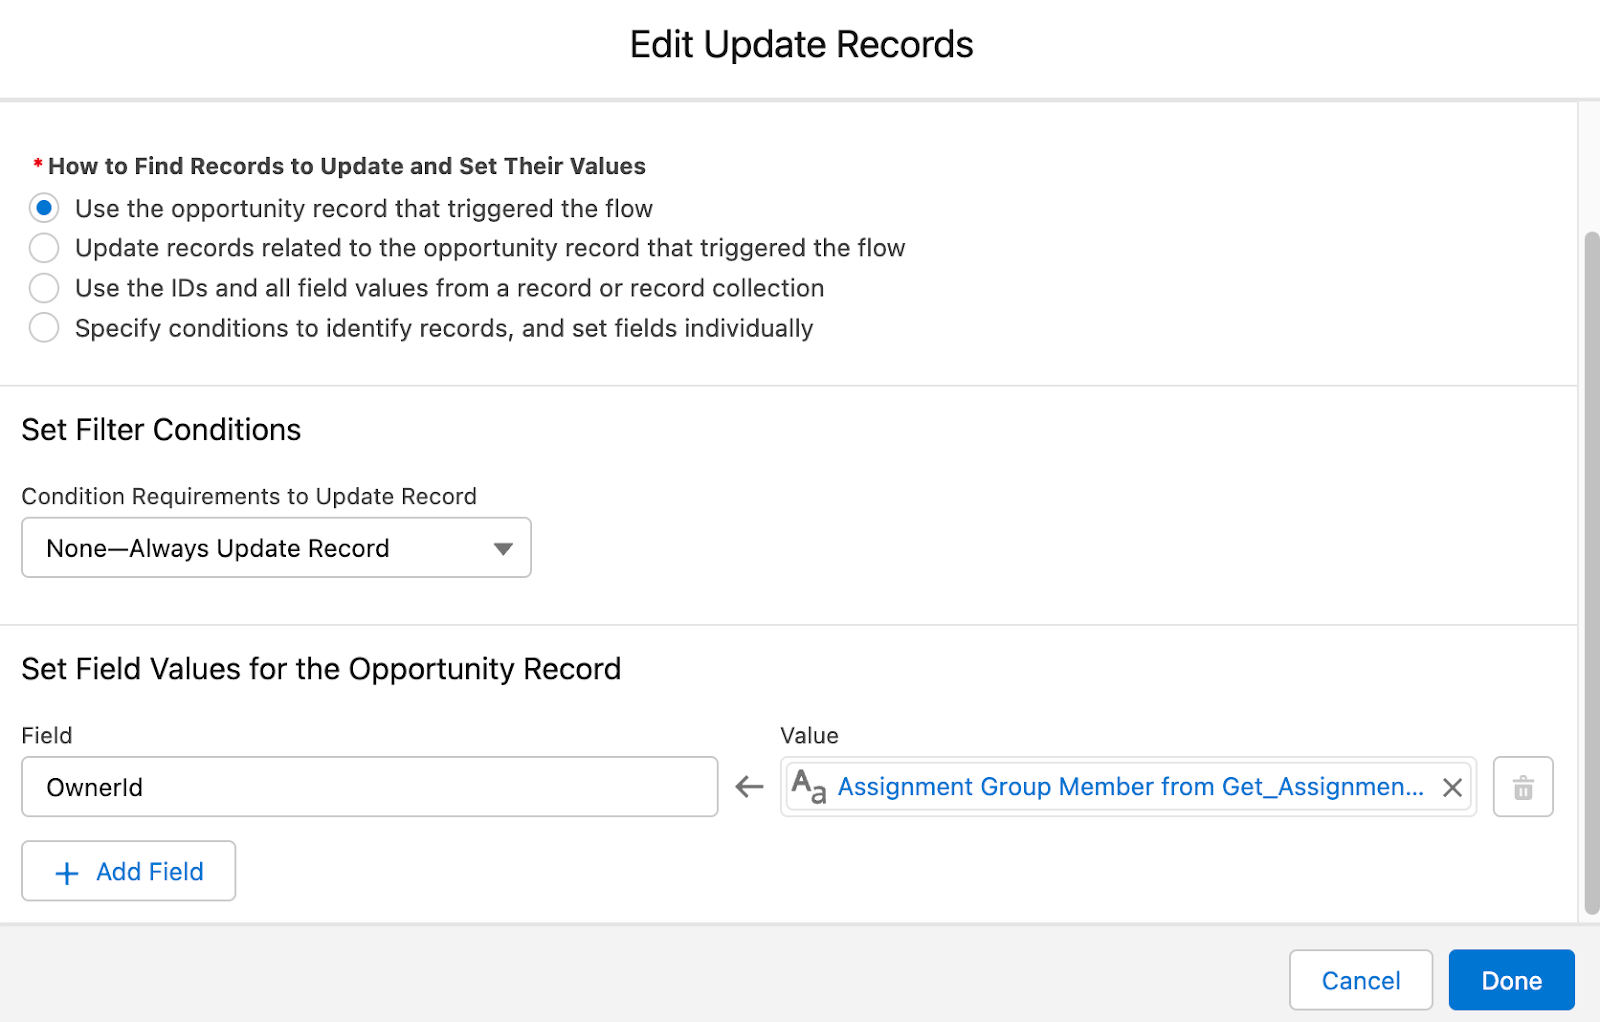
Add an Update Records element to the flow, and select “Use the record that triggered the flow.” Select the relevant field to update — in this case Owner — and select the User from the Get Assignment Group Member User Id element.
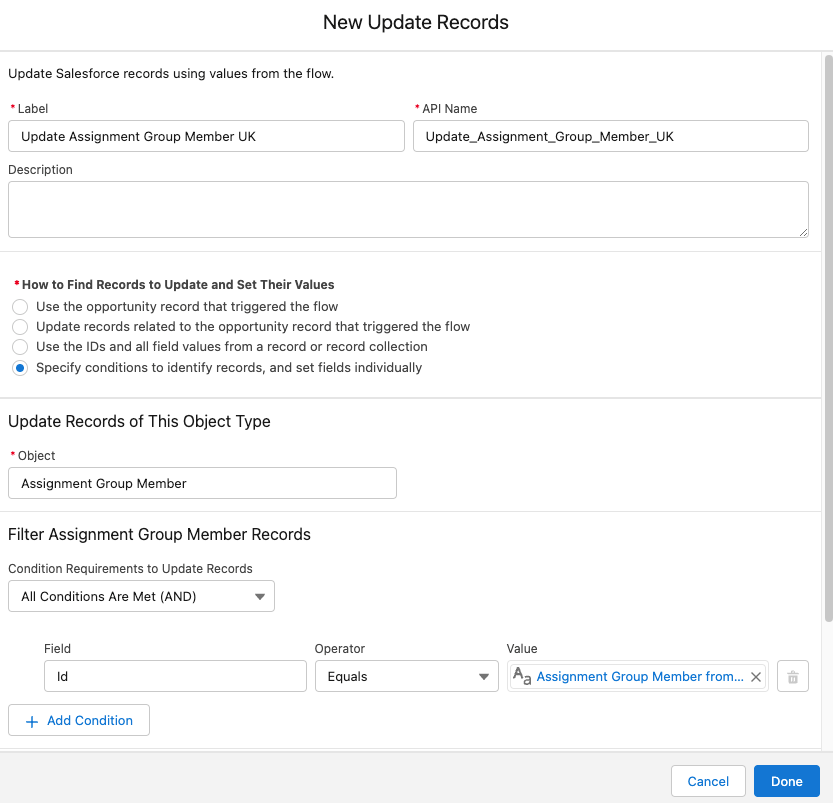
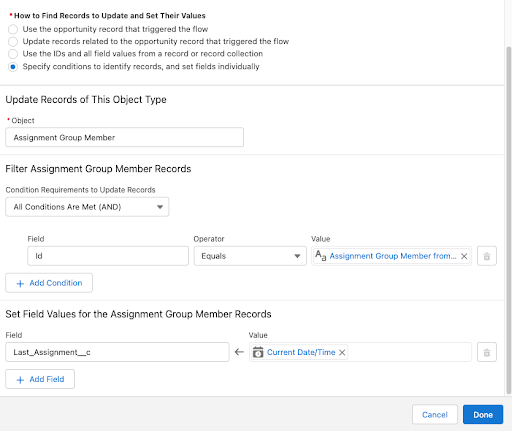
Then, create another Update Related Records element and select “Specify conditions to identify records, and set fields individually.” Select the Assignment Group Member from the objects list and specify the record to update where the “ID” equals the ID from the previous Get Assignment Group Member element. Select the relevant field to update — in this Last Assignment Date — and select Flow> Current Date/Time.
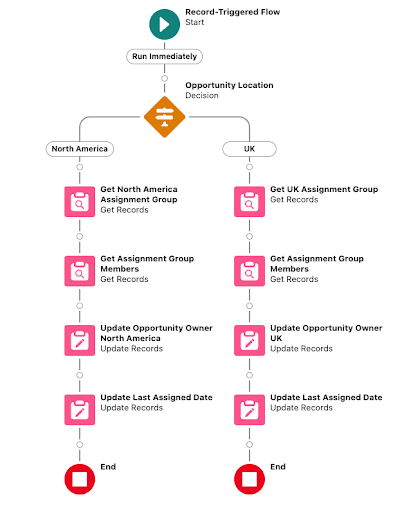
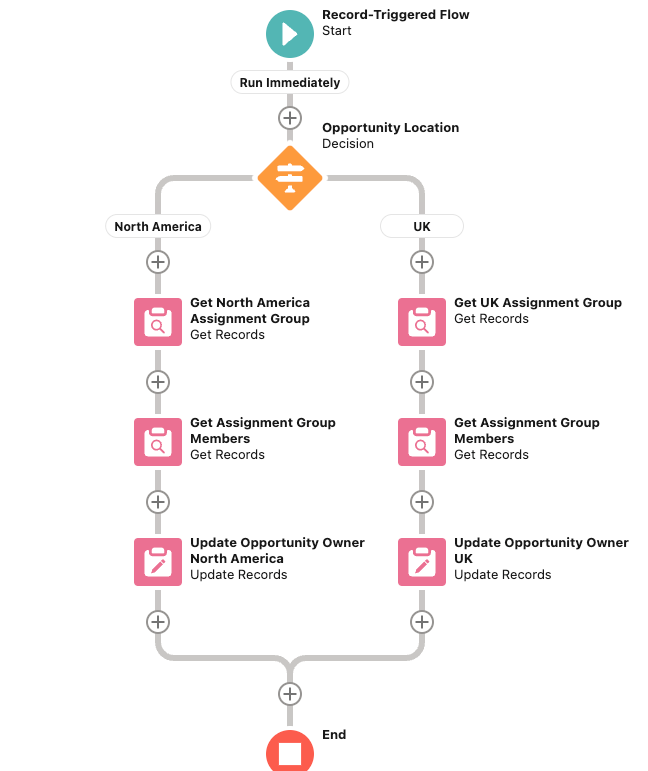
See if your flow looks like this
Repeat the steps on the other decision paths as needed. The flow should look something like this, if you have multiple assignment groups to round robin in the flow.
Additional Considerations
- Consider creating a custom Rollup Summary on the Assignment Group object to record the number of Assignment Group Members in the Assignment Group. You can also filter this to show only active Assignment Group Members.
- If any changes are made to the name of the Assignment Group record or any additional Assignment Groups created; this must be updated in the Round Robin Assignment Flow.
- Make sure to debug and test the flow before making this live to make sure that everything works as desired.
- You can also add in a Send Email Action to the flow or a Custom Notification to notify the user of the assignment at the end of the flow.
- Ensure that the necessary users have access to the tabs created of the custom object; you could delegate permissions to Team managers to manage the users available to round robin and annual leave.
Great Solution for Complex Salesforce Object Routing Needs
In summary, this solution can help all teams with complex object routing needs or for admins who would like a more manageable solution than other round robin configurations.
The ability to assign records to users and consider availability in a front end facing way allows records to be actioned in an efficient manner; removing wasted time re-assigning records for users that are on holiday or have left the business.
If you need further assistance with your business automation needs, feel free to reach out to the Sercante team where we can help you build scalable business solutions.