Category

Setup & Admin

Does your marketing and sales data live in separate places? Do you want all customer details to live in one place? If so, Marketing Cloud Connect is the answer. 

Marketing Cloud Connect combines the digital marketing capabilities of Marketing Cloud Engagement with the data management, segmentation, and campaign management tools in Sales Cloud. 

What is Marketing Cloud Connect?

Marketing Cloud Connect is an installed package that integrates your Salesforce CRM (Sales Cloud/Service Cloud) with Salesforce Marketing Cloud Engagement. By creating unitary customer relationships with more data-driven, personalized conversations and the ability to automate the customer journey,  Marketing Cloud Connect provides access to powerful Marketing Cloud tools directly within Sales or Service Clouds and vice versa.

Connecting Marketing Cloud Engagement with Salesforce CRM

The overall process of connecting these two clouds together is relatively straightforward, and it can be summarized in a 6-step process. However, there are key items to consider along the way.
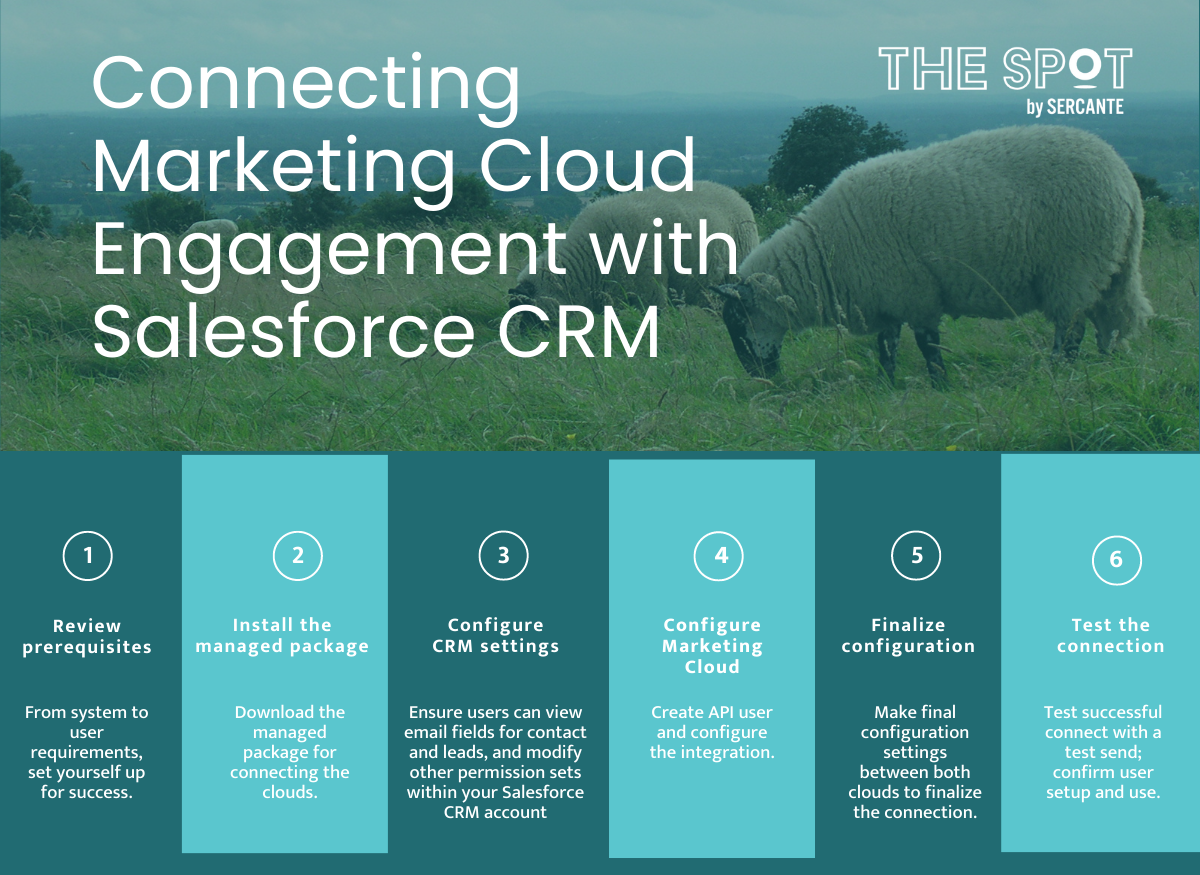
Connect marketing cloud to salesforce crm steps

Step 1. Review prerequisites for implementation

From system to user requirements, set yourself up for success by reviewing the prerequisites or requirements you’ll need for Marketing Cloud Connect implementation.

Step 2. Install the Marketing Cloud Connect managed package

Download the managed package for connecting the Salesforce clouds. To do that, you’ll copy-paste the URL below that relates to where you’ll install the package. Remember to log in to Salesforce using your administrator credentials.

  • Production Org: https://sfdc.co/MCC
  • Sandbox Org: https://sfdc.co/MCCSandbox

Step 3. Configure CRM settings

Ensure users can view email fields for contact and leads, as well as modify any additional permission sets within your Salesforce CRM account.

Step 4. Configure Marketing Cloud

Create the API user and configure the integration. This will enable core system communication activities between Marketing Cloud and Sales or Service Cloud.

Step 5. Finalize configuration

Make final configuration setting adjustments between both clouds to finalize the connection.

Step 6. Test the connection

Finally, complete a test to check for a successful connection. You’ll complete this step with a test email send. Then, you’ll confirm user setup. Once all the tests are successful, you can start using it.

Considerations for implementing Marketing Cloud Connect

Keep the following considerations in mind as you complete the implementation.

User Admin Level Access

The user setting up the connection should have admin access to both Marketing Cloud and Sales Cloud.

1:2 Relationship

Marketing Cloud Connect requires a relationship between a single Marketing Cloud account and one or more Salesforce orgs. Your Marketing Cloud account must be provisioned and enabled for use with Marketing Cloud Connect before connection.

Subscriber Key

The Subscriber Key is required for Marketing Cloud Connect. If it is not enabled in your Marketing Cloud account, complete a Subscriber Key Migration before proceeding with the connection process.

Avoid using email addresses as the Subscriber/Contact Key in Marketing Cloud.

Instead, use something that is: 

  • Unique
  • Persistent
  • Channel agnostic
  • Global

We recommend using Salesforce Contact ID as your Marketing Cloud Subscriber Key to deliver maximum synchronization between the two clouds. Learn more about contact model relationships here.

Important Note: If the email address has already been set as the Subscriber Key, please reach out to your Salesforce consulting partner or Salesforce Account Executive before connecting Marketing Cloud and Sales Cloud. They’ll provide  more guidance and help you to avoid duplicates.

Custom Tabs Available

Ensure that four custom tabs are available in your Salesforce org.

Multiple Licenses

To use most Marketing Cloud Connect functionality, users need a Marketing Cloud license and a Sales or Service Cloud license.

Lightning Experience

Salesforce Lightning Experience is not supported for Marketing Cloud Connect features. Those using Lightning Experience with Salesforce are automatically redirected to Salesforce Classic when any Marketing Cloud Connect tabs are clicked.

Using Marketing Cloud Connect

While the initial focus may be getting Marketing Cloud Connect set up properly, the real magic occurs in using these clouds together. 

Top benefits include:

  • Syncing CRM data to make smarter decisions and personalize every message in Marketing Cloud Engagement. By tapping into the Synchronized Data sources and Contact Builder, marketers are able to create highly targeted communications while avoiding static or outdated data at the time of send.
  • Automating 1:1 cross-channel journeys across clouds and bi-directionally. You can listen and react to changes in any object across the Salesforce suite of cloud products for journey enrollment. Additionally, the sync can update tasks, open and close service cases, or update sales opportunities based upon interactions that have occurred in Marketing Cloud.
  • Empowering sales & service users to send Marketing Approved Emails within their native platform. – can be sent on a 1:1 basis, to a specific report or prospects/leads that are part of an existing campaign in Sales Cloud; users will also be able to see performance tracking results also from Sales Cloud
  • Sending triggered actions from Sales Cloud via Apex Trigger for a specific Object – typically for a contact based upon a set trigger such as new record is created or lead is updated

Benefits of Salesforce Marketing Cloud Connect Integration

By enabling Marketing Cloud Connect functionality, you’re helping to reduce previous data silos that may have once existed. Through a single source that consolidates your marketing and sales data, you’re able to send highly personalized, super-targeted data-rich communications more confidently. 

To learn more about how to implement Marketing Cloud Connect for your organization and how to maximize Marketing Cloud Connect in your digital marketing efforts, contact us today.

Resources: Marketing Cloud Implementation Guide 2020

Accessibility has always been top of mind for me in everything I do. As someone with a disability, I am conscious of others who may be having similar struggles. 

So, when I found a professional career in digital marketing, specifically email marketing, the idea of accessibility transitioned with me. 

This idea was further driven home for me when I encountered a client who was working on a massive project to update their entire digital platform, email marketing, website, social, etc. to be compliant with the Americans with Disabilities Act (ADA). I learned a lot from that project and now I want to share it with you.

In this article, I will share with you the top resources and items to check off your to-do list when enacting the ADA guidelines into your digital marketing to achieve email accessibility. Hopefully, this will save you a lot of time googling!

Why does email accessibility matter to me?

More than 1 billion people have a disability, which is 15% of the world’s population. Of those struggling with a disability, approximately 43 million people live with blindness and 295 million people live with moderate-to-severe visual impairment, leaving them to use an assortment of assistive devices to interact on the web. These devices include:

  • Screen Readers: software that allows users to read text with a speech synthesizer or braille display
  • Magnifiers: tools that increase the text size for the reader
  • Navigation Assistants: systems that guide users via sound commands

As a marketer, it is important for us to take these into consideration when creating our digital marketing content, such as your website, landing pages, emails, social posts, and any other digital content. Overall, companies who practice digital marketing accessibility experience fewer lawsuits, an increased customer base, and an improved sense of brand loyalty.

At the end of the day, this isn’t about accommodating someone’s preferences or unique quirks. It’s about meeting the needs of your customers. The likelihood of one of your customers falling into the 15% of disabled users is very high and meeting their needs should be a top goal for every marketing initiative. Luckily, the best practices for ensuring accessibility in your digital marketing efforts is also the best practice for improved usability and SEO performance across the board.

What can I do to create accessible digital marketing assets?

There are a handful of basic tips and tricks that you can enact today to make your marketing content more effective and accessible to all of your audience members.

Let’s get started!

Color Contrast

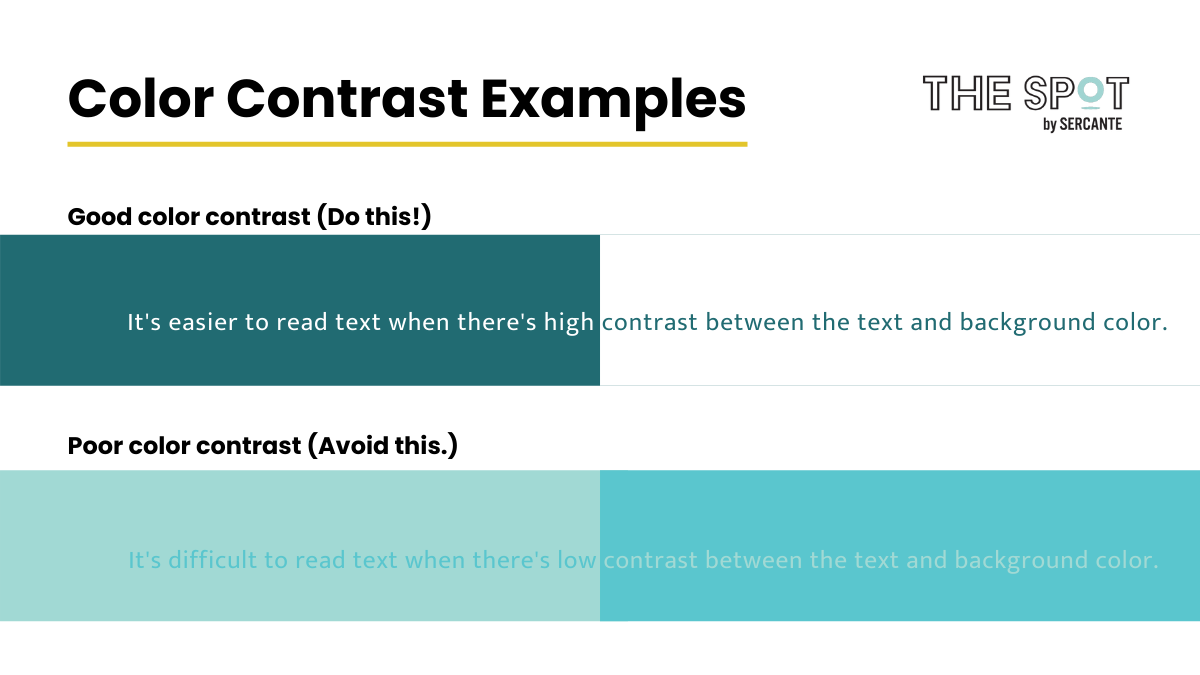
Use clear color contrast between text color and your background. Users with color blindness will be especially thankful to you. So let’s experience less of this and more of that.

Color contrast examples

We recommend WebAim to measure your color contrast ratio. It is a great tool that will give you an easy to decipher pass/fail grade for all things accessibility.

Large Font Sizes

While people can use their magnifiers or zoom in on your content, why should they have to? This is especially true if it ruins the look and feel of what you are providing them. 

Instead, create your content using larger font sizes, and build the design around it. 

The ADA recommends a font size of at least 16 pt on any form of digital media. This is also the preferred size for most of the population.

Font size examples

Text & Imagery

Avoid using text on your images and graphics. Individuals who use screen readers can’t read text on an image. That’s because screen readers simply see that as a picture file and will overlook it. 

Using text in your graphics means some of your readers may not be getting the full message you are trying to present. Ensure that the key content and messaging you are providing is in your text, and use images as a supporting player.

Text and imagery examples

Alternative Text

Alt text can be your best friend! 

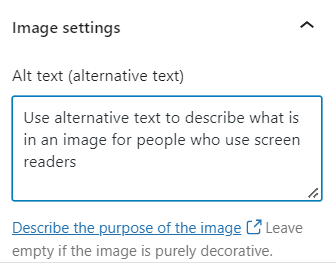
If you are using images or have web links that you are sharing, insert your alt text so that screen readers don’t overlook the additional information. 

Screen readers know to look for alt text and will provide this content to the reader allowing them to get a fuller picture and better user experience.

Alt text describes an image

Visual Hierarchy

Use headers and subheadings appropriately to provide the reader with an overview of the content and establish the key points. Also, use breaks and keep content left aligned when possible. This helps visually-impaired readers define the critical information that is being provided and allows for an easier experience when they don’t have to jump around due to justification changes.

Plain Text

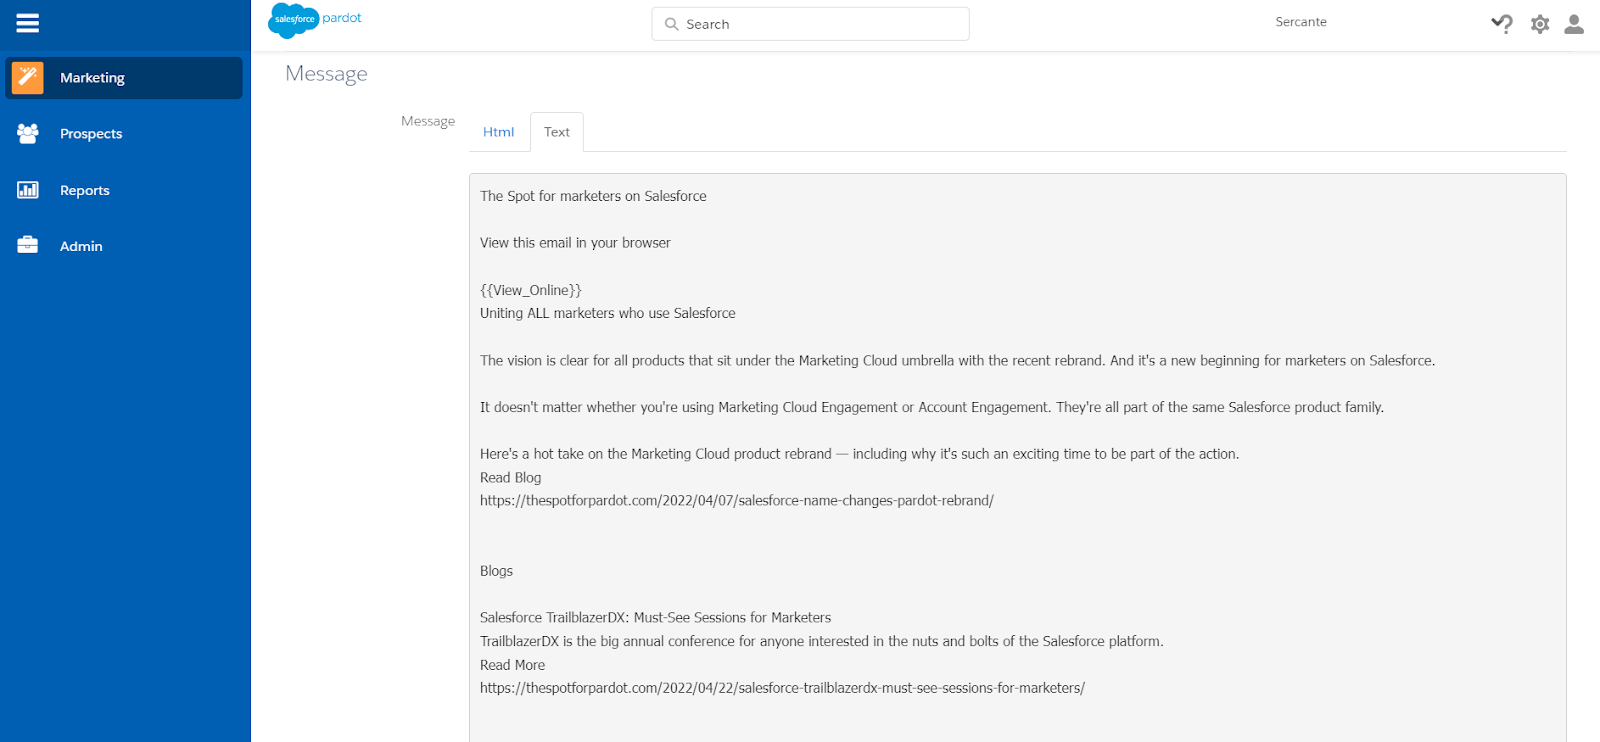
This is an easy win for our Marketing Cloud Account Engagement (Pardot) users! 

When building an email in Pardot, you are required to create a text version of every email you deploy. This ensures accessibility for all recipients and allows for you to include the pertinent information in a text email that assistive devices can easily access. 

Use alt text to provide content for screen readers to describe what's in an image

Accessible Links

Do not group links together. Instead, space them apart and consider using bullets. This helps readers who are using navigation assistants to click on the correct URL. This is also helpful for users who are on mobile devices.

Additionally, you should always write descriptive link text:

Emoji Overload

Any type of bright, strobing media can cause dangerous, life-threatening seizures. This can include emojis such as the Party Parrot or flashing Gifs. 

Images that could cause seizures include:

  • Flash more than 3 times per second
  • Are sufficiently large
  • Are bright with high contrast

Are there legal ramifications for not following digital marketing accessibility guidelines?

As I previously referenced, there are potential legal ramifications and fallout for not following ADA guidelines. 

Web Accessibility Initiative (WAI) is an international organization that sets standards around accessibility. Their latest publication, WCAG 2.1, references three levels of accessibility with 61 checkpoints. However, they are not all equal. I have grouped the levels of accessibility below by importance here:

  • The “must” list: Without these changes, at least one group of potential customers will not have access to your information.
  • The “should” list: Meeting these t=recommendations ensures significant barriers are removed for those with disabilities, increasing your brand visibility.
  • The “may want to” list: Individuals with disabilities may struggle to fully access your content, but it won’t be impossible.

Based on your company’s headquarters, laws may differ. So, I encourage you to take the time to look into your local laws and regulations pertaining to disabilities. 

For the United States, Title III of the Americans with Disabilities Act states that “discrimination against individuals with disabilities persists in such critical areas as employment, housing, public accommodations, education, transportation, communication, recreation, institutionalization, health services, voting, and access to public services.” With communication being covered, arguably, within digital marketing. As a result, regardless of industry or sector, it may be time to assess your accessibility guidelines.

Email accessibility benefits everyone

Building emails that everyone can access is not only the right thing to do. It’s something that’s going to ensure you’re not just delivering messaging, but instead delivering messaging everyone can process and understand. 

Tell us about your experiences with email accessibility in the comments section!

Personalization is a common buzzword one can hear throughout the digital marketing landscape. And as a result, it can mean so many things depending upon who you ask. 

However, at the end of the day, personalization is what marketers are aiming to deliver — user experiences that are personal and customized based on contact preferences and previous engagement. 

We’ll focus on several key features and functionalities available in Salesforce Marketing Cloud Engagement to offer personalized content.

Personalization can mean many things in Marketing Cloud

Personalization is a powerful tactic for marketers to leverage. However, the term is used so often and can mean many different things — especially when it comes to the what and the how. It can leave everyone a bit confused as to what one really means when they use this term. 

There are several ways you can deliver personalized content in Salesforce Marketing Cloud Engagement that range from simple to complex.

Marketing Cloud Personalization Strings

The most basic and common form of personalization in your digital marketing efforts can be referred to as personalization strings. A personalization string lets you insert subscriber attributes, such as subscriber name, into your emails. 

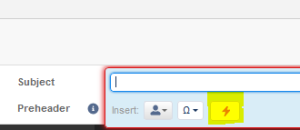
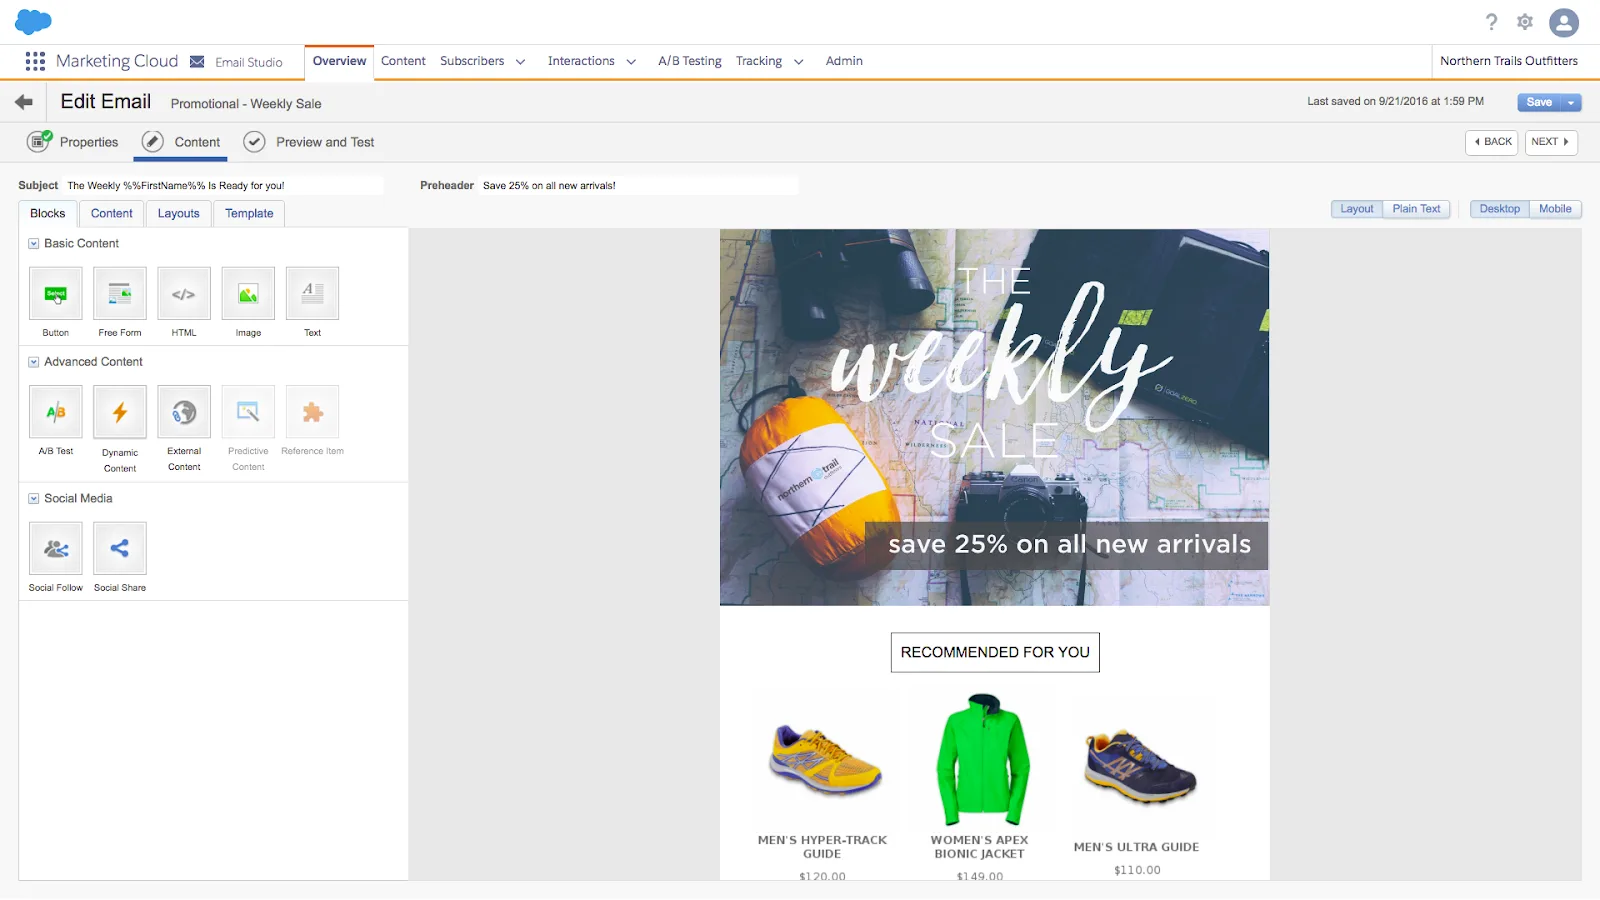
Personalization strings can appear in the subject line, preheader, or in the content of the email in Email Studio. 

You may hear personalization strings referred to as merge fields or substitution strings. This type of personalization has been in usage for quite some time and while commonplace, it is very effective.

In addition to the subscriber attributes, you can insert system data and modify the content using AMPscript expressions. You can type personalization strings into the HTML of your email body if you’re creating an HTML paste email, or you can type them into the text editor when you create or modify text content.

Tips for using Marketing Cloud Personalization Strings

Below are some tips to consider when using personalization strings: 

  • All personalization strings are case-insensitive.
  • Include the two sets of double percent symbols.
  • If you’re inserting a personalization string into a line with other data, include a space before and after the personalization string.
  • If you insert a personalization string, and the subscriber attribute isn’t populated, the string will appear blank in the email. Be sure to define a default value for every attribute you intend to use with a personalization string. For example, use this string to include default attributes for First_Name: %%[IF Empty(First_Name) == “False” THEN SET @FN = First_Name ELSE SET @FN = “Customer” ENDIF]%%Hi %%=v(@FN)=%%
  • Do not include personally identifiable information, such as email address, in email links.
  • Testing is critical; two testing tools available for personalization strings are Content Detective and Validation.
  • Leverage code snippets for your AMPscript for non-technical users.

Learn more about using personalization strings here.

Marketing Cloud Dynamic Content

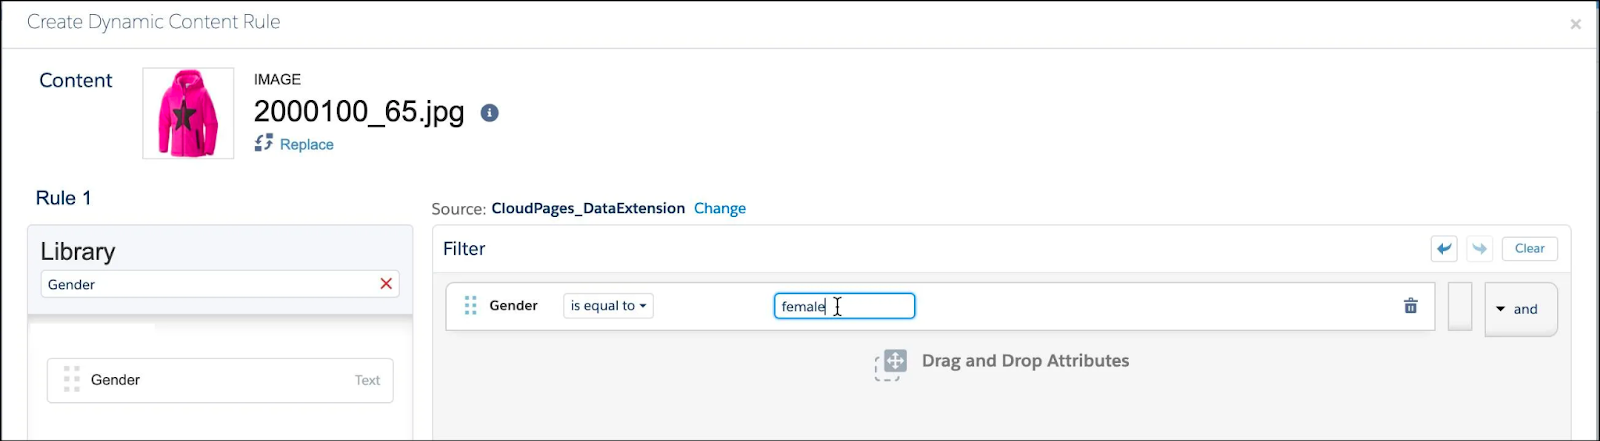
Dynamic content is another way to offer relevant and personalized content to your audience in Email Studio. 

Like its counterpart in Account Engagement (Pardot), Dynamic content in Marketing Cloud Engagement is content that displays in a content area according to the rules that you define based on the subscriber’s attributes or the targeted data extension column values. It’s a great way for non-technical marketers to deliver personalized content using the rules-based interface. 

You can also use dynamic content in your preheader and subject line instead of using AMPscript expressions.

The two testing tools available for dynamic content are: 

  1. Subscriber preview 
  2. Test send

Marketing Cloud Enhanced Dynamic Content

If you are designing emails that extend beyond a couple of rules for swapping dynamic content, the Enhanced Dynamic Content tool lets you import a delimited file containing text and image URLs to create content.

Instead of using AMPscript and data extensions to manually create complex dynamic content and the rules for each variation, the system creates the content from the data in your import file. The columns in the import file contain the names of the enhanced dynamic content assets, and the rows contain the content variations for each asset. 

Content Builder saves the assets as Enhanced Dynamic Content Maps in the content library. Then you can use them as blocks in emails and templates. You can link your enhanced dynamic content to an audience during the import or while adding the blocks to an email or template.

Einstein Content Selection

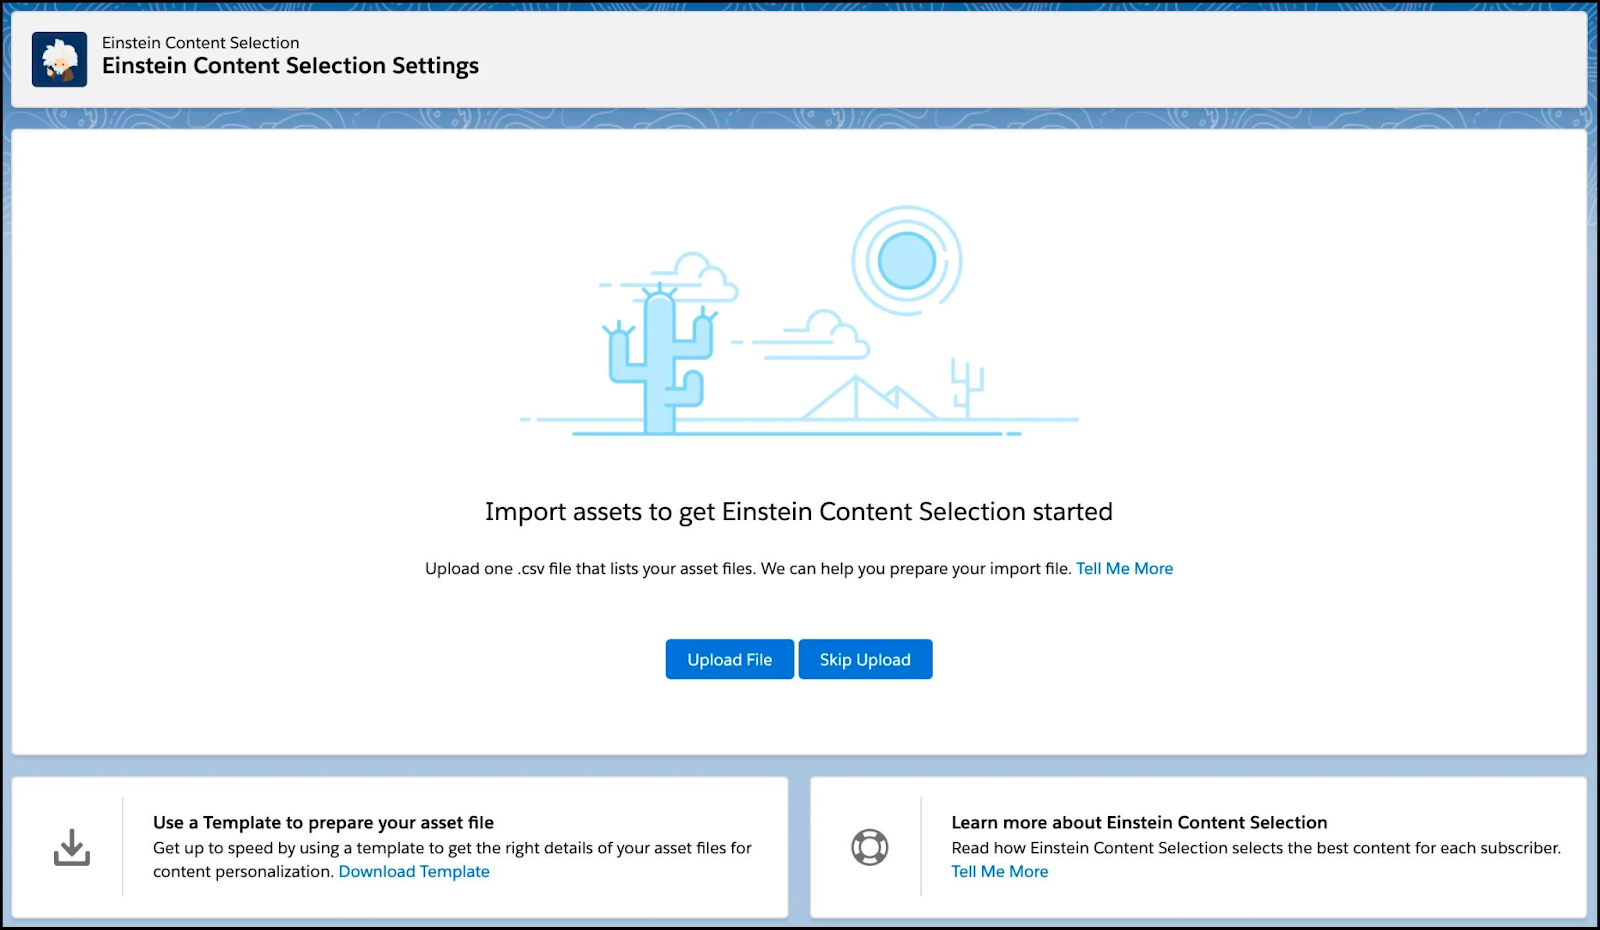
You can also add an Einstein Content Selection content block to your messages. At open, Einstein then can select an image for your messages by analyzing the assets that are engaging your customers. The content block selects an asset that’s personalized for each subscriber from a pool of assets that you upload and then adds the asset to the message. 

Things to consider:

  • Einstein Content Selection must be enabled in Marketing Cloud Setup.
  • You should add an asset catalog file before dragging the Einstein Content Selection block into your message so that Einstein can select the image assets to show.
  • The subscriber list can’t contain a field called memberid. If it does, the block doesn’t function properly.
  • Assets are selected based on how they perform with your subscribers.

Einstein Recommendations via Marketing Cloud Personalization (Interaction Studio) 

Last but not least, Marketing Cloud Personalization*, powered by Einstein recommendations, delivers the next best product, content, or offer to every individual through product and content recommendations for email and web. 

Every customer interaction is an insight. With every click, download, view, and purchase, customers are giving data about their preferences. Marketing Cloud Personalization combines user behavior with algorithms and your unique business rules to build a user profile of affinities. And in turn, use that profile to determine the most relevant content and products for each customer in real-time.

Marketing Cloud Personalization gives marketers the ability to:

  • Understand Customer Behavior – through JavaScript collection and Item Attribution to understand Customer Affinity
  • Predict & Automate Decisions – including 1:1 recommendations and behavioral triggers
  • Personalize Each Customer Journey – through audience segmentation and conversion reporting

*Marketing Cloud Personalization must be purchased and provisioned before use; it is not included as part of the Marketing Cloud Engagement product.

Personalization can take many forms

In summary, the ways you can deliver personalized content in Salesforce Marketing Cloud Engagement range far and wide, from simple to complex.  

Regardless of what you choose, see below for some reminders and tips to get started: 

  • Personalization always depends on your data and what is available.
  • A template is a shell for an email that can be used and a great place to standardize personalized or dynamic content.
  • Content blocks can also be reused. Design personalization based on the attributes you are collecting and enable every email to be personalized.
  • Personalization strings can be used inline in a Text block and in the Subject and preheaders for individualized content.
  • Testing is critical. Leverage Preview to view individualized content for a subscriber; Test sends allow you to send specific email versions or multiple versions to ensure personalization and business logic is set up correctly.
  • Crawl, walk, and run into email personalization.

Tell us how you’re using Marketing Cloud personalization features in the comments below. Or reach out to the Sercante team for help figuring out how to leverage the tools.

Knowing the who, what, when, and how of Salesforce and Account Engagement (Pardot) sync behavior is key to understanding how you can use the integration to your advantage.

If you’re a newbie to Marketing Cloud Account Engagement (Pardot), then you may be wondering how in the world this system communicates with the main workhorse of Sales Cloud (Salesforce). 

Well, follow me my little pretties, as we look behind the curtain of the Wizard of Oz to find out how it really all works.  

1. The Who: Identifying the Wizard 

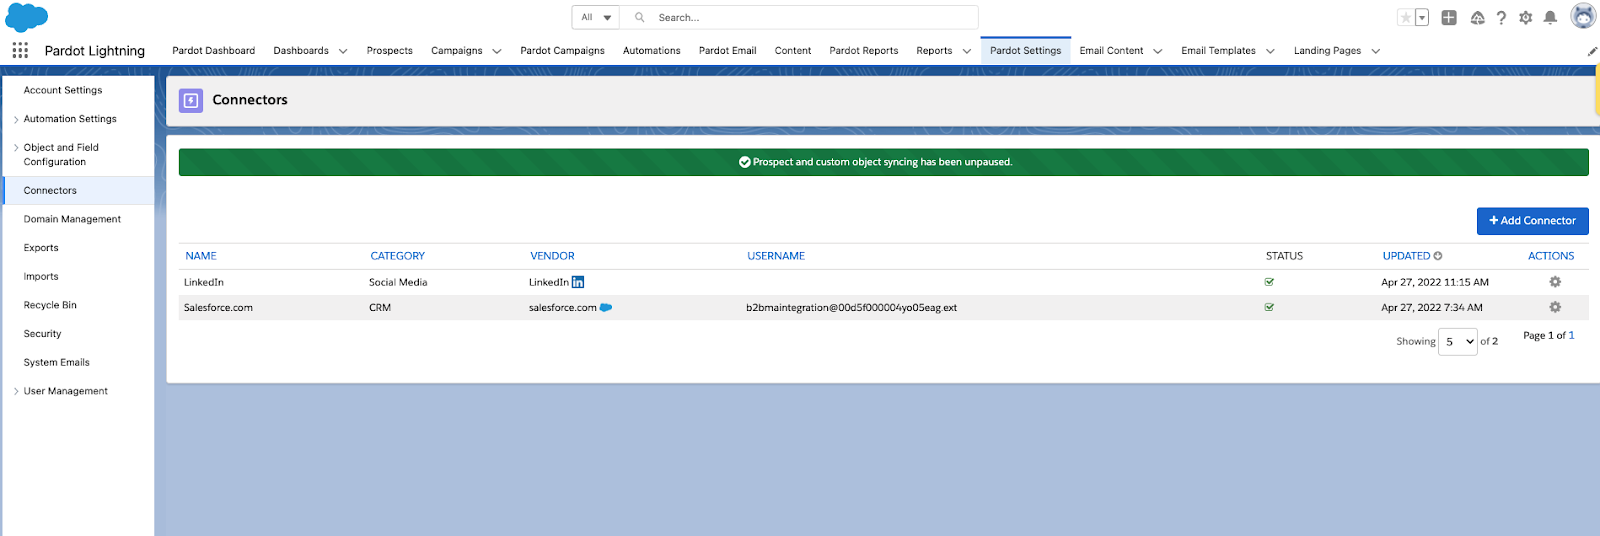
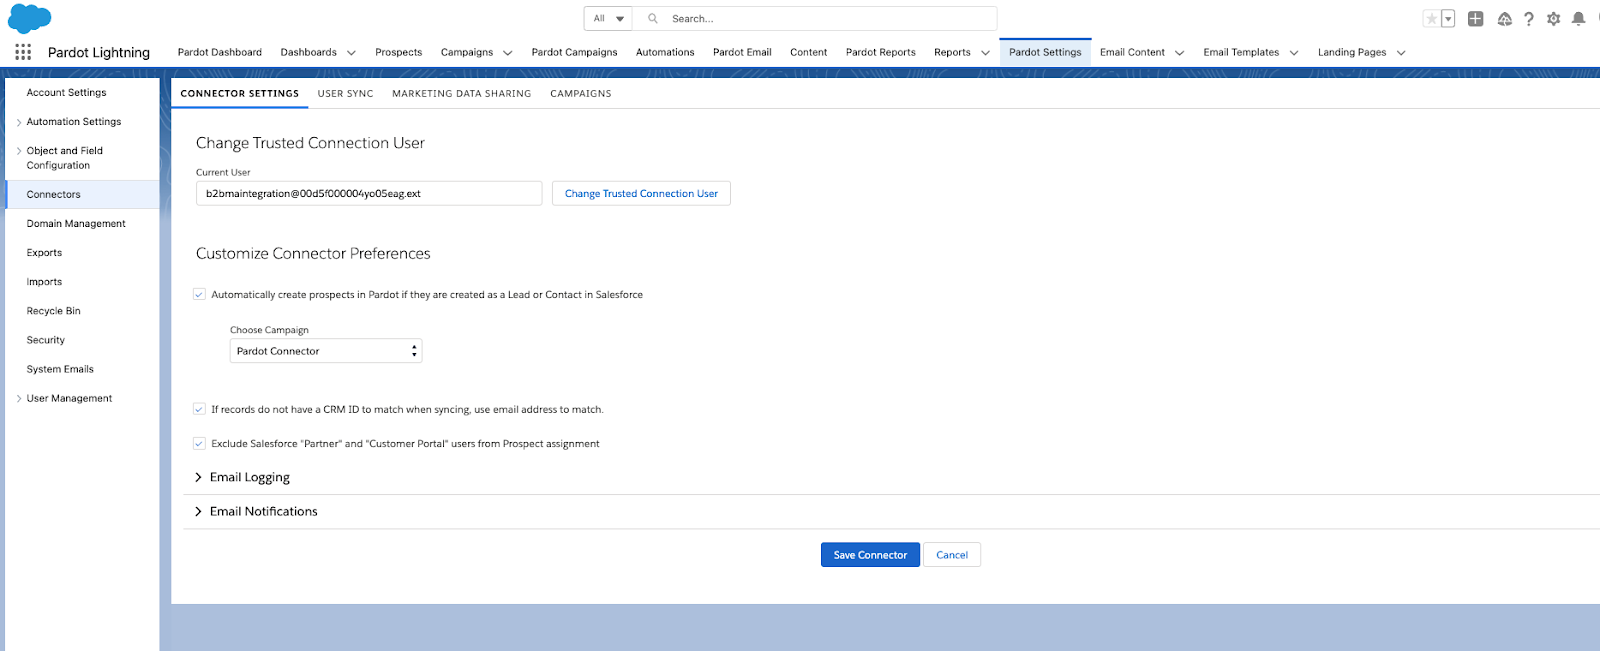
Unmasking the culprit behind the smoke and mirrors of the sync magic is not a difficult path to take. Just navigate to your Pardot Settings tab, and hang a left at the Connectors intersection. 

Here you will find the wizard who’s behind all of the shenanigans.

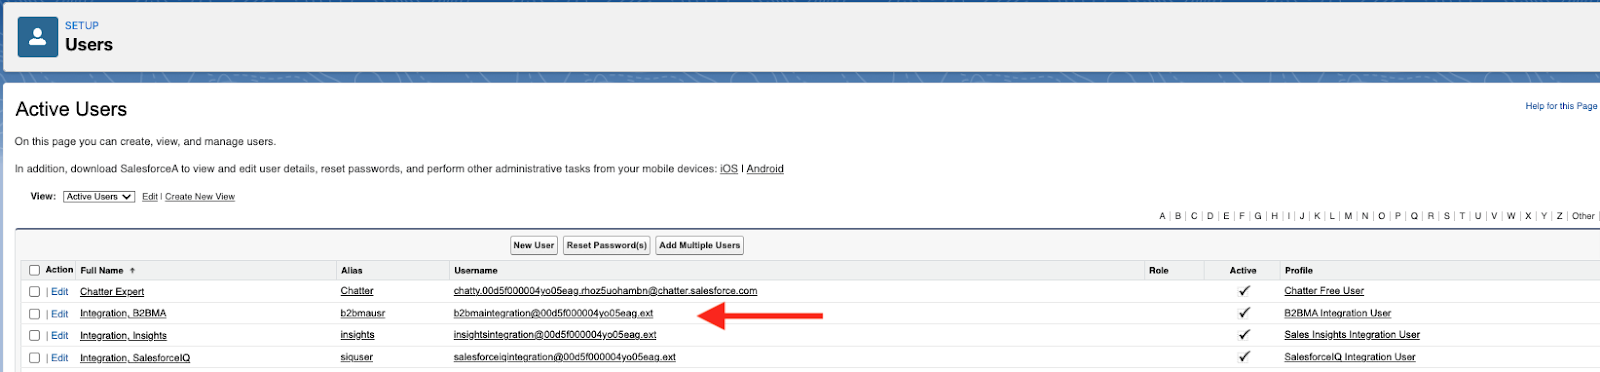
Enter the B2BMA Integration user. 

B2BMA Integration User controls Sales Cloud and Pardot Sync behavior

You can find the B2BMA Integration user in your Salesforce setup with the username similar to the following: [email protected] (see below).

This user comes out of the box with the installation of any new v2 MCAE/Pardot instance purchased after February 11, 2019. It’s a free Salesforce licensed user that serves as the handshake between both MCAE/Pardot and Salesforce (Sales Cloud). 

Chances are, you have this user available to you. If not, you likely have a custom connector user that’s tied to a company-specific/unique Salesforce username (and license) that’s in its place. 

Whichever username you have, the underlying matter is that this is the who the system looks to for direction and instruction on what will sync when the sync occurs. Whatever this user can see, will be what the system will sync when the sync takes place.

2. The What: Determine what will sync to Salesforce

You may be wondering, what do you mean, whatever this user can see? Well, I’m glad you asked.

Connector user access determines what will sync to Salesforce

To understand what will sync when the sync occurs, you first have to understand the fabric of the connector user. This user is special. Whatever this user can see — a la whatever visibility to record data this user has access to will be what is included when the Salesforce-Pardot sync transpires.

Heads up — Salesforce connector user gotchas

As a quick reminder, there are four out-of-the-box standard objects that the connector user can communicate with in Salesforce; that’s the Lead, Contact, Account, and Opportunity objects. The Account and Opportunity objects/fields have a read-only relationship and the Lead and Contact objects/fields have a read/write relationship. 

Your connector user (B2BMA Integration User or Custom Connector User) will determine what set of records will be included in the sync between both systems. The out-of-the-box B2BMA Integration User has View All/Modify All permissions for all lead and contact records that exist in Salesforce. Therefore, if this user is the selected user, then all records will have the capability to sync between both systems. 

If your Pardot system has a different user (i.e. Custom Connector User) with sharing rules set up to only have access to certain lead/contact records, or if you are using Marketing Data Sharing (Advanced and Premium editions only), then those records will be the only ones that will be synced when the sync ensues.

3. The When: Understand how often Salesforce and Pardot sync

Once the connector user has been set up and is in “play mode” (see below green ticker), watch the wizardry transpire.

The smoke machine behind the curtain is powered by a native feature that automatically syncs record and field data every 2-4 minutes.  Certain changes to prospect or lead/contact records will be pushed to Salesforce and certain information that is updated on Salesforce records, that have a matching MCAE/Pardot record, will be pulled into the corresponding prospect record. 

4. All Salesforce record changes are not created equal 

It is tempting to say that any changes to records will trigger a sync. However, this is not the case. 

The Salesforce connector user will only recognize certain “activities” when it’s ready to perform its regularly scheduled automated sync. Such changes to prospect records can be classified by the three types of activities: 

  1. System
  2. User
  3. Prospect

The following is a breakdown of each type of action that can cause a prospect record to queue for syncing.

System activities:

  • Any record changes to field values that occur because of an automation rule or completion action
  • Using the “Add to Salesforce campaign” in an automation rule, segmentation rule, completion action, or Engagement Program action
  • Changing/updating a Salesforce campaign status via automation rule, segmentation rule, completion action, or Engagement Program action

User activities: 

  • Performing a prospect import
  • Changing any prospect fields (including opting out prospects via import or manually)
  • Making changes to a Pardot campaign (for those who do not have Connected Campaigns)
  • Making changes to a prospects’ assigned user
  • Manually syncing from the prospect record (yes you can go the good ole fashioned route and manually sync an individual prospect record by pressing the “Sync with CRM” button on the Prospect record)

Prospect activities:

  • When a new or existing prospects submits a Pardot form 
  • When a new or existing prospects submits on a Pardot form handler 
  • When a new or existing prospects submits on a Pardot landing page form
  • When an existing prospect unsubscribes (globally opts out)

5. But what about Salesforce to Pardot?

While there are qualified activities that can cause a sync to trigger from Pardot to Salesforce, there are equally a few activities that can trigger a sync from Salesforce to Pardot. 

The following is a breakdown of each type of action that can cause a prospect record to queue for syncing.

  • Updating the Last Modified timestamp triggers a sync to Pardot for existing prospects
  • Updating a lead or contact email address
  • Updating the assigned user (owner) for the lead or contact record
  • Making field changes to a lead or contact record (Check the Sync Behavior setting on the MCAE/Pardot field to determine whether this value will “win” out when the sync occurs)
  • Updating a related account record in Salesforce for a lead or contact who is associated to a Pardot prospect.

And of course, i’ll queue up the trusty Salesforce knowledge article disclaimer/recommendation below:

6. The How: Connector Preferences

Each Pardot account comes with two key customizable connector preferences that determine how the sync will follow suit:

  • Automatically create prospects in Pardot if they are created as a Lead or Contact in Salesforce

and

  • If records do not have a CRM ID to match when syncing, use email address to match.

The first setting has to do with record creation from Salesforce to Pardot and the second setting relates to the overall sync logic. 

With the first setting enabled (turned on/selected), the connector user will check every 2-4 minutes to see if a new lead or contact record with an email address has been created in Salesforce that does not currently exist in Pardot. If found, that record will be swooped up by the connector user, scanned and copied over to Pardot as a new prospect record with the corresponding record data accompanying it. 

Recommendations for enabling this setting for your system are on a case-by-case basis depending on your mailable database limits and overall internal operational workflow/strategy. 

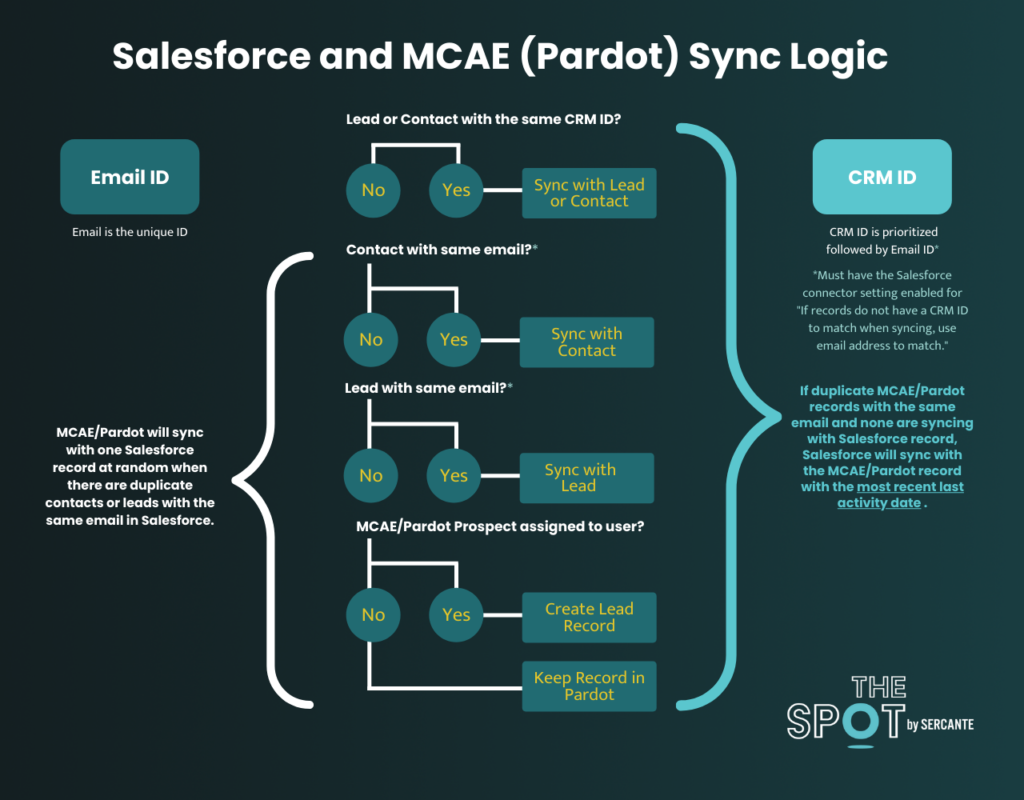
The second connector preference setting relates to how the system performs its hierarchical sync logic when a sync commences. It is highly recommended (best practice) to enable and keep this setting checked on your connector due to its native sync logic behavior as shown in the below diagram:

Salesforce and Pardot Sync Logic

Essentially, what this outlines is that when the connector user performs the sync, it will first check for a matching CRM ID at the lead or contact level. If no matching record is found for the existing Pardot record, it will then check for a matching email address first at the Contact level then down at the Lead level. If neither a matching CRM ID or email address has been located for the Pardot prospect record, that record will remain in Pardot until the record is assigned (either to a user, a queue or via any active assignment rule).

Now you’re a Salesforce sync Wizard

So, now that you are armed with the who, what, when and how Pardot syncs with Salesforce, it’s time to lock arms with the Tin Man, Scarecrow and Lion to ease on down the road to Oz. 

If you’re still feeling a little “cowardly” or “scarecrowy” (yeah totally not a word), then let the Sercante Munchkins escort you along the way! 

Nothing is more frustrating than when you experience a slowdown in your Marketing Cloud Account Engagement (Pardot) org. 

I just need this one Dynamic List to run, why is it taking so long!?! 

These slow downs are frustrating. But they’re typically a sign that you need to archive old, continuously running, processes and/or optimize how you are using the platform. 

The following best practices will help keep your Pardot org running efficiently. Many of these strategies are going to be more relevant to large orgs with 1 million+ prospects. But this information can be used to help increase processing times in Pardot orgs of any size.

1. Clean your Dynamic Lists

Dynamic lists are constantly running, matching and unmatching prospects as they fit or do not fit criteria. Old Dynamic Lists that are no longer matching prospects, or Dynamic Lists that are not actively being used can be a big strain on your system. 

Salesforce recommends a limit of 1,000 Dynamic Lists per Pardot org. Also, if you have millions of Prospects, consider reviewing Dynamic Lists matching over 5 million prospects to see if these lists can be broken into smaller pieces. 

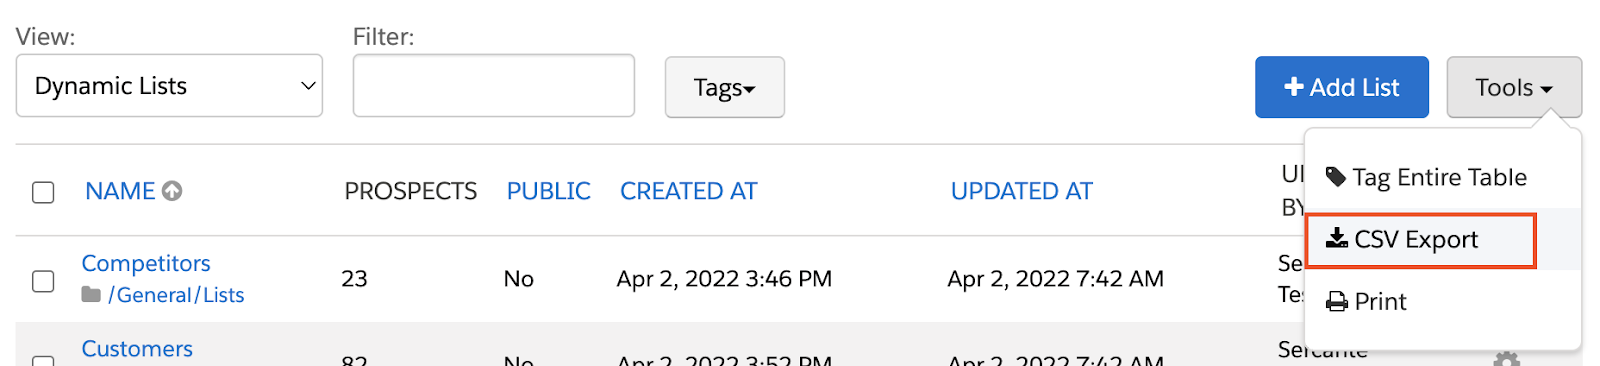
I like to CSV export my Dynamic Lists so I can sort them by Updated Date and look at the oldest ones first. You can also sort by number of Prospects to tackle your biggest Dynamic Lists.

2. Check those Automation Rules

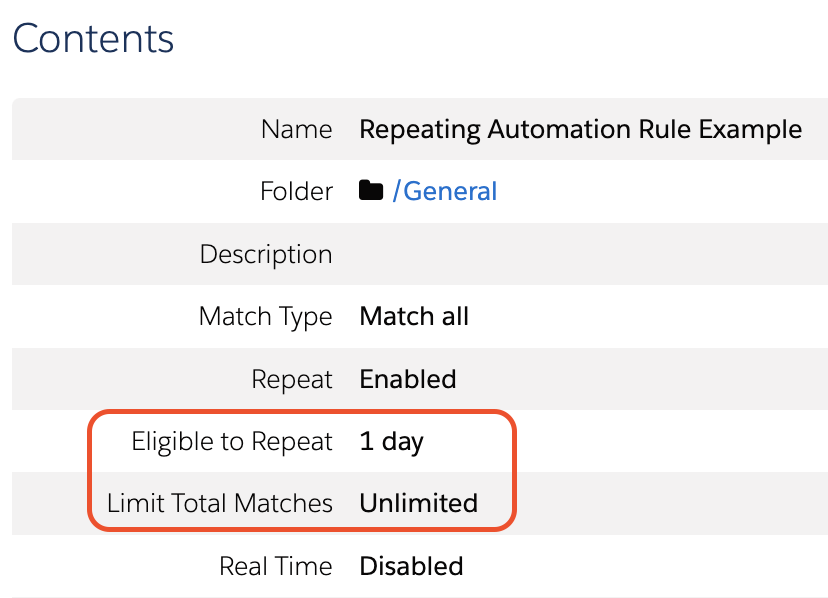
To keep things running smoothly, limit your automation rules to 5 million actions per day. This is a lot more than I see most Pardot orgs needing or using, but it doesn’t hurt to review your repeating automation rules and ensure the “Repeat Rule” settings are set appropriately to your needs. 

I also recommend reviewing which Automation Rules are set to run in real time. Although Pardot can handle this, it is still not recommended to use this for every rule. I find most of the time a Real Time Automation Rule can instead be replaced by a Completion Action. 

3. Only keep the best Prospects

The more Prospects you have in your Pardot Org, the more processing your org needs to do. Cleaning up unwanted or unneeded Prospects is a great way to cut down the number of processing requests quickly and our Junk Data in Your Pardot Org and 7 Ways to Clean Your Mailable List in Pardot blog posts have some great tips on how to do so. 

Dynamic Lists and Automation Rules are also going to look at every Prospect in your org to see if they match criteria. If you can’t cut down on the number of Prospects in your org, consider adding criteria that will exclude Prospects from recurring automations. 

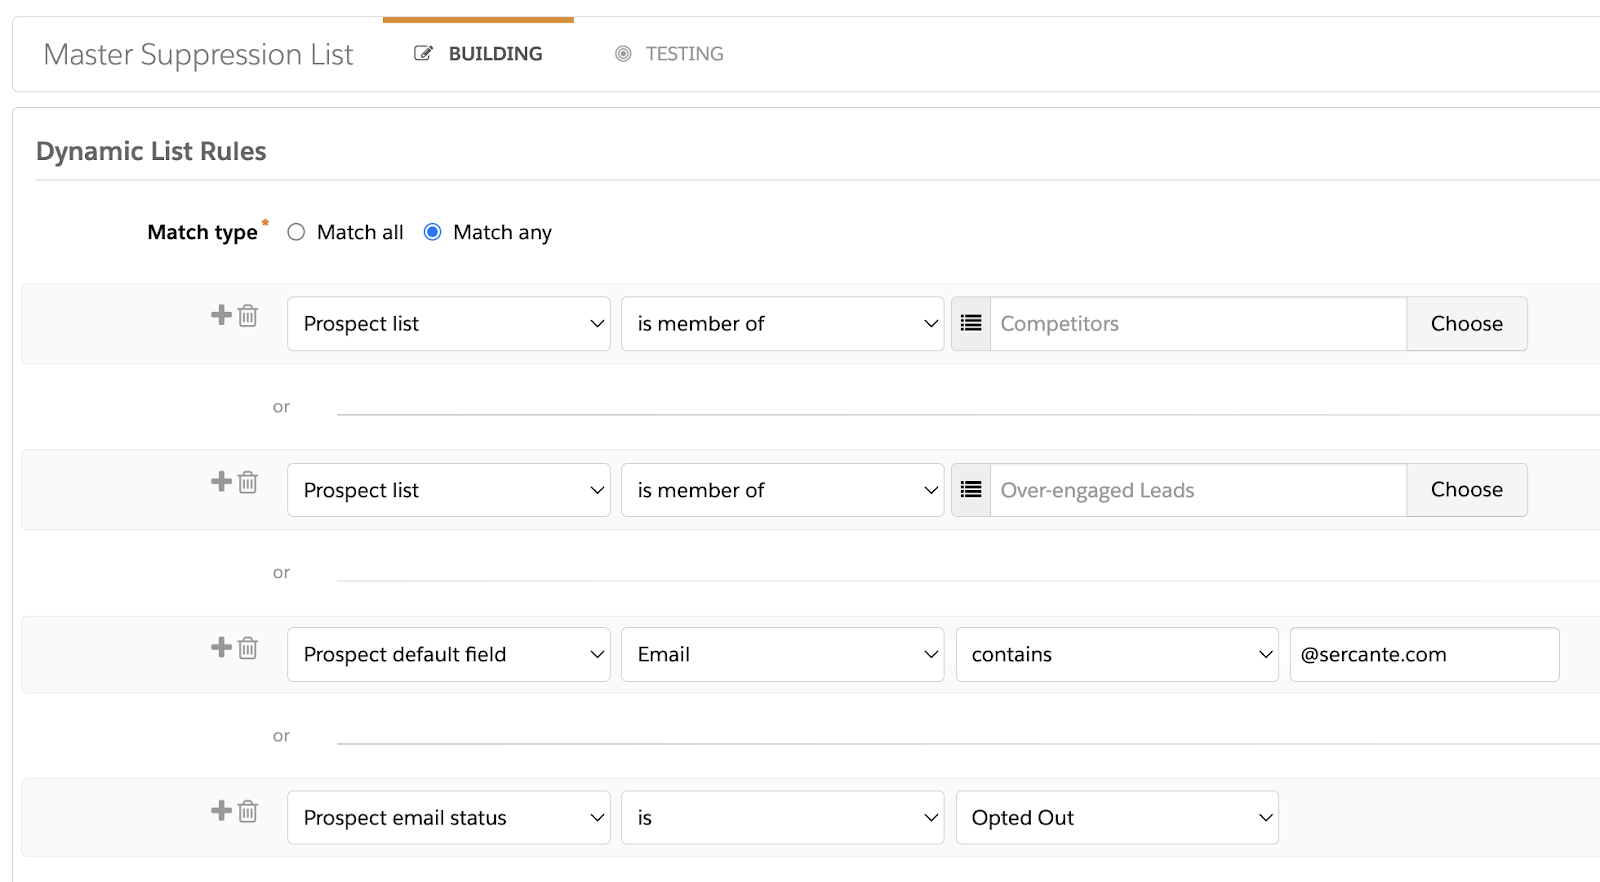
For example, if I am creating a dynamic list for an email send, I don’t have to include the criteria “Prospect email status isn’t Opted Out” because any Prospects who have Opted Out won’t be sent the email anyway. However, including this in my Dynamic List criteria means Pardot can rule out that chunk of Prospects and process by request faster. 

If you exclude the same set of Prospects from most of your emails and/or automations, consider creating a “Master Suppression List” that can easily be referenced. 

4. Optimize your Engagement Studio Programs (ESPs)

Spread out your wait steps

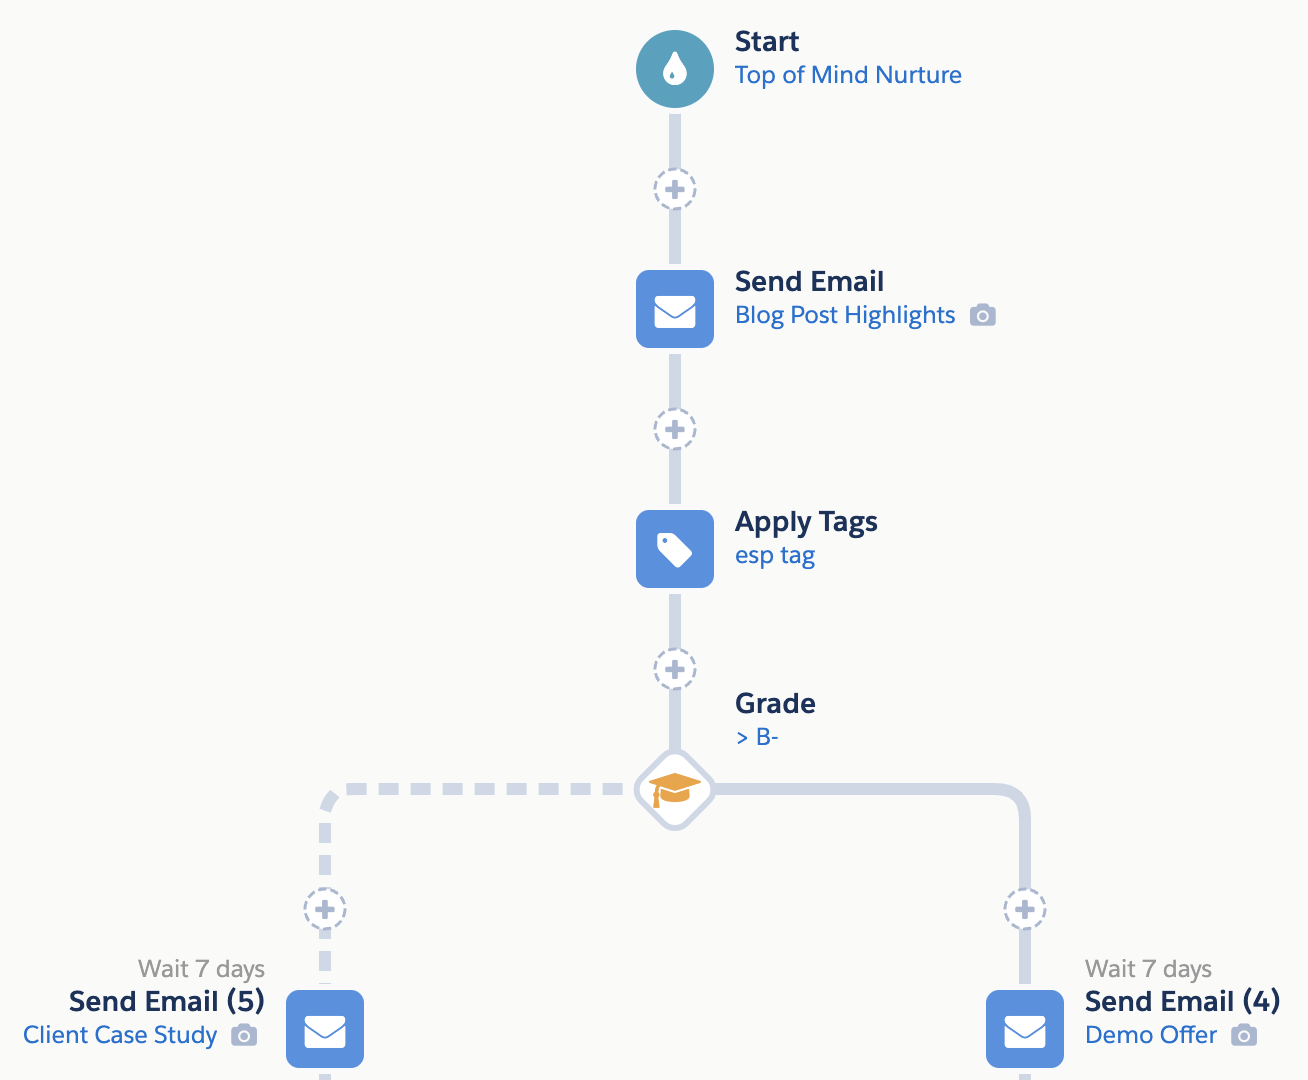
ESPs can perform a ton of actions on a ton of prospects. Keep in mind that an ESP performs an action per node per prospect. For example, if my ESP starts with 

  1. Send Email
  2. Apply Tag
  3. Check if Grade is B- or above

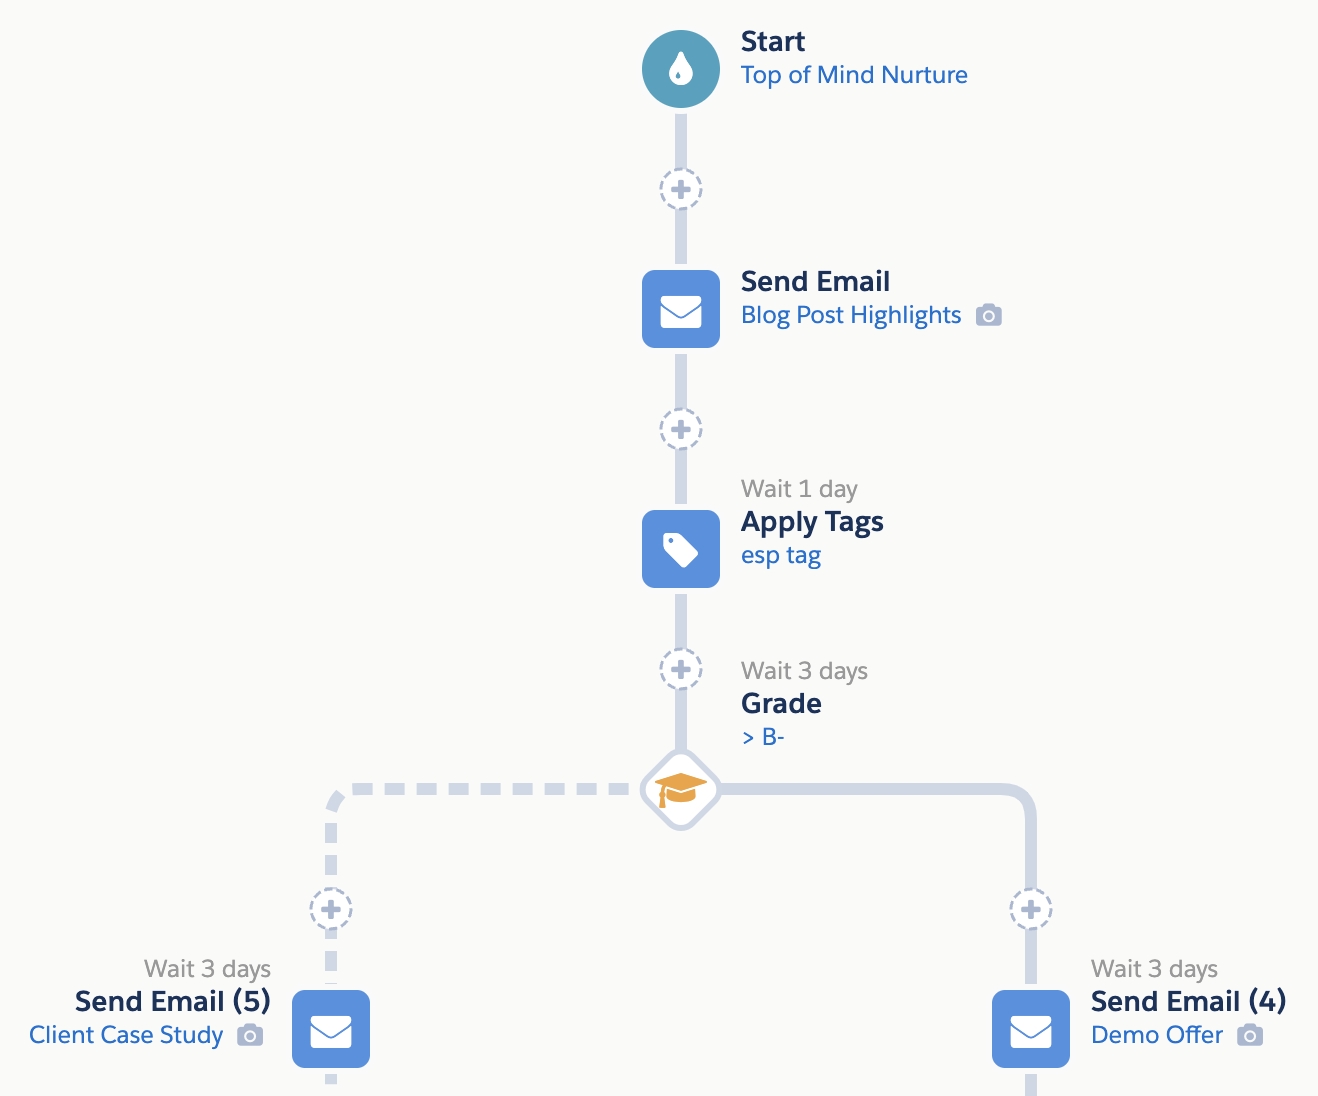
And I’m sending 5,000 Prospects through this ESP, that is 15,000 processing requests right off the bat. Wait steps can be used to space out the amount of processing one ESP needs to do per day. 

For example, going from this:

To this:

There are still 7 days between the 1st and 2nd email sends, but the processing requests are spread out over the wait period rather than happening all at once. 

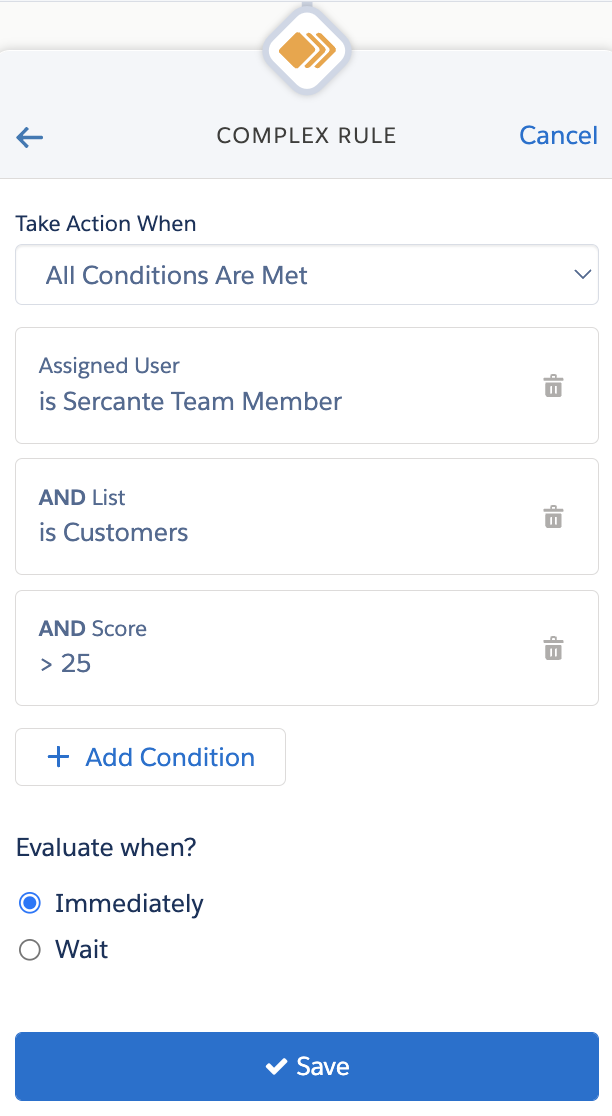
Use Complex Rules

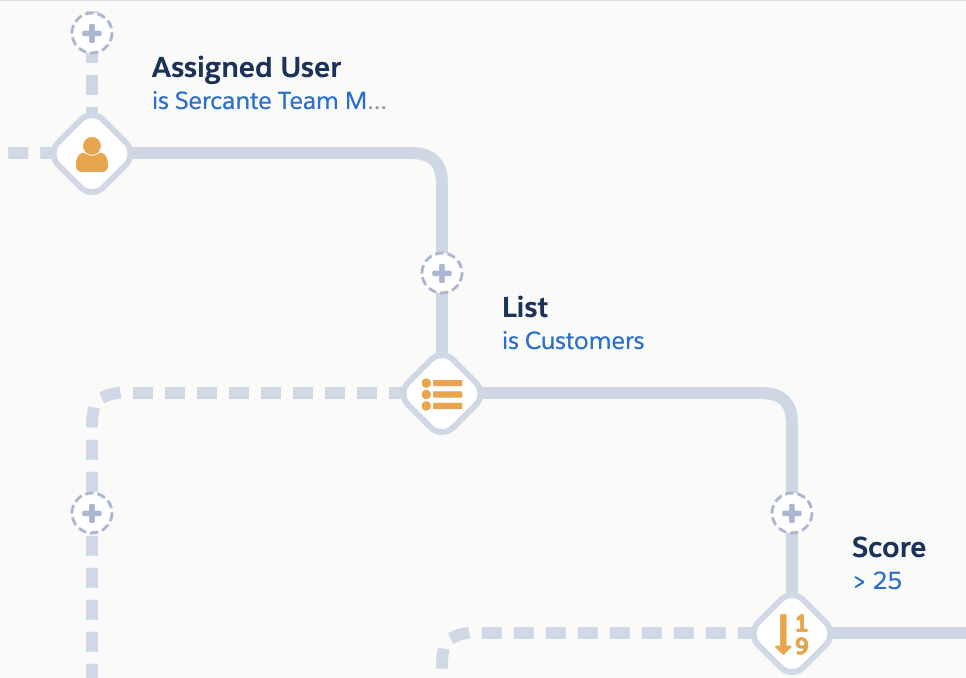
Complex Rules are another great way to streamline your ESPs. Rather than have multiple Rule nodes

Combine your rules into one Complex Rule node to simplify your ESP.

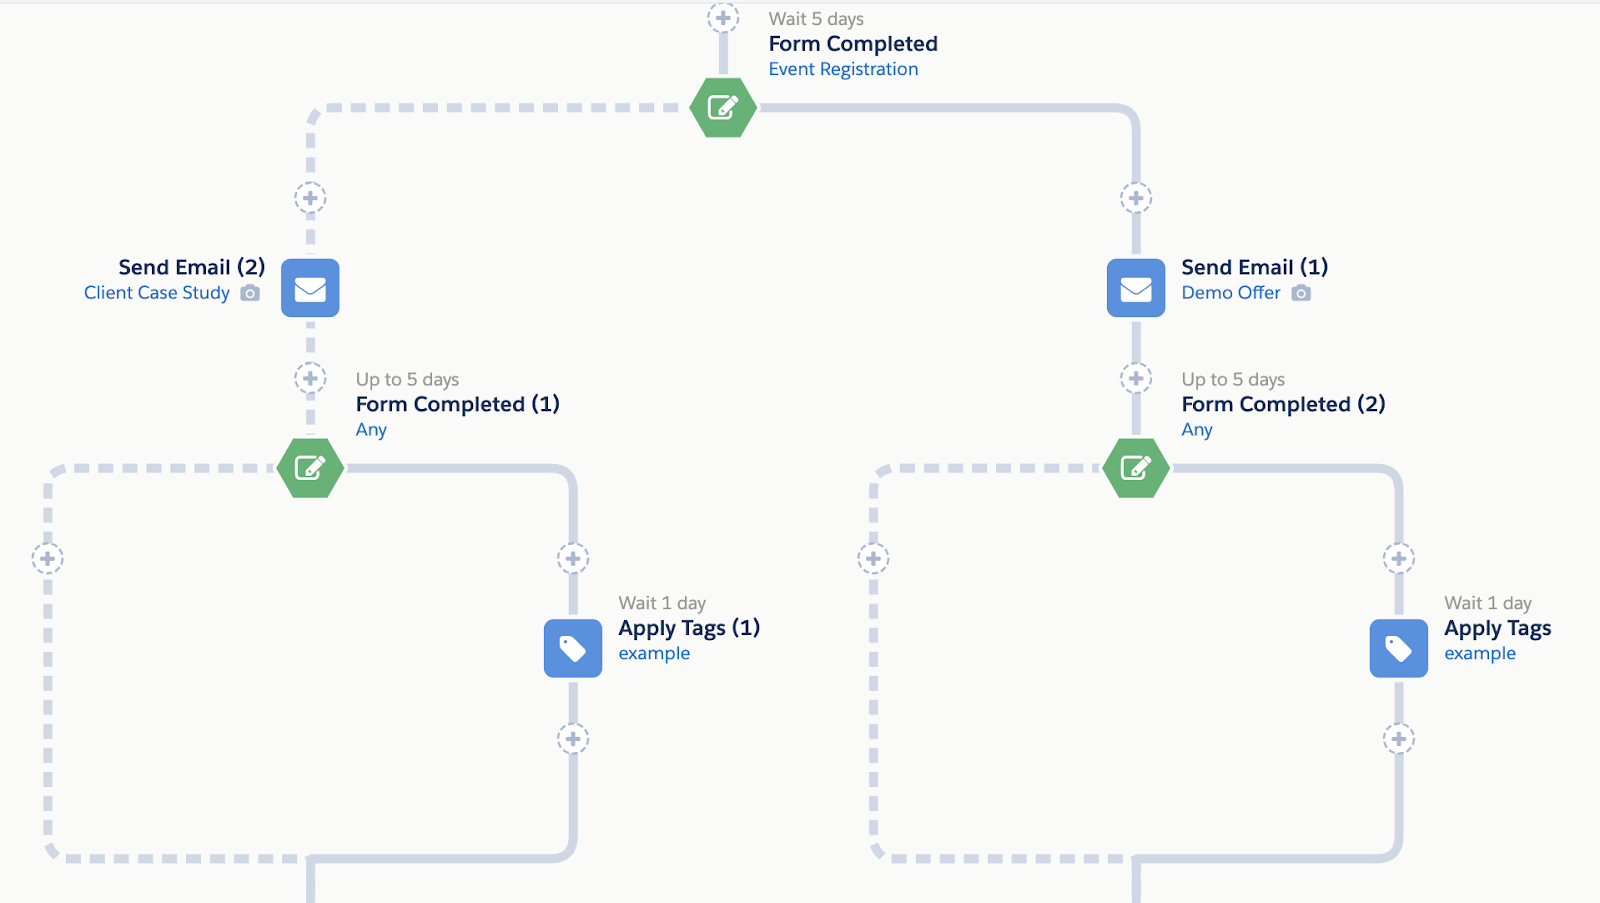
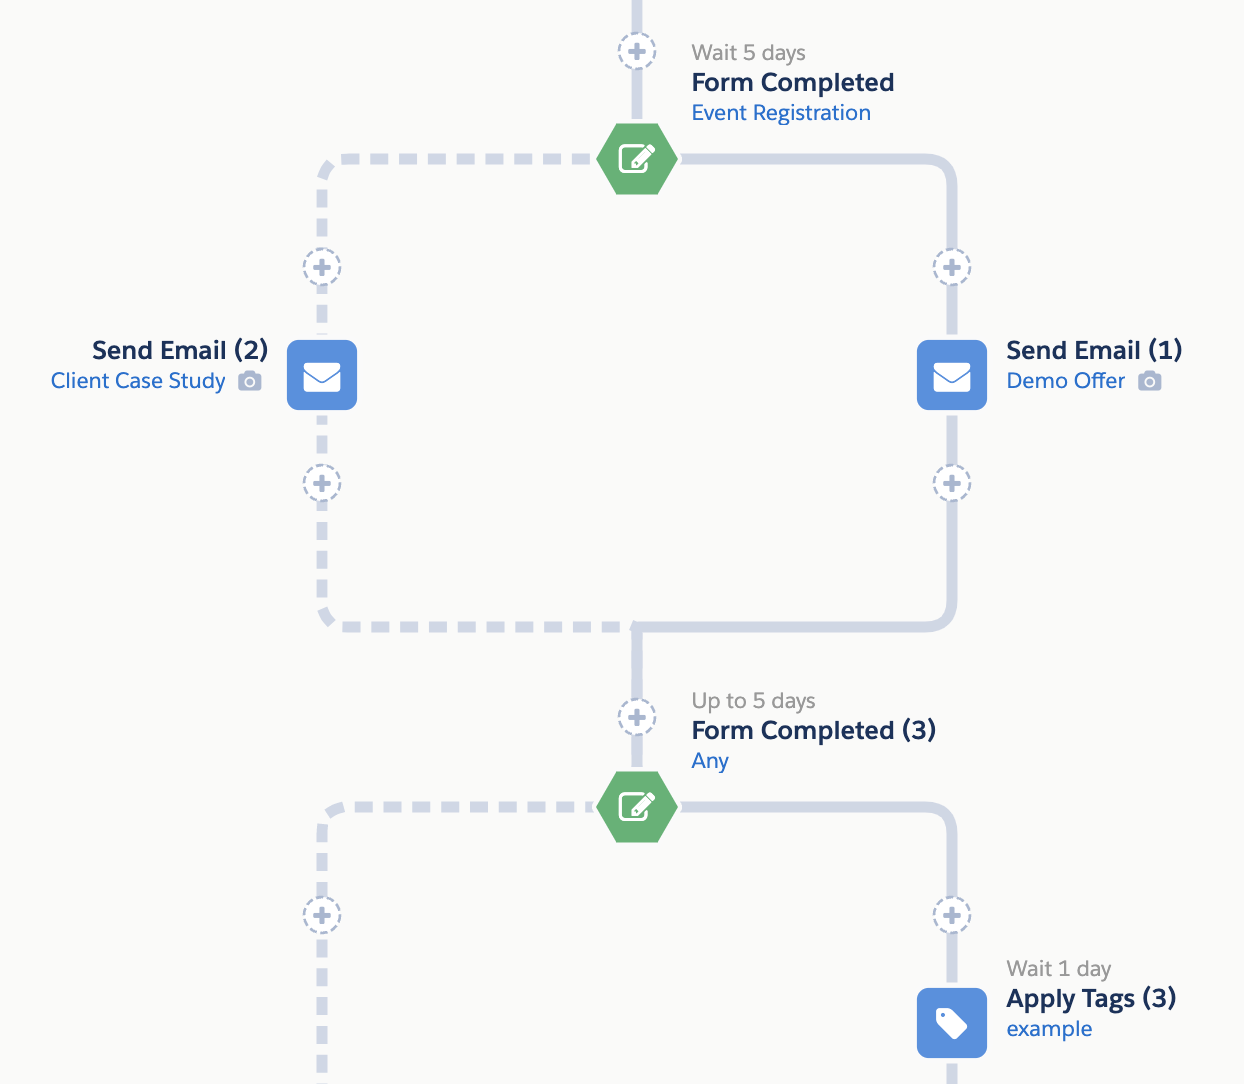
Consolidate Branches

Consolidating ESP branches is another great way to cut down on the number of nodes an ESP has and therefore the number of requests it has to process. I find a lot of times users forget that ESPs can branch out, then back in, then back out again etc. When you don’t consolidate branches, your ESP will get very wide and updating them can be a big headache. 

For example, moving from this:

To this:

A little Pardot org cleanup goes a long way

These are just some of the strategies you can employ to keep your Pardot org running smoothly, especially if you have a large org that is tackling numerous processes everyday. 

Regularly auditing your org and Pardot processes is not only going to improve processing times, but it will make the system easier to use overall. 

What other tactics do you use to keep your org clean? Tell us in the comments!

Your organization recently purchased Marketing Cloud Corporate or Enterprise Edition, which includes one free SMS code that needs to be provisioned. But, you have no clue where to start. 

You understand the value of using SMS in your digital marketing strategy. The only thing holding you back are considerations like code procurement, resources, and timelines. 

Let’s change that by showing you what it takes to get SMS up and running for your org using Marketing Cloud Mobile Studio.

Marketing Cloud Engagement SMS Overview

First thing’s first: SMS stands for short message service and are text-only messages with a maximum character length of 160. Whereas, MMS (multimedia messaging service) messages include images, video, and text. 

 Both types of messages require a number or SMS code to send messages to a mobile subscriber. 

The SMS channel in Marketing Cloud is most successful when marketers use it to deliver relevant messaging like alerts and event messaging. 

Marketing Cloud Text SMS Messaging Codes

Let’s review the types of SMS messaging codes available. 

Code TypeDescriptionConsiderations
Short CodeA short code (typically 5 to 6 digits long) is used in one country or market.Vanity or personalized codes are available in the US.Two-way support: The marketer can send messages to a customer, and the customer can text information back.
Long CodeA long code (typically 11 to 13 digits long) is used in multiple countries and includes a country code prefix.International reach.One-way support (in most markets): The marketer can send messages to a customer, but the customer can’t text information back.Two-way support (in specific markets): The marketer can send messages to a customer, and the customer can text information back.
Private or Dedicated CodeA code assigned to your company for a specific purpose.Unlimited number of keywords.Required for US SMS/MMS programs.
Shared CodeA code that is shared across multiple clients from different verticals.Restricted keywords based on availability. Also limited to five keywords.Not available in the US.

Tips: 

  • Every Corporate and Enterprise Marketing Cloud license includes one free SMS code that needs to be provisioned. Implementation and regulations vary by country, so be sure to consult your account executive to clarify all requirements and charges. Professional services are required to obtain United States (US) and Canadian private short codes.
  • Salesforce pays for the first year of the lease on your code and waives activation fees. Discuss future fees with your account executive. 
  • MMS is only available in the United States. Be sure to let your account executive know if you are interested in MMS activation.
  • MobileConnect can manage multiple short and long codes in the same account.  

How Marketing Cloud SMS Works

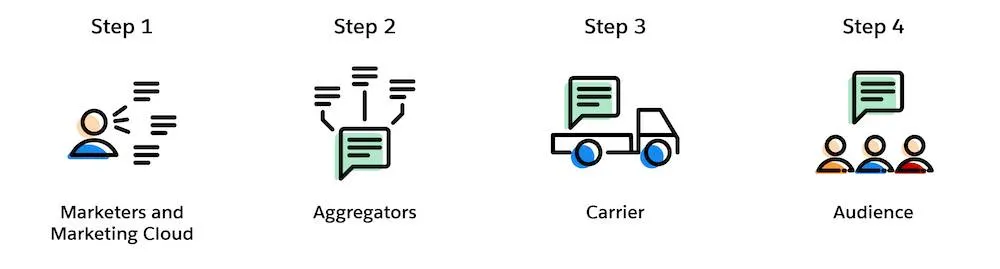
There are 4 steps to sending a SMS message: 

  1. Marketing creates a personalized text message in Marketing Cloud Mobile Studio
  2. Aggregator ( Salesforce partners that connect our messaging platform with carrier networks around the world) preps message for delivery to appropriate carrier (Mobile providers across the globe. )
  3. Carrier receives messages and delivers to the final audience
  4. Customer receives personalized text message

Pre-implementation tasks

Now that you have a good level set of what SMS marketing is and how it works, let’s focus on preparing for implementation. 

Below is a checklist of information to gather so you can identify steps for implementing SMS in your Marketing Cloud org.

  • Audience
    • Who is your audience? Internal or external?
    • What are your plans to grow your subscriber list?
    • Do your subscribers overlap with other Marketing Cloud channels?
  • SMS Codes
    • Which countries do you support? Do you have plans for future expansion?
    • Do you have multiple brands that a customer subscribes to?
  • Campaigns
  • Are your messages transactional or commercial (also known as marketing)?
  • What types of campaigns are you sending? Contests, promotions, or regular marketing alerts for sales?
  • What keywords are needed for these campaigns?
  • Frequency
    • Are you sending one-time messages or subscriptions?
    • How often are they sent? Weekly? Monthly?
  • Opt-In Type
    • Will you have a double-opt in campaign or single opt-in?
    • Does your program require age validation?

Tips

  •  A mobile subscriber opts out of a single code (not a keyword). If you have multiple brands, it may be best to have a code per brand or per business unit, as subscription is managed at the code and business unit level.
  • CTIA best practices state that SMS subscriptions originating from a web form or mobile app must use the double opt-in.

Marketing Cloud SMS implementation process  (US/Canada)

Here are the steps to take when you’re ready to implement Marketing Cloud SMS messaging in your org.

Step 1: Purchase the license to a US or CA Private Code 

Salesforce pays for the first year of the lease on your code and activation fees are waived.

Step 2: Purchase Required Services

Professional services (Services Partner) are required to acquire and apply for activation with the carriers.

Step 3: Procure your US or CA Private code

Work with your Services Partner to acquire and activate your code with the local country’s carriers. Your implementation partner will provide guidance on your program specifics based upon the answers to your checklist. 

Your implementation partner will also ask you for the following information:

  • Company info (tax ID, years in business, company mailing address, and website)
  • Campaign title, type, and description (name of your SMS campaign and explanation of the campaign)
  • Opt-in type and keyword (web opt-in via API? Single or double opt-in? What keyword?)
  • Opt-in message (what customers receive when they opt-in to your campaign)
  • Message frequency (1 msg/week, 3 msg/week, 5 msg/month)
  • HELP (customer support) and STOP (opt-out) message copy
  • Toll-free phone helpline and a customer support email
  • Mobile-enabled terms and conditions webpage (with an active URL)
  • Mobile-enabled privacy policy webpage (with an active URL)
  • Business Unit/MID information

Your service partner then takes this info and works with aggregators to obtain the code(s) on your behalf. Keep in mind, if something is incorrect or incomplete, the aggregator may ask for fixes, which can delay implementation.

Once the aggregator approves your code request, they work with carriers to complete the activation process. When that’s done, your services partner confirms that your setup is accurate in Marketing Cloud and you’re ready to start sending SMS in typically 8-12 weeks.  

It may seem like a long time for SMS. However, it’s a multistep process involving campaign submission forms, code provisioning, and aggregator approvals, as well as carrier testing. 

Step 4: Migration/Rebuild of existing SMS campaigns on newly activated Short Code (optional)

With your newly activated code, you can ask professional services to re-build your campaigns or self implement.

Now armed with what SMS is, how to prepare and the overall process you can work with your various internal stakeholders to set expectations related to timing, requirements and where your organization may need additional consultation and support.

Pay attention to your timelines and regulations in your area

The terms and conditions pages tend to be a common hangup in the process. Be sure to start working on this in advance and confirm the requirements with your Services Partner before submitting to the aggregator.  Also, be sure to consult a lawyer to develop an SMS regulatory framework for your company and to ensure you adhere to relevant laws in all the markets (states, countries, or territories) in which you are operating.

Have any gotchas to add to the process? Tell us in the comments section below.

Resource: Salesforce SMS Checklist Preparation Guide to acquire US and CA Codes 2/21/2020

No more posts to show