If you’re like me, then you often work with marketing tools that do not integrate nicely with Pardot forms.
Maybe they claim to have a ‘direct’ integration with the tool. However, we all know it’s nothing more than a Salesforce integration. #annoying
Don’t give up! There is a way around this common frustration. Enter Zapier webhooks, which you can use to bring data into Pardot.
This handy little-known feature is the solution to all your Pardot integration problems! Dramatic maybe. But it’s still a game changer.
How to use Zapier webhooks with Pardot
Zapier is a tool you can use to send data into Pardot from third-party apps and platforms. With Zapier webhooks, you can capture data from nearly any place and push it to Pardot as a form handler submission.
You read that correctly — a form handler submission.
Prerequisites for using Zapier webhooks with Pardot
You’ll need to do the following before we get into the setup:
Here are common examples of ways to use Zapier with Pardot to bring data into the platform via a form submission.
LinkedIn Lead Generation
In this example, a company is using LinkedIn Lead Generation forms to capture new leads.
There is no direct way to tie LinkedIn submissions to Pardot. So, the company sets up a zap to trigger when a new response is received. Their zap is configured to push the data to Pardot via a form handler post.
Google Form Submission
For this example, our company is using Google Forms to send out a survey to their customers.
The survey itself has data they don’t want within Pardot. So, they chose to send it using Google Forms.
Still, the company wants to see the name and email address of everyone who completes the survey within Pardot.
They can trigger a new workflow (zap) using Zapier when a survey submission comes in. That’s because Zapier integrates directly with Google. Their zap is configured to push the data to Pardot via a form handler.
Drift Lead
In this case, a company captures a new lead via a drift chat. They leverage Zapier’s ability to receive those leads to route the data to Pardot via a form handler.
Setting Up a Zap with a Pardot Form Handler
Follow these steps to set up a Zapier ‘zap’ to bring data into Pardot as a form handler submission.
Step 1
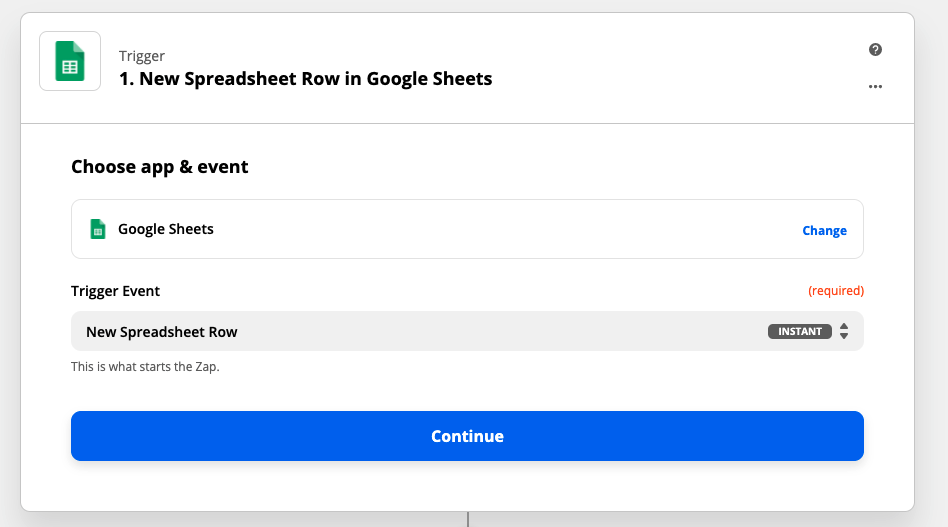
Create a new zap and select the Google Sheets integration (the app selection will change based on where your data comes from).
The trigger is ‘New Spreadsheet Row,’ and then select the correct sheet from your drive.
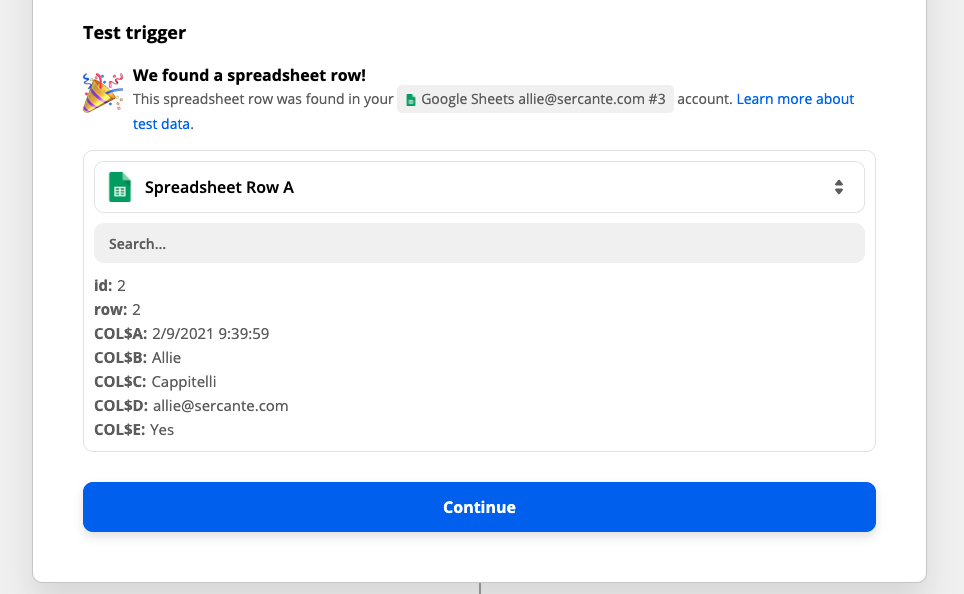
Pro Tip: Test the data capture to ensure it’s working. This will only work if there is data in the app triggering your zap.
In our example, I submitted example data to the form, and Zapier successfully pulled it in as a test.
Step 2
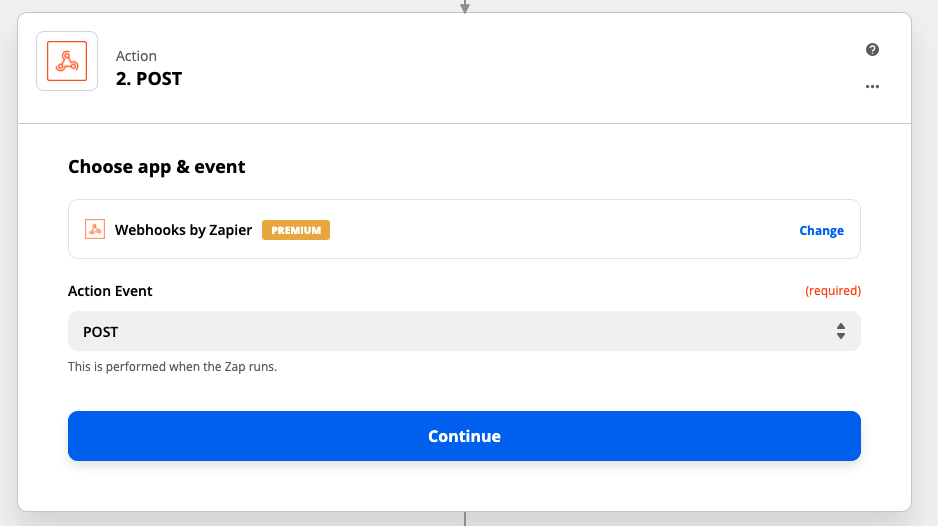
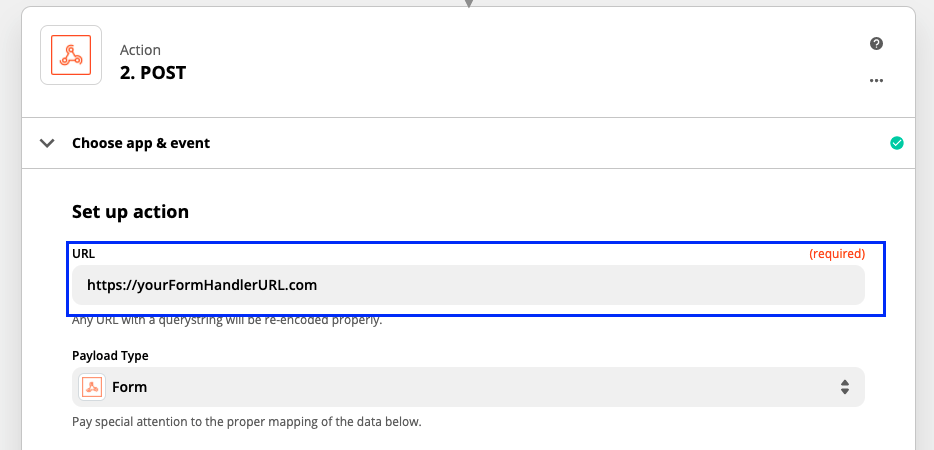
Now move to select the Webhook as the Action step. Select the POST option on the setup page.
Step 3
Paste your HTTPS encoded Form Handler url into the URL box.
Step 4
If we were to activate it now, the zap would trigger and post to the Form Handler URL. But, no data would pass through.
We need to set up the data pass.
We’ll take this step by step below:
Add a ? to the end of your URL
For each field you want to pass to Pardot:
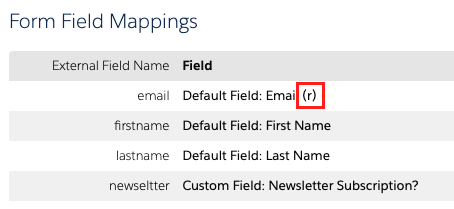
Right after the question mark, add the external field name.
Immediately after the external field name, add an equal sign.
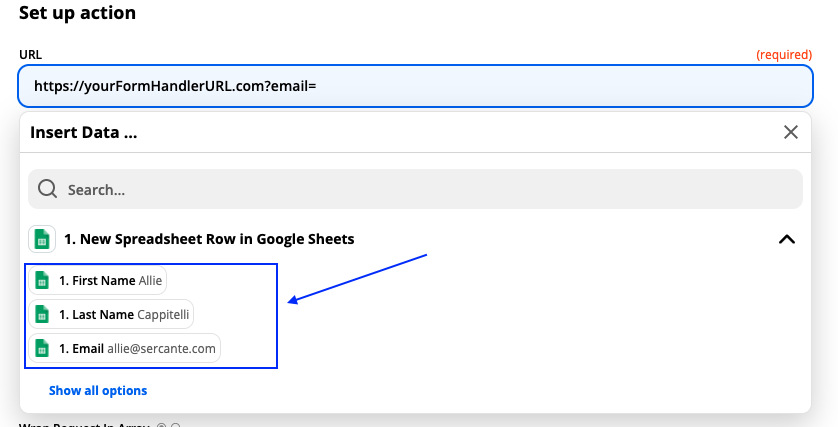
Immediately after the equal sign, add in the data source. This can be done via the dropdown in the URL field.
Scroll until you find the field that contains the data you want to pass. Then, click on it.
Your URL will now look like this. The underlined portion is the part that you’ve added to send over a single field.
If you want to add another field, then add a “&” to the end of your URL and then repeat steps I – V for each field.
Step 5
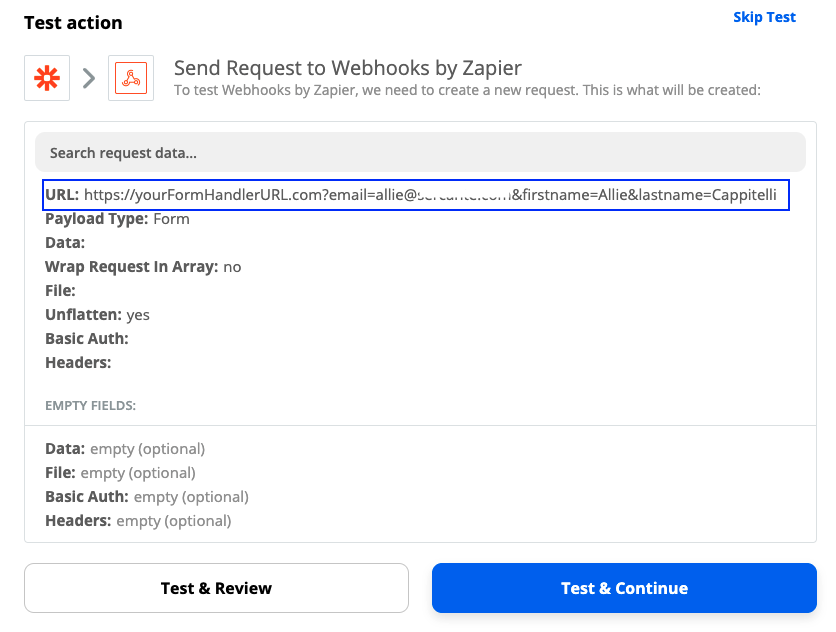
Test your action and make sure the submission comes through in Pardot. The final URL will contain all the fields you’d like to pass. On the testing screen, you’ll see what the final URL will look like with your test data.
Click test. Then, ensure you captured the data in Pardot.
Now, turn on your Zap, and watch the leads flow into Pardot!
Go forth and let the data flow into Pardot
Now you know how to bring in data from third party tools into a Pardot form handler.
This unlocks the ability to score, grade, assign, add to Salesforce campaigns and more! The sky’s the limit with how you can use this setup.
As our Pardot integrations are coping and adjusting to using the Pardot API with Salesforce SSO users, one of the new requirements is to provide the Pardot Business Unit ID in each API request. It is easy for Salesforce Administrators to get the ID, but what if we could do this with code?
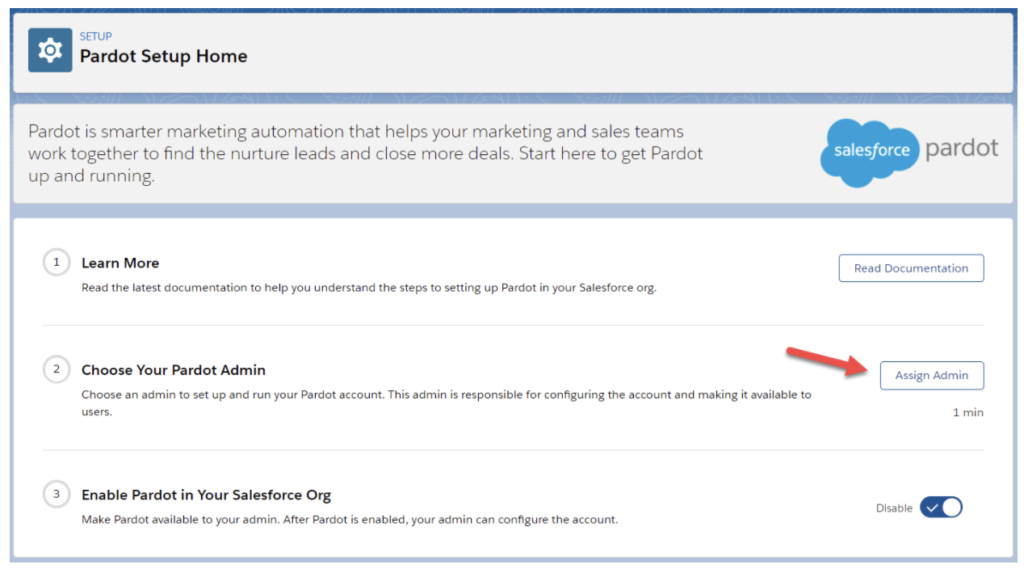
Right now, most Apps are directing Salesforce Administrators to grab the Pardot Business Unit ID by going through these simple steps:
In Salesforce Lightning, Navigate to Setup
Navigate to Pardot Setup Home under Platform Tools > Pardot
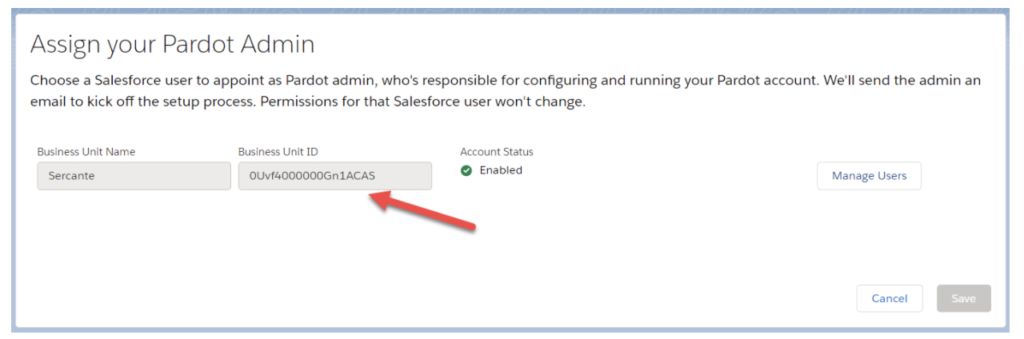
Next, click Assign Admin
4. On this page, you will see your Business Unit Id. Note: some people might have many Business Units!
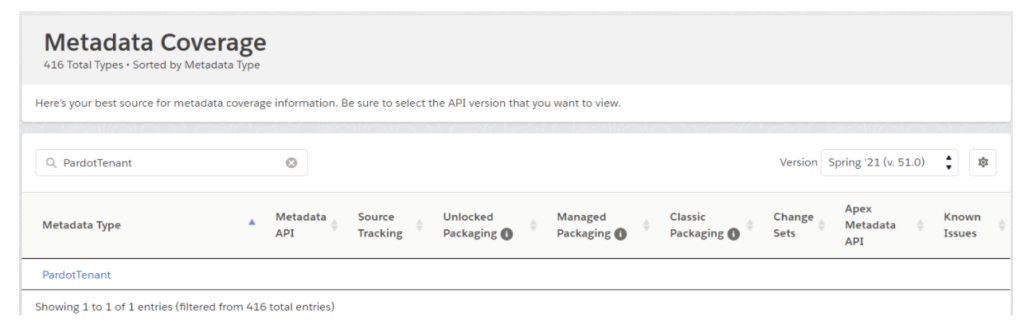
Currently, this step can leave room for configuration errors. So now that we know how to ask for a Business Unit ID, let’s look at how we can do this with code? Well as you might have noticed, the Business Unit ID is a Salesforce record Id, and after a little discovery we learned that the Salesforce object name is PardotTenant.
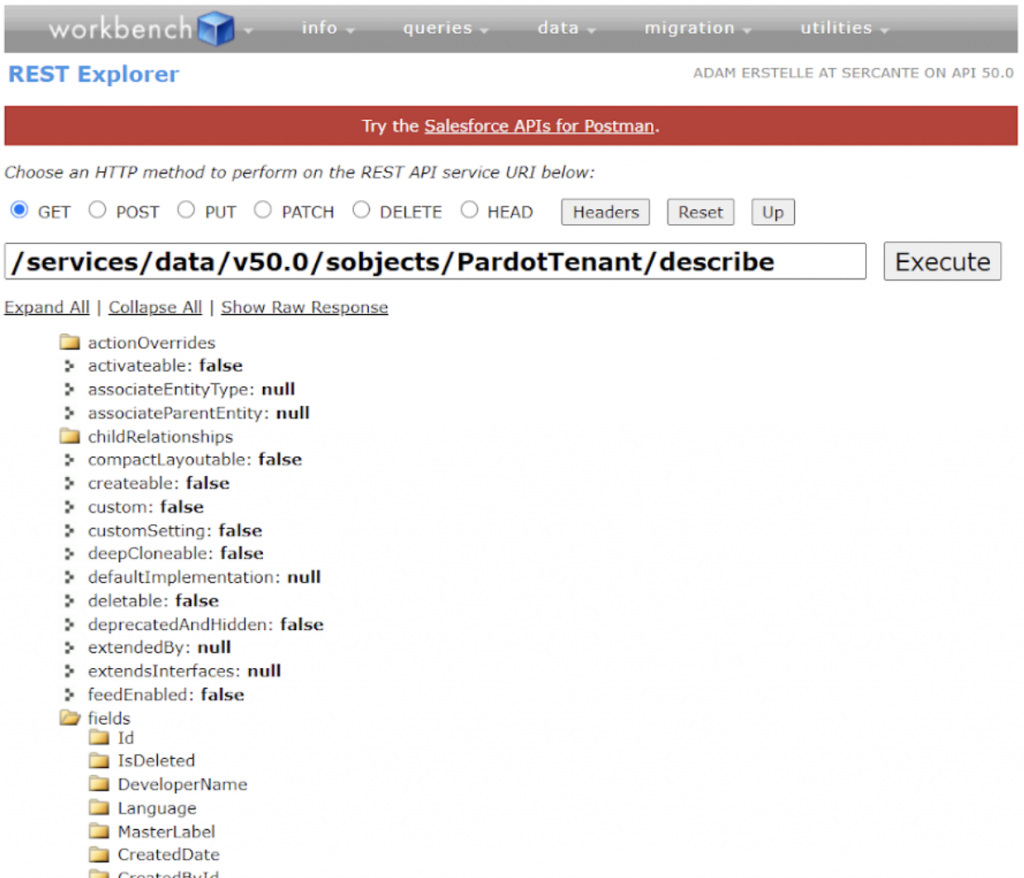
That’s ok, as developers we are used to wanting documentation right! So let’s use Salesforce’s standard functionality to learn as much as we can. For this exploring, we will be using the Workbench: REST Explorer.
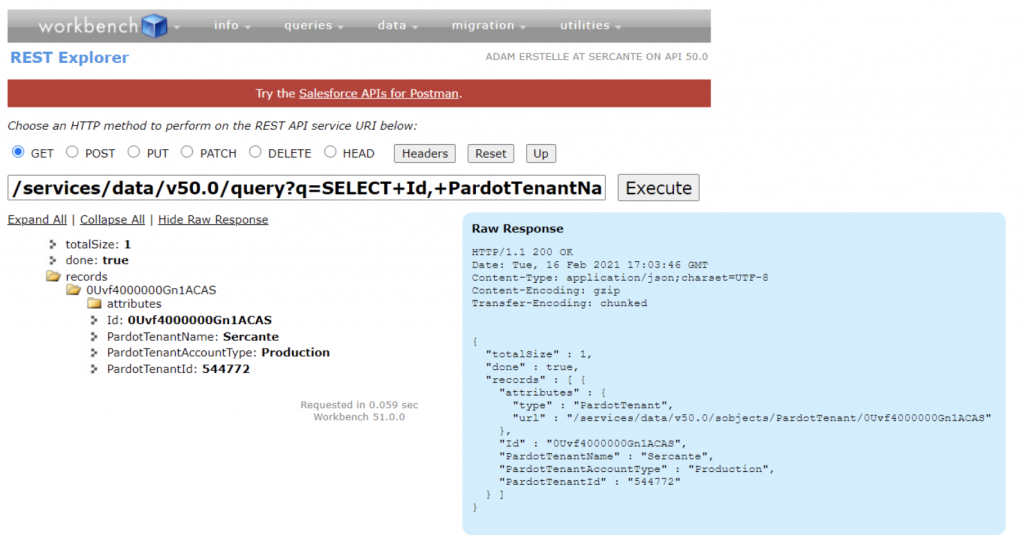
Once you are logged in, we will use a GET request with the following path: /services/data/v50.0/sobjects/PardotTenant/describe
Here’s a breakdown of what we think the key fields are and what we can use:
Id: The Business Unit Id that is used for the API
PardotTenantName: The Business Unit Name that we see beside the ID in Setup.
PardotTenantAccountType: We’ve seen Production and Demo as values, could be used to determine which Pardot URL to use for the API
PardotTenantId: The Pardot Account ID that you see in Account Information in Pardot’s Settings page.
Now that we know what the fields are and what may be of use to us (for the application we are working on right?), we can use a new REST call to get the list of PardotTenants with the following path:
Great, we know what REST calls need to be made and the format of the response. The tricky part is getting our Connected App to be correctly configured to enable us to get the information we need.
There are 2 key things that you need to be able to use the Salesforce REST API and get a list of Pardot Business Units.
A Connected App which includes the API scope.
A Salesforce User with at least a Platform license.
Needing at least a platform license is where things can get tricky. Normally for working with the Pardot API, a User with the Identity License (along with the Connected App) is good enough. Identity Licenses don’t provide access to most of the Pardot objects, PardotTenant included.
Troubleshooting REST Errors
This is pretty tricky, and even just writing this post I came across a few errors.
Session is not valid
[{"message": "This session is not valid for use with the REST API", "errorCode": "INVALID_SESSION_ID"}]
You will get this error if your Connected App is missing the API scope, even if your Salesforce User can see the PardotTenant object. Simply edit your Connected App, add the API scope, wait a few minutes and then try again.
Invalid Type or The Requested Resource Does Not Exist
There could be 2 causes for you getting one of these 2 errors.
The first is that the Salesforce Org you are connecting to just might not have Pardot setup. Pretty easy to check why.
The next (that I’m not 100% sure why yet) seems to be when I used an Access Token that I received from a Username/Password Oauth authentication request, but when I issued a JWT Bearer flow authentication request this worked fine. For production-level code, it’s best to not use Username/Password flows anyways, but during experimentation this might cause a small issue.
Working with PardotTenant – APEX
This is pretty simple, we can use a plain old SOQL statement to retrieve the information we need.
List<PardotTenant> pardotTenants = [
        SELECT Id, PardotTenantName, PardotTenantAccountType, PardotTenantId
        FROM PardotTenant
        WHERE IsDeleted = false];
However, if you are working on a Managed Package, you might get a lot of packaging complaints about PardotTenant not being available to you. In that case, you can do something a little more dynamic:
public List<PardotTenantDto> getBusinessUnits() {
        List<sObject> pardotTenants = Database.query(
                'SELECT Id, PardotTenantName FROM PardotTenant WHERE IsDeleted = false');

        List<PardotTenantDto> businessUnits = new List<PardotTenantDto>();
        for(sObject pardotTenant : pardotTenants) {
            businessUnits.add(new PardotTenantDto(
                    (String)pardotTenant.get('Id'),
                    (String)pardotTenant.get('PardotTenantName')
            ));
        }
        return businessUnits;
    }
Conclusion
Depending on your app, it might provide a better user experience to allow users setting up their Pardot connection to select from a list of Pardot Business Units, in order to help reduce the chance of configuration errors. Exploring the PardotTenant object might be a great way to get you to being able to do this. Have questions or need help exploring if this is the right path for your app? We would love to help. Reach out or shoot a question in the comments.
Have you ever wished you could have multiple conditional form completion actions in a single Pardot form?
If you answered “OF FREAKIN’ COURSE I HAVE”, you’re in luck because I am going to teach you how in just 5 easy steps.
As you know it is super easy to add a single completion action to a Pardot form. But what would you do if you wanted to add multiple completion actions to a form and tie those actions to specific form elements.
I know, it’s a head scratcher right (and you’ve probably heard: “Nope, can’t do it”)? Never fear I’ll guide you through the dragon’s den.
When we combine the magic of Pardot together with the superpowers of JavaScript anything is possible.
But, before we take our first step down the path to knowledge, let’s set the scene. Imagine that we are promoting multiple webinar events with a single registration form.
In this scenario, we want to have one landing page that has a list of upcoming webinars. Visitors can choose one or more of those webinars to attend and only need to fill out one Pardot form. Then, we need that registration information to register the visitor (now a Prospect) in the appropriate GoToWebinar sessions.
So where do we start?
Step 1: Configure the Custom Fields.
Our first step is to identify the field(s) we will use on the form and to which form elements we will apply the conditional completion actions.
We need to note the API field name (field ID) for the field(s) we’ve selected. These can be found with one of the following navigations depending upon your chosen experience:
In Pardot (classic), navigate to Admin | Configure Fields | Prospect Fields.
In the Pardot Lightning app, click the Pardot Settings tab, then click Object and Field Configuration | Prospect Fields.
For our scenario we’ll create 4 custom fields for 4 upcoming webinars so our future prospects can register for any or all of our webinar options.
Our list of the unique Field IDs:
Webinar_topic_1
Webinar_topic_2
Webinar_topic_3
Webinar_topic_4
Keep these IDs somewhere you can access them easily. They’ll be needed in our final step.
Step 2: Create a Pardot form (or edit an existing one).
Make sure to select the fields that you wish to use for your completion actions and make sure they are checkbox fields, text fields, or radio buttons. If they are Checkbox fields, they must have EXACTLY ONE selection option. When selecting your inputs make sure to uncheck the required option.
For our scenario, I’ve created 4 custom checkbox fields and added each to the form. Each has exactly one value, and was step up like this:
First select the Prospect Field “Webinar Topic 1”, select type of Checkbox and Data Form of “Text”.
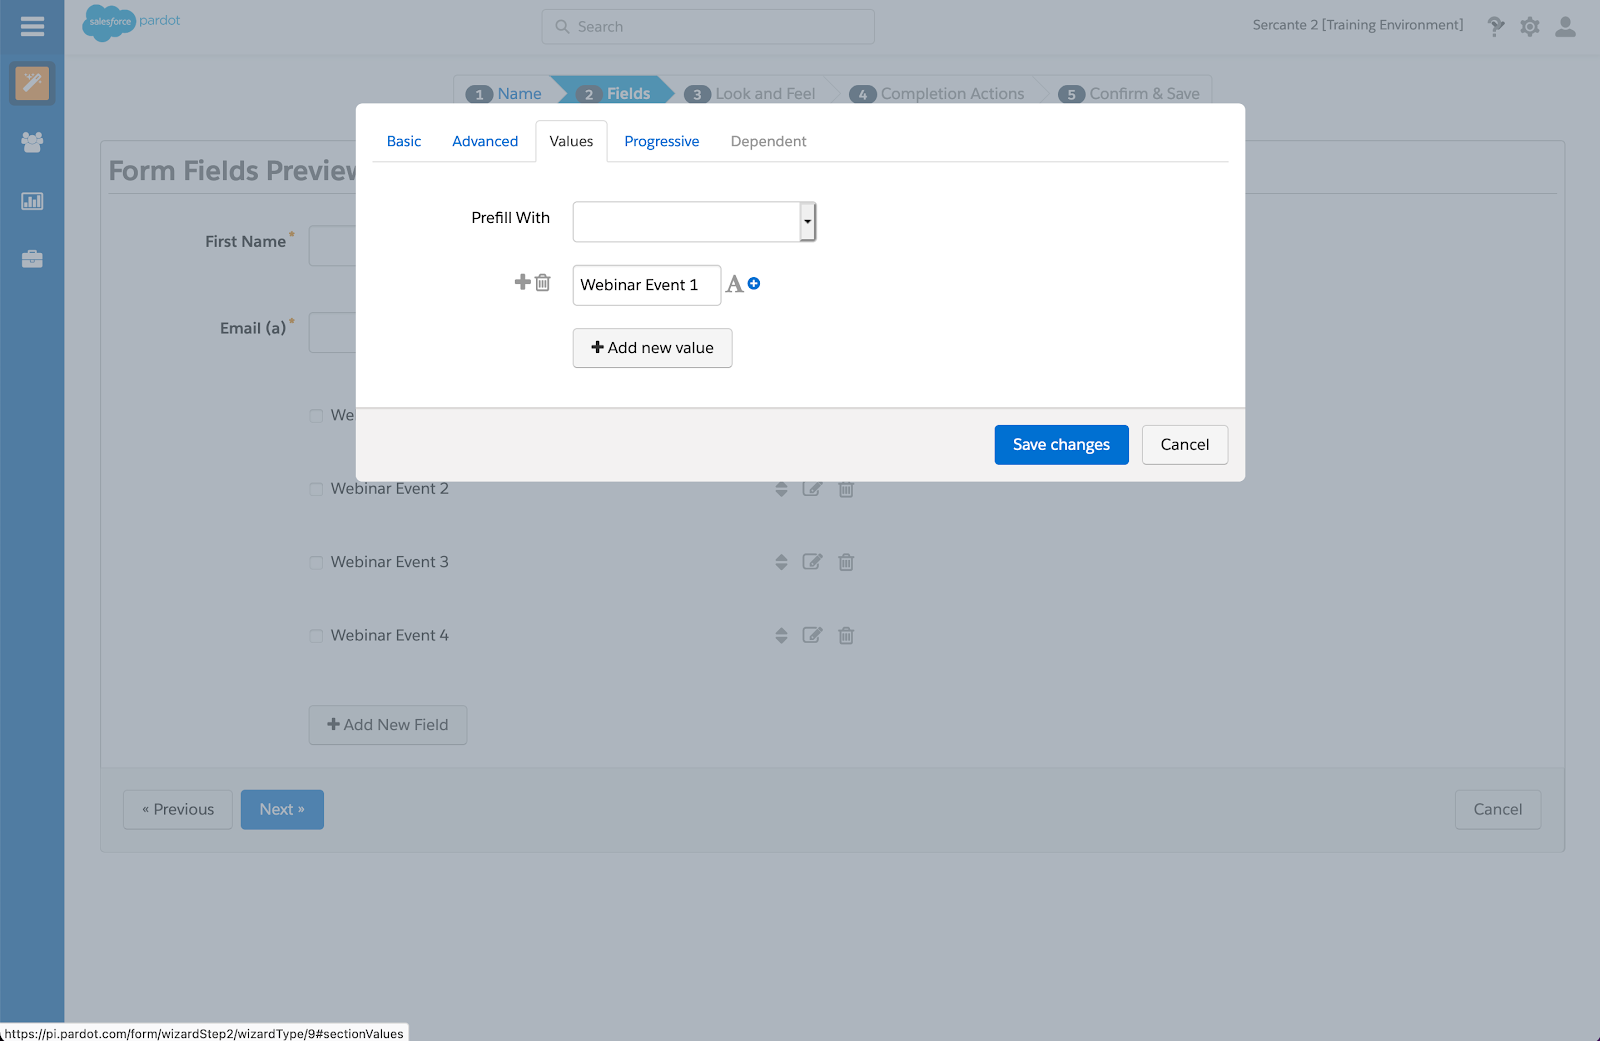
Now click on the Values tab. Enter the Value that you want to display on the form (in this case, our Value is Webinar Event 1). Keep a record of this value handy. We’ll need it in step 5 when we start customizing our JavaScript.
Note that for each form field value on which you want to apply a unique completion action, you will need to create a unique form handler. In our example we’ll be using 4 completion actions and therefore 4 form handlers.
These are our Field ID and Value pairs so far:
FieldID: Webinar_topic_1 Form Value: Webinar Event 1
FieldID: Webinar_topic_2 Form Value: Webinar Event 2
FieldID: Webinar_topic_3 Form Value: Webinar Event 3
FieldID: Webinar_topic_4 Form Value: Webinar Event 4
I know the naming is not 100% awesome. I want to keep it generic though so Fields can be reused as needed. If we gave each one very specific names our solution would be too brittle (meaning easy to break, hard to scale).
Step 3: Create a Pardot form handler for each field value you’d like to apply completion actions.
Start by only adding the email field to the form handler. Then, add the corresponding completion action for each value. Save. Take note of the form handler endpoint URL (specifically the HTTPS version) as you’ll need this in step 5 and match it to the related Values from the form.
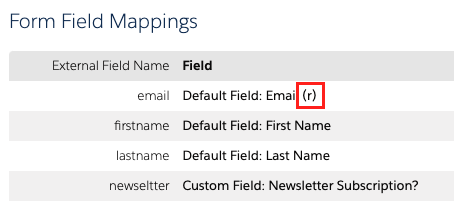
Note: make sure that the “External Field Name” is: “email” (all lower case), and make sure that “Disable Visitor Activity throttling” has been checked (so that multiple submissions of the form all work flawlessly)
As we continue with our multiple webinar example, I’ve repeated the step 4 times and created a form handler to use for each of the 4 custom fields created in step 2.
Here is a list of the 4 form handlers and their endpoint URLs and how they map to the field values set up above:
Step 4: Copy this script and paste into your Pardot form’s Thank You Code.
Copy the code below and paste it directly into the Thank You “Code” in Pardot’s “Completion Actions” tab.
<script>
var fieldsConfig = [
{//this block of lines is for option 1
    fieldValue: '%%your_field_id_1{js}%%',
    checkboxVal: 'VALUE_1',
    endpointUrl: 'FORM_HANDLER_1_URL'
},
{//this block of lines is for option 2
    fieldValue: '%%your_field_id_2{js}%%',
    checkboxVal: 'VALUE_2',
    endpointUrl: 'FORM_HANDLER_2_URL'
}
//add more blocks if you need them
];
// DO NOT CHANGE BELOW THIS LINE
var email = encodeURIComponent('%%email{js}%%');
var thankYouContainer = document.querySelector('.form-thank-you') || document.body;

fieldsConfig.forEach(function (field) {
//console.log('Expecting '+field.checkboxVal+', got: '+field.fieldValue);
  if (field.checkboxVal === field.fieldValue) {
//console.log('matched! adding iFrame to endpoint URL: '+iFrameUrl);
var iframeUrl = field.endpointUrl +'?email=' +email + '&t=' + Date.now();
    var iframe = document.createElement('iframe');
    iframe.setAttribute('height', '1px');
    iframe.setAttribute('width', '1px');
    iframe.setAttribute('src', iframeUrl);
    thankYouContainer.append(iframe);
  }
});
</script>
Note: remove the commented console.log statements to observe how it works
After pasting the code into the thank you code input area make sure the “Always display form after submission” checkbox is checked — otherwise this method will not work and the script will run in a loop! Which will cause a total computer meltdown and all pictures of cats on the internet to disappear. Ok that last bit is a small exaggeration but seriously don’t forget the checkbox. You’ve been warned.
Step 5: Time to modify some JavaScript
The code we pasted into our thank you content in step 4 is a bit of boilerplate to get us started. It will need to be updated for each unique use. I know it’s a bit daunting but we’ll take it slow and be very mindful of the characters we adjust.
For our webinar scenario I’ve duplicated the first code block two additional times for a total of 4 blocks of field/value/url. This is a necessary step because we have 4 form handlers and custom fields to match up. If we were only working with 2 we would not need to duplicate this code block.
Notice how each code block is contained in a set of curly braces and separated by a comma. There is no trailing comma on the last block:
{//this block of lines is for option 1
    fieldValue: '%%your_field_id_1{js}%%',
    checkboxVal: 'VALUE_1',
    endpointUrl: 'FORM_HANDLER_1_URL'
},
{//this block of lines is for option 2
    fieldValue: '%%your_field_id_2{js}%%',
    checkboxVal: 'VALUE_2',
    endpointUrl: 'FORM_HANDLER_2_URL'
},
{//this block of lines is for option 3
    fieldValue: '%%your_field_id_3{js}%%',
    checkboxVal: 'VALUE_3',
    endpointUrl: 'FORM_HANDLER_3_URL'
},
{//this block of lines is for option 4
    fieldValue: '%%your_field_id_4{js}%%',
    checkboxVal: 'VALUE_4',
    endpointUrl: 'FORM_HANDLER_4_URL'
}
First thing we need to update is your_field_id_1. Let’s replace that with the Pardot field ID that you want to perform completion actions on. A couple of things to note:
the name must be wrapped in %%, and
a {js} modifier must be added at the end of the name.
For example, if your field id is custom_field_1, it should look like %%custom_field_1{js}%% not %%custom_field_1%%or%custom_field_1{js}%
Now that we know what to watch out for let’s start making edits. First we’ll replace the “your_field_id” placeholders with the values of prospect field IDs (step 1):
%%your_field_id_1{js}%% = %%Webinar_topic_1{js}%%
%%your_field_id_2{js}%% = %%Webinar_topic_2{js}%%
%%your_field_id_3{js}%% = %%Webinar_topic_3{js}%%
%%your_field_id_4{js}%% = %%Webinar_topic_4{js}%%
Next, we replace the placeholder values for “VALUE”. Using our example, the values are what we used in the Pardot form checkbox value tab – Please note that if there are special characters like ampersands (&) in the form values, they MUST be replaced with HTML entity code like: & (that’s the & symbol followed by the letters amp and ended with a semicolon. Probably best to avoid special characters in the Values if at all possible):
VAULE_1 = Webinar Event 1
VAULE_2 = Webinar Event 2
VALUE_3 = Webinar Event 3
VALUE_4 = Webinar Event 4
Finally, each value that we’re searching for in our form will trigger a unique form handler. So, each code block will need to be updated with the correct endpoint URL. Make sure to match the correct endpoint URL with the correct form field. Here the endpoints created in step 3 are used in place of the FORM_HANDLER_1_URL variables.
The final block of code from our example looks like this:
<script>
var fieldsConfig = [
{//this block of lines is for option 1
    fieldValue: '%%Webinar_topic_1{js}%%',
    checkboxVal: 'Webinar Event 1',
    endpointUrl: 'https://sercante.com/l/876401/2020-11-30/gny9d5'
},
{//this block of lines is for option 2
    fieldValue: '%%Webinar_topic_2{js}%%',
    checkboxVal: 'Webinar Event 2',
    endpointUrl: 'https://sercante.com/l/876401/2020-11-30/gny9df'
},
{//this block of lines is for option 3
    fieldValue: '%%Webinar_topic_3{js}%%',
    checkboxVal: 'Webinar Event 3',
    endpointUrl: 'https://sercante.com/l/876401/2020-11-30/gny9dk'
},
{//this block of lines is for option 4
    fieldValue: '%%Webinar_topic_4{js}%%',
    checkboxVal: 'Webinar Event 4',
    endpointUrl: 'https://sercante.com/l/876401/2020-11-30/gny9dh'
}
];
// DO NOT CHANGE BELOW THIS LINE
var email = encodeURIComponent('%%email{js}%%');
var thankYouContainer = document.querySelector('.form-thank-you') || document.body;

fieldsConfig.forEach(function (field) {
//console.log('Expecting '+field.checkboxVal+', got: '+field.fieldValue);
  if (field.checkboxVal === field.fieldValue) {
//console.log('matched! adding iFrame to endpoint URL: '+iFrameUrl);
var iframeUrl = field.endpointUrl +'?email=' +email + '&t=' + Date.now();
    var iframe = document.createElement('iframe');
    iframe.setAttribute('height', '1px');
    iframe.setAttribute('width', '1px');
    iframe.setAttribute('src', iframeUrl);
    thankYouContainer.append(iframe);
  }
});
</script>
Step 6: Just kidding there is no step six
While it’s technically true for the purpose of this blog post, there is no step 6, but if there was it would look something like this:
Test, Test, Test.
Make sure to thoroughly test your landing page, form and JavaScript to ensure everything is working as expected.
And there you have it. Our future prospects will be able to select multiple webinar events with our form checkboxes. Then our unique form actions will run based on the prospect action of selecting one or more of the form elements.
Let’s take a moment to recap what we’ve learned today
We created a custom solution that allows multiple completion actions to fire based on a value recorded by Pardot form in 5 easy steps.
In our imaginary situation we want a user to be able to register for multiple webinar events in one simple form.
We started by creating Prospect Fields and connected form inputs to them.
After linking all the values and Prospect fields we created Pardot form handlers for each form element we want to interact with.
Next we copied a bit of boilerplate JavaScript into the forms Thank you content section and updated the code replacing the generic values with our real content.
Finally we made sure to test all the things and confirm everything is working correctly.
Huge congratulations for making it all the way through with us. Give yourself a big pat on the back and make sure everyone at your company knows how awesome you are with your newly gained wizardry. Come back to visit any time.
If you have any questions or would like help solving other interesting ideas, let us know about it in the comments.
The campaign member object in Salesforce represents the association between a campaign and a lead or a contact. While some standard lead and contact fields are available for the campaign member object, if you want to view or pull a report for custom fields, you will need to create a new field. This post will show you how to create a formula field on the campaign member object that will pull in the custom field value for a lead or a contact.
Create a formula field
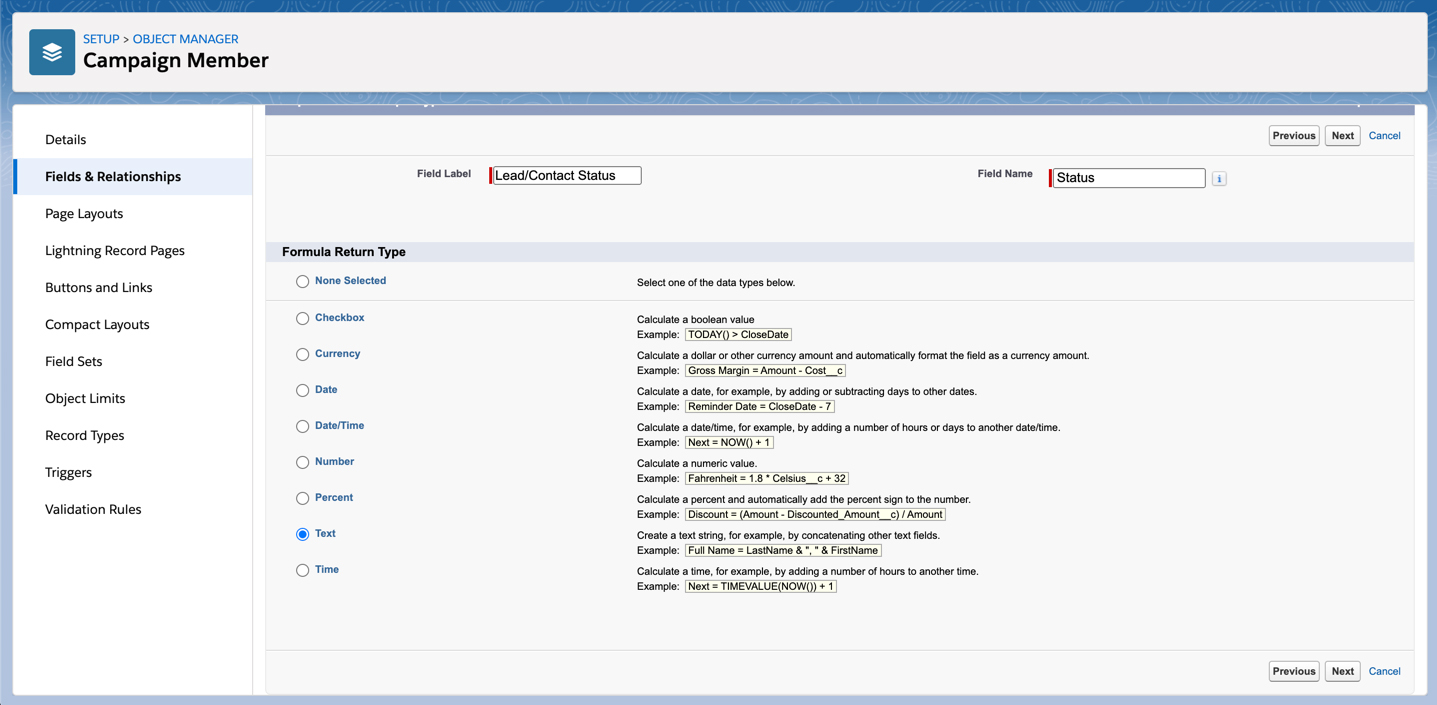
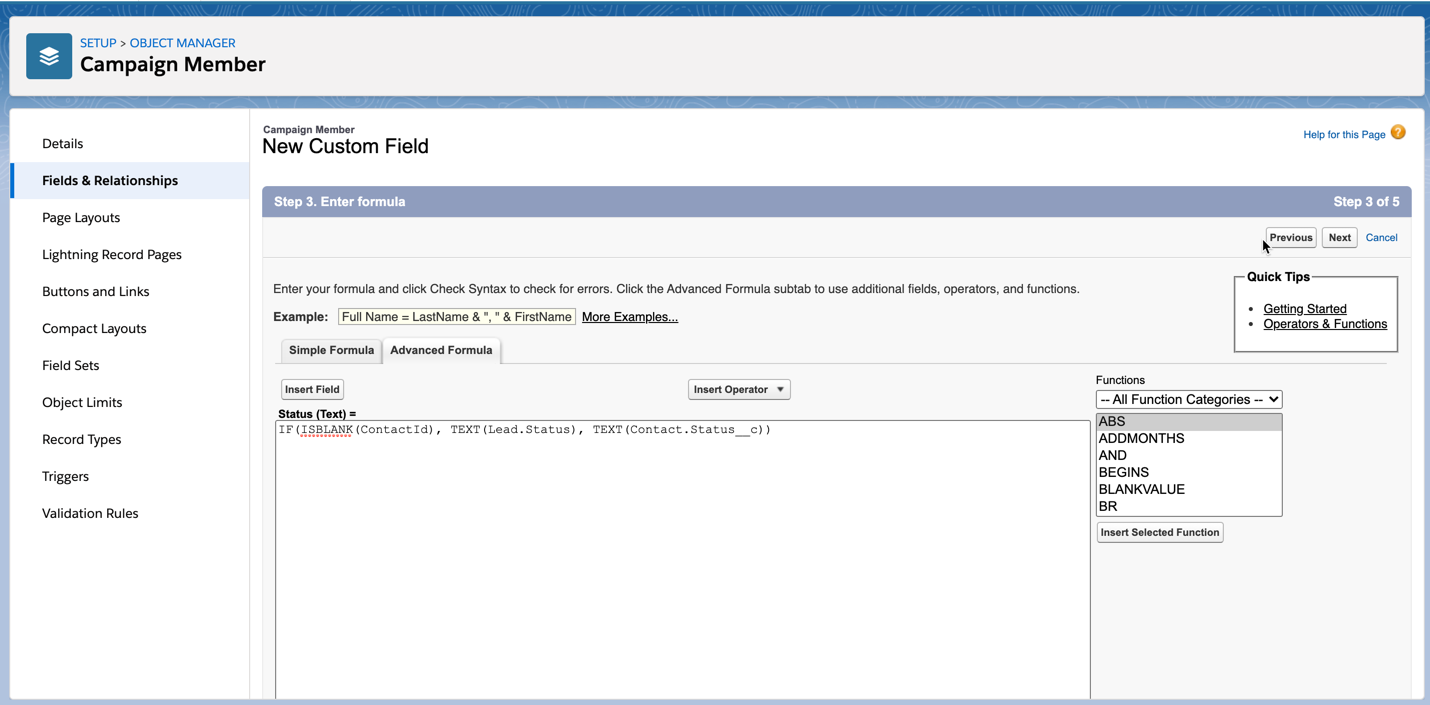
Create a formula field on the campaign member object that will check if the campaign member is a Lead or a Contact and populate the field with the custom field value.
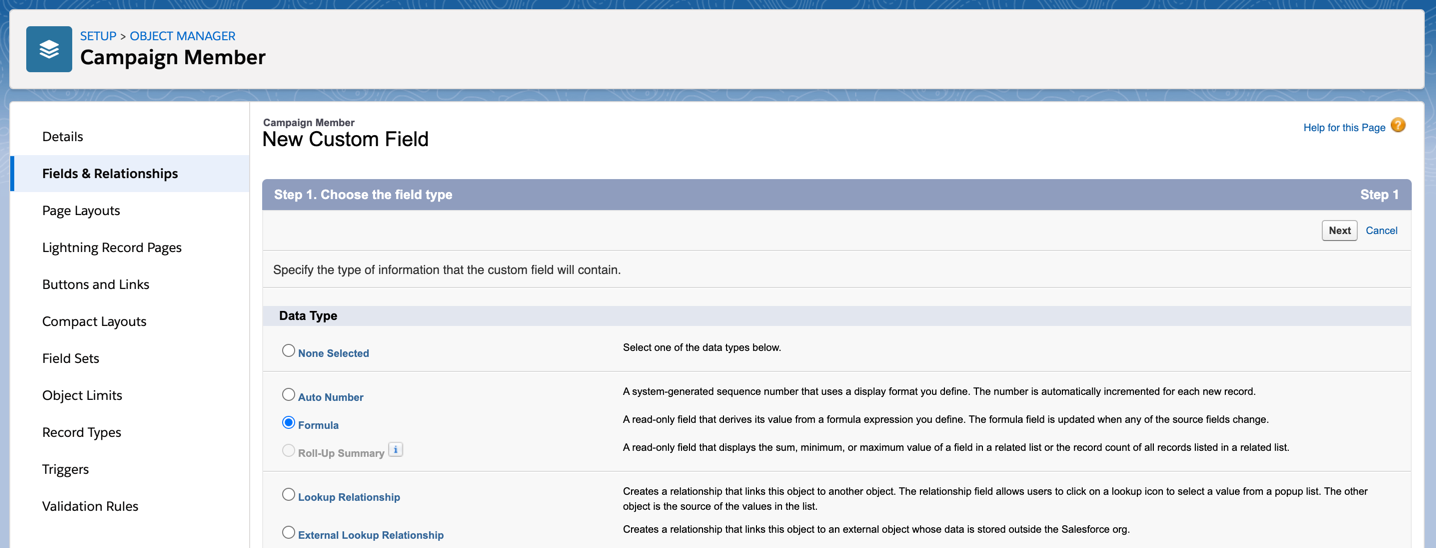
Navigate to the campaign member object within the object manager and create a new formula field.
If your lead and contact fields are picklists, use this syntax for the formula.
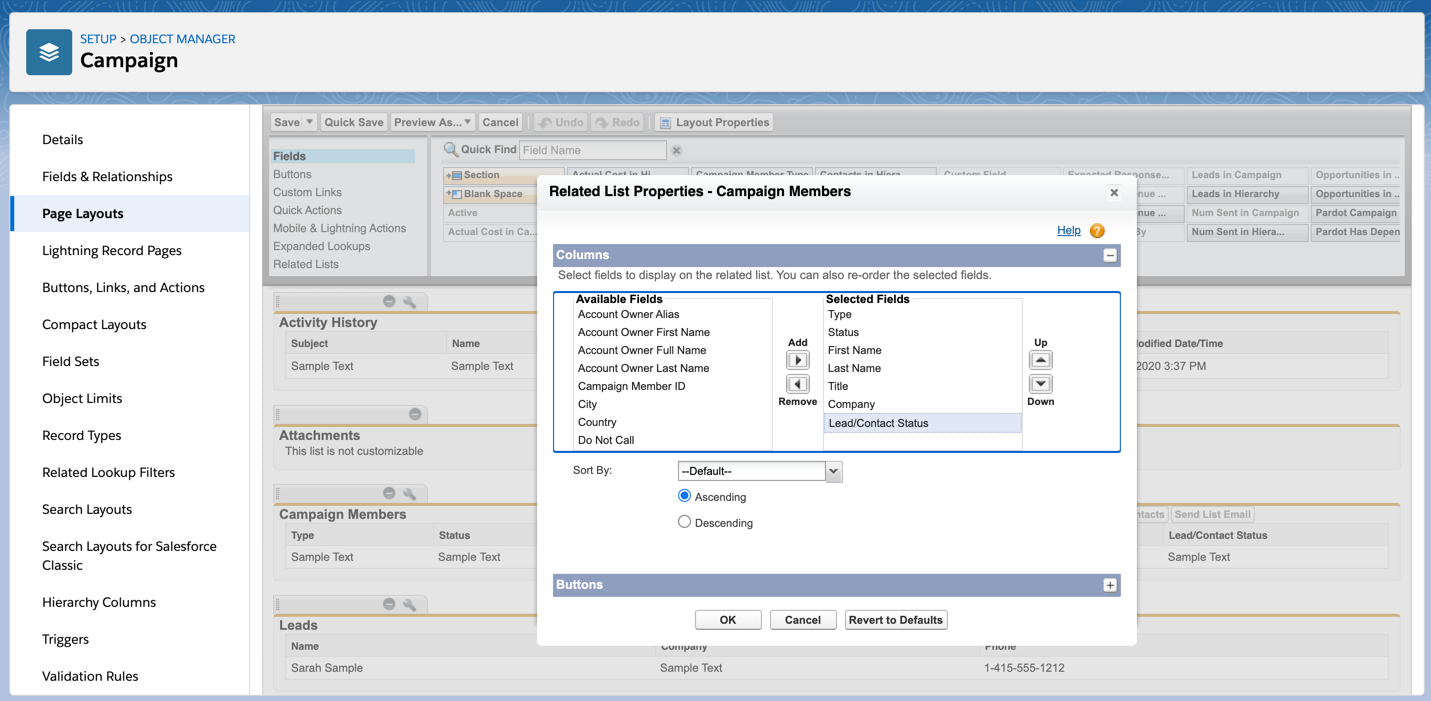
You can add the new custom field to the campaign member related list by navigating to the campaign object in the campaign manager and selecting your page layout. Scroll to the campaign member related list and click on the wrench icon to select your fields.
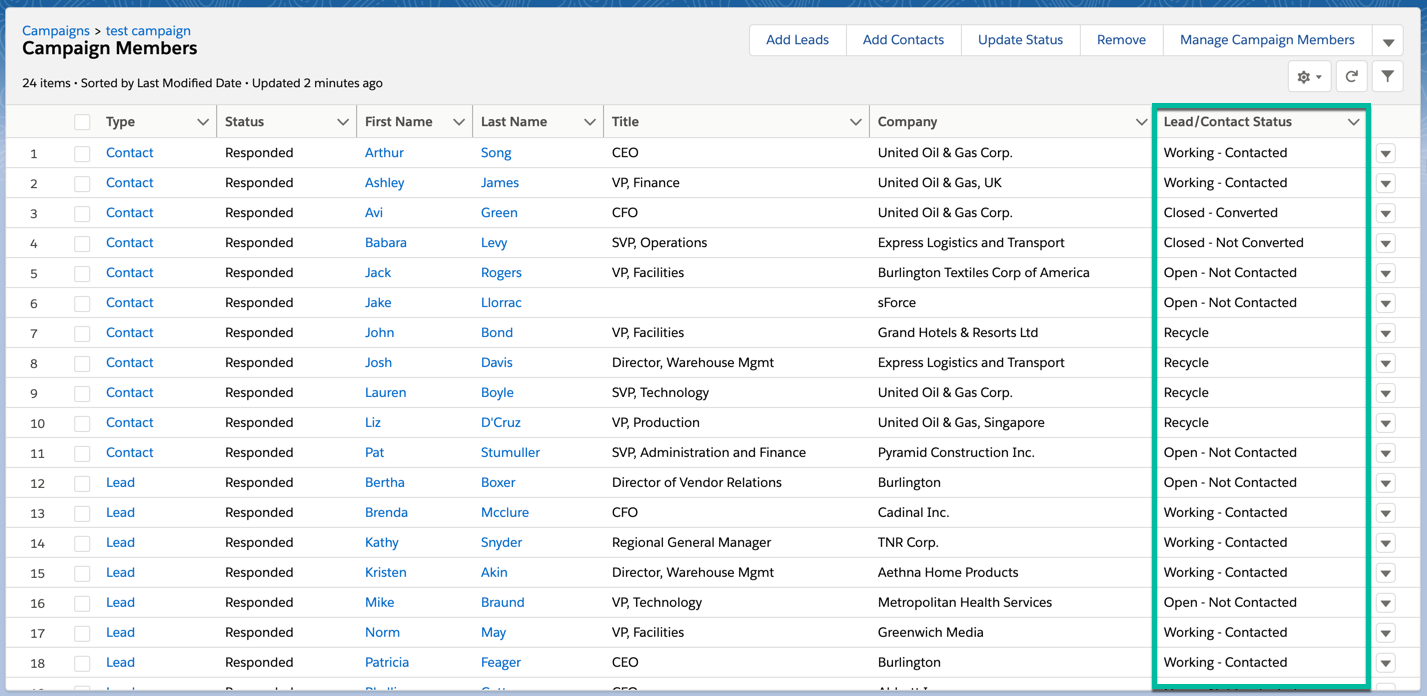
Now the custom field displays in the related list for campaign members.
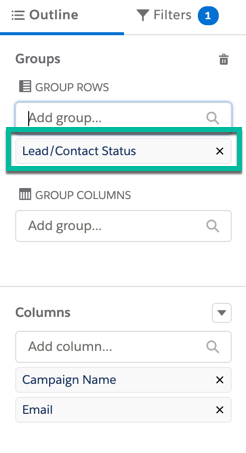
Use the fields within reports
The custom field is also available within the campaigns with campaign members report.
Automatically Create Campaign Member Statuses: The Example
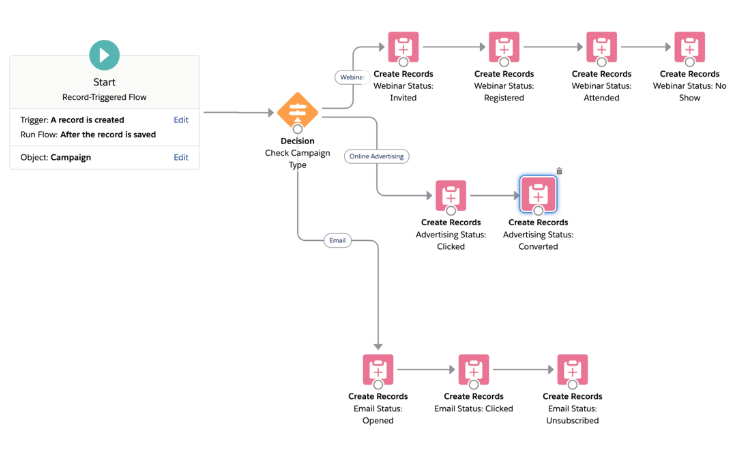
In this post, I’ll be using Salesforce Flow to create the following statuses based on campaign type.
Campaign Type
Campaign Member Status
Online Advertising
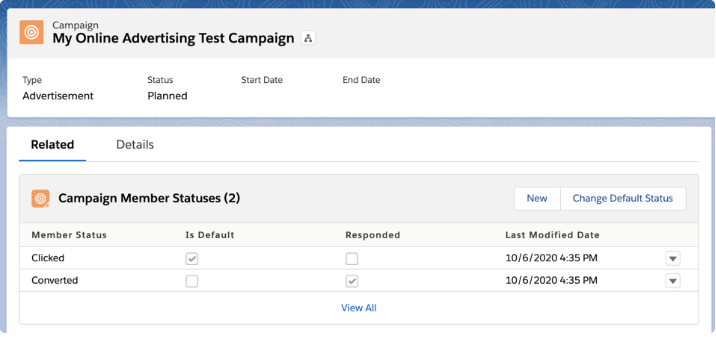
Clicked Converted
Email
Sent Opened Clicked Unsubscribed
Webinar
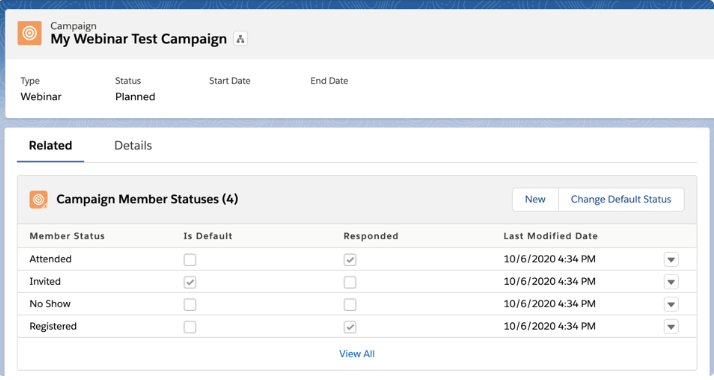
Invited Registered Attended No Show
Automatically Create Campaign Member Statuses: The Example
In this post, I’ll be using Salesforce Flow to create the following statuses based on campaign type.
Prerequisites
I recommend you map out what status values you want to use for each campaign type as well as which statuses should be marked as default and responded before creating your flow.
Create the Salesforce Flow
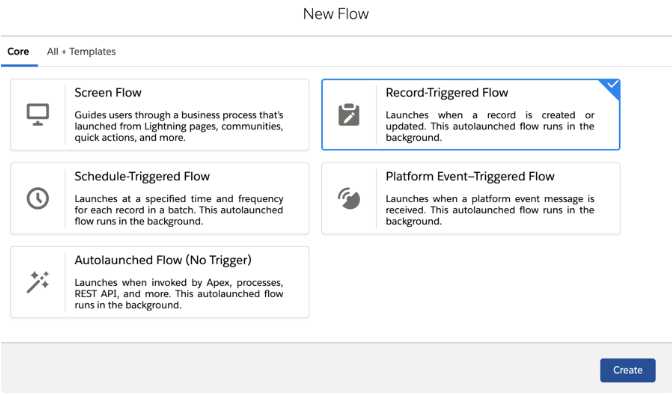
Navigate to Setup > Process Automation > Flows and select new flow. Select Record-Triggered Flow from the wizard.
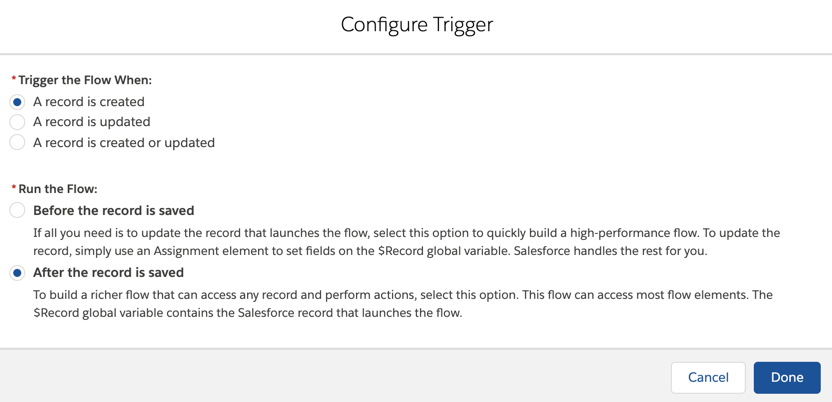
Configure the Trigger to occur when a record is created, and after the record is saved.
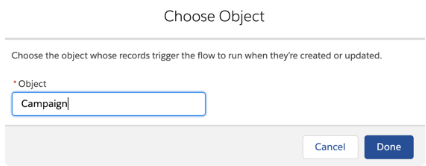
Select Campaign as the trigger object.
Add a Decision element to the flow
Drag and drop a decision element onto the page. This is where we will set up the logic to determine what campaign statuses to create for each campaign type.
In this example, I will be creating three outcomes:
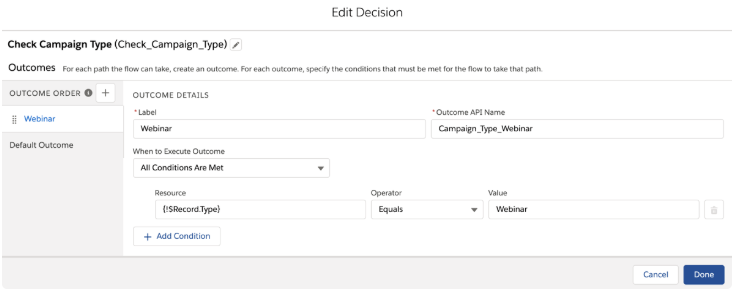
Campaign type = Webinar
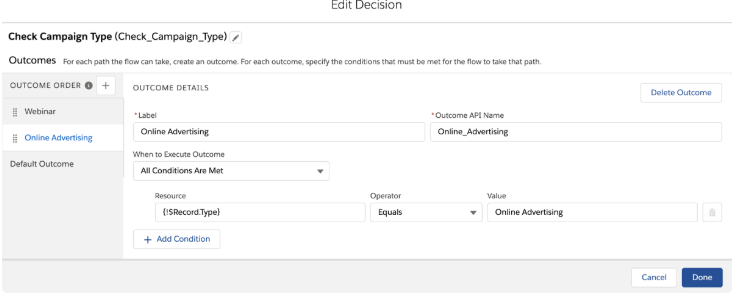
Campaign type = Online Advertising
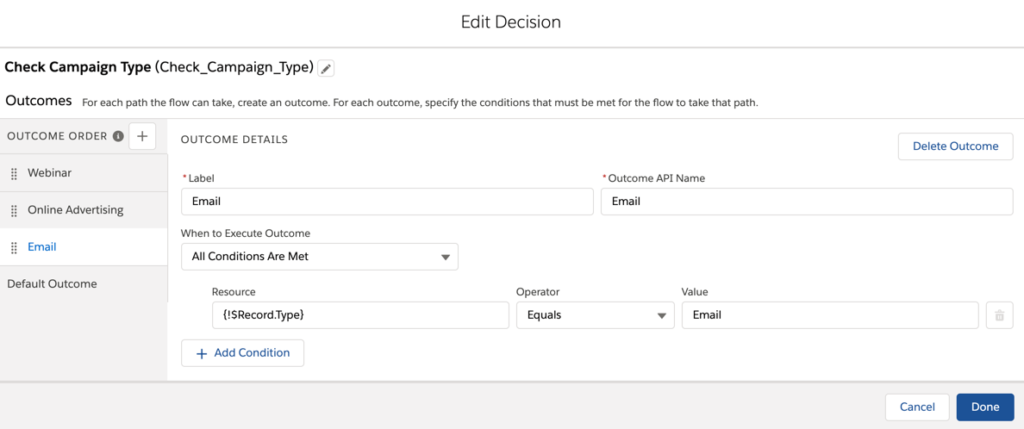
Campaign type = Email
Each outcome will use the {!$Record.Type} resource and use the value of the campaign type.
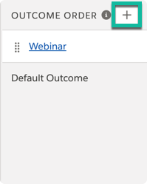
Click the plus sign to add each outcome.
Example: Campaign type = Webinar
Example: Campaign type = Online Advertising
Example: Campaign type = Email
Add create record elements to the Salesforce Flow
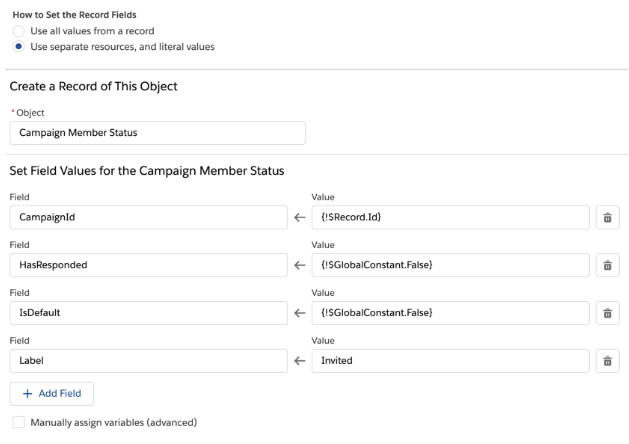
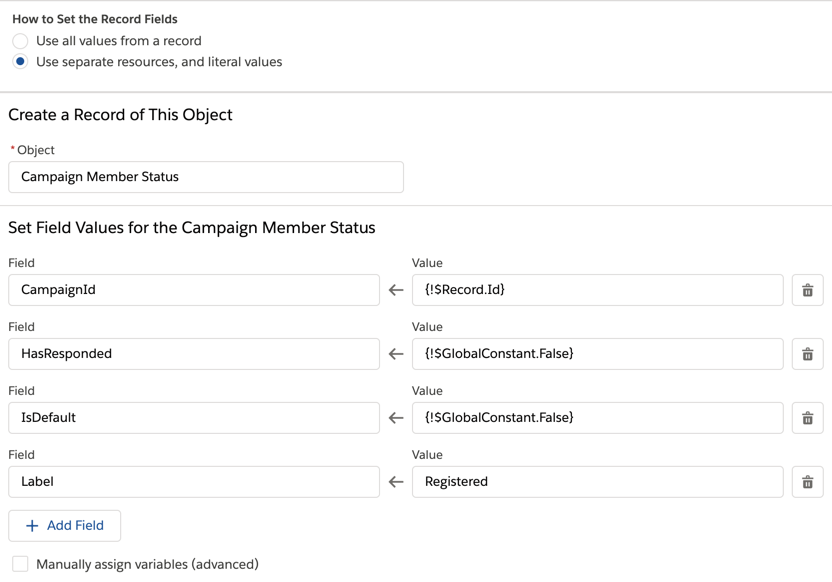
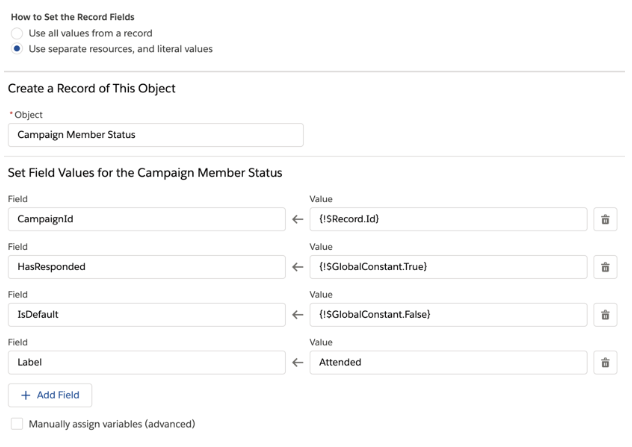
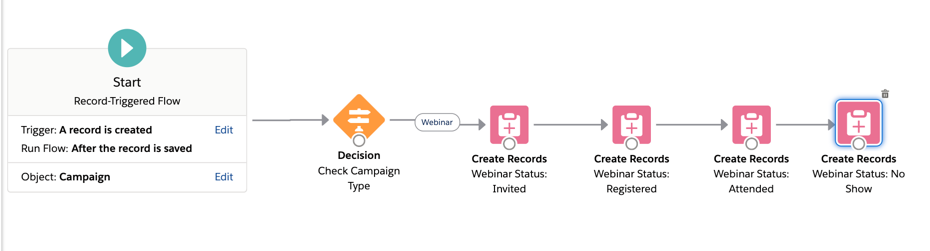
Once your decision outcomes have been created, you can add actions to create each campaign member status. Each status for the campaign will use a Create Records element. For example, if you want to create four campaign member statuses for webinars, you will need add four Create Record elements to the flow.
Each create records element will set the following values:
Create one record
Use separate resources, and literal values
Set the value for CampaignId to {!$Record.Id}
Set a field label
Setting these values are optional:
HasResponded: I highly recommend setting this as it is helpful for reporting
IsDefault: There can only be one default campaign status.
SortOrder: I recommend not setting this value. If your campaign already has values, it can sometimes cause a flow error.
Using my webinar campaign type as an example, here is what my create record steps look like.
Example: Create a campaign member status for invited
Example: Create a campaign member status for registered
Example: Create a campaign member status for attended
Example: Create a campaign member status for no show
Example: All webinar statuses
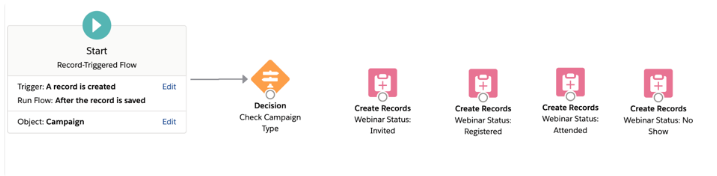
Here’s what my flow looks like once all my webinar statuses have been added.
Note: There is more than one way to create campaign member statuses using Flow. I’ve chosen to create them using separate create record elements, but you can also create them by using an assignment element paired with a loop element. While this method works and eliminates some steps, you cannot assign HasResponded and IsDefault values to individual statuses.
Connect the decision element
Connect the decision element to the first create record element and select webinar as the outcome.
Connect the rest of your elements. Now, we are left with a flow that looks like this.
Repeat for the rest of your campaign statuses
Repeat the process above by adding more create record elements to your flow for the rest of your campaign types.
Here’s what my flow looks like once I added the Online Advertising and the Email statuses.
Optional: Delete the default status values
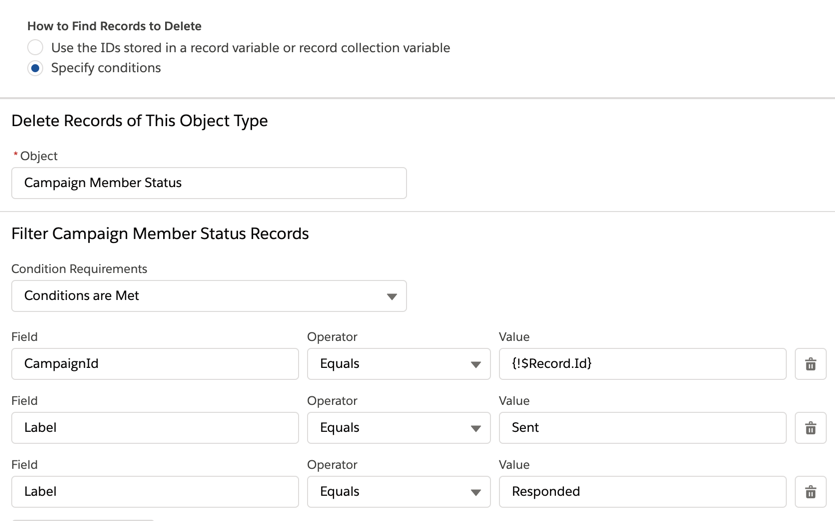
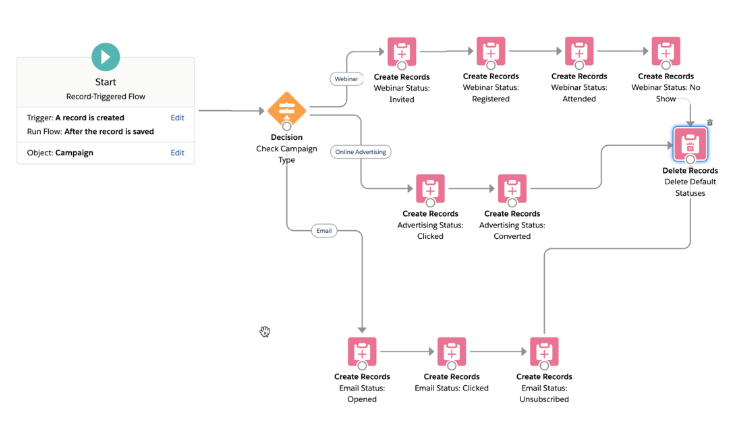
Optionally, you can delete the two default status values (sent and responded) from campaigns automatically by adding a delete record action to your flow.
Drag and drop the delete records element to your flow, select the Campaign Member Status object, and add the criteria.
Connect the delete records element to the last element of each of the flow steps.
Note: Use caution when deleting these statuses. Campaigns must have one status set to responded and one status set to default. If you remove the ‘Sent’ and ‘Responded’ statuses from campaigns you must set these values for one of your custom custom statuses.
Test, test, test
Save and activate your flow. Create new campaigns for each of the campaign types to ensure the statuses are correct.
Before we dig into the meat of this post and some cool ways you can personalize your marketing efforts with Pardot Advanced Dynamic Content, let’s take a step back and start with…
“What is Advanced Dynamic Content?”
Advanced Dynamic Content displays custom HTML based on the Prospect’s criteria and allows you to customize messaging to the prospect.
For example, if am trying to sell Pardot to a Sales executive, I might use the subject line, “Increase your close rate with Marketing Automation”, but if I am trying to sell Pardot to a Marketing Automation Manager, I might use, “Automate and personalize your Prospect journey with Pardot”.
Where to use Pardot Advanced Dynamic Content
Advanced Dynamic Content can be used on Pardot Forms, Landing Pages, and emails and is available for Plus and Advanced editions.
But wait, why should I worry about personalization in the first place?
Prospects are increasingly expecting a personalized experience and personalization has consistently been shown to increase sales and engagement. Personalization can increase sales by 19%, email opens by 29%, and email clicks by a whopping 41%! (Source: https://www.pardot.com/blog/5-incredible-examples-personalized-marketing/)
Isn’t Handlebars Merge Language replacing Advanced Dynamic Content?
Nope! HML adds a new tool to your arsenal for delivering tailored content to your prospects, but there are use cases for both Dynamic Content and HML. With HML you can write if statements right in your emails, while Advanced Dynamic Content provides you more of a library of prewritten content to use based on the Prospect’s data. Learn more about HML in our blog here. And if you really want to get tricky, learn how you can use HML and scoring categories to fuel dynamic content in our blog post here.
Ok, back to the topic at hand. What are some fancy ways you can use Advanced Dynamic Content?
Use dynamic content on standard areas of your email templates
If you have standard language on every single one of your email templates (such as Terms & Conditions, Privacy Policies, legal mumbo-jumbo, etc.) and this language ever changes, you will have to edit every single one of your email templates. To avoid this pain, make this standard language dynamic content. That way, if it ever changes, you only have to update it in one place!
For example, if your standard footer language looks something like this:
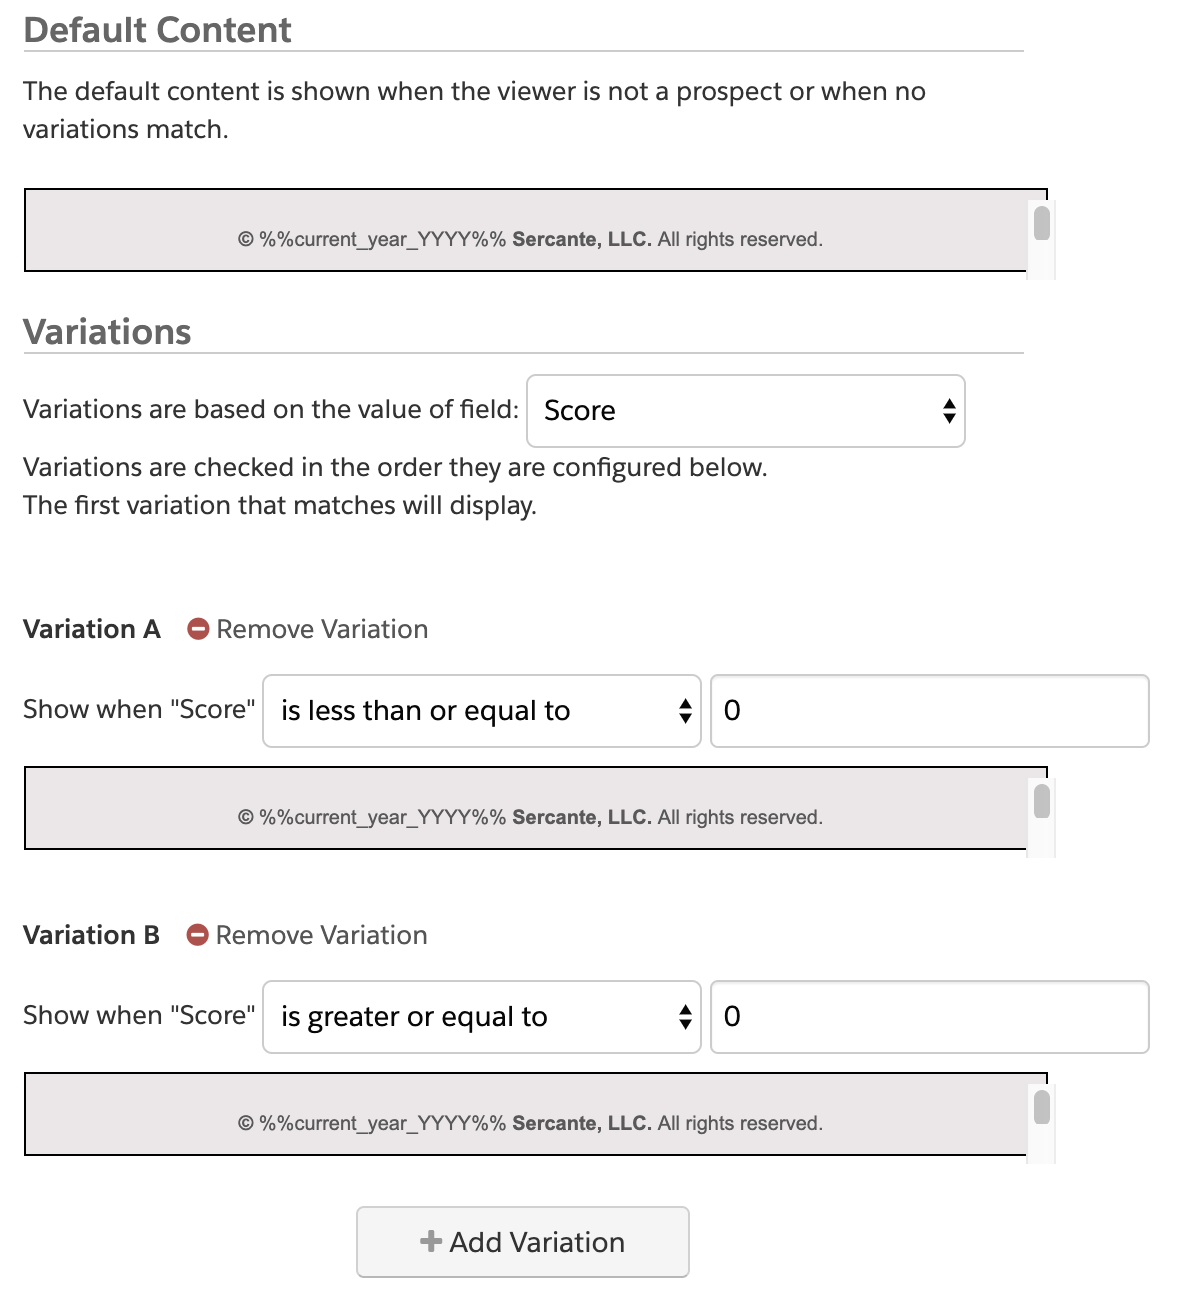
Set up your Dynamic Content with a variation that will match all prospects and enter your standard footer content into each variation.
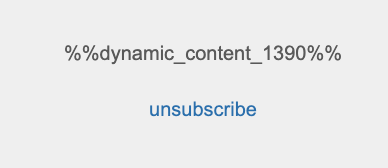
Finally, replace your standard footer content with your Dynamic Content tag.
(You’ll need to leave the unsubscribe or email preference center link outside of the dynamic content because Pardot needs to see that one of these links is on your email drafts.)
Use dynamic content to manage translations
If you have an international client base, consider adding Dynamic Content to your forms and landing pages. This example does rely on you capturing the language the prospect speaks somewhere on the prospect’s profile.
Create content for each stage of the prospect lifecycle
Pardot has 5 Lifecycle Stages for prospects:
Visitor: an anonymous individual who has visited your website or Pardot-tracked assets
Prospect: a Visitor who has converted and is associated with an email address.
Marketing Qualified Leads (MQLs): a prospect that has been assigned to a user
Sales Qualified Leads (SQLs): a prospect who has been assigned to a user and associated with an opportunity in Salesforce
Won Deals: the opportunity the prospect is associated with is changed to “Closed Won”.
The stage a prospect is in is not recorded on each prospect’s profile, but you can easily make that happen with a few automation rules and these instructions.
Once you identify which Lifecycle stage the prospect is currently in, you can use your Dynamic Content to personalize messaging based on the stage.
For example, if you’re connecting with a prospect who is still in the MQL stage, you may highlight the features of your products or offerings. However, if you are connecting with a prospect who is in the “Won Deals” stage, they’re likely more familiar with the features of your products and offerings already, so they may want to hear about recent case studies or new features you’ve added.
Customize a “next step” CTA for the prospect
When a prospect fills out a form, the subsequent thank you or success page should not be a dead-end. With dynamic content, you can use these pages to show prospects a “Next Step” CTA that is personalized to them.
For example, if this is a brand new prospect, you may ask them to subscribe to your emails or link to an overview of your products so they can learn more. If the prospect is a current customer and subscriber, serving up the same content as you would for the brand new prospect is not going to be relevant, so show current customer white papers, case studies, or use the CTA for a cross-sell opportunity.
Ongoing personalization through Pardot
As you can see, personalizing your marketing is something customers have come to expect and, fortunately, it’s totally doable in Pardot! All you need is a use case and a little creativity.
What are some interesting ways you’ve used advanced dynamic content? We’d love to hear in the comments!