
Have you ever wished you could have multiple conditional form completion actions in a single Pardot form?
If you answered “OF FREAKIN’ COURSE I HAVE”, you’re in luck because I am going to teach you how in just 5 easy steps.
As you know it is super easy to add a single completion action to a Pardot form. But what would you do if you wanted to add multiple completion actions to a form and tie those actions to specific form elements.
I know, it’s a head scratcher right (and you’ve probably heard: “Nope, can’t do it”)? Never fear I’ll guide you through the dragon’s den.
When we combine the magic of Pardot together with the superpowers of JavaScript anything is possible.
But, before we take our first step down the path to knowledge, let’s set the scene. Imagine that we are promoting multiple webinar events with a single registration form.
In this scenario, we want to have one landing page that has a list of upcoming webinars. Visitors can choose one or more of those webinars to attend and only need to fill out one Pardot form. Then, we need that registration information to register the visitor (now a Prospect) in the appropriate GoToWebinar sessions.
So where do we start?
Step 1: Configure the Custom Fields.
Our first step is to identify the field(s) we will use on the form and to which form elements we will apply the conditional completion actions.
We need to note the API field name (field ID) for the field(s) we’ve selected. These can be found with one of the following navigations depending upon your chosen experience:
- In Pardot (classic), navigate to Admin | Configure Fields | Prospect Fields.
- In the Pardot Lightning app, click the Pardot Settings tab, then click Object and Field Configuration | Prospect Fields.
For our scenario we’ll create 4 custom fields for 4 upcoming webinars so our future prospects can register for any or all of our webinar options.
Our list of the unique Field IDs:
- Webinar_topic_1
- Webinar_topic_2
- Webinar_topic_3
- Webinar_topic_4
Keep these IDs somewhere you can access them easily. They’ll be needed in our final step.
Step 2: Create a Pardot form (or edit an existing one).
Make sure to select the fields that you wish to use for your completion actions and make sure they are checkbox fields, text fields, or radio buttons. If they are Checkbox fields, they must have EXACTLY ONE selection option. When selecting your inputs make sure to uncheck the required option.
For our scenario, I’ve created 4 custom checkbox fields and added each to the form. Each has exactly one value, and was step up like this:
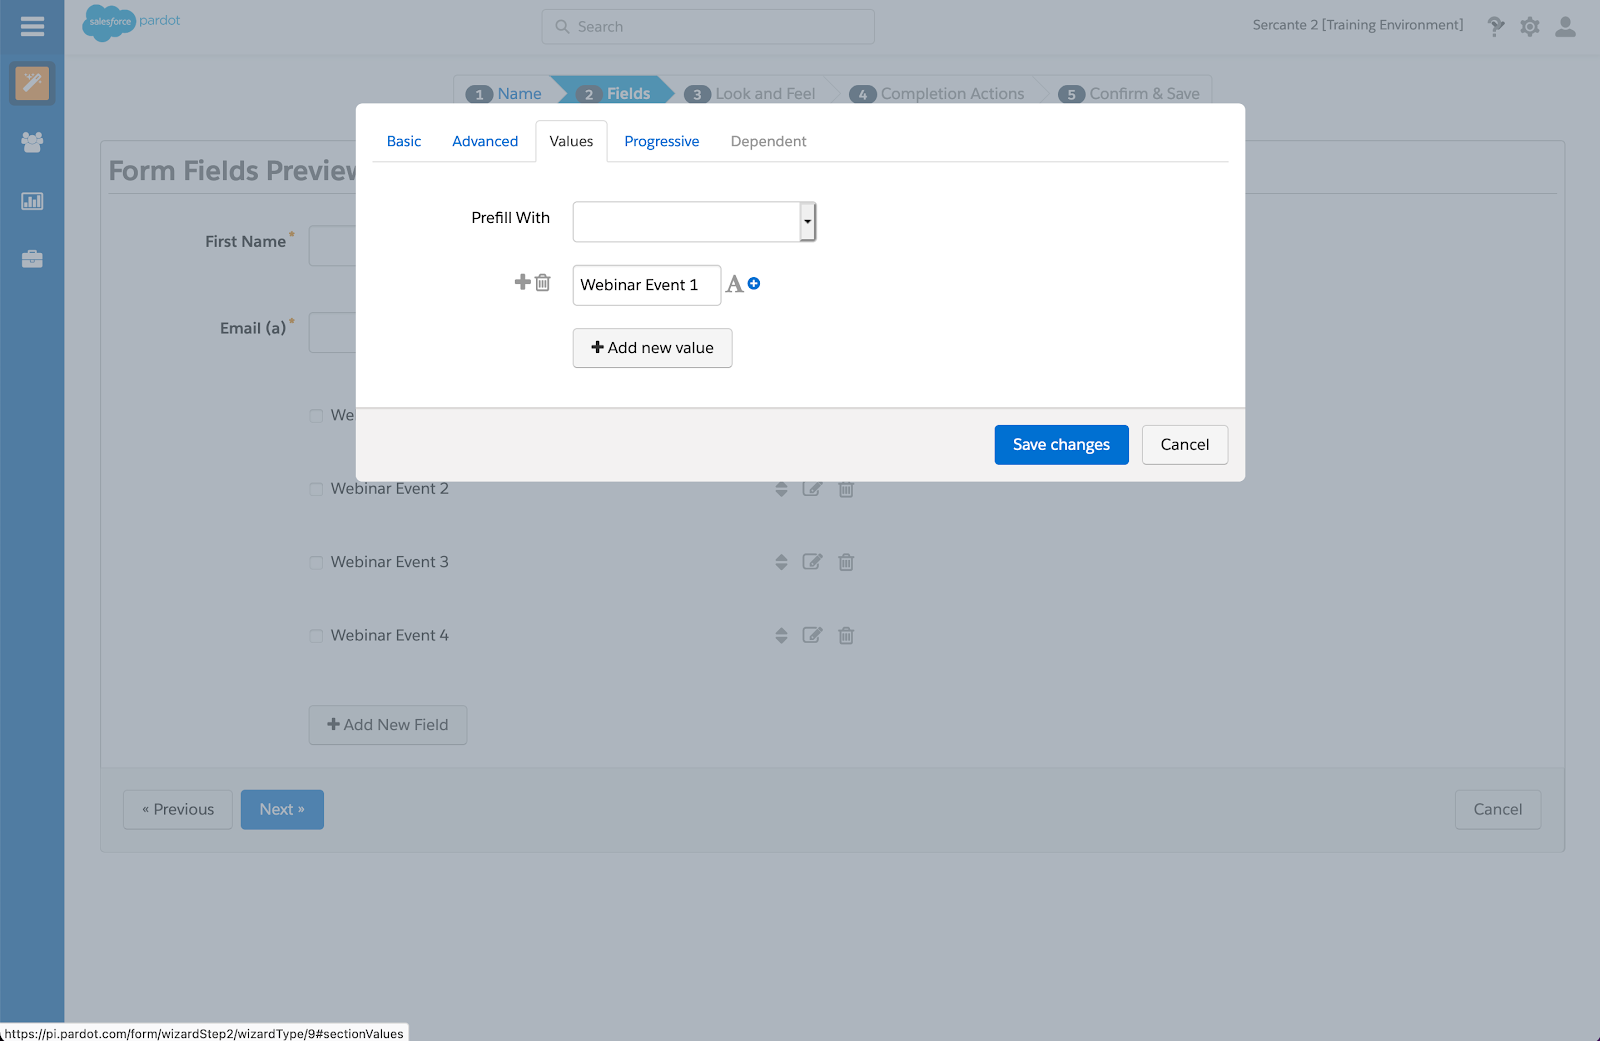
First select the Prospect Field “Webinar Topic 1”, select type of Checkbox and Data Form of “Text”.

Now click on the Values tab. Enter the Value that you want to display on the form (in this case, our Value is Webinar Event 1). Keep a record of this value handy. We’ll need it in step 5 when we start customizing our JavaScript.
Note that for each form field value on which you want to apply a unique completion action, you will need to create a unique form handler. In our example we’ll be using 4 completion actions and therefore 4 form handlers.
These are our Field ID and Value pairs so far:
- FieldID: Webinar_topic_1
Form Value: Webinar Event 1 - FieldID: Webinar_topic_2
Form Value: Webinar Event 2 - FieldID: Webinar_topic_3
Form Value: Webinar Event 3 - FieldID: Webinar_topic_4
Form Value: Webinar Event 4
I know the naming is not 100% awesome. I want to keep it generic though so Fields can be reused as needed. If we gave each one very specific names our solution would be too brittle (meaning easy to break, hard to scale).
Step 3: Create a Pardot form handler for each field value you’d like to apply completion actions.
Start by only adding the email field to the form handler. Then, add the corresponding completion action for each value. Save. Take note of the form handler endpoint URL (specifically the HTTPS version) as you’ll need this in step 5 and match it to the related Values from the form.
Note: make sure that the “External Field Name” is: “email” (all lower case), and make sure that “Disable Visitor Activity throttling” has been checked (so that multiple submissions of the form all work flawlessly)
As we continue with our multiple webinar example, I’ve repeated the step 4 times and created a form handler to use for each of the 4 custom fields created in step 2.
Here is a list of the 4 form handlers and their endpoint URLs and how they map to the field values set up above:
- FieldID: Webinar_topic_1
Form Value: Webinar Event 1
Form Handler URL: https://sercante.com/l/876401/2020-11-30/gny9d5 - FieldID: Webinar_topic_2
Form Value: Webinar Event 2
Form Handler URL: https://sercante.com/l/876401/2020-11-30/gny9df - FieldID: Webinar_topic_3
Form Value: Webinar Event 3
Form Handler URL: https://sercante.com/l/876401/2020-11-30/gny9dk - FieldID: Webinar_topic_4
Form Value: Webinar Event 4
Form Handler URL: https://sercante.com/l/876401/2020-11-30/gny9dh
Step 4: Copy this script and paste into your Pardot form’s Thank You Code.
Copy the code below and paste it directly into the Thank You “Code” in Pardot’s “Completion Actions” tab.
<script>
var fieldsConfig = [
{//this block of lines is for option 1
    fieldValue: '%%your_field_id_1{js}%%',
    checkboxVal: 'VALUE_1',
    endpointUrl: 'FORM_HANDLER_1_URL'
},
{//this block of lines is for option 2
    fieldValue: '%%your_field_id_2{js}%%',
    checkboxVal: 'VALUE_2',
    endpointUrl: 'FORM_HANDLER_2_URL'
}
//add more blocks if you need them
];
// DO NOT CHANGE BELOW THIS LINE
var email = encodeURIComponent('%%email{js}%%');
var thankYouContainer = document.querySelector('.form-thank-you') || document.body;

fieldsConfig.forEach(function (field) {
//console.log('Expecting '+field.checkboxVal+', got: '+field.fieldValue);
  if (field.checkboxVal === field.fieldValue) {
//console.log('matched! adding iFrame to endpoint URL: '+iFrameUrl);
var iframeUrl = field.endpointUrl +'?email=' +email + '&t=' + Date.now();
    var iframe = document.createElement('iframe');
    iframe.setAttribute('height', '1px');
    iframe.setAttribute('width', '1px');
    iframe.setAttribute('src', iframeUrl);
    thankYouContainer.append(iframe);
  }
});
</script>
Note: remove the commented console.log statements to observe how it works
After pasting the code into the thank you code input area make sure the “Always display form after submission” checkbox is checked — otherwise this method will not work and the script will run in a loop! Which will cause a total computer meltdown and all pictures of cats on the internet to disappear. Ok that last bit is a small exaggeration but seriously don’t forget the checkbox. You’ve been warned.
Step 5: Time to modify some JavaScript
The code we pasted into our thank you content in step 4 is a bit of boilerplate to get us started. It will need to be updated for each unique use. I know it’s a bit daunting but we’ll take it slow and be very mindful of the characters we adjust.
For our webinar scenario I’ve duplicated the first code block two additional times for a total of 4 blocks of field/value/url. This is a necessary step because we have 4 form handlers and custom fields to match up. If we were only working with 2 we would not need to duplicate this code block.
Notice how each code block is contained in a set of curly braces and separated by a comma. There is no trailing comma on the last block:
{//this block of lines is for option 1
    fieldValue: '%%your_field_id_1{js}%%',
    checkboxVal: 'VALUE_1',
    endpointUrl: 'FORM_HANDLER_1_URL'
},
{//this block of lines is for option 2
    fieldValue: '%%your_field_id_2{js}%%',
    checkboxVal: 'VALUE_2',
    endpointUrl: 'FORM_HANDLER_2_URL'
},
{//this block of lines is for option 3
    fieldValue: '%%your_field_id_3{js}%%',
    checkboxVal: 'VALUE_3',
    endpointUrl: 'FORM_HANDLER_3_URL'
},
{//this block of lines is for option 4
    fieldValue: '%%your_field_id_4{js}%%',
    checkboxVal: 'VALUE_4',
    endpointUrl: 'FORM_HANDLER_4_URL'
}
First thing we need to update is your_field_id_1. Let’s replace that with the Pardot field ID that you want to perform completion actions on. A couple of things to note:
- the name must be wrapped in %%, and
- a {js} modifier must be added at the end of the name.
- For example, if your field id is custom_field_1, it should look like %%custom_field_1{js}%% not %%custom_field_1%% or %custom_field_1{js}%
Now that we know what to watch out for let’s start making edits. First we’ll replace the “your_field_id” placeholders with the values of prospect field IDs (step 1):
- %%your_field_id_1{js}%% = %%Webinar_topic_1{js}%%
- %%your_field_id_2{js}%% = %%Webinar_topic_2{js}%%
- %%your_field_id_3{js}%% = %%Webinar_topic_3{js}%%
- %%your_field_id_4{js}%% = %%Webinar_topic_4{js}%%
Next, we replace the placeholder values for “VALUE”. Using our example, the values are what we used in the Pardot form checkbox value tab – Please note that if there are special characters like ampersands (&) in the form values, they MUST be replaced with HTML entity code like: & (that’s the & symbol followed by the letters amp and ended with a semicolon. Probably best to avoid special characters in the Values if at all possible):
- VAULE_1 = Webinar Event 1
- VAULE_2 = Webinar Event 2
- VALUE_3 = Webinar Event 3
- VALUE_4 = Webinar Event 4
Finally, each value that we’re searching for in our form will trigger a unique form handler. So, each code block will need to be updated with the correct endpoint URL. Make sure to match the correct endpoint URL with the correct form field.
Here the endpoints created in step 3 are used in place of the FORM_HANDLER_1_URL variables.
- FORM_HANDLER_1_URL = https://sercante.com/l/876401/2020-11-30/gny9d5
- FORM_HANDLER_2_URL = https://sercante.com/l/876401/2020-11-30/gny9df
- FORM_HANDLER_3_URL = https://sercante.com/l/876401/2020-11-30/gny9dk
- FORM_HANDLER_4_URL = https://sercante.com/l/876401/2020-11-30/gny9dh
The final block of code from our example looks like this:
<script>
var fieldsConfig = [
{//this block of lines is for option 1
    fieldValue: '%%Webinar_topic_1{js}%%',
    checkboxVal: 'Webinar Event 1',
    endpointUrl: 'https://sercante.com/l/876401/2020-11-30/gny9d5'
},
{//this block of lines is for option 2
    fieldValue: '%%Webinar_topic_2{js}%%',
    checkboxVal: 'Webinar Event 2',
    endpointUrl: 'https://sercante.com/l/876401/2020-11-30/gny9df'
},
{//this block of lines is for option 3
    fieldValue: '%%Webinar_topic_3{js}%%',
    checkboxVal: 'Webinar Event 3',
    endpointUrl: 'https://sercante.com/l/876401/2020-11-30/gny9dk'
},
{//this block of lines is for option 4
    fieldValue: '%%Webinar_topic_4{js}%%',
    checkboxVal: 'Webinar Event 4',
    endpointUrl: 'https://sercante.com/l/876401/2020-11-30/gny9dh'
}
];
// DO NOT CHANGE BELOW THIS LINE
var email = encodeURIComponent('%%email{js}%%');
var thankYouContainer = document.querySelector('.form-thank-you') || document.body;

fieldsConfig.forEach(function (field) {
//console.log('Expecting '+field.checkboxVal+', got: '+field.fieldValue);
  if (field.checkboxVal === field.fieldValue) {
//console.log('matched! adding iFrame to endpoint URL: '+iFrameUrl);
var iframeUrl = field.endpointUrl +'?email=' +email + '&t=' + Date.now();
    var iframe = document.createElement('iframe');
    iframe.setAttribute('height', '1px');
    iframe.setAttribute('width', '1px');
    iframe.setAttribute('src', iframeUrl);
    thankYouContainer.append(iframe);
  }
});
</script>
Step 6: Just kidding there is no step six
While it’s technically true for the purpose of this blog post, there is no step 6, but if there was it would look something like this:
Test, Test, Test.
Make sure to thoroughly test your landing page, form and JavaScript to ensure everything is working as expected.
And there you have it. Our future prospects will be able to select multiple webinar events with our form checkboxes. Then our unique form actions will run based on the prospect action of selecting one or more of the form elements.
Let’s take a moment to recap what we’ve learned today
- We created a custom solution that allows multiple completion actions to fire based on a value recorded by Pardot form in 5 easy steps.
- In our imaginary situation we want a user to be able to register for multiple webinar events in one simple form.
- We started by creating Prospect Fields and connected form inputs to them.
- After linking all the values and Prospect fields we created Pardot form handlers for each form element we want to interact with.
- Next we copied a bit of boilerplate JavaScript into the forms Thank you content section and updated the code replacing the generic values with our real content.
- Finally we made sure to test all the things and confirm everything is working correctly.
Huge congratulations for making it all the way through with us. Give yourself a big pat on the back and make sure everyone at your company knows how awesome you are with your newly gained wizardry. Come back to visit any time.
If you have any questions or would like help solving other interesting ideas, let us know about it in the comments.