Your event or webinar has finished and now it’s time for sales to follow up on those leads. A great way to automate sales follow up is to create an automated engagement program in Pardot to send out emails on the sales rep’s behalf and create follow up tasks automatically in Salesforce.
Creating the content
The first step is to create the content for your series of follow up emails. Here are some great resources for helping you come up with the content for your emails.
- How To Write A Sales Email People Want To Respond To
- 30 Sales Prospecting Email Templates Guaranteed to Start a Relationship
- Ultimate guide to sales emails: How to write sales emails that convert (templates, examples and case studies)
- 26 sales email tips to crush 2020 (+ 13 templates)
- Acknowledge the “no” and other sales email tips to book more meetings
- Outbound Email Sequence Tips: 13 Tips to Write the Perfect Email Cadence
- 5 Ways To Write Targeted Outbound Sales Emails That Get Opens and Replies
Creating the emails in Pardot
The goal for the emails is to make it look like it’s coming from a Sales rep. This means that you might need to set up a new standard email template that looks like a personal email. You will also need to customize the sender to be a Sales user rather than a general user. The email is going to contain a couple of different components:
- Personalized with the recipient’s first name.
- The email signature of the Sales Rep.
- A link to unsubscribe.
Creating the Sales Rep’s signature
The Sales Rep’s signature should be dynamic, so you don’t have to create a new email template for each Sales Rep. There are three different ways to make this dynamic, depending on what content you want to display.
Creating the Sales Rep’s signature: Option 1
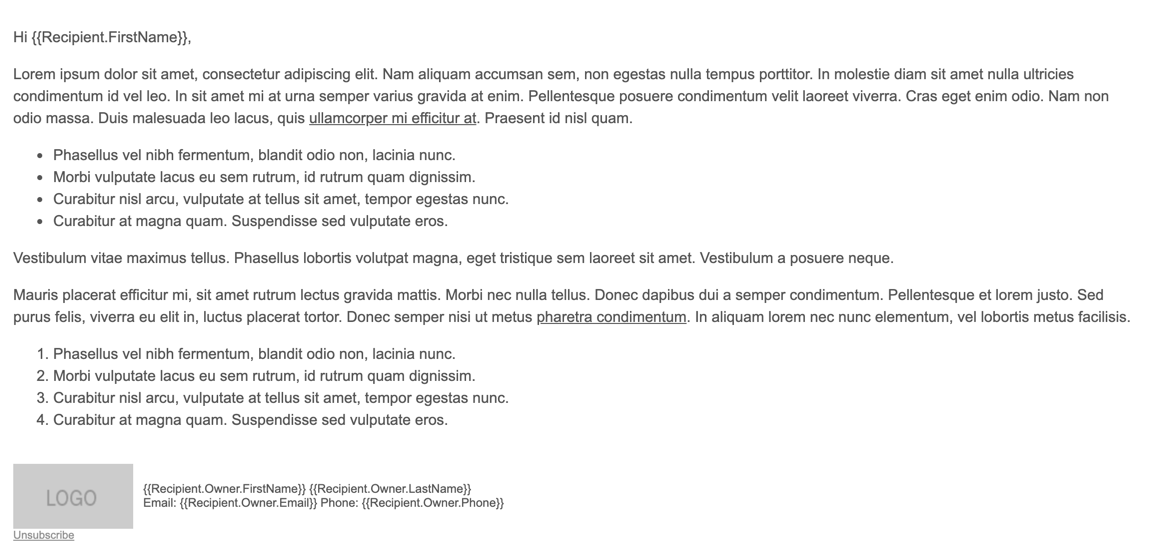
The first way to create the Sales Rep’s signature is to use the merge fields for the Recipient Owner.
Example:
{{Recipient.Owner.FirstName}} {{Recipient.Owner.LastName}}
Email: {{Recipient.Owner.Email}} Phone: {{Recipient.Owner.Phone}}
This will pull in the first name, last name, phone number and email address of the prospect’s owner in Salesforce. The downside to this is if you want to include job title in the Rep’s email signature there is no way to display it using this method.
Template preview
Template HTML
<!DOCTYPE html>
<html xmlns="http://www.w3.org/1999/xhtml"
xmlns:v="urn:schemas-microsoft-com:vml"
xmlns:o="urn:schemas-microsoft-com:office:office">
<head>
<!--[if gte mso 9]><xml>
<o:OfficeDocumentSettings>
<o:AllowPNG/>
<o:PixelsPerInch>96</o:PixelsPerInch>
</o:OfficeDocumentSettings>
</xml><![endif]-->
<meta charset="utf-8">
<meta content="text/html; charset=utf-8" http-equiv="Content-Type">
<meta name="x-apple-disable-message-reformatting" />
<meta content="width=device-width, initial-scale=1" name="viewport">
<style type="text/css">
body, p, ul li, ul, ol, ol li {
font-size:15px;
font-family:Arial,Verdana,Sans-serif;
color:#555555;
line-height:22px;
}
a {
color:#555555;
}
</style>
</head>
<body style="margin:0;padding:0;">
<table border="0" cellpadding="0" cellspacing="0" width="100%">
<tbody>
<tr>
<td style="padding:10px;" class="">
<p>Hi {{Recipient.FirstName}},</p>
<p>Lorem ipsum dolor sit amet, consectetur adipiscing elit. Nam aliquam accumsan sem, non egestas nulla tempus porttitor. In molestie diam sit amet nulla ultricies condimentum id vel leo. In sit amet mi at urna semper varius gravida at enim. Pellentesque posuere condimentum velit laoreet viverra. Cras eget enim odio. Nam non odio massa. Duis malesuada leo lacus, quis <a href="#">ullamcorper mi efficitur at</a>. Praesent id nisl quam.</p>
<ul>
<li>Phasellus vel nibh fermentum, blandit odio non, lacinia nunc.</li>
<li>Morbi vulputate lacus eu sem rutrum, id rutrum quam dignissim.</li>
<li>Curabitur nisl arcu, vulputate at tellus sit amet, tempor egestas nunc.</li>
<li>Curabitur at magna quam. Suspendisse sed vulputate eros.</li>
</ul>
<p>Vestibulum vitae maximus tellus. Phasellus lobortis volutpat magna, eget tristique sem laoreet sit amet. Vestibulum a posuere neque.</p>
<p>Mauris placerat efficitur mi, sit amet rutrum lectus gravida mattis. Morbi nec nulla tellus. Donec dapibus dui a semper condimentum. Pellentesque et lorem justo. Sed purus felis, viverra eu elit in, luctus placerat tortor. Donec semper nisi ut metus <a href="#">pharetra condimentum</a>. In aliquam lorem nec nunc elementum, vel lobortis metus facilisis.</p>
<ol>
<li>Phasellus vel nibh fermentum, blandit odio non, lacinia nunc.</li>
<li>Morbi vulputate lacus eu sem rutrum, id rutrum quam dignissim.</li>
<li>Curabitur nisl arcu, vulputate at tellus sit amet, tempor egestas nunc.</li>
<li>Curabitur at magna quam. Suspendisse sed vulputate eros.</li>
</ol>
<table border="0" cellpadding="0" cellspacing="0" width="100%">
<tbody>
<tr>
<td width="120" class=""><img src="https://via.placeholder.com/120x65?text=LOGO"></td>
<td style="padding-left:10px; font-size:12px;" class="">{{Recipient.Owner.FirstName}} {{Recipient.Owner.LastName}}<br>
Email: {{Recipient.Owner.Email}} Phone: {{Recipient.Owner.Phone}}</td>
</tr>
</tbody>
</table>
<span style="font-size:11px;color:#8f8f8f;"><a href="{{Unsubscribe}}" rel="nofollow,noreferrer" style="color:#8f8f8f;">Unsubscribe</a></span></td>
</tr>
</tbody>
</table>
</body>
</html>
Creating the Sales Rep’s signature: Option 2
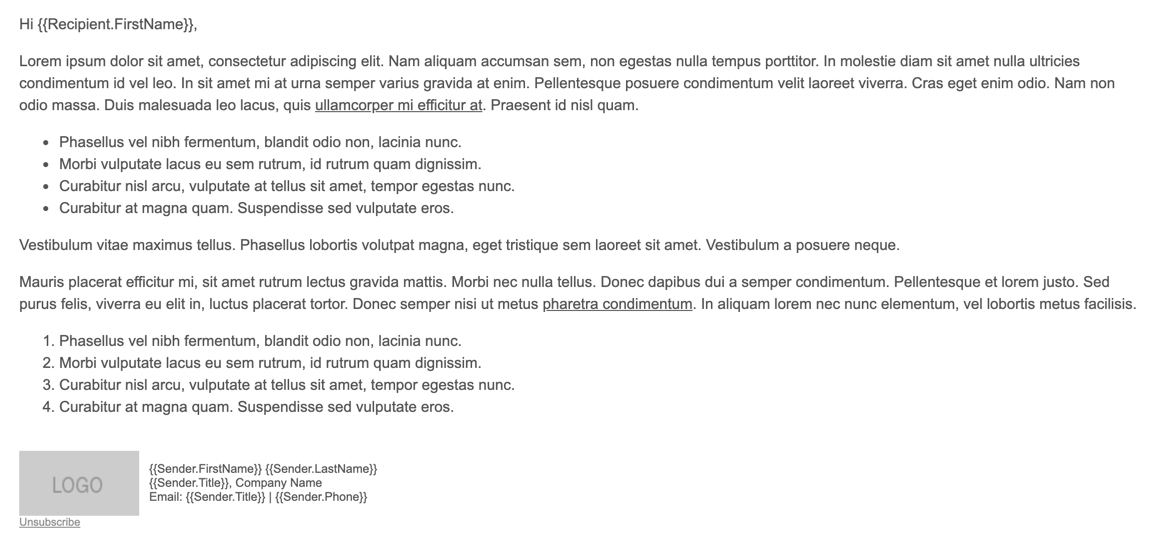
The second way to create the Sales Rep’s signature, is to use the sender merge tags.
Example:
{{Sender.FirstName}} {{Sender.LastName}}
{{Sender.Title}}, Company Name
Email: {{Sender.Title}} | Phone: {{Sender.Phone}}

These fields are pulled from the Pardot user when the email is sent.
Template preview
Template HTML
<!DOCTYPE html>
<html xmlns="http://www.w3.org/1999/xhtml"
xmlns:v="urn:schemas-microsoft-com:vml"
xmlns:o="urn:schemas-microsoft-com:office:office">
<head>
<!--[if gte mso 9]><xml>
<o:OfficeDocumentSettings>
<o:AllowPNG/>
<o:PixelsPerInch>96</o:PixelsPerInch>
</o:OfficeDocumentSettings>
</xml><![endif]-->
<meta charset="utf-8">
<meta content="text/html; charset=utf-8" http-equiv="Content-Type">
<meta name="x-apple-disable-message-reformatting" />
<meta content="width=device-width, initial-scale=1" name="viewport">
<style type="text/css">
body, p, ul li, ul, ol, ol li {
font-size:15px;
font-family:Arial,Verdana,Sans-serif;
color:#555555;
line-height:22px;
}
a {
color:#555555;
}
</style>
</head>
<body style="margin:0;padding:0;">
<table border="0" cellpadding="0" cellspacing="0" width="100%">
<tbody>
<tr>
<td style="padding:10px;" class="">
<p>Hi {{Recipient.FirstName}},</p>
<p>Lorem ipsum dolor sit amet, consectetur adipiscing elit. Nam aliquam accumsan sem, non egestas nulla tempus porttitor. In molestie diam sit amet nulla ultricies condimentum id vel leo. In sit amet mi at urna semper varius gravida at enim. Pellentesque posuere condimentum velit laoreet viverra. Cras eget enim odio. Nam non odio massa. Duis malesuada leo lacus, quis <a href="#">ullamcorper mi efficitur at</a>. Praesent id nisl quam.</p>
<ul>
<li>Phasellus vel nibh fermentum, blandit odio non, lacinia nunc.</li>
<li>Morbi vulputate lacus eu sem rutrum, id rutrum quam dignissim.</li>
<li>Curabitur nisl arcu, vulputate at tellus sit amet, tempor egestas nunc.</li>
<li>Curabitur at magna quam. Suspendisse sed vulputate eros.</li>
</ul>
<p>Vestibulum vitae maximus tellus. Phasellus lobortis volutpat magna, eget tristique sem laoreet sit amet. Vestibulum a posuere neque.</p>
<p>Mauris placerat efficitur mi, sit amet rutrum lectus gravida mattis. Morbi nec nulla tellus. Donec dapibus dui a semper condimentum. Pellentesque et lorem justo. Sed purus felis, viverra eu elit in, luctus placerat tortor. Donec semper nisi ut metus <a href="#">pharetra condimentum</a>. In aliquam lorem nec nunc elementum, vel lobortis metus facilisis.</p>
<ol>
<li>Phasellus vel nibh fermentum, blandit odio non, lacinia nunc.</li>
<li>Morbi vulputate lacus eu sem rutrum, id rutrum quam dignissim.</li>
<li>Curabitur nisl arcu, vulputate at tellus sit amet, tempor egestas nunc.</li>
<li>Curabitur at magna quam. Suspendisse sed vulputate eros.</li>
</ol>
<table border="0" cellpadding="0" cellspacing="0" width="100%">
<tbody>
<tr>
<td width="120" class=""><img src="https://via.placeholder.com/120x65?text=LOGO"></td>
<td style="padding-left:10px; font-size:12px;" class="">{{Sender.FirstName}} {{Sender.LastName}}<br>
{{Sender.Title}}, Company Name<br>
Email: {{Sender.Title}} | Phone: {{Sender.Phone}}</td>
</tr>
</tbody>
</table>
<span style="font-size:11px;color:#8f8f8f;"><a href="{{Unsubscribe}}" rel="nofollow,noreferrer" style="color:#8f8f8f;">Unsubscribe</a></span></td>
</tr>
</tbody>
</table>
</body>
</html>
Creating the Sales Rep’s signature: Option 3
The third option for creating the Sales Rep’s signature is to configure the signature within the user’s settings within Pardot and use the {{{Sender.Signature}}} merge tag within your email template.
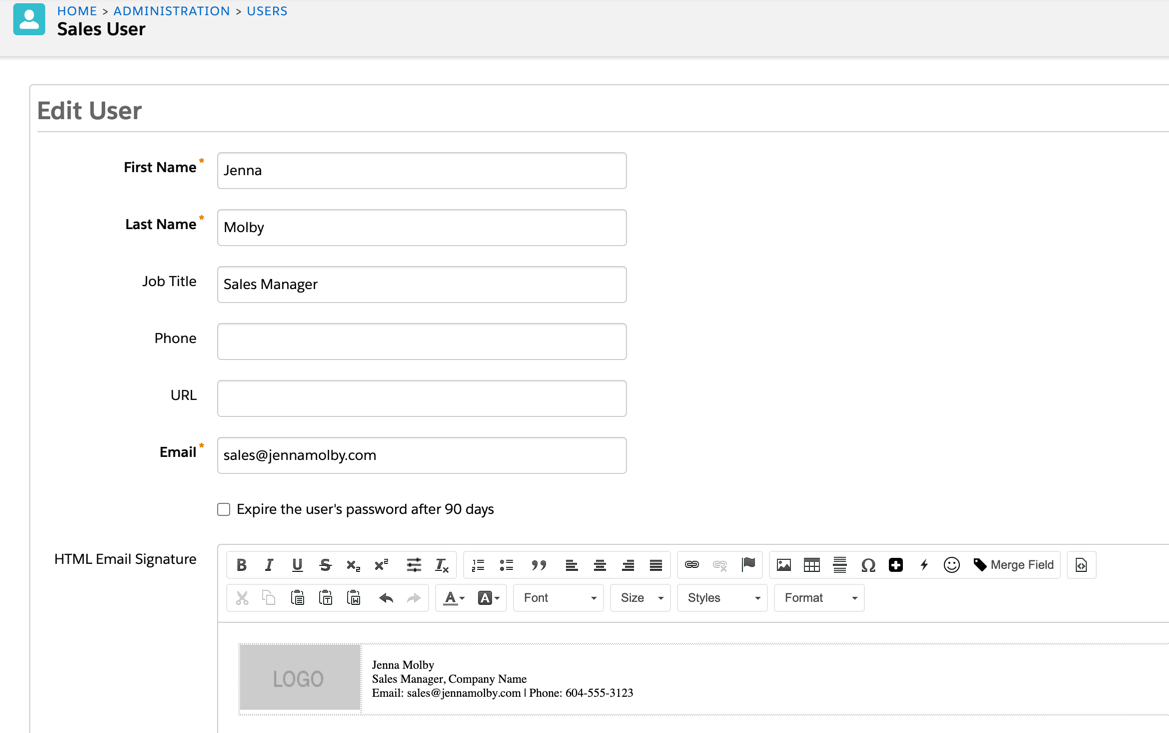
Template preview

Template HTML
<!DOCTYPE html>
<html xmlns="http://www.w3.org/1999/xhtml"
xmlns:v="urn:schemas-microsoft-com:vml"
xmlns:o="urn:schemas-microsoft-com:office:office">
<head>
<!--[if gte mso 9]><xml>
<o:OfficeDocumentSettings>
<o:AllowPNG/>
<o:PixelsPerInch>96</o:PixelsPerInch>
</o:OfficeDocumentSettings>
</xml><![endif]-->
<meta charset="utf-8">
<meta content="text/html; charset=utf-8" http-equiv="Content-Type">
<meta name="x-apple-disable-message-reformatting" />
<meta content="width=device-width, initial-scale=1" name="viewport">
<style type="text/css">
body, p, ul li, ul, ol, ol li {
font-size:15px;
font-family:Arial,Verdana,Sans-serif;
color:#555555;
line-height:22px;
}
a {
color:#555555;
}
</style>
</head>
<body style="margin:0;padding:0;">
<table border="0" cellpadding="0" cellspacing="0" width="100%">
<tbody>
<tr>
<td style="padding:10px;" class=""><p>Hi {{Recipient.FirstName}},</p>
<p>Lorem ipsum dolor sit amet, consectetur adipiscing elit. Nam aliquam accumsan sem, non egestas nulla tempus porttitor. In molestie diam sit amet nulla ultricies condimentum id vel leo. In sit amet mi at urna semper varius gravida at enim. Pellentesque posuere condimentum velit laoreet viverra. Cras eget enim odio. Nam non odio massa. Duis malesuada leo lacus, quis <a href="#">ullamcorper mi efficitur at</a>. Praesent id nisl quam.</p>
<ul>
<li>Phasellus vel nibh fermentum, blandit odio non, lacinia nunc.</li>
<li>Morbi vulputate lacus eu sem rutrum, id rutrum quam dignissim.</li>
<li>Curabitur nisl arcu, vulputate at tellus sit amet, tempor egestas nunc.</li>
<li>Curabitur at magna quam. Suspendisse sed vulputate eros.</li>
</ul>
<p>Vestibulum vitae maximus tellus. Phasellus lobortis volutpat magna, eget tristique sem laoreet sit amet. Vestibulum a posuere neque.</p>
<p>Mauris placerat efficitur mi, sit amet rutrum lectus gravida mattis. Morbi nec nulla tellus. Donec dapibus dui a semper condimentum. Pellentesque et lorem justo. Sed purus felis, viverra eu elit in, luctus placerat tortor. Donec semper nisi ut metus <a href="#">pharetra condimentum</a>. In aliquam lorem nec nunc elementum, vel lobortis metus facilisis.</p>
<ol>
<li>Phasellus vel nibh fermentum, blandit odio non, lacinia nunc.</li>
<li>Morbi vulputate lacus eu sem rutrum, id rutrum quam dignissim.</li>
<li>Curabitur nisl arcu, vulputate at tellus sit amet, tempor egestas nunc.</li>
<li>Curabitur at magna quam. Suspendisse sed vulputate eros.</li>
</ol>
<br>
{{{Sender.Signature}}} <span style="font-size:11px;color:#8f8f8f;"><a href="{{Unsubscribe}}" rel="nofollow,noreferrer" style="color:#8f8f8f;">Unsubscribe</a></span></td>
</tr>
</tbody>
</table>
</body>
</html>
Sender settings
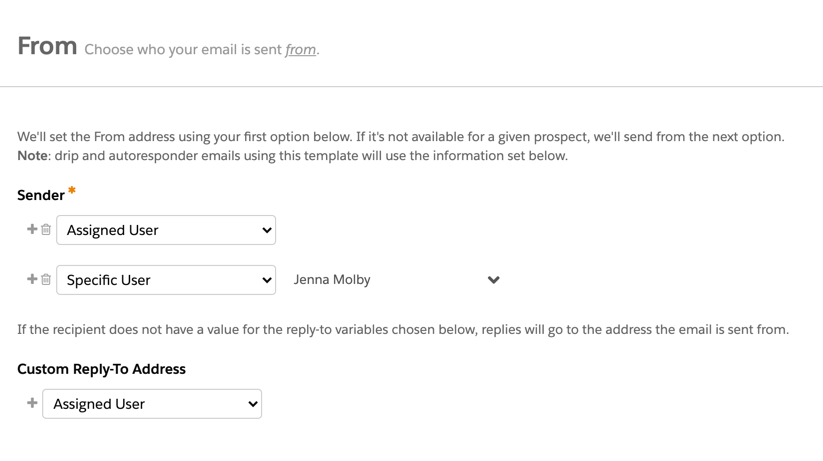
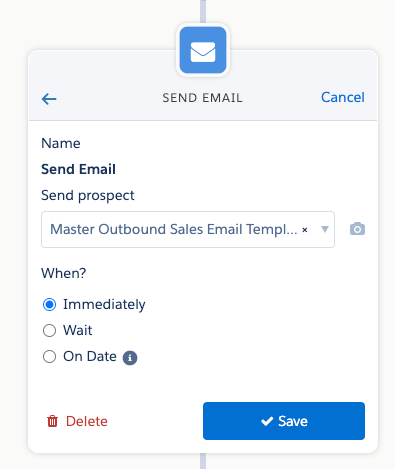
Since the email should come from the assigned Sales Rep, the sender settings need to be configured to come from the Assigned User. It’s also required that a Specific User is selected when choosing this option.
Creating the list
Create your list based on your requirements. Not sure where to start? Here are some tips for planning your list.
- How should prospects enter the engagement program?
- Should prospects be added automatically after an event or webinar?
- Will Sales Rep’s add prospects manually to the engagement program?
- When should prospects be removed from the engagement program?
- When the prospect’s lead status is updated?
- When the prospect has an open opportunity?
- When the prospect replies to an email?
- When the Sales Rep has a live conversation with the prospect?
- Should some prospects be excluded from the engagement program?
- Should ALL prospects who attended the webinar or event be put in the engagement program?
- Should certain job titles or job levels be excluded?
- If there is an open opportunity with the prospect, should the prospect be added to the engagement program?
Example list criteria
Here are some list examples to get you started.
List example #1: Automatically add all prospects to the engagement program list
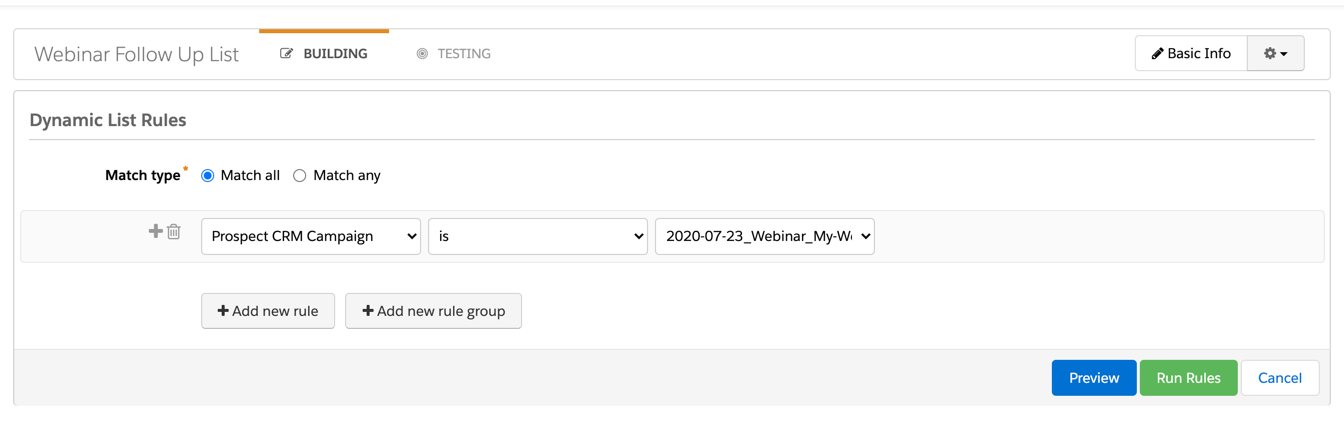
List example #2: Automatically add all prospects who attended the webinar to the engagement program list

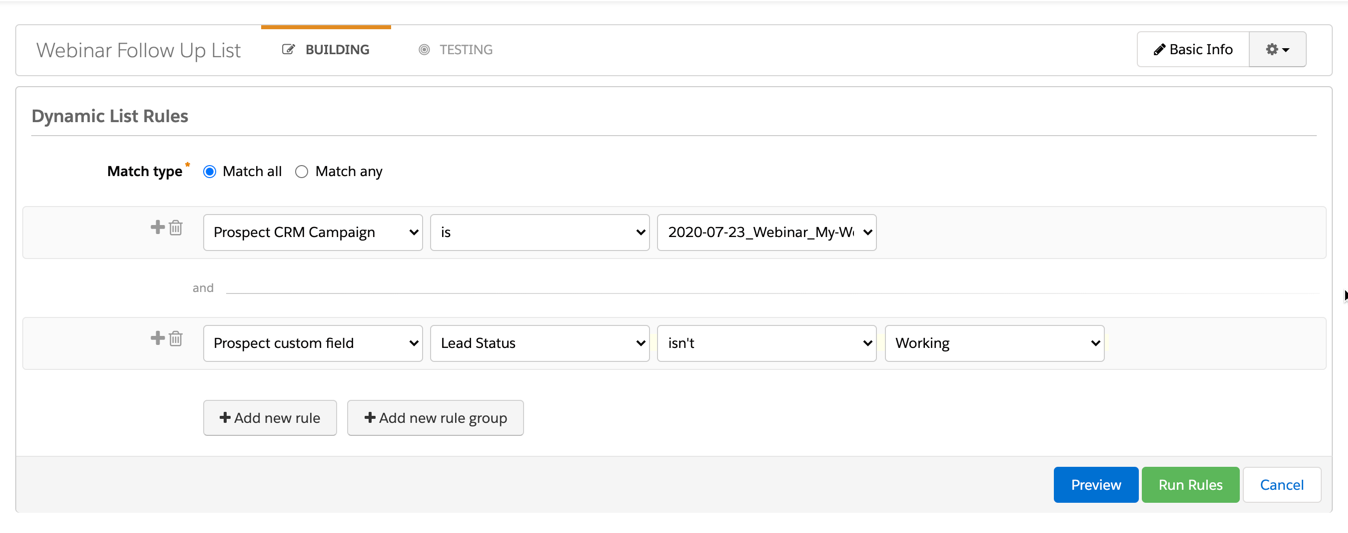
List example #3: Automatically add all prospects to the engagement program list if Lead Status is not = working
Creating the Engagement Program in Pardot
Now that all the emails and lists have been created, it’s time to set up the engagement program. In this example, I’m going to send 2 emails and create 2 tasks in Salesforce for the Sales Rep’s to complete.
The first step in the program is to send out one of the personalized emails, coming from the assigned Sales Rep.
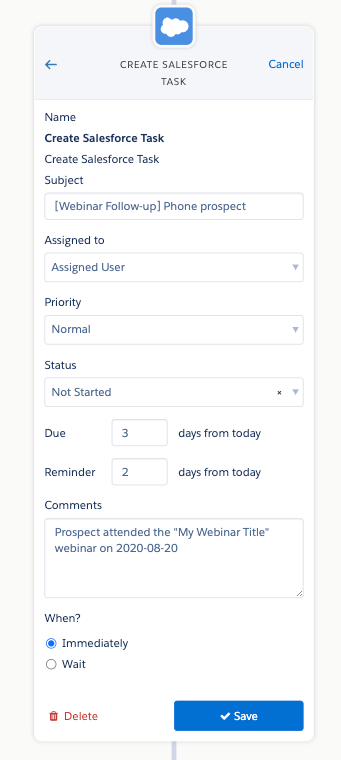
The second step is to create a task in Salesforce for the Sales Rep to give the prospect a call. The task is created automatically following the send of the email. The task is due within 3 days of the task created date and the Rep will receive a reminder 2 days from the created date.
Once the task is created, this is what the Sales Rep will see in Salesforce.
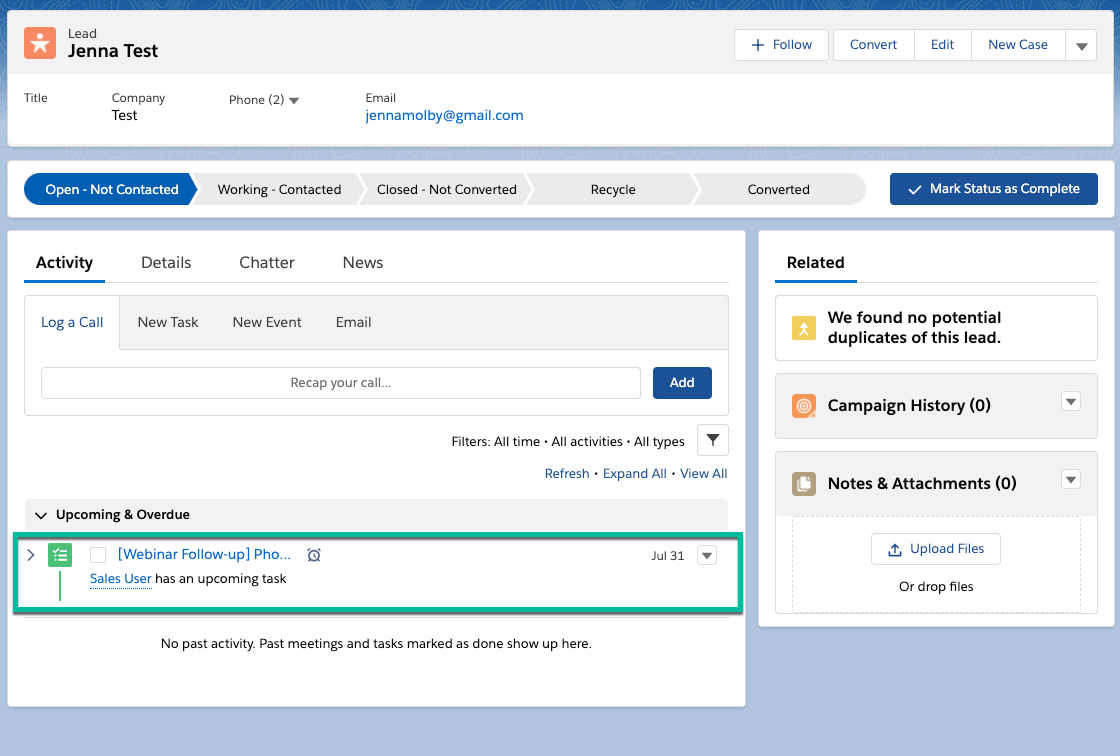
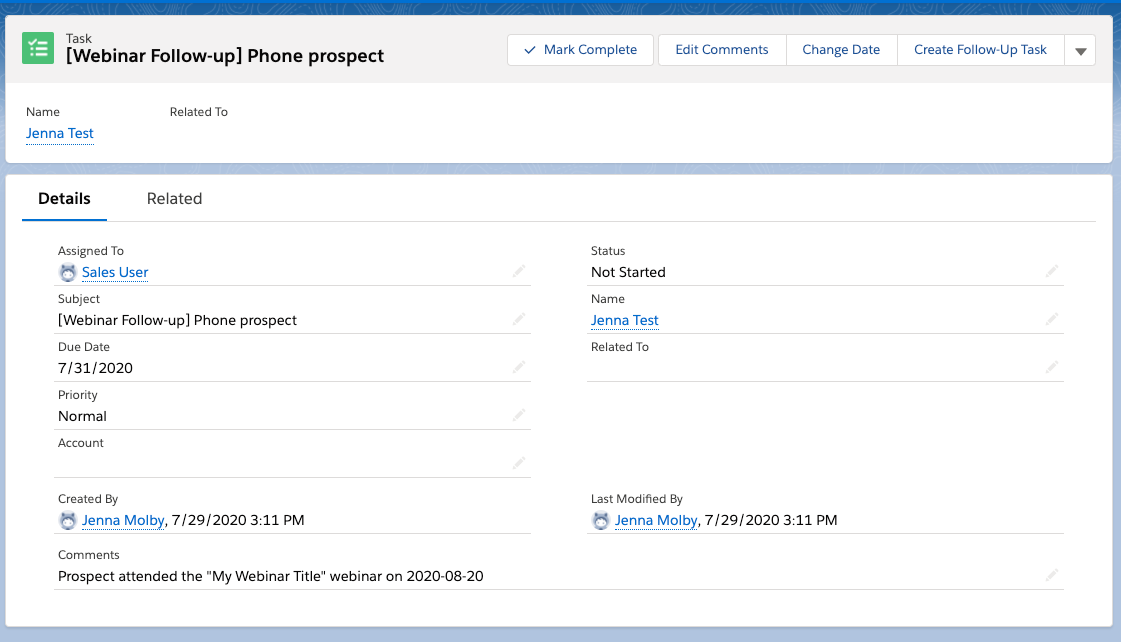
The third step is to create a task in Salesforce to prompt the Sales Rep to connect with the prospect on Linkedin.
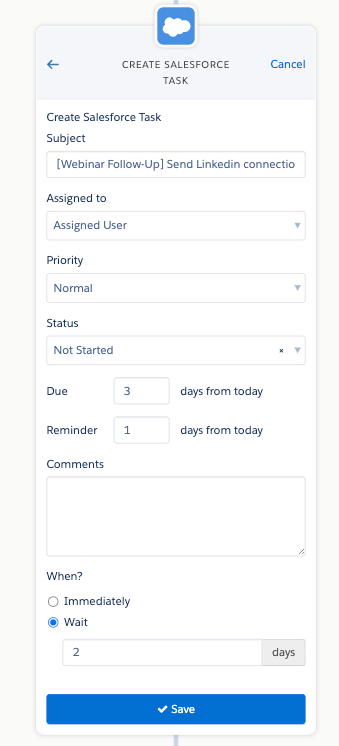
Once the task is created, this is what the Sales Rep will see in Salesforce.

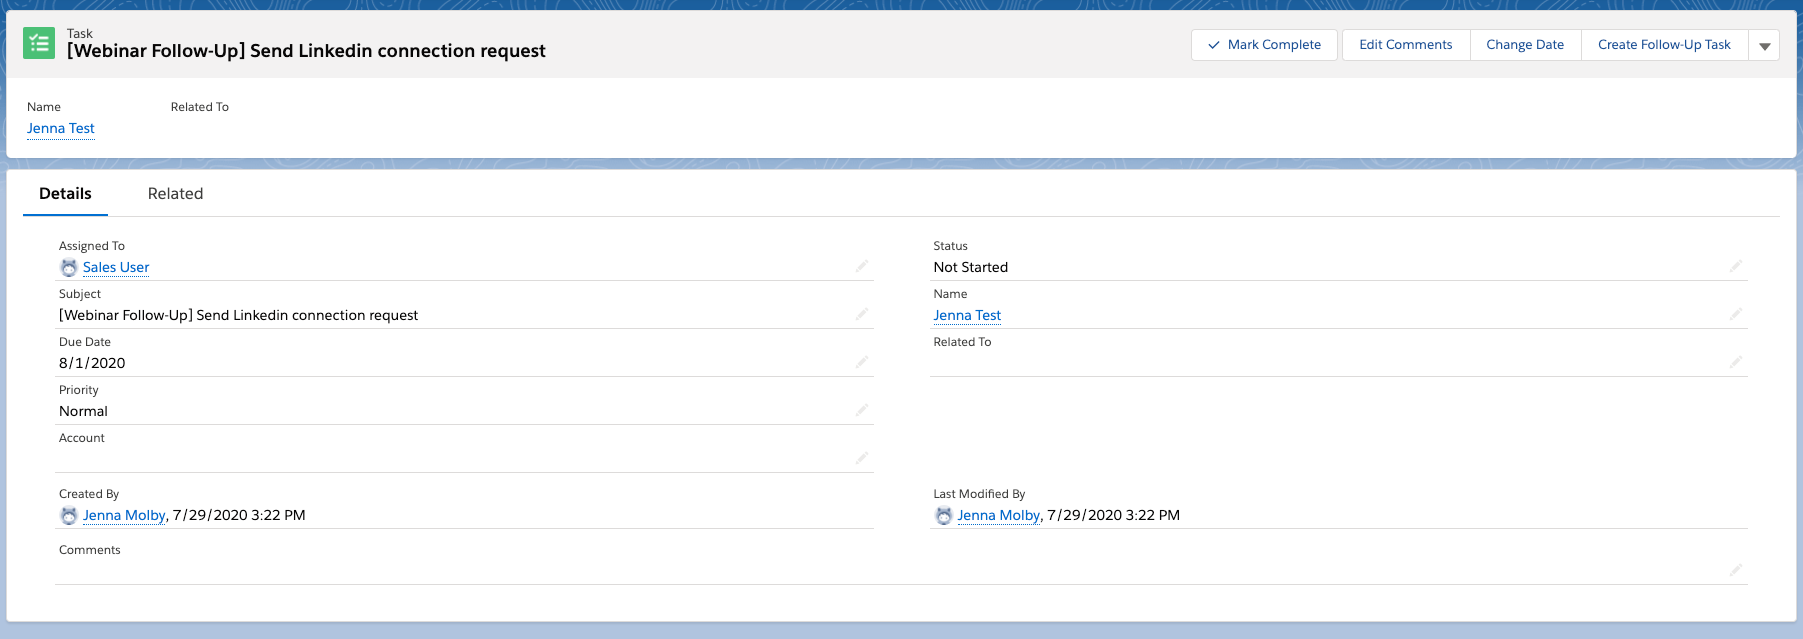
The last step in the example engagement program is to send a follow-up email.

Considerations for setting up the engagement program
- Should there be separate paths for prospects who attended the event vs did not attend the event?
- Should all job titles and job levels be followed up with a phone call?
- What is a realistic time frame for this program to be active? (this will help determine the cadence and how many tasks and emails to set up)
- Will the tasks for the Sales Rep’s be manageable with the amount of attendees?
Questions?
Send me a tweet @jennamolby, or contact the Sercante team for help.