Category

Pro Tips

Marketing Cloud Engagement is a great tool and it offers a wide range of functionality and various capabilities. But, as with all software, there are always limitations that leave you wanting more. That’s where Marketing Cloud extensions become essential.

Thanks to the strong Salesforce ecosystem, the openness of the platform, and the love it receives from its customers, users, and enthusiasts, there are so many extensions, apps, and add-ons that can help enhance your Marketing Cloud experience.

Listed below are some of my favorites from my seven years of working with Salesforce Marketing Cloud (SFMC).

Top Marketing Cloud Extensions

SFMC Companion

This Chrome Extension is a fond favorite of mine and it is particularly useful for those “busy” Marketing Cloud accounts and for anyone who spends hours down rabbit holes trying to understand whether a particular Data Extension is still being used, or is even still relevant.
SFMC Companion offers a useful search functionality that allows you to look for any asset or object using a free-text search field. Furthermore, whilst on any SFMC asset or object, the ‘Inspect’ tool will show all components referencing or using that particular asset or object.
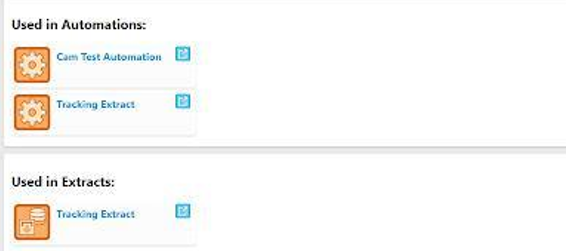
Thanks to SFMC Companion there is no longer a need to have several tabs open simultaneously just to understand whether a Data Extension can be deleted. 

Evergage Launcher

This might technically be cheating as it’s practically a necessity for implementing Marketing Cloud Personalization but I’ve always enjoyed using it.

This extension helps identify whether the Marketing Cloud Personalization (MCP) SDK has been added to the website, so you no longer need to pester your IT team, and it is also where you can launch the Visual Editor. 
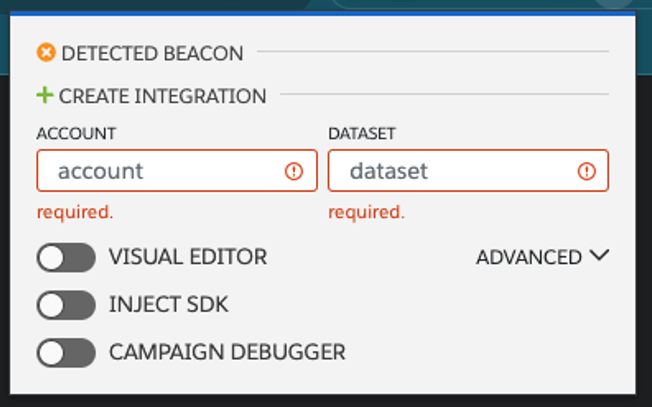
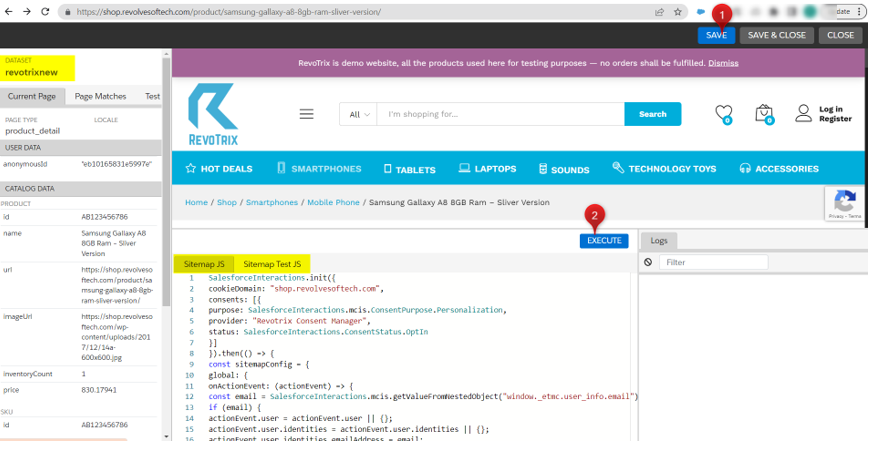
The Visual Editor is by far the easiest way to build your JS Sitemap, which is a huge part of any MCP implementation. Users also have the ability to see their work whilst on the page – this comes in handy when creating personalization campaigns, another feature accessible via the Evergage Launcher. 
Salesforce Inspector

Whilst this is not specifically related to SFMC, it is worth installing. Most SFMC accounts use Salesforce CRM data (it’s very rare not to have Marketing Cloud Connect).

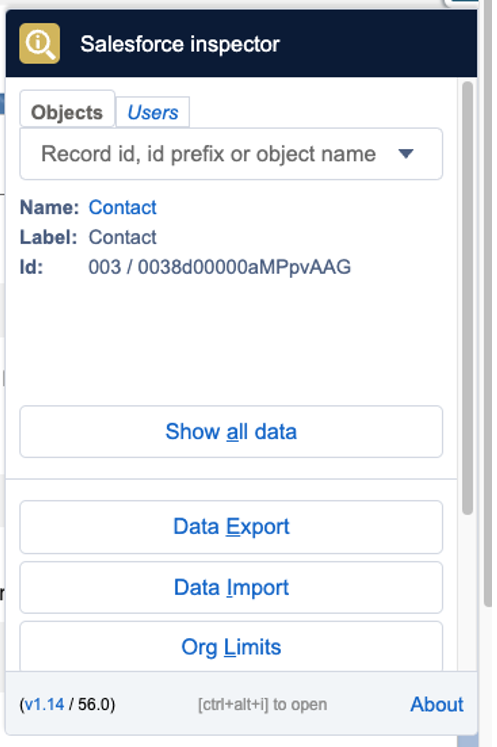
Therefore, with such a reliance on Core Salesforce data, this extension can save you a lot of time. If you quickly need to check the API field names or the field type, or even example values, Salesforce Inspector is your tool.

Furthermore, Salesforce Inspector lets you easily import and export data which is incredibly useful if you need to prepare test data for UAT.
Top Marketing Cloud Apps

It’s worth mentioning that for the following section, I’ve loosely used the term “Apps” as it covers everything from App Exchange products to Mobile Apps.

Query Studio

Perhaps one of Marketing Cloud’s best-kept secrets, but Query Studio is an incredibly useful app to add to your SFMC instance. If you’ve ever wanted to test your SQL skills without having to create an automation, then this might be for you.
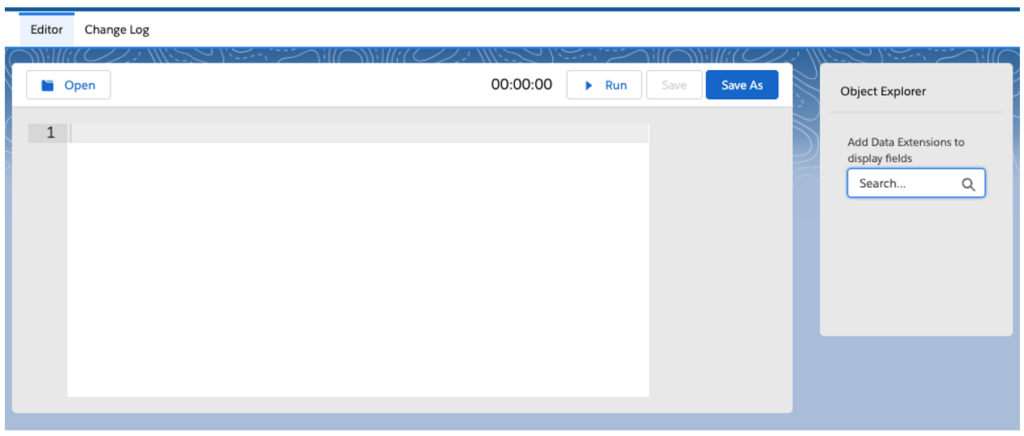
Query Studio allows you to quickly build queries in the Marketing Cloud without needing to create and configure an automation. Once you’re happy with your selection, Query Studio can use your query to create Data Extensions automatically.

Marketing Cloud Mobile App

Ever needed to quickly track email performance or to check that you definitely paused that Journey, but you don’t have access to your laptop? The Marketing Cloud Mobile App might just be able to help.
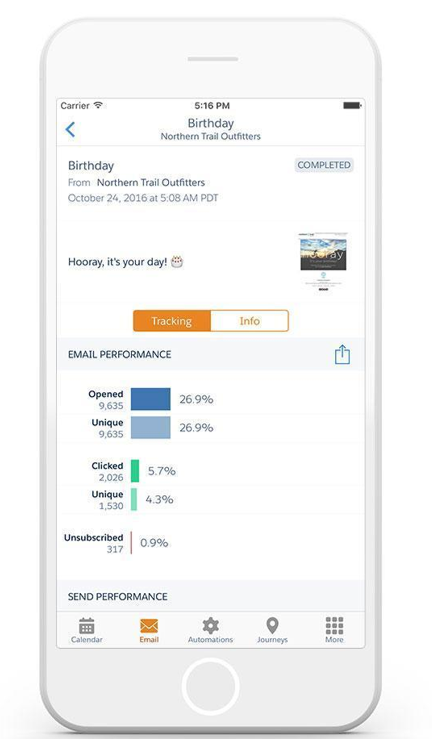
However, whilst it’s useful to have instant access to your SFMC account with just your phone, it is worth pointing out that there are some SFMC features that are not available in the mobile App, so don’t throw away the laptop just yet.

You can find the app in both the Google Play Store and Apple Store.

SiteCore

Technically two for the price of one as there is both a Web CMS app and a DAM app but they’ll both help bolster your SFMC instance with the world-leading CMS. Although, it is probably worth pointing out that these apps are far from cheap.
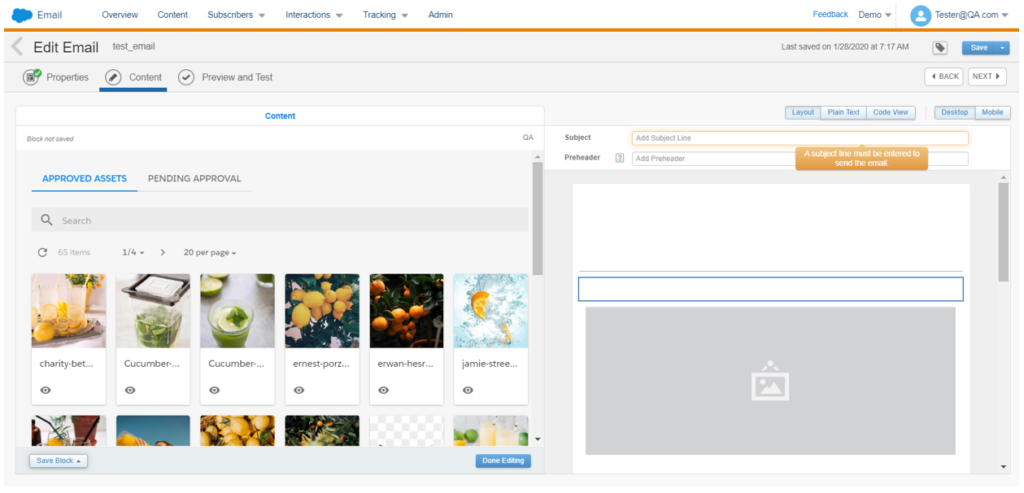
If, however, you’re lucky enough to have one of these licenses, you can drag-and-drop approved SiteCore assets directly from the SFMC Email Editor. Alternatively, you can send contact data and behavior back to your Sitecore Experience Database to close the loop on asset performance.
DESelect Segment

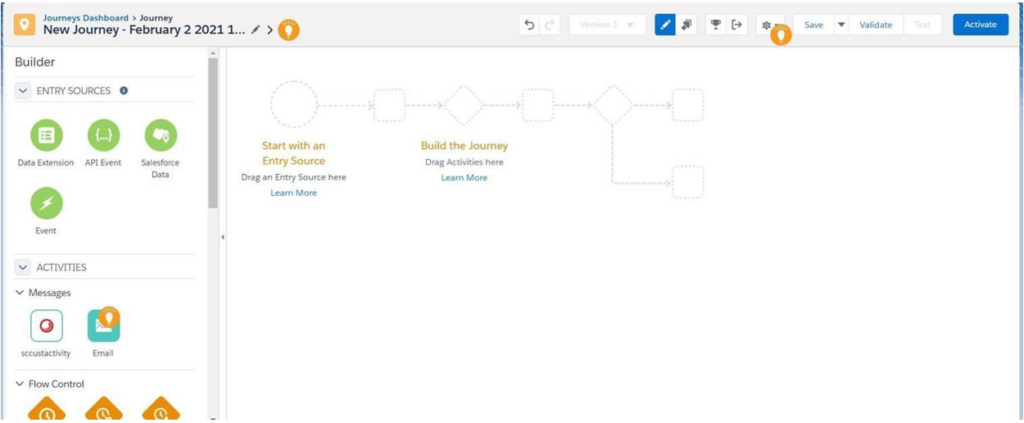
Full disclosure, I’ve never had the pleasure of working with this particular app but I had to include it as it solves, what I think, is one of the biggest issues SFMC clients face when procuring SFMC… segmentation. DESelect brings drag-and-drop segmentation to Marketing Cloud and reduces the need for marketing teams to have SQL knowledge.
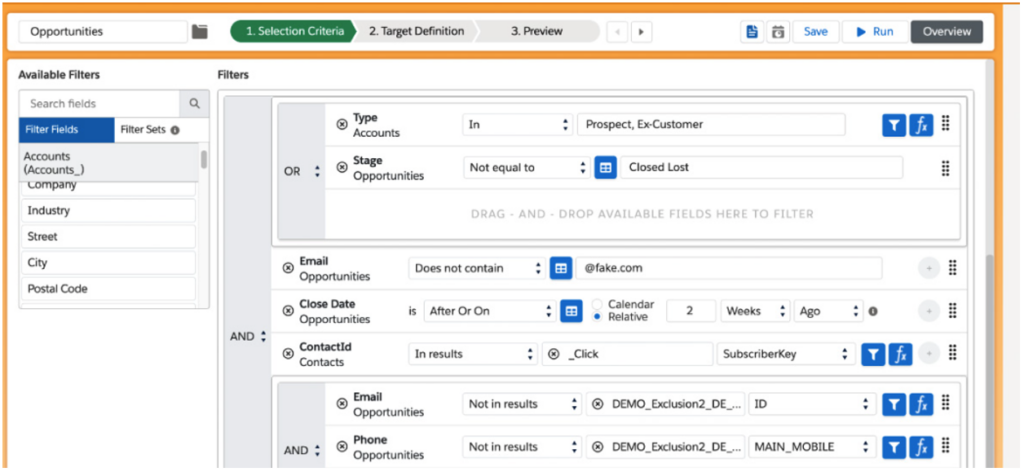
Again, it’s worth pointing out that whilst there is a free version available you will have to pay to increase usage, users and features (i.e., saturation control and deduplication). However, depending on your team’s skillset this app could well be worth considering.

Bonus Content

If the technical skills aren’t your team’s forte and AMPscript is constantly causing you trouble, check out ampscript.io, a useful tool that helps validate AMPscript code and highlights any AMPscript that may result in potential syntax errors.

Get more details about AMPscript in this blog post from Kayla Border.

Top Marketing Cloud Add-Ons

SalesWings

Ever needed Lead Scoring in SFMC? Say hello to SalesWings! This add-on is easy to install and is a highly cost-effective way of plugging the SFMC Lead Scoring hole.
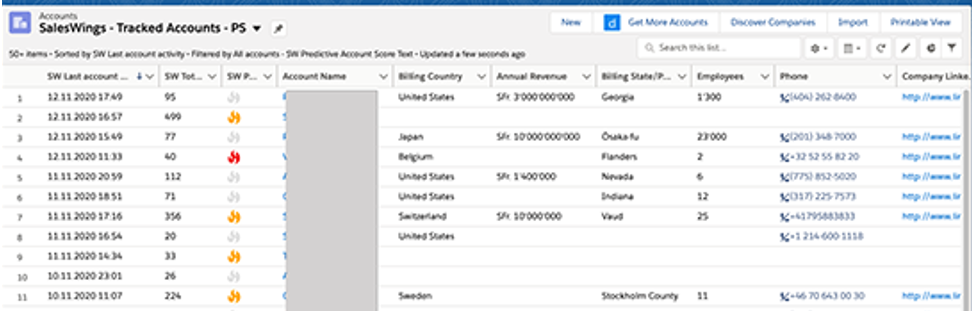
SalesWings tracks website activity and couples it with data from CRM before scoring and grading customers using a flexible scoring model. SalesWings data can be shared with Salesforce CRM as well as used in future SFMC segmentation.
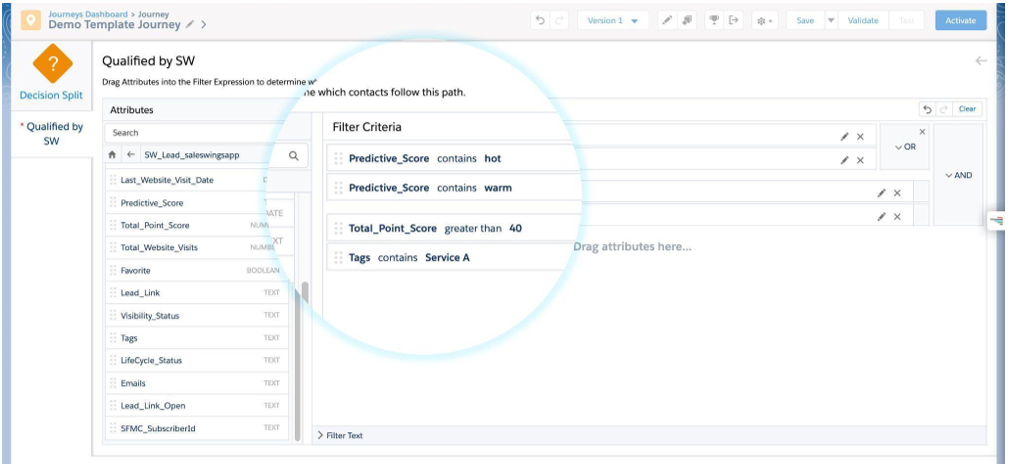
Litmus

If you’re lucky enough to have both a Litmus and SFMC account, then you should definitely consider integrating the two. Yes, SFMC allows you to preview emails, but with an integrated Litmus account, you get so much more.
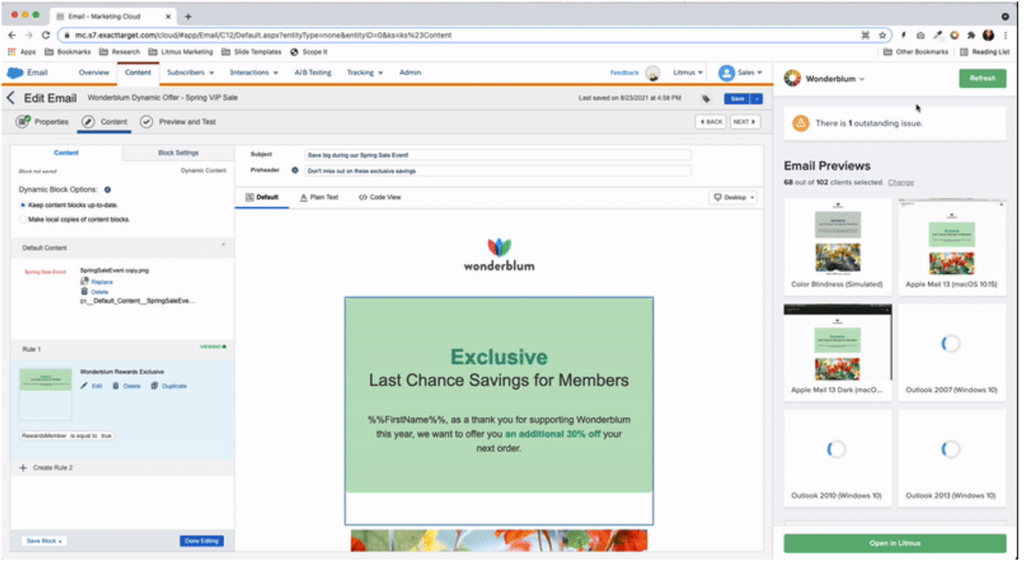
With an integrated account you can sync emails from the Litmus builder to SFMC or build in SFMC and test as you go. You can test dynamic content and individual personalization with the integrated email previews and, perhaps most impressively, share email performance with Litmus to create a single view of performance.

Use Marketing Cloud extensions to make the most of the platform

Going back to my previous comment, all software products have their limitations, but it is Salesforce’s ecosystem that has encouraged enthusiasts to build upon its offerings which, as shown above, has led to some innovative solutions that could give your SFMC instance that much-needed capability boost.

So if you’ve been contemplating if the grass is greener on the other side it could be worth exploring the depths of the Salesforce Community — chances are there is already a solution to your problem out there.

Recently I was perusing the Salesforce IdeaExchange for interesting features to upvote and came across a common issue with over 4k upvotes, “Automate contact owner update when account owner changes.” 

Now, I would LOVE for this to be a native Salesforce feature of course, but there is a simple solution to this that I couldn’t find documented anywhere. 

So let’s get to it!

The problem with Account and Contact Owner mismatches 

Depending on how your sales team manages Account and Contacts, Account and Contact Owner mismatches can cause a lot of headaches. 

In most Salesforce orgs I’ve worked with, the Account Owner is responsible for nurturing all Contacts within the Account, but if Sales Rep A owns the Account and Sales Rep B owns half of the Contacts under the Account it can cause issues.

Those issues include:

  • Sales Rep A missing Contacts when viewing reports
  • Account Engagement “Create Salesforce Task” completion actions get assigned to the wrong user
  • Contact Activities get missed by the Salesperson who needs to act on them
  • Multiple Sales reps nurturing the same Contact at the same time

To solve for this common issue we’re going to build two items:

  1. Formula Field on the Contact
  2. Schedule-Triggered Flow for Contacts

Identify Owner Mismatches

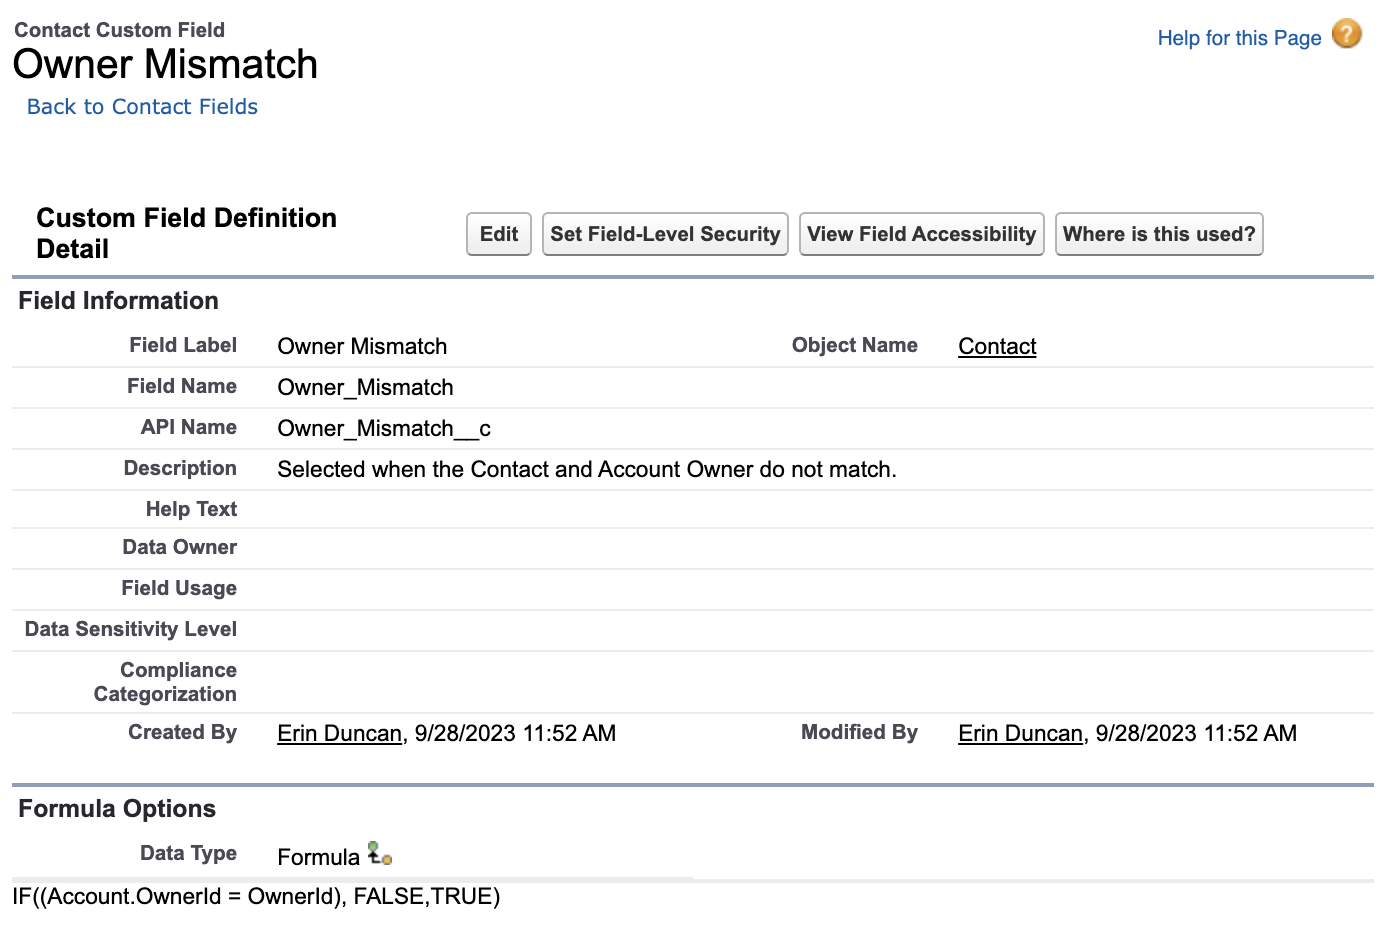
The first step is identifying records with an Account and Contact Owner mismatch. To do so, we want to build a Formula Checkbox field.

  1. Navigate to Setup > Object Manager > Contact > Fields & Relationships
  2. Select New
  3. Choose Formula, then Next
  4. Name the field “Owner Mismatch”
  5. Select Checkbox, then Next
  6. For the Formula, enter “IF((Account.OwnerId = OwnerId), FALSE,TRUE)”
    • If you are not familiar with Salesforce formulas, what this essentially says is if the Account Owner’s ID equals the Contact Owner’s ID the checkbox should be False, or unchecked. If the two Owner IDs do not match, the checkbox should be True, or checked. 
  7. Enter an Description so other users know what this field is for, and select Next
  8. Select the users who should have access to this field and the page layouts you’d like the fields added to, then select Save

Automatically Update Contact Owners

Next, we’ll create a flow to automatically update your Contact Owner to match your Account Owner. This flow is very simple, so don’t abandon ship if you are not yet a Flow super user!

  1. Navigate to Setup > Flows
  2. Select New Flow
  3. Select Schedule-Triggered Flow
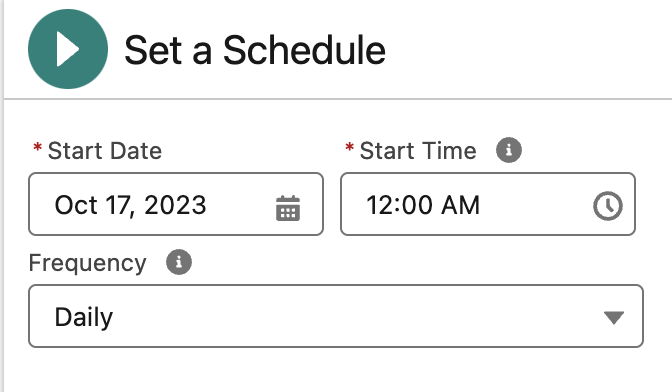
  4. Fill in the “Set a Schedule” details as below
    • Start Date: Today’s date
    • Start Time: I recommend you set this flow to run outside of business hours. For my flow, I chose 12:00 AM
    • Frequency: Daily
  1. Next, select + Choose Object
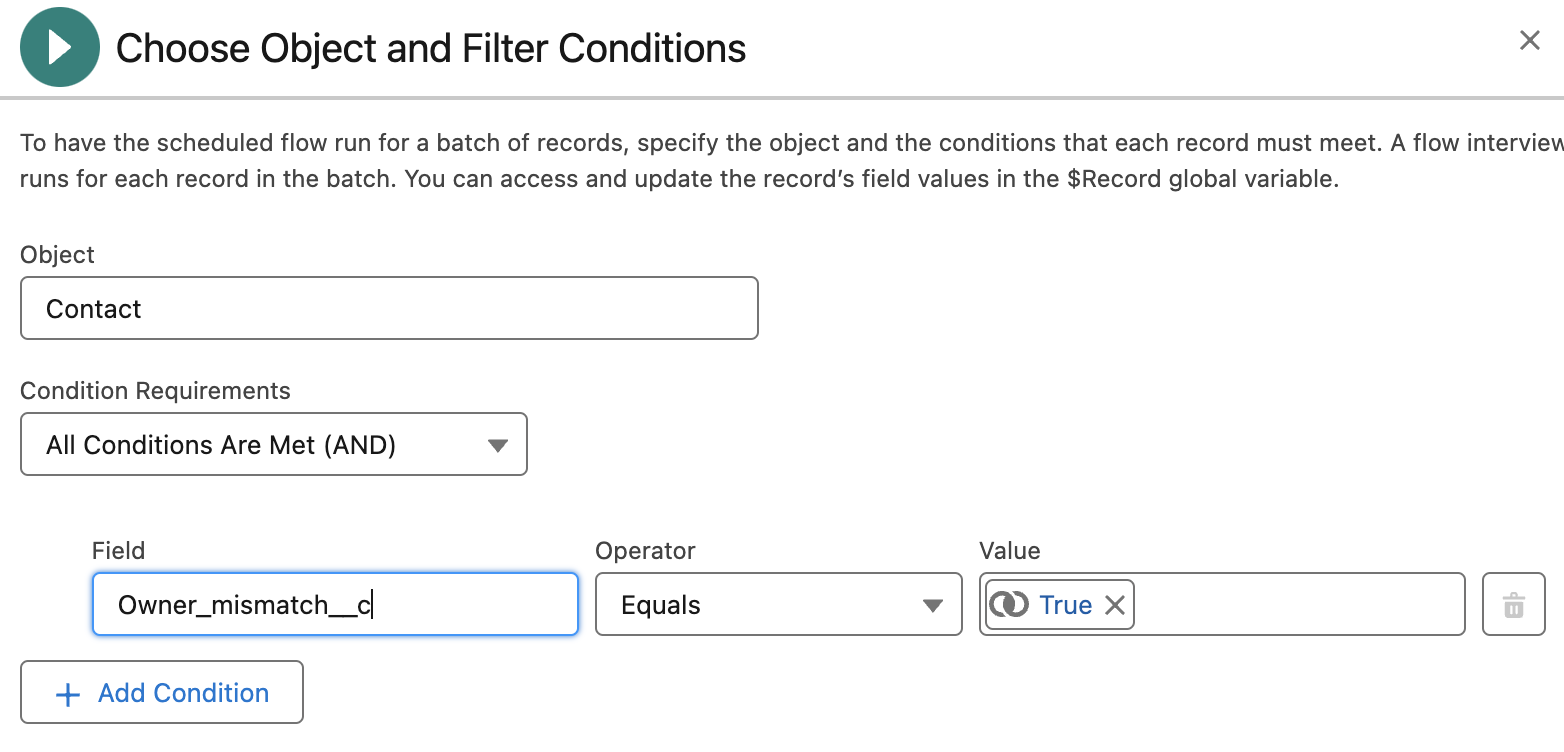
  2. Fill in the Configure Start details outlined below
  3. Select Contact
  4. Enter the condition as below
    • Field: Owner_Mismatch__c
    • Operator: Equals
    • Value: True
  1. Under your Start element, select the plus symbol to add a new element
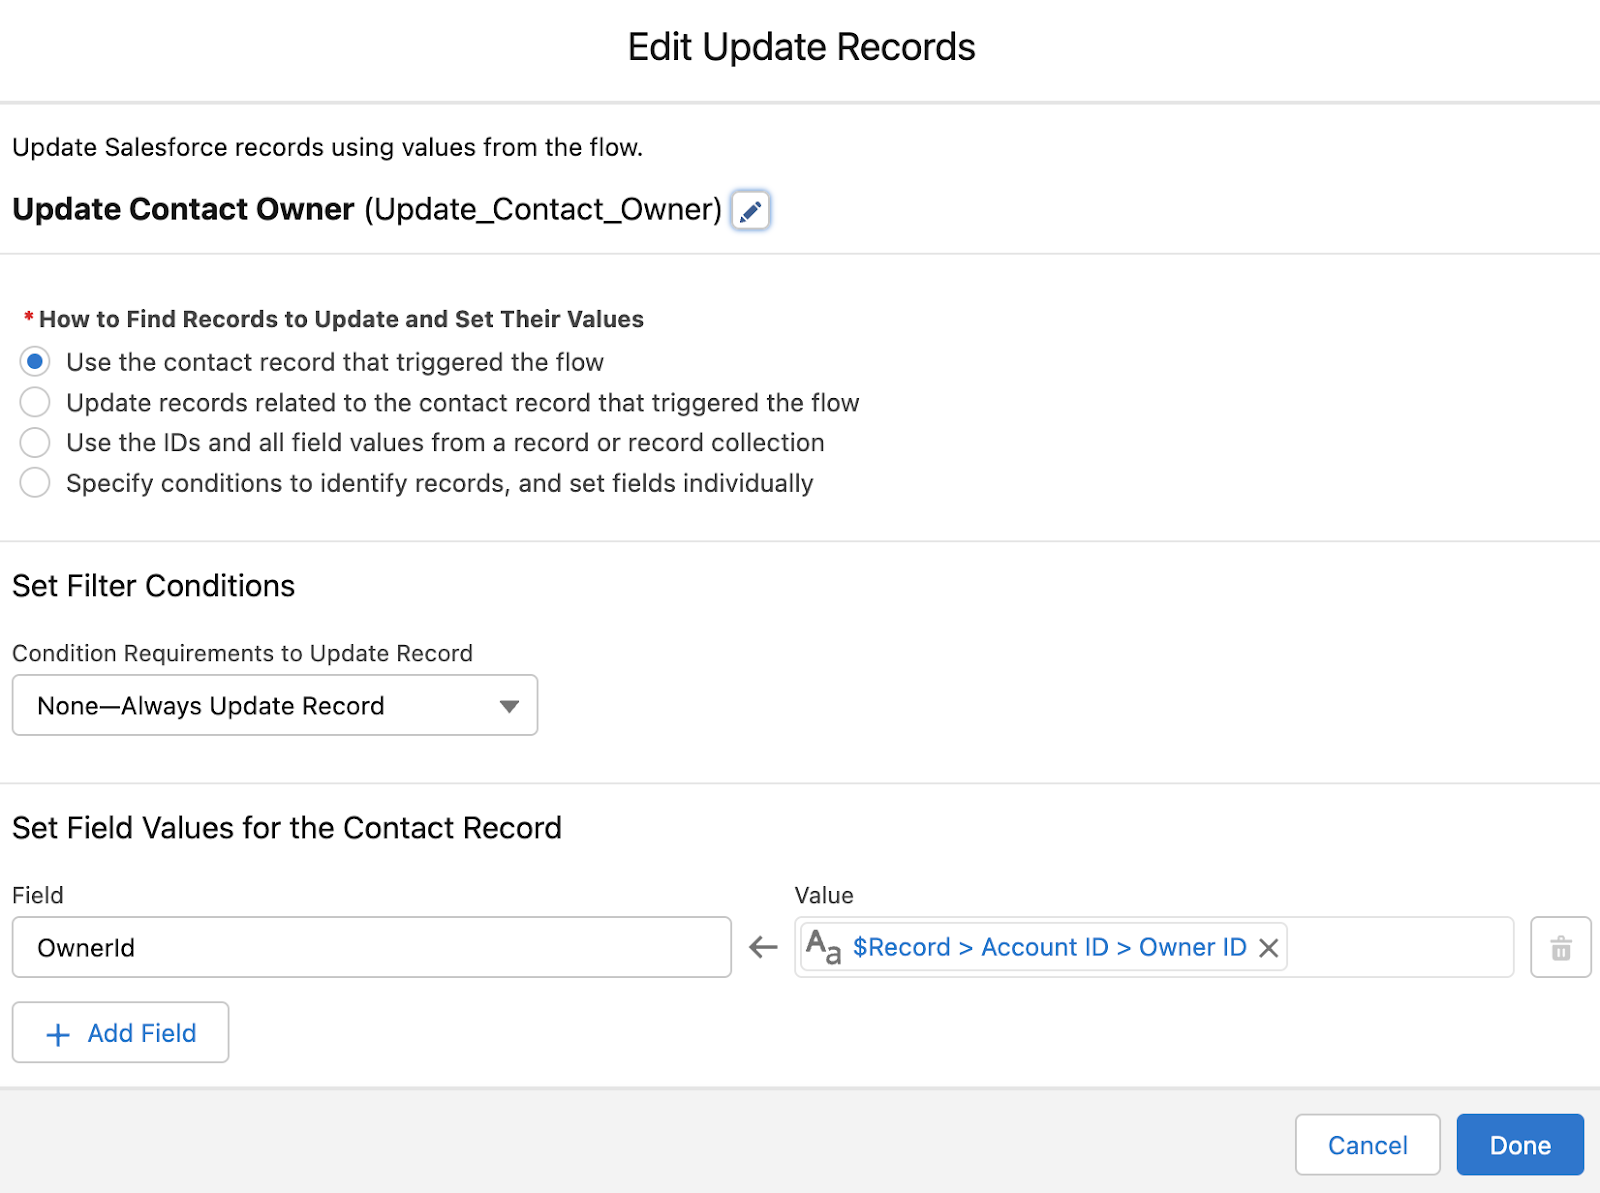
  2. Select Update Records
  3. Label the Element “Update Contact Owner”
  4. Under “Set Field Values for the Contact Record” set the Field to OwnerID and set the Value to {!$Record.Account.OwnerId}
  1. Select Done
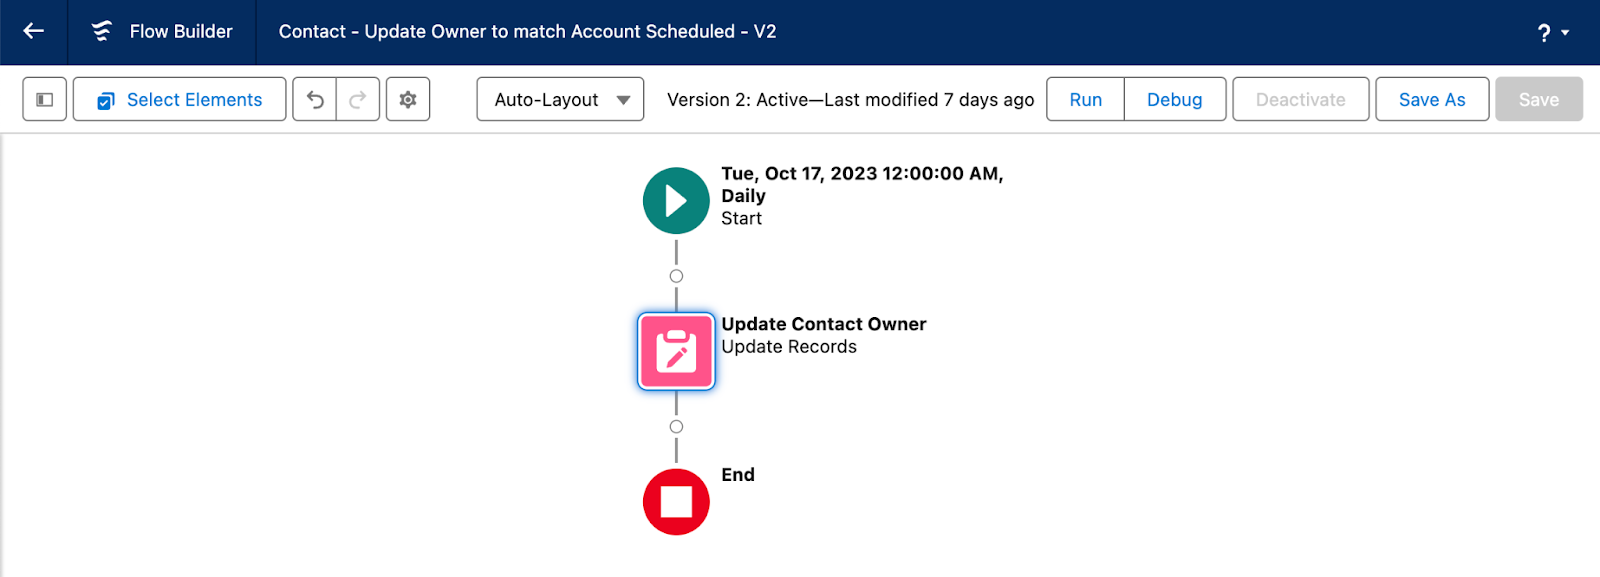
  2. Select Save from the top right hand corner and name your Flow “Contact – Update Owner to Match Account”
  1. Select Save
  2. Finally, Debug your Flow to ensure it works as expected, then Activate it! 

Now sit back and let everyone marvel at how clean Account and Contact owners are in the org. 

Get more solutions like this from Sercante

Need help figuring it all out? Reach out to the team at Sercante to get a conversation going.

If you’re new to Marketing Cloud Engagement, you may be feeling overwhelmed. Salesforce’s powerful marketing platform can do a lot. And that comes with a steep learning curve.

I’ve been on my Marketing Cloud Engagement journey for a while now and still feel the sense of having so much to learn. My learning journey has consisted of hands-on experience, boot camp-style training courses, and of course, all the Trailheads. 

Florida Dreamin’ Session – How to Write like a Marketer: Intro to AMPscript for Salesforce Marketing Cloud

I knew when I was given the opportunity to attend this year’s Florida Dreamin’, finding Marketing Cloud Engagement sessions was at the top of my event bucket list. That’s why I was super excited to attend Tatiana Romanko’s presentation, How to Write like a Marketer: Intro to AMPscript for Salesforce Marketing Cloud.  

Romanko took a complex topic and simplified it, making her content easy to understand by providing real-world use cases every marketer could relate to. This session was a great introduction to AMPSprcipt for Marketing Cloud Engagement users who are still on that learning curve, and even seasoned veterans took away a thing or two. 

What I especially loved about her session is that, like me, Romanko doesn’t have a coding background. Her message really resonated with me: with hard work and hands-on experience, you too can learn the technical intricacies of Salesforce Marketing Cloud. 

What is AMPScript? 

Before jumping right into a complex topic, Romanko set the stage with a quick introduction to AMPscript. “AMPscript is Marketing Cloud’s proprietary scripting language for advanced dynamic content in emails, landing pages, SMS, and push messages.”

“AMPscript expands Marketing Cloud functionality to help you create the one-to-one, personalized communications that are so coveted by digital marketers. https://trailhead.salesforce.com/content/learn/modules/ampscript-for-nondevelopers/get-to-know-ampscript) 

AMPscript is used to:

  • Personalize emails using subscriber or contact data.
  • Create complex, highly dynamic emails using conditional logic.
  • Clean and format data.
  • Add real-time information to emails such as date or time.
  • Track impressions.”

(source: https://trailhead.salesforce.com/content/learn/modules/ampscript-for-nondevelopers/get-to-know-ampscript) 

What is AMPScript used for in Marketing Cloud Engagement?

AMPScript does a lot. At Sercante, we use it to help our clients with personalizing their emails, creating dynamic content, and much more. What I liked about Romanko’s session is that she really honed in on three common use cases that every marketer can relate to. 

Personalization

If you’re a marketer, you already know the power of personalization. One study found that emails featuring personalized subjects are 50% more likely to be opened. AMPScript in Marketing Cloud Engagement allows you to use your subscriber data to personalize your marketing. 

Creating a personalized greeting in Marketing Cloud Engagement through a personalization string isn’t complicated. What I liked about Romanko’s use case is she focused on something I often times see clients overlook: what happens when you don’t have a subscriber’s first name? In this case, we could use AMPscript to set a generic value (Customer) as our greeting if we don’t have this data. 

Formatting Your Data

As a marketer, I’ve seen customers input their data in every way imaginable. Romanko gave the example of asking someone to provide their favorite color. In this instance, we could get a few different variations: 

  • Pink
  • pink
  • PINK

So what happens when we go to pull this data into an email? It could end up looking like we either don’t know our basic grammar, or come across like we are YELLING at our reader. 

Romanko highlighted AMPScript’s ProperCase function here, “which capitalizes the first letter in the specified string and any other letters in the string that follow any character other than a letter. It converts all other letters into lowercase.”

AMPScript Resources

As you can see, Romanko gave some great use cases for using AMPScript. She also provided her audience with some really great resources on where to go to learn more:

Soak in all the lessons learned at Florida Dreamin’

Be sure to check out these other posts from my fellow dragons who attended Florida Dreamin’ with me and shared details about their favorite sessions there.

One of the biggest trouble spots I see with customers customizing in CRM Analytics and B2B Marketing Analytics (B2BMA) is using recipes and joins — specifically when it comes to the Account Engagement customizable Campaign Influence model. 

Recently, a customer and I were diving into their Campaign Influence Model, and the numbers were just not right. They had done a great job of knowing what objects to select in the recipe. On the surface, everything looked great, but once they started reviewing the data in a lens they saw a lot of data discrepancy. This type of recipe can get tricky if you aren’t aware of some of the nuances of CRM Analytics.

In this blog, I want to walk you through step by step so you can build your custom recipe in B2BMA utilizing Campaign Influence and feel confident about the data you have on your CRM Analytics dashboards.

What is Campaign Influence? 

Now I don’t want to go on a diatribe on Campaign Influence. Chances are if you are reading this, you are already aware of it and how great it is. But on the off chance you just stumbled upon this blog, I will give you a brief overview.

Quite frankly, besides CRM Analytics, Account Engagement influence models and Campaign Influence are my favorite Salesforce reporting features. Account Engagement Campaign Influence models are a way to give a campaign credit for a closed opportunity. 

As a recovering marketer myself, I know how important it is for the marketing team to identify which campaigns are performing well and leading to closed deals and revenue.  The magic is that Account Engagement’s Campaign Influence Models go way beyond just the first touch like the Account Engagement’s campaign source. 

3 Models Included in the Account Agagement Customizable Campaign Influence Pack

There are three different models included in the Account Engagement Customizable Campaign Influence pack. 

These different models showcase each part of the marketing funnel. The best part is, they are each reflected based on the opportunity. That means they’re great for cross-selling, add-ons, and upgrades!

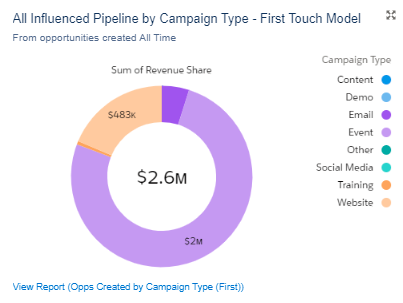
First-Touch Model

Influence will be attributed to the campaign associated with a contact role whose Campaign Membership Created Date is the earliest of all contact roles associated with an opportunity.

account engagement b2bma screenshot - graph example first touch model

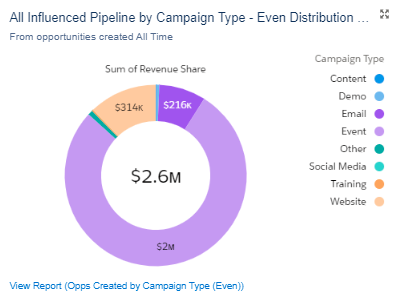
Even Attribution Model

Attribution is divided evenly across all campaigns associated with each contact role on the opportunity. As an example, imagine a scenario where there is a contact associated with four campaigns. Each campaign would receive 25% of the attribution. If they were only on two campaigns it would be 50%.

account engagement b2bma screenshot - graph example influenced by pipeline

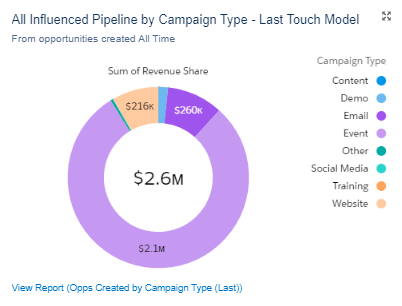
Last-Touch Model

Influence will be attributed to the campaign associated with a contact role whose Last Modified date of the campaign member is last for all contact roles associated with the opportunity.

account engagement b2bma screenshot - graph example

There is so much you can do with these models, and it gives you great insight into how assets are performing all across the marketing funnel. For even more information on why campaign influence should be a part of your strategy, check out this blog on Salesforce and Account Engagement Marketing Reporting here. 

We at Sercante even have a great starter pack that has the report types built out automatically making the process easy to set up! You can check out the Campaign Influence Starter Pack here. 

Step-by-Step Instructions to Build the Custom Recipe in B2BMA Using Campaign Influence Models

Now to the fun part!

Step 1: Selecting the Objects in the recipes

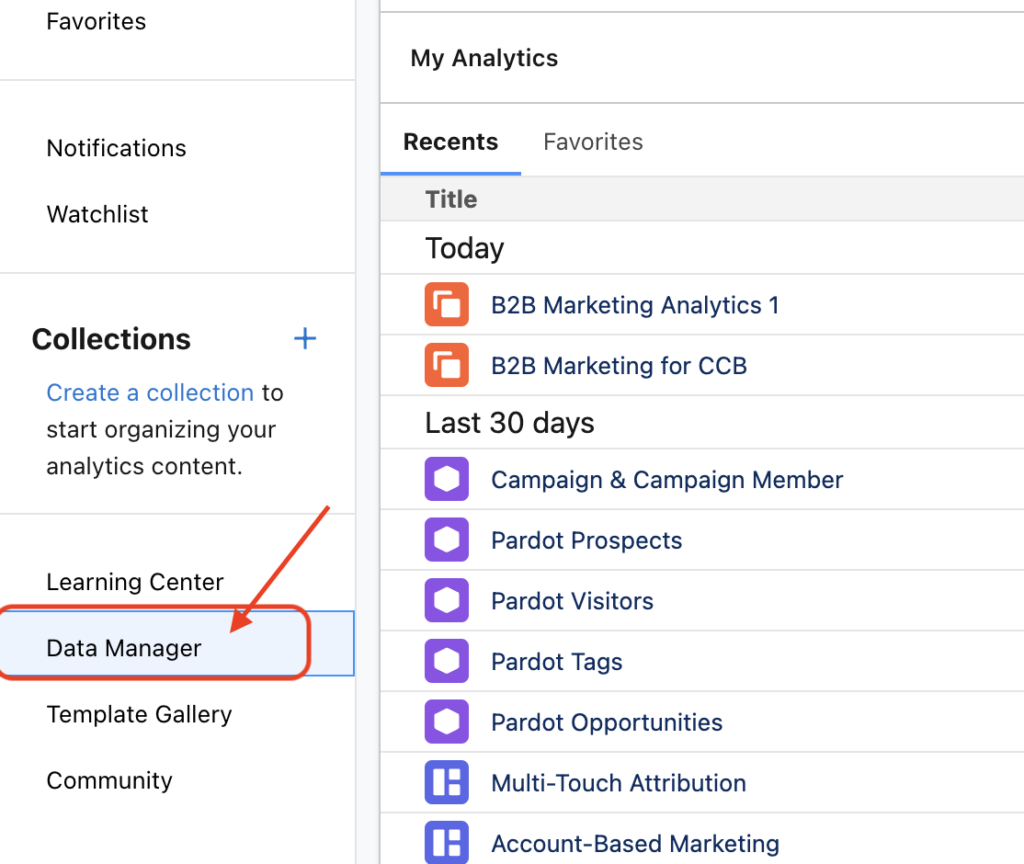
Before we get too far, we want to make sure we select the right objects in Data Manager.  Open Analytics Studio from the app launcher. From there, select Data Manager.

account engagement b2bma screenshot

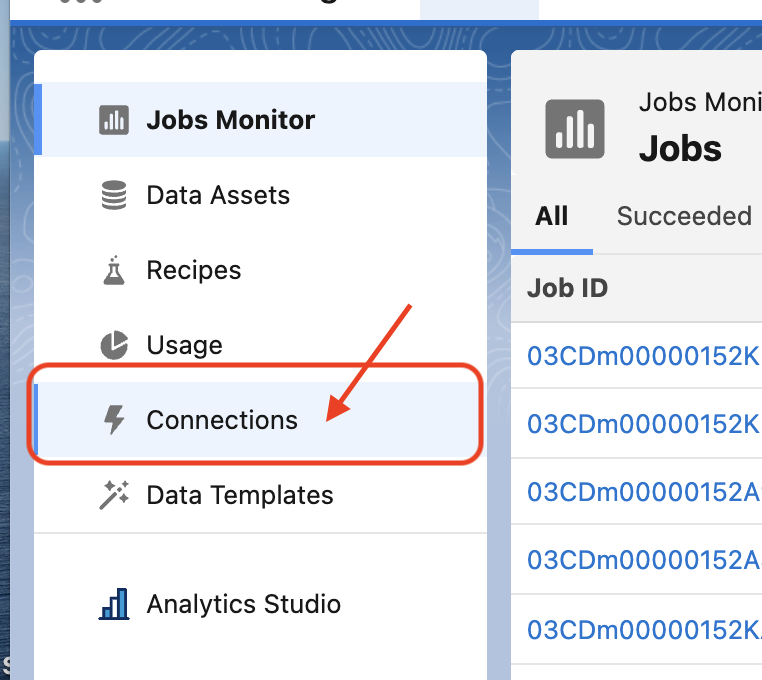
Now we are in Data Manager. We want to make sure the Campaign and Campaign influence objects are syncing. Select the Connections tab and review the list of currently syncing objects.

Pardot Screenshot -  b2bma custom recipe

Once you have verified your objects are there and ready to go, we can build out the recipe!

Step 2: Selecting joins

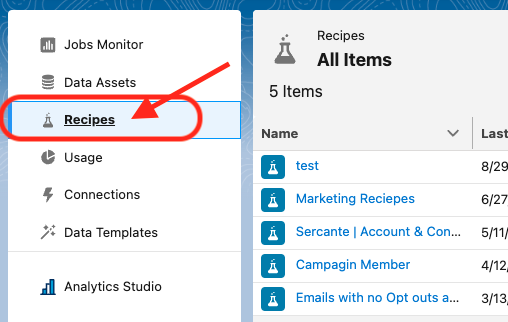
First, select the recipes tab. You can create a brand-new recipe or group it into an already-created recipe.

Pardot Screenshot - b2bma select joins

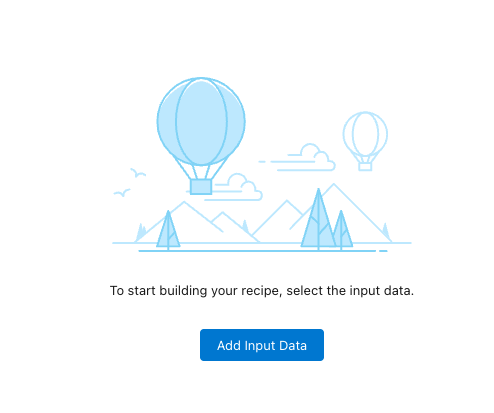
Then Add in your data. Select Add Input. 

* Note: If you are using an existing recipe, you can click on the Add Input button at the top left. 

Pardot Screenshot - b2bma add input data build recipe

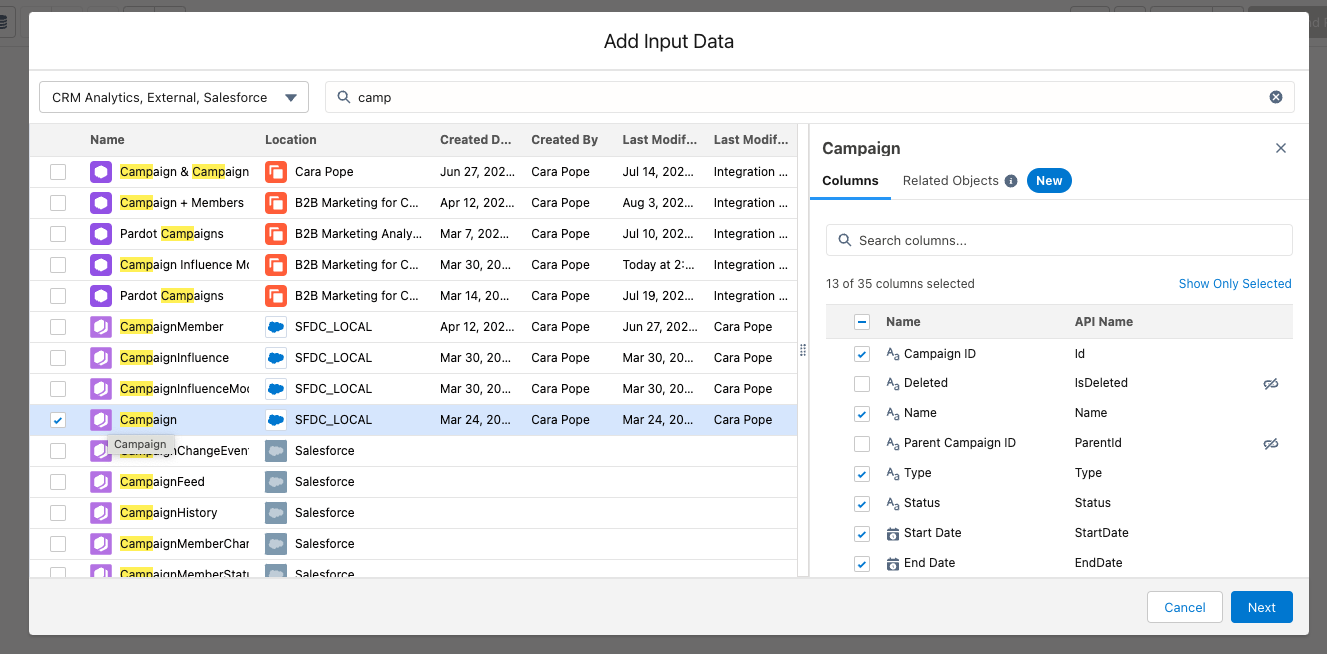
Select Campaign object.

Pardot Screenshot - add input data campaign

This will be the step where if there are specific campaign fields like budget, leads in campaign, or any additional campaign fields, you will make sure they are selected in the fields’ columns.

Don’t worry, the party isn’t done yet!

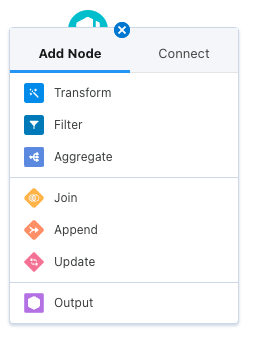
To add in Campaign Influence, hit the plus button next to the campaign. Then, select Join.

Pardot Screenshot - b2bma add node

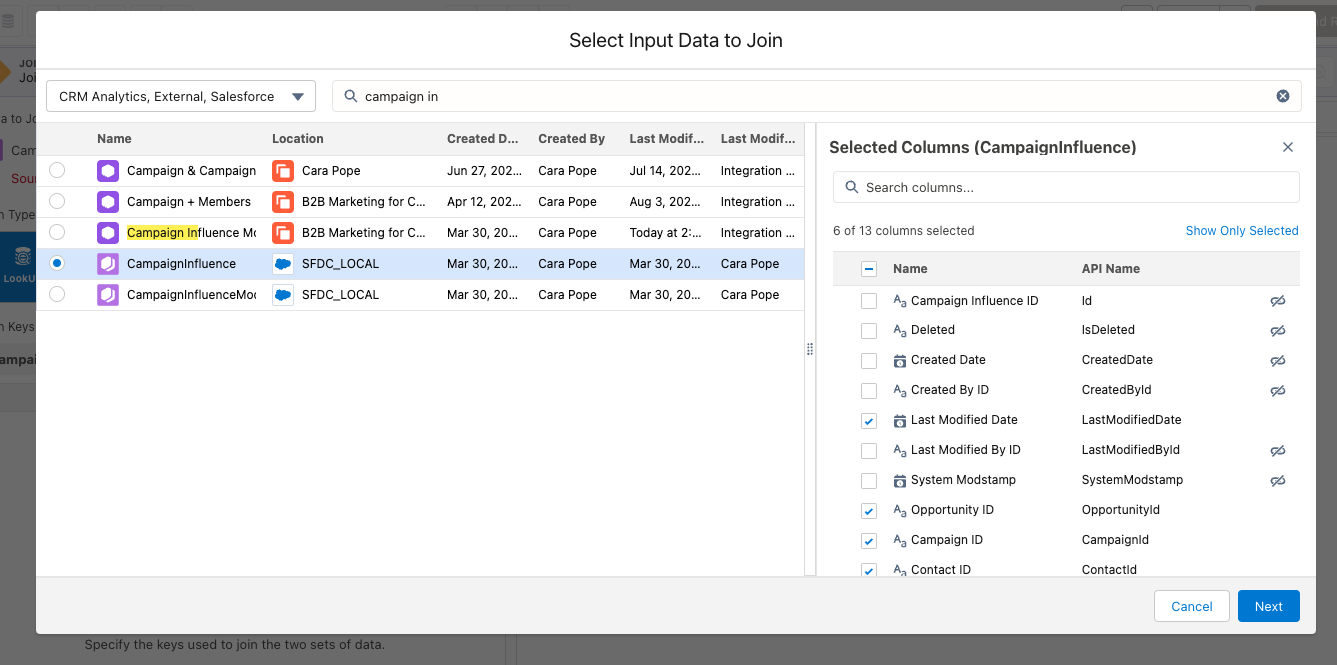
Then select Campaign Influence: again if you see any Campaign Influence field you want, select it here!

Pardot Screenshot - select data input to join

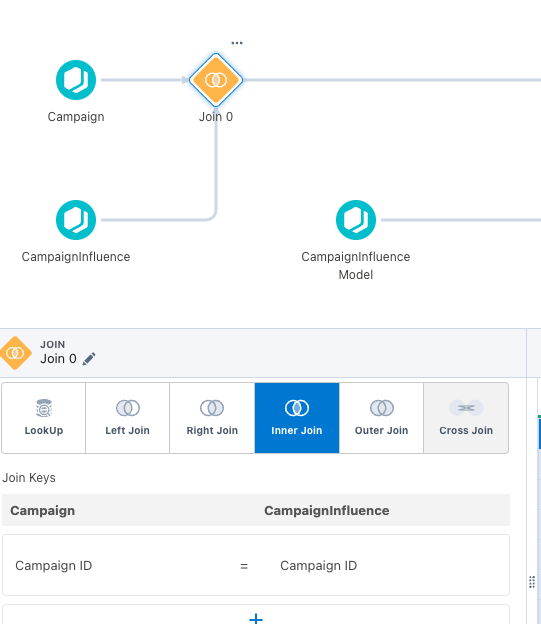
This next part is KEY to get the whole thing to work. When selecting the join make sure you select an Inner Join. Make sure your Join Keys are IDs.

Pardot Screenshot - b2bma inner join

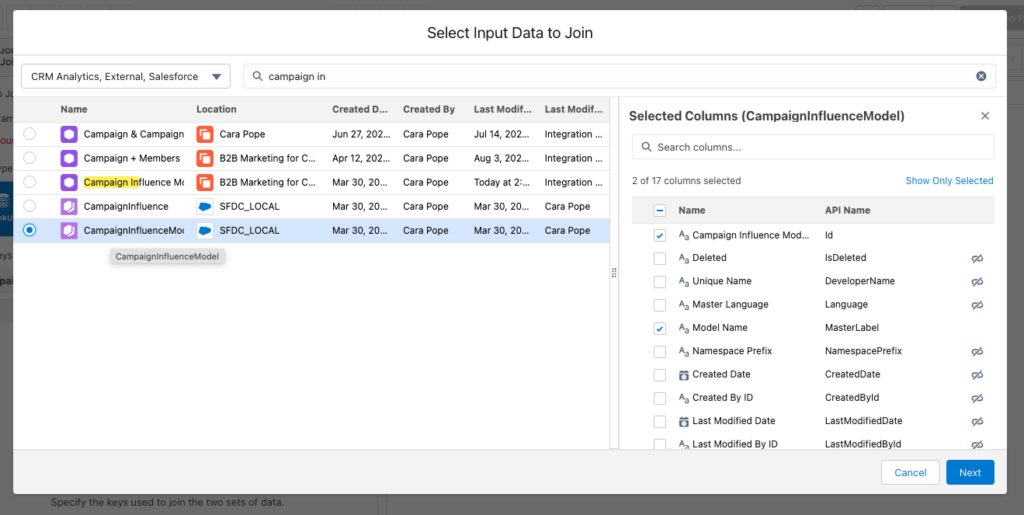
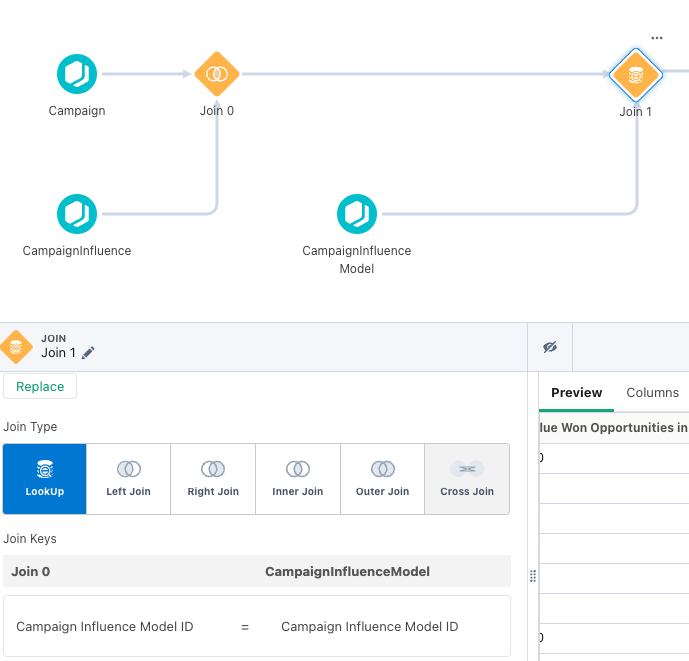
Final step: do one more join. Select the plus button again, and this time add in Campaign Influence Model.

Pardot Screenshot - Select data input to join

This is key because it allows us to have the model name versus just the model ID. Jin Keys will be the Campaign Influence Model ID.

Pardot Screenshot - campaign influence model join keys

Step 3: Output and Review

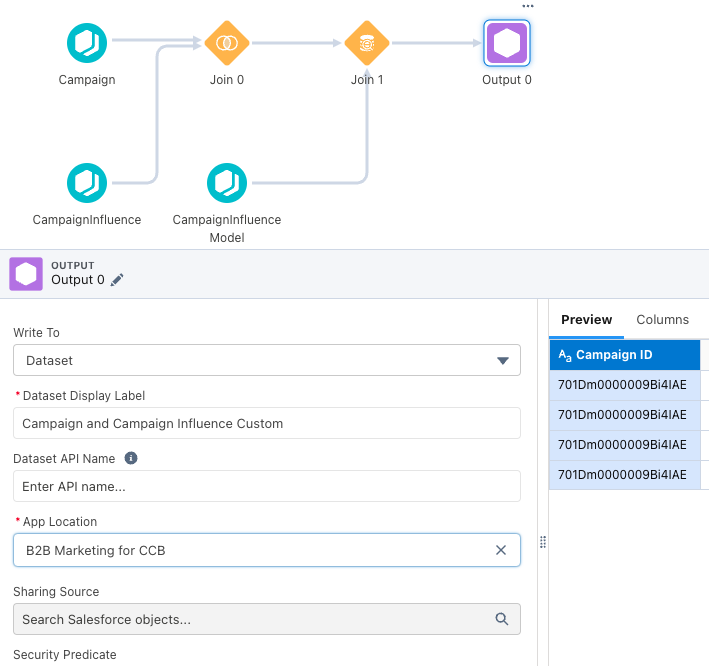
The last step is adding an output! Now from here, if you want to do any data manipulation or transformation, you can simply click the plus button and apply them in the data model. Filtering is great to break down by business units or even specific campaigns or campaign types. If you don’t need anything additional, that is it! 

Your recipe should look something like this:

From there, it is always best to check naming conventions and make sure you know where the dataset will be hosted. You can leave it in your private app if you want to do some testing before you move it to the B2B Marketing Analytics app.

After the dataset has been created, you want to begin testing. Take a small set of data (I personally like using a month date filter — makes the data easier to digest!) and see if it matches up to the data you are seeing in Salesforce. 

Once you feel good. you are ready to hit the ground running!

Let’s wrap it up so you can start building your custom recipe in B2BMA!

Creating this custom recipe in B2BMA can open up a ton of possibilities, from looping in additional campaign and contact fields to even making a whole dashboard that reflects your ABM Strategy and what campaigns helped influence those results! 

Either way, you now have more accessible Campaign and Campaign Influence data with the enhanced features of CRM Analytics. And remember, you can always reach out to team Sercante for help along the way.

A Campaign Member’s First Associated Date records the date a Lead/Contact became a member of a Salesforce Campaign, and it’s a great metric to use in your reporting. First Associated Date can be used to show how many Leads/Contacts a Campaign touched in a given time period, how long the Lead/Contact was in the campaign before they moved to a “Responded” status, or how long the Lead/Contact was in the campaign before an associated Opportunity was opened. However, sometimes the Campaign Member’s first associated date gets skewed. 

Common causes of this are:

  • Lead/Contact should have been added to the campaign on September 15th, but was stuck in the Account Engagement sync queue until October 1st
  • New Leads from an event we’re not uploaded into Salesforce until a few weeks after the event
  • Campaign Members were brought over from another Salesforce org during a migration
  • Sales didn’t enter a new Lead they were working with until after the Opportunity was created

If you are relying on Campaign Member First Associated Date for your reporting, any of the above causes can really throw off your data and make a Campaign, or a time period, look less successful than it actually was. Luckily, you can backdate this field with a few system permissions and the help of Data Loader!

You can insert, but not update!

Before we get into the nitty-gritty of how to do this, it’s important to note that you can’t update the Campaign Member First Associated Date of existing Campaign members. You can only insert new Campaign Members with a backdated first associated date. However, you can use Data Loader to export Campaign Members, their Campaign Status, their dates, etc. from a Campaign, delete the Campaign Members, then re-add them to the Campaign with new dates. 

Permissions needed

The first step to updating First Associated Date is enabling “Set Audit Fields Upon Record Creation”.

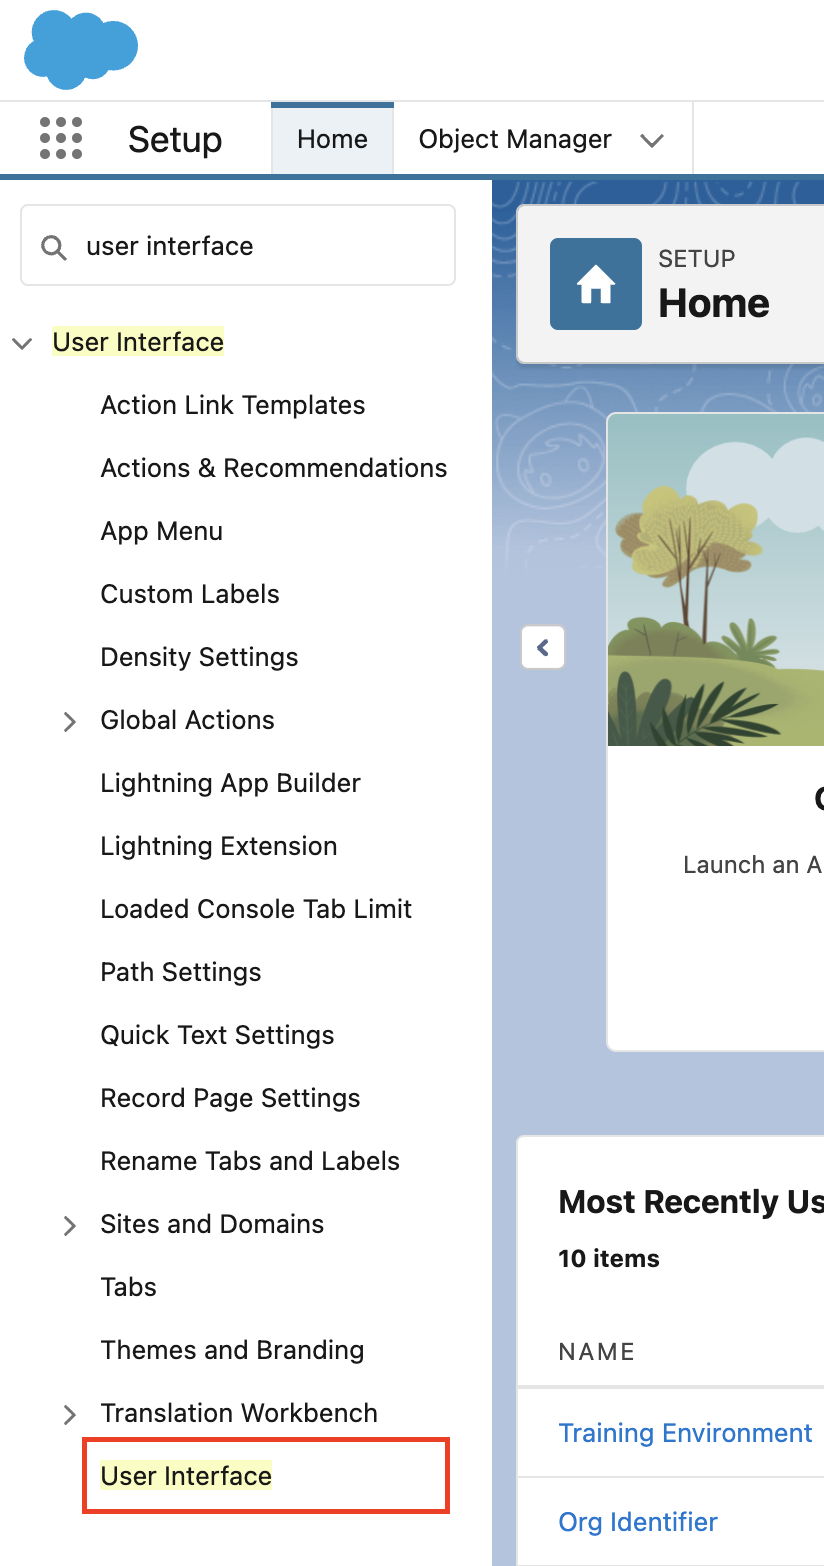
  1. Navigate to Setup > User Interface 
Salesforce screenshot
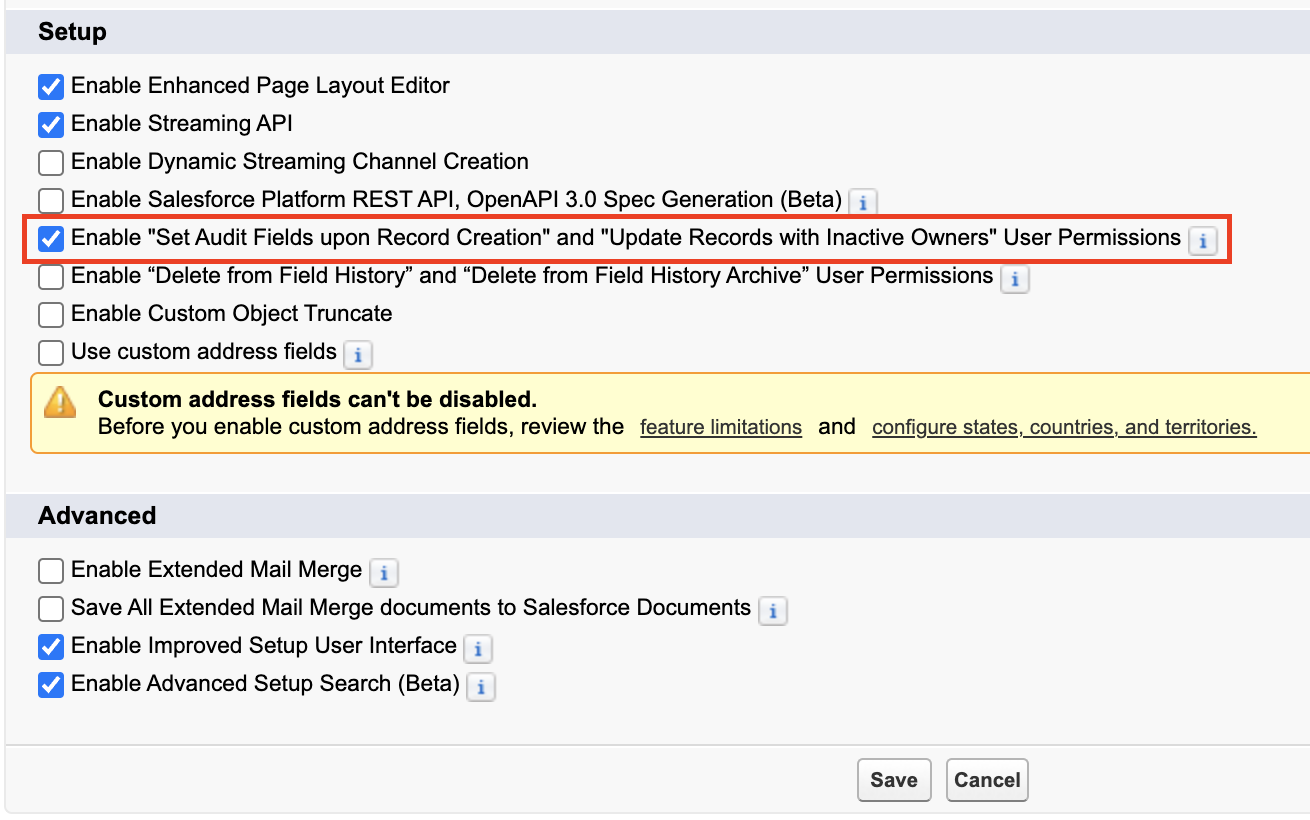
  1. Ensure the “Enable “Set Audit Fields upon Record Creation” and “Update Records with Inactive Owners” User Permissions” option is selected
Salesforce screenshot
  1. Select Save

Next, create a Permission Set for “Set Audit Fields Upon Record Creation” and assign this Permission Set to the user(s) who will handle the Data Loader imports. 

  1. Navigate to Setup > Permission Sets
  2. Select New
  3. Name your Permission Set “Set Audit Fields Upon Creation”
  4. Select Save
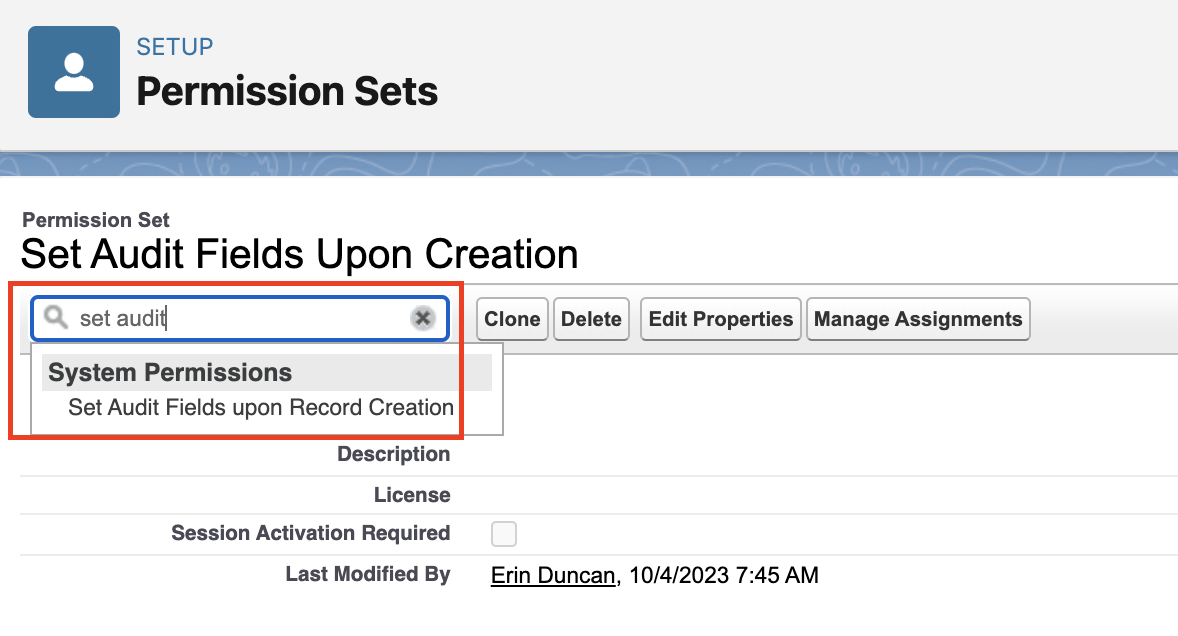
  5. Within your new permission set, type “Set Audit” into the “Find Settings” box
  6. Select Set Audit Fields Upon Creation
Salesforce screenshot
  1. Select Edit on the resulting page and select the Set Audit Fields Upon Creation checkbox 
  2. Select Save
  3. Select Manage Assignments 
  4. Select Add Assignments
  5. Select any users who will be handling the Data Loader imports of Campaign Members, then select Next and Assign

Import your data

Finally, get your Data ready for import! At a minimum, you’ll want to make sure your file includes:

  • Campaign ID
  • Lead ID and/or Contact ID
    • If you are importing both Leads and Contacts into the Campaign, I recommend splitting the import into 2 files. 
  • Campaign Member Status (if different from the Campaign’s default Status)
  • Campaign Member first associated date
    • Ensure the column is formatted using one of the options below, otherwise you will get an error.
      • MM/DD/YYYY (example: 04/23/2012)
      • DD/MM/YYYY (example: 23/04/2012)
      • YYYY-MM-DD (example: 2012-03-25)

To import the data

  1. Open Data Loader and login
    • Note: Updating Campaign Member First Associated Date is not possible with the Data Import Wizard, only Data Loader.
  2. Select Insert
    • Note: The ability to map to Campaign Member First Associated Date will not be available if you select Update or Upsert.
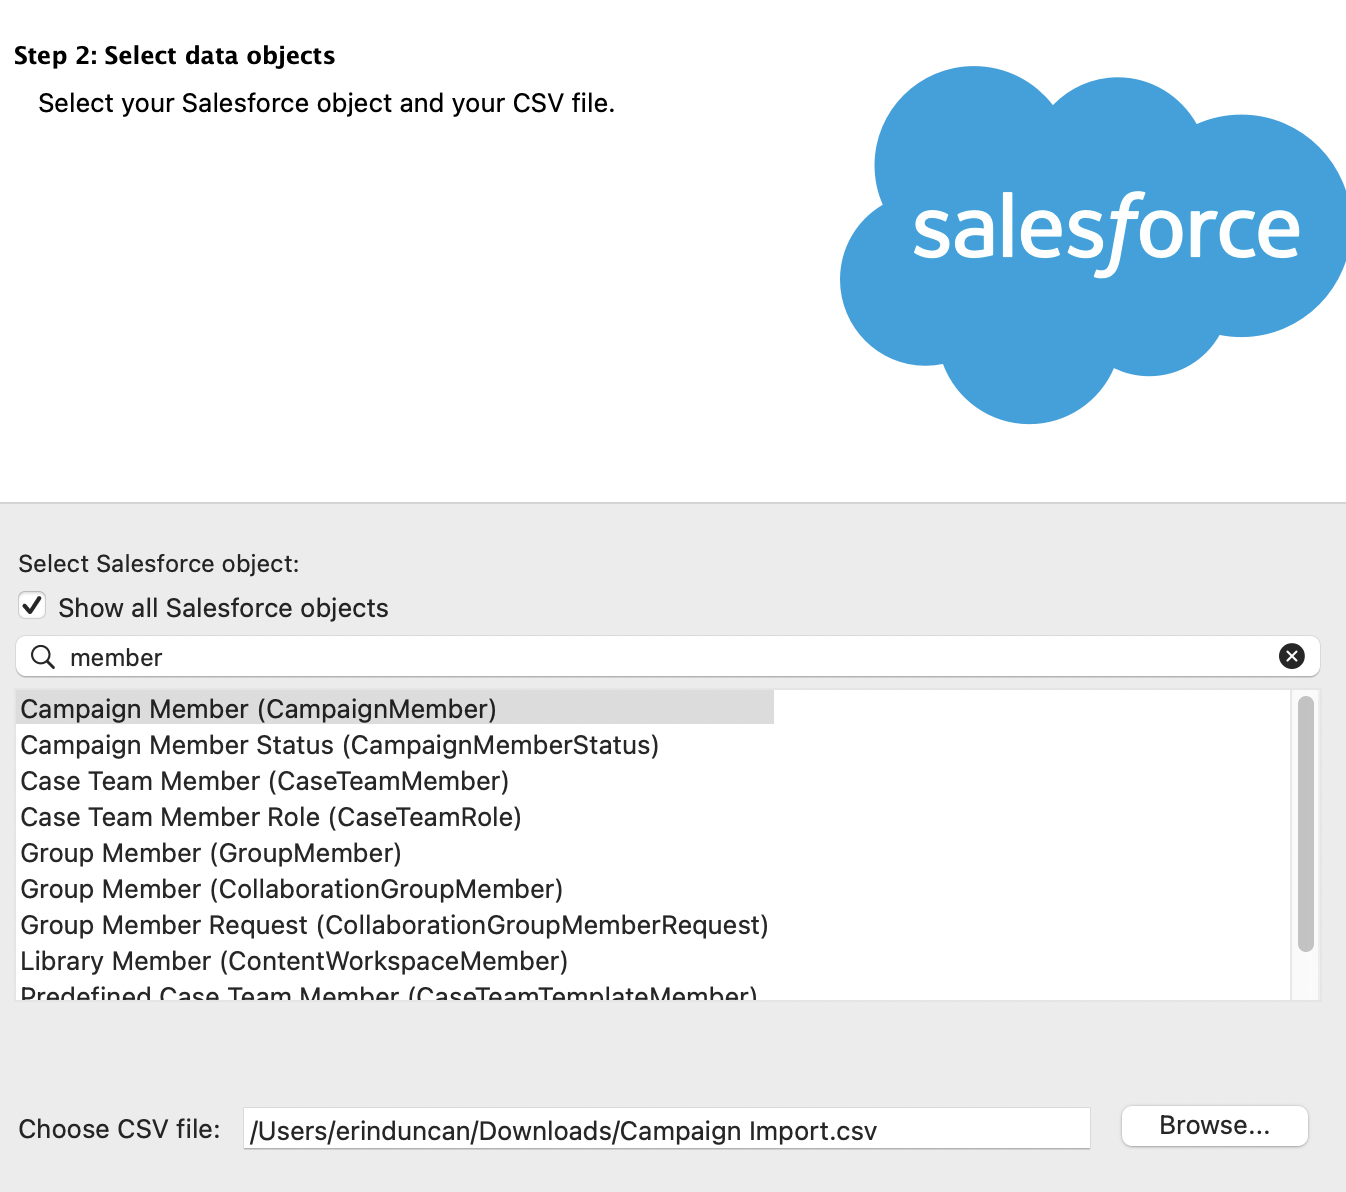
  3. Check the Show all Salesforce Objects checkbox and search for CampaignMember
Salesforce screenshot
  1. Select your CSV file and click Next
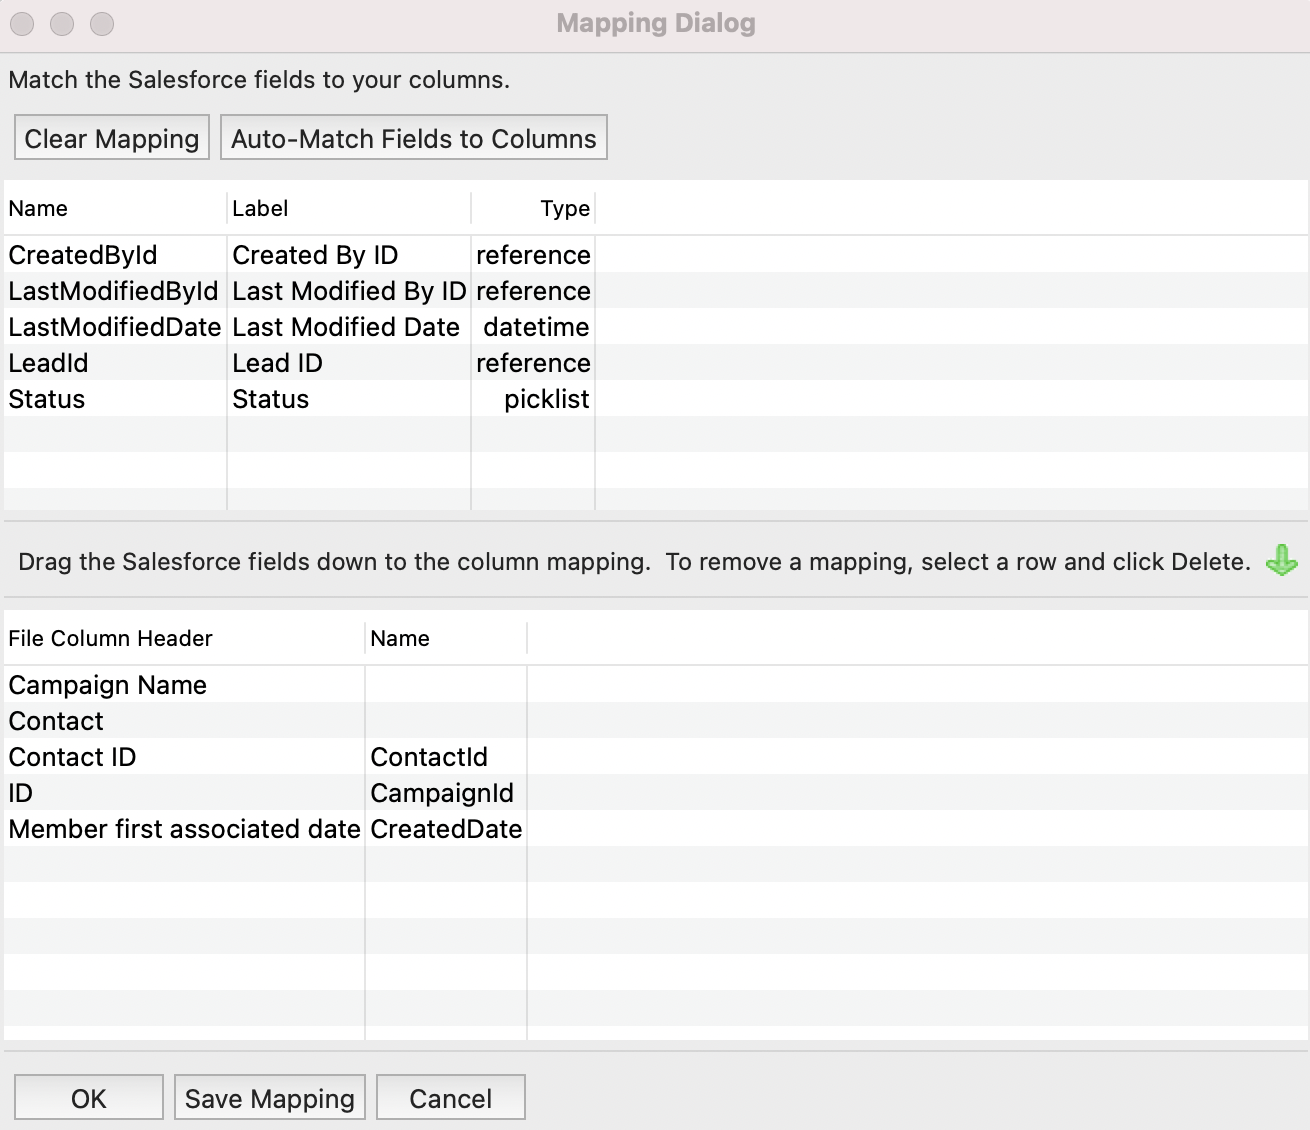
  2. Select Create or Edit a Map and map your fields
    • CreatedDate is the field you’ll need to map to the Member First Associated Date column
Salesforce screenshot
  1. Select OK > Next > Finish

And Voila, beautiful, accurate Campaign Member data!

Marketing Cloud Intelligence  (previously known as Datorama) is a tool that offers many potential uses. But with those uses comes the uncertainty that you are using the tool to its maximum potential or even correctly. That’s where a Marketing Cloud Intelligence audit can help.

In this blog post, we’ll cover the reasons you should audit your Marketing Cloud Intelligence instance, the steps to take during your audit, and what you should do with the information you gain.

Why would I need a Marketing Cloud Intelligence audit?

There are several reasons you could need an audit, including but not limited to the following topics.

 Reason #1. You want to validate the effectiveness of your work within the platform

Having worked with this tool for years, we have seen it all. An Intelligence audit serves as a second set of eyes to ensure your performance is not being stretched or that you are governing your field usage effectively. It can make a serious difference.

Reason #2. You want to explore if you are missing value adds in the platform

Suppose you are already using Marketing Cloud Intelligence for one set use case and not the full suite of features. In that case, an Intelligence audit will review options based on your needs and ask the right questions to ensure you are maximizing value. As a constantly evolving tool, there is always a new data connector, app, or feature to utilize and build value for your team from a few clicks.

Reason #3. API connectors show inaccurate data in reporting/dashboards

It can be discouraging to set up a data flow into Marketing Cloud Intelligence only to find your output from the platform, whether it be reports or visualizations, look off. An audit can guide you on everything from filtering your data to managing redundancies in setup.

Reason #4. Your Marketing Cloud Intelligence instance has mostly sat idle

You can do so much with Marketing Cloud Intelligence, and even automate processes you may not expect. But that is not of help if the platform is sitting empty or unused. An audit will take what you currently have and guide you toward possible uses you may not have explored.

Reason #5. A key admin has recently left your company or organization

Want to understand what your admin was working on and how data flowed before disaster strikes (or perhaps after)? An audit can help put it into clean process flows and documentation that you may be missing, or even help break down existing documentation into usable guidance.

What does our audit look like in practical steps?

After going through lots of Intelligence audits, we’ve come up with a straightforward process that works in most cases.

Every audit will be a bit different (a series of 3,000+ data streams is more complex than a workspace with five streams). But these are the core processes we review during an Intelligence audit.

Step 1. Having a conversation to discover your goals with marketing analytics

With minimal dialogue, we help clients route to what steps are needed to get the most out of Marketing Cloud Intelligence and their larger tech stack.

Step 2. Combining your priorities and our standard template

We center our solutions around clients’ needs, using our standard process as a springboard to ensure there is always something to explore.

Step 3. We share a detailed breakdown of the usage of platform features

We recommend various features to explore such as Einstein Marketing Insights, Reporting, and Dashboards, and how you can maximize their functionalities for the client’s needs.

Step 4. Reviewing premium features, such as Sandbox and Granular Data Center

When you buy into the more complex and pricier features of Marketing Cloud Intelligence, it may be frustrating to find new learning accompanying these tools. We break it all down so those learnings are succinct and easy to follow.

Step 5. Breaking down the impact and effort of platform features 

We showcase what tasks are high impact and low effort (and of course other levels of impact and effort) to make sure you get the most out of the platform in a swiftly actionable manner.

What will a Marketing Cloud Intelligence audit provide?

We know that an audit can unlock a powerful set of tools for you, such as the following.

Recommended platform features to utilize

We tailor our audit to your specific needs and make high-level and in-the-weeds recommendations that are centric to your business needs.

A clearer sense of data challenges to explore and recommended fixes

We showcase any glaring issues for you to skip the puzzle-solving and instead work with our tailored guidance to have a steady QA process.

Reducing redundancies for simpler data flow

We make it easy for clients to organize their data streams and remove reporting duplications so they have a clear roadmap to avoid data duplication and increase ease of navigation.

A path forward for using the platform to its full potential

At the end of our audit, you have a simple must-hit checklist based on your needs and a whole set of status updates on platform features and guidance on how to maximize their use when time allows, making a complex journey into a series of steps to explore.

How can I explore an audit with the Sercante team?

We are here to help. Our team includes Marketing Cloud Intelligence system administrator experts and readiness to explore your data to maximum effect. 

You can contact our team to explore what your audit could look like and how we can best work together!

No more posts to show