Category

Marketing Cloud

Product Note: Marketing Cloud Growth and Advanced are editions of Marketing Cloud Next and have also been referred to as Agentforce Marketing.

Adding personalization to your marketing assets, like a recipient’s first name or company information, has been a hallmark of the marketing automation world for as long as I’ve been a marketer – probably longer. Legacy Salesforce tools for marketers have included ways to personalize content using data that resides in the system you’re working within – Account Engagement or Engagement – but with the Marketing Cloud Growth and Advanced Edition Salesforce has introduced a way to include personalization from multiple sources.

Cross Object Personalization opens up a world of possibilities when it comes to crafting the perfect message for your audience. Imagine post-virtual event follow up emails that include specific sessions an attendee was at and links to where they can find recordings for sessions they missed, or a personalized post-purchase nurture program that pulls in data from the customers most recent order. This is achieved by creating Data Graphs that allow you to add fields and other objects as related attributes to the Unified Individual.

Creating a Data Graph

The first step in cross object personalization is creating a Data Graph in Data Cloud. We’ll build this Data Graph based on the Unified Individual object and whichever objects hold the data you want to reference in your Marketing assets. You can only have one Data Graph per Marketing Cloud instance, so you’ll want to keep that in mind as you’re thinking through your connections.

Build a New Data Graph

To build out your Data Graph, select the App Manager and search for Data Graphs.
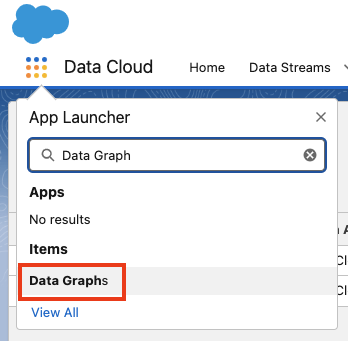
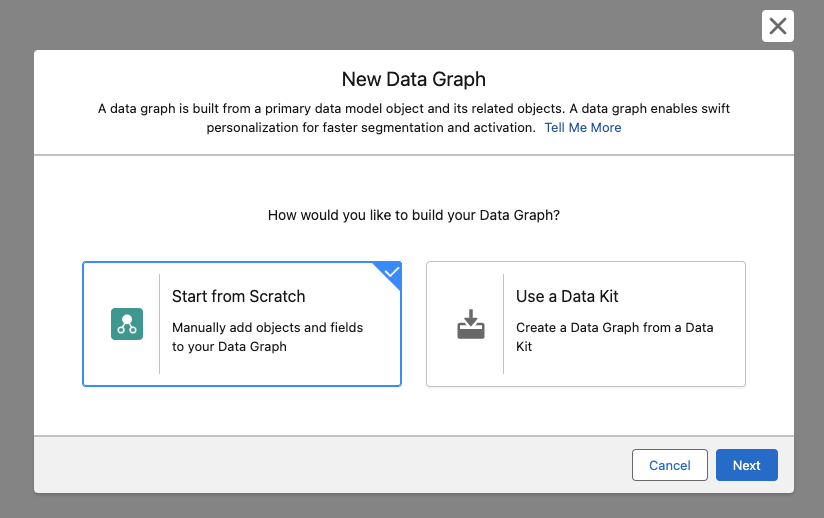
Select “New” in the upper right hand corner and then choose “Start from Scratch”.
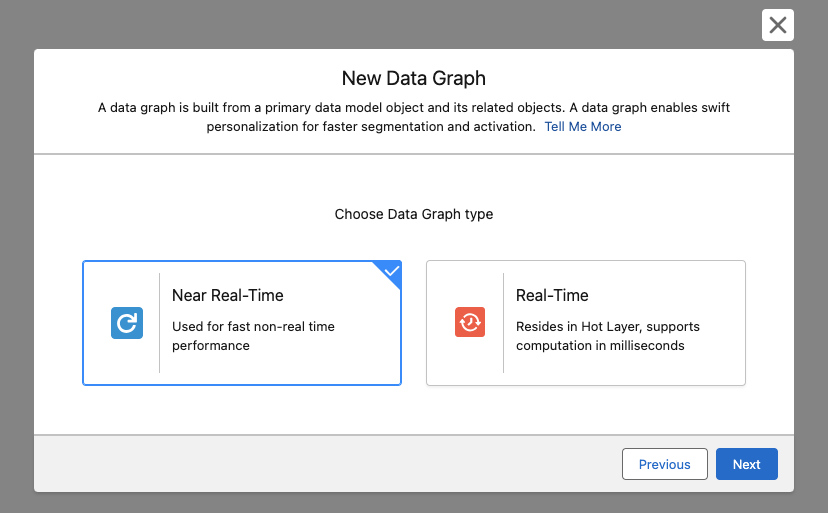
Next select your Data Graph Type

  • Near Real-Time: Updates within a short time frame but not necessarily instantly. This option is recommended in most use cases and will help you save on Data Cloud credits.
  • Real-Time: Updates immediately with new information. Each update consumes Data Cloud credits.
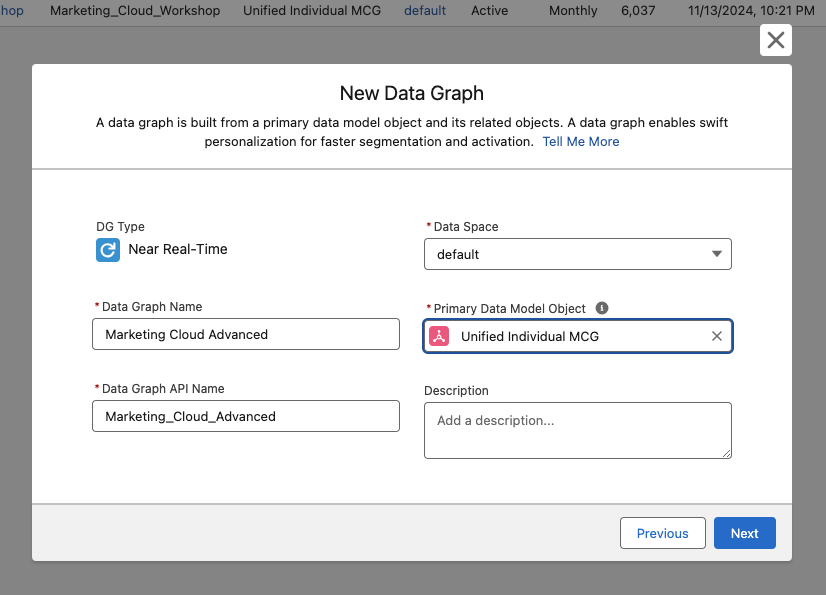
Name your Data Graph, leave the Data Space as default, and choose the Unified Individual as your Primary Data Model Object.
On the next screen you’ll be able to choose which objects and fields you’d like to include in this Data Graph by clicking on the + button next to “Unified Individual”.
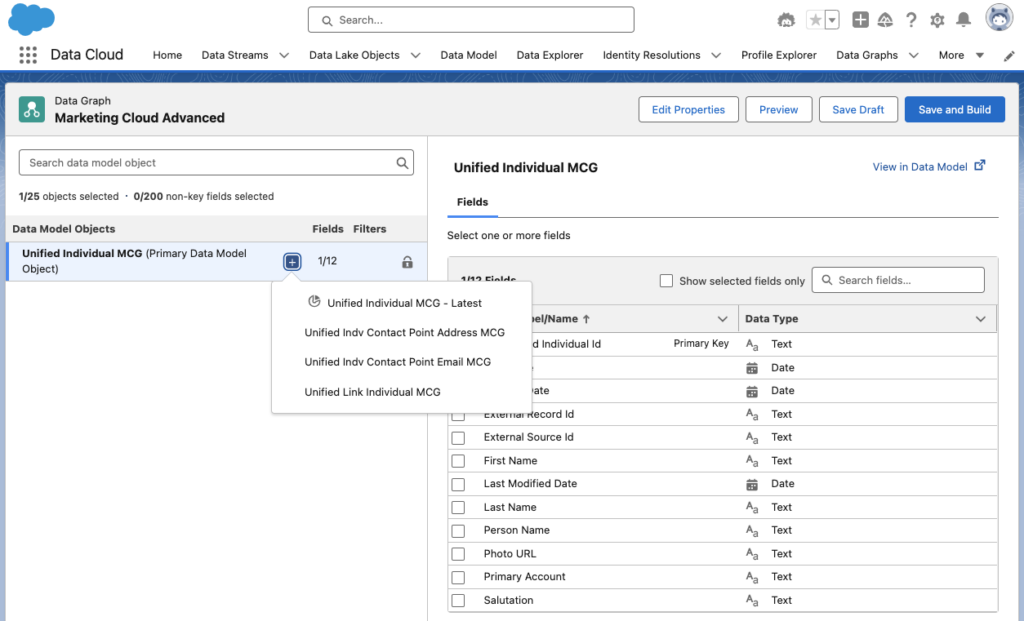
Depending on which of these objects you select, you’ll have a range of different options – either diving deeper into related objects or selecting fields you want to include from that object on the right hand side of the screen.

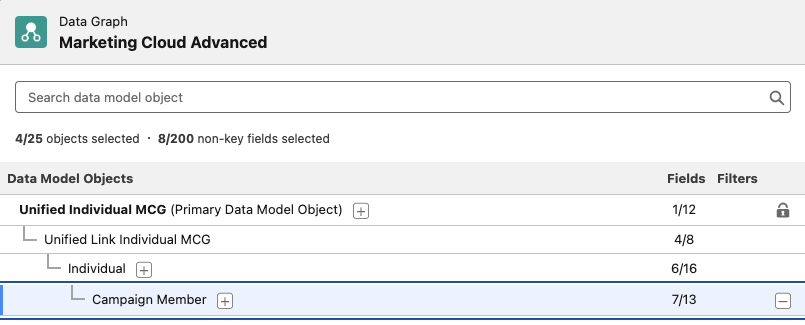
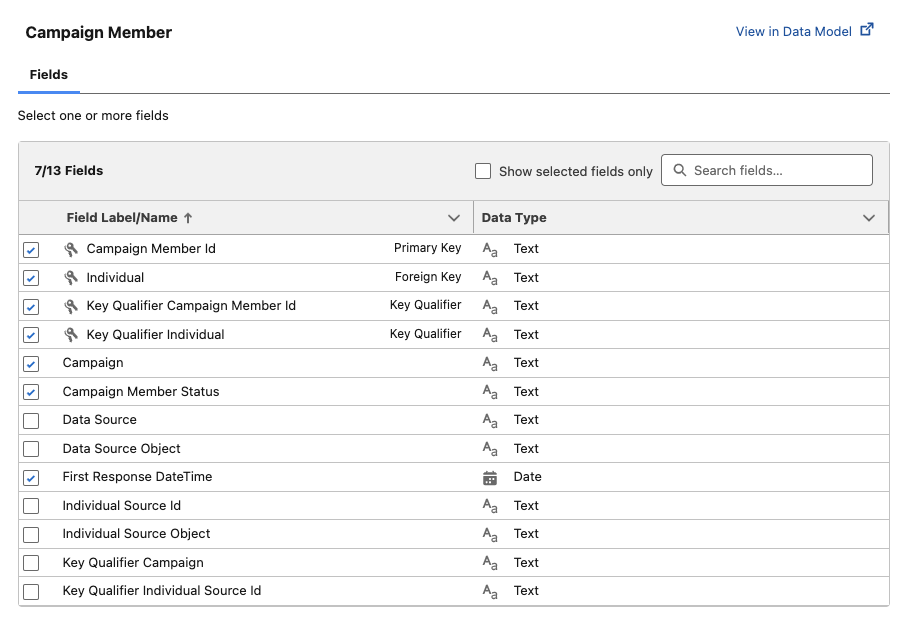
In the following example, I have drilled down to Campaign Member to bring in Campaign Name, Campaign Member Status, and Campaign First Response DateTime fields into Marketing Cloud. I’ve achieved this by going from Unified Individual > Unified Link Individual > Individual > Campaign Member. At each of these levels of data I am able to select fields I’d like to include in the Data Graph, which will make them available for use as personalization items in Marketing Cloud.

The Data Model Objects section on the left side of the screen displays the number of fields selected to bring into the Data Graph, as well as the total number of fields available and if there are any filters setup on these objects.
On the right side of the screen, we’re able to see the selected Data Model Object, in this case Campaign Member, and all of the fields available for us to bring into our Data Graph. Any field that’s marked with the 🗝️icon will automatically be selected to be brought in as it is either a Primary Key, Foreign Key, or Key Identifier used to link to other objects in Data Cloud.
Save and Build Your Data Graph

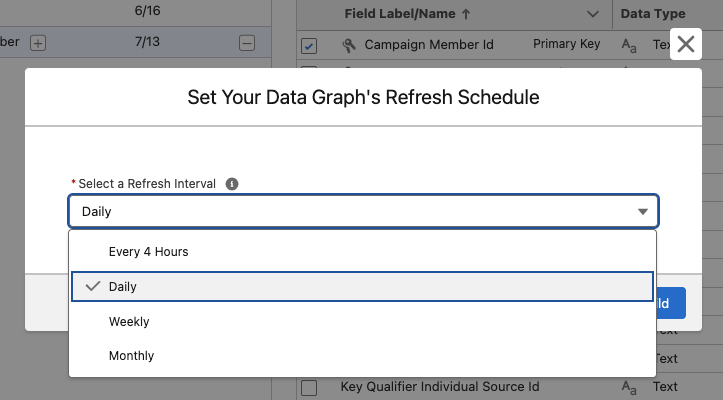
Once you have selected all of your objects and related fields for your Data Graph, click Save and Build in the upper right corner.

Select a refresh interval for your Data Graph. Remember – every time you refresh your data you’re consuming credits, so think carefully about how often you need to refresh this data. You can always adjust this later if you decide your refresh rate is too slow or too fast.
Deploying Your Data Graph

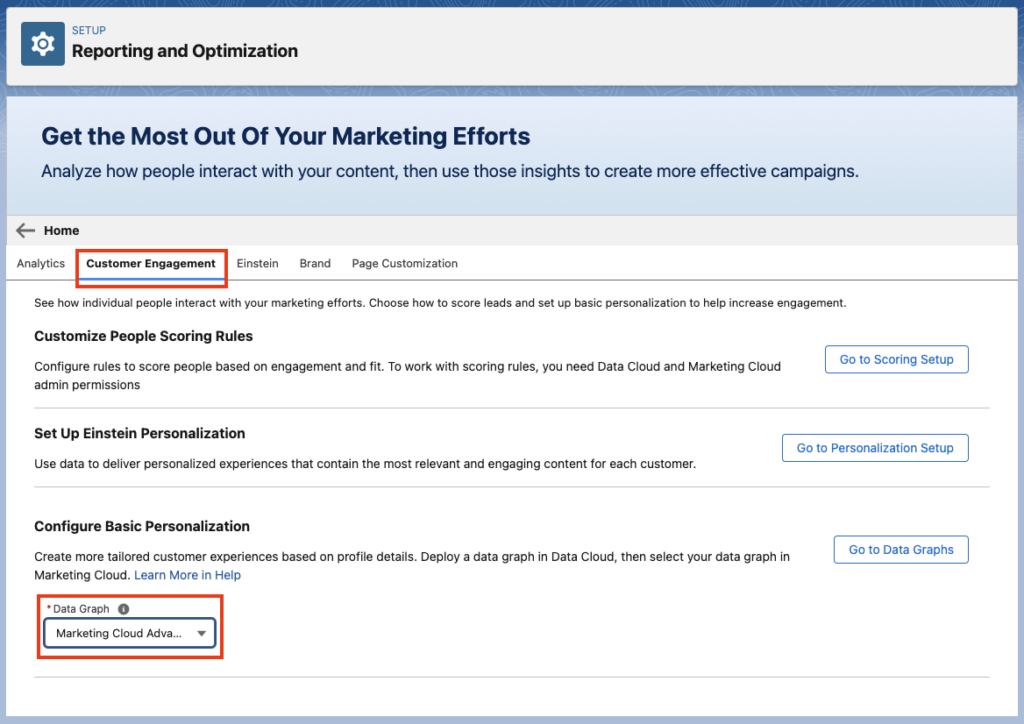
Now that you have successfully set up your Data Graph with additional objects and fields for personalization, deploy it so it can be used within Marketing Cloud. Head to Salesforce Setup, then in the Quick Find box search for “Reporting and Optimization”.

From there, click on the Customer Engagement tab. At the bottom of the page, under Configure Basic Personalization, click into the drop down menu to select a Data Graph.
Personalize To Your Heart’s Content

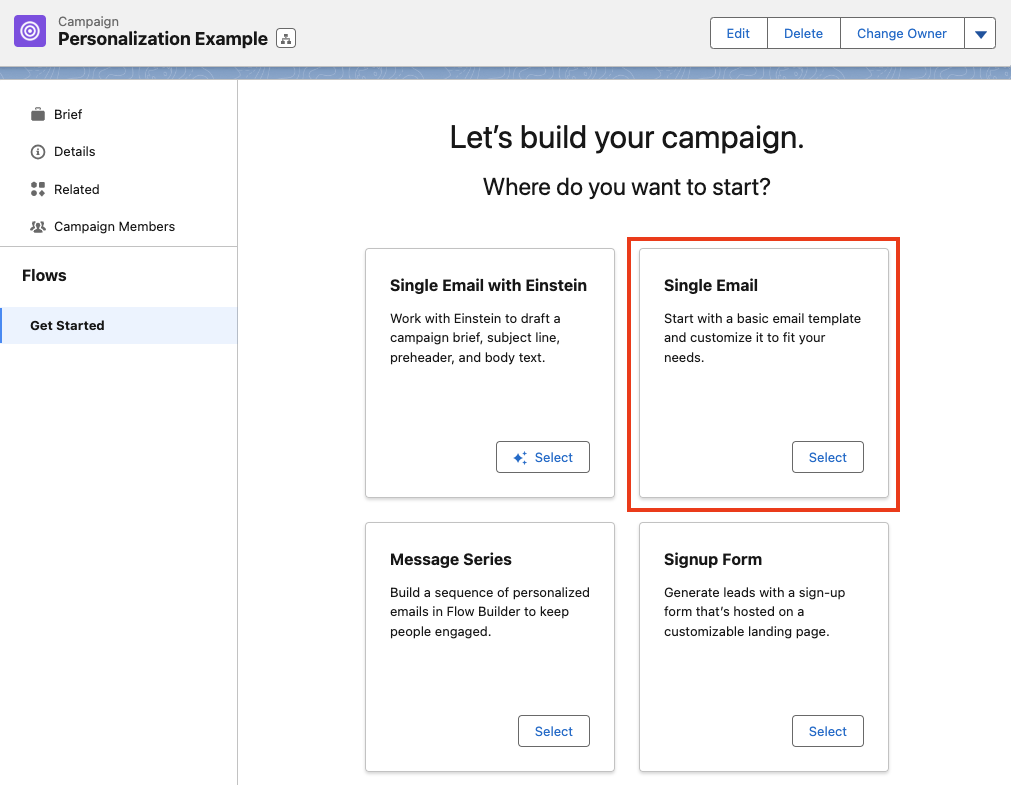
Now that you have successfully deployed your Data Graph, you’re ready to start personalizing your Marketing assets! We’ll build a Single Email Campaign for our example by going to App Manager > Marketing > Campaigns and creating a new Campaign.
Customizing your Email

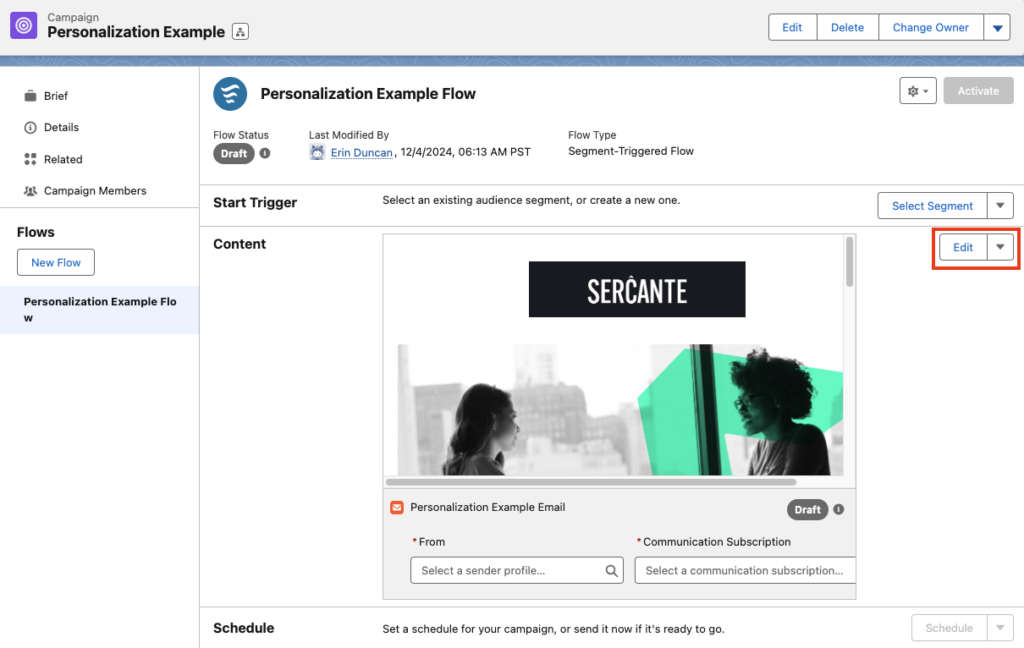
Select Edit from the top right hand corner to open your email in the builder.
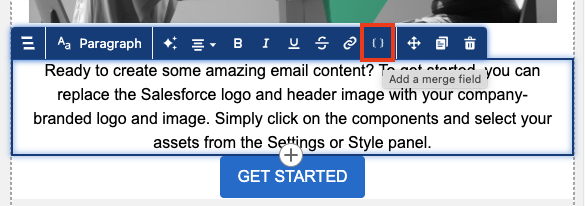
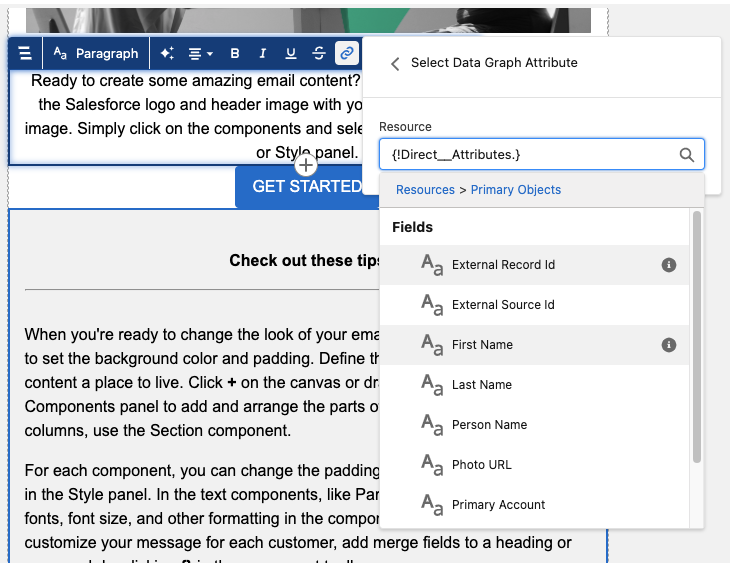
Select a Paragraph Component or drag and drop a new Paragraph Component onto the canvas. When a Paragraph Component is selected, an editing menu will appear along the top. Select the { } icon to enter a merge field.
Once selected, choose the Select Data Graph Attribute option.

Next, you can choose between Primary and Related Objects. Primary Objects will allow you to enter direct information about the Unified Individual, such as their First Name. Related Objects will allow you to enter any of the related fields you selected when building your Data Graph.
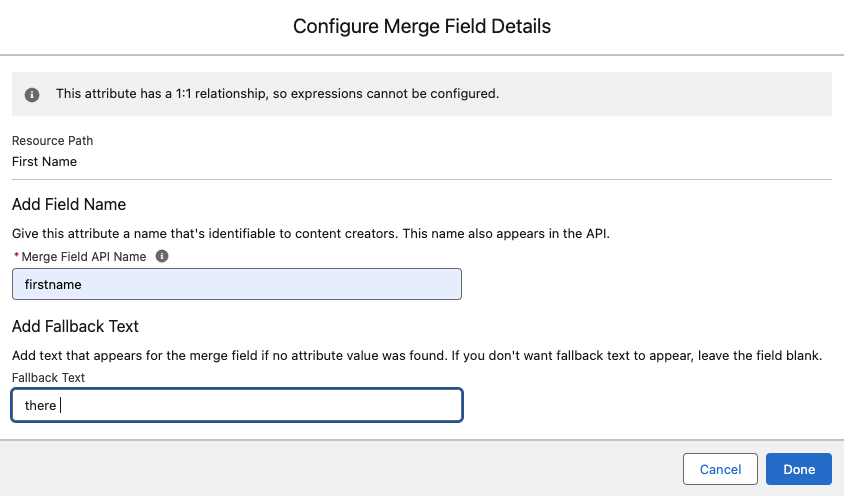
After you’ve selected your merge field, configure your merge field details. This includes the Merge Field API Name and Fallback Text that will be used if the recipient does not have a value in this field.
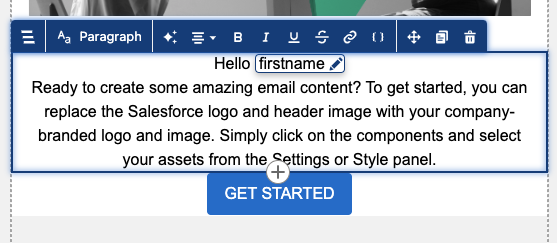
Select Done and you can see your merge tag inserted into your Paragraph Component.
Get Started with Cross-Object Personalization

Cross-object Personalization with Marketing Cloud brings an incredible amount of flexibility with how you personalize your marketing assets. With Data Graphs, you’re able to bring in any data that is tied back to the Unified Individual into your Marketing Cloud organization and personalize to your heart’s content!


It’s time for part two of our three-part series on getting the most out of your Salesforce Marketing Cloud Intelligence, or Datorama, instance. Part 1 of the series touched on little tricks and shortcuts to success with data ingestion and transformation. Today, I’ll be going through how you can speed up the platform for yourself and your team and boost efficiency in reviewing your data. Read on for Marketing Cloud Intelligence tips that will help you maximize its performance.

Marketing Cloud Intelligence Performance Boosts

Marketers are competitive by nature. You’re fighting for bids, placements, and user attention. So why wouldn’t you want the best performance out of the tool you’re using to measure your data and give you insights? 

We’re going to walk you through how to ensure you get the speediest and most efficient version of Marketing Cloud Intelligence you can!

Less widgets, more pages – why?

You may be inclined to make a gigantic page of widgets for one humongous dashboard that you use — this is a fine starting point! It’s especially useful for the sake of exporting data in a PDF or PowerPoint in an advanced manner, using the platform’s advanced export feature.

But when it comes to using the actual dashboards in Intelligence, you should try to break your pages out as much as possible. This could be done by channel, campaign, or any other kind of unifying but specific factors you might be thinking about. 

We’ll touch on this more below, but the more compact your view and the fewer widgets you have, the less you’ll wait for pages to load. 

A load by any other name

You may have sat in front of numerous online analytics tools and seen long loading times. You probably used the old answer as to why: slow internet speeds.

Source: https://i.imgur.com/us5fOfG.jpeg

The true answer to why your analytics tool is slow to load though is… it depends:

JavaScript ifs VS. spreadsheet IF formulas

I’ll cite a specific example below, but any calculated fields may slow your load down. I noted some of this in my first blog in this series, but using JavaScript ifs can help a bit by setting quick end criteria (ie. if it’s this thing, this is the output), as opposed to large loops in Excel style IF formulas.

An additional point of clarity: when I note calculated fields, I mean calculated measurements, filtered measurements, calculated dimensions, and patterns.

Data fusions & transitive fusions

Data fusions similarly happen live and can significantly slow down your instance, either with heavy data sets or more than 5-10 fusions existing back end. Transitive fusions (a is fused to b, b is fused to c) can also cause problems in heavy use.

Page reloads

Accessing a page in a way that makes data load anew can cause slow load times.

  • I’ll hit some rules of this later, but scrolling down will cause data to load anew 
  • Any updates to the data back-end will cause reloads of the data when you open a page with that data
  • Clearing your cache either in the platform or in your browser will cause data to recalculate and populate the dashboard page
  • Changing filters will also reset the loading of the page

Identifying load problems & getting help

There is not currently a public-facing timer for loading data in Intelligence, but you know a long load when you see it. 

What can help in identifying the root causes of slow loads is that Salesforce support can help diagnose timing issues down to certain widgets. I recommend this (or the next method) to validate that your internet/instance is not the issue. You could also have a colleague access the same dashboard and compare load times with you using a timer to ensure you are capturing the issue correctly.  

Come Together (but also maybe don’t)

One of my favorite functions of the Intelligence platform is using Coalesces and other calculated dimensions whenever I can’t cleanly join data. There are other ways to do this — like using if statements with ISEMPTY formulas, using data fusions, or doing Vlookups to tie entities together, among others (we’ll touch on some of these below, too). 

Coalesce is often one of the cleanest and quickest ways to join data points where you need a data point from one stream or another, depending on what’s available. A good example is something like lead source, where you may have leads and cost data to join across Salesforce data and paid media APIs. In that case, you would check the lead source field or the channel name of the data stream feeding cost data). 

Technical tip sidenote: Coalesces can be incredibly confounding, so here’s a brief walkthrough of this function. In this platform, as documented in Intelligence’s Help Center, they let you return the first non-empty value of a set of data formatted like COALESCE([value1, value2,…]). The really confusing part is that you have to have brackets around those dimensions, so correct syntax would be like COALESCE([[day],[campaign start date]]).

Scroll first, ask questions in a minute

One thing that can be really frustrating, even when things load okay as a page opens, is that as you scroll the content may not be there when you move down. A way to avoid this is to scroll all the way through a page before walking through it. 

Why is this? Two big reasons:

  1. Intelligence loads about 15 widgets at a time. Anything more than that queues up, so multiple widgets loading piece by piece can be difficult on the system.
  2. The system only loads what you see. There is no secret back-end loading happening wherein data is populating that you don’t see. You’ll still have to reload widgets when you filter, but by scrolling down, any initial data sets will populate and make you appear to be the marketing superstar we know you are.

Filter secrets-greater than 0

  • Have you ever gone into a page and waited for a filter to load? 
  • Or, have you opened a filter widget’s dropdown to find hundreds of irrelevant campaigns when you know your workspace should only have a handful of campaigns? 

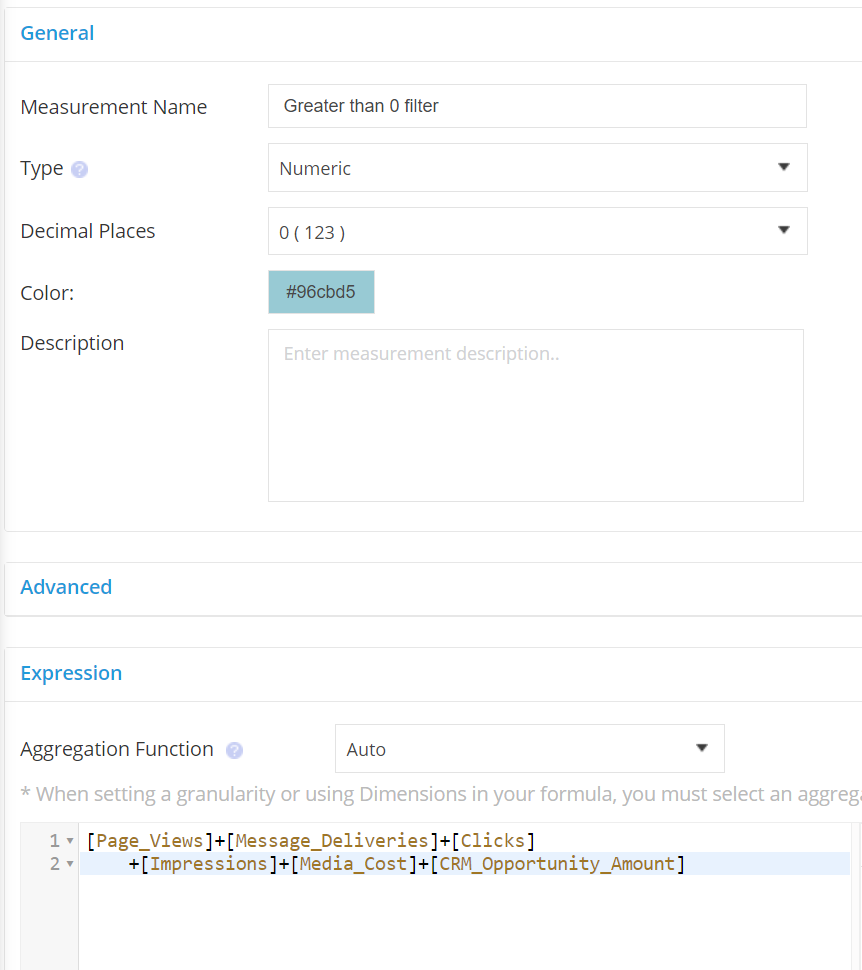
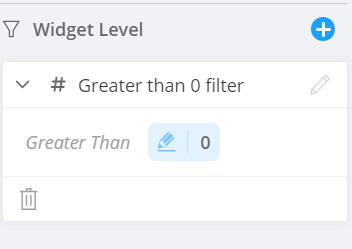
I use a trick that I call “Greater than 0,” which is a calculated measurement that adds all of my measurements in use for a page and filters that on greater than 0 for any relevant filters. My filters load faster and my dropdowns are minimized to just data points I need, not junk data. 

You’ve successfully loaded the end of this article

Thanks for scrolling down here successfully and ingesting our content! Now you have quick wins that can help you maximize Marketing Cloud Intelligence performance.

Check out part one of this Marketing Cloud Intelligence series to get a reasonable foundation on some other data topics. And keep an eye out for part three of this series, which will go in-depth on some data stream tricks to get your best data pulls/updates possible. 

We hope you get some added productivity out of this piece, and if you’re looking for a tailored conversation to your needs, drop us a line.

Product Note: Marketing Cloud Growth and Advanced are editions of Marketing Cloud Next and have also been referred to as Agentforce Marketing.

The role of marketers is continually evolving. This is especially true for those working within the Salesforce ecosystem. With the advent of advanced technologies, products, and functionalities to support — all while sticking to data-driven strategies — marketers are expected to adapt and expand their skill sets to stay competitive and relevant in the industry. 

One significant shift that I see for Marketing Cloud Engagement professionals is the need to add Data Cloud and Flows into their skill repertoire

In this blog post, we’ll explore why Marketing Cloud Engagement professionals should upgrade their skills to include Data Cloud and Flows, along with practical steps to start this learning journey.

Why upgrade your Marketing Cloud Engagement skills?

1. It’s the future for the Mothership

Unless you’ve been living under a rock, you’re likely very aware of how much rapid growth and development Salesforce has invested in its Data Cloud product — not only are the release cycles happening much more frequently than other products. This in turn unlocks new features and integration points with other products in the ecosystem, and there’s also a version of Data Cloud being offered at $0 for Sales and Service Cloud customers and just recently announced for Marketing Cloud Customers too. 

If that’s not a sign, I’ll give you one more reason: Data Cloud is the data foundation and Flows power automation for Salesforce’s new product, Marketing Cloud Growth Edition. Marketing Cloud Growth Edition is built on Einstein 1, which has been the pipe dream for many of us Marketing Cloud Engagement fans who have dealt with wonky UX, and clunky integrations over the years. Reading between the lines, cough cough SAFE Harbor cough cough sometime in the future (likely a few years), there will be a single marketing automation application that current Marketing Cloud Account Engagement and Engagement users will want to use.

So now that I’ve convinced you (hopefully) of the WHY — let’s dive into how these tools/features can help you as a marketer.

2. Become a better marketer by offering better customer experiences  

Enhanced Targeting and Personalization

Data Cloud can enable you to take your target and personalization efforts even further when using Data Cloud with Marketing Cloud Engagement through segmentation and activation. 

Data is the lifeblood of modern marketing. By incorporating a solid understanding and foundation of data models and the Data Cloud platform into your skill set, you’ll be able to visioncast and architect how to leverage vast repositories of consumer data, enabling you to create more targeted and personalized marketing campaigns and customer experiences. 

Understanding how to leverage data effectively within Data Cloud allows you to segment your audiences more precisely, tailor your messaging, and deliver content that resonates with individual preferences and behaviors in Marketing Cloud Engagement and beyond. (you also might want to read up on Consent Management)

Seamless Automation and Optimization

For those who have no clue about Flows (no I’m not talking about the Progressive Lady), let’s give you a breakdown:  Flows allow you to build complex business automation using clicks instead of code. For Salesforce admins, Flows are your best friends because they allow you to be able to handle the majority of complex business requirements without the help of a Salesforce developer.

Flows are not currently a feature/functionality in Marketing Cloud Engagement however it accomplishes many of the same needs you’d use Automation Studio and Journey Builder for. While the need and exposure for flows in your immediate feature might be limited, getting familiar and a basic foundation will allow you to go further faster in the future.

3. Gain a Competitive Edge and Future-Proofing

Marketers who embrace emerging technologies and methodologies gain a significant advantage in a competitive landscape. By upgrading your skills to include Data Cloud and Flows, you position yourself as a forward-thinking marketer capable of leveraging cutting-edge tools to drive results. Moreover, as the marketing landscape continues to evolve, proficiency in these areas ensures that you remain adaptable and prepared for future developments in the industry.

How to start your learning journey

1. Make time for training and education

For many practitioners, finding or making the time for training and education can be hard. As the old adage goes, “Investing in yourself is the best investment you will ever make.” So, invest!  As your reward for reading through this entire article, we’ll provide you with our recommended learning path to begin upskilling in these areas.

Begin by seeking out training programs and educational resources focused on Data Cloud and Flows. Many online platforms offer courses and certifications specifically tailored to marketers looking to expand their skill sets in these areas. Look for reputable sources such as industry-leading tech companies, online learning platforms, or professional associations.

2. Be realistic

Just like most things — be realistic with your goals. As they say, Rome wasn’t built in a day. Getting a shiny new certification might be the goal for some but doesn’t necessarily mean it’s the right goal for you. Set learning goals that make sense for your current role, day-to-day responsibilities, and where you want to go in your career.

3. Look for hands-on practice and experimentation

Theory is essential, but practical experience is equally crucial. Take advantage of sandbox environments or trial versions of Data Cloud and Flows functionality. (Unlike Marketing Cloud Engagement — these do exist!) 

From experimenting with building automated workflows, setting up data streams, mapping data, and creating segments to exploring data analytics tools, and analyzing results, hands-on experience will deepen your understanding and proficiency in these areas.

4. Collaborate and Network

Engage with peers and industry professionals who are already proficient in Data Cloud and Flows. Join online communities, attend webinars, and participate in networking events to exchange knowledge, seek advice, and learn from others’ experiences. Collaborating with experts in the field can provide valuable insights and accelerate your learning process.

Conclusion

As marketing continues to evolve in the digital age, we see Data Cloud and Flows becoming increasingly vital for success. By upgrading your skills in these areas, you can unlock new opportunities for not only yourself but also for ultimately driving better results for your organization. Start your learning journey today:

Data Cloud Learning Path

Flows Learning Path

The beginning of the year is an ideal time to have a reset on your Marketing Cloud contact strategy. That way, you can get your Marketing Cloud contacts in order, have an org cleanup, and create a future-proof strategy that will ensure those contacts within your org are serving a purpose (and you stay within your Marketing Cloud contact limit).

So where do you begin when it comes to developing a Marketing Cloud contact strategy? 

A Marketing Cloud contact is an individual added to any contact database within your Marketing Cloud instance. So, your Marketing Cloud contact strategy is the process you’ll create to make the most of your marketing efforts by focusing on promising contacts and letting go of contacts that aren’t helping your team reach its goals.

Step 1. Find out how many Marketing Cloud contacts you have purchased.

Every Marketing Cloud contract will have a contact limit. You can expect communication from your Salesforce Account Executive if you breach this limit, which can result in you needing to pay for more contacts. So it’s important to know what you’re working with. 

Refer to your Marketing Cloud contract to find how many contacts your license includes, or reach out to your Salesforce Account Executive to find out. 

Step 2. Find out how many contacts you currently have in Marketing Cloud.

Once you know the number of contacts you have purchased, you’ll want to find out how many contacts you currently have in Marketing Cloud. This will help you identify if a review or a cleanup is needed. 

Follow these steps to find out how many contacts you have in Marketing Cloud:

  1. Go to Contact Builder > ‘All Contacts’ tab
  2. From there, click ‘All Contacts’ for the total number to show up.

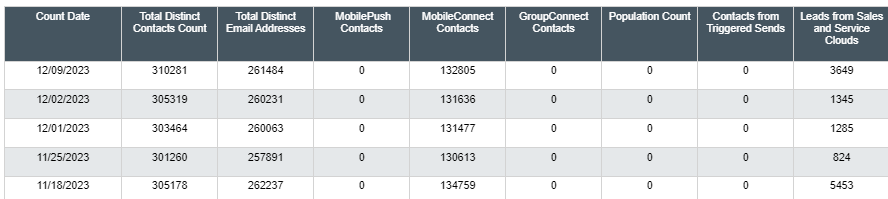
Alternatively, you can run a report that will show you how many contacts you have from each audience, such as Sales and Service Cloud leads, and contacts, per channel.

Keep your Marketing Cloud contact numbers handy

At this point you should have two numbers:

  1. The number of contacts you are contracted to
  2. The number of contacts currently in Marketing Cloud 

Review your Marketing Cloud contacts

The next step is to review your contacts. Think about:

  • What they are doing
  • Who they are
  • If they should even be in Marketing Cloud (after all each contact comes at a cost)

From there, decide which ones you can remove from your org. 

Ask Yourself: Do all your contacts provide value to your business?

If you’re not sure how to make that decision, then check out this blog post where Sarah Smith explores the reasons why deleting your marketing contacts regularly is a good thing when you delete the right ones.

Step 3. Review Marketing Cloud contacts and complete your cleanup tasks.

A key part of a good contact strategy is ensuring you only have the contacts that are needed in Marketing Cloud. As part of your contact strategy, it’s important to evaluate your current contacts and perhaps have a clean-out. 

Check for Duplicate Records

One of the biggest reasons Marketing Cloud users go over their contacts limit is due to duplicate records. 

First, identify how many duplicates you have using SQL queries in Automation Studio

  1. Identify how many duplicate records you have by following the instructions in this trailhead: Evaluate Your Contacts Unit 
  2. Delete your duplicates – follow this Salesforce help article: Contact Delete Best Practices in Contact Builder

Bonus Duplicate Contact Tips

Identify the source of the duplicates: 

  • Do you import contacts directly into Marketing Cloud?
    • This can sometimes cause an issue, particularly if you are also syncing records from Salesforce
    • You’ll end up with the “Salesforce version synced down” + the Marketing Cloud version you imported!  
  • Review your Salesforce lead-sync approach
    • Syncing both leads and contacts can often cause duplicates in Marketing Cloud when a lead is converted into a contact, particularly if you’re using Salesforce Record ID as the unique identifier
    • Your lead record will have a lead ID and this lead will sync with a Marketing Cloud contact but when you convert that lead it will have a different ID, a contact ID thus creating a duplicate record in Marketing Cloud 
    • It is however best practice to use the Salesforce ID as  the unique identifier rather than email 
  • Review your Salesforce records 
    • Are there duplicates here? If so then this could be causing duplicates in Marketing Cloud as well 
  • Do you import records into Salesforce (manually or via a third party)? 
    • This could cause duplicate records in Salesforce and therefore Marketing Cloud

Review contacts that do not have an assigned channel address

Assigned channels are things like email, mobile, ad studio, and any channel within Marketing Cloud that uses your contacts to target. If you have contacts that do not have a channel address, then these are likely to be a good candidate for removal. These types of contacts often get into Marketing Cloud because of the Marketing Cloud Connector [Keep reading to implement a solution that minimizes the “wrong” records being synced into Marketing Cloud from Salesforce!]

Identify if your contacts do not have an “assigned channel.” Why? If they don’t have an assigned channel then you haven’t “used them” in your marketing campaigns:

  1. In Marketing Cloud, navigate to Automation Studio.
  2. Click the Activities tab, then click Create Activity.
  3. Select Data Extract and click Next.
  4. Add a name, external key value, and a file naming pattern. The file naming pattern value doesn’t actually affect anything, because all results go into a Contacts Without Channels data extension in the root folder of the account.

Remove contacts that are not right for your business

If you have been letting everyone into your Marketing Cloud org, then chances are some folks just shouldn’t be there (for example, competitors or spam submissions). As part of your contact strategy, it’s important to define the purpose of Marketing Cloud for your business. If it’s only to engage with leads and customers, then you could remove staff, partner, and competitor contacts.

Use SQL and Automation Studio to identify any contacts that do not meet your criteria (for example, if they do not have a “client” or “lead status” or if they have your business email address). Add these contacts into a non-sendable data extension and then delete them. 

Step 4. Implement the right processes to keep a clean Marketing Cloud contact database moving forward.

Below are some suggestions to help when creating your Marketing Cloud contact strategy so it’s an easy lift for your team and you avoid over-limit surprises.

Think about the ways Marketing Cloud fits into your overall business goals

Start with the right foundation. Evaluate the ways your marketing and business goals align with your team’s use of Marketing Cloud.

Who are your audience personas? And who are you connecting with through Marketing Cloud? Your list may include:

  • Leads
  • Customers
  • Partners

Putting this on paper may help you prioritize your contact usage and determine the ‘nice to haves’ versus the ‘need to haves.’

Determine how you’ll segment your Marketing Cloud contacts

From there, create segments for each group of contacts:

  • Those who are highly engaged and likely to purchase
  • Those who may need a little more encouragement 
  • Those at the start of their journey who need a lot more nurturing 

You can follow Cara Weese’s blog post Audience Segmentation Strategies for Salesforce Marketers for guidance on segmenting your contacts in Marketing Cloud.

Once you have your segments, create a Content Strategy for each. Then, you can develop messaging strategies for each of your audience segments.

Control how Marketing Cloud syncs contacts with Salesforce

This one is for Marketing Cloud Connect users. If you use Marketing Cloud Connect with Salesforce, create a ‘Sync to Marketing Cloud’ field in Salesforce.

  • Develop a list of criteria for who should be in Marketing Cloud. For example, everyone should at least have an email address or mobile number, and everyone should be mailable and be opted into emails and/or texts.
  • Use a Salesforce flow to check the Sync to Marketing Cloud field
  • Select the field in Marketing Cloud as the sync criteria. 

You can also use a single unique identifier, such as Salesforce ID, to match Marketing Cloud records to Salesforce records. 

Other contact strategy tips

  • Create contact count reports and build a process to ensure your team is monitoring them regularly. This can be as simple as setting a monthly calendar reminder to check the contact report.
  • Build a process in Automation Studio via a script to remove contacts. This avoids manual deletion in the future.
Final tips from our Marketing Cloud Developers at Sercante 

Zach Norman, Marketing Cloud Developer of 12 years: If you have Marketing Cloud Connect enabled and you implement a “sync to Marketing Cloud” field, any contacts that you delete that do turn out to be needed in Marketing Cloud will sync back down should they meet your criteria.Note: Engagement data will be lost for the contact once you delete it though 

Chris Putnam, Marketing Cloud Developer of 6  years: Before deleting unwanted contacts, copy them to a non-sendable data extension. This will serve as an archive of your deleted contacts. Capturing the date of deletion as well as the date the contact joined Marketing Cloud would be two useful data points to include.

Future-Proof Your Marketing Cloud Contact Strategy 

Remember, there’s no one-size-fits-all when it comes to creating a Contact Strategy, it needs to be specific to your business and your goals. However, there are steps you can follow to create a future-proof plan that will ensure all your contacts serve a purpose in Marketing Cloud:

  • Know your limits.
  • Keep your data clean.
  • Implement automation to manage your contacts.
  • Review and reiterate continuously — your plan needs to grow as your business does!

Need help with creating a contact strategy for your marketing automation platform? Get in touch with the team at Sercante to get the ball rolling.

Marketing Cloud Engagement is a great tool and it offers a wide range of functionality and various capabilities. But, as with all software, there are always limitations that leave you wanting more. That’s where Marketing Cloud extensions become essential.

Thanks to the strong Salesforce ecosystem, the openness of the platform, and the love it receives from its customers, users, and enthusiasts, there are so many extensions, apps, and add-ons that can help enhance your Marketing Cloud experience.

Listed below are some of my favorites from my seven years of working with Salesforce Marketing Cloud (SFMC).

Top Marketing Cloud Extensions

SFMC Companion

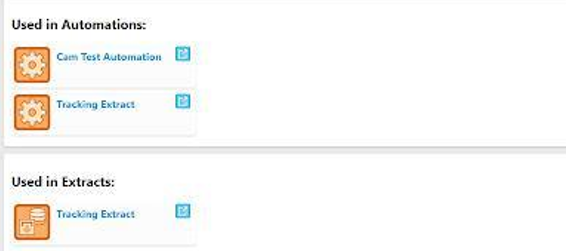
This Chrome Extension is a fond favorite of mine and it is particularly useful for those “busy” Marketing Cloud accounts and for anyone who spends hours down rabbit holes trying to understand whether a particular Data Extension is still being used, or is even still relevant.

SFMC Companion offers a useful search functionality that allows you to look for any asset or object using a free-text search field. Furthermore, whilst on any SFMC asset or object, the ‘Inspect’ tool will show all components referencing or using that particular asset or object.

Thanks to SFMC Companion there is no longer a need to have several tabs open simultaneously just to understand whether a Data Extension can be deleted. 

Evergage Launcher

This might technically be cheating as it’s practically a necessity for implementing Marketing Cloud Personalization but I’ve always enjoyed using it.

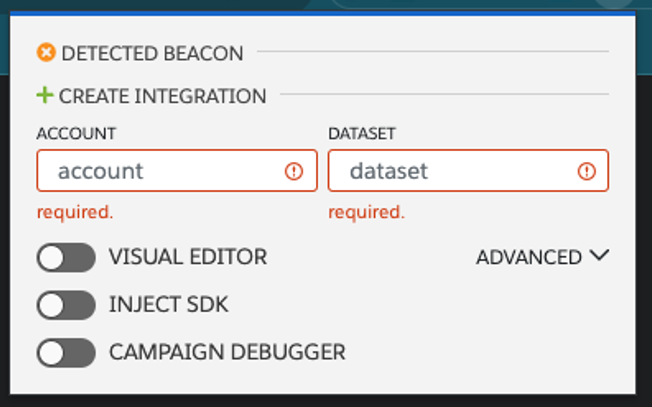
This extension helps identify whether the Marketing Cloud Personalization (MCP) SDK has been added to the website, so you no longer need to pester your IT team, and it is also where you can launch the Visual Editor. 

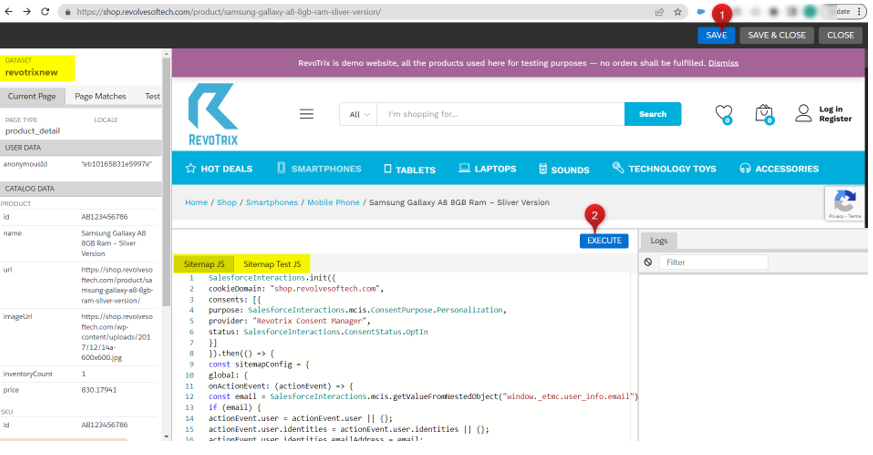
The Visual Editor is by far the easiest way to build your JS Sitemap, which is a huge part of any MCP implementation. Users also have the ability to see their work whilst on the page – this comes in handy when creating personalization campaigns, another feature accessible via the Evergage Launcher. 

Salesforce Inspector

Whilst this is not specifically related to SFMC, it is worth installing. Most SFMC accounts use Salesforce CRM data (it’s very rare not to have Marketing Cloud Connect).

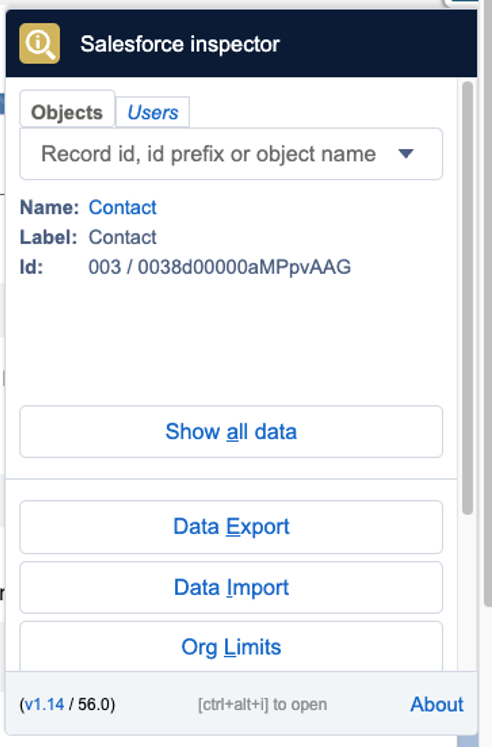
Therefore, with such a reliance on Core Salesforce data, this extension can save you a lot of time. If you quickly need to check the API field names or the field type, or even example values, Salesforce Inspector is your tool.

Furthermore, Salesforce Inspector lets you easily import and export data which is incredibly useful if you need to prepare test data for UAT.

Top Marketing Cloud Apps

It’s worth mentioning that for the following section, I’ve loosely used the term “Apps” as it covers everything from App Exchange products to Mobile Apps.

Query Studio

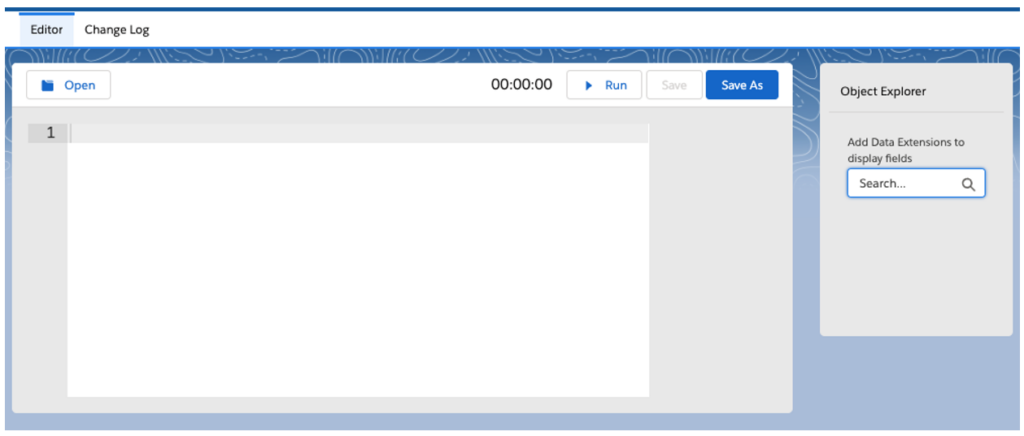
Perhaps one of Marketing Cloud’s best-kept secrets, but Query Studio is an incredibly useful app to add to your SFMC instance. If you’ve ever wanted to test your SQL skills without having to create an automation, then this might be for you.

Query Studio allows you to quickly build queries in the Marketing Cloud without needing to create and configure an automation. Once you’re happy with your selection, Query Studio can use your query to create Data Extensions automatically.

Marketing Cloud Mobile App

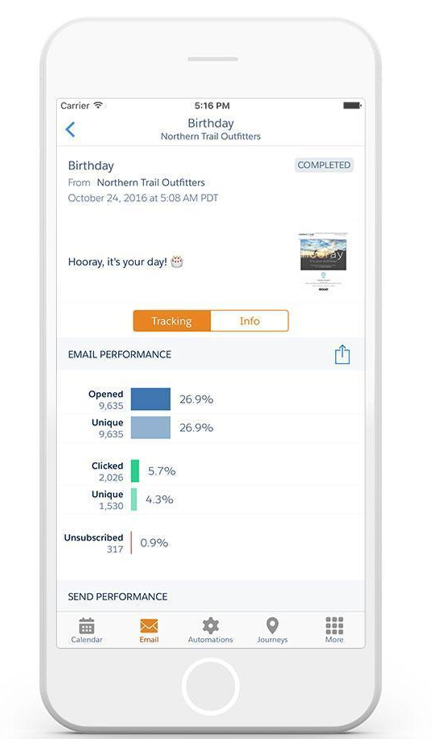
Ever needed to quickly track email performance or to check that you definitely paused that Journey, but you don’t have access to your laptop? The Marketing Cloud Mobile App might just be able to help.

However, whilst it’s useful to have instant access to your SFMC account with just your phone, it is worth pointing out that there are some SFMC features that are not available in the mobile App, so don’t throw away the laptop just yet.

You can find the app in both the Google Play Store and Apple Store.

SiteCore

Technically two for the price of one as there is both a Web CMS app and a DAM app but they’ll both help bolster your SFMC instance with the world-leading CMS. Although, it is probably worth pointing out that these apps are far from cheap.

If, however, you’re lucky enough to have one of these licenses, you can drag-and-drop approved SiteCore assets directly from the SFMC Email Editor. Alternatively, you can send contact data and behavior back to your Sitecore Experience Database to close the loop on asset performance.

DESelect Segment

Full disclosure, I’ve never had the pleasure of working with this particular app but I had to include it as it solves, what I think, is one of the biggest issues SFMC clients face when procuring SFMC… segmentation. DESelect brings drag-and-drop segmentation to Marketing Cloud and reduces the need for marketing teams to have SQL knowledge.

Again, it’s worth pointing out that whilst there is a free version available you will have to pay to increase usage, users and features (i.e., saturation control and deduplication). However, depending on your team’s skillset this app could well be worth considering.

Bonus Content

If the technical skills aren’t your team’s forte and AMPscript is constantly causing you trouble, check out ampscript.io, a useful tool that helps validate AMPscript code and highlights any AMPscript that may result in potential syntax errors.

Get more details about AMPscript in this blog post from Kayla Border.

Top Marketing Cloud Add-Ons

SalesWings

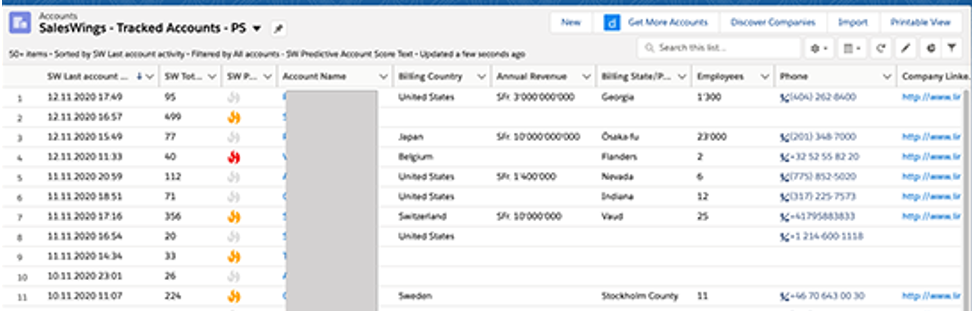
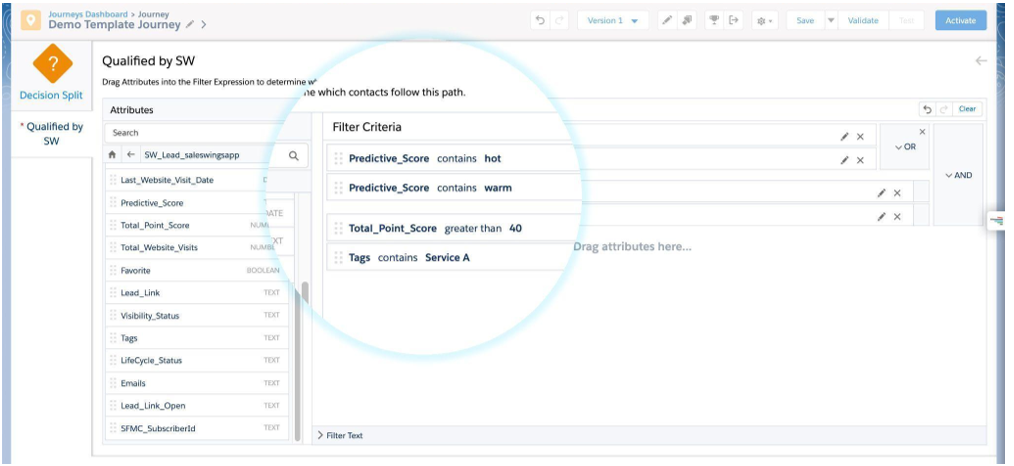
Ever needed Lead Scoring in SFMC? Say hello to SalesWings! This add-on is easy to install and is a highly cost-effective way of plugging the SFMC Lead Scoring hole.

SalesWings tracks website activity and couples it with data from CRM before scoring and grading customers using a flexible scoring model. SalesWings data can be shared with Salesforce CRM as well as used in future SFMC segmentation.

Litmus

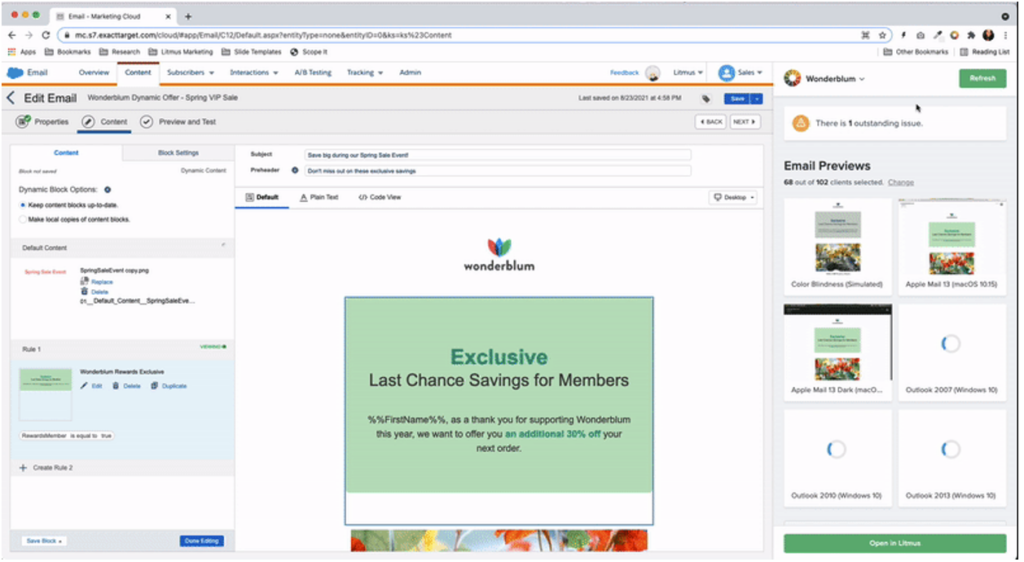
If you’re lucky enough to have both a Litmus and SFMC account, then you should definitely consider integrating the two. Yes, SFMC allows you to preview emails, but with an integrated Litmus account, you get so much more.

With an integrated account you can sync emails from the Litmus builder to SFMC or build in SFMC and test as you go. You can test dynamic content and individual personalization with the integrated email previews and, perhaps most impressively, share email performance with Litmus to create a single view of performance.

Use Marketing Cloud extensions to make the most of the platform

Going back to my previous comment, all software products have their limitations, but it is Salesforce’s ecosystem that has encouraged enthusiasts to build upon its offerings which, as shown above, has led to some innovative solutions that could give your SFMC instance that much-needed capability boost.

So if you’ve been contemplating if the grass is greener on the other side it could be worth exploring the depths of the Salesforce Community — chances are there is already a solution to your problem out there.

If you’re new to Marketing Cloud Engagement, you may be feeling overwhelmed. Salesforce’s powerful marketing platform can do a lot. And that comes with a steep learning curve.

I’ve been on my Marketing Cloud Engagement journey for a while now and still feel the sense of having so much to learn. My learning journey has consisted of hands-on experience, boot camp-style training courses, and of course, all the Trailheads. 

Florida Dreamin’ Session – How to Write like a Marketer: Intro to AMPscript for Salesforce Marketing Cloud

I knew when I was given the opportunity to attend this year’s Florida Dreamin’, finding Marketing Cloud Engagement sessions was at the top of my event bucket list. That’s why I was super excited to attend Tatiana Romanko’s presentation, How to Write like a Marketer: Intro to AMPscript for Salesforce Marketing Cloud.  

Romanko took a complex topic and simplified it, making her content easy to understand by providing real-world use cases every marketer could relate to. This session was a great introduction to AMPSprcipt for Marketing Cloud Engagement users who are still on that learning curve, and even seasoned veterans took away a thing or two. 

What I especially loved about her session is that, like me, Romanko doesn’t have a coding background. Her message really resonated with me: with hard work and hands-on experience, you too can learn the technical intricacies of Salesforce Marketing Cloud. 

What is AMPScript? 

Before jumping right into a complex topic, Romanko set the stage with a quick introduction to AMPscript. “AMPscript is Marketing Cloud’s proprietary scripting language for advanced dynamic content in emails, landing pages, SMS, and push messages.”

“AMPscript expands Marketing Cloud functionality to help you create the one-to-one, personalized communications that are so coveted by digital marketers. https://trailhead.salesforce.com/content/learn/modules/ampscript-for-nondevelopers/get-to-know-ampscript

AMPscript is used to:

  • Personalize emails using subscriber or contact data.
  • Create complex, highly dynamic emails using conditional logic.
  • Clean and format data.
  • Add real-time information to emails such as date or time.
  • Track impressions.”

(source: https://trailhead.salesforce.com/content/learn/modules/ampscript-for-nondevelopers/get-to-know-ampscript

What is AMPScript used for in Marketing Cloud Engagement?

AMPScript does a lot. At Sercante, we use it to help our clients with personalizing their emails, creating dynamic content, and much more. What I liked about Romanko’s session is that she really honed in on three common use cases that every marketer can relate to. 

Personalization

If you’re a marketer, you already know the power of personalization. One study found that emails featuring personalized subjects are 50% more likely to be opened. AMPScript in Marketing Cloud Engagement allows you to use your subscriber data to personalize your marketing. 

Creating a personalized greeting in Marketing Cloud Engagement through a personalization string isn’t complicated. What I liked about Romanko’s use case is she focused on something I often times see clients overlook: what happens when you don’t have a subscriber’s first name? In this case, we could use AMPscript to set a generic value (Customer) as our greeting if we don’t have this data. 

Formatting Your Data

As a marketer, I’ve seen customers input their data in every way imaginable. Romanko gave the example of asking someone to provide their favorite color. In this instance, we could get a few different variations: 

  • Pink
  • pink
  • PINK

So what happens when we go to pull this data into an email? It could end up looking like we either don’t know our basic grammar, or come across like we are YELLING at our reader. 

Romanko highlighted AMPScript’s ProperCase function here, “which capitalizes the first letter in the specified string and any other letters in the string that follow any character other than a letter. It converts all other letters into lowercase.”

AMPScript Resources

As you can see, Romanko gave some great use cases for using AMPScript. She also provided her audience with some really great resources on where to go to learn more:

Soak in all the lessons learned at Florida Dreamin’

Be sure to check out these other posts from my fellow dragons who attended Florida Dreamin’ with me and shared details about their favorite sessions there.

No more posts to show