The Salesforce Summer ’24 release notes have arrived, and with them, the delivery of one of the most highly sought-after Marketing Cloud Account Engagement (MCAE/Pardot) features ever requested. In fact, sending operational emails in Engagement Studio functionality has garnered the fifth most points in the Account Engagement category on the IdeaExchange.
When an email is marked as “operational,” it bypasses the recipient’s opt-in status and will send the message even if the subscriber has opted out. You must only use operational emails for their intended purpose, as this can affect your sending reputation and put you on the wrong side of the CAN-SPAM Act.
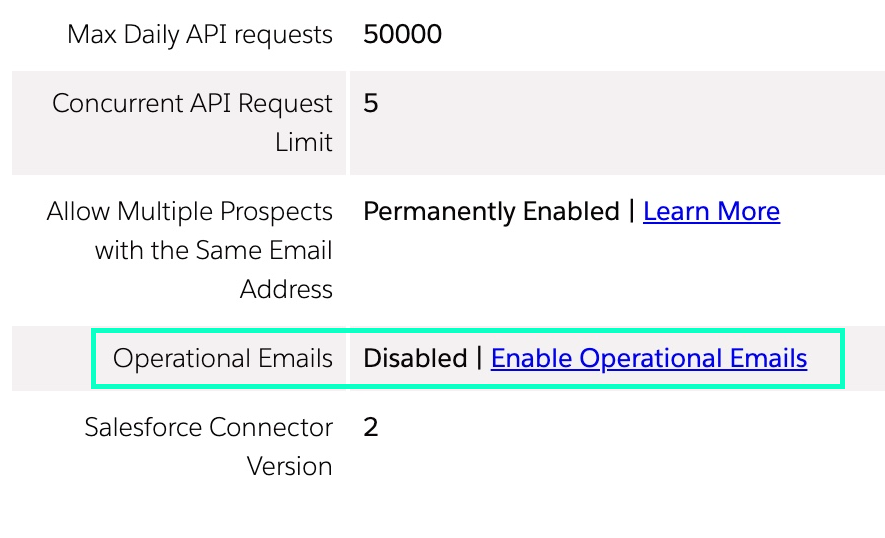
How Do I Enable Operational Emails in MCAE?
Navigate to Account Engagement Settings
Click Enable Operational Emails
Review the restrictions associated with sending operational emails and confirm your selection
Keep in mind that only Account Engagement Admin users and custom user roles can send operational emails.
Sending Operational Emails with Engagement Studio
Previously, operational emails could only be sent from list sends. This required selecting an audience, building email content, and manually sending at a single point in time. Now, users can send operational emails directly from Engagement Studio, where recipients are enrolled based on user-defined criteria and emails are automatically sent based on your parameters.
Let’s put this into practice. Imagine you are a SaaS company and need to deliver communications regarding your product’s planned system outages. Instead of setting up multiple operational list sends, you could create an Engagement Studio program to automate the outage and issue-resolved notifications to your selected audience.
Another example could be letting your customers know that their product’s license is about to expire. You could create an Engagement Studio program that could send notifications to let them renew their product on a more time-based cadence. Once the Engagement Studio is set and running, you do not need to reconfigure manual email list sends.
Other use cases could include:
Renewal or expiration reminders
Order updates
Event registration reminders
Internal employee onboarding
As with all effective communications, using operational emails in engagement studios will take planning. You will need content to create your emails, data to ensure that the right emails are being sent to the right person, and, most importantly, compliance with the Marketing Cloud Account Engagement Permission Based Marketing Policy.
If a program is running and the Operational Email setting is disabled, operational emails aren’t sent. Prospects skip those steps and proceed to the next one.
If a program with a Send Operational Email card is paused and the account setting is disabled. To restart the program, remove the steps or re-enable the Operational Email setting.
If a program with a Send Operational Email card isn’t running and the account setting is disabled, the program can’t be started or resumed. To start or resume the program, you must re-enable the setting or remove the step.
One Small Step for Email Marketing, One Giant Leap Forward for Efficiency
This is a huge improvement in saving marketers time and improving customers’ experiences with your brand. It ensures that customers can receive mission-critical information at the right time without having to manually and tediously configure the email sends.
How do you plan on using Engagement Studio to send operational emails? Let us know in the comments.
Engagement Studio Programs (ESPs) are key for nurturing prospects until they are ready to send over to your sales team. But have you ever thought about A/B testing in ESPs?
ESPs allow you to automatically send your cold prospects awareness content and consistently stay top of mind so they can gradually warm up to a sales-ready stage. Although ESPs can be used for everything from basic email sends to complex process automations, one feature it lacks is native functionality for A/B testing. The feature exists natively (and wonderfully) for list emails, but in the realm of automated emails and ESPs, this is something marketers are chomping at the bit for.
Let’s dig into some of the creative workarounds that make A/B testing possible in ESPs as well as the pros and cons of each option.
How does native A/B Testing work?
Within the native functionality of list emails, A/B testing is very user-friendly. You can:
Create and edit two versions of your email (Version A & B) via the WYSIWYG editor or by editing the HTML
Specify if the email versions should be measured by email opens or email clicks (we prefer clicks)
Determine the length of the A/B testing period (1 hour to 30 days)
Determine the percentage of your audience that is tested
Automating the A/B testing process
The beauty of A/B testing with list emails is that so much of the process is automated.
Once the criteria have been set, Account Engagement automatically and randomly splits the test recipients from the intended recipient lists, sends the email variations to the test group, and, once a winner has been selected, automatically sends the winning version of the email to the remaining recipients on the list.
This native functionality allows marketers to fine-tune their marketing content by testing which subject lines, CTAs, and even images best resonate with their target audience.
A/B Testing in an ESP
To A/B Test in an ESP, you have a few options:
Split your recipient list before starting the ESP
Split recipients by last name
Split recipient by a random number from Salesforce
Split recipient lists using Prospect Updater
Using Native Split List Functionality
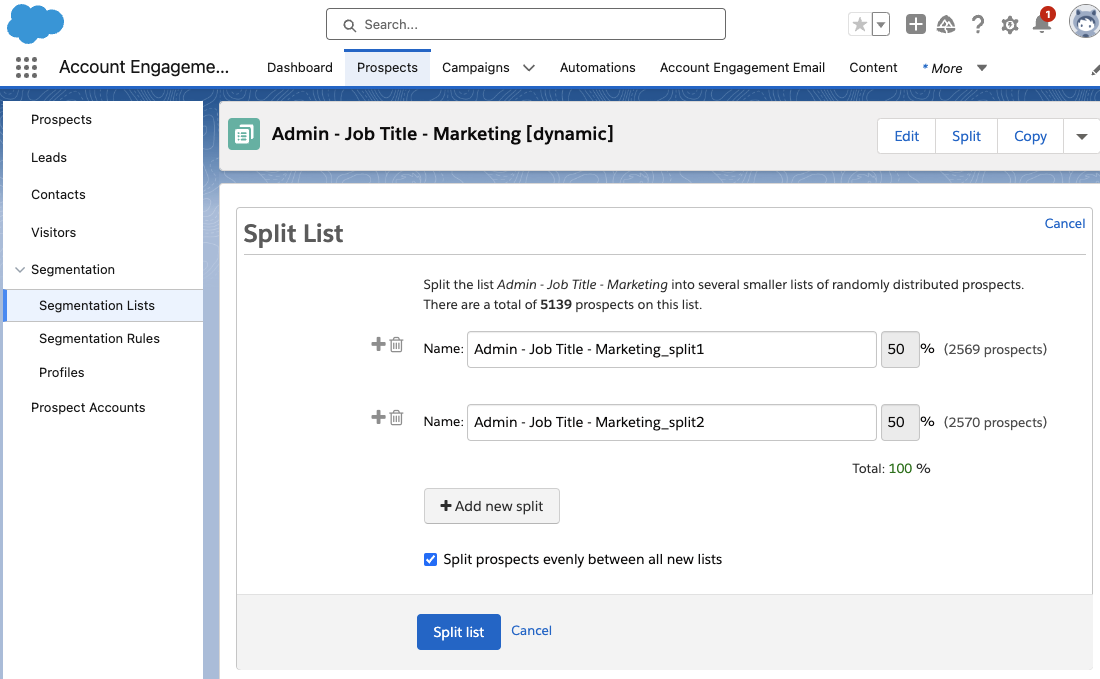
All Account Engagement Static and Dynamic lists can be split into smaller lists. While viewing your list, the split option will be available in the top right-hand corner. This allows you to split lists evenly, or specify the percentage on each list.
It’s important to remember that when splitting a dynamic list, the resulting lists will be static.
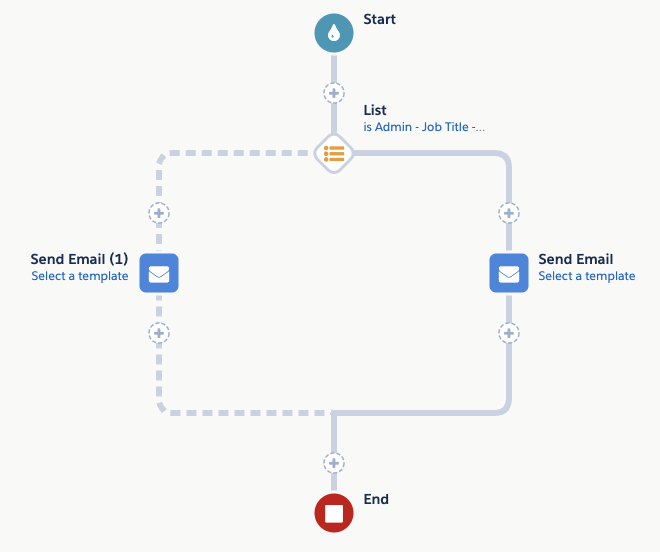
When using this option in an ESP, add an Action node before your email send that checks if the recipient is on split list 1. If they are a member of this list, they receive version A of your email. If they are not, they receive version B.
This option works best when your ESP has a static recipient list that you are not adding to later, for example, an event follow-up nurture. If you intend on gradually adding more prospects to this ESP, there isn’t a way to easily and automatically split the new prospects between the two lists.
Splitting by Last Name
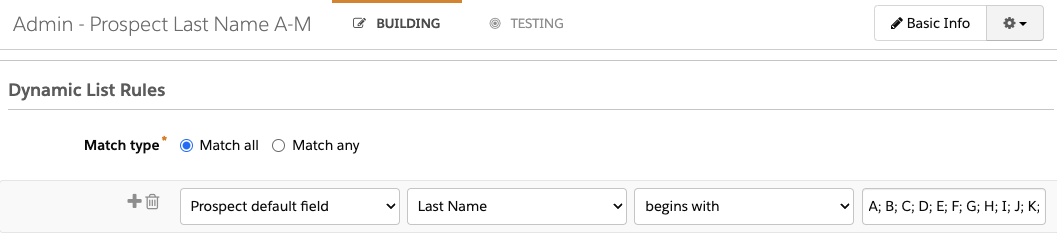
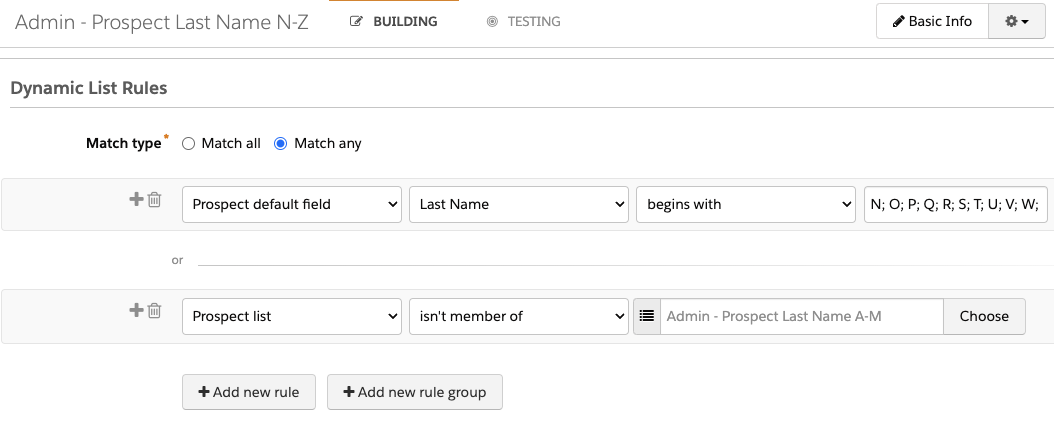
Another strategy is to split the recipients by last name. This allows you to split recipients with dynamic lists so you can continually add new recipients to the ESP. To do so, you’ll need two dynamic lists.
Your first list will capture prospects with last names starting with A-M:
Your second list will capture any prospects with last names beginning with N-Z, as well as any prospects with last names that start with characters, non-English letters, or numbers.
Finally, use these lists to split ESP recipients between your email variations.
Things to keep in mind
The drawback to this solution is that splitting by last name is not likely to evenly split your recipients. S, B, H, M, and C are the most common initials for last names, so if you split your recipients by “last name begins with A-M” and “last name begins with N-Z”, the “A-M” list is likely to be larger and can skew your data.
Generate a Random Number in Salesforce
Another strategy for randomly splitting your recipient list is by using Salesforce’s Auto Number functionality. This allows you to auto-generate a random number for each Lead or Contact and push this data down to Account Engagement.
In Salesforce Setup, select Object Manager then Lead
Select Fields & Relationships
Select New
Select Auto Number then Next
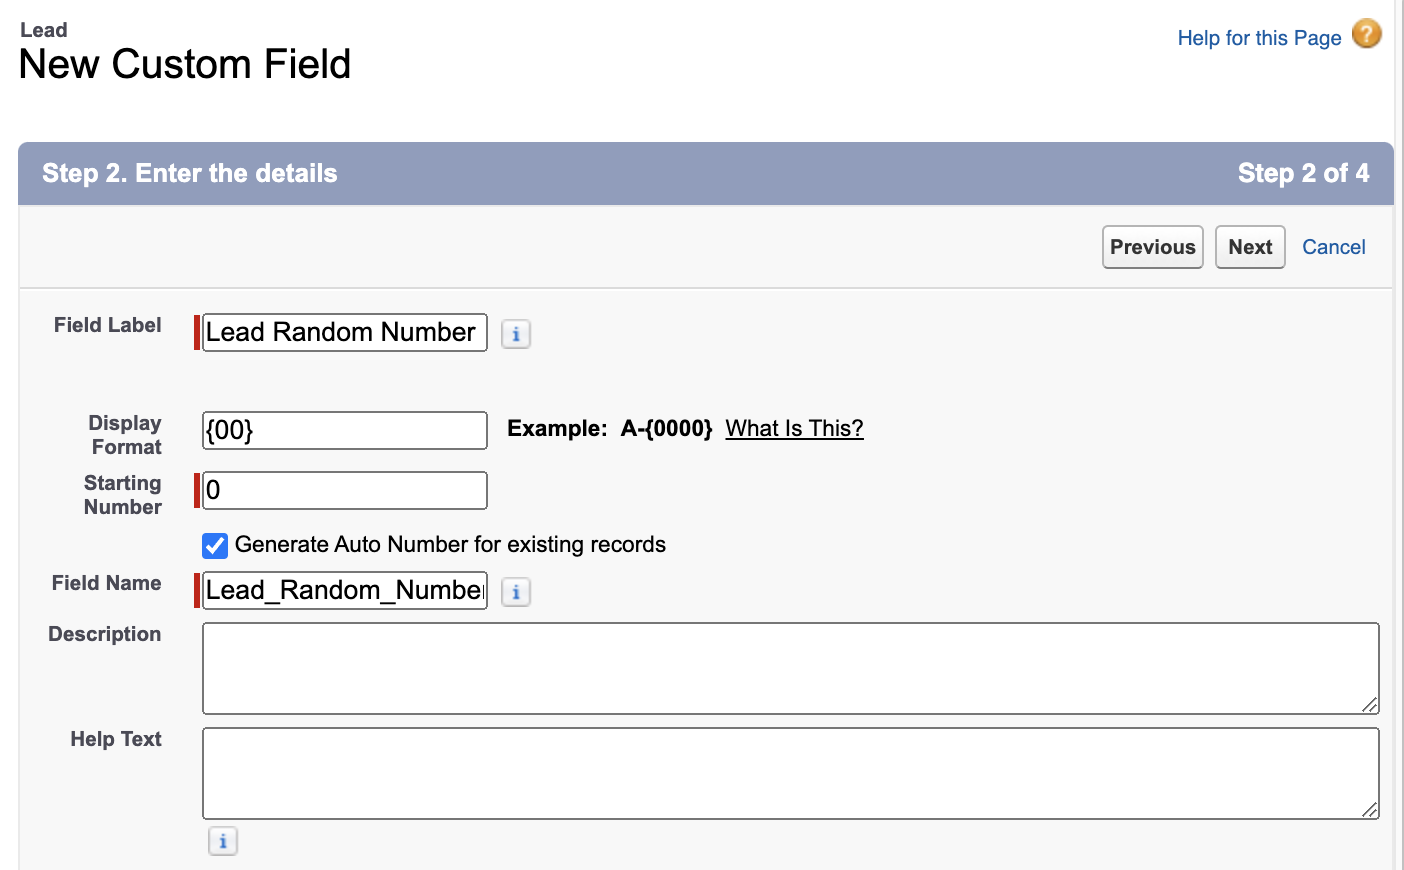
Enter the following details
Field Label: Lead Random Number
Display Format: {00}
Starting Number: 0
Generate Auto Number for existing records: Selected
Select Next
Select which profiles have access to view this field.
Select Next
Select any Lead pages where this field should appear. I recommend leaving this field off your page layouts. Select Save.
Next, create a Formula field. While still in the Fields & Relationships tab of the Lead object, select New
Select Formula, then Next
Enter the following details
Field Label: Email Random Number
Formula Return Type: Number
Options – Decimal Places: 0
Select Next
Enter the formula MOD(VALUE({! Lead_Random_Number__c}) ,9)
Select Next
Select which profiles have access to view this field. Ensure the B2BMA Integration User profile, or your connector user’s profile, has access so Account Engagement can map to this field.
Select Next
Select any Lead pages where this field should appear. I recommend leaving this field off your page layouts. Select Save.
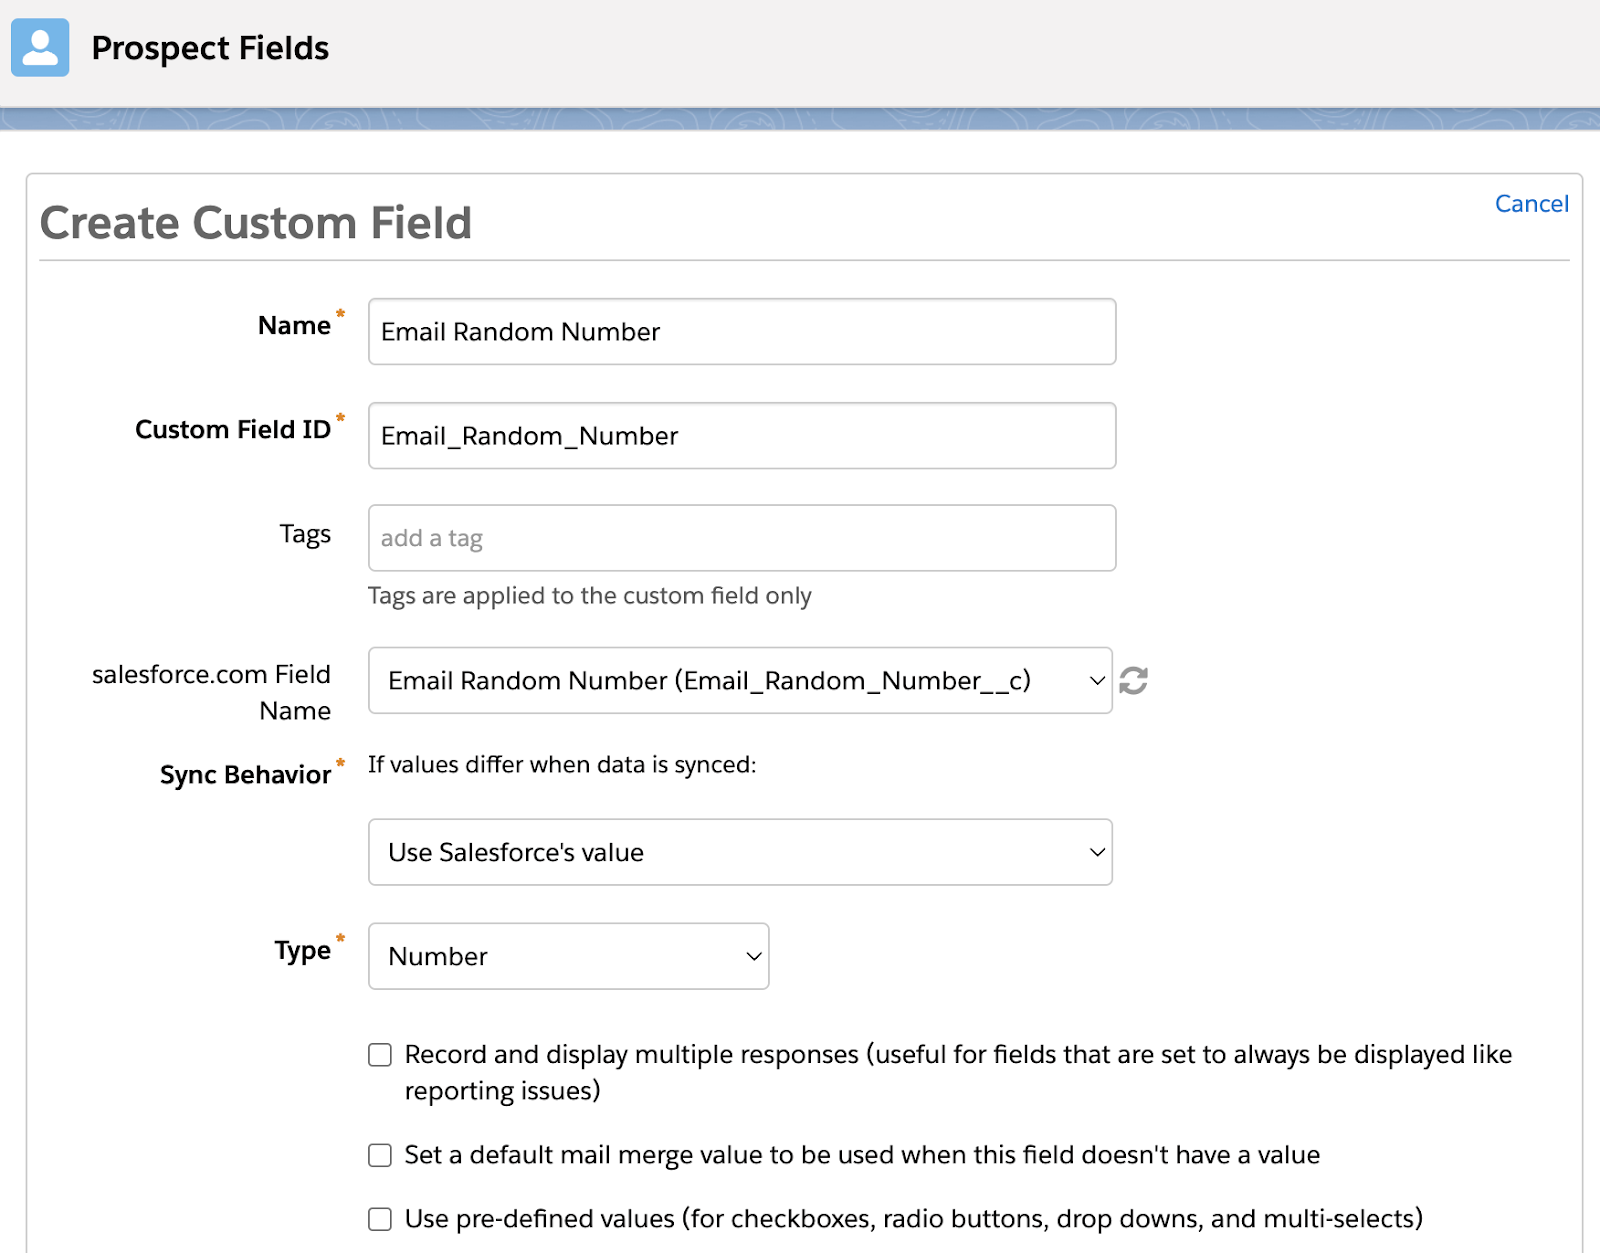
This formula field will auto-generate a random number between 1-9 for each Lead. Optionally, repeat the steps above for the Contact object. Finally, map the “Email Random Number” field to Account Engagement so this new field can be used to randomly split ESP recipients for an A/B Test.
Now, the only downside of this approach is that all your Account Engagement prospects must be synced to Salesforce before they will get an Email Random Number value. If you regularly nurture prospects in Account Engagement before syncing them over to Salesforce, you could use a combination of the Random Number and Last Name methods, or you can move to our last option.
Use Prospect Updater
Sercante’s Prospect Updater is a Swiss army knife for advanced data updates, cleansing, and manipulation within Account Engagement. This solution allows you to work with your prospect data in more streamlined ways and enables you to create a truly random recipient list split without your data being in Salesforce.
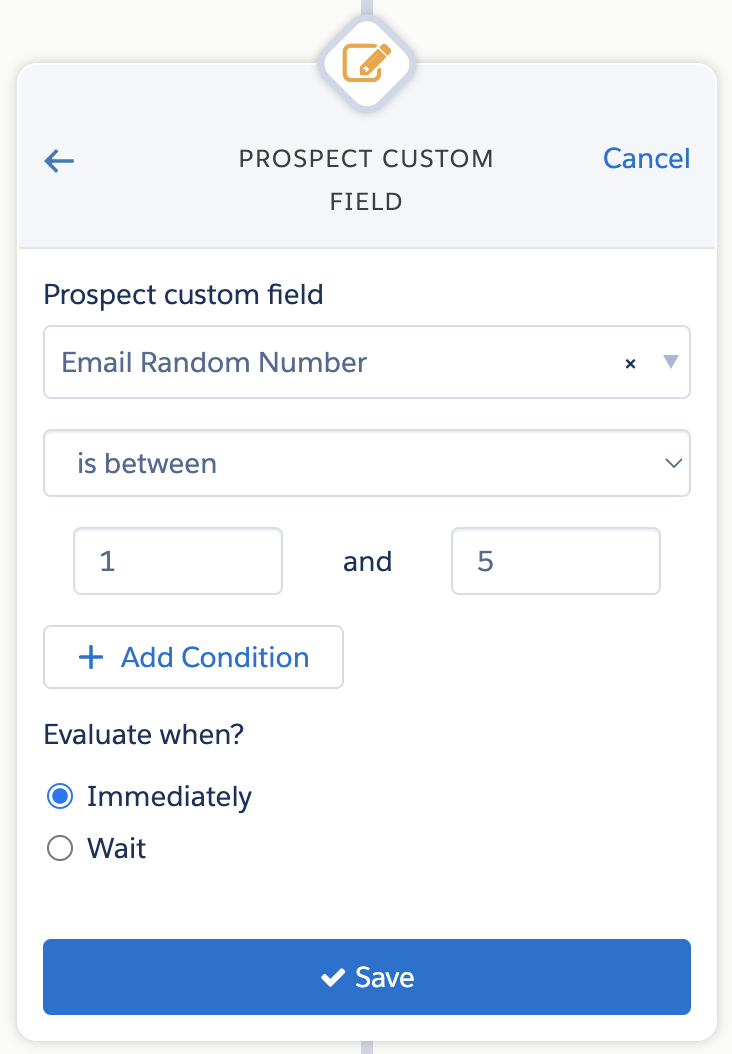
With Prospect Updater, you can use a RANDBETWEEN function to auto-generate a random number and stamp the number on new prospect records within minutes of them being added to Account Engagement. Then, use an Action node in an ESP to split your prospects into your A/B test groups.
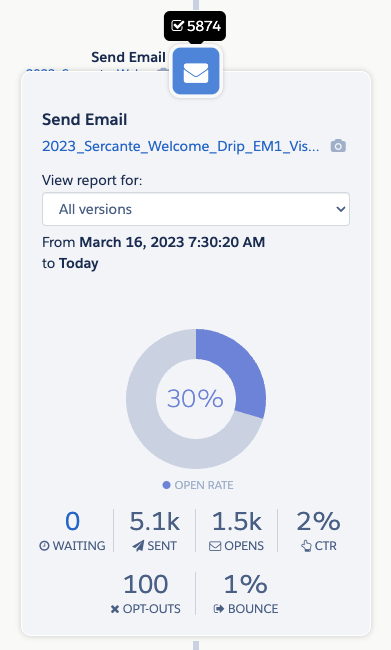
After you’ve selected your method of A/B testing and let your ESP run, it’s time to choose a winner and, optionally, consolidate your ESP down to 1 email version. The best way to compare the data between your A and B email versions is by using the ESP reporting tooltips. While on the Reporting tab of your ESP, select the email send node to view the metrics for that particular send.
The tooltips allow you to easily view the number of sends and opens as well as your click-through rate. If you want to dive deeper into each template’s metrics, select the name of the template from within the tooltip view to open the full email template report.
Start A/B testing in Engagement Studio Programs
It’s clear that Engagement Studio Programs (ESPs) are the backbone of effective prospect nurturing, guiding them along the journey until they’re ripe for the sales pitch.
So, let’s embrace the challenge, get creative, and make the most of our ESPs. With a bit of ingenuity and a keen eye on the metrics, we can craft killer campaigns that resonate with our audience and drive those all-important conversions. Here’s to pushing the boundaries and unleashing the full potential of our ESPs.
Remember, you can always reach out to the team at Sercante for help setting up your Account Engagement (Pardot) Engagement Studio Programs and configuring your A/B tests within them.
For Account Engagement users, the most exciting feature coming with the Salesforce Winter ‘24 release is the ability to get more precise with wait steps in Engagement Studio Programs. Gone are the days waiting a full day to trigger an action, we can now set wait steps anywhere from 2-8 hours. This provides more flexibility with our programs and what we are able to do.
How do we get started with shorter wait steps in Engagement Studio?
In Engagement Studio, we’ve always had the ability to add wait steps. We were able to do this in day long increments after an event took place. We’ve used these for things like, sending follow up emails after a form fill, or sending an additional email days after an initial send.
Sometimes, a day seemed like too long of a wait, but that was all we had to work with.
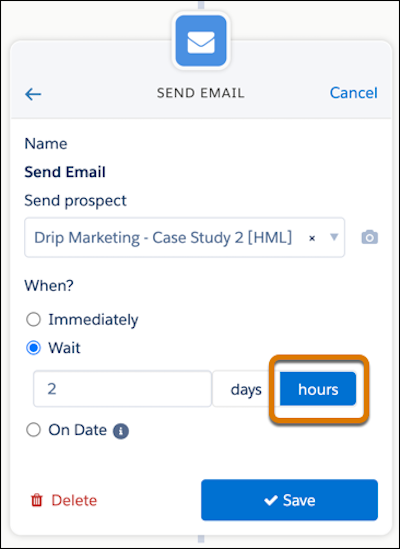
Now, we can use these new hour increments. When adding an action to an Engagement Studio Program, click “wait”, then toggle to “hours” and set the desired amount of hours. That’s it!
When you should use hour wait steps…
Wondering how you can make the most of this feature? We’ve compiled a list of scenarios that we think would be best suited for a short, hours-long wait period.
Welcome Programs
Prospects signed up for your mailing list or were imported? Add an hour wait step to send that first welcome email instead of waiting days.
Post Form Follow Up Emails from Sales Team Members
If your follow up emails are sent immediately, prospects know it’s automated, and waiting days to follow up can lead you to miss out on an opportunity. With a wait step of just a couple hours, it gives your prospects time to finish looking at your website, gives your internal assignment processes time to complete, and feels more personal than an automated reply.
System Processing Time For List Evaluation
When using automations that evaluate which lists a prospect is on, a two hour wait step will ensure your dynamic lists have time to run and prospects newly added to the list are included.
Custom Redirect/ Page Action Follow Ups
Set up custom redirects or page actions on high priority pages and have them funnel leads into an Engagement Studio Program. From there, suggest the next step a prospect should take or the next piece of content the prospect might be interested in a few hours after they have left your website.
Time to get started with shorter wait times in Engagement Studio
This feature is one that hundreds of trailblazers have been asking for because it can be so useful in customizing programs. Once it becomes available, we recommend revisiting your existing engagement studio programs and seeing if this would be a better fit for some of the current day long wait steps you are currently using.
Being able to take action in hours, rather than days can really help personalize the experience you give to prospects.
One of the most highlighted and versatile Pardot features is the Engagement Studio program.
Plain and simple it is the most flexible feature Pardot has when it comes to building strong workflows, email sequences, and even taking your Pardot (and Salesforce) operational game to the next level. This is without a doubt my favorite platform feature. (more…)
When people ask me why I want to work in the Salesforce and Pardot ecosystem, my answer is always the same — automation! Workflows! Personalization! (And usually with that many exclamation marks.)
Engagement Studio is one of the best things to happen to the Pardot platform since I’ve been a customer. But it’s a bit nuanced… and without paying attention to the details, there are a few “gotchas” that can trip you up. (more…)