Category

Jenna Molby

The 3rd and final part of the form customization series is finally here! In part 1, I showed you how to implement the popular floating label technique and how to create searchable, user-friendly dropdowns. In part 2, I showed you how to create a conversational, paragraph-style form and how to create a form on a single line. In this post, I will show you how to add images to your checkbox and radio buttons.

Checkboxes with images

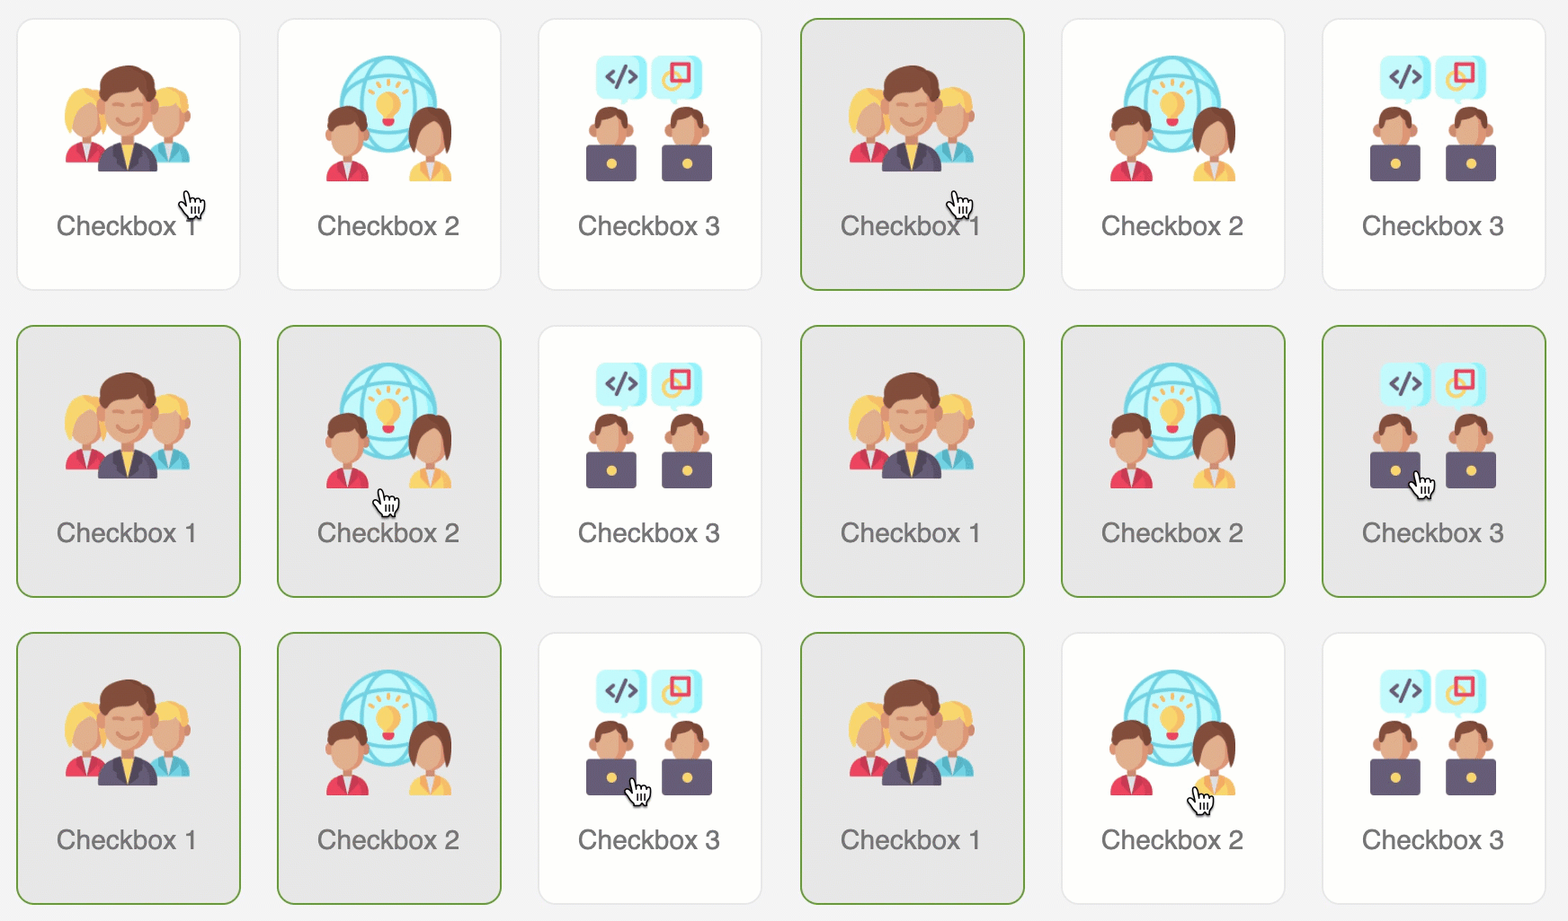
The concept is to hide the default checkboxes and replace them with images. When one of the images is selected, the border and background color of the box will change to let the prospect know the option was selected.
Step 1: Add the images and text to your form

The first step is to add the text and images to the checkboxes within your form. To do this, go to the fields tab of your form and edit or add the checkboxes field. Click on the values tab and add the values. The text in the first box is the text that will be stored in Pardot. The second box is the display text aka the text the prospect will see when completing the form. This is where you would add the images for each option.
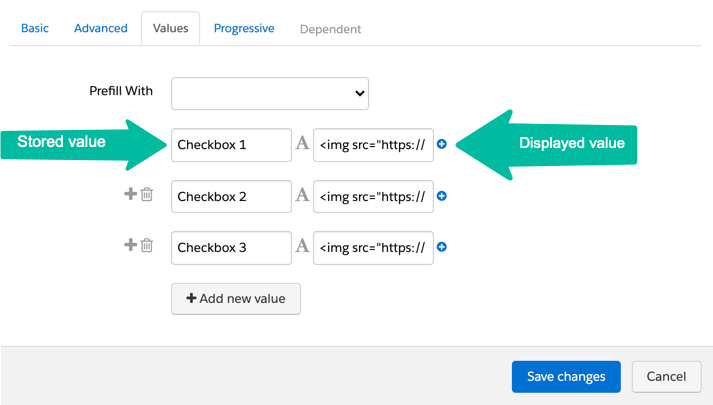
The value should look like this:

<img src="YOUR-IMAGE-URL" width="70" /> <span>Checkbox 1</span>

Add your image URL, set the image width (optional) and add your text (wrapped in a SPAN tag).

Here’s what my form looks like once I added the images to the checkboxes.
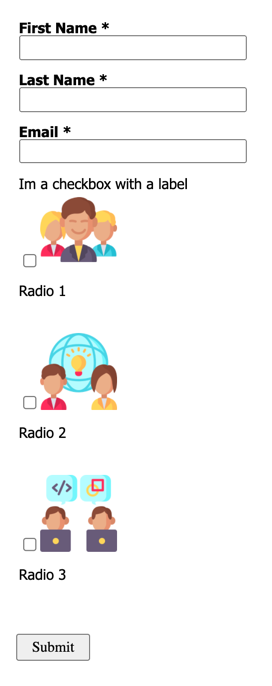
Now, let’s add some CSS to make it look better…

Step 2: Add the CSS

Add this CSS to style the checkboxes.

/* --- customize the checkboxes --- */
/* Put the checkbox text on one line */
#pardot-form .pd-checkbox label span  {
    display:block;
    float:none;
    padding-top:10px;
}
/* align the new checkboxes */
#pardot-form .pd-checkbox span.value {
  display:flex;
  width:100%;
  gap: 10px;
}
#pardot-form .pd-checkbox span.value span {
  flex-grow: 1;
  flex-basis: 0;
}
/* style the new checkboxes */
#pardot-form .pd-checkbox label.inline  {
    margin-top:5px;
    background-color:#FFF;
    display:flex;
    flex-direction:column;
    border:solid 1px #e8e8e8;
    padding:20px;
    text-align:center;
    -moz-border-radius:10px;
    -webkit-border-radius:10px;
    border-radius:10px;
    align-items:center;
    cursor:pointer;
}
/* hide the default checkbox */
#pardot-form .pd-checkbox input {
    display:none;
}
/* style the checkboxes when selected */
#pardot-form .pd-checkbox input:checked+label {
	background-color:#e8e8e8;
	border:solid 1px #539c18;
}

Note: I only have ONE checkbox in my form, but if you have MULTIPLE checkboxes in your form this will style all of them. To style only ONE checkbox, replace .pd-checkbox within the CSS to .YOURFIELDNAME

See it in action

Here’s what my example looks like in action.

Radio buttons with images

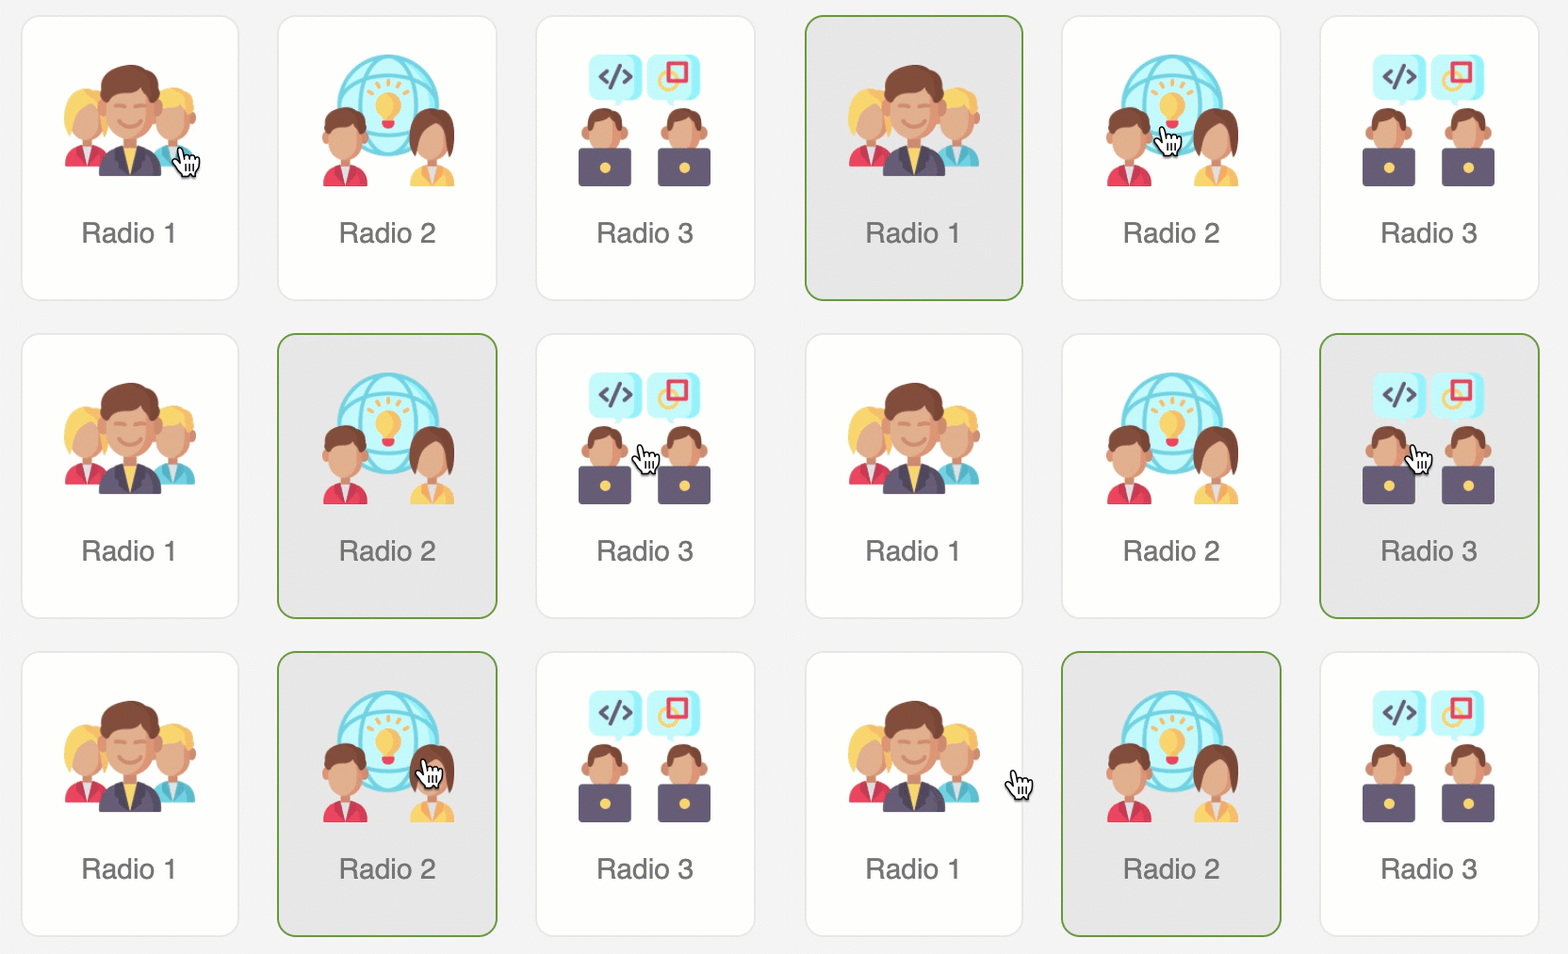
The concept is the same as the checkboxes example. We’re going to hide the default radio buttons and replace them with images. When one of the images is selected, the border and background color of the box will change to let the prospect know the option was selected.
Step 1: Add the images and text to your form

The first step is to add the text and images to the radio buttons within your form. To do this, go to the fields tab of your form and edit or add the radio field. Click on the values tab and add the values. The text in the first box is the text that will be stored in Pardot. The second box is the display text aka the text the prospect will see when completing the form. This is where you would add the images for each option. The value should look like this:

The value should look like this:

<img src="YOUR-IMAGE-URL" width="70" /> <span>Radio 1</span>

Add your image URL, set the image width (optional) and add your text (wrapped in a SPAN tag).

Here’s what my form looks like once I added the images to the radio buttons.
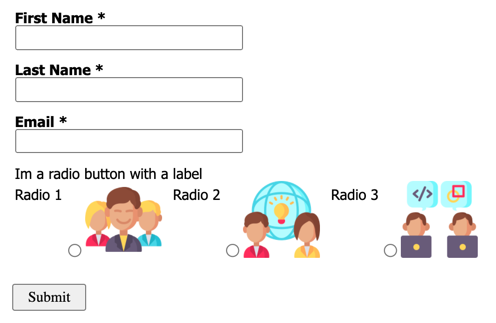
Step 2: Add the CSS

Add this CSS to style the radio buttons.

/* --- customize the radio buttons --- */
/* Put the radio button text on one line */
#pardot-form .pd-radio label span  {
    display:block;
    float:none;
    padding-top:10px;
}
/* align the new radio buttons */
#pardot-form .pd-radio span.value {
  display:flex;
  width:100%;
  gap: 10px;
}
#pardot-form .pd-radio span.value span {
  flex-grow: 1;
  flex-basis: 0;
}
/* style the new radio button */
#pardot-form .pd-radio label.inline  {
    margin-top:5px;
    background-color:#FFF;
    display:flex;
    flex-direction:column;
    border:solid 1px #e8e8e8;
    padding:20px;
    text-align:center;
    -moz-border-radius:10px;
    -webkit-border-radius:10px;
    border-radius:10px;
    align-items:center;
    cursor:pointer;
}
/* hide the default radio button */
#pardot-form .pd-radio input {
    display:none;
}
/* style the radio button when selected */
#pardot-form .pd-radio input:checked+label {
	background-color:#e8e8e8;
	border:solid 1px #539c18;
}

Note: I only have ONE radio field in my form, but if you have MULTIPLE radio fields in your form this will style all of them. To style only ONE radio field, replace .pd-radio within the CSS to .YOURFIELDNAME

See it in action

Here’s what my example looks like in action.

Questions?

Send me a tweet @jennamolby, or contact the Sercante team for help.

Establishing a connection between leads and accounts can give you insight into what customers are coming in as leads and tighten sales and marketing alignment. Salesforce Flow can be used to automatically match leads to existing accounts based on different criteria. In this post, I’ll show you how to match leads to accounts based on domain a well as company/account name.

Note: This is a follow up post to ‘How to Set Up Lead-to-Account Matching in Salesforce Using Process Builder and Flow’.

There have been new features and capabilities added to Salesforce Flow since the original post was published on May 26, 2020. You can now achieve lead to account matching in Salesforce using Flow only.

The lead to account matching process

The goal is to populate a related list on the accounts with the matched leads.

populate a related list on the accounts with the matched leads

The matched account will also be shown as a lookup field on the lead.

The matched account will also be shown as a lookup field on the lead.

Here’s a high-level look at what needs to happen to setup lead to account matching:

  1. Lead is matched to an account based on email domain.
  2. If the lead email domain does not match an account email domain, the match will be based on lead company = account name.
  3. A Flow is used to identify the matched leads and update them accordingly.

Create lead fields

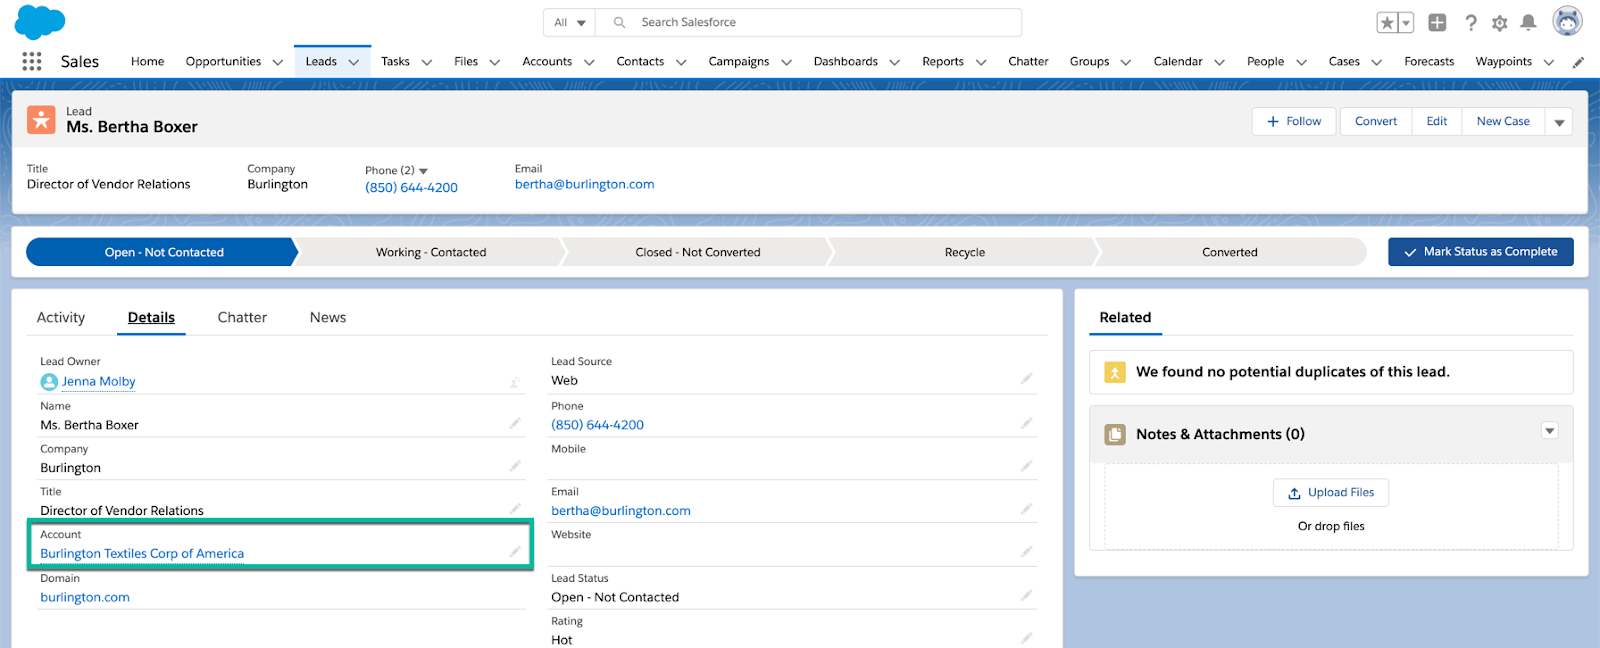
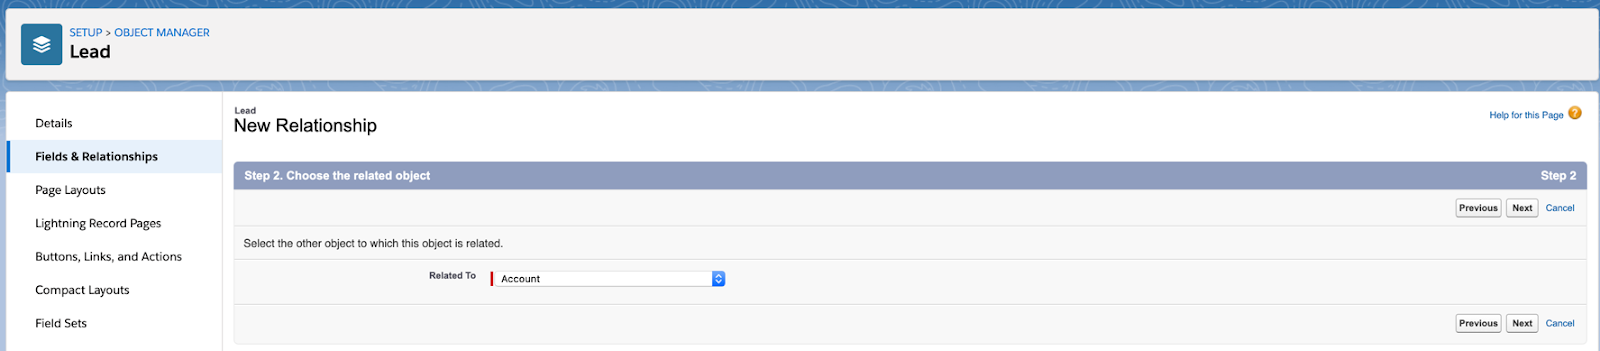
Create a new lookup field on the lead to the account called “Account”.

Create lead fields
Create lead fields

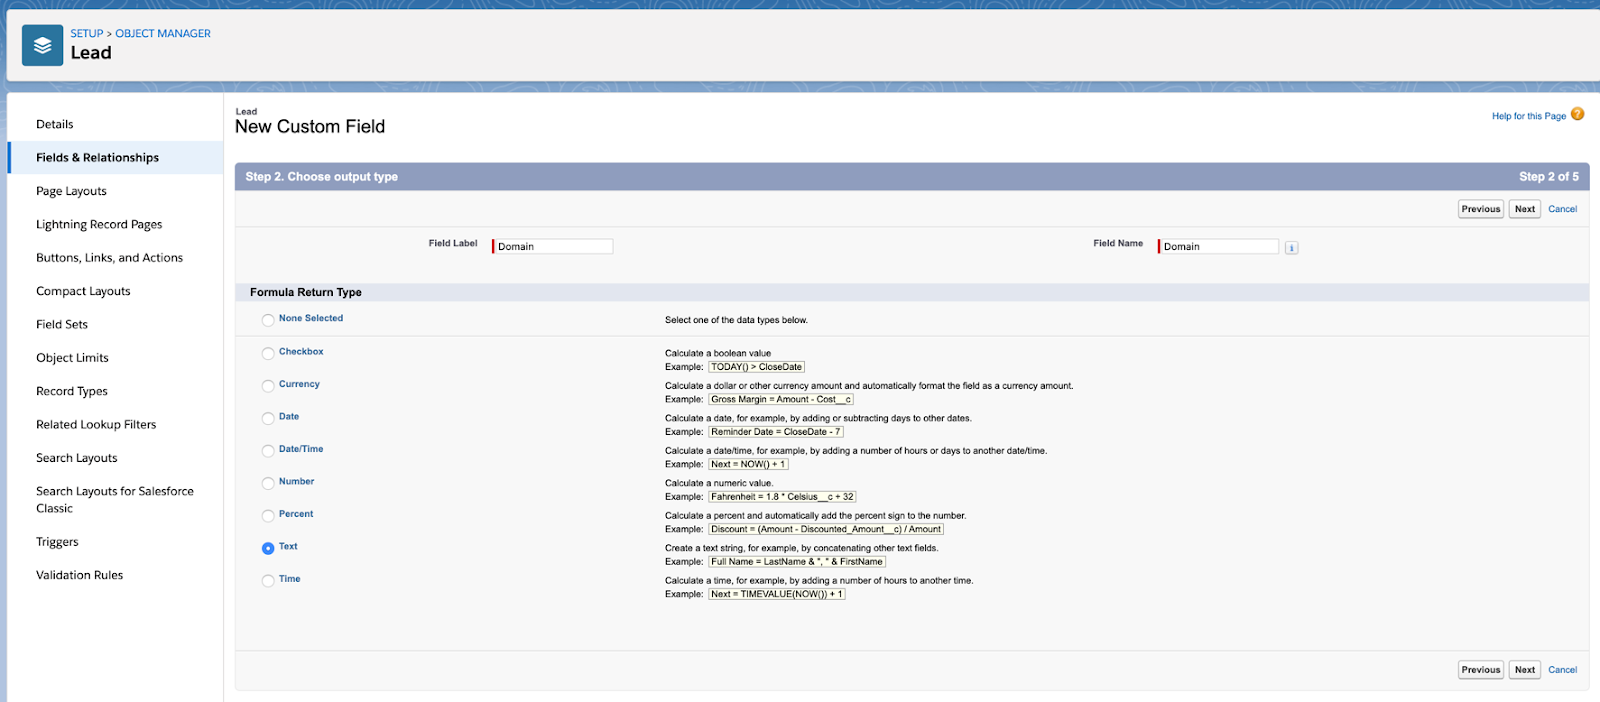
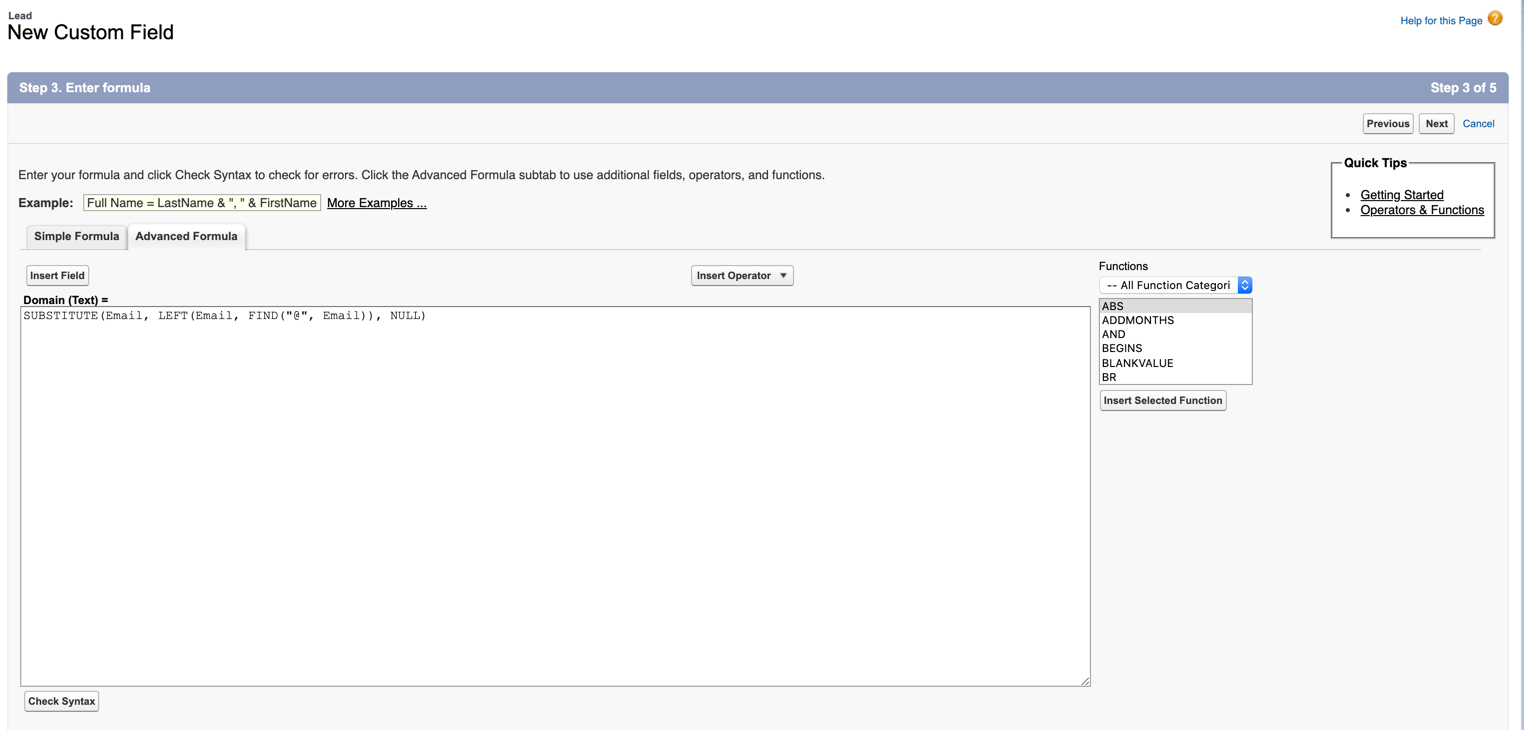
Create a new formula field on the lead called “domain”, using the following formula:

SUBSTITUTE(Email, LEFT(Email, FIND("@", Email)), NULL)

Create a new formula field

Create account field

Create a text field on the account called “domain”. This is the field we will use to match the account domain to the lead domain. You will need to populate the account with the domain. This tutorial will not cover how to populate the domain on the account level.

Create the flow

Navigate to Setup > Process Automation > Flows and select new flow. Select Record-Triggered Flow from the wizard.

Create new Record-Triggered Flow

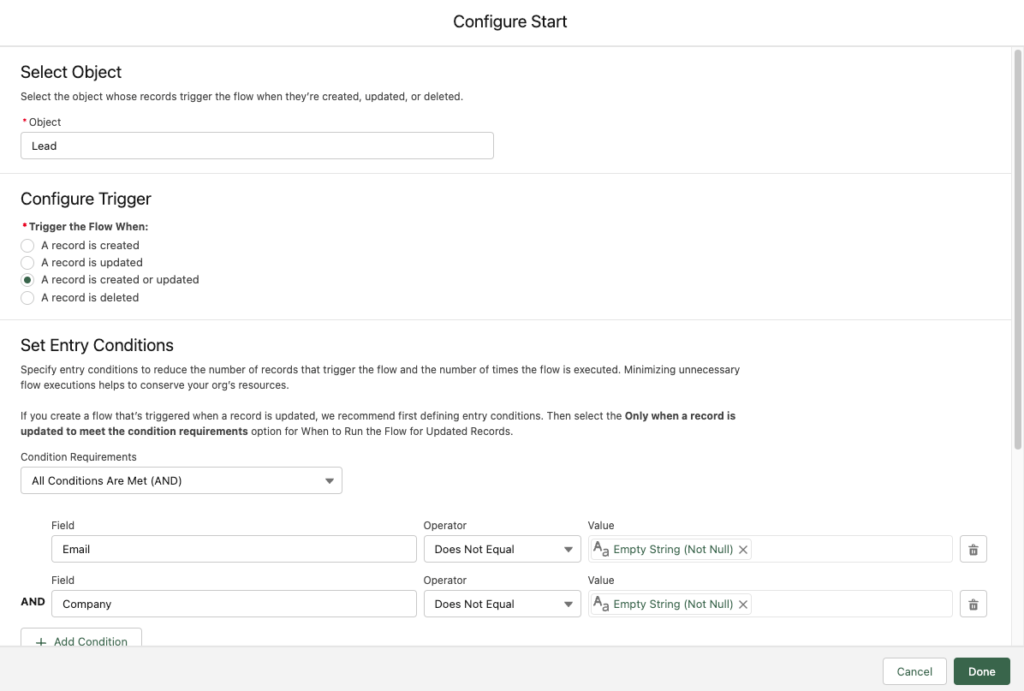
Configure Start

Configure the start conditions to occur when a record is created or updated and optimize the flow for Actions and Related Records.

Set the trigger to run on the lead object if email is not empty or if company name is not empty.

Create variables

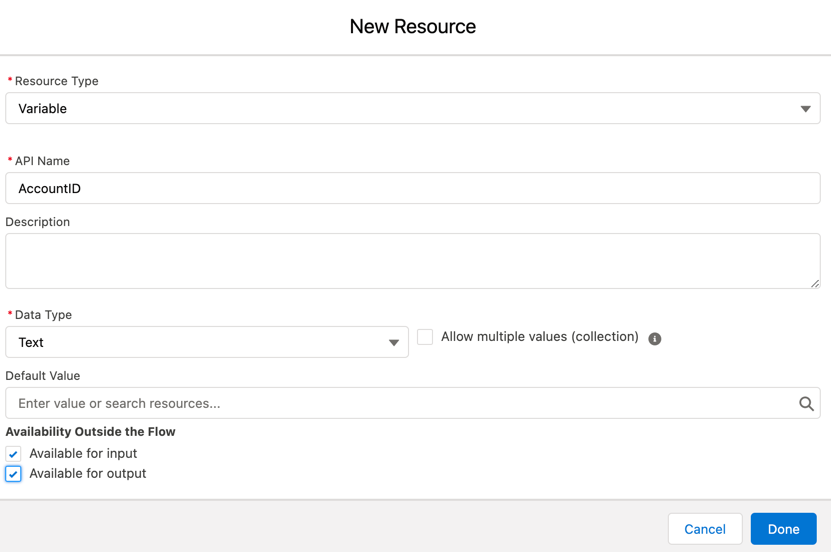
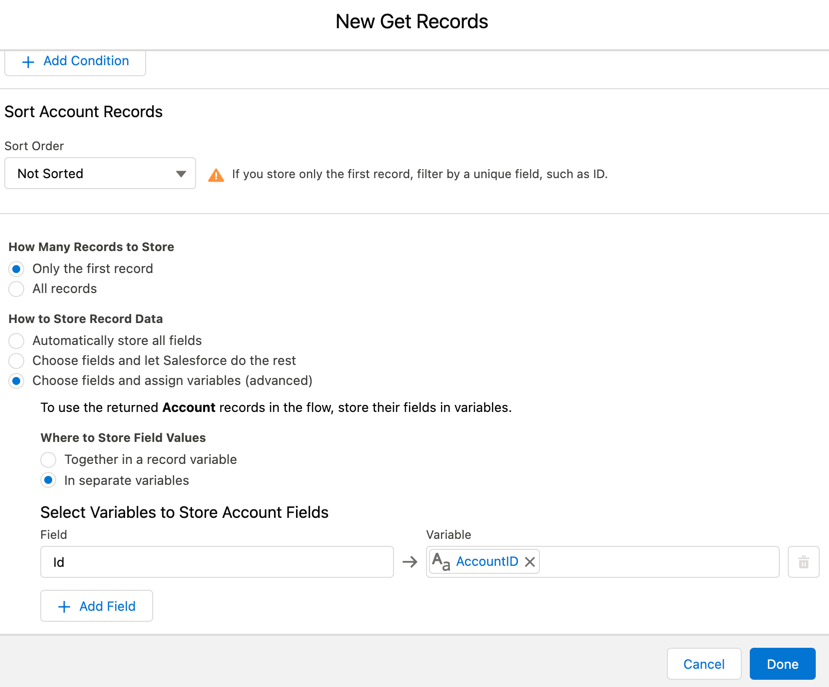
Create a variable called AccountId

Create new variables

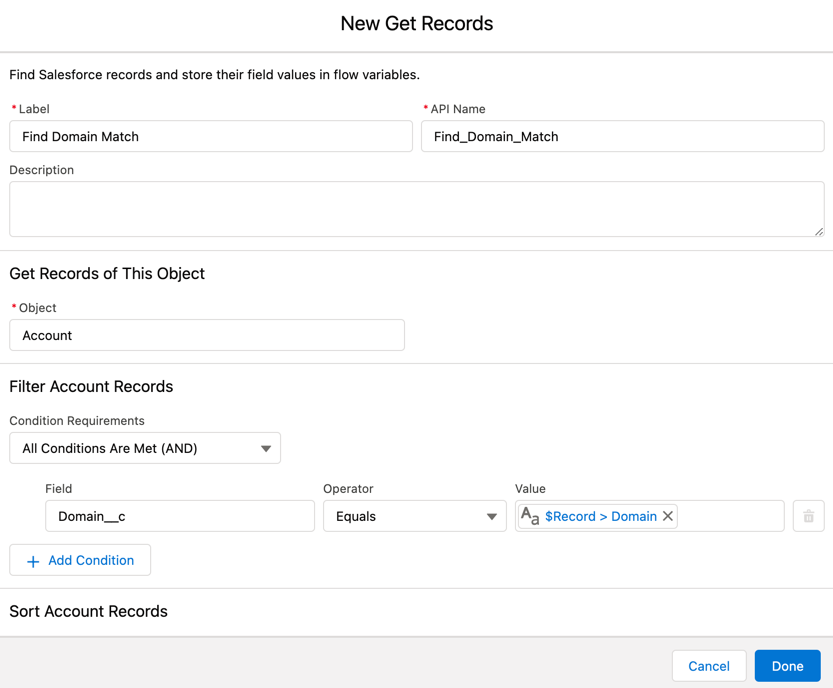
Add a Get Records element to the flow

Drag and drop a Get Records element to the page. This element will look for a domain match based on the domain on the account and the domain on the lead.

Add a Get Records element to the flow

Connect the start of the flow to the new element.

Connect the start of the flow to the new element.

Add a Decision element to the flow

Drag and drop a decision element on to the page. This will check to see if there is a domain match or not.

Drag and drop a decision element on to the page

The default outcome should just be left empty.

Save and connect the get records element to the decision element.

Save and connect the get records element to the decision element.

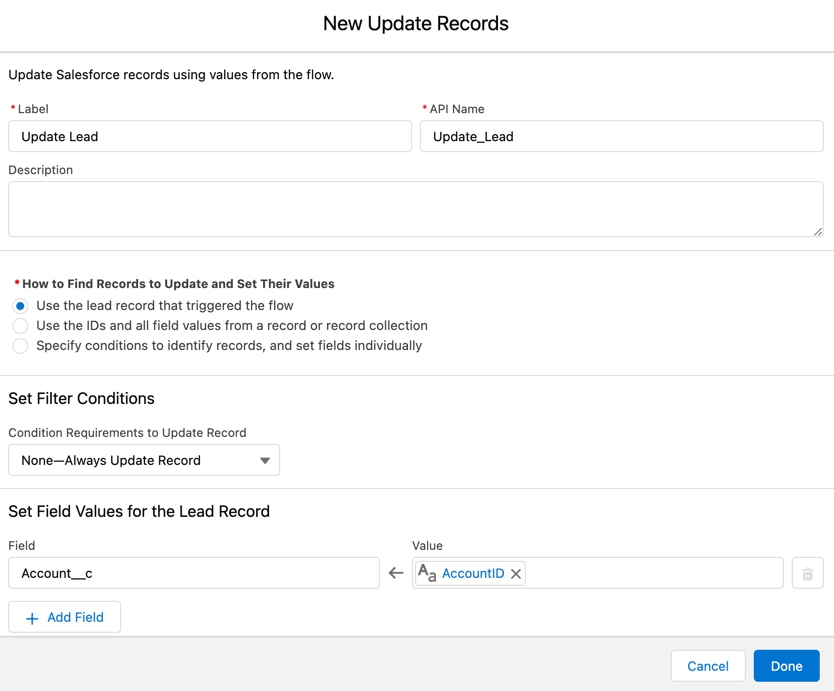
Add a Update Records element to the flow

Now add an update records element to the flow. This will update the matched Account lookup on the lead if there is a domain match.

Add a Update Records element to the flow

Add a Get Records element to the flow

Next, add another get records element to the flow to check to see if there is a company/account match.

add another get records element to the flow

Save and connect the element to the decision element (default outcome).

Save and connect the element to the decision element (default outcome)

Add an update records element to the flow

Lastly, add another update records element to the flow to update the account lookup on the lead if there is a company name -> account name match.

add another update records element to the flow to update the account lookup on the lead

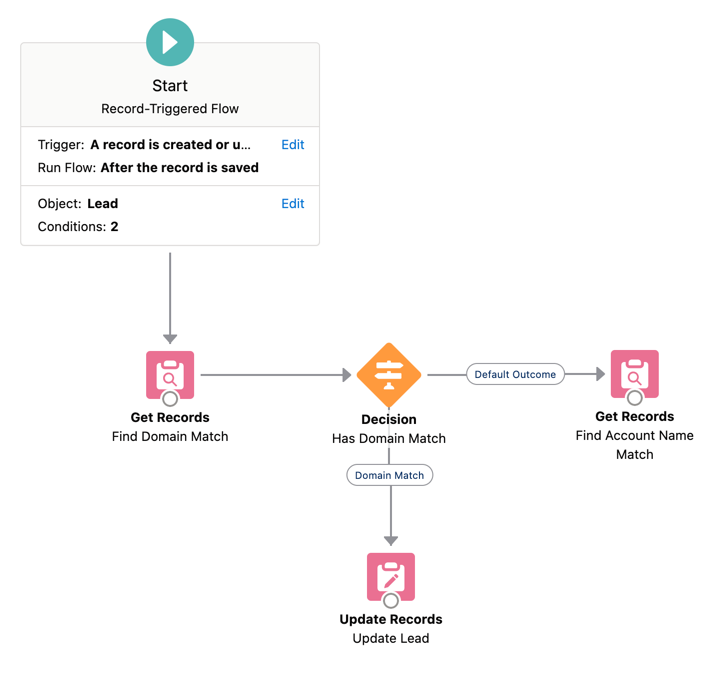
Save and connect the last element to the flow. Your final flow should look something like this:

Save and connect the last element to the flow

Activate the flow

Save and activate your flow!

Test, test, test

Make sure you test! Here is what my testing process looks like:

  • Make sure all the new fields are added to the page layout (at least for now)
  • Find an account to use to test (ex. Burlington Textiles Corp of America)
  • Populate the domain field on the account (ex. burlington.com)
  • Create a new lead using that domain as part the email address (ex. [email protected])
  • Ensure the domain field on the lead is populated with the correct domain from the email address you entered (ex. burlington.com)
  • Look at the lead to see if the account lookup is populated with the correct account
  • Look at the account to ensure the lead is populating in the related list
  • Create a new lead where the company name = the account name from your test account (ex. Burlington Textiles Corp of America). The email address for the lead should use a invalid domain name (ex. [email protected])
  • Look at the lead to see if the account lookup is populated with the correct account
  • Look at the account to ensure the lead is populating in the related list

If you have it set up so your process will run when a lead is created and updated, repeat the steps to test an updated lead. You will also want to test different lead scenarios based on the filters you specified in your process builder. For example, if you have a filter to exclude all @gmail.com email addresses, try updating or creating a lead with an @gmail.com email address to ensure the lead updates as expected.

Questions?

Send me a tweet @jennamolby, or contact the Sercante team for help.

This post was originally published on February 2, 2021. After this post was published, Salesforce released the ability to check if a field has been changed. Previously, the solution to capture every UTM touchpoint in Salesforce was to clear out the UTM field values after the flow ran. The new solution is to use the is changed feature instead of clearing out field values.

Refreshed and republished on September 10, 2021

The Concept

If a lead or a contact’s fields for UTM Source, UTM Medium and UTM Campaign have a value, run a Salesforce Flow to create a record in a custom object. The process will run again whenever the UTM information is updated.

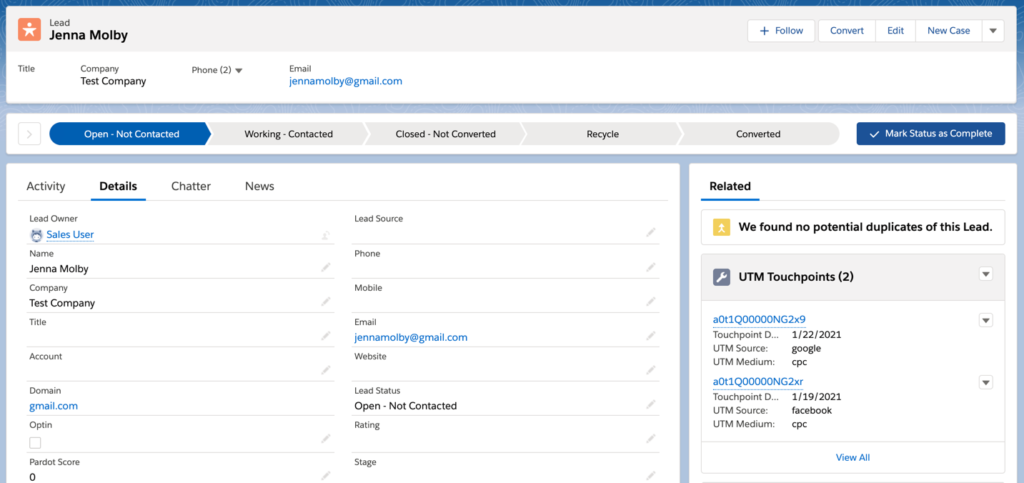
UTM touchpoints displayed on the lead layout

UTM touchpoints displayed on the lead layout

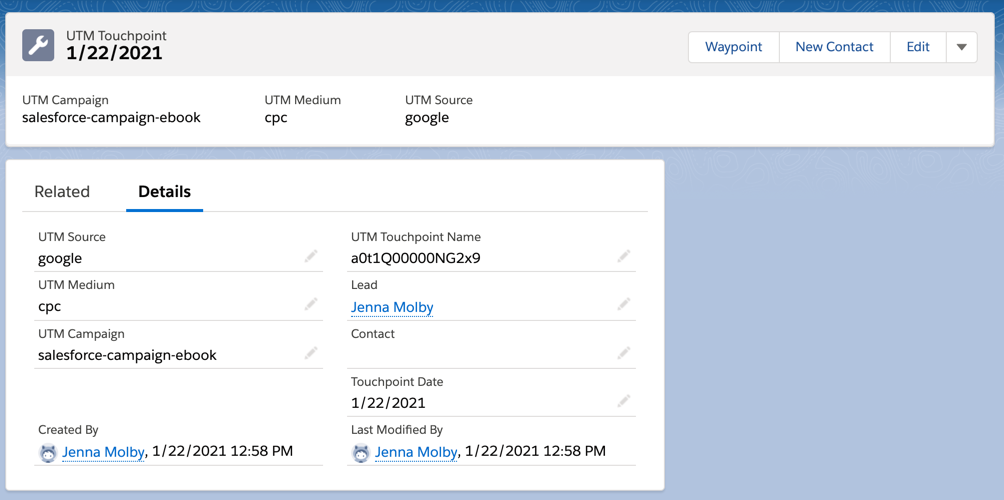
Record detail page for a UTM touchpoint

Record detail page for a UTM touchpoint

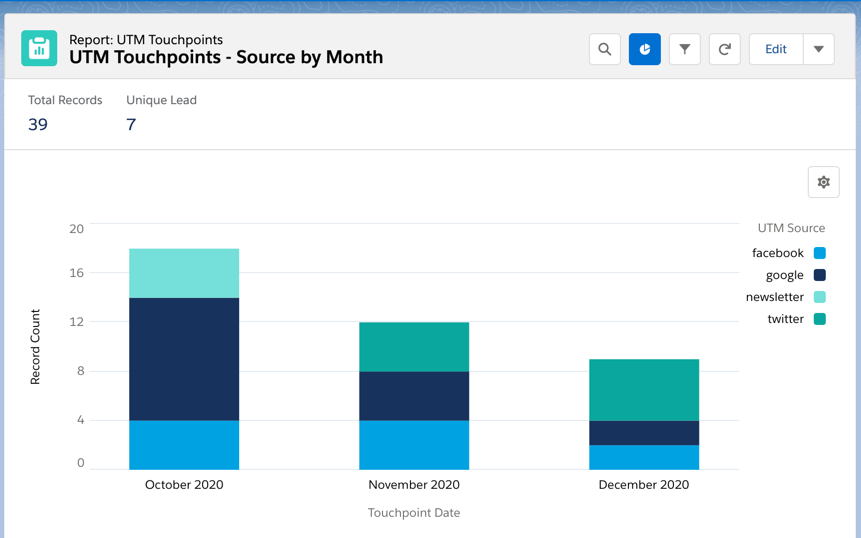
Report preview

Report preview

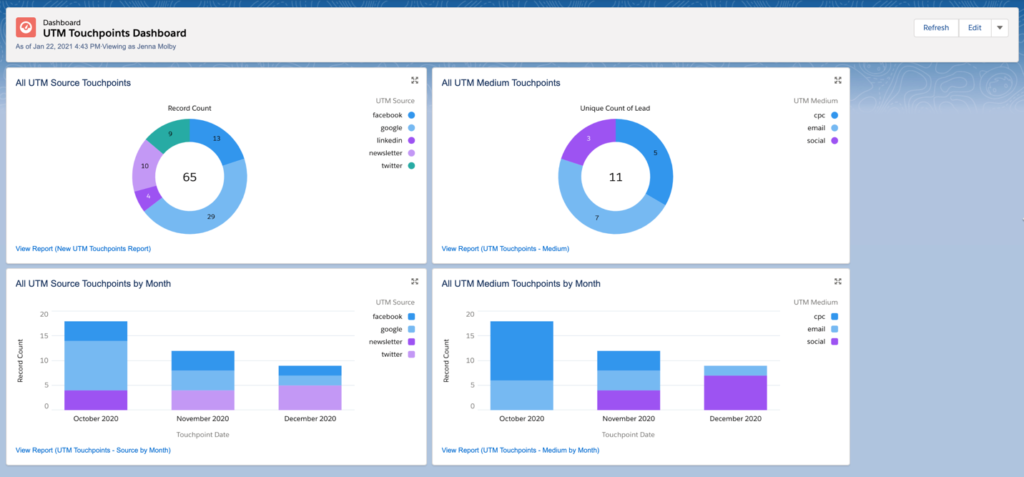
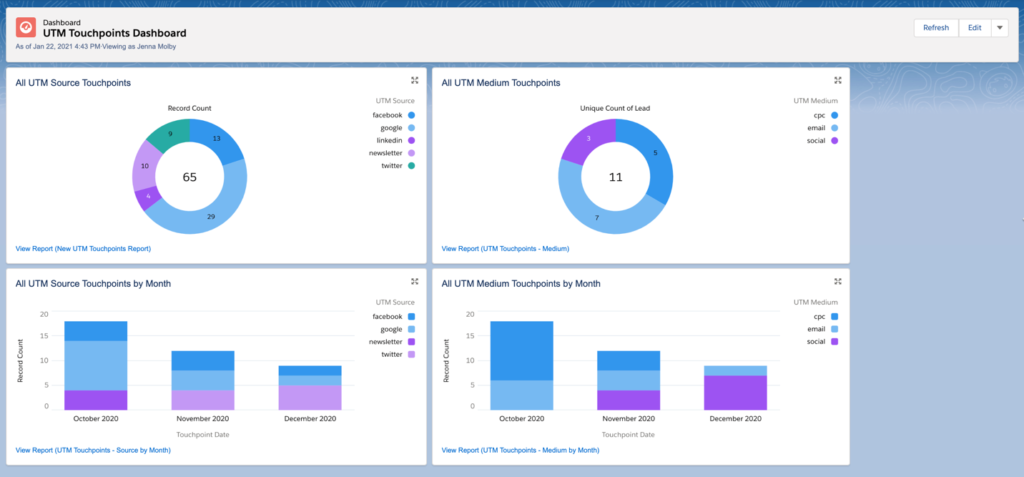
Dashboard preview

Dashboard preview

Planning

In order for this approach to work, there are 2 things you need to plan for:

  1. UTM fields for the Lead and Contact MUST be set up to be overwritten every time.
  2. What to do if there’s EXISTING UTM data in these fields to prevent data loss.

I recommend you review how your UTM fields are currently populated, what data currently exists in these fields and what reports/automations, etc rely on these fields. You should be able to answer these questions before getting started:

  1. How are the UTM fields populated?
  2. Do the UTM fields get overwritten?
  3. What are we going to do with existing data?

What to do if you have existing data

There are plenty of options on how to get this to work if you have existing data in your UTM fields. It all depends on your current setup. Here are some ideas:

  1. Create new fields named “First UTM Source”, “First UTM Medium”, etc. Rename your CURRENT UTM field labels (not API names) as “Last UTM Source, “Last UTM Medium”, etc. Populate the “First UTM” fields with your current data and use the “Last UTM” fields in your Flow.
  2. Once the UTM custom object is set up, use DataLoader.io to create records using all the existing UTM values.

Create the custom object

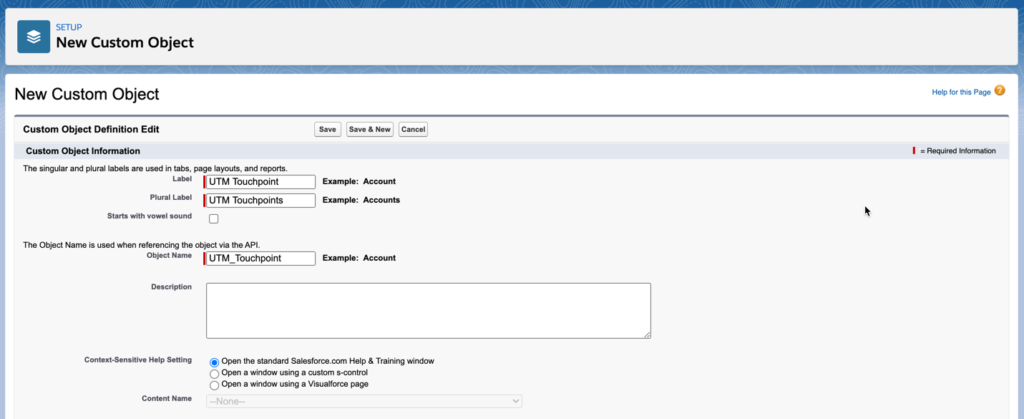
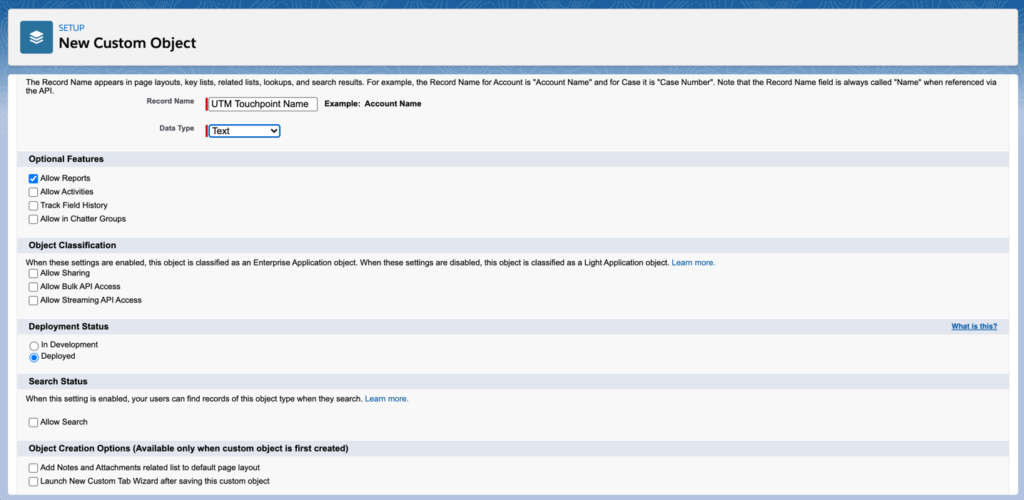
Create the custom object. I named by object “UTM Touchpoint”.

UTM touchpoint custom object 1
UTM touchpoint custom object 2

Create your fields

Next, create the custom fields for your custom object.

Field nameField type
LeadLookup (Lead)
ContactLookup (Contact)
UTM SourceText
UTM CampaignText
UTM MediumText
Touchpoint DateDate

You can also create any other fields you want to track using this object. For example, UTM Term or UTM Content.

Create the Flow for Leads

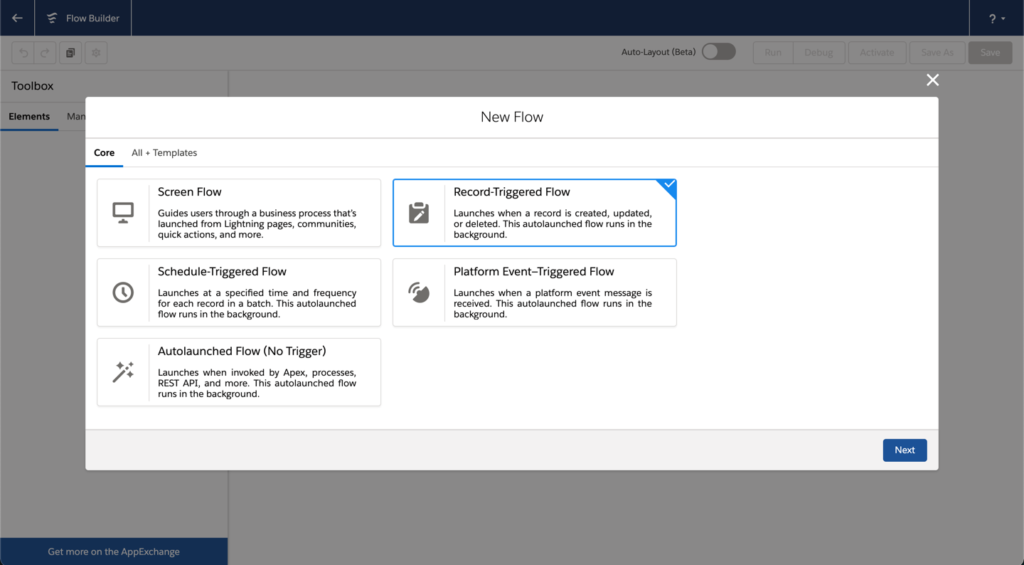
Navigate to the Flow builder and create a new Flow. Select Record-Triggered Flow as your Flow type.

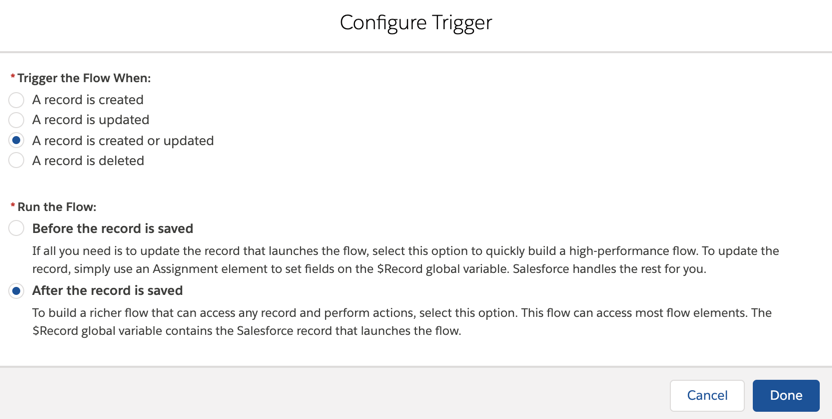
Configure Lead Flow - Step 1

Configure the trigger to run when a a record is created or updated and after the record is saved

Configure Lead Flow - Step 2

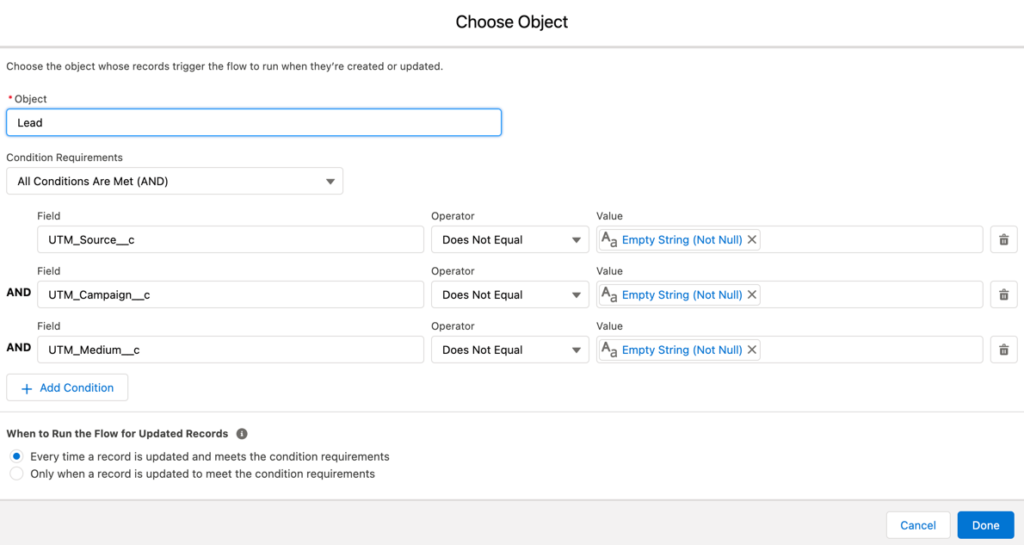
Select the Lead object as the starting object and add in the filters that will trigger your flow. For this example, I want to trigger the flow when UTM Source, UTM Medium AND UTM Campaign have values.

Configure Lead Flow - Step 3

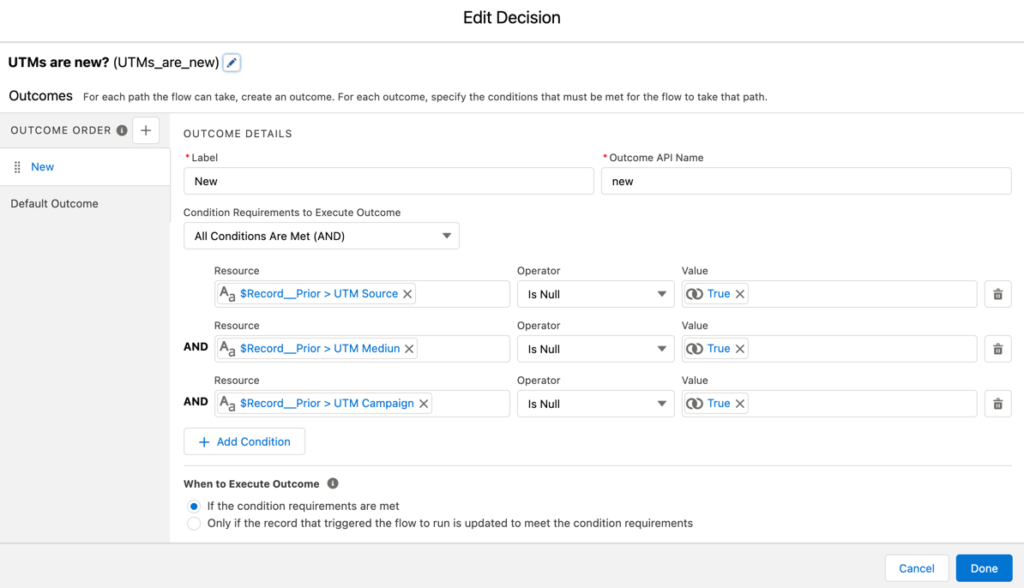
Add a decision element to the flow that will check if the UTM values are set.

Configure Lead Flow - Step 4

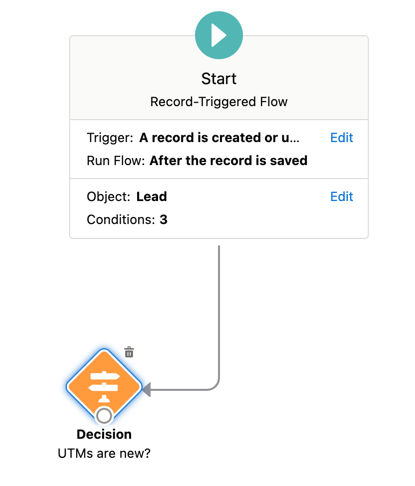
Now your flow should look like this.

Configure Lead Flow - Checkpoint 1

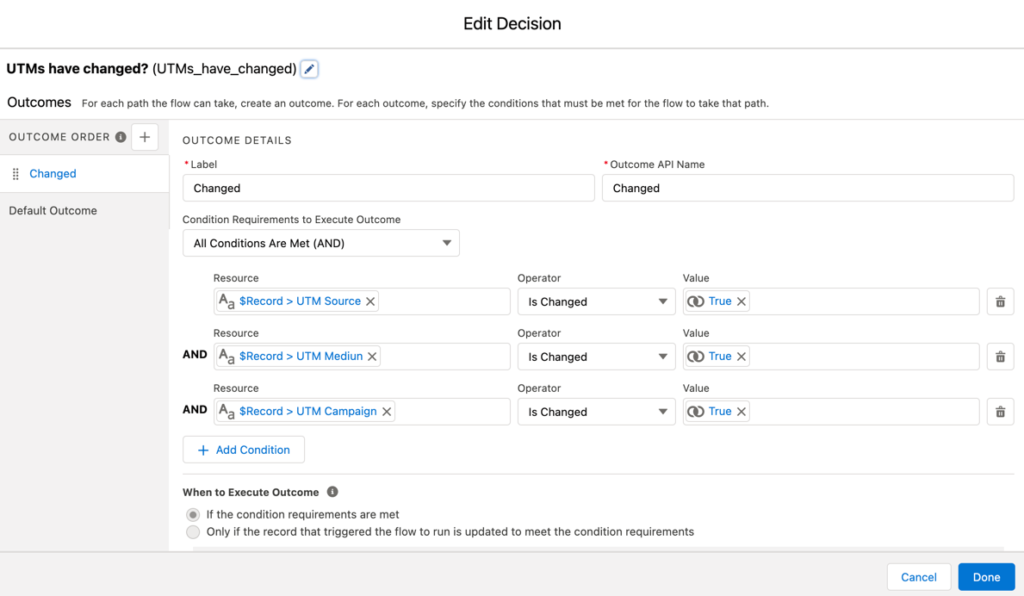
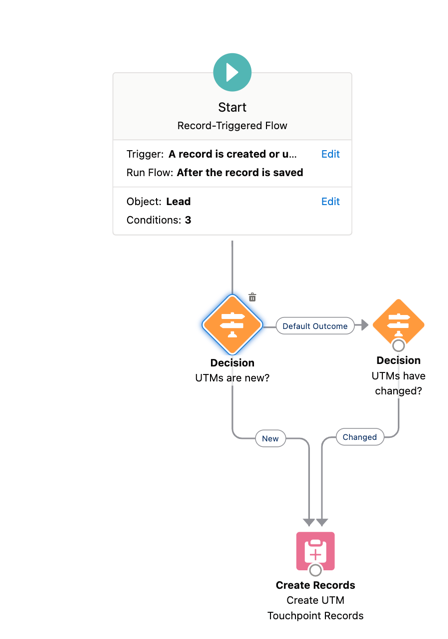
Add another decision element that will check if the UTM fields are updated.

Configure Lead Flow - Step 5

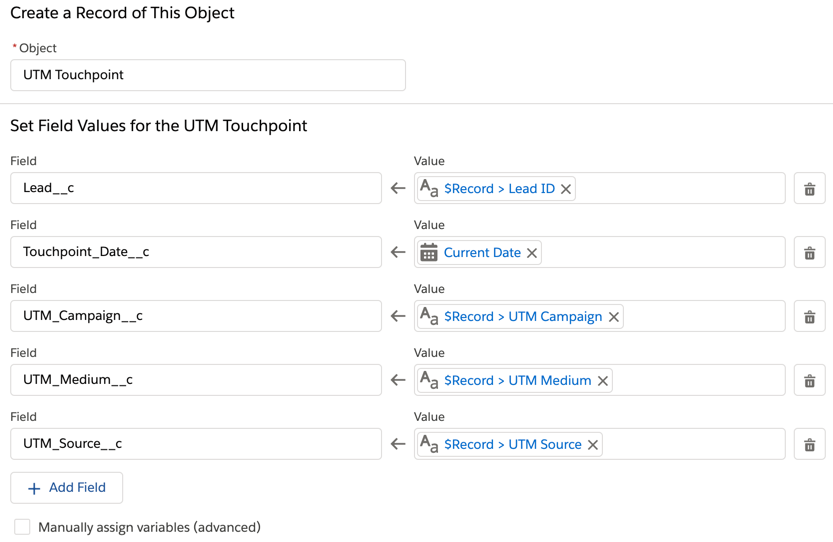
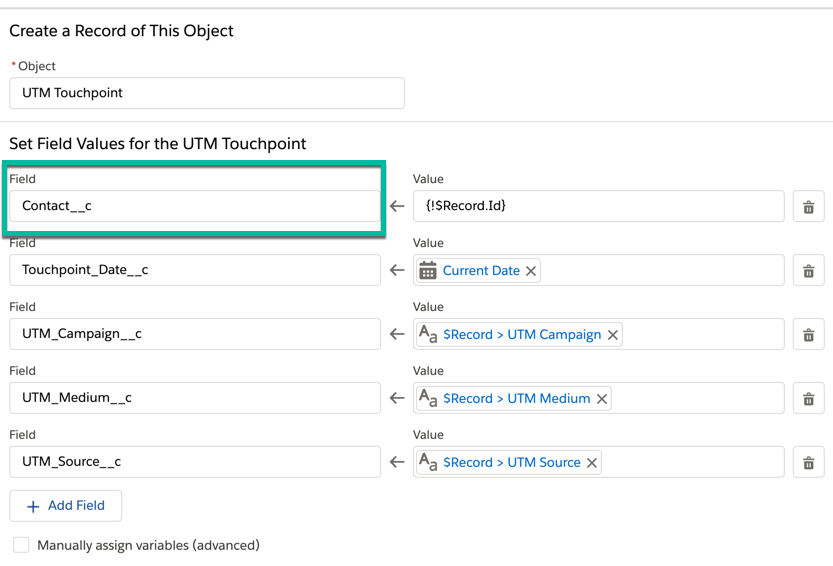
Add a create records element to the Flow that will take the UTM values from the lead and set the values for the UTM Touchpoint object.

Configure Lead Flow - Step 6

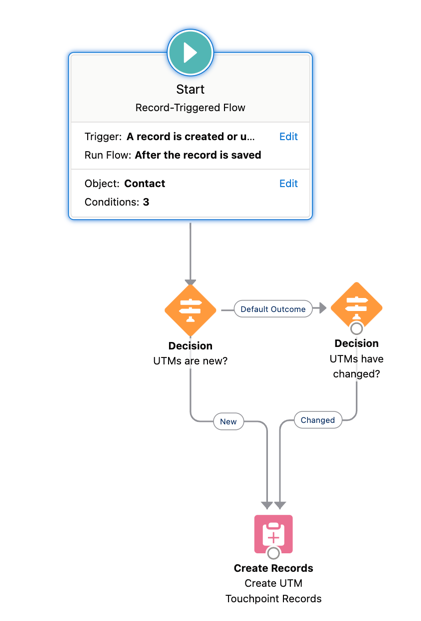
Connect the decision elements and the create records element. The final flow should look like this.

Final Lead Flow

Create the flow for contacts

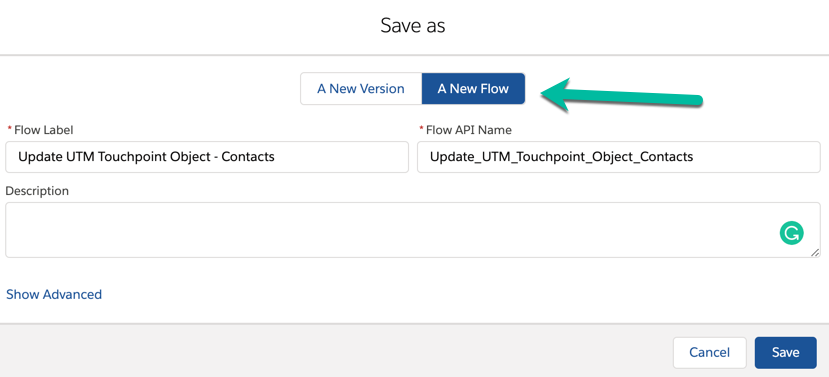
To create the flow for contacts, click save as on the lead flow and select save as new flow.

Configure Contact Flow - Step 1

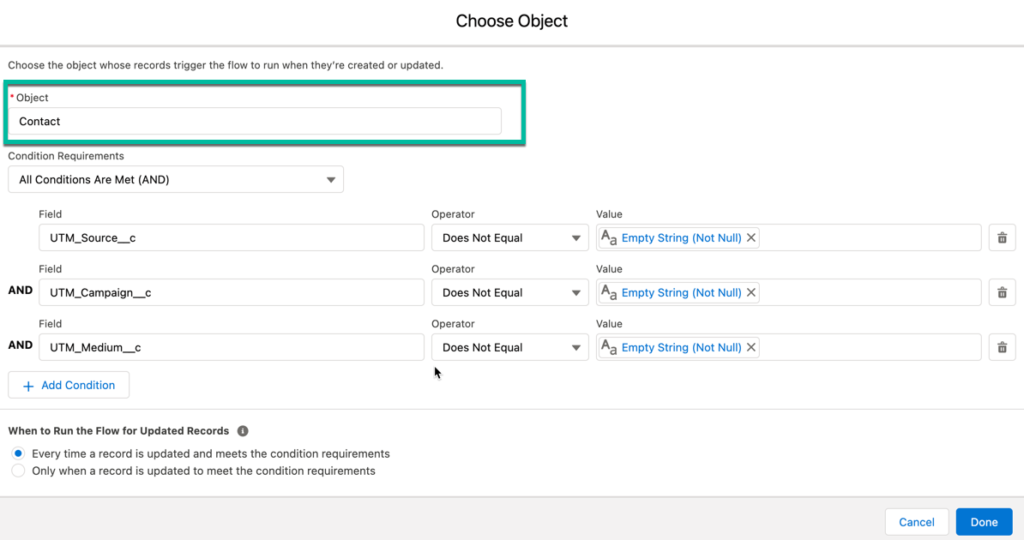
Edit the flow to start on the contact object instead of the lead object.

Configure Contact Flow - Step 2

Edit the create records step to update the contact rather than the lead.

Configure Contact Flow - Step 3

Here’s what my completed flow looks like for contacts.

Final Contact Flow

Creating reports

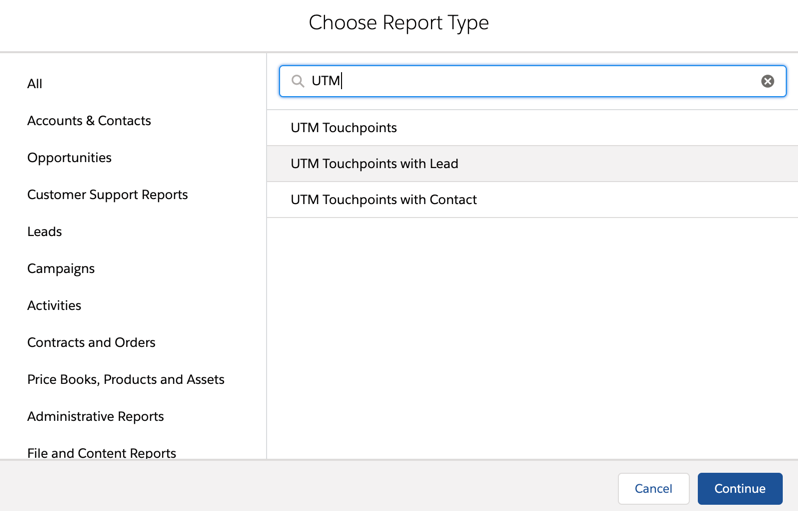
You can create reports by using one of the predefined UTM report types. The report type “UTM Touchpoints” will allow you to pull a report of ALL UTM touchpoints for both leads and contacts.

UTM Touchpoint Report 1

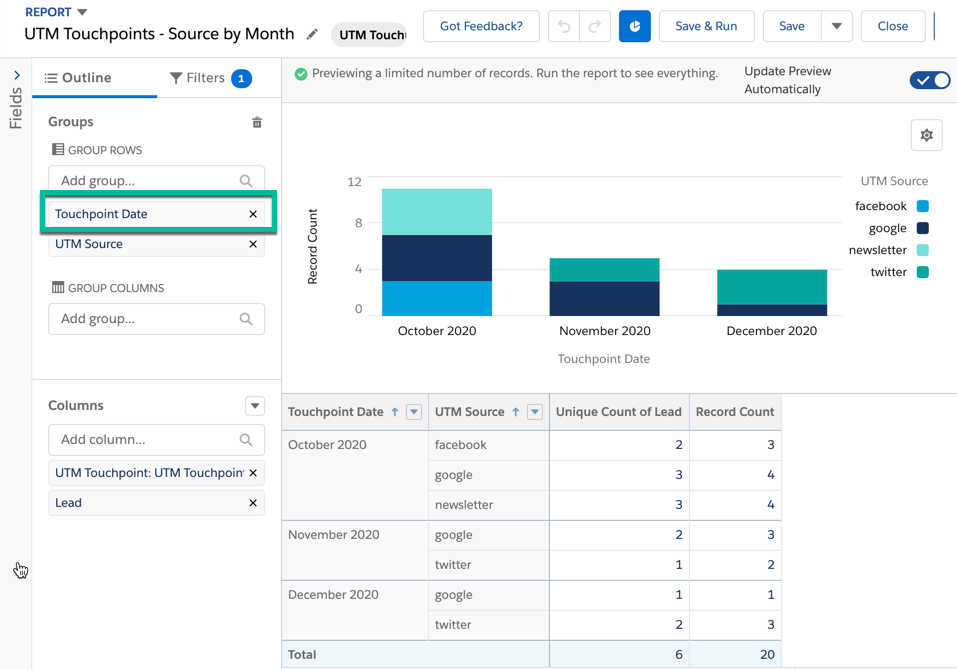
You can group by UTM Touchpoint Date to view all the touchpoints for a specific month, day, quarter, year, etc.

UTM Touchpoint Report 2
UTM Touchpoint Report 3

Questions?

Send me a tweet @jennamolby, or contact the Sercante team for help.

Want to do something with your Pardot form that is not available in the editor? Try using JavaScript! Enhance your forms by using these 6 advanced Pardot form techniques. Learn how to add text between form fields, how to capture URL parameters in hidden fields and more.

Adding JavaScript to your Pardot forms

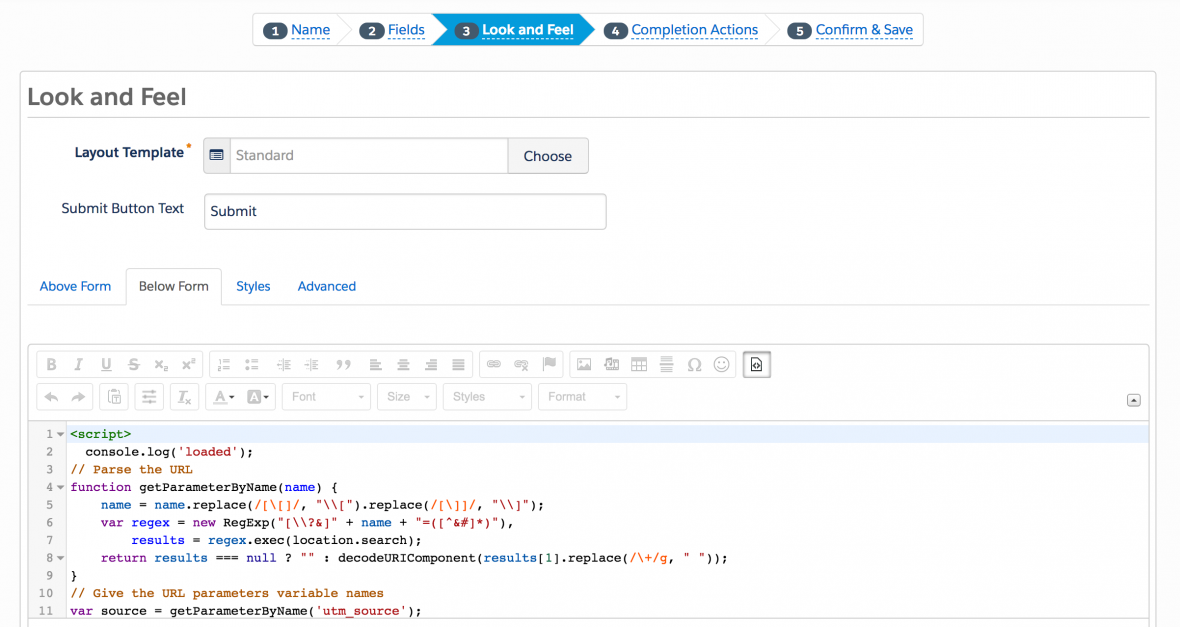
Custom JavaScript can be placed within your Pardot forms under Look and Feel > Below Form. Click on the HTML button within the WYSIWYG editor and add in the JavaScript.

1. Add text between form fields

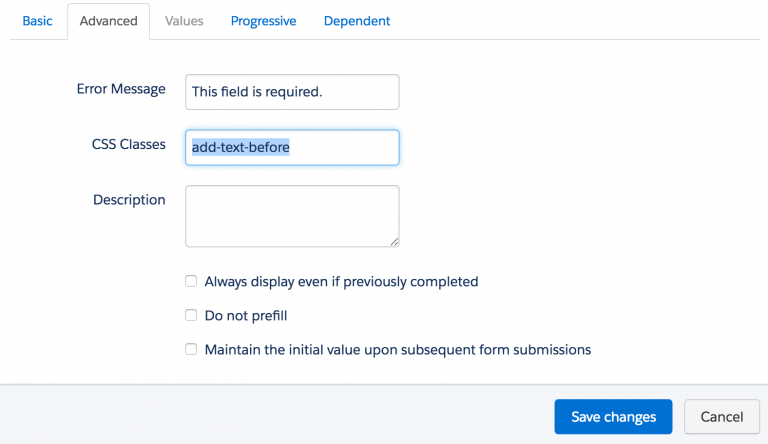
Edit the form field you want to add the text before in the form editor. Click on the advanced tab and add a CSS class with the name “add-text-before”.

Once the class has been added to the form field, you can add the following JS to your form and update the message.

<script type="text/javascript">
function insertBefore(el, referenceNode) {
    referenceNode.parentNode.insertBefore(el, referenceNode);
}
 
var newEl = document.createElement('div');
// replace this line with your message
newEl.innerHTML = 'ENTER YOUR TEXT HERE';
 
var ref = document.querySelector('.add-text-before');
 
insertBefore(newEl, ref);
</script>

2. Redirect to a thank you page based on field values

This tip is from the Pardot Help Docs, but with a couple updates. The article recommends using JavaScript-encoding for variable tags using {js}. I’ve never had success while using this method. Instead using this JavaScript does the trick.

<script type="text/javascript">
  switch('%%Free_Trial_Live_Demo%%') {
  case 'Free Trial':
  document.location='http://www.yoursite.com/thank-you-free-trial/';
  break;
  case 'Live Demo':
  document.location='http://www.yoursite.com/thank-you-live-demo/';
  break;
  }
</script>

3. Use a hidden field to capture page url

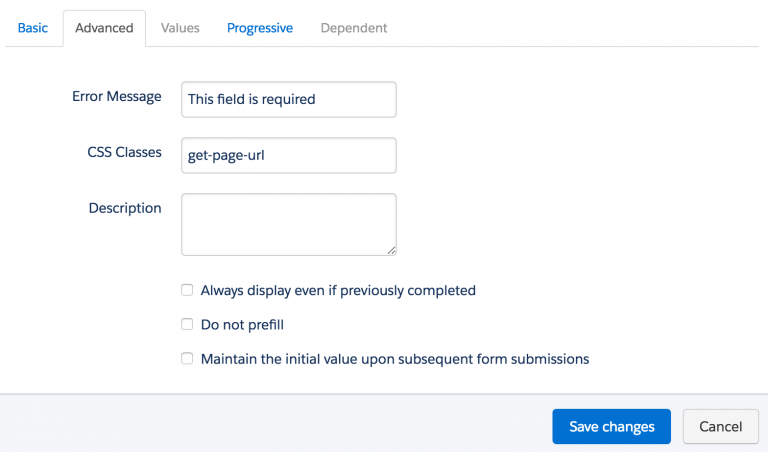
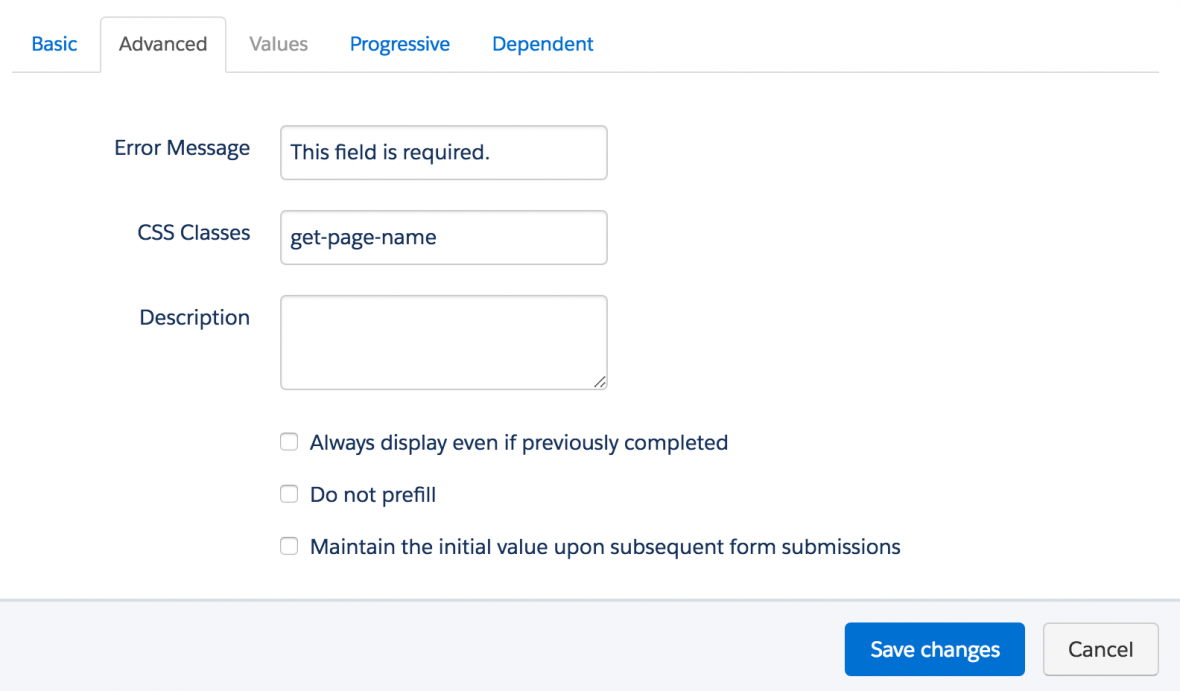
Edit the hidden form field, click on the advanced tab and add a CSS class with the name “get-page-url”.

Insert this JS into your form to capture the page url in the hidden field.

Note: This will not work if you have a iFramed form on a web page

<script>
document.querySelector(".get-page-url input").value = window.location.href;
</script>

4. Use a Hidden field to capture page name

Edit the hidden form field, click on the advanced tab and add a CSS class with the name “get-page-name”.

Note: This will not work if you have a iFramed form on a web page.

Insert this JS into your form to capture the page url in the hidden field.

<script>
document.querySelector(".get-page-name input").value = document.title;
</script>

5. Pass URL parameters to a Pardot form

You can use this script to parse out URL parameters and put them into fields within your Pardot form. In this example, I’m passing utm_source, utm_medium and utm_campaign into hidden form fields.

Learn more about UTM parameters in Pardot in this post

<script>
// Parse the URL
function getParameterByName(name) {
    name = name.replace(/[\[]/, "\\[").replace(/[\]]/, "\\]");
    var regex = new RegExp("[\\?&]" + name + "=([^&#]*)"),
    results = regex.exec(location.search);
    return results === null ? "" : decodeURIComponent(results[1].replace(/\+/g, " "));
}
// Give the URL parameters variable names
var source = getParameterByName('utm_source');
var medium = getParameterByName('utm_medium');
var campaign = getParameterByName('utm_campaign');
// Put the variable names into the hidden fields in the form. selector should be "p.YOURFIELDNAME input"
document.querySelector("p.source input").value = source;
document.querySelector("p.medium input").value = medium;
document.querySelector("p.campaign input").value = campaign;
</script>

6. Turn your form labels into placeholder text

There’s currently no feature for Pardot forms that allow you to use placeholder text instead of the label text. So, in this tutorial, I will show you how to add a bit of JavaScript to your Pardot forms to use the field labels as placeholders.

Questions?

Send me a tweet @jennamolby, or contact the Sercante team for help.
In this blog, I’ll walk you through how to prevent a lead source from being overwritten in Salesforce and how to activate and test it.

Create a validation rule

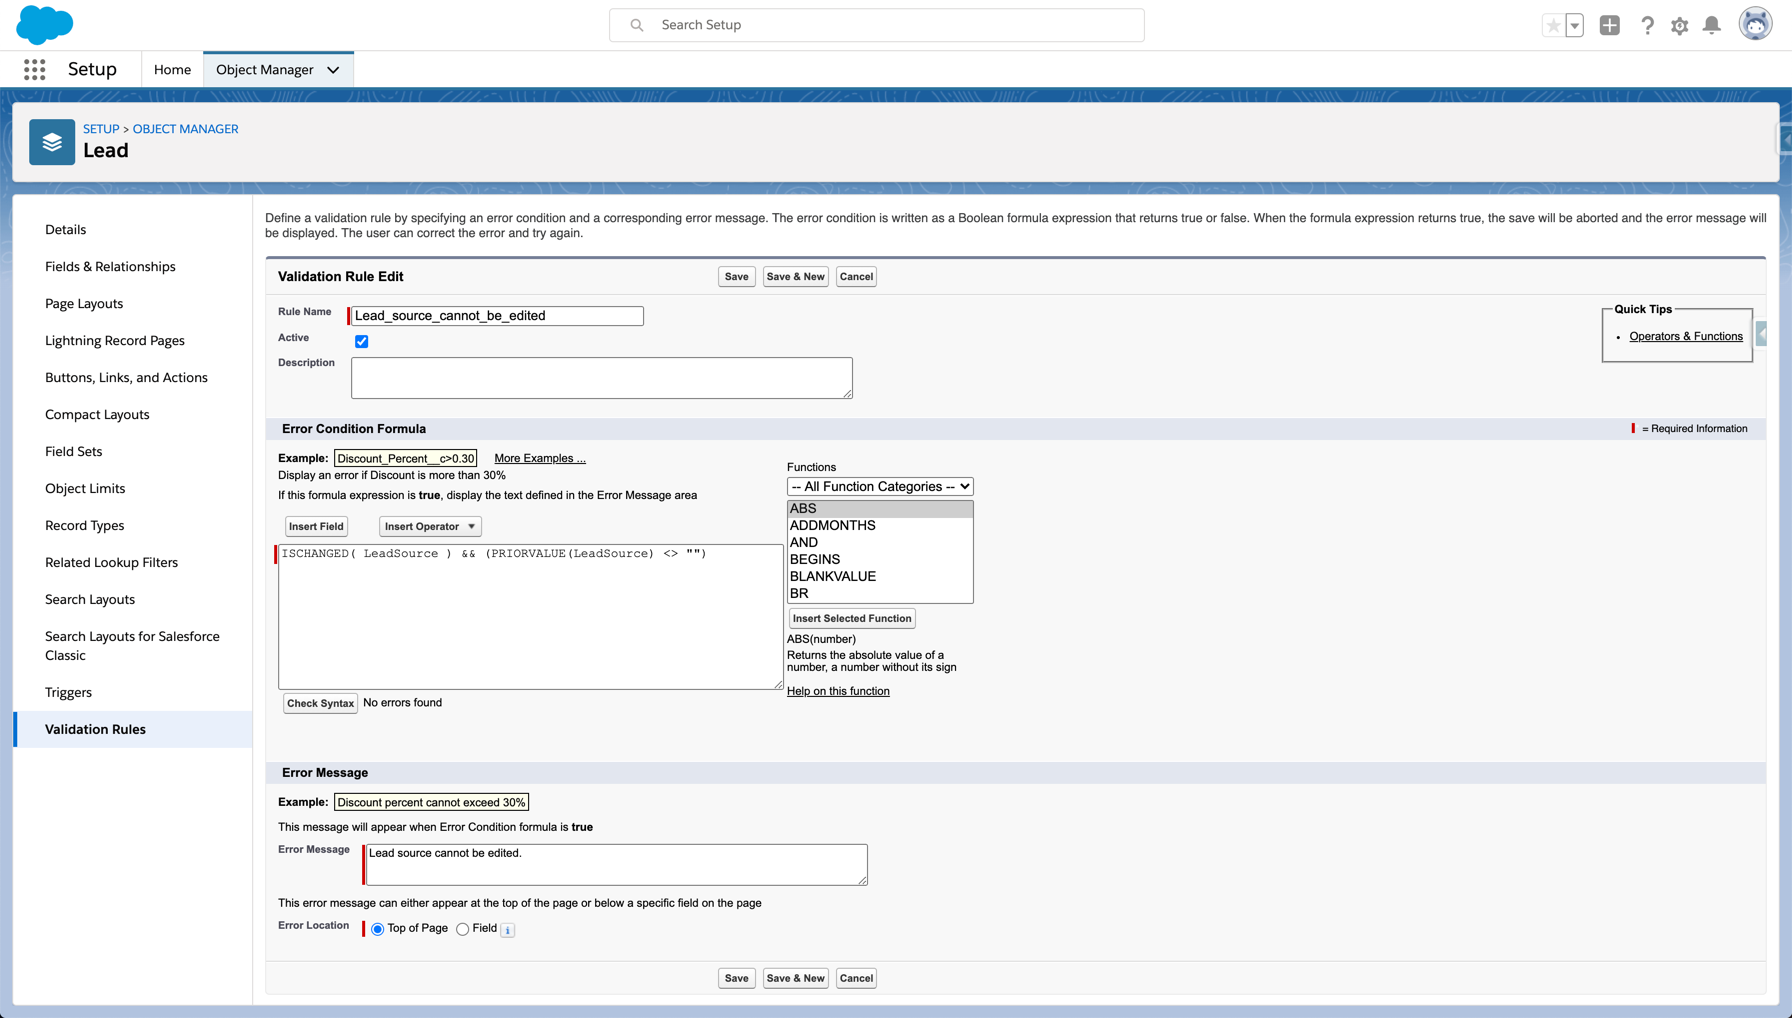
To prevent lead source for being overwritten, create a validation rule in Salesforce. Navigate to the lead object > validation rules > new and enter the required information.

To run the validation rule if the lead source is changed and if the current value is not empty use this as your error condition formula.

	
ISCHANGED( LeadSource ) && (PRIORVALUE(LeadSource) <> "")

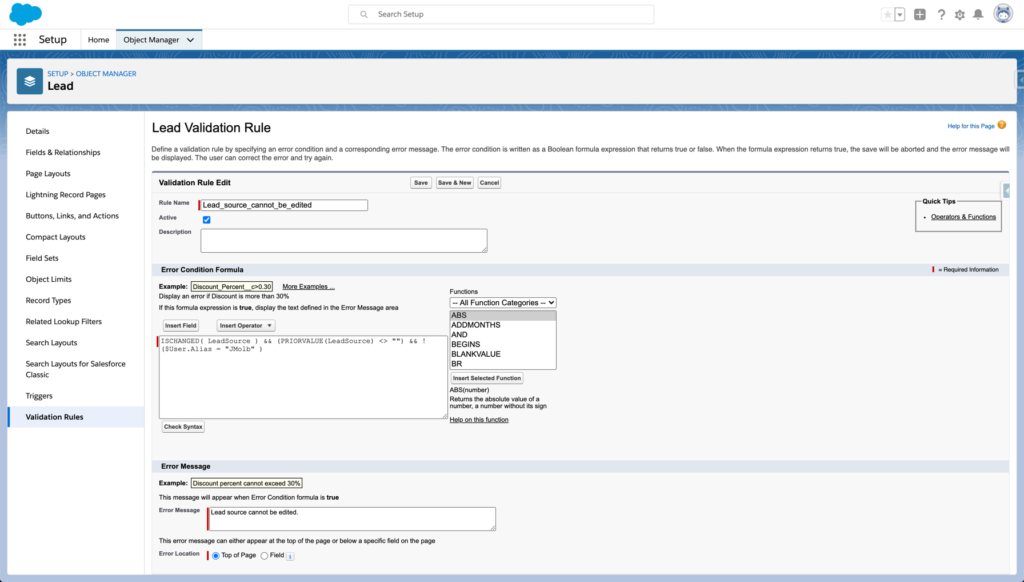
You might want to allow some users to update the lead source field. For example, a marketing manager might need to update this field to correct data. To run the validation rule if the lead source is changed, if the current value is not empty AND allow a particular user alias to bypass the validation rules, use this as your error condition formula.

ISCHANGED( LeadSource ) && (PRIORVALUE(LeadSource) <> "") && !($User.Alias = "JMolb" )

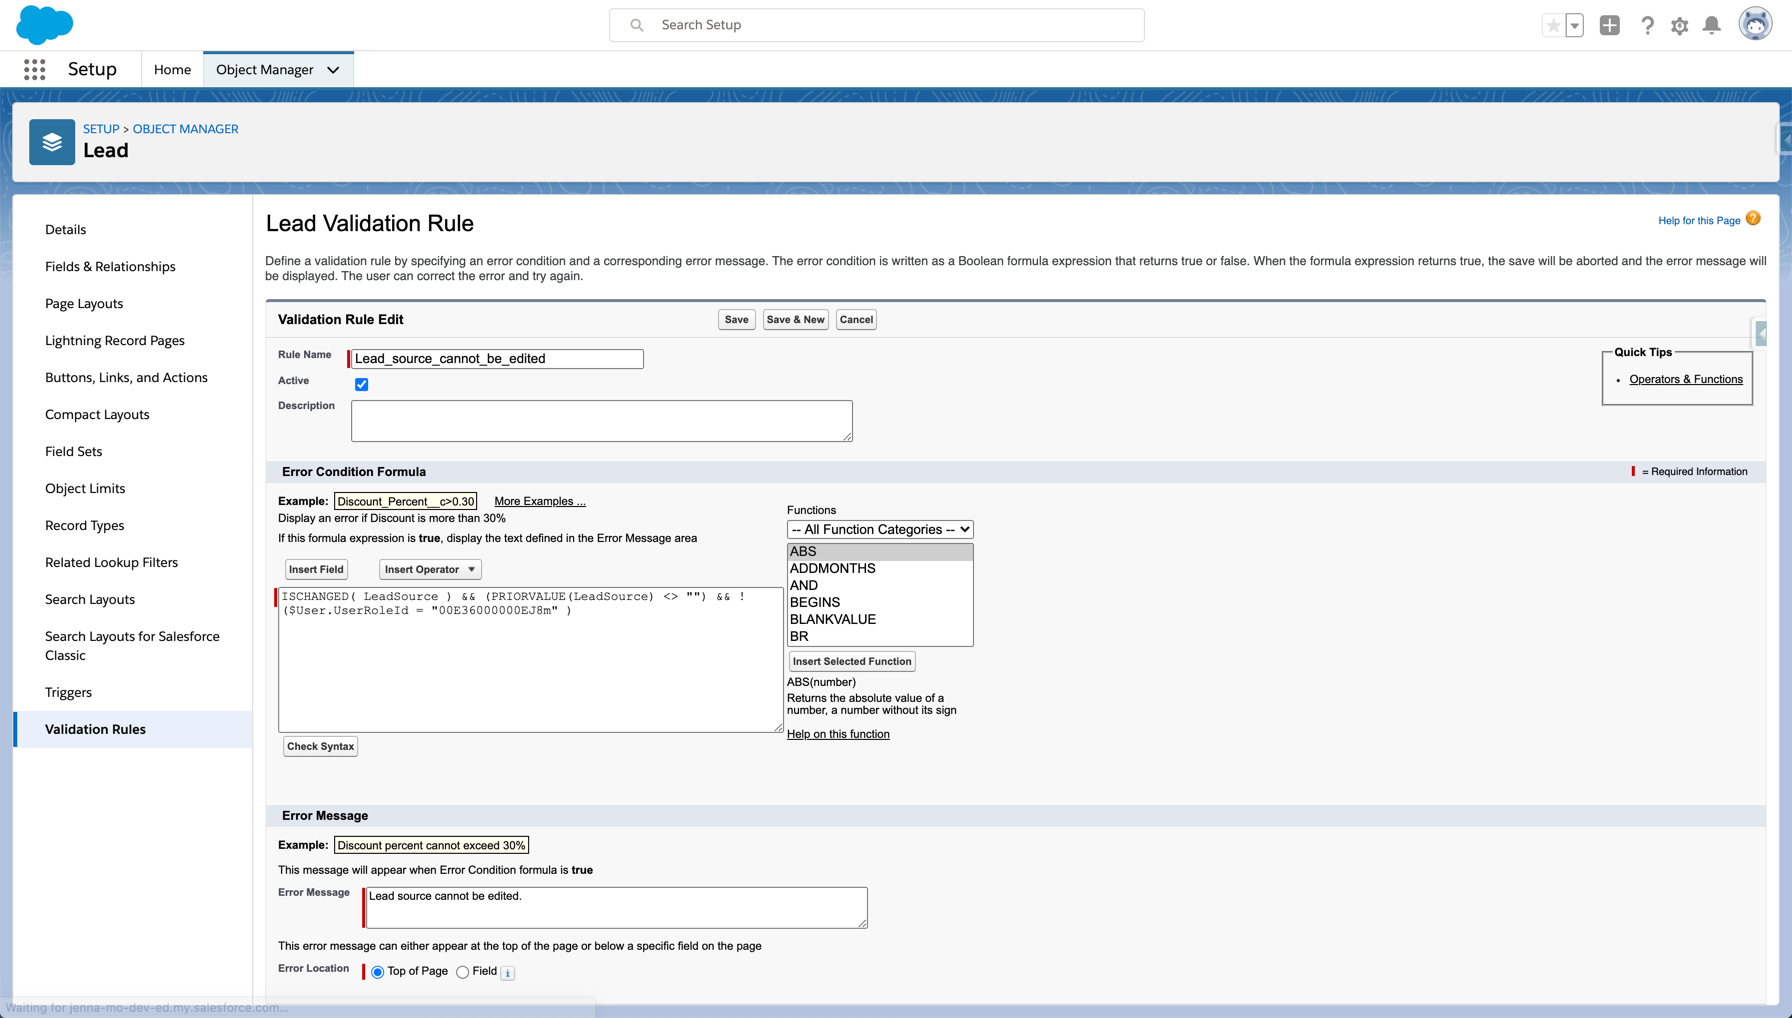
You can also bypass the validation rules by using the user role ID, like this:

ISCHANGED( LeadSource ) && (PRIORVALUE(LeadSource) <> "") && !($User.UserRoleId = "00E36000000EJ8m" )

Activate and test

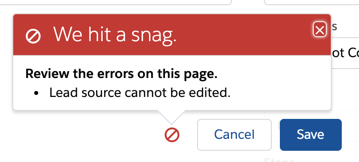
Activate your validation rule and test it by updating the lead source for a lead that already has a value. You should see an error message when saving the record.

Do another test by creating a new lead. Fill out the lead source field to ensure that you have the ability to update the field.

Questions?

Send me a tweet @jennamolby, or contact the Sercante team for help.
Looking for a way to spice up your Pardot email preferences page? Try using toggles instead of checkboxes. In this tutorial, I’ll show you how to create a preferences page that uses toggles instead of checkboxes. With a bit of HTML and some CSS, you can transform your preferences page in four easy steps.

Demo: Creating toggles for Pardot Email Preference Center

Here’s an example of what we’ll be creating in this tutorial.


Select which lists you would like to receive email communications from.

  1.   The latest updates on our events including webinars and our annual conference.
  2.   Get the best content right in your inbox.
  3.   Occasional emails about product releases and updates.
  4.   Our latest blog posts delivered weekly to your inbox.
  5. Opt out from all email communications

Step 1: Style your preference page

This post does not cover the basics of styling your Pardot preferences page. Click here to learn how to customize your page from scratch.

Step 2: Update the preferences page template

To make the toggles work, you will need to edit the form section of your layout template. Navigate to the layout template and click on the form tab. Replace the content with this HTML.


<!DOCTYPE html>
<html>
<head>
  <base href="http://go.pardot.com">
  <meta charset="utf-8">
  <meta content="text/html; charset=utf-8" http-equiv="Content-Type">
  <meta content="%%description%%" name="description">
  <title>Preferences Page</title>
  <link crossorigin="anonymous" href="https://stackpath.bootstrapcdn.com/bootstrap/4.1.1/css/bootstrap.min.css" integrity="sha384-WskhaSGFgHYWDcbwN70/dfYBj47jz9qbsMId/iRN3ewGhXQFZCSftd1LZCfmhktB" rel="stylesheet">
  <meta content="noindex, nofollow" name="robots">
  <link href="https://go.pardot.com/css/form.css?ver=2020-10-19" rel="stylesheet" type="text/css">
</head>
<body>
  <div>
    <div>
      <div>
        <img alt="" src="https://via.placeholder.com/220x65.png?text=LOGO" width="250">
        <div>
          <div>
            <form accept-charset="UTF-8" action="xx" id="pardot-form" method="post" name="pardot-form">
              <p>Select which lists you would like to receive email communications from.</p>
              <ol>
                <li>
                  <label for="piEmailPrefEmail">Email Address</label> <input id="piEmailPrefEmail" name="piEmailPrefEmail" readonly="readonly" type="text" value="j******1@g*******l.com">
                  <div id="error_for_piEmailPrefEmail" style="display:none">
                  </div>
                </li>
                <li>
                  <input id="piEmToken" name="piEmToken" readonly="readonly" type="hidden" value=""">
                  <div id="error_for_piEmToken" style="display:none">
                  </div>
                </li>
                <li>
                  <input id="list_111694" name="list[]" type="checkbox" value="111694" checked="checked">&nbsp;<label for="list_111694">Conferences & Events</label> <span>The latest updates on our events including webinars and our annual conference.</span>
                  <div id="error_for_list_111694" style="display:none">
                  </div>
                </li>
                <li>
                  <input id="list_111688" name="list[]" type="checkbox" value="111688">&nbsp;<label for="list_111688">News & Updates</label> <span>Get the best content right in your inbox.</span>
                  <div id="error_for_list_111688" style="display:none">
                  </div>
                </li>
                <li>
                  <input id="list_111692" name="list[]" type="checkbox" value="111692">&nbsp;<label for="list_111692">Product Updates</label> <span>Occasional emails about product releases and updates.</span>
                  <div id="error_for_list_111692" style="display:none">
                  </div>
                </li>
                <li>
                  <input id="list_111690" name="list[]" type="checkbox" value="111690" checked="checked">&nbsp;<label for="list_111690">Weekly Blog Digest</label> <span>Our latest blog posts delivered weekly to your inbox.</span>
                  <div id="error_for_list_111690" style="display:none">
                  </div>
                </li>
                <li>
                  <a data-confirm="Are you sure you want to opt out from all future email communications?" href="">Opt out from all email communications</a>
                  <div id="error_for_gUnsub" style="display:none">
                  </div>
                </li>
              </ol>
              <p style="position:absolute; width:190px; left:-9999px; top: -9999px;visibility:hidden;"><label for="pi_extra_field">Comments</label> <input id="pi_extra_field" name="pi_extra_field" type="text"></p>
              <!-- forces IE5-8 to correctly submit UTF8 content  -->
              <input name="_utf8" type="hidden" value="&#9731;">
              <p><input accesskey="s" type="submit" value="Save Preferences">
              </p>
              <script type="text/javascript">
              //<![CDATA[
              var anchors = document.getElementsByTagName("a");
              for (var i=0; i<anchors.length; i++) {
               var anchor = anchors[i];
               if(anchor.getAttribute("href")&&!anchor.getAttribute("target")) {
                   anchor.target = "_top";
               }
              }
              //]]>
              </script>
            </form>
          </div>
        </div>
      </div>
    </div>
  </div>
  <script src="https://code.jquery.com/jquery-latest.min.js"></script> 
      <script type="text/javascript">
      $( document ).ready(function() {
         $('label').contents().each(function() {
       if (this.nodeType == 3 && $.trim(this.nodeValue) != '') {
          $(this).wrap('<span></span>');
       }
      });
      $('.label-wrapper').after('<span></span>');
      });
      </script> 
</body>
</html>

What’s changed?

  1. Instead of placing the form fields in a paragraph, the form fields are placed in an ordered list with a class named “switches”.
  2. Some jQuery is added to update the HTML markup of the preferences form.

Step 3: Upload icons into Pardot

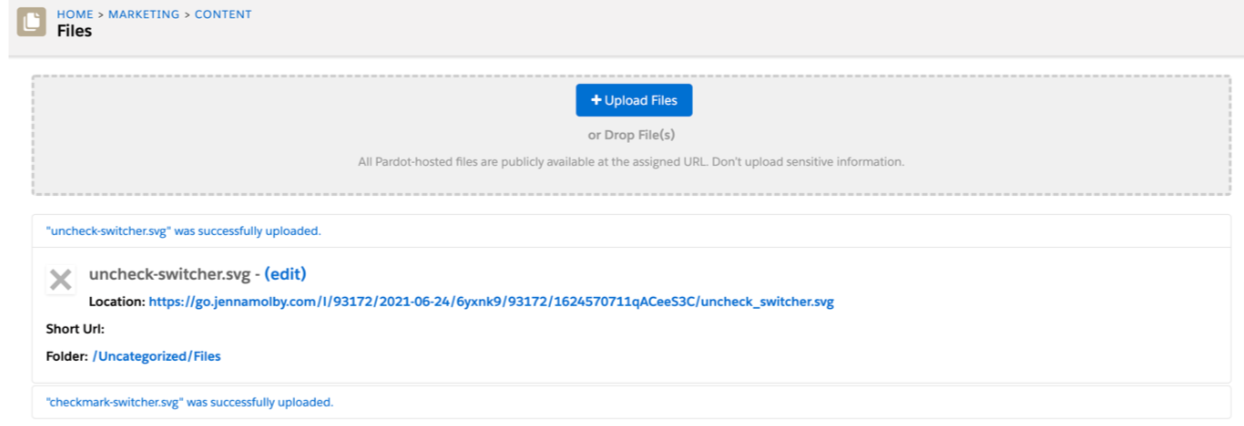
There are two icons that will need to be uploaded in Pardot, a checkmark icon and a “x” icon. Download the images and then upload the images into the content library within Pardot.

Step 4: Add the CSS for the toggles

Add this CSS to your layout template. Update the first couple of lines to include the image paths to the icons you uploaded in step 4.

/* Update this line with the URL of your checkbox image */
.switches .pd-checkbox [type="checkbox"]:checked + label span:last-child::after {
  background-image: url(https://);
}
/* Update this line with the URL of your "X" image */
.switches .pd-checkbox span:last-child::after {
  background: url(https://);
}
* {
  padding: 0;
  margin: 0;
  box-sizing: border-box;
}
ol {
  list-style: none;
}
label {
  cursor: pointer;
}
#pardot-form p {
  margin-left:0;
  padding-left:0;
}
/* hide the checkbox */ 
[type="checkbox"] {
  position: absolute;
  left: -9999px;
}
/* Position the checkbox label */
.switches .pd-checkbox label {
  display: flex;
  align-items: center;
  justify-content: space-between;
}
/* Style the switch */
.switches .pd-checkbox label.inline span:last-child {
  position: relative;
  width: 50px;
  height: 26px;
  border-radius: 15px;
  box-shadow: inset 0 0 5px rgba(0, 0, 0, 0.4);
  background: #434257;
  transition: all 0.3s;
}
.switches .pd-checkbox label.inline span:last-child::before,
.switches .pd-checkbox label.inline span:last-child::after {
  content: "";
  position: absolute;
}
.switches .pd-checkbox span:last-child::before {
  left: 1px;
  top: 1px;
  width: 24px;
  height: 24px;
  background: #FFF;
  border-radius: 50%;
  z-index: 1;
  transition: transform 0.3s;
}
/* Style the "X" switch */
.switches .pd-checkbox span:last-child::after {
  top: 50%;
  right: 8px;
  width: 12px;
  height: 12px;
  transform: translateY(-50%);
  background-size: 12px 12px;
}
/* Style the "ON" switch */
.switches .pd-checkbox [type="checkbox"]:checked + label span:last-child {
  background: #00d084;
}
.switches .pd-checkbox [type="checkbox"]:checked + label span:last-child::before {
  transform: translateX(24px);
}
.switches .pd-checkbox [type="checkbox"]:checked + label span:last-child::after {
  width: 14px;
  height: 14px;
  left: 8px;
  background-size: 14px 14px;
}

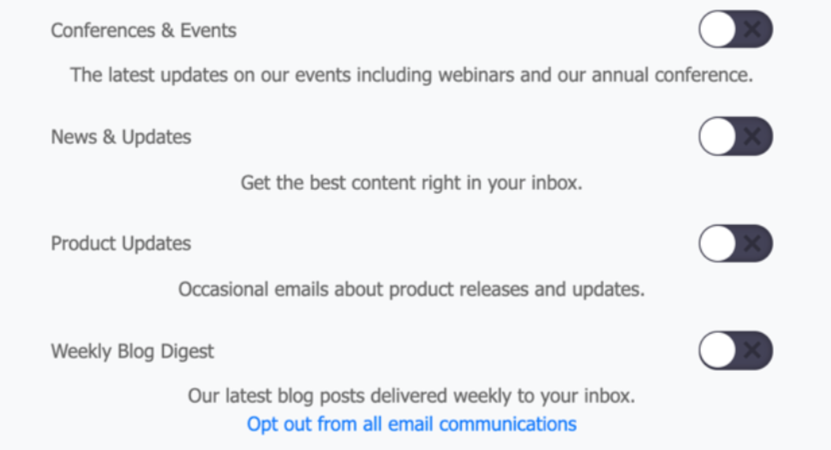
Now your page would look something like this, with the checkboxes turned into toggles.

Optional: Add any additional CSS

I added some additional CSS to my page to style the labels, list descriptions and options for my page. Here’s the CSS I added.

#pardot-form .no-label{
  text-align:center;
   margin-top:35px;
}
#pardot-form .no-label a {
 text-decoration:underline;
}
#pardot-form label {
  font-weight:500;
  font-size:15px;
}
.pd-email {
  margin:20px 0;
}
#pardot-form .description {
  text-align:left;
  display:block;
}
#pardot-form li.pd-checkbox {
  background-color:#FFF;
  margin-bottom:5px;
  border:solid 1px #ebebeb;
  padding:0px 20px 20px 20px;
  border-radius:5px;
  -moz-border-radius:5px;
  -webkit-border-radius:5px;
}
#pardot-form .label-wrapper {
  color:#444444;
}
#pardot-form {
  color:#737373;
}
#pardot-form .form-field {
  text-align:left;
}
#pardot-form input.text {
   border:solid 1px #ebebeb;
  padding:10px;
  border-radius:5px;
  -moz-border-radius:5px;
  -webkit-border-radius:5px;
  color:#737373;
}
#pardot-form .no-label {
  text-align:center;
}
#pardot-form .no-label a {
    color:#737373;
}

The final result

Here’s what my final page looks like.


Select which lists you would like to receive email communications from.

  1.   The latest updates on our events including webinars and our annual conference.
  2.   Get the best content right in your inbox.
  3.   Occasional emails about product releases and updates.
  4.   Our latest blog posts delivered weekly to your inbox.
  5. Opt out from all email communications

Questions?

Send me a tweet @jennamolby, or contact the Sercante team for help.

No more posts to show