Want to know how many accounts or companies attended an event, webinar or interacted with a marketing campaign? This metric can be difficult for marketers to pull in Salesforce because reports by default will show the number of leads, contacts or campaign members within a report.
One solution is to use the “Power of One” hack, which involves creating a custom field for accounts.
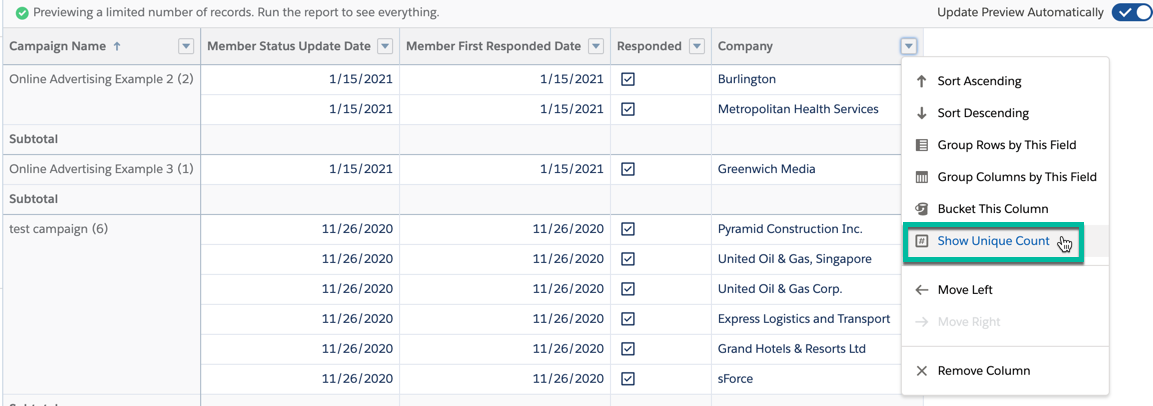
The other easier solution is to use the “show unique count” option within your campaign report. This option allows you to see how many distinct values a column has in a report and returns with a unique count – perfect for campaign reporting!
Keep reading to see how to enable it and some examples of campaign report.
How it works
While editing a report in the report builder, find the column for which you want to count unique values.
Click Show More | Show Unique Count.
Click Save.
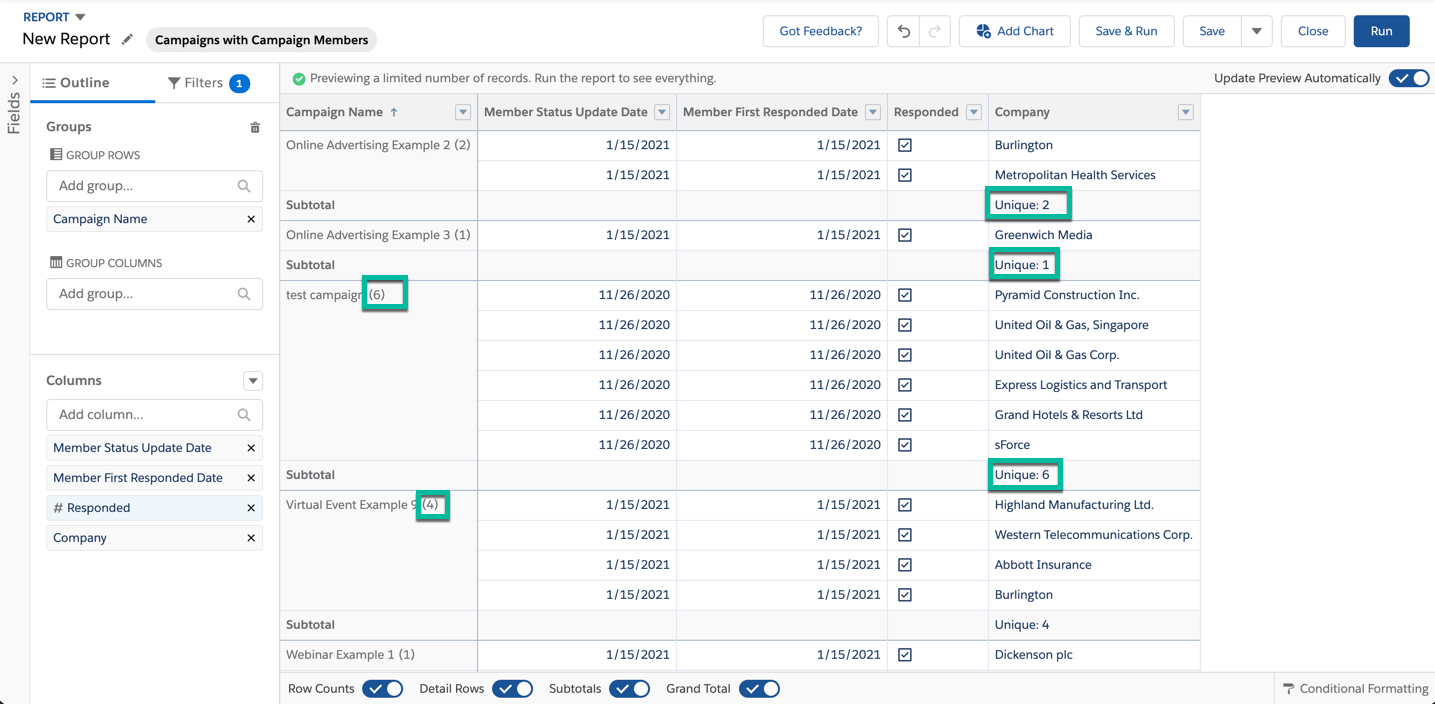
A count of unique values appears as a grand total for the whole report and as a subtotal for each group.
Each report support up to 3 unique counts.
Examples
Campaigns with campaign members report example
This example shows the unique count of the companies touched by all marketing campaigns.
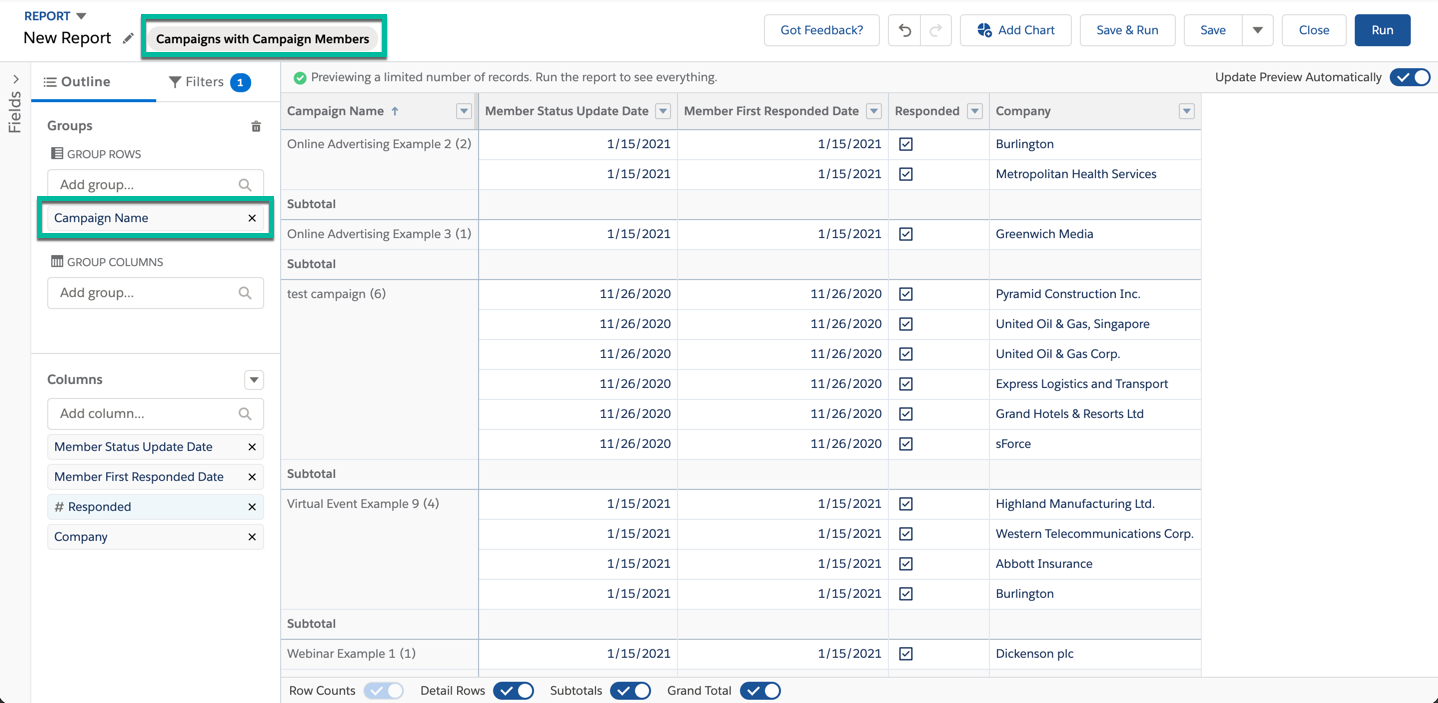
The report is using the “campaigns with campaign members” report type and is grouped by campaign namex.
The unique count for company can be pulled by selecting the show unique count option for the company column.
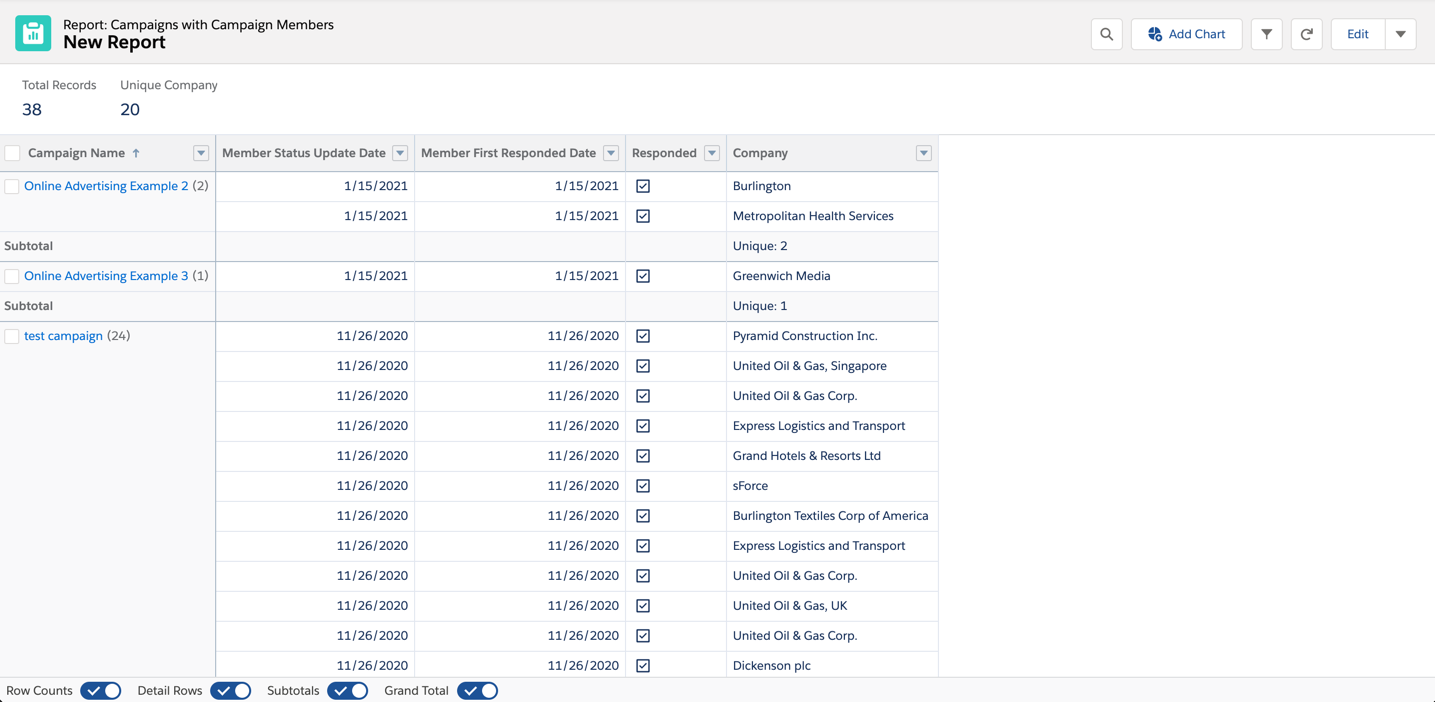
Running the report allows you to see the total number of records (the number of campaign members) and the unique company count (the number of companies that were touched by the campaigns).
Campaigns with contacts report example
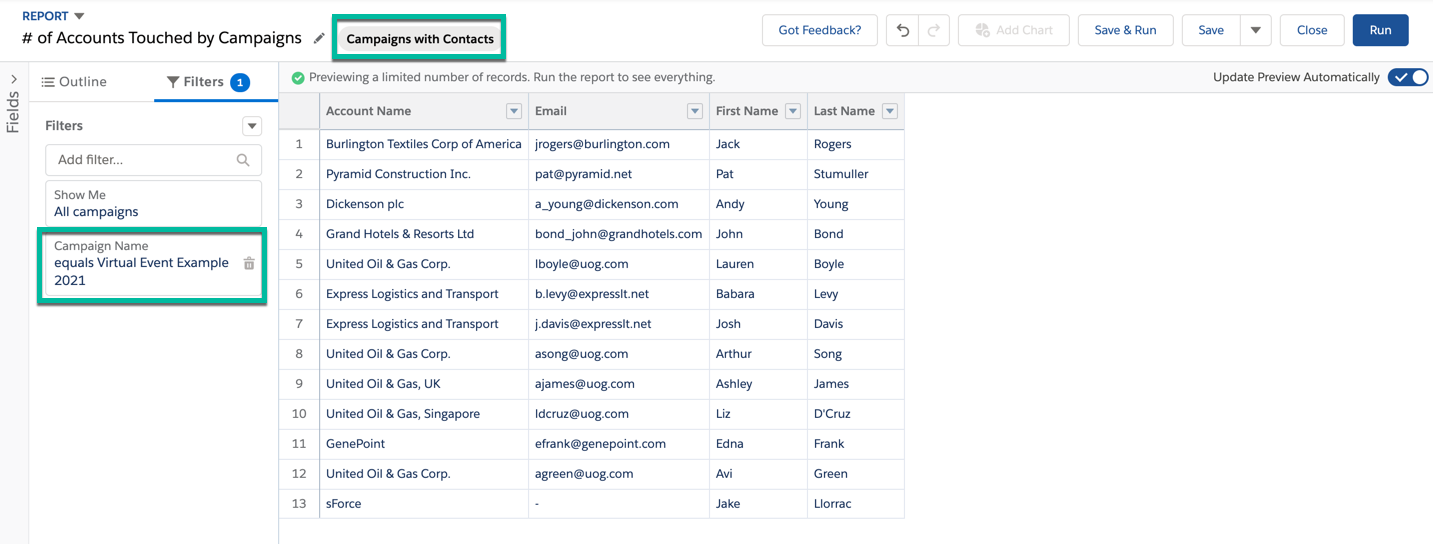
This example shows the unique count of the accounts touched by a specific marketing campaign.
The report is using the “campaigns with contacts” report type and has a filter for campaign name equals (the virtual event campaign).
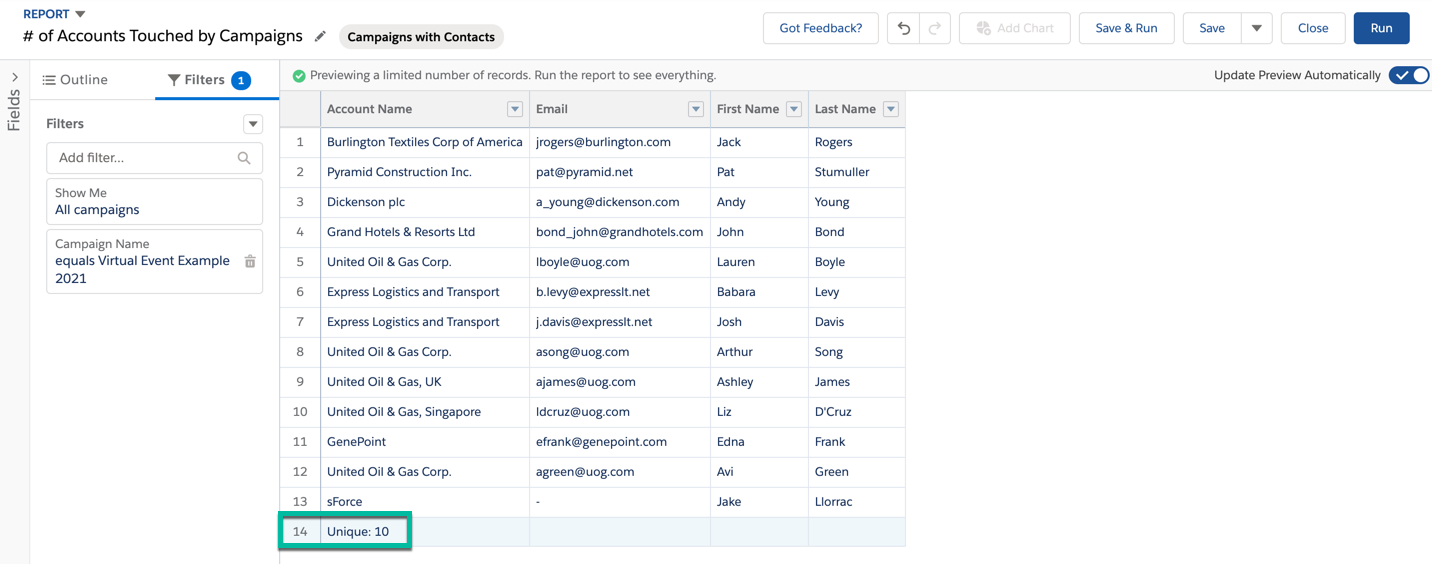
The unique count for account can be pulled by selecting the show unique count option for the account column.
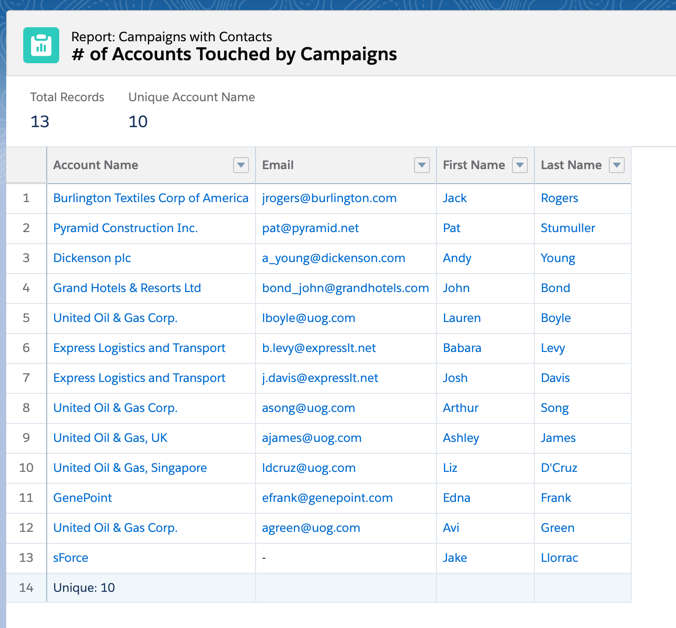
Running the report allows you to see the total number of records (the number of contacts) and the unique account count (the number of accounts that were touched by the campaign).
In this post, I’ll show you how to create a page that asks for feedback as to why the prospect is unsubscribing. The goal is to use the standard Marketing Cloud Account Engagement (Pardot) unsubscribe page and ask them why they have unsubscribed on the confirmation page. This gives the prospect the option to complete this information, but it’s not required for them to be unsubscribed from emails.
Unsubscribe Reason Page Preview
Here’s what the completed page looks like.
Implementation Steps
Step 1: Create the custom field(s)
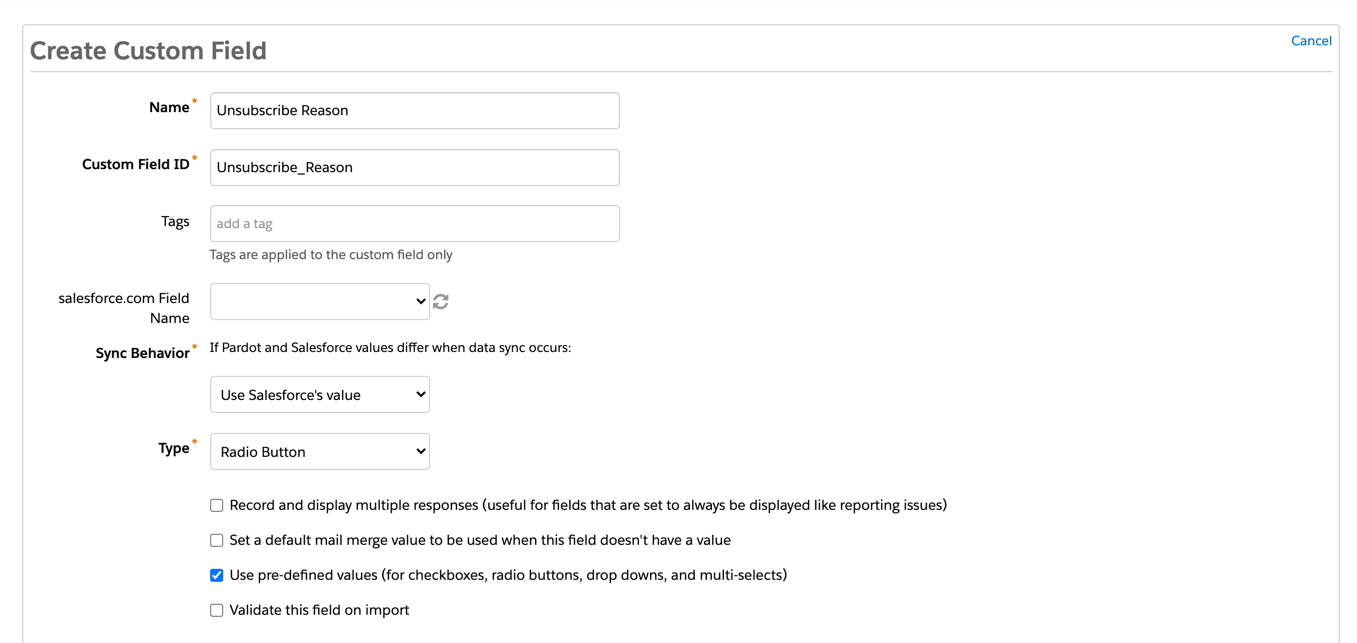
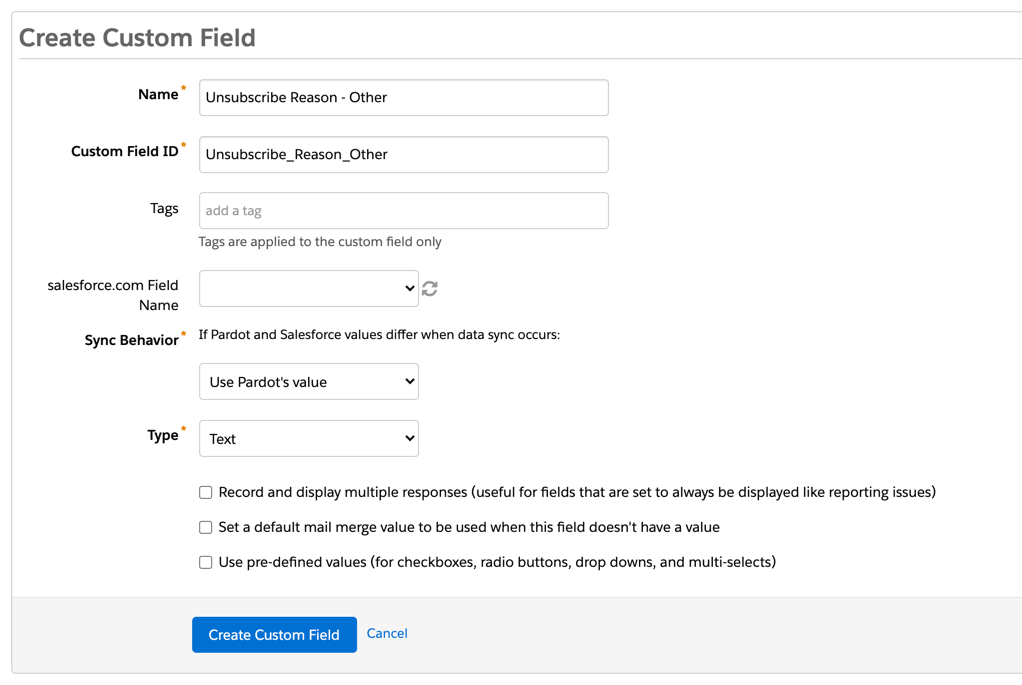
First, create a field in Pardot that will be used to capture the unsubscribe reason.
Optionally, you can create an additional field to capture the reason if “other” is selected in the form.
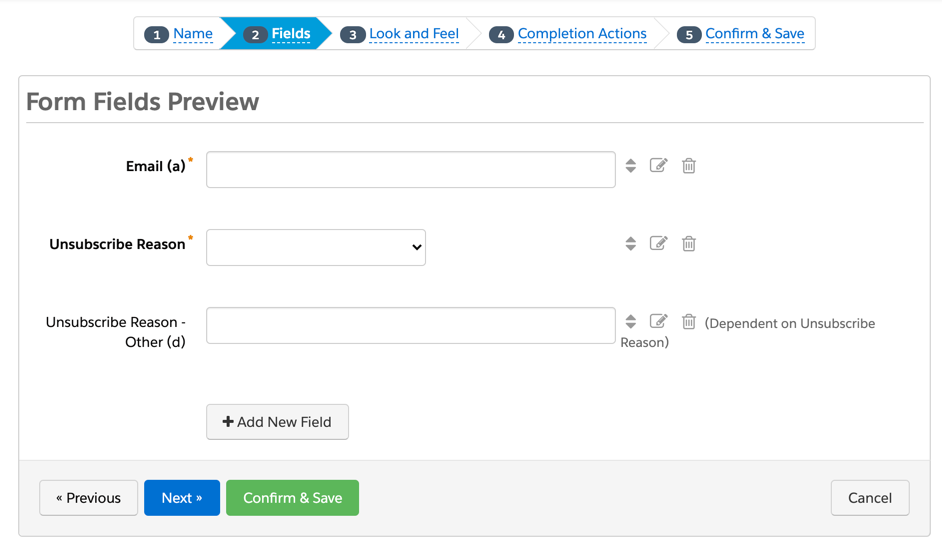
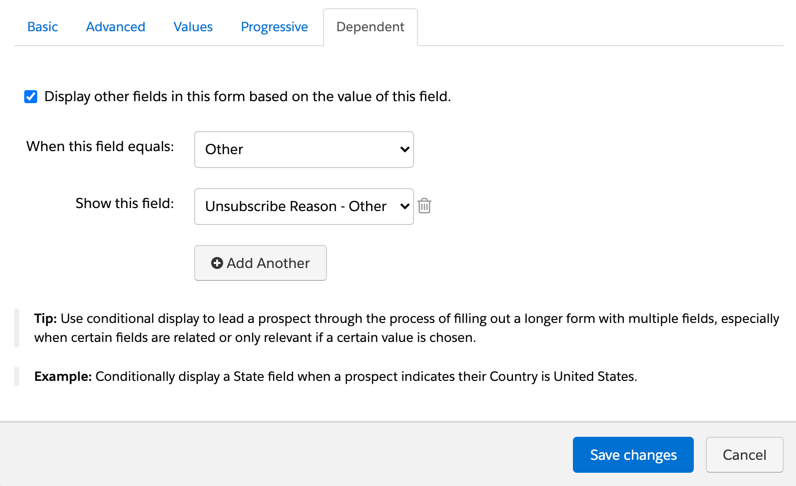
Step 2: Create the unsubscribe reason form
Create a new form and add your new fields.
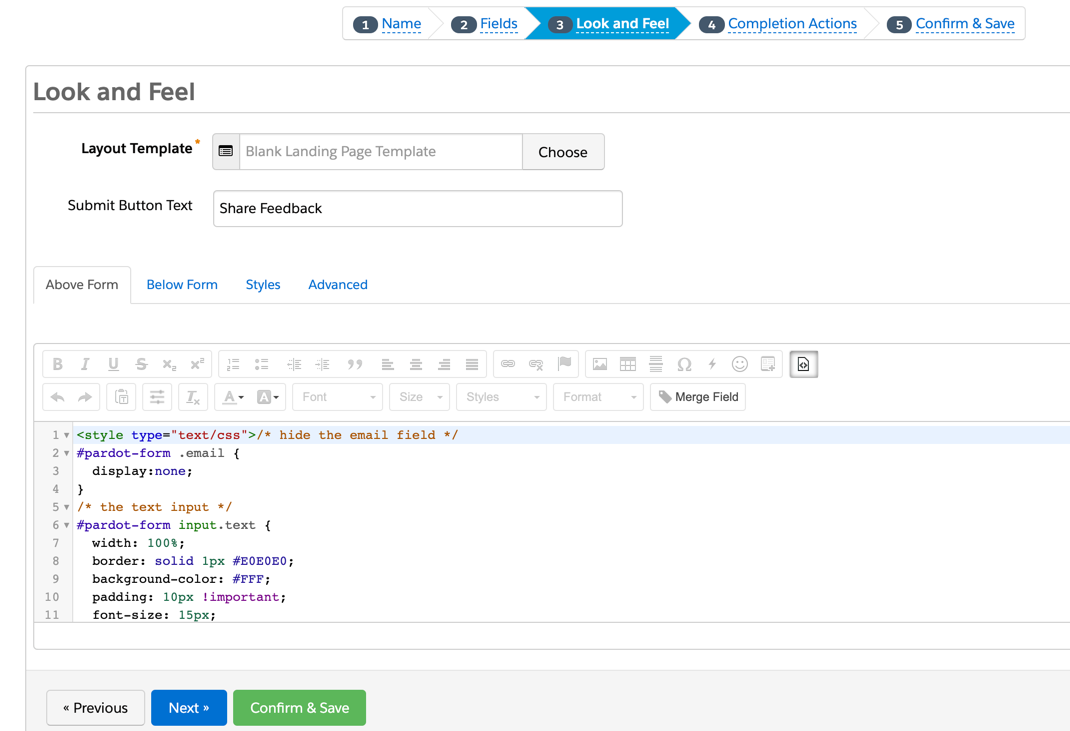
Step 3: Style the unsubscribe reason form
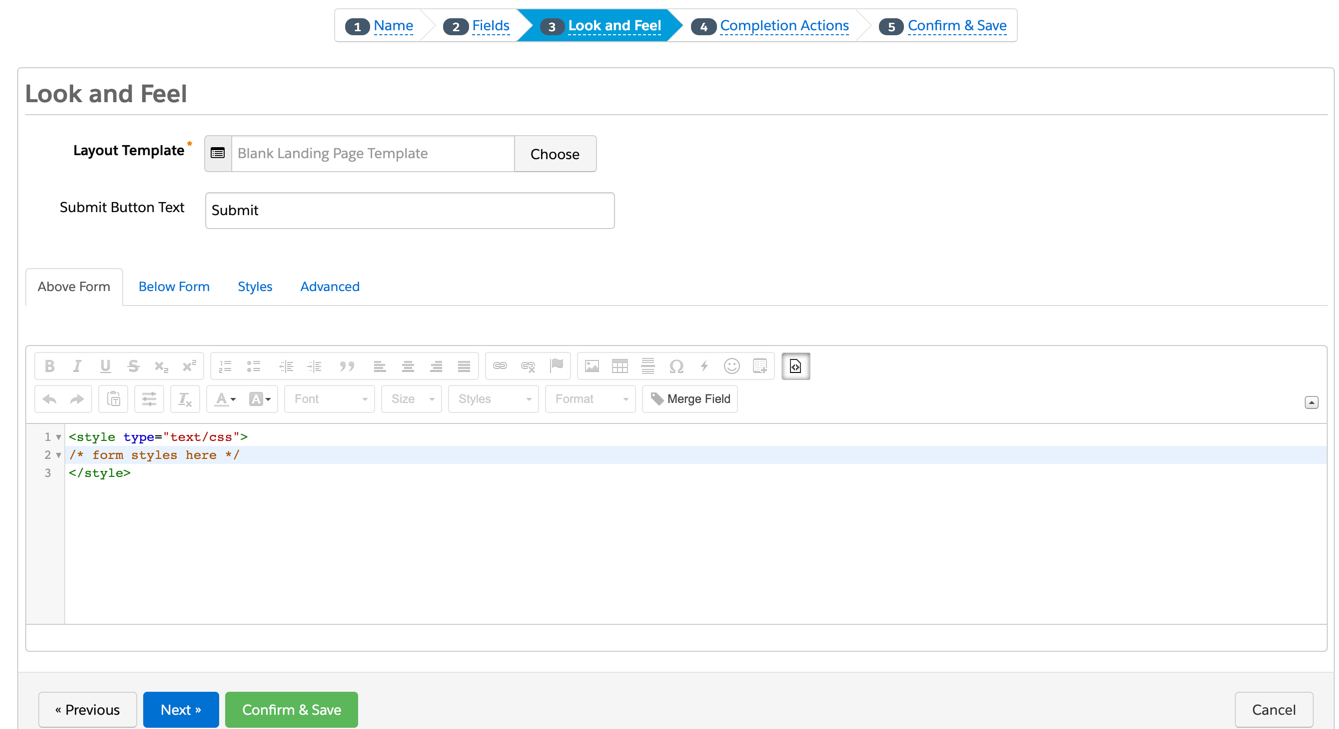
Add some CSS to the unsubscribe form in the Above Form section.
Since the only way to get to the unsubscribe reason page will be from an email, I highly recommend hiding the email address field from the form by adding this CSS:
#pardot-form .email {
  display:none;
}
Here’s what my full CSS looks like for my form:
<style type="text/css">
/* hide the email field */
#pardot-form .email {
  display:none;
}
/* the text input */
#pardot-form input.text {
  width: 100%;
  border: solid 1px #E0E0E0;
  background-color: #FFF;
  padding: 10px !important;
  font-size: 15px;
  box-sizing:border-box;
}
/* the dropdown field */
#pardot-form select {
  width: 100%;
  border: solid 1px #E0E0E0;
  background-color: #FFF;
  padding: 10px !important;
  font-size: 15px;
  border-radius: 0;
  -moz-border-radius: 0;
  -webkit-border-radius: 0;
  -moz-appearance: none;
  -webkit-appearance: none;
  appearance: none;
  background-position: right center;
  background-repeat: no-repeat;
  background-size: 1ex;
  background-origin: content-box;
  color: #868686;
  outline:none;
  background-image: url("data:image/svg+xml;base64,PD94bWwgdmVyc2lvbj0iMS4wIiBlbmNvZGluZz0iVVRGLTgiIHN0YW5kYWxvbmU9Im5vIj8+CjxzdmcKICAgeG1sbnM6ZGM9Imh0dHA6Ly9wdXJsLm9yZy9kYy9lbGVtZW50cy8xLjEvIgogICB4bWxuczpjYz0iaHR0cDovL2NyZWF0aXZlY29tbW9ucy5vcmcvbnMjIgogICB4bWxuczpyZGY9Imh0dHA6Ly93d3cudzMub3JnLzE5OTkvMDIvMjItcmRmLXN5bnRheC1ucyMiCiAgIHhtbG5zOnN2Zz0iaHR0cDovL3d3dy53My5vcmcvMjAwMC9zdmciCiAgIHhtbG5zPSJodHRwOi8vd3d3LnczLm9yZy8yMDAwL3N2ZyIKICAgdmVyc2lvbj0iMS4xIgogICBpZD0ic3ZnMiIKICAgdmlld0JveD0iMCAwIDM1Ljk3MDk4MyAyMy4wOTE1MTgiCiAgIGhlaWdodD0iNi41MTY5Mzk2bW0iCiAgIHdpZHRoPSIxMC4xNTE4MTFtbSI+CiAgPGRlZnMKICAgICBpZD0iZGVmczQiIC8+CiAgPG1ldGFkYXRhCiAgICAgaWQ9Im1ldGFkYXRhNyI+CiAgICA8cmRmOlJERj4KICAgICAgPGNjOldvcmsKICAgICAgICAgcmRmOmFib3V0PSIiPgogICAgICAgIDxkYzpmb3JtYXQ+aW1hZ2Uvc3ZnK3htbDwvZGM6Zm9ybWF0PgogICAgICAgIDxkYzp0eXBlCiAgICAgICAgICAgcmRmOnJlc291cmNlPSJodHRwOi8vcHVybC5vcmcvZGMvZGNtaXR5cGUvU3RpbGxJbWFnZSIgLz4KICAgICAgICA8ZGM6dGl0bGU+PC9kYzp0aXRsZT4KICAgICAgPC9jYzpXb3JrPgogICAgPC9yZGY6UkRGPgogIDwvbWV0YWRhdGE+CiAgPGcKICAgICB0cmFuc2Zvcm09InRyYW5zbGF0ZSgtMjAyLjAxNDUxLC00MDcuMTIyMjUpIgogICAgIGlkPSJsYXllcjEiPgogICAgPHRleHQKICAgICAgIGlkPSJ0ZXh0MzMzNiIKICAgICAgIHk9IjYyOS41MDUwNyIKICAgICAgIHg9IjI5MS40Mjg1NiIKICAgICAgIHN0eWxlPSJmb250LXN0eWxlOm5vcm1hbDtmb250LXdlaWdodDpub3JtYWw7Zm9udC1zaXplOjQwcHg7bGluZS1oZWlnaHQ6MTI1JTtmb250LWZhbWlseTpzYW5zLXNlcmlmO2xldHRlci1zcGFjaW5nOjBweDt3b3JkLXNwYWNpbmc6MHB4O2ZpbGw6IzAwMDAwMDtmaWxsLW9wYWNpdHk6MTtzdHJva2U6bm9uZTtzdHJva2Utd2lkdGg6MXB4O3N0cm9rZS1saW5lY2FwOmJ1dHQ7c3Ryb2tlLWxpbmVqb2luOm1pdGVyO3N0cm9rZS1vcGFjaXR5OjEiCiAgICAgICB4bWw6c3BhY2U9InByZXNlcnZlIj48dHNwYW4KICAgICAgICAgeT0iNjI5LjUwNTA3IgogICAgICAgICB4PSIyOTEuNDI4NTYiCiAgICAgICAgIGlkPSJ0c3BhbjMzMzgiPjwvdHNwYW4+PC90ZXh0PgogICAgPGcKICAgICAgIGlkPSJ0ZXh0MzM0MCIKICAgICAgIHN0eWxlPSJmb250LXN0eWxlOm5vcm1hbDtmb250LXZhcmlhbnQ6bm9ybWFsO2ZvbnQtd2VpZ2h0Om5vcm1hbDtmb250LXN0cmV0Y2g6bm9ybWFsO2ZvbnQtc2l6ZTo0MHB4O2xpbmUtaGVpZ2h0OjEyNSU7Zm9udC1mYW1pbHk6Rm9udEF3ZXNvbWU7LWlua3NjYXBlLWZvbnQtc3BlY2lmaWNhdGlvbjpGb250QXdlc29tZTtsZXR0ZXItc3BhY2luZzowcHg7d29yZC1zcGFjaW5nOjBweDtmaWxsOiMwMDAwMDA7ZmlsbC1vcGFjaXR5OjE7c3Ryb2tlOm5vbmU7c3Ryb2tlLXdpZHRoOjFweDtzdHJva2UtbGluZWNhcDpidXR0O3N0cm9rZS1saW5lam9pbjptaXRlcjtzdHJva2Utb3BhY2l0eToxIj4KICAgICAgPHBhdGgKICAgICAgICAgaWQ9InBhdGgzMzQ1IgogICAgICAgICBzdHlsZT0iZmlsbDojMzMzMzMzO2ZpbGwtb3BhY2l0eToxIgogICAgICAgICBkPSJtIDIzNy41NjY5Niw0MTMuMjU1MDcgYyAwLjU1ODA0LC0wLjU1ODA0IDAuNTU4MDQsLTEuNDczMjIgMCwtMi4wMzEyNSBsIC0zLjcwNTM1LC0zLjY4MzA0IGMgLTAuNTU4MDQsLTAuNTU4MDQgLTEuNDUwOSwtMC41NTgwNCAtMi4wMDg5MywwIEwgMjIwLDQxOS4zOTM0NiAyMDguMTQ3MzIsNDA3LjU0MDc4IGMgLTAuNTU4MDMsLTAuNTU4MDQgLTEuNDUwODksLTAuNTU4MDQgLTIuMDA4OTMsMCBsIC0zLjcwNTM1LDMuNjgzMDQgYyAtMC41NTgwNCwwLjU1ODAzIC0wLjU1ODA0LDEuNDczMjEgMCwyLjAzMTI1IGwgMTYuNTYyNSwxNi41NDAxNyBjIDAuNTU4MDMsMC41NTgwNCAxLjQ1MDg5LDAuNTU4MDQgMi4wMDg5MiwwIGwgMTYuNTYyNSwtMTYuNTQwMTcgeiIgLz4KICAgIDwvZz4KICA8L2c+Cjwvc3ZnPgo=");
}
/* the field labels */
#pardot-form label {
  font-size: 14px;
  color: #868686;
  font-weight:normal;
  padding-bottom:5px;
}
/* the submit button container */
body form.form p.submit {
  margin-left:0;
  text-align:center;
}
/* the submit button */
body form.form p.submit input {
  background:#56CFD2;
  color:#FFF;
  border:0;
  padding:10px 35px;
  font-style: normal;
  font-weight: 800;
  text-transform: uppercase;
  line-height: 1.6923em;
  letter-spacing: 2px;
  cursor:pointer;
}
body form.form p.submit input:hover {
background: #4ebfc2;
}
/* the form */
body form.form {
  line-height: 1.6923em;
  font-size:14px;
  color:#868686;
}
</style>
Step 4: Edit or create a layout template
If your unsubscribe page does not have a dedicated layout template, create a new layout template to use for the unsubscribe page. You can find the layout template name on the settings page for your unsubscribe page.
Navigate to your layout template and click on the Form tab. Find the %%form-before-form-content%%tag within the HTML and replace it with the iFramed version of your unsubscribe reason form. Also, add any text you want to include before or after the embedded form.
Here’s the HTML I replaced the %%form-before-form-content%% tag with:
<!-- START the custom unsubscribe content -->
<h3>Please take a moment and let us know why you unsubscribed.</h3>

<p><iframe allowtransparency="true" frameborder="0" height="250" src="https://go.pardot.com/l/xxx/xxxx-xx-xx/6vr8db" style="border: 0" type="text/html" width="100%"></iframe></p>
<div class="resubscribe">
<h3>Unsubscribed by mistake?</h3>
<p>Click the re-subscribe button below to opt back in.</p>
</div>
<!-- END the custom unsubscribe content-->
And here’s what the full HTML looks like in the Form tab of the layout template:
<form accept-charset="UTF-8" method="post" action="%%form-action-url%%" class="form" id="pardot-form">
%%form-opening-general-content%%
%%form-if-thank-you%%
%%form-javascript-focus%%
%%form-thank-you-content%%
%%form-thank-you-code%%
%%form-end-if-thank-you%%
%%form-if-display-form%%
<!-- START the custom unsubscribe content -->
<h3>Please take a moment and let us know why you unsubscribed.</h3>
<p><iframe allowtransparency="true" frameborder="0" height="250" src="https://go.pardot.com/l/xxx/xxxx-xx-xx/6vr8db" style="border: 0" type="text/html" width="100%"></iframe></p>
<div class="resubscribe">
<h3>Unsubscribed by mistake?</h3>
<p>Click the re-subscribe button below to opt back in.</p>
</div>
<!-- END the custom unsubscribe content-->
%%form-if-error%%
<p class="errors">Please correct the errors below:</p>
%%form-end-if-error%%
%%form-start-loop-fields%%
<p class="form-field %%form-field-css-classes%% %%form-field-class-type%% %%form-field-class-required%% %%form-field-class-hidden%% %%form-field-class-no-label%% %%form-field-class-error%% %%form-field-dependency-css%%">
%%form-if-field-label%%
<label class="field-label" for="%%form-field-id%%">%%form-field-label%%</label>
%%form-end-if-field-label%%
%%form-field-input%%
%%form-if-field-description%%
<span class="description">%%form-field-description%%</span>
%%form-end-if-field-description%%
</p>
<div id="error_for_%%form-field-id%%" style="display:none"></div>
%%form-field-if-error%%
<p class="error no-label">%%form-field-error-message%%</p>
%%form-field-end-if-error%%
%%form-end-loop-fields%%
%%form-spam-trap-field%%
<!-- forces IE5-8 to correctly submit UTF8 content -->
<input name="_utf8" type="hidden" value="☃" />
<p class="submit">
<input type="submit" accesskey="s" value="%%form-submit-button-text%%" %%form-submit-disabled%%/>
</p>
%%form-after-form-content%%
%%form-end-if-display-form%%
%%form-javascript-link-target-top%%
</form>
Lastly, here’s my HTML for the entire Layout tab of my layout template.
There have been some reported issues with the email address not populating in the unsubscribe reason form. This is because the form depends on cookies in order to populate the email address. The prospect might have a browser setting enabled or they are in Incognito Mode. There are two workarounds to solve this:
Workaround #1: Show the email address field if it’s not populated automatically.
The first workaround is to show the email address field if the email field is not populated automatically. To do this, navigate to your unsubscribe reason form, go to the Look and Feeltaband paste this jQuery code in the Below Formsection.
<script src="https://ajax.googleapis.com/ajax/libs/jquery/1.11.2/jquery.min.js"></script>
<script>
    $(document).ready(function() {
    if($('.email input').val() == ''){
    	//show the email field if it's not automatically populated
    	$('#pardot-form .email').show();
   }
});
</script>
Workaround #2: Hide the unsubscribe reason form if the email address is not populated automatically.
The second workaround is to hide the form altogether if the email address is not populated automatically. To do this, navigate to your unsubscribe reason form, go to the Look and Feel tab and paste this jQuery code in the Below Form section. Update the jQuery with your own messages.
<script src="https://ajax.googleapis.com/ajax/libs/jquery/1.11.2/jquery.min.js"></script><script>
    $(document).ready(function() {
    // Add the header to the unsubscribe reason form instead
    $('#pardot-form').before('<h3>Please take a moment and let us know why you unsubscribed.</h3>');
    // check to see if the email field is empty
    if($('.email input').val() == ''){
    // hide the form and the header if the email field is empty
      $('#pardot-form, h3').hide();
    // display an unsubscribe message instead
      $('#pardot-form').before('You have been unsubscribed');
   }
});
</script>
Lastly, remove the header from your unsubscribe layout template since the header is placed within the form instead.
Testing
To test the unsubscribe reason page, you must send yourself a REAL email. The page will not show up if you are using one of the email test features.
Questions?
Send me a tweet @jennamolby or leave a comment below.
Want your Pardot form to match your brand? This can be done by using the Pardot form CSS generator or by writing some custom CSS. If you add custom CSS it can be difficult to know which CSS selectors to use. That’s why I created a CSS framework that you can use to style every aspect of your Pardot forms easily.
Adding Custom CSS to Pardot Forms
Before we dive into some tips and examples, it’s important to know how to update the custom CSS within Pardot. CSS for your form can be placed in your layout template or in the look & feel section of your form.
Default form settings
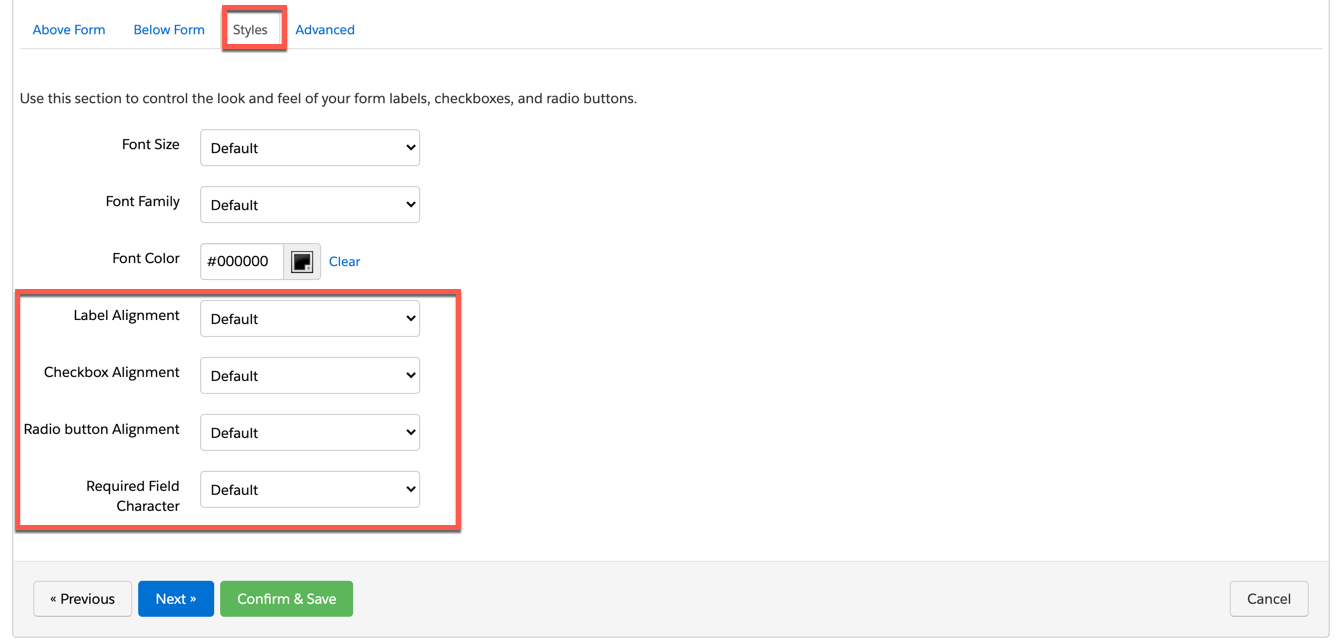
There are a couple of default settings that you can set within your form to make it easier to style. These settings can be found by navigating to your form > look and feel > styles.
One setting I always select is changing the required field character from default to a *. I also like to change the label alignment to above. For the rest of the settings (font color, size, etc) I prefer to use custom CSS.
CSS Framework to Style Pardot Forms
Below is the CSS framework you can use to style your Pardot forms. It contains all the CSS classes needed to style all the elements of your form. Copy & paste the framework and add your custom CSS. Optionally, remove any of the classes that you won’t be using.
/* Form background, width etc */
#pardot-form {

}

/* ------ Styles for all the fields  ------*/
/* Text */
#pardot-form input.text,
/* Dropdown */
#pardot-form select,
/* Date */
#pardot-form input.date,
/* Textarea */
#pardot-form textarea.standard {

}

/* Text input fields */
#pardot-form input.text {

}

/* Textarea fields */
#pardot-form textarea.standard {

}

/* Dropdown fields */
#pardot-form select {

}

/* Date fields */
#pardot-form input.date {

}

/* Checkbox fields */
#pardot-form .pd-checkbox input {

}

/* Radio buttons */
#pardot-form .pd-radio input {

}

/* Captcha */
#pardot-form .g-recaptcha {

}

/* Description field */
#pardot-form p span.description {

}

/* The field labels */
#pardot-form p label {

}

/* Required field labels */
#pardot-form p.required label, #pardot-form span.required label {

}

/* The submit button */
#pardot-form p.submit input {

}

/* The container around the submit button */
#pardot-form p.submit {

}

/* Error message header */
.red-background, #pardot-form p.errors {

}

/* Error message field text */
#pardot-form p.error.no-label {

}

/* Error message label text */
#pardot-form p.required label,
#pardot-form span.required label {

}
Did you know you can create a calendar based on any custom object in Salesforce – without using an app? Yes, this applies to the campaigns object as well. While there are a couple of limitations to using this feature, it’s a great way to get a view of all your campaigns in a campaign view without purchasing an app from the Salesforce App Exchange.
Limitations
Before diving into how to create a campaign calendar, there is one big limitation when it comes to using this feature… the calendar can not be made shareable without using the API. If you want to use this feature, each user will need to create their own calendar. With that being said, there is an idea open to allow sharing via the UI.
If you are looking for more robust calendar functionality, take a look at these apps on the Salesforce AppExchange.
How to create a campaign calendar (without installing an App)
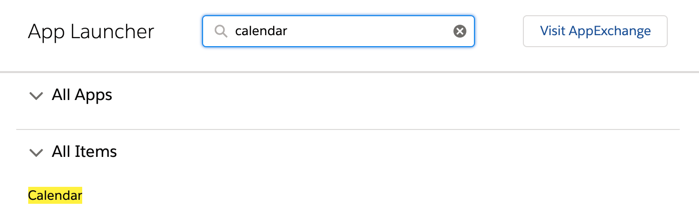
Search for “Calendar” in the App Launcher to find the calendar app.
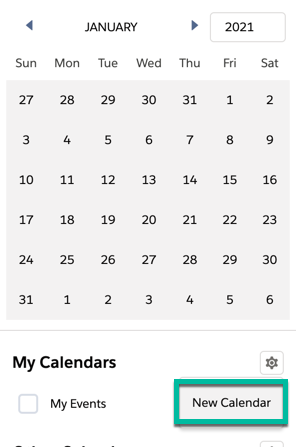
Under My Calendars, click on the gear icon to create a new calendar.
Select the Campaign object from the drop-down and click next.
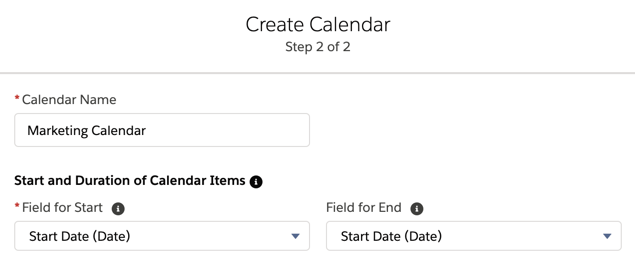
Give your calendar a name and select the start date (required) and the end date (optional). You can use the standard Salesforce campaign fields for the start date and end date, or you can select a custom field. For example, if you have a “go live” date field, you can use that as your start date instead.
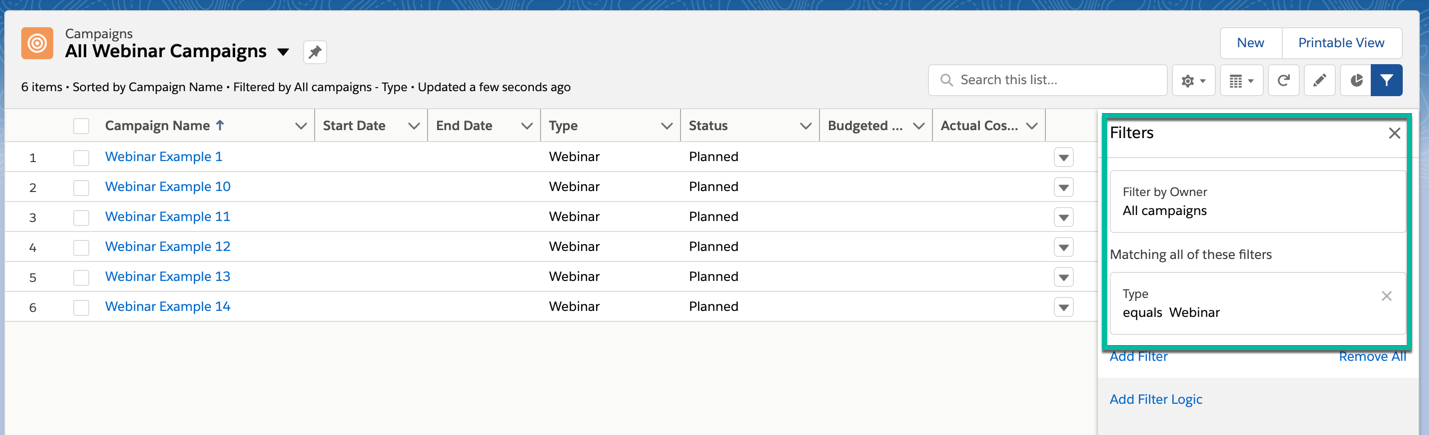
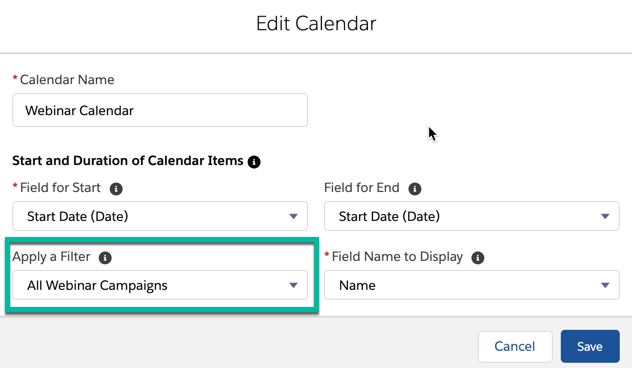
You also have the option to add a filter to your calendar. The filter has to be a list view using the campaign object. For example, if you want to have a separate campaign calendar for webinars only, this is what your list view would look like.
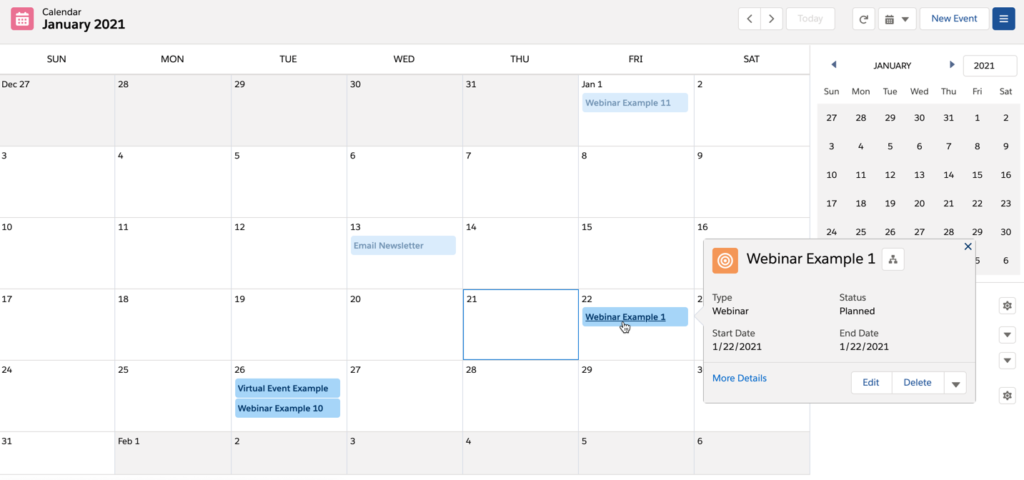
Here’s what my calendar looks like:
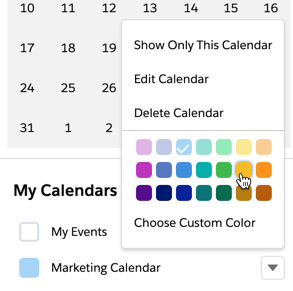
Click on the gear icon next to your calendar name to change the colour of the campaigns displayed in the calendar.
Hover over the campaign name within the calendar to view more information about the campaign.
Want to know which one of your marketing campaigns is causing the lead to reach your MQL threshold? You can stamp this information on the lead by creating two new fields and creating two processes using Salesforce Process Builder. Once the information is available on the lead record, you can pull reports to show which campaigns have triggered the most leads to become an MQL.
Create two fields
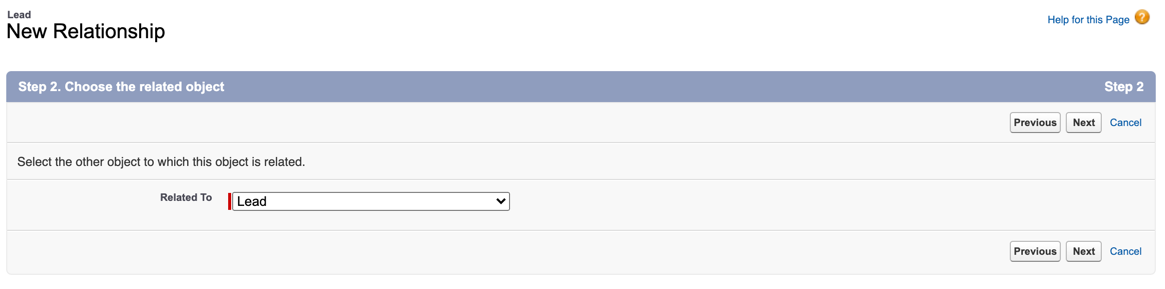
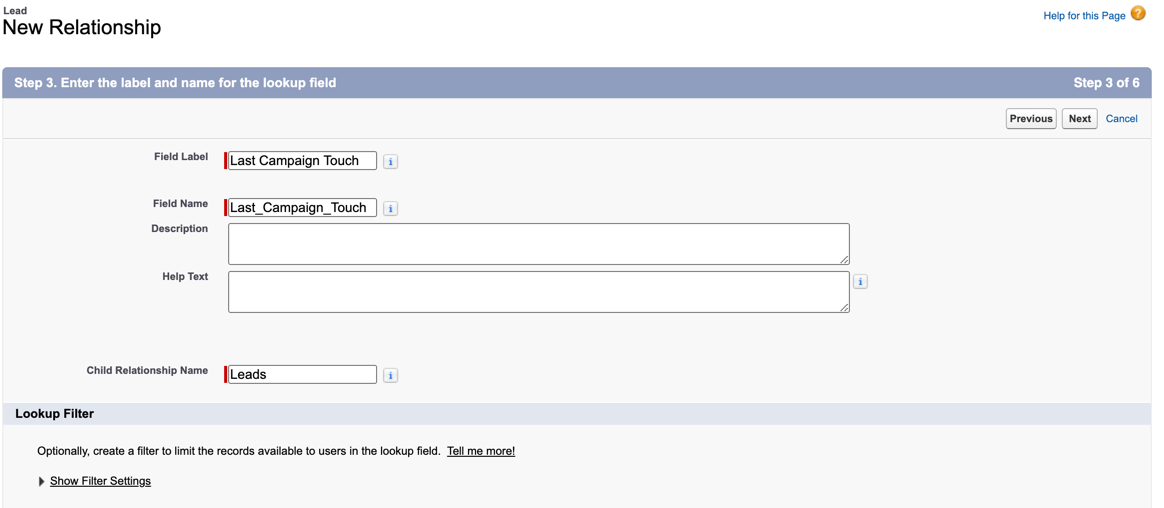
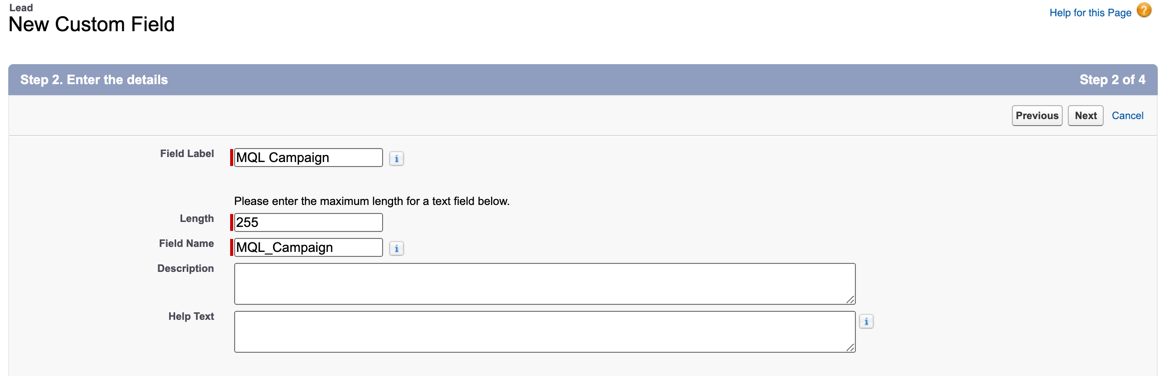
First, create two fields on the lead object. One field will be a lookup that will be populated with the ID of the last campaign, and the second will be a text field that will be populated with the campaign name at MQL.
Last Campaign Touch (Lookup field)
MQL Campaign (Text field)
Create the two processes within Process Builder
To stamp the lead record with the last campaign at MQL, we will create two processes within Process Builder:
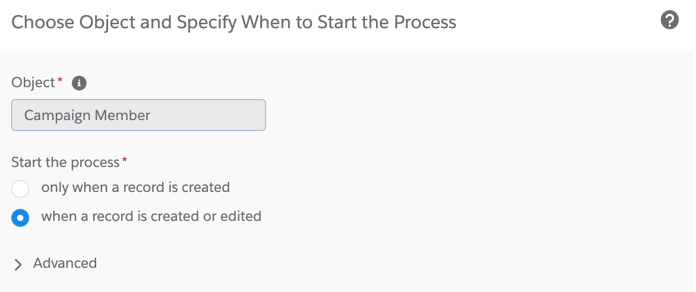
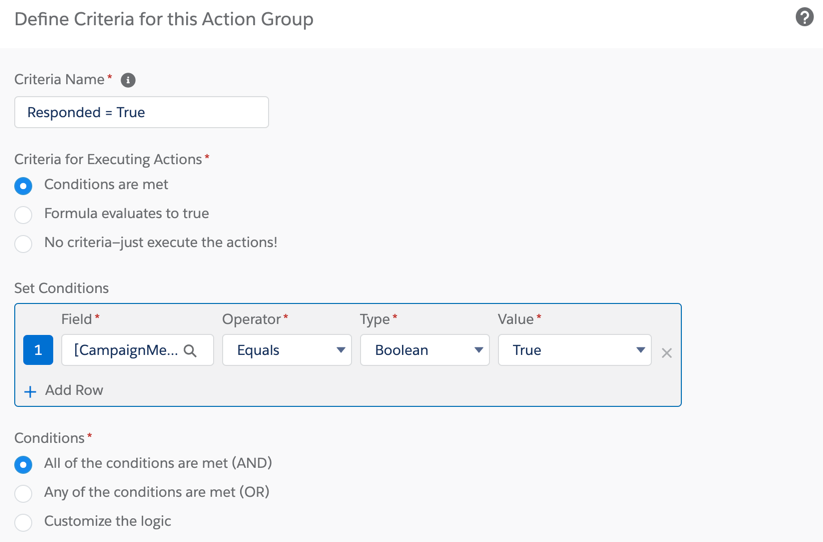
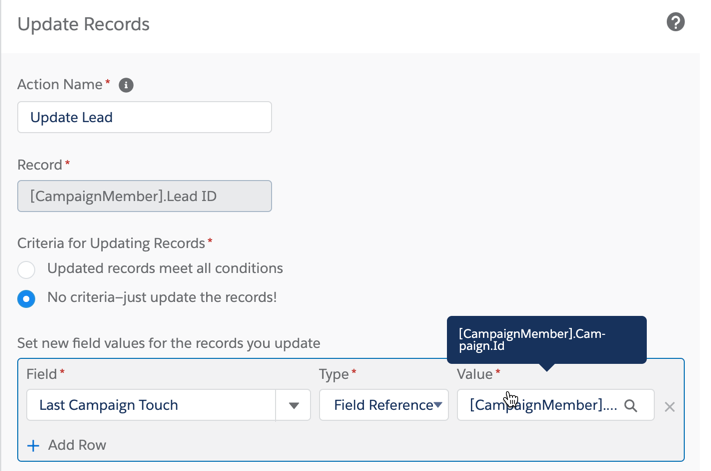
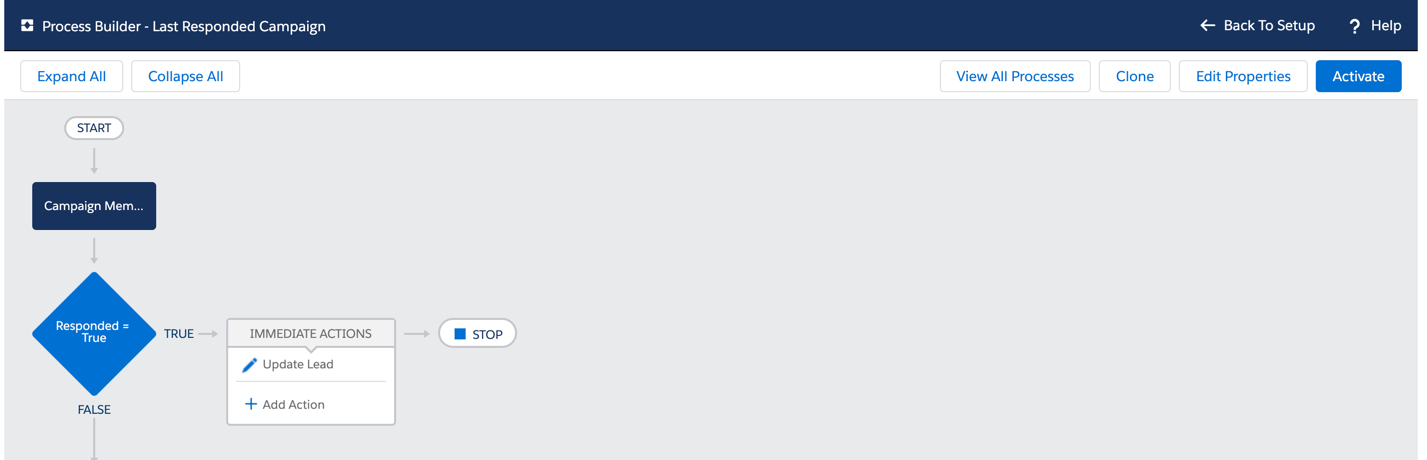
Last Responded Campaign: This will be triggered when a Campaign Member is created or edited. It will look to see if the Lead has responded (HasResponded = TRUE) to the campaign and update the lookup field (Last Campaign Touch) with the Campaign ID.
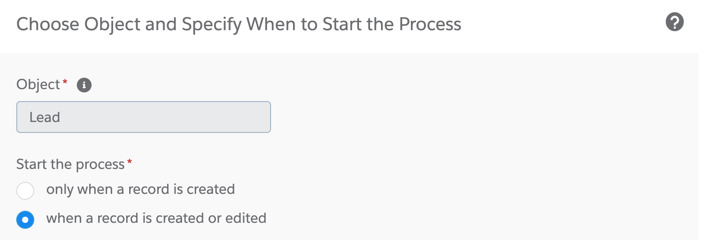
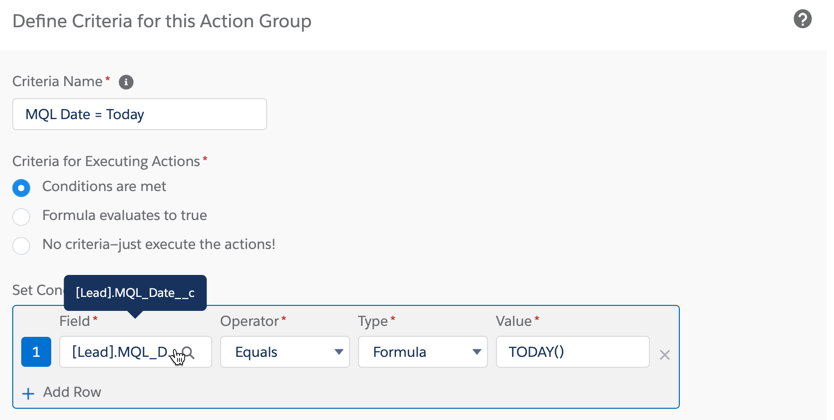
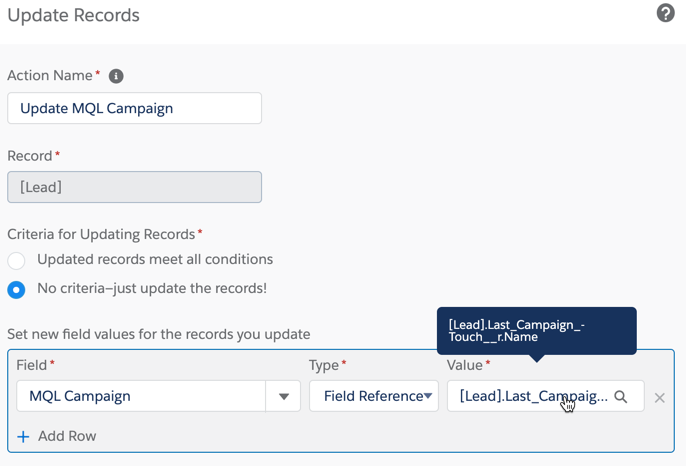
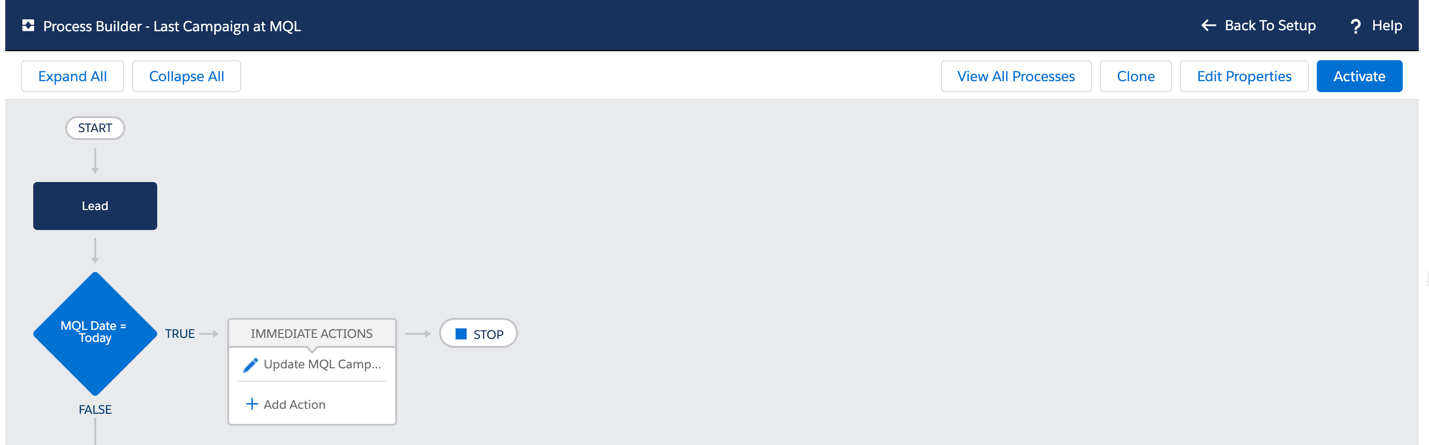
Last Campaign at MQL: This will be triggered when a Lead is created or edited. It will look to see if the Lead is an MQL and update the text field (MQL Campaign) with the Campaign Name.
Last Responded Campaign Process Builder
Last Campaign at MQL Process Builder
Testing
To test your processes, create a new test lead and add the lead to a campaign. Set the campaign member status for the lead as responded and then refresh your lead to see if the Last Campaign Touch field is populated with the correct campaign ID.
Next, update your test lead to become an MQL and see if the MQL Campaign field populates with the campaign name.
Add your test lead to another campaign and see the campaign member status as responded and check to see if the Last Campaign Touch is updated and MQL Campaign is NOT updated.
Reporting
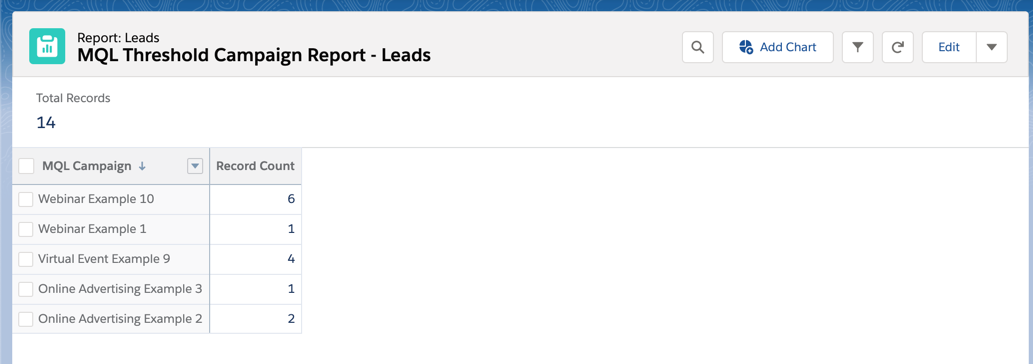
Once the information is available on the lead, you can pull a lead report and group by the MQL Campaign field to show how many MQLs can be attributed to each one of your campaigns.
You might already be using UTM parameters to track your marketing campaigns with Google Analytics, but are you capturing that information when a prospect is created in Pardot? Capturing this data is critical to assess the value of your marketing campaign and is a lead management best practice.
What are UTM Parameters?
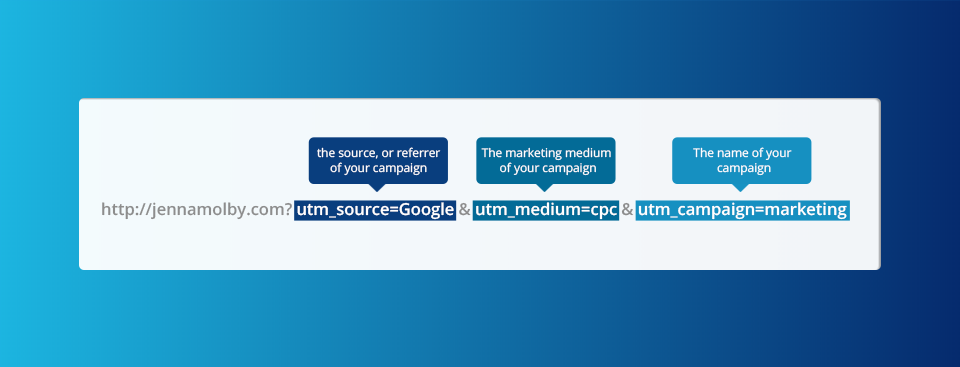
UTM parameters are tags you add to a URL. Marketers use this to track the traffic from a variety of sources such as email, social media, banner ads, etc. The tags can be sent back to Google Analytics and tracked, which can gauge the effectiveness of campaigns and identify the best ways to drive more visitors to your website.
Capturing UTM parameters in Pardot: Overview
There are two main ways to capture UTMs in Pardot. The first way is to enable the Google Analytics Connector. The connector simplifies the flow of Google Analytics data between Pardot and Salesforce. It collects data from five Google Analytics tags: campaign name, medium, source, content, and term automatically. Here are some great resources to help you get started with the Google Analytics Connector:
The second way to capture UTMs in Pardot is through hidden form fields. This method involves adding fields for campaign name, medium, source and content to each of your forms and then using a tracked URL within your marketing campaigns.
How are you embedding your form?
Select one of the options below to view the step-by-step guide.
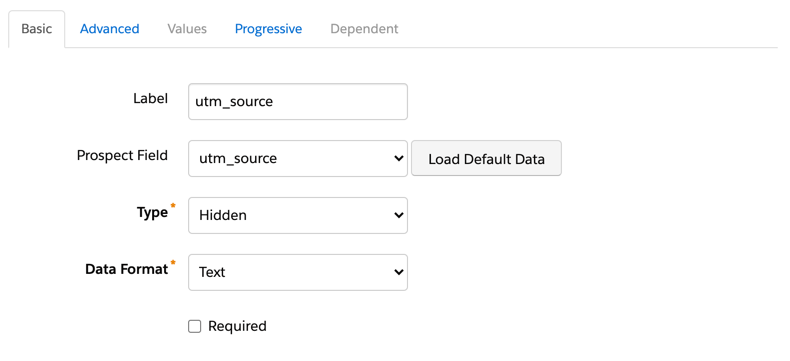
If you have an embedded form on a Pardot landing page, capturing URL parameters is easy. Add your UTM fields to your Pardot form as hidden fields with the following settings:
Not required
Type: hidden
Date format: Text
Always display even if previously completed (checked)
Maintain the initial value upon subsequent form submissions (checked)*
* checking this will ensure that the UTM parameters will not be overwritten (first touch only).
Creating URLs
In order for Pardot to automatically populate your hidden fields with the correct data, the Field ID and the parameter name in the URL MUST match. For example, if your Pardot field name is “medium” and your URL uses utm_medium, the fields will not automatically populate. Note: This is case-sensitve.
The IDs for your form fields are field ID or API name. This can be found in Administration > Prospect Fields > Custom Fields.
If your field names follow the standard naming convention recommended by Google, you can use this Campaign URL Builder to build your URLs. If your field names are different, you can create a Google Sheet to generate URLs. Here’s a Google Sheet Template to get you started. Simply update Column G with your field names.
Alternatively, you can use the script outlined in this post to have full control over the parameter names and field names.
On a web page (iFrame)
Capture URL parameters on a web page with a Pardot embedded form (iFrame)
Capturing URL parameters via an iFrame is similar to using a Pardot form on a landing page. The only difference is that you need to pass the URL parameters from the parent page (your webpage) to the embedded (iFrame) form.
Add your UTM fields to your Pardot form as hidden fields with the following settings:
Not required
Type: hidden
Date format: Text
Always display even if previously completed (checked)
Maintain the initial value upon subsequent form submissions (checked)*
* checking this will ensure that the UTM parameters will not be overwritten (first touch only).
Add the form to your web page
Grab the iFrame script for your Pardot form. Since we will be adding some JavaScript to the web page in order to pass the parameters to the iFrame, we need to give the iFrame an ID. Here’s what my iFrame code looks like after adding the ID called “myiframe”.
If you used a different ID for your iFrame, other than “myiframe”, you will need to update the ID within the JavaScript.
Creating URLs
In order for Pardot to automatically populate your hidden fields with the correct data, the Field ID and the parameter name in the URL MUST match. For example, if your Pardot field name is “medium” and your URL uses utm_medium, the fields will not automatically populate. Note: This is case-sensitve.
The IDs for your form fields are field ID or API name. This can be found in Administration > Prospect Fields > Custom Fields.
If your field names follow the standard naming convention recommended by Google, you can use this Campaign URL Builder to build your URLs. If your field names are different, you can create a Google Sheet to generate URLs. Here’s a Google Sheet Template to get you started. Simply update Column G with your field names.
Alternatively, you can use the script outlined in this post to have full control over the parameter names and field names.
A Pardot form handler
Capture URL parameters using a Pardot form handler
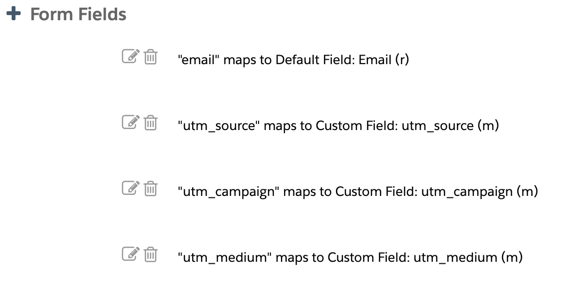
Add your UTM fields to you Pardot form handler and add them to your form as hidden fields.
Add some JavaScript code to your landing page or web page
Place this piece of code on your landing page or web page. This will parse the URL parameters and put the values into the hidden fields on your form.
<script type="text/javascript">
// Parse the URL
function getParameterByName(name) {
    name = name.replace(/[\[]/, "\\[").replace(/[\]]/, "\\]");
    var regex = new RegExp("[\\?&]" + name + "=([^&#]*)"),
        results = regex.exec(location.search);
    return results === null ? "" : decodeURIComponent(results[1].replace(/\+/g, " "));
}
// Give the URL parameters variable names
var source = getParameterByName('utm_source');
var medium = getParameterByName('utm_medium');
var campaign = getParameterByName('utm_campaign');

// Put the variable names into the hidden fields in the form.
document.getElementsByName("utm_source").value = source;
document.getElementsByName("utm_medium").value = medium;
document.getElementsByName("utm_campaign").value = campaign;
</script>