Category

Forms & Form Handlers

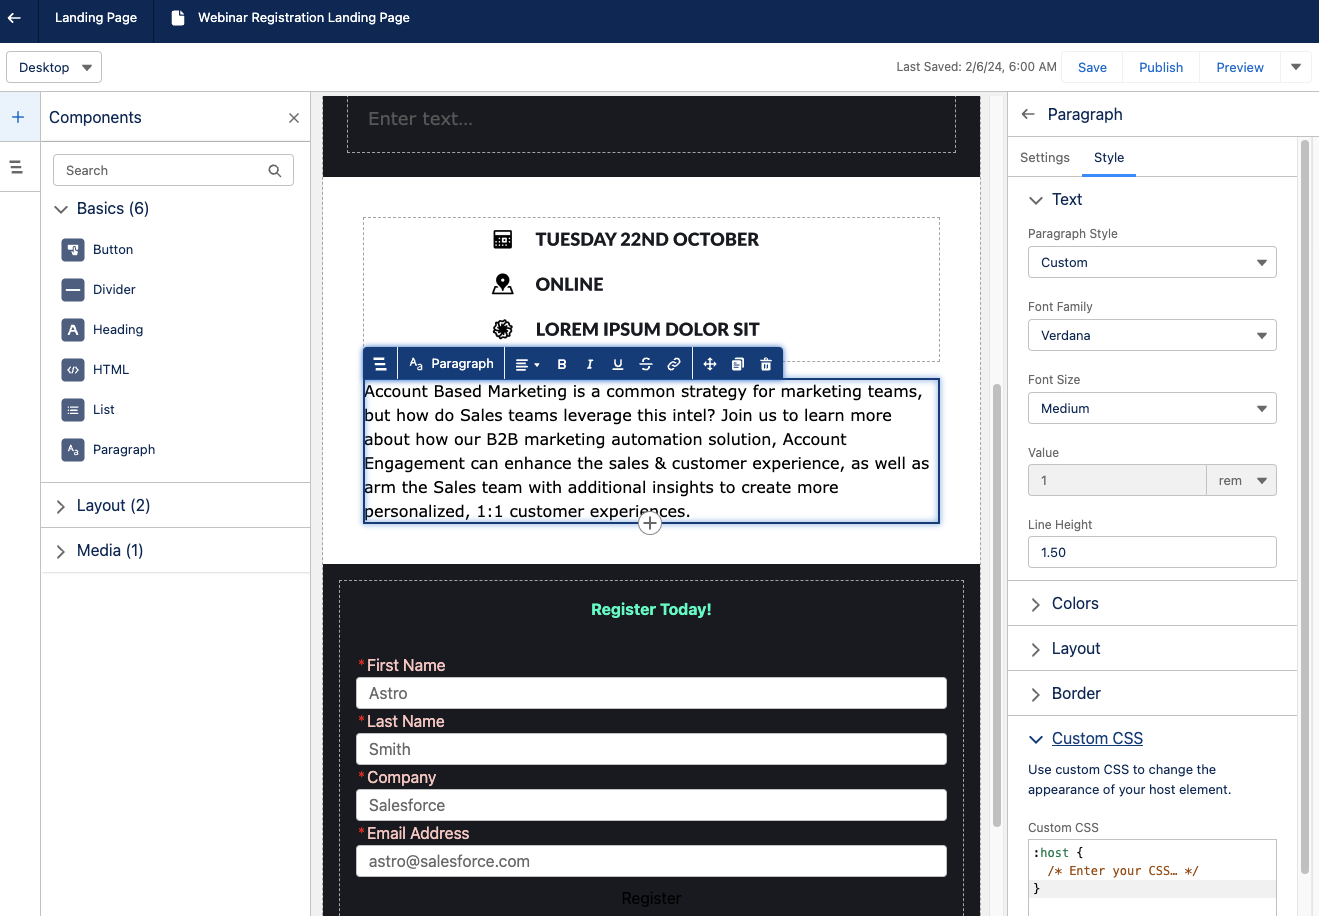
Agentforce Marketing forms are built in Salesforce CMS and can be hosted on Agentforce Marketing landing pages or embedded on external sites. These forms utilize Salesforce Flow to create and update records and represent a significant shift for users transitioning from Marketing Cloud Account Engagement. In this post, I’ve compiled five considerations that I encountered and provided solutions to help speed up your adoption.

Product Note: In previous blog posts, Agentforce Marketing has also been referred to or known as Marketing Cloud on Core and Marketing Cloud Next. This product may have also been referred to under its Edition names, Marketing Cloud Growth and Marketing Cloud Advanced.

Consideration #1 – Duplicate Record Creation

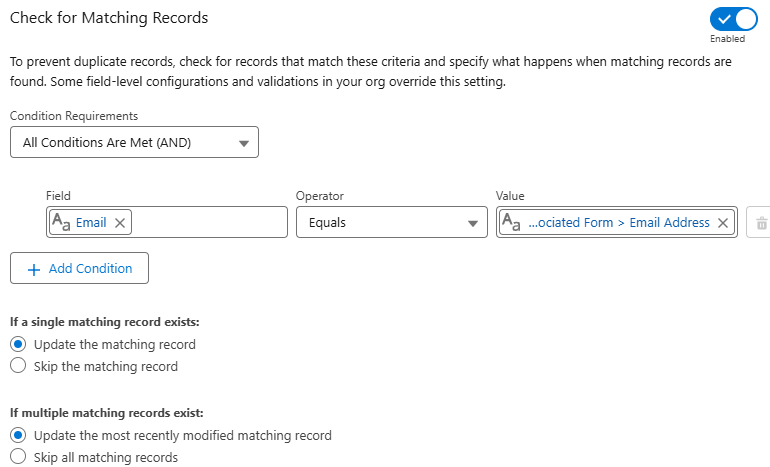
The Create Records element in Flow includes a feature to check for existing records and define actions when matches are found. However, the configuration of your organization impacts this setting and, in some cases, can cause duplicate records to still be created even with this feature enabled.

To prevent duplicate records, check for records that match these criteria and specify what happens when matching records are found. Some field-level configurations and validations in your org override this setting.

Checking for matching records

Solution – Test and Validate

Before getting too concerned about this one, do some testing. Salesforce is extremely customizable, so I get the disclaimer. It’s totally possible that duplicate rules, validation rules, or other configurations could impact this feature in your org.

I tested in my development org and a couple live orgs and did not run into any issues. Still this is worth noting and validating.

Consideration #2 – Specifying the Created By User for New Leads

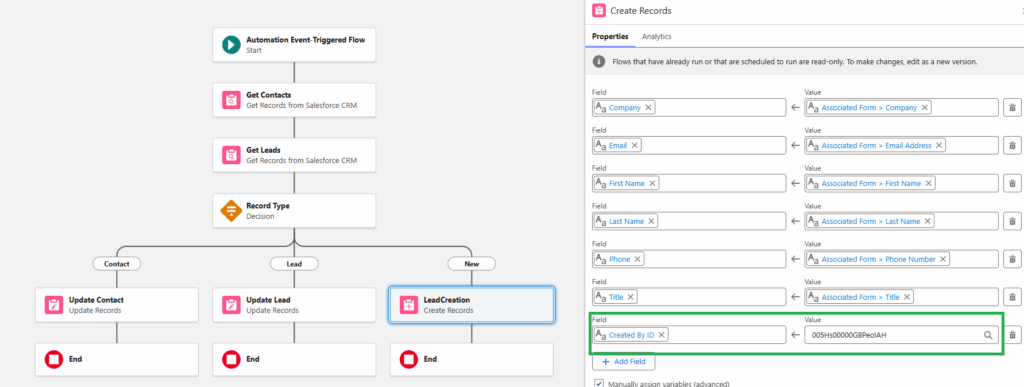
When new leads are created from a form-triggered flow, the“Created By” field defaults to the user who activated the flow. This is not ideal – especially when flows are activated by users that the sales team is unfamiliar with.

The simple fix is to specify the “Created By ID” in the create records element of the flow.  However, this field is an audit field and might not be available to you in your org.

Even if you have access to this field, there are limitations if you try to use it in conjunction with the “Check for Matching Records” setting. The “Created By ID” can’t be updated on matching records, which makes total sense.

Creating records and checking for matching records

Solution – Audit Fields and Flow Updates

The first step is ensuring that the “Created By ID” field is available and accessible to the user building the form-triggered flow.

This feature must be activated by your System Administrator and assigned to users. The full instructions are included in the Salesforce support article Enable the ‘Create Audit Fields’ Permission in Salesforce.

The second step is addressing the issue related to updating existing records. Since you can’t update the “Created By” field on an existing record, the best option is to add a decision element to your flow. This allows you to create different paths and actions based on the type of record.

This solution replicates the functionality of the “Determine CRM Record for Individual” element that’s currently available in segment-triggered flows. Fingers crossed that this element will be available in form-triggered flows in the future. Until then, this solution gives the flexibility to set the “Created By ID” on new records without impacting existing records.

Automation event-triggered flow processes

Consideration #3 – Overwriting Data

When an existing record completes an Agentforce Marketing form and leaves a field blank, the empty input overwrites the current Salesforce data. For example, if a lead with the job title ‘Quality Engineer’ submits a form with the title field empty, the existing value will be overwritten with a blank.

Before

Details of lead prospect information


After

Shows details of lead prospect without the title

Solution #1 – Required Fields

The quick and easy solution is to prevent blank data from being submitted in the first place. This can be done by updating the field to required in the form. 

Solution #2 – Formula Fields

Depending on the number of fields on your form, making all fields required could impact the user experience and reduce completion rates. Understanding that there will likely be times that there are optional fields on forms, we can still protect good data using formula fields.

Creating formula fields allows you to check to see if the form value is blank before updating data in Salesforce. If the form value is blank, the current value from the contact or the lead can be preserved.

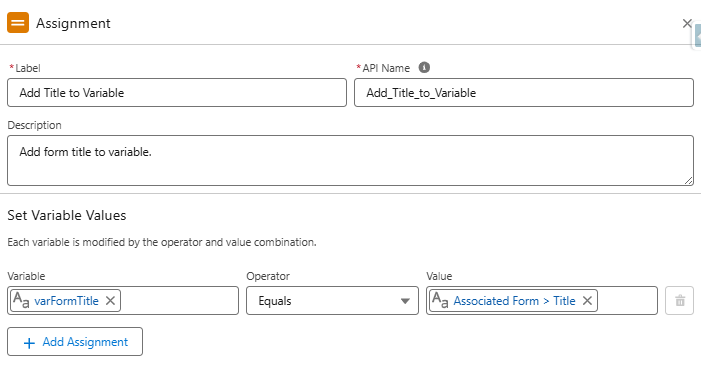
The formulas are complicated by the fact that form fields can’t be used in formulas. This is due to the fact that the data has not yet been committed to the flow’s local memory. This can be addressed by adding the value from the field to an assignment element and using it in the formula.

Protecting Fields 

  1. Create a Variable
    • Toolbox > New Resource > Variable
      • Resource Type: Variable
      • API Name: varFormTitle
      • Data Type: Text
Steps into creating a new resource
  1. Add Assignment Element
    • Set variable values as follows:
      • varFormTitle Equals Associated Form > Title
How to add titles, names, descriptions etc. to a variable
  1. Create Formula
    • API Name:  “clean_Title” (data type – text)
    • This formula will return the value of the varFormTitle variable if it has a value. If it’s blank, it will return the title from the contact record. If a contact record is not found, the final fallback is the title field from the lead. 
    • This ensures that if a blank value is submitted in the form, the current title from the contact will be retained (for contact records) and the title from the lead will be retained for lead records.

IF(
NOT(ISBLANK(TRIM({!varFormTitle}))),
{!varFormTitle},
IF(
NOT(ISBLANK({!Get_Contacts.Title})),
{!Get_Contacts.Title},
{!Get_Leads.Title}
)
)

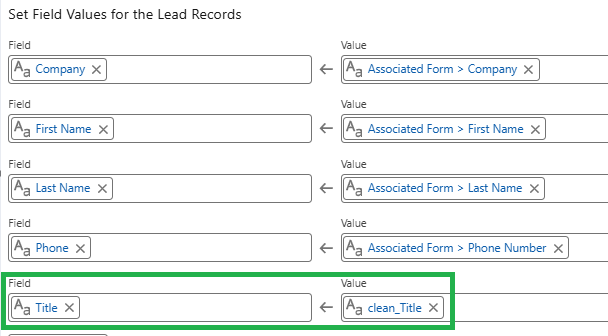
  1. Configure Update Elements
    • Use the “clean_Title” formula in the “Update Contacts” and “Update Leads” elements.
Setting field values for Lead Records

Consideration #4 – Campaign Member Records

Agentforce Marketing uses Opportunity Influence to track revenue as opposed to Campaign Member Influence, so campaign member records are not really needed. However, many marketers (present company included) rely on campaign member records for much more than just revenue tracking.

At this time, there is no single flow element that automatically adds submissions to a Salesforce campaign, but I’m optimistic that one will be added. Until this happens, we have a couple options.

Solution #1 – Customize Each Form Flow

While possible, this option is not very practical. Even with flow templates, this adds a lot of extra complexity to the form-triggered flow. 


Solution #2 – Campaign Manager Flows

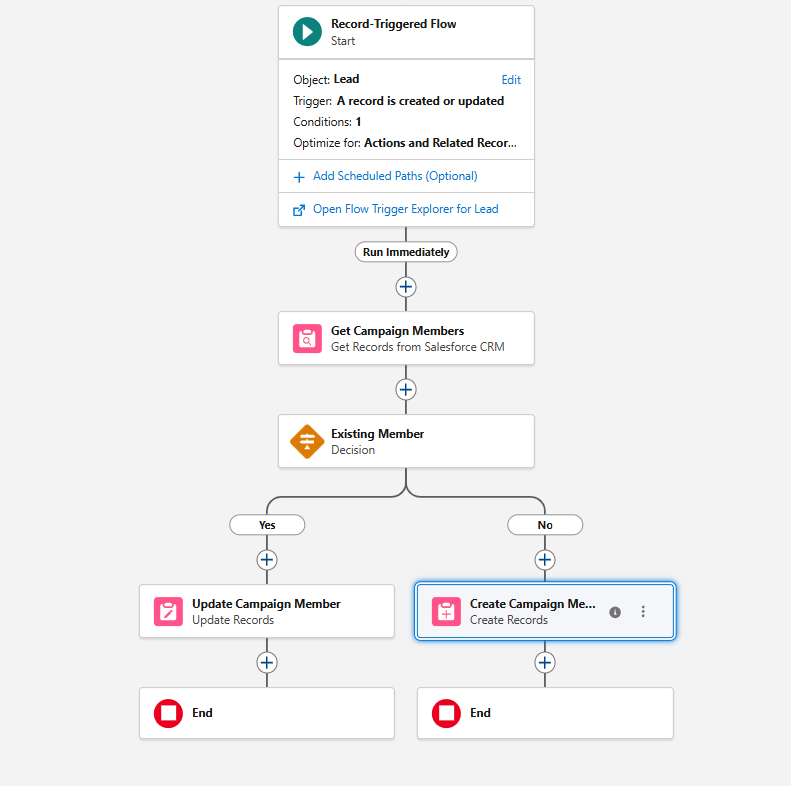
My preferred method for creating campaign member records is separate record-triggered flows. These flows are triggered when new records are created or the campaign or campaign member status on an existing record is changed. 

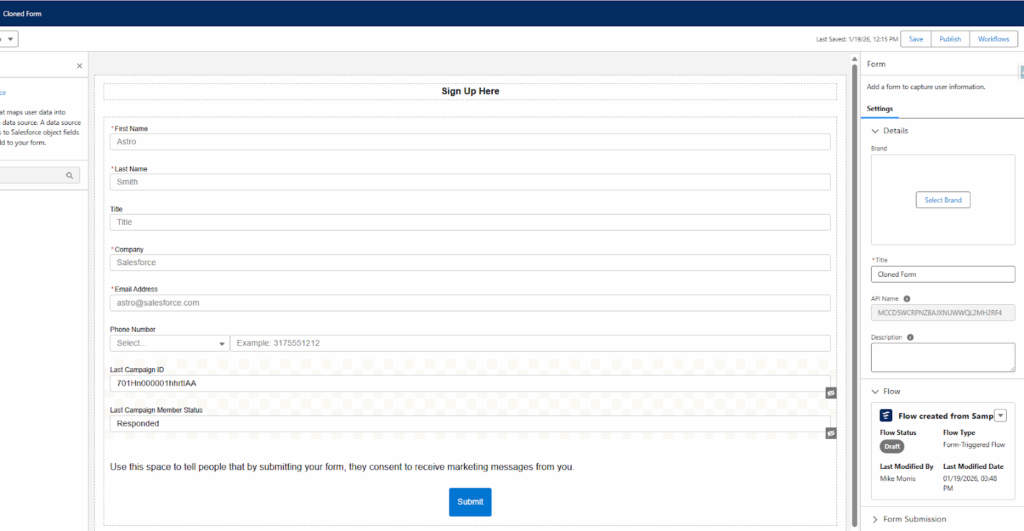
Creating Campaign Manager Flows

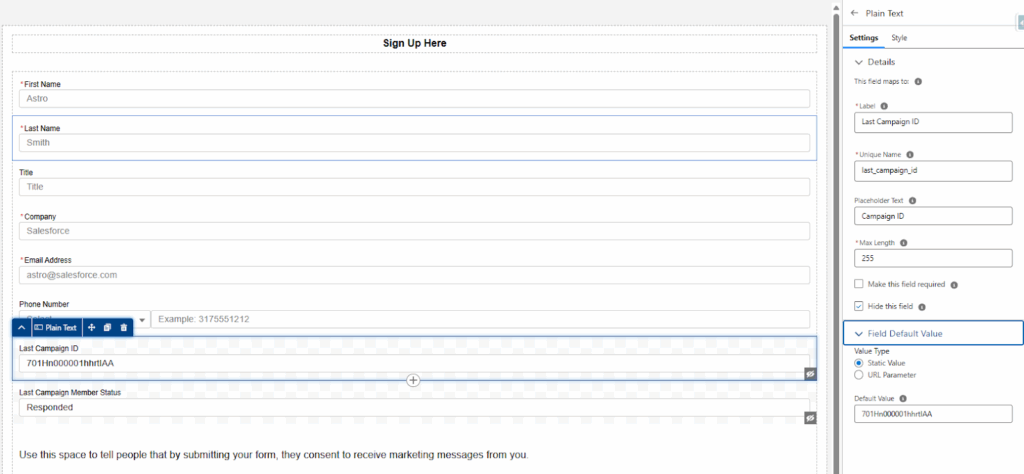
  1. Create Contact and Lead Fields
    • Last Campaign ID (text)
    • Last Campaign Member Status (text)
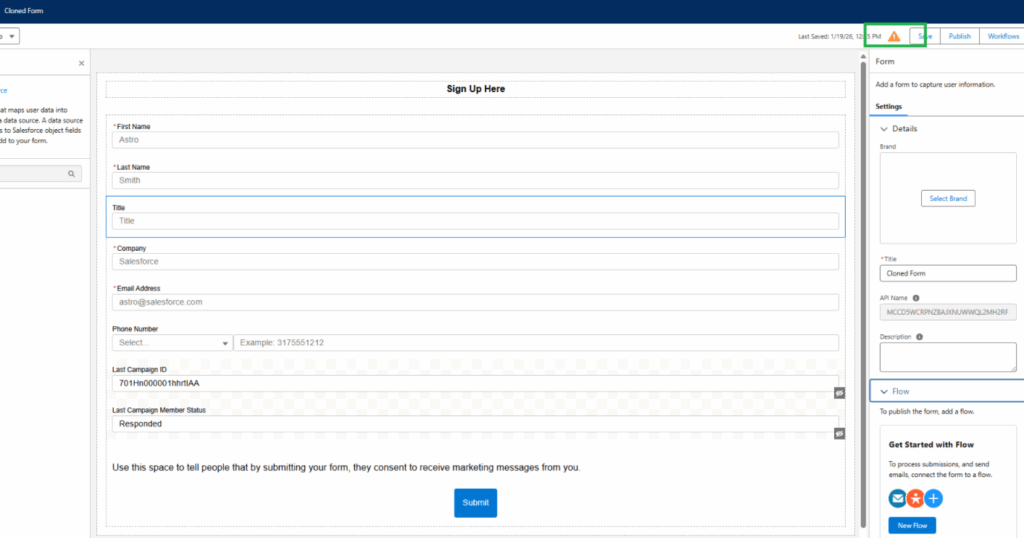
  2. Add Hidden Fields (to the form)
    • This makes it easy for users to update the values for specific forms by updating the default values of the hidden fields. This is preferable to modifying the flow, in my opinion.
      • Add the campaign ID associated with the form as the default value for the “Last Campaign ID” field.
      • Add the desired campaign member status as the default value for the “Last Campaign Member Status” field.
How to sign up for campaign manager flows
  1. Create the Flow (separate flow are needed for each object)
    • Type – Record-Triggered Flow
    • Object – Contact, Lead, or Account (if person accounts are being used)
    • Trigger – A record is created or updated
    • Entry Conditions – This formula triggers when a new record is created and the Last Campaign ID field has a value or when the Last Campaign ID or Last Campaign Member Status value on an existing record is changed.

OR(
AND(
ISNEW(),
NOT(ISBLANK({!$Record.Last_Campaign_ID__c}))
),
ISCHANGED({!$Record.Last_Campaign_Member_Status__c}),
ISCHANGED({!$Record.Last_Campaign_ID__c})
)

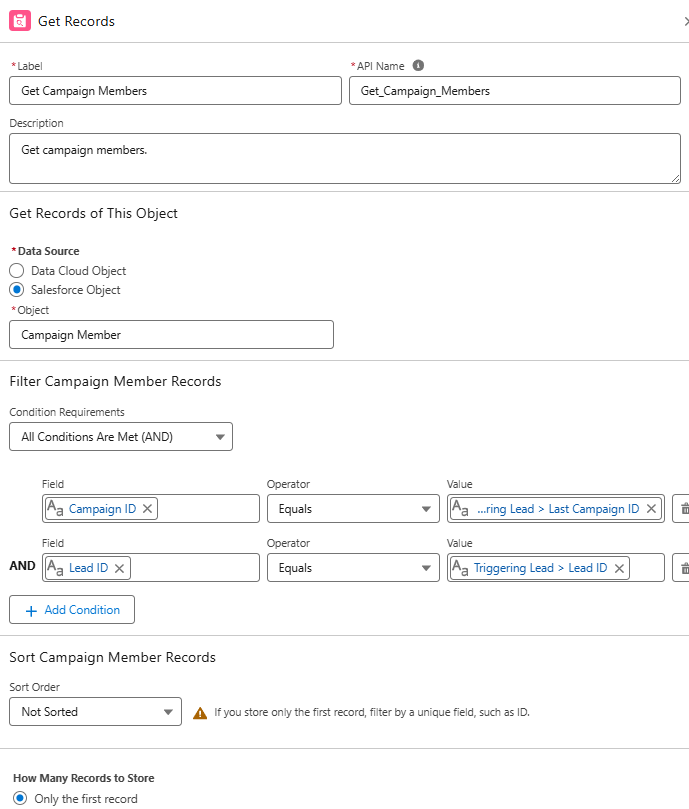
  1. Get Campaign Members
    • Add a “Get Records” element to get all the members of the campaign (based on the Last Campaign ID value from the form).
How to get campaign member records
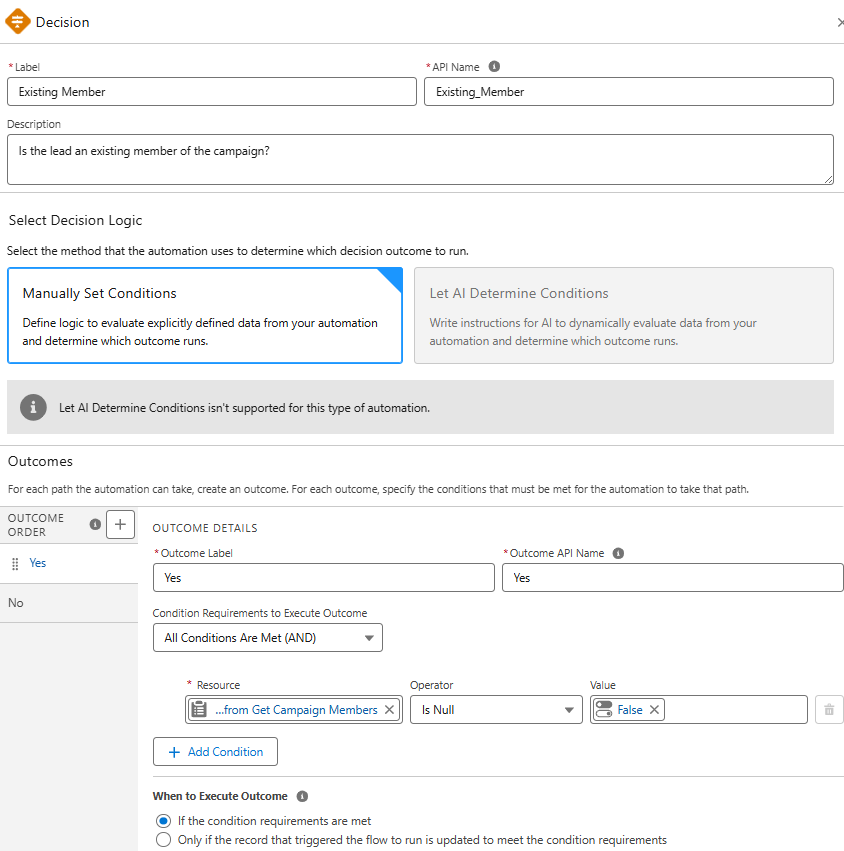
  1. Check for Existing Campaign Members
    • Add a “Decision Element” to create distinct paths for existing vs. new records.
How to check for existing campaign members
  1. Update/Create Records
    • Add an element to update the campaign member status of existing campaign members to the “Last Campaign Member Status” value.
    •  Add an element to create campaign members for new records based on the record ID, “Last Campaign ID” and ““Last Campaign Member Status”.
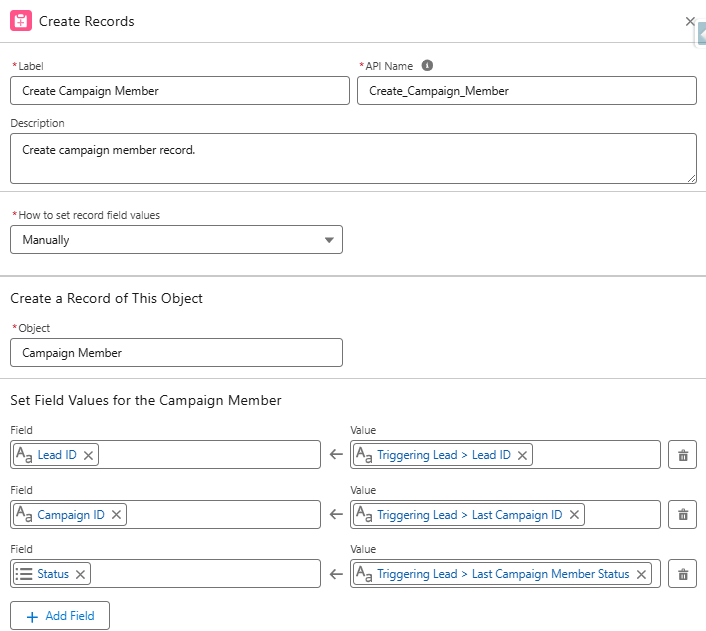
How to update/create records
  1. Activate the Flow
    • Based on the example flow (created on the lead object), new lead records or existing members that meet the entry conditions, will now be automatically added to the target campaign.
Activating the record-triggered flow

Consideration #5 – Time Spent Building Flows

Over the course of this post, we’ve taken a very basic flow and enhanced it with additional elements, assignment variables, and formula fields.

The most frequent concern I hear from clients is that they don’t have the time or skills to manage these builds. However, you don’t actually have to build everything from scratch.

Final Flow

Chart of the final flow

Solution – Flow Templates

Flow templates are a great way to jumpstart flow creation. An existing flow can be saved as a template and a new flow can be created from it. Once created, the new flow can be connected to a form.

Creating a Flow Template

  1. Open and existing flow.
  2. Click “Edit As New Version”.
  3. Open the “Start” element and remove the connected form.
  4. Select the “Save As New Flow” option, name, and save.
    • Note: You will have a large number of errors and warnings. This is expected as the flow is referencing form fields and there is no connected form.
    • With the new flow open, select the “Save as Template” option. This will set the flow type as a template. 
How to save a flow template
  1. Clone the source form.
    • Since the original flow was created from a form, you can clone this form (essentially using it as a template). This will ensure that all fields map correctly to the flow and resolve the errors and warnings.
    • Update the hidden field as needed (Last Campaign ID, Last Campaign Member Status, and any other fields that may have been added).
    • Note – You will see a warning because a flow has not been created. This is expected.
Cloning the source form
  1. Create a new flow using the flow template.
    • Flow > New
    • Use the “Search automations” box to your flow template.
Creating a new flow using the flow template
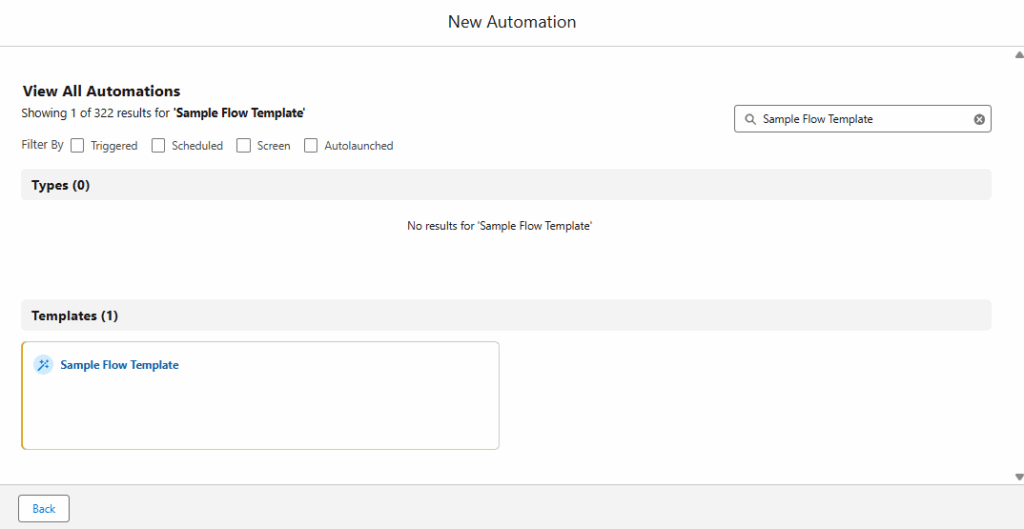
  • Select the template.
    • Close the “Something when wrong” message.
    • Open the “Event” section in the state element and select the new form that was created.
    •  Click “Save” and name the flow.
    • Confirm all errors and warnings have been resolved.
    • DO NOT ACTIVATE.
  1. Publish the form.
    • Return to the new form, confirm that the flow has been connected, click “Publish”.
Publishing the form

Accelerate Your Success 

Agenforce Marketing forms function a bit differently than Marketing Cloud Account Engagement forms, but they perform the same function. There’s an expected learning curve when adopting a new platform and my hope is that understanding some of the considerations will help speed up your adoption and success. 


Sercante is recognized as a Marketing Cloud Growth and Advanced Implementation Expert and has the expertise to support your Agentforce Marketing needs. Let us know how we can help.

Product Note: Marketing Cloud Growth and Advanced are editions of Marketing Cloud Next and have also been referred to as Agentforce Marketing.

Marketing Cloud Growth Edition builders enable marketers to build beautiful landing pages and forms with ease. The builders have a robust set of styling and functionality options that allow Marketers to customize their assets without needing extensive custom coding. Let’s dive into the features of these builders and walk through how to build your first Growth Edition assets. 

Creating a New Landing Page

Users can create a new landing page in two ways:

Option 1

  1. Navigate to Content > CMS Workspace for Marketing Cloud
  2. Select Add > Content
  3. Select Landing Page

This option starts you with a completely blank canvas and does not auto-generate a form or flow for your page.

Option 2

  1. Navigate to Campaigns and create a new campaign
  2. Select Save
  3. Select the Signup Form Template

This option starts you with a Salesforce Landing Page that can be easily customized with your own content and styling. It also auto-generates a form and flow for the form. 

Landing Page Builder

Once you’re in the landing page builder, you can begin setting up the landing page’s basic info. 

This includes:

  • Internal title and description
  • URL content slug, this is the URL-friendly name for your page (a.k.a. vanity URL)
  • Favicon
  • Public page title (max 70 characters)
  • Public Description (max 2000 characters)
    • If SEO indexing is enabled and this field is blank, the search engine results display the first text that the search engine finds on the page.
  • Head Tags
  • Whether or not the Landing Page should be hidden from search engine indexing

You can also optionally set a background image for the Landing Page on the Style tab. 

Drag-and-drop components

Similar to the Lightning Builder experience for Account Engagement, you can begin building your Landing Page by dragging and dropping components from the left-hand components menu. 

I always like to start with a Sections component so I can divide up my section and set the style before dragging in another component for my content. The Sections component can be divided up to 12 and includes an option to stack columns when the page is viewed on mobile.

Add more components to the section

Once you’ve formatted your section, you can drag and drop additional components into said section. This includes:

  • Buttons
  • Dividers
  • Headings
  • HTML
  • Lists
  • Paragraphs
  • Forms
  • Images

All components and sections have robust editing options and have an optional area to enter Custom CSS for more granular customization.

Add form to landing page

To add a form to your Landing Page, drag and drop a form component anywhere on the builder canvas. Once a form component is added, select the existing form you’d like to use. You cannot create a new form while in the landing page builder, but you can open the form builder to edit an existing form or switch out the form later. You can only have one form on your Landing Page.

Form Builder

Build your form by selecting edit within the form component on your landing page. Once in the form builder, you have the option to configure a data source to pull in Lead, Contact, or Account fields into your form. Doing so allows you to easily see which fields are required to create a new record of that type. 

If you opt to not configure a data source, just ensure your fields are mapped accordingly within the flow. 

Customize your form

The components panel has several options for customizing your form. You can enter buttons, dividers, headings, HTML, lists, and paragraphs above, below, or in between form fields. You can also create a new section or insert images. The following form field types (aka Inputs) are supported in this form builder: 

  • Email
  • Phone Number
  • Plain Text
  • Checkbox
    • This is an individual checkbox, but multiple checkbox components can be added in if you want a multi-picklist.
  • Dropdown
  • You must manually enter the picklist options for dropdown components. Labels and Unique Names can be set for each value within the field.

Drag and drop Inputs into your form to add new fields. Options to add placeholder text, make the field required, and set the max length of the entered data are available on the right-side panel. You can also fully customize the field’s text styling, background, padding, border etc., as well as insert Custom CSS.

Edit any flows

Keep in mind that adding or removing fields from the form does not automatically update the flow that is associated with it. When you are done building your form, you will need to edit your flow to correctly map the final form fields to their destinations.

Publishing your Landing Page

Once you’re ready to test and publish your landing page, select the Preview option from the top right-hand corner. The Preview will allow you to view your landing page in Desktop, Tablet, and Mobile views to ensure everything looks good no matter how your audience is viewing the page. 

When you are ready to push the landing page live, select the Publish button in the top right-hand corner. You can then confirm the related content that needs to be published with your landing page, such as images used on the page, translations, and your form. 

Activate URL Alias

Once published, you also need to activate your URL alias. Publishing a landing page indicates that the content is ready to be made available online, but the content isn’t accessible until you also activate the URL alias. To do so, 

  1. Navigate to Content > CMS Workspace for Marketing Cloud 
  2. Select your landing page
  3. Select the URL tab
  4. Select Activate URL Alias
  1. Select Activate

Start Building in Growth!

Now you’re ready to build your first landing page in Marketing Cloud Growth Edition! Be sure to return to The Spot for more posts about Marketing Cloud Growth. We’ll dive into Flows, building emails and all our other Growth learnings in future blog posts.  

Want to know more about Marketing Cloud Growth, like, today? Then reach out to the team at Sercante to start a conversation.

Salesforce web forms can be a game changer by empowering you to create personalized experiences for customers. Complex forms using multiple steps and conditional logic tailor digital journeys to meet the unique needs of the individual. These engaging forms enable savvy sales and marketing teams to foster interest in their product or service and close deals faster. 

While native Salesforce forms have many advantages, they also come with challenges. Specifically, if you want to create complex forms involving detailed steps, containing dynamic content, or with a customized UX, you will need to invest in some kind of development or code. 

Using complex web forms without coding knowledge

If you have time and money to burn or in-house developers to tap for help, then this is no problem. However, if you don’t have knowledge of code or access to a development team or want to speed up time to market, you might want to consider alternatives. 

In this article, we check out how you can get all the perks of complex Salesforce forms without having to write a single line of code. To do this, you will need to venture away from Salesforce native solutions, and their associated limitations, and check out some of the leading tools on the Salesforce AppExchange

Want to learn more? Keep reading! 

Creating leads in Salesforce using web-to-lead forms

Let’s take a look at web-to-lead forms for Salesforce and how these forms can further the aims and objectives of your sales and marketing teams. In the process, we will discover some of the limitations of native Salesforce functionality and find ways to navigate them.

Web-to-lead is a feature that empowers you to create leads in Salesforce via forms embedded on your website. Setting up forms with the native Salesforce web-to-lead feature is relatively easy and doesn’t require any code at all. 

When a user fills in your form and submits it, real-time data gets pushed into Salesforce where the CRM automatically creates a lead. From here, your sales and marketing teams can ensure high-value leads are routed to your best salespeople. That information on your lead is analyzed against relevant metrics and consumer trends. 

Finding flexibility with Salesforce web-to-lead forms

The challenge with the Salesforce web-to-lead is that the out-of-the-box version may leave teams wanting more. For example, you can’t connect your form to other objects in Salesforce such as Case or Opportunity. In addition, you can’t attach files to native web-to-lead forms to provide supporting information on your lead. 

You can accomplish these things and collect detailed information on the preferences and needs of each lead, but the solution requires the implementation of custom code.

Implementing complex web-to-lead forms in Salesforce

To kickstart next-level lead generation and close deals faster, we recommend creating complex web-to-lead forms that capture robust information on a prospective customer such as their likes, dislikes, and purchasing preferences. 

Using a Salesforce form that allows attachments also means you can get comprehensive data on leads and execute deals more effectively. Similarly, complex web-to-lead forms for Salesforce that contain conditional logic and multiple steps are more exciting to the user and give you a more granular picture of their personality and profile. For example, if a user says they are interested in purchasing a particular product, then you can prompt them to fill in follow-up questions such as the specifications they are looking for and the amount of money they are willing to spend. 

On the other hand, if a lead expresses no interest in a product or service, then there is no need to ask them further questions. In this line of thought, if a user answers a question indicating they want to learn more about your organization, you can give them the ability to download a pamphlet or ebook. If not, you don’t need to bother them with this. This kind of dynamic logic saves time and holds the interest of users a lot longer.

You can achieve this level of flexibility and create dynamic, multi-step web-to-lead forms in Salesforce, but it will require coding and development. So, what are your options if you want to skip the heavy dev work but still get all of the perks? 

Alternatives to native Salesforce forms

If you are a seasoned Salesforce user, you will know that the Salesforce AppExchange is a giant marketplace where you can find thousands of platforms that integrate with the planet’s leading CRM. And while there are countless tools with which to create forms in Salesforce, some tools do this more seamlessly than others. 

The best solutions give you the freedom to build forms in Salesforce using any logic or object you want without any limitations or code. This frees up your schedule, saves you money, and requires zero compromise when it comes to your dream solution. 

While it’s up to you to choose the tool that best suits your organization, we will zone in on one app: Titan for Salesforce. Taking its name from the most powerful of Greek gods, Titan is a no-code platform that can implement any custom solution for Salesforce. 

Web-to-lead forms by Titan allow you to: 

  • Connect your web form to any object in Salesforce such as Contact, Opportunity, and Case.
  • Include attachments on your web form for Salesforce.
  • Create tailored customer journeys with multiple steps and conditional logic.
  • Generate leads in Salesforce.
  • Make forms with a custom UX. 
  • Gather comprehensive information on leads. 
  • View comprehensive data on every lead in Salesforce.
  • Data is validated in real-time so you can make sure form data is sent to the correct object:
  • Go-to-market fast! 

And all this requires no code or any special technical expertise, though experience with Salesforce or having worked as a Salesforce administrator will certainly help you work at optimum speed. Learn more about Titan’s Web-to-Lead powers here:

Salesforce Forms Wrapped 

And that’s a wrap on building complex forms for Salesforce using zero code. We hope you learned more about how more complex forms can create intuitive and guided digital experiences for users and help you make deals that much faster. 

Web-to-lead forms automate the lead creation process for marketing and sales teams but Salesforce’s native feature is limited. We suggest finding a no-code alternative on the AppExchange. Titan is one great option, but it’s up to you to choose the perfect solution for your business needs and objectives.

Marketing Cloud Account Engagement Progressive Profiling is an out-of-the-box functionality and a powerful solution for B2B marketers who want to get detailed prospect data without overwhelming them with a large number of form fields to complete.

This advanced form feature allows marketers to gather additional information about prospects over time, without creating lengthy forms. On one hand, it helps the marketers gain higher conversion rates, while on the other it enhances the user experience and reduces form fill burnout.

How does Progressive Profiling work?

Through Progressive Profiling, Marketing Cloud Account Engagement replaces the form fields for which data is already collected with new fields.

So when a prospect visits your progressive profiling enabled form, it will only present the fields they haven’t

filled out before, unless the ‘Always display even if previously completed’ setting is enabled. By doing so, you gradually collect more information about your prospects over multiple interactions.

  • When a prospect first interacts with your marketing content, Marketing Cloud Account Engagement should display a short form with essential fields such as first name, last name, email address, and company name. The goal is to capture basic prospect data to initiate the engagement.
  • Upon subsequent engagement, Marketing Cloud Account Engagement flips previously completed fields with new ones. For instance, if the prospect has completed the Company Name field, the next time they interact with a form, it could be replaced with the Job title field.
  • Through every interaction, Marketing Cloud Account Engagement will ask the prospect to provide additional data beyond what is collected already.
  • Gradually you can build a comprehensive profile of your prospects, and it can be used to tailor your marketing campaigns to cater to their specific needs and preferences.

Key Benefits of Progressive Profiling

  • Progressive profiling ensures that quality prospect data is collected, as the risk of data entry errors is minimized due to this gradual approach of presenting fields.
  • Since the number of fields displayed at a time is limited, it makes the form submission exercise seamless, reduces burnout and increases the likelihood of getting more form submissions.
  • Segmentation and targeting of prospects also becomes a lot more easier and effective as more and more prospect data is collected.
  • Through better segmentation, marketers can send personalized content to the prospects and improve the chances of conversion.
  • Collecting additional information regarding the needs and preferences of the prospects can aid marketers in channelizing marketing efforts in the right areas.

How to set up progressive profiling in Account Engagement

  • Create Custom Fields:

Before setting up progressive profiling, you need to ensure the custom fields to collect the incremental prospect data are created.

  • Create your Marketing Cloud Account Engagement Form:

This feature requires you to first create the forms you intend to use for capturing prospect data. Create a form and either add new fields or use the existing ones such as First Name, Last Name, Email and Company.

  • Enable progressive profiling for your form:
    • In the form editor, click on the pencil icon adjacent to the form fields you seek to progressively profile.
      (The screenshots below show the example of progressive profiling on the ‘Department’ field, which will be displayed only when the ‘Job Title’ field is already completed.)
  • Then, in the form settings dialogue box, switch to the ‘Progressive’ tab and enable progressive profiling by checking the checkbox labeled as ‘Show this field only if the prospect already has data in the following field(s)
  • When adding multiple progressive profile fields, you can also manage the sequence in which they are displayed.
  • Remember to save the changes you made to the form settings, and click the ‘Confirm and save’ button before exiting the form editor.

Conclusion 

Overall, progressive profiling addresses the issue of form fill burnout by creating a dynamic, user-friendly and incremental approach to collect prospect data. It ensures quality data is collected and aids segmentation and targeting. 

This approach also ensures that marketers respect their prospect’s time and effort in the form completion process, while increasing engagement and prospect data quality. When using this approach remember to maintain a balance between asking information and honoring the prospect’s preferences.

Need help creating sophisticated prospect profiles and segmentation strategies? Reach out to the team at Sercante to get the conversation going.

Marketers often overlook code literacy, outsourcing anything code related to website or email developers. But understanding some coding basics, such as HTML, benefits the everyday marketer more than they realize.

By learning the fundamentals of HTML, you can:

  • Better communicate your vision to the web developers
  • Understand how web pages are designed and where pieces of code need to go
  • Create richer, more engaging email and website content
  • Improve their search engine rankings

“But I don’t need to know how to code. It’s scary.”

That’s where we come in!

HTML coding basics for marketers

Hypertext markup language, aka HTML, is the code that tells your web browser what it should show when you go to a website. When you go to a webpage, your browser reads through the HTML tags and then presents it visually. This blog page even uses HTML to display its design and content to you in a way that is easy to read and understand.

With even the most basic knowledge of HTML code, you can better break up your page’s content in a way that will better engage your audience.

Code formatting

Each HTML tag you add must have a matching set of open and close tags. Without a close tag, any code you write will cause errors in how the info is displayed.

If we were to use the standard paragraph code, <b>, we would need to add </b> after we’re done.

<b>This tag makes text bold!</b> becomes This tag makes text bold!

HTML page structure

These tags will be utilized on every webpage. While you may not need to write them yourself, they are important to know and understand.

<head>

Any additional code for a page will go inside of the tag. This covers everything from general page design, additional styling, or Javascript code. Most tracking codes will go here as well.

<body>

This will be the main content for your website page.

<link>

If your page needs to link to a Cascading Stylesheet Sheet (CSS), it will do so inside of a tag.

<title>

Each page needs a title. What you place in the title tag will appear in search engine results as well as the name of the browser tab.

<div>

This is a structural element that goes inside the tag. Web pages and emails can be broken down into a series of nested tables. Div tags act as a single cell inside of this high level structure.

Building richer, more readable content

A main way marketers effectively use HTML is breaking up walls of text into something that is easier for a reader to sift through.

Content is meant to be read — not just for search engines to crawl. The more readable your landing page or email, the better your customers will understand the message you’re trying to convey. 

With HTML, you add rich text formatting to make key points stand out or build a list of reasons why your product is awesome.

Here are some important tags to spice up your copy!

TagWrite ItShow It
<a><a href=”(URL”)>Click me!</a>Click me!
<img><img src=”(image URL)” />
<p><p>A separate paragraph</p>A separate paragraph
<ul><ul>
<li>A bullet point list!</li>
<li>No numbers!</li>
</ul>
A bullet point list!
No numbers!
<ol><ol><li>A numbered list!</li>
<li>No bullet points</li>
</ol>
A numbered list
No bullet points
<b><b>Bold</b>Bold
<i><i>Italicized</i>Italicized
<u><u>Underlined</u>Underlined
<h1><h1>Fancy Title</h1>Fancy Title
<h2><h2>Secondary Title</h2>Secondary Title
<br />A line break<br />for readabilityA line break
for readability

Coding basics for stronger search engine optimization

SEO is the name of the online content game. Marketers are always on the lookout for ways to improve their search engine rankings. But HTML provides some simple ways to gain a boost – no hard thinking required.

The importance of alt tags

Google can do a lot of things except look at images. So how does it know what photos to show as relevant when I search for something online?

Alt text! Alt tags, also known as alt descriptions or alt text, describe the images you post to the search engine. They also allow customers who require certain accessibility tools to enjoy your more visual content. 

And if an image is taking a while to load (or doesn’t load at all), the alt text will display.

To add an alt tag to an image in HTML, you would use the following format:

<img src=”(Image URL)” alt=”A meme with the text Hello… is it alt-tags you’re looking for? over a photo Lionel Richie’s face”>

Use HTML header hierarchies

Search engines like it when pages lay out what is most important. When you utilize H1, H2, etc. tags on your page, you are laying out a table of contents of what content is connected and how important each piece is.

By placing a keyword in an H1 tag, compared to an H4 tag, you tell Google that the keyword in the H1 tag is one of the most important pieces of context about what is on your landing page.

All header tags can be stylized to make the most important ones stand out visually, which assist with readability.

Let’s get meta with meta tags

Meta tags may not directly impact your SEO rankings, but by adding in appropriate meta descriptions, this tells search engines like Google know what to display on their search results page. The more accurate and correct the meta description on the results page, the higher the chance someone will click on your website’s link because your result looks more relevant to the searcher.

If you don’t set a meta description yourself, Google then gets to guess what content to put here based on what exists on your page. Also another reason why header hierarchy is vital.

These type of tags usually fall under the main <head> tag for a page and look like the following:

<head>

<title>Let’s Get Meta</title>

<meta name=”keywords” content=”HTML, Meta Tags, Meta Description, Metadata” />

<meta name =”description” content=”Answering all of your questions about meta tags!” />

</head>

Basic coding is not so scary, right?

Simple coding doesn’t have to be scary. Knowing the basics of HTML makes a difference when it comes to having stand out landing pages and email copy. And understanding how code works will help you communicate with your web developers.

If you want to learn more about code that helps marketers, check out Code School for Marketers, a 6-week interactive online course to give you the tools to improve your code literacy!

A form on a landing page or your website is often the final step in a nurturing process and represents the crucial point of conversion. According to Manifest, 81% of people will abandon a form after beginning to fill it out. And of that 81%, more than half (67%) will not return to complete the form. 

So how do we, as marketers, improve our game and increase conversions while decreasing form abandonment? By using five native tools at your disposal within the Marketing Cloud Account Engagement (Pardot) forms tool.

Five Ways to Increase Pardot Form Submissions and Decrease Form Abandonment

When marketers first start using forms within Pardot, they’re probably inclined to keep things simple and have a primary focus on collecting information they see as required or important to their sales process. However, you can leverage a few things within Pardot to decrease form abandonment and up your marketing game. 

  1. Use Dependent Fields

Keep the form simple and limit the number of fields using dependent fields. When you are seeking relatable information based on specific field values, dependent fields are the best way to capture that additional insight.

For example, if you are a global company, you can ask for the user’s country. And if they respond with the United States, then you can ask for their state. Or if they respond with Canada, you can ask which province they are from. Whereas, if they respond with the United Kingdom, no additional information is required. 

Dependent fields eliminate unnecessary questions, shorten the form, and personalize the experience for each Prospect.

  1. Set Up Progressive Profiling

Another great way to help shorten your forms, but still collect the required information is through progressive profiling. This tool enables you to ask new questions based on each return to a form, eliminating previously completed questions from prior form fills. 

For example, if you already know their company, the next time they return to the form, you can now ask for a job title to dig in further. This is one of the best tools at your disposal as a marketer because it ensures a positive user experience for the Prospect and helps keep the sales team happy by collecting details for lead assignment, segmentation, and increased nurturing via targeted Engagement Studio Programs.

  1. Have Clear Calls to Action

Calls to action are the short persuasive text used on the form button to close the deal. You want to be straightforward while keeping it short and simple. I would recommend starting with a verb and following up with an adverb or subject thereafter. 

For example, a clear call to action could say:  “Download Your e-book Now” or “Subscribe Today.”

Ultimately, use language that promises them the delivery of something your reader wants. 

Form submission thank you page example
  1. Use Autoresponders

Creating an experience for Prospects is crucial in seeing them return to want more. This can be accomplished by ensuring that you follow through on your delivery when a form is completed through autoresponders and/or thank you pages. 

Take advantage of the redirect and follow-up by creating a personalized experience by offering them a thank you message, a downloaded asset, and/or highlighting similar content they may be interested in. 

By directing them to additional content, you can use your Progressive Profiling and they can gain additional insight into your organization and how you can help solve their issues.

  1. Enable Completion Actions

Completion Actions are similar to your Autoresponders, as they are unseen heroes of the form experience but play a critical role in delivering what was promised. A Completion Action is an action that Pardot will automatically make on your behalf as soon as the form is completed. 

Actions could include:

  • Delivering gated content
  • Adding to subscription lists
  • Notifying users
  • Adding prospects to nurture programs
  • Creating a task to follow up with the prospect

It’s the final touch to the entire experience and will keep your prospects returning for more.

Create Better Pardot Forms to Get More Conversions

With these out-of-the-box Pardot tools at your disposal, you can easily decrease form abandonment and increase Prospect engagement, growing your pipeline and improving your nurture game. 
Interested in learning more about how to get started or how to expand your Pardot form game? Contact us today!

No more posts to show