Category

Getting Started

Salesforce Starter was unveiled in August 2023 as an easy way for small-medium businesses (SMBs) to get started with Salesforce CRM. Historically, SMBs have found CRM systems to be overly complex and difficult to implement, but Salesforce Starter was built with this struggle in mind, allowing customers to get up and running in a matter of minutes while making future growth of the CRM easy.

What is Salesforce Starter? 

Salesforce Starter focuses on sales, service, and marketing and provides guided onboarding to ease users into Salesforce CRM. It’s an easy-to-use platform that’s aimed at getting teams at small businesses up and running with a CRM that can grow as the company scales.

The best part is that getting up and running with Salesforce Starter brings your data into the platform. You’ll avoid some migration expenses later on if you outgrow Salesforce starter and decide to implement other Salesforce clouds to replace it.

What marketing functionality is included in Salesforce Starter?

Salesforce Starter’s marketing features focus on emails, segmentation, and, with Pro Suite, process automation. The marketing features work a bit differently than what we’re used to with Marketing Cloud Account Engagement and Marketing Cloud Engagement. But if you’re familiar with the Lightning Email Builder and Salesforce Flows, you’ll be able to pick up Salesforce Starter’s marketing functionality pretty easily. 

Campaign-Centric Workflow

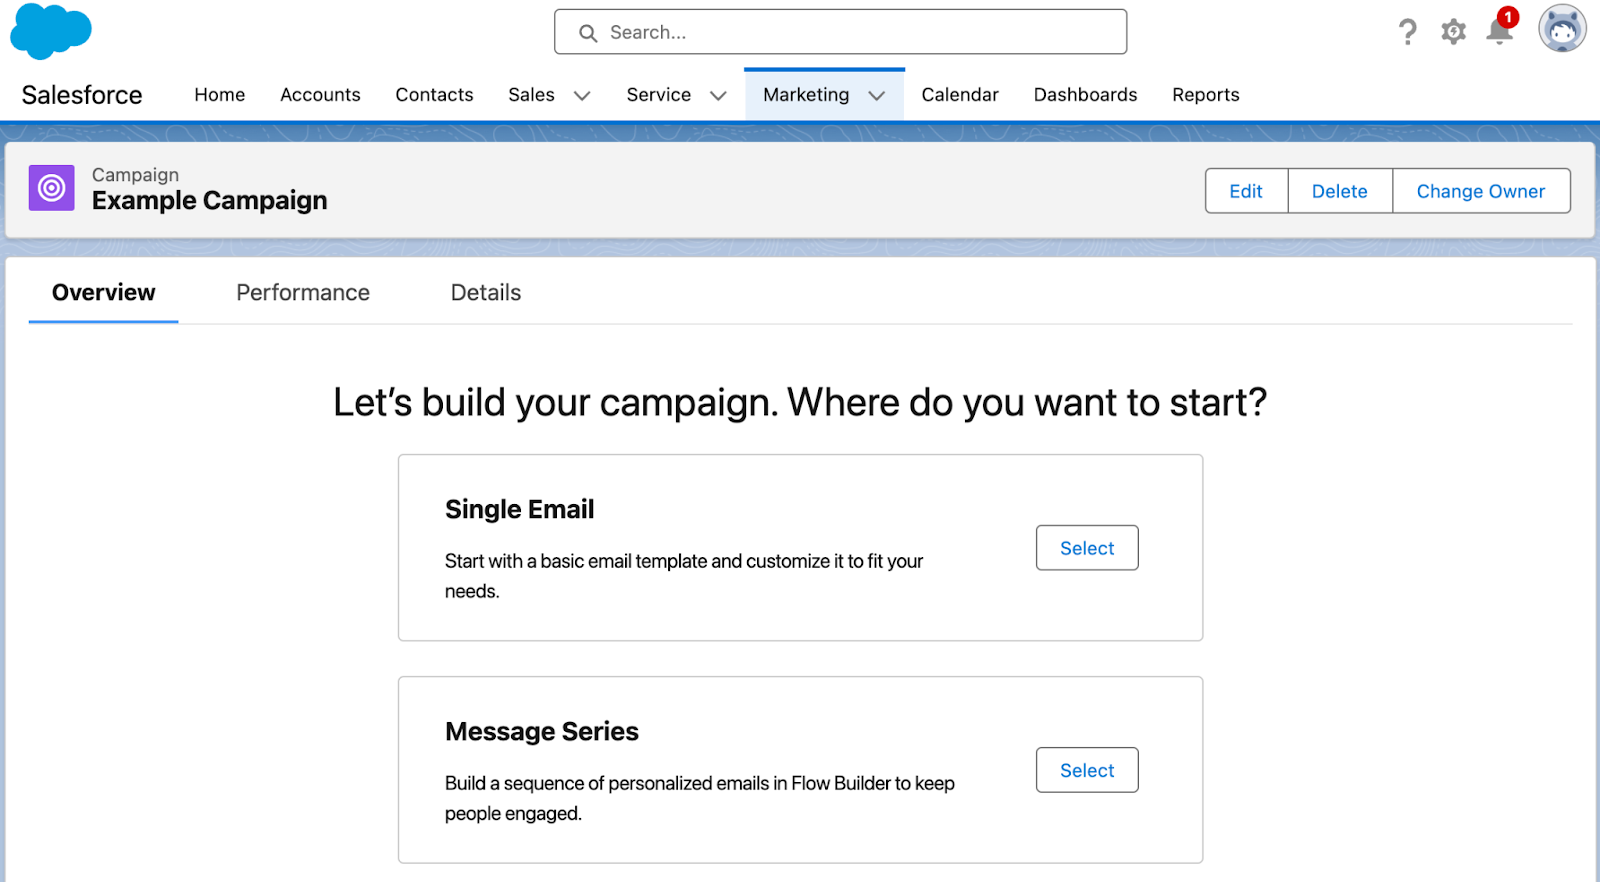
Marketing in Salesforce Starter revolves around the Campaign. Once you’ve created a campaign, you’re guided to choose between creating a single email (similar to a List Email for Account Engagement users, or a single email send for MC Engagement users) or a Message Series (similar to a “Engagement Studio Program” for Account Engagement users, or a “Email Journey” for MC Engagement users).
Segmentation

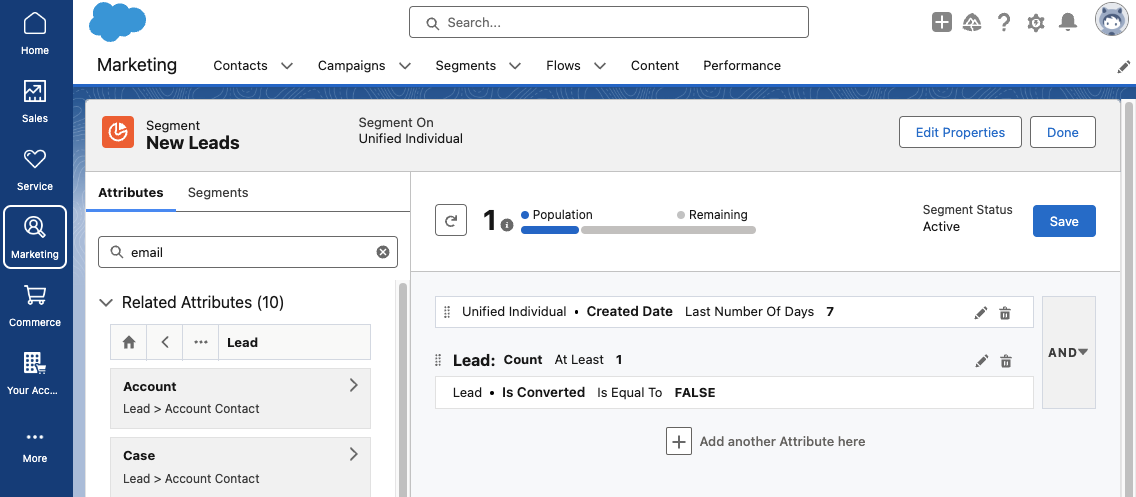
Segmentation in Salesforce Starter is handled with Data Cloud, which allows you to create a unified customer profile and harness data from all interactions your Lead/Contact has with your company. If you’re new to Data Cloud segmentation, I highly recommend working through the Segmentation and Activation Trailhead module to get a feel for creating and editing Segments in Salesforce Starter. This help article also provides several Segment examples to help you get started. 

Before we start building our first email, we’ll want to set up an Audience Segment. A Segment is required to preview and test your email, so we’ll want the Segment running while we’re building the email. Click Select Audience from your Campaign page to begin, then select New Segment

Building Emails in Salesforce Starter

Building emails in Salesforce Starter feels familiar to the Lightning Email Builder. You’ll start off with a pre-built email template that can be edited by dragging and dropping components from the left side menu. Custom styling can be configured on the right side menu and will change depending on the component you have selected. 
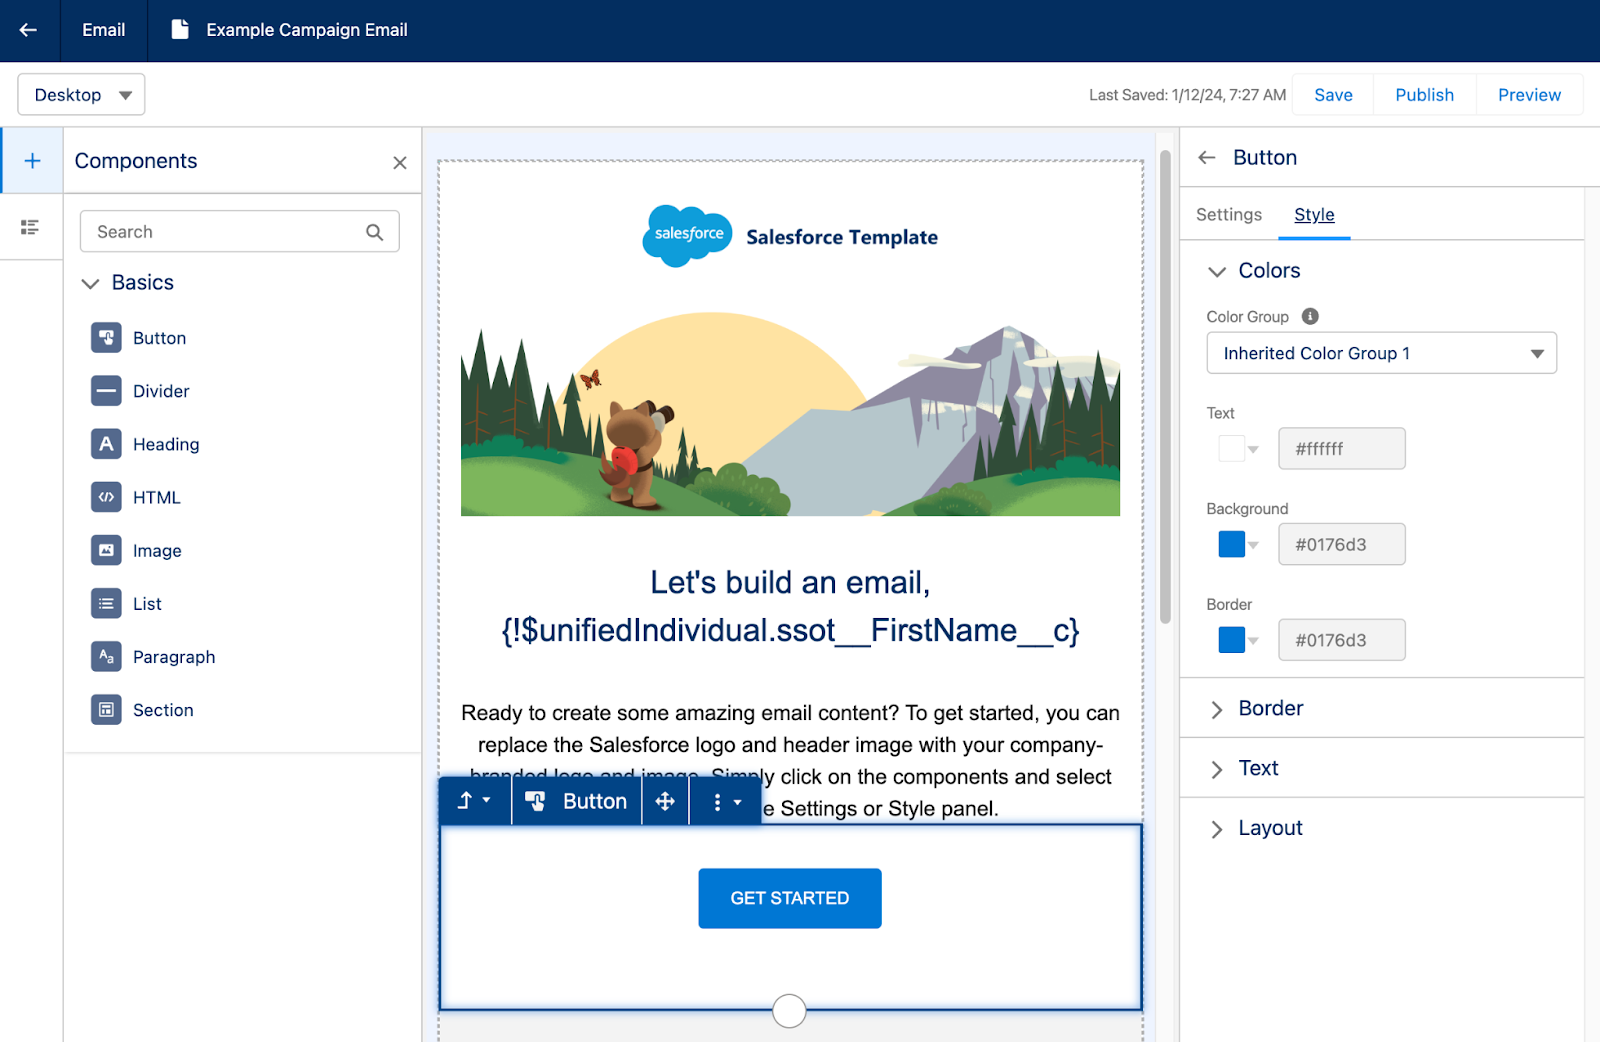
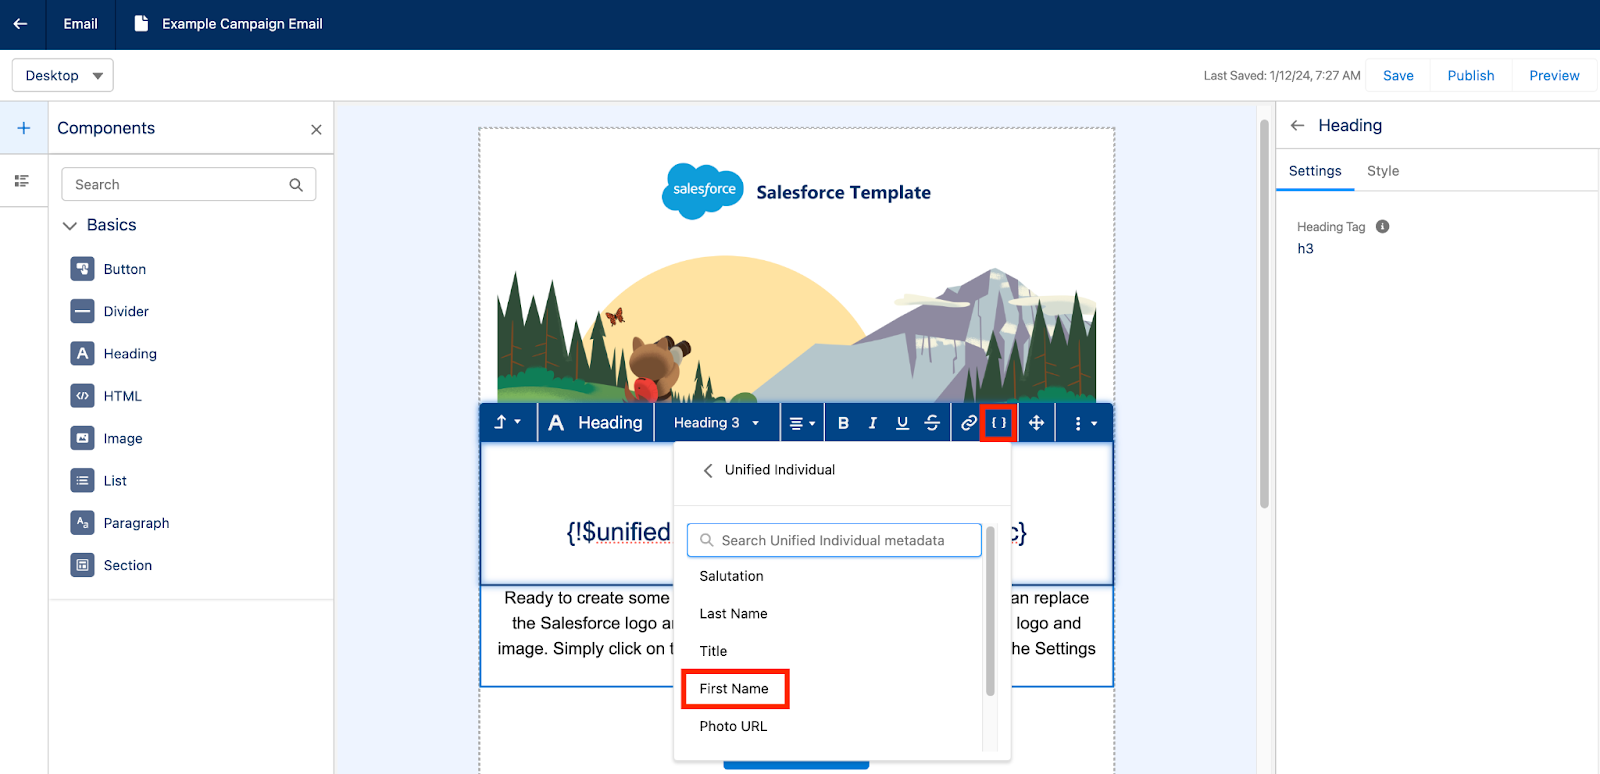
Merge tags can be inserted to personalize the email for each recipient. These merge tags rely on the Data Cloud unified individual rather than having to choose a specific Marketing Platform or Lead Object field. 
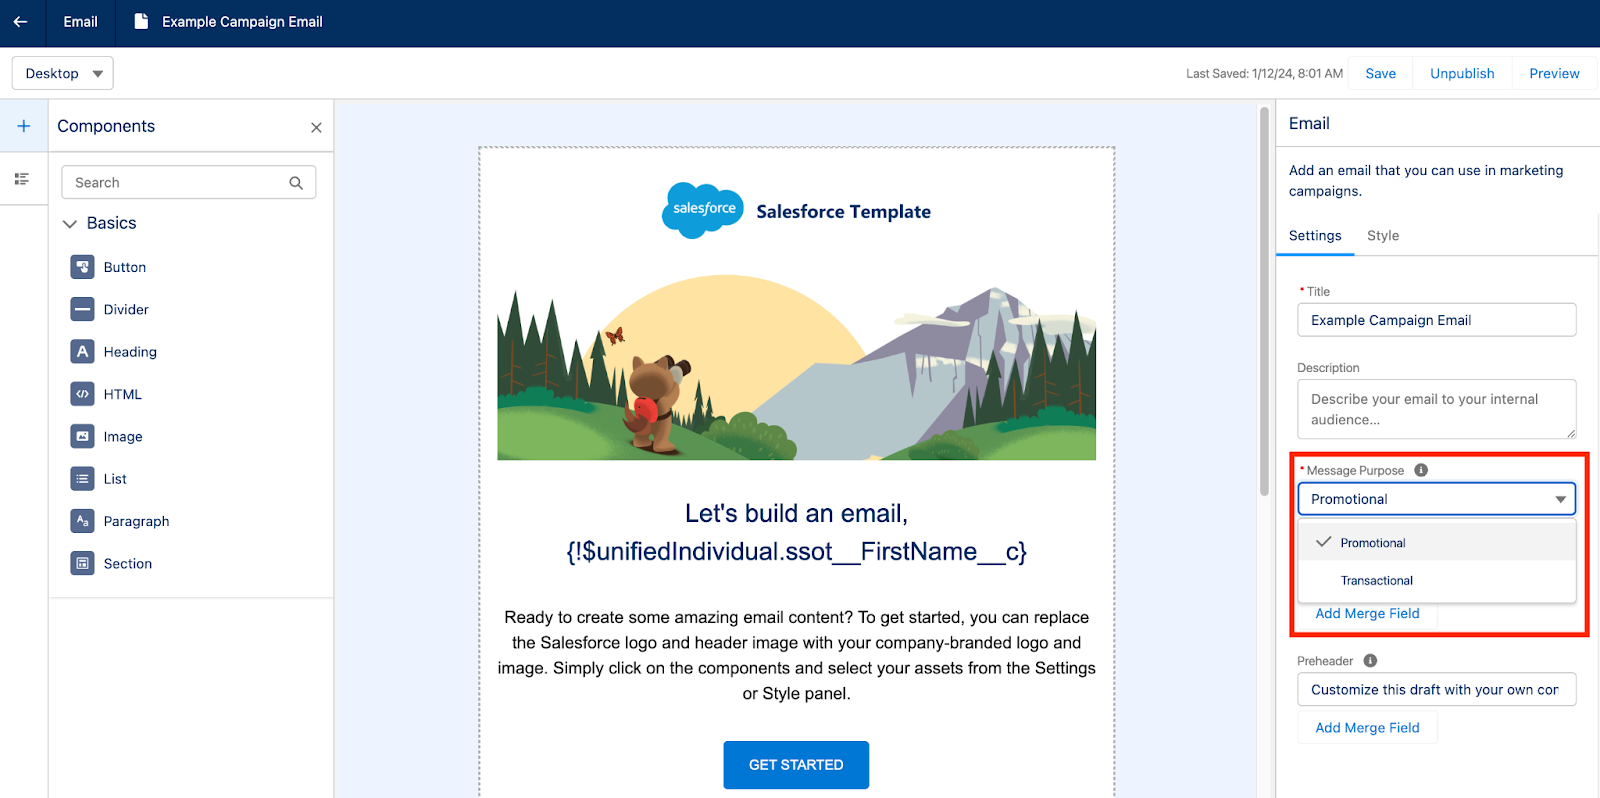
Salesforce Starter also supports sending transactional, also known as operational, emails by toggling the Message Purpose field.
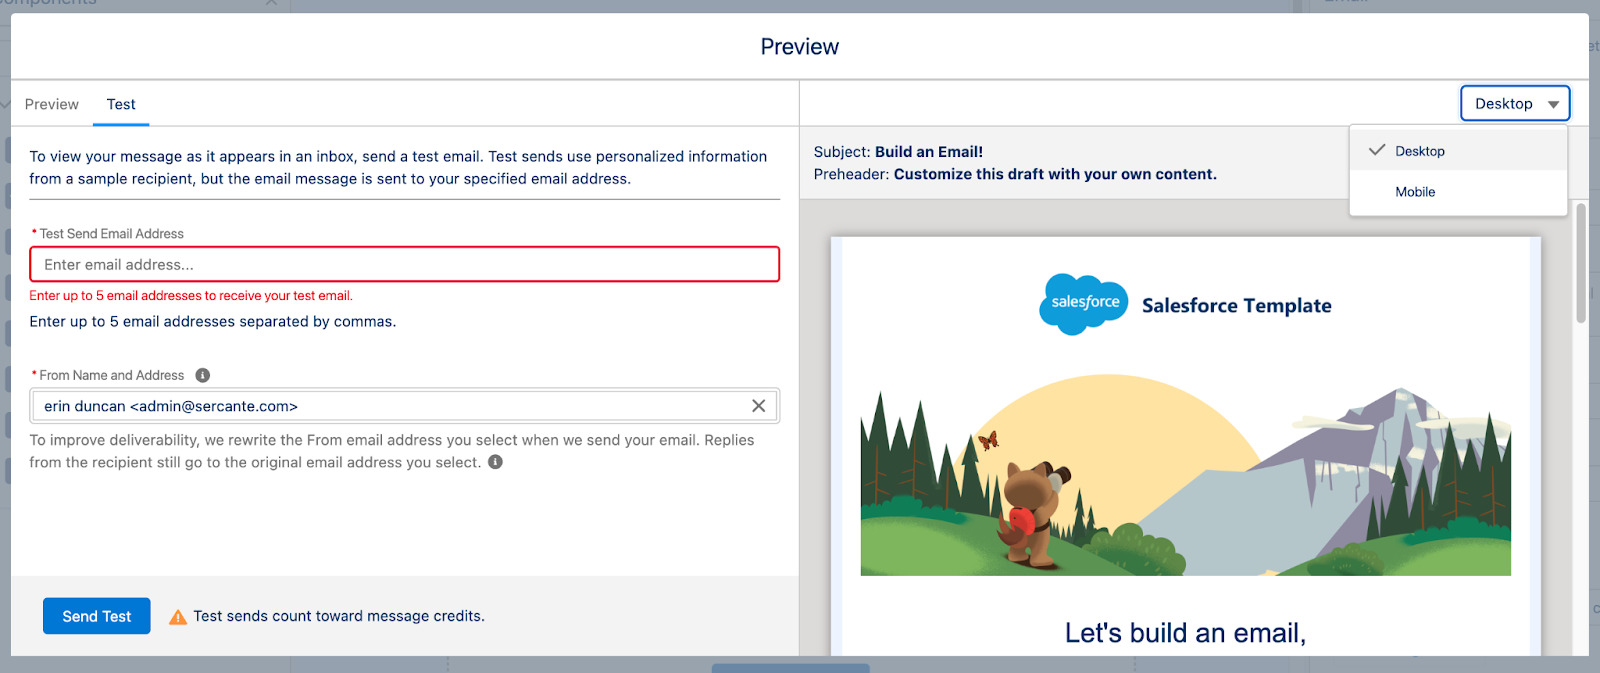
Once you are done building your email, make sure you select Publish before previewing and testing your email. Publishing the email will ensure all the associated images are published and won’t be broken during testing. 

The Preview option allows you to toggle between Desktop and Mobile views to ensure your email is responsive. You can also send your team a test email for review, but note that test sends count towards Salesforce Starter’s base credits of 2,000 emails per org/month.
Sending Single Emails with Salesforce Starter

If you’re sending a single email, navigate back to the Campaign Overview page and select Schedule or Send Now.
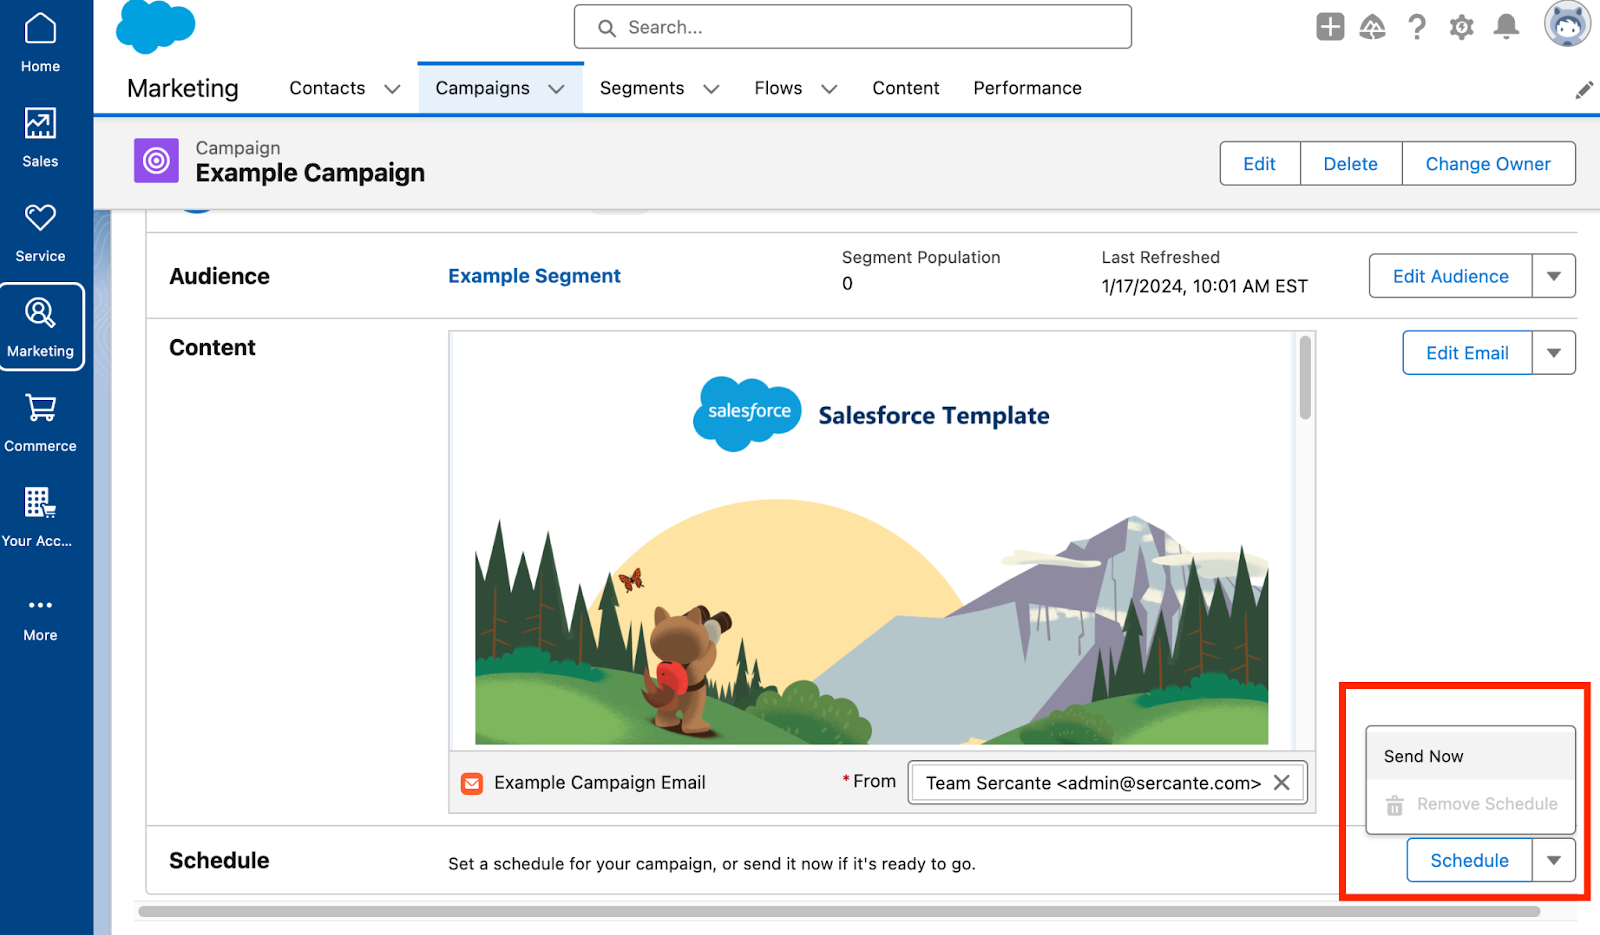
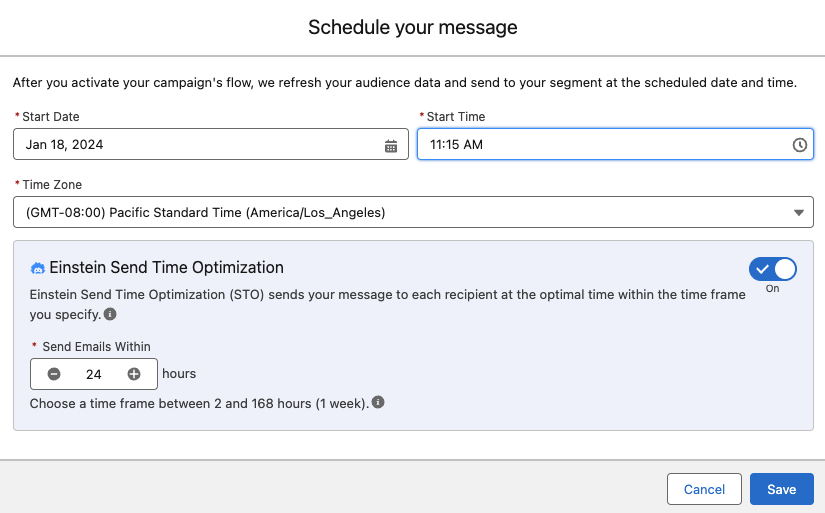
When scheduling, Einstein Send Time Optimization is available to help select the best time for each recipient on your Audience Segment. Check out our blog post, Pardot Einstein Send Time Optimization: A How-To Guide, for more information on how Einstein Send Time Optimization works.
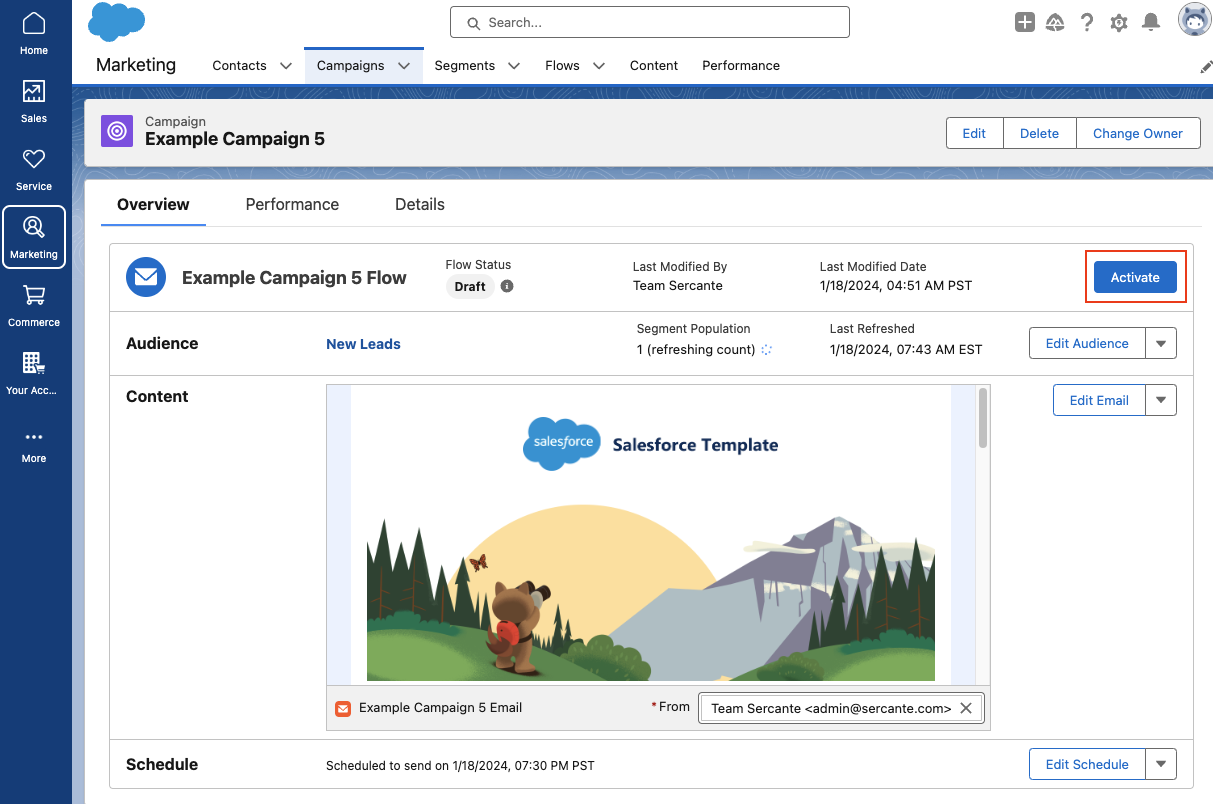
If you’ve selected Send Now your Email Campaign Flow will automatically be activated. However, if you are scheduling the email in advance, you’ll need to manually select the Activate button to ensure the Flow is ready for this email send. 
Sending a Message Series in Salesforce Starter

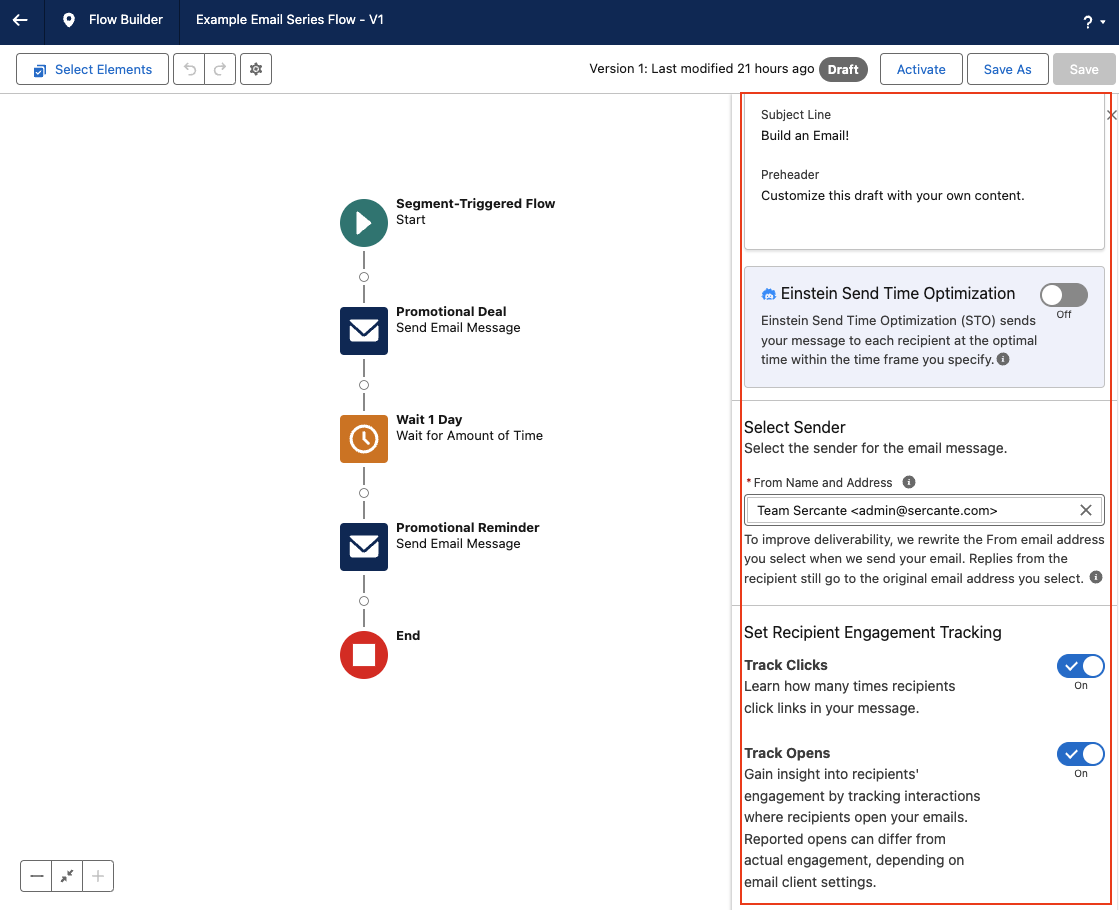
If you’re sending a message series, you will have to first edit your Flow so you can configure the schedule, segment, and wait steps between each email send. By default, the Message Series Flow will be built with a 1 day wait step between each email, Einstein Send Time Optimization is disabled, and Track Clicks and Track Opens is enabled. All of these settings can be reconfigured by clicking each element within the flow. 
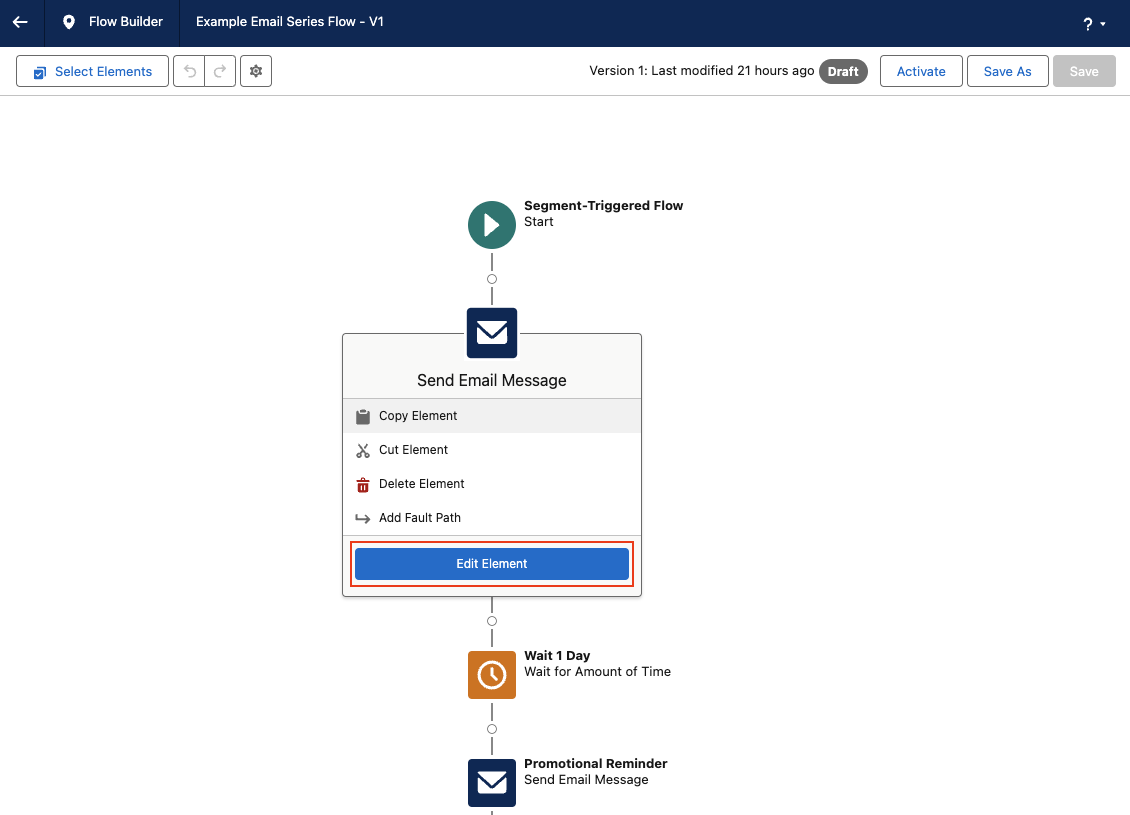
Make sure you select the Start element to configure your segment and schedule. 
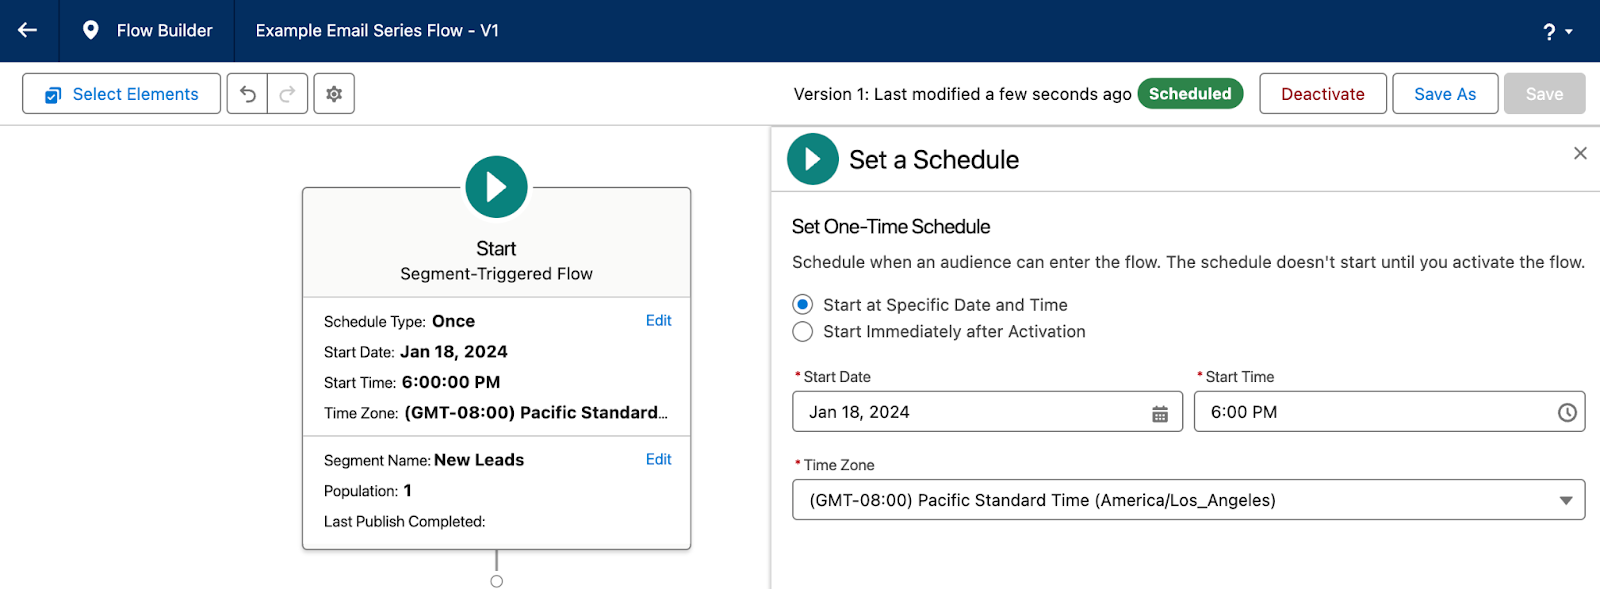
Once you’ve finished configuring your Message Series Flow, make sure you Save and Activate the flow before navigating back to the Campaign overview page. 

Now, if you are new to Flow and the steps above are causing a bit of existential dread, don’t worry! Flows seem a little intimidating at first, but I promise they are pretty easy to use and you can do some really neat things with them. Check out our blog post, An Introductory Guide to Salesforce Flow for Marketers, or the Flow Builder Basics Trailhead Module to get more familiar with Flows. 

Salesforce Starter Reporting and Performance

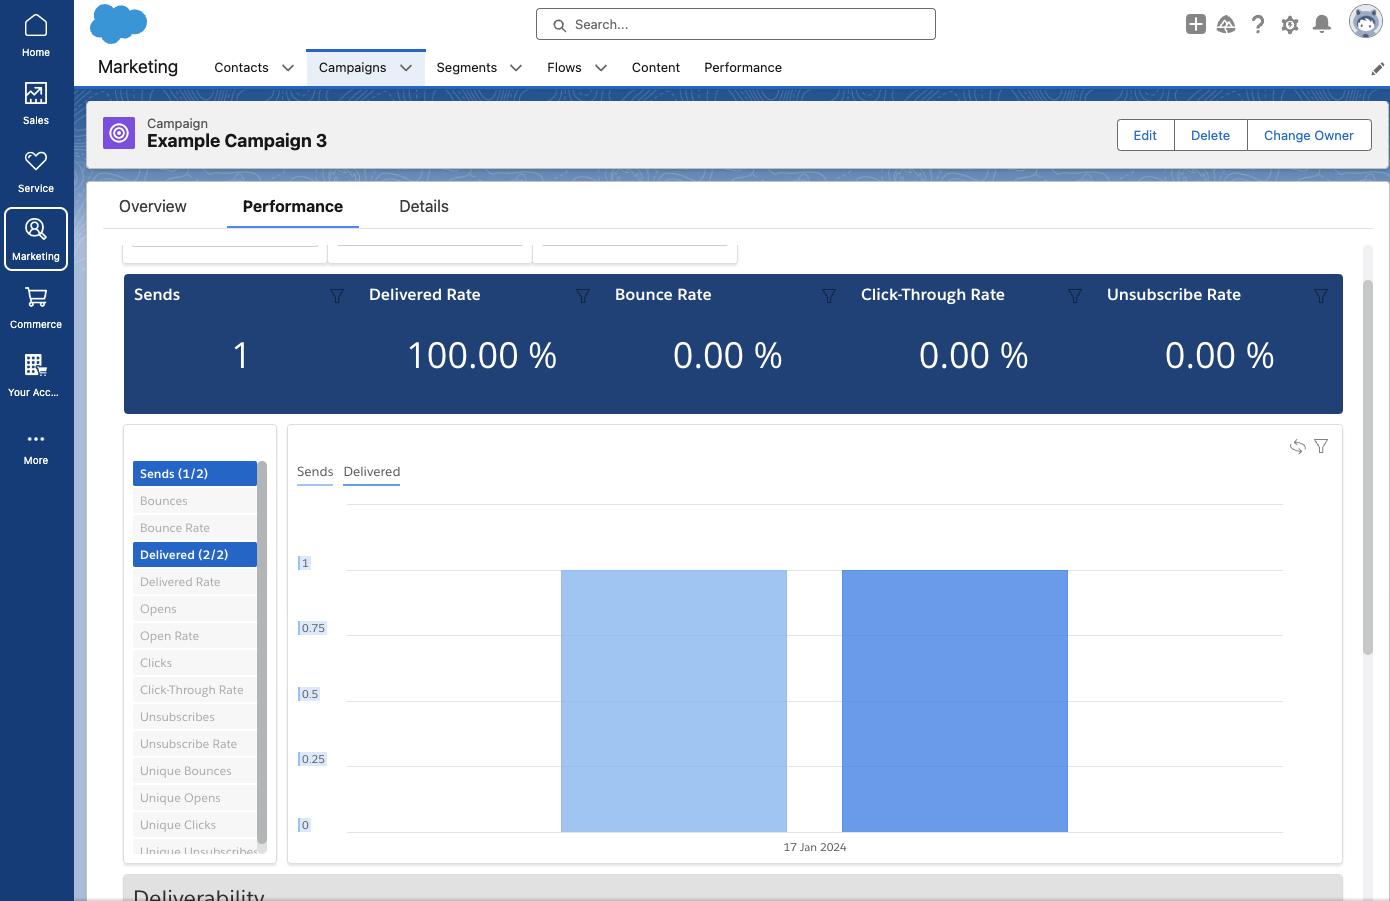
Salesforce Starter automatically collects and displays aggregate engagement data about your campaign on the Performance page. Common metrics, such as opens, clicks, unsubscribes, bounces, etc. can all be viewed in this prebuilt dashboard. 
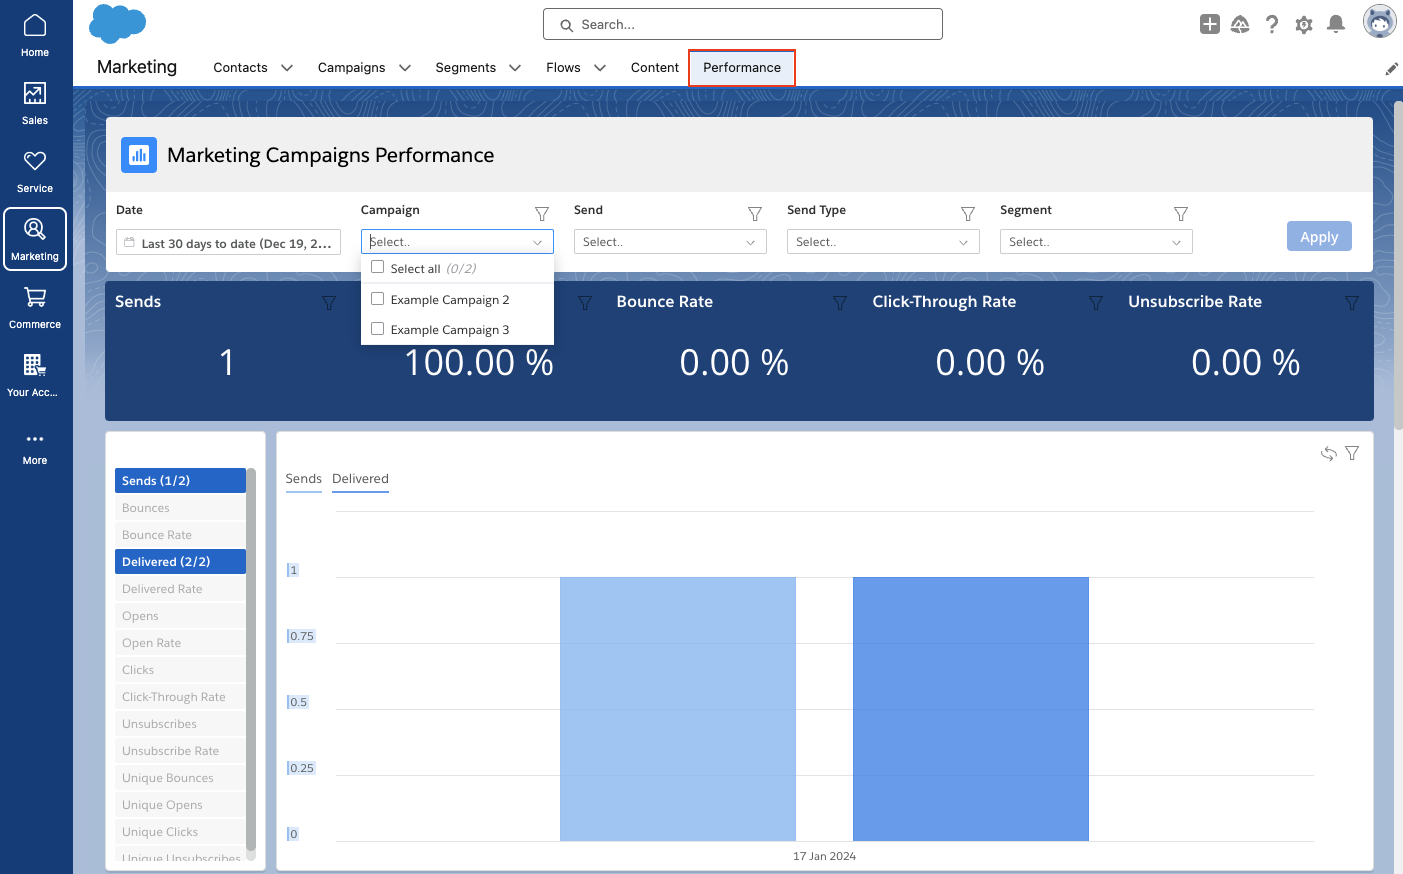
To view the Performance of multiple Campaigns, navigate to the Performance tab. In this view you can filter your dashboard by date range, campaign(s), individual sends, send type, and even segments.
Salesforce Starter — easing small business marketers into CRM life

And there you have it! In summary, Salesforce Starter is a great way for SMBs to get started with CRM and Marketing Automation. As your company and familiarity with CRMs expands, you may outgrow this edition. But the great thing about Salesforce Starter is that you can avoid migration costs because your data is already in the Salesforce platform if you outgrow the product at any point. 

Reach out to the team at Sercante if you have any questions or need help figuring out if Salesforce Starter is the right tool for your team.

Scores in Marketing Cloud Account Engagement play a critical role in getting the right lead to the right person at the right time. However, scores can become unreliable and actually distract sales if they are not periodically decayed. In this post, we’ll address the importance of score decay and provide several methods that can be used in your organization. 


A Primer on Scoring

Before we get into score decay, let’s level set on Account Engagement scores. Account Engagement scores are a measure of calculating engagement with your account engagement assets. Prospects with higher scores have had greater engagement and are therefore more sales-ready.

Base Scoring

All Account Engagement accounts come with base scoring rules configured. These rules add and subtract points for actions like email opens, form submissions, page views, link clicks, and more and are intended to be a starting point. It’s highly recommended that you customize these rules based on your organizational needs and conduct periodic reviews to ensure that prospects are not scoring up too slowly or too quickly. 

Review Your Scoring Rules 

Account Engagement Settings > Automation Settings > Scoring

Additional Scoring

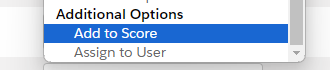
Scores can also be increased in Account Engagement manually at the prospect level, using automations (automation rules, completion actions, and engagement studio programs), or in bulk when importing prospects into Account Engagement (by mapping to “Add to Score”).

Suggested Reading 

If you want to learn more about scoring and grading, check out the following posts:

The Importance of Score Decay

Time is possibly the most important consideration that influences the quality of leads.

Think of leads as fresh-baked cookies. Who doesn’t want a chocolate chip cookie hot out of the oven? Those same cookies are still pretty good after they’ve cooled a bit, but they get a bit stale after sitting around for a few days. The same applies to your leads.

It’s important to make sure the hot leads get to sales as quickly as possible and that they are easy to identify. Let’s say that 100 points is your threshold for passing a lead to sales. Which lead would you want to call?

  • “Roy” has a score of 150, but his last engagement was 30 days ago.
  • “Katie” has a score of 101, but engaged today and passed the 100-point mark as a result.

It’s pretty clear that “Katie” is the better lead in this scenario, but we have all the facts. The reality is that your sales team has a lot of leads assigned to them and they don’t have time to learn the story behind each. It’s very possible that sales could prioritize “Roy” over “Katie” based on score alone. This would be logical, but incorrect. We can take the guesswork out of this situation by applying score decay so that “Roy’s” score falls below the 100-point threshold based on his inactivity.

Score Decay Methods

There are two primary ways that scores can be decayed –  Activity Based Decay and User Based Decay.

  • Activity Based Decay is based on activity (or inactivity in Account Engagement). This method simply decays scores to a set value (or reduces by a set amount) based on the last activity date of the prospect. 
  • User Based Decay is score decay that’s triggered by internal Salesforce users based on updates to the contact or lead record. This could be actions like updating the status or any other field.  

Activity-Based Decay

Activity-Based Decay is very simple to implement but requires a few decisions to be made in advance.

  •  When should a lead be decayed?
  • By how much should the score be decayed?

The “when” question differs greatly between organizations and is often related to the length of sales cycles. Organizations with longer sales cycles tend to tolerate longer periods of inactivity while those that are more “transactional” in nature tend to decay scores quicker.

The decay amount is also based on the organization and its scoring model, but I can offer some guidance and best practices based on experience.

  • Tip #1 – Don’t decay all the way to 0. I like to keep some points associated with the prospect as an indicator of past engagement. As a starting point, I would recommend decaying by 50% of your threshold for passing leads to sales. If 100 is your threshold, decay to 50. 
  • Tip #2 – Decay to a set number vs. by a specific amount. Scores in Account Engagement continue to increase over time – if measures are not taken. It’s not uncommon to see some older prospects with very high point values. As an example, if a prospect has a score of 275 and you reduce by 50 points, you still have a lead with a score of 225 points who has not been active in an extended period of time. This really does not help at all. My recommendation is to reduce it to a set value so you can be assured that the lead drops off the radar or your sales team – until new engagement is recorded.

Implementing Activity-Based Decay

  1. Create an automation rule in Account Engagement with a descriptive name.
    • Example: Score Decay – Last Activity > 45 Days Ago
  2. Make use of the “Description” section to summarize what actions the rule will take and when.
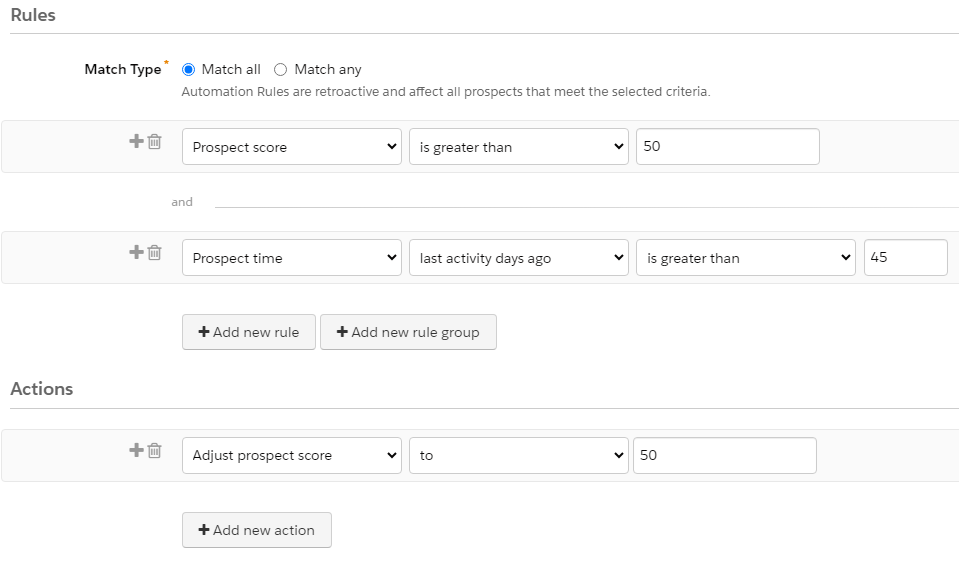
    • Example: Decays scores that are greater than 50 to 50 if the last activity is greater than 45 days ago. 
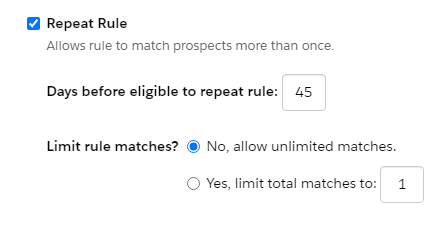
  3. Set the rule to repeat and specify the number of days before eligible to repeat.
  1. Configure the rules and actions.
    • The example below is very simple, but you can add additional rules as needed. For example, you can omit records that have open opportunities or are being worked by sales so their scores are not decayed.
  1. Since this rule will be altering the scores of prospects, be sure to preview the matches before activating. Also, be sure to review all automations in Account Engagement and Salesforce that could be triggered as a result of score adjustments.
     

User-Based Decay

Account Engagement scores are intended as an indicator of engagement within Account Engagement. Since scores can only be changed in Account Engagement, decaying scores based on actions taken in Salesforce requires a bit of ingenuity and a “handshake” between the platforms. The goal is to tell Account Engagement to decrease the score based on an action that occurred in Salesforce.

In this example, we are going to use flows and custom fields to trigger score decay in Account Engagement from Salesforce. I like this option due to the ability to easily set the criteria that triggers the action and the fact that code is not required.

Scenario

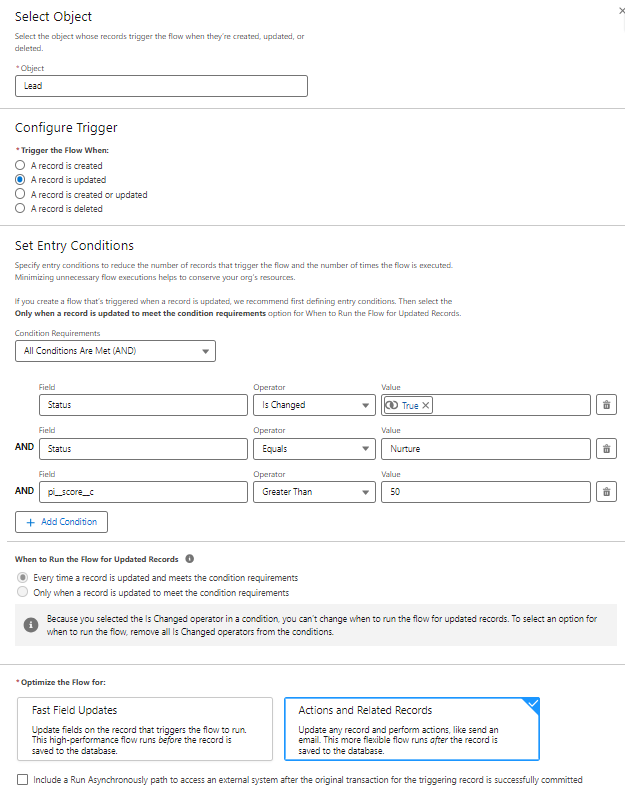
Scores should be decayed to 50 if the status is changed to “Nurture” by a user in Salesforce.

Implementing User-Based Decay

  1. Create “Trigger Score Decay” custom fields on the contact and lead objects in Salesforce.
    • Data type = Checkbox
    • Default value = Unchecked
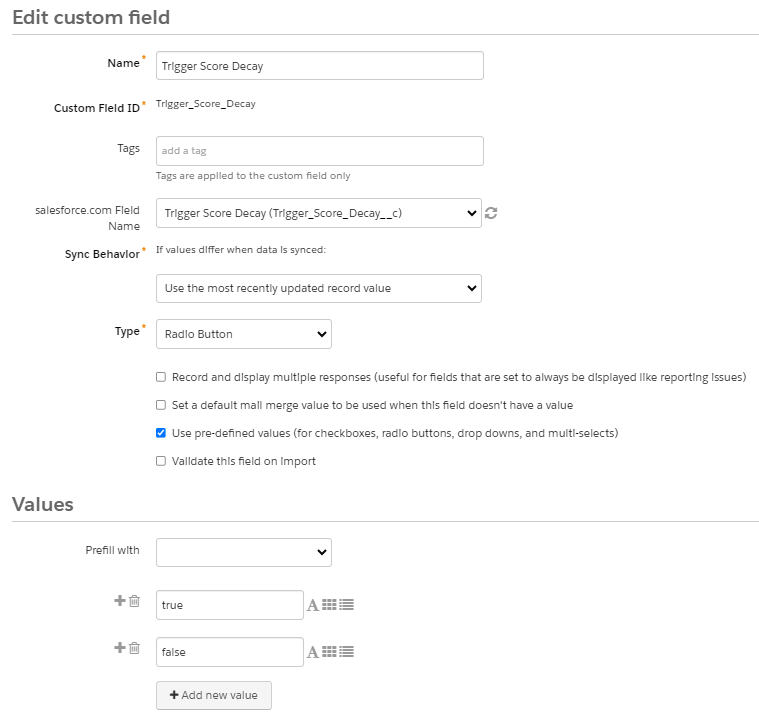
  2. Create a “Trigger Score Decay” custom field in Account Engagement.
    • Type = Radio Button
    • Sync behavior = Use the most recently updated record value
    • Values (these are case sensitive)
      • true
      • false
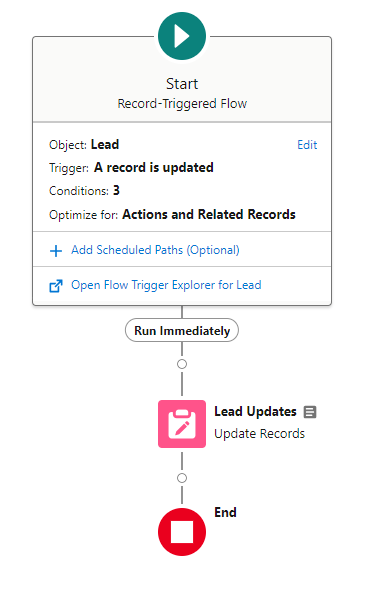
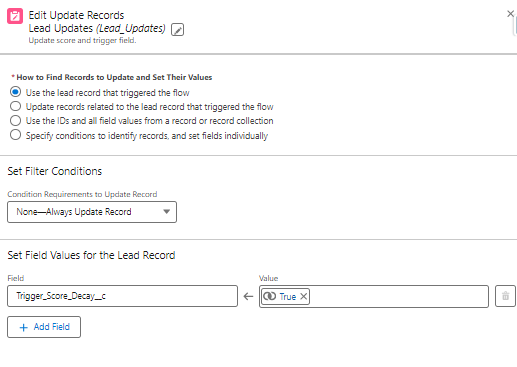
  1. Create flows on the contact and lead objects to update the “Trigger Score Decay” checkbox based on the defined entry criteria. This is a straightforward flow that uses a single element to update a checkbox field. The checkbox will later be used to trigger an automation rule in Account Engagement.

Full Flow

Entry Conditions Configuration

Update Triggering Records Element

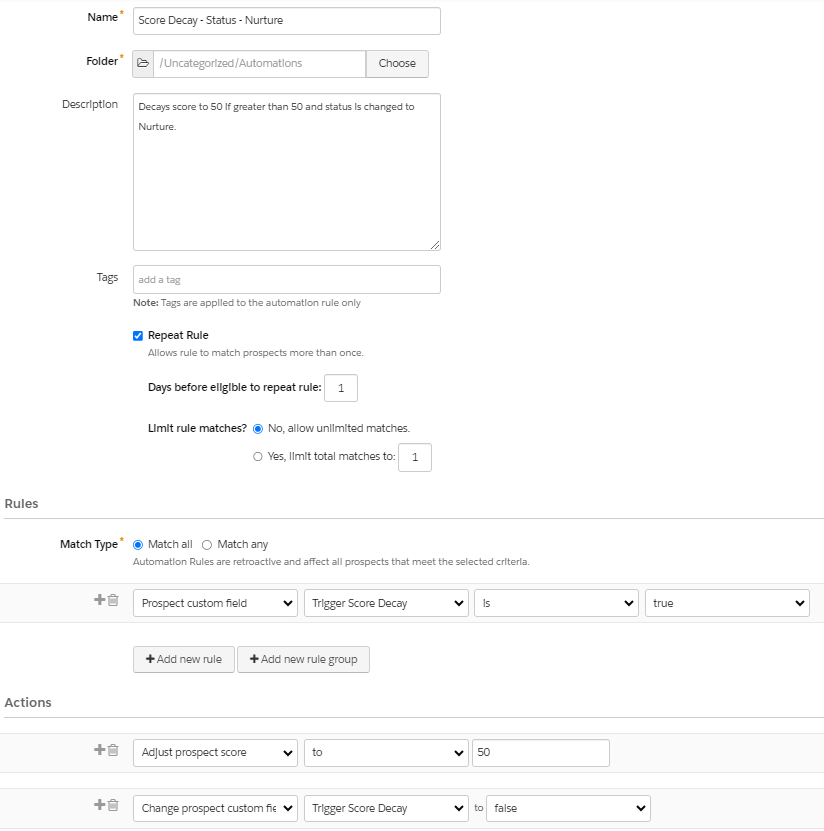
  1. The final step is to create an automation rule in Account Engagement that will decay the score if the “Trigger Score Decay” checkbox is checked. The rule will also need to uncheck the box as a way of “resetting” the record. 

Score Decay – Status – Nurture Automation Rule

  1. Test, validate, and activate. As with all automations, be sure to test by debugging your flows and previewing automation rule matches before activation.

Address Overinflated Scores

Scores in Account Engagement are meant to identify prospects that are actively engaging with your marketing. If scores are not decayed, identifying prospects with recent activity can become a challenge and lead to confusion for your sales teams.

Score decay is fairly simple to implement, but should not be done in a vacuum. It’s very likely that there are processes in your Salesforce or Account Engagement orgs that could be triggered when the score of a contact or lead is decayed. For this reason, it’s highly recommended that testing is conducted in a sandbox organization prior to implementation in production and that key stakeholders are included in the process. 

Need help along the way? Send us a message to see how we can help you reach your goals.

Salesforce web forms can be a game changer by empowering you to create personalized experiences for customers. Complex forms using multiple steps and conditional logic tailor digital journeys to meet the unique needs of the individual. These engaging forms enable savvy sales and marketing teams to foster interest in their product or service and close deals faster. 

While native Salesforce forms have many advantages, they also come with challenges. Specifically, if you want to create complex forms involving detailed steps, containing dynamic content, or with a customized UX, you will need to invest in some kind of development or code. 

Using complex web forms without coding knowledge

If you have time and money to burn or in-house developers to tap for help, then this is no problem. However, if you don’t have knowledge of code or access to a development team or want to speed up time to market, you might want to consider alternatives. 

In this article, we check out how you can get all the perks of complex Salesforce forms without having to write a single line of code. To do this, you will need to venture away from Salesforce native solutions, and their associated limitations, and check out some of the leading tools on the Salesforce AppExchange

Want to learn more? Keep reading! 

Creating leads in Salesforce using web-to-lead forms

Let’s take a look at web-to-lead forms for Salesforce and how these forms can further the aims and objectives of your sales and marketing teams. In the process, we will discover some of the limitations of native Salesforce functionality and find ways to navigate them.

Web-to-lead is a feature that empowers you to create leads in Salesforce via forms embedded on your website. Setting up forms with the native Salesforce web-to-lead feature is relatively easy and doesn’t require any code at all. 

When a user fills in your form and submits it, real-time data gets pushed into Salesforce where the CRM automatically creates a lead. From here, your sales and marketing teams can ensure high-value leads are routed to your best salespeople. That information on your lead is analyzed against relevant metrics and consumer trends. 

Finding flexibility with Salesforce web-to-lead forms

The challenge with the Salesforce web-to-lead is that the out-of-the-box version may leave teams wanting more. For example, you can’t connect your form to other objects in Salesforce such as Case or Opportunity. In addition, you can’t attach files to native web-to-lead forms to provide supporting information on your lead. 

You can accomplish these things and collect detailed information on the preferences and needs of each lead, but the solution requires the implementation of custom code.

Implementing complex web-to-lead forms in Salesforce

To kickstart next-level lead generation and close deals faster, we recommend creating complex web-to-lead forms that capture robust information on a prospective customer such as their likes, dislikes, and purchasing preferences. 

Using a Salesforce form that allows attachments also means you can get comprehensive data on leads and execute deals more effectively. Similarly, complex web-to-lead forms for Salesforce that contain conditional logic and multiple steps are more exciting to the user and give you a more granular picture of their personality and profile. For example, if a user says they are interested in purchasing a particular product, then you can prompt them to fill in follow-up questions such as the specifications they are looking for and the amount of money they are willing to spend. 

On the other hand, if a lead expresses no interest in a product or service, then there is no need to ask them further questions. In this line of thought, if a user answers a question indicating they want to learn more about your organization, you can give them the ability to download a pamphlet or ebook. If not, you don’t need to bother them with this. This kind of dynamic logic saves time and holds the interest of users a lot longer.

You can achieve this level of flexibility and create dynamic, multi-step web-to-lead forms in Salesforce, but it will require coding and development. So, what are your options if you want to skip the heavy dev work but still get all of the perks? 

Alternatives to native Salesforce forms

If you are a seasoned Salesforce user, you will know that the Salesforce AppExchange is a giant marketplace where you can find thousands of platforms that integrate with the planet’s leading CRM. And while there are countless tools with which to create forms in Salesforce, some tools do this more seamlessly than others. 

The best solutions give you the freedom to build forms in Salesforce using any logic or object you want without any limitations or code. This frees up your schedule, saves you money, and requires zero compromise when it comes to your dream solution. 

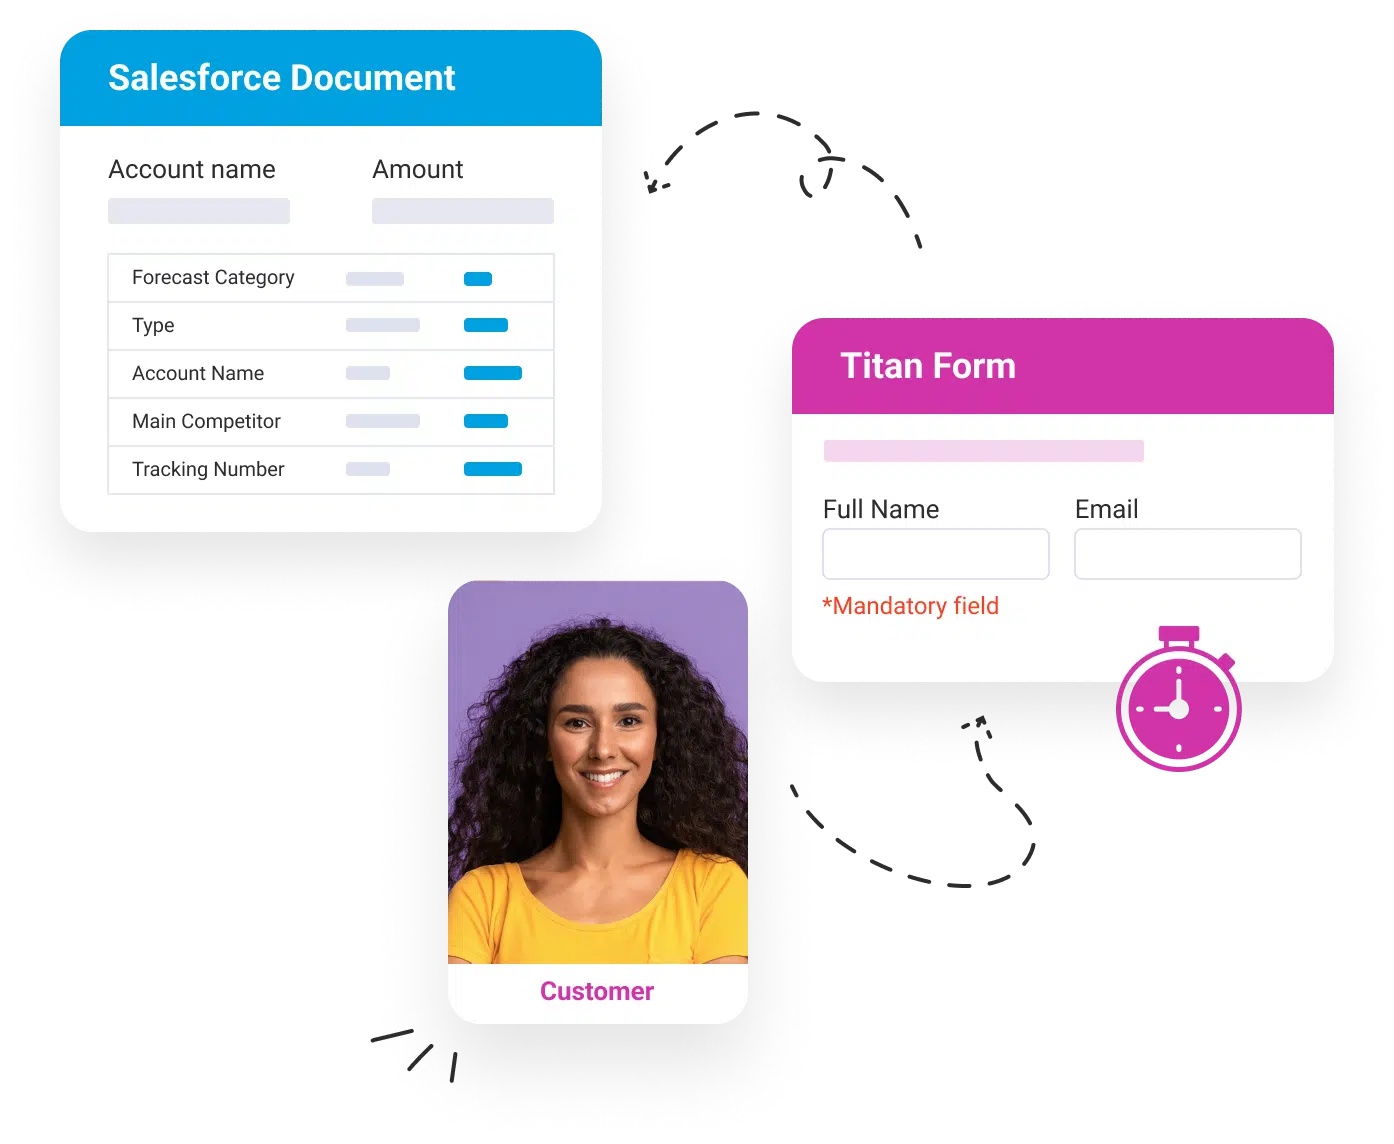
While it’s up to you to choose the tool that best suits your organization, we will zone in on one app: Titan for Salesforce. Taking its name from the most powerful of Greek gods, Titan is a no-code platform that can implement any custom solution for Salesforce. 

Web-to-lead forms by Titan allow you to: 

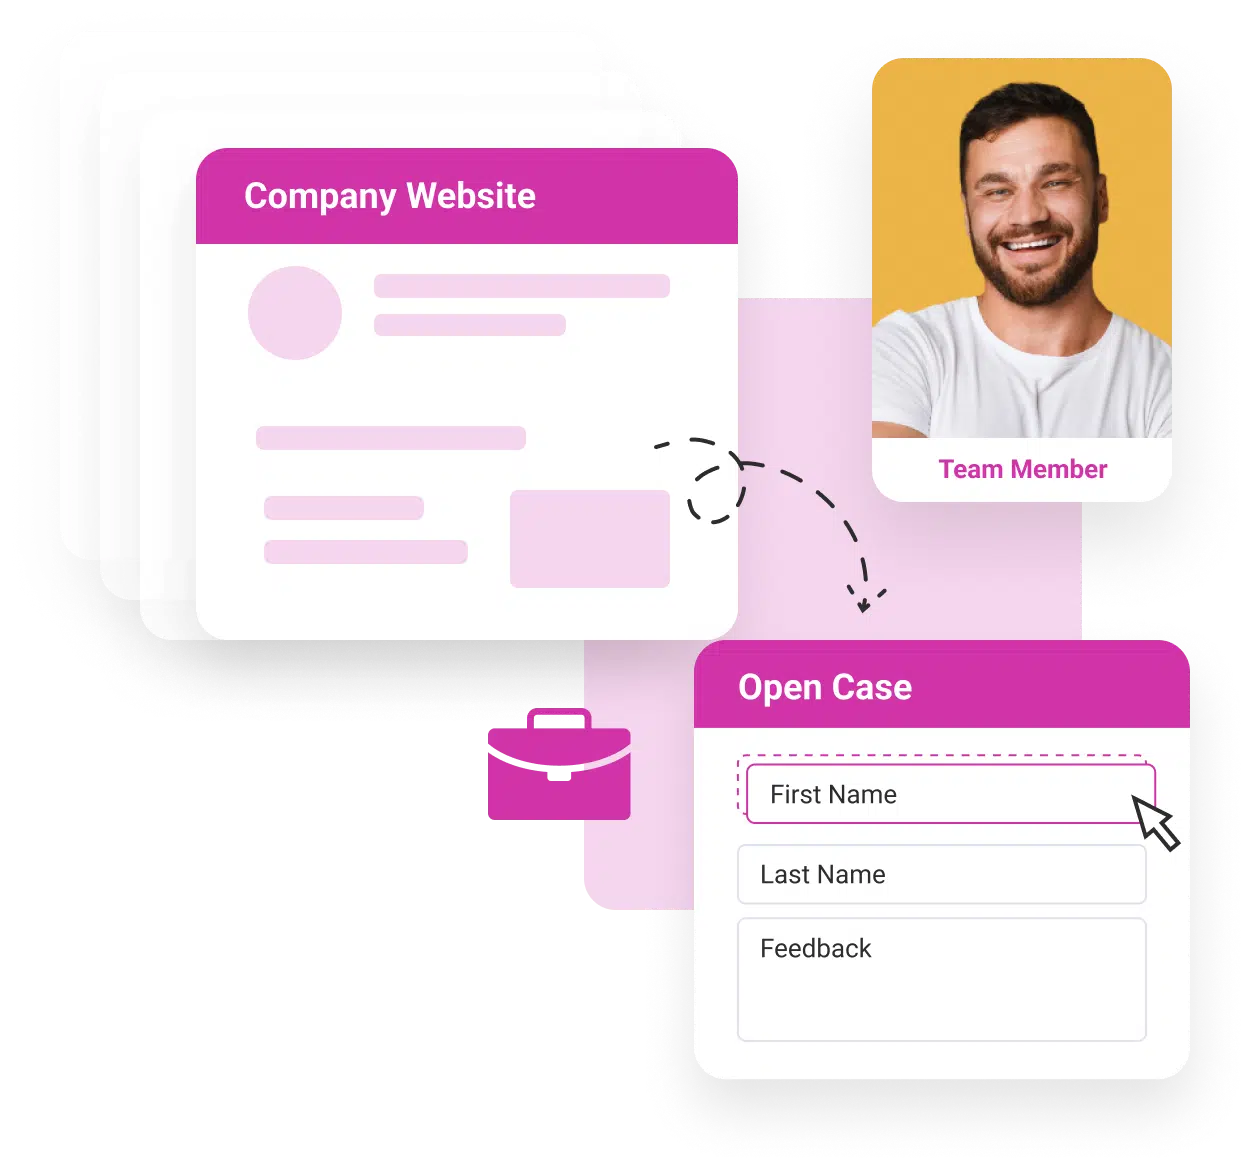
  • Connect your web form to any object in Salesforce such as Contact, Opportunity, and Case.
  • Include attachments on your web form for Salesforce.
  • Create tailored customer journeys with multiple steps and conditional logic.
  • Generate leads in Salesforce.
  • Make forms with a custom UX. 
  • Gather comprehensive information on leads. 
  • View comprehensive data on every lead in Salesforce.
  • Data is validated in real-time so you can make sure form data is sent to the correct object:
  • Go-to-market fast! 

And all this requires no code or any special technical expertise, though experience with Salesforce or having worked as a Salesforce administrator will certainly help you work at optimum speed. Learn more about Titan’s Web-to-Lead powers here:

Salesforce Forms Wrapped 

And that’s a wrap on building complex forms for Salesforce using zero code. We hope you learned more about how more complex forms can create intuitive and guided digital experiences for users and help you make deals that much faster. 

Web-to-lead forms automate the lead creation process for marketing and sales teams but Salesforce’s native feature is limited. We suggest finding a no-code alternative on the AppExchange. Titan is one great option, but it’s up to you to choose the perfect solution for your business needs and objectives.

In the world of digital marketing, a seamless and visually captivating user experience is crucial to capturing your audience’s attention and driving conversions. For Marketing Cloud Account Engagement users, optimizing both email and landing page designs is an art that requires a balance of creativity and strategy. 

Crafting Impactful Email and Landing Page Experiences

In this post, we’ll delve into five design musts that can elevate your Account Engagement-powered campaigns and help you create impactful email and landing page experiences.

Design Must #1: Use Responsive Design to Engage Across Devices

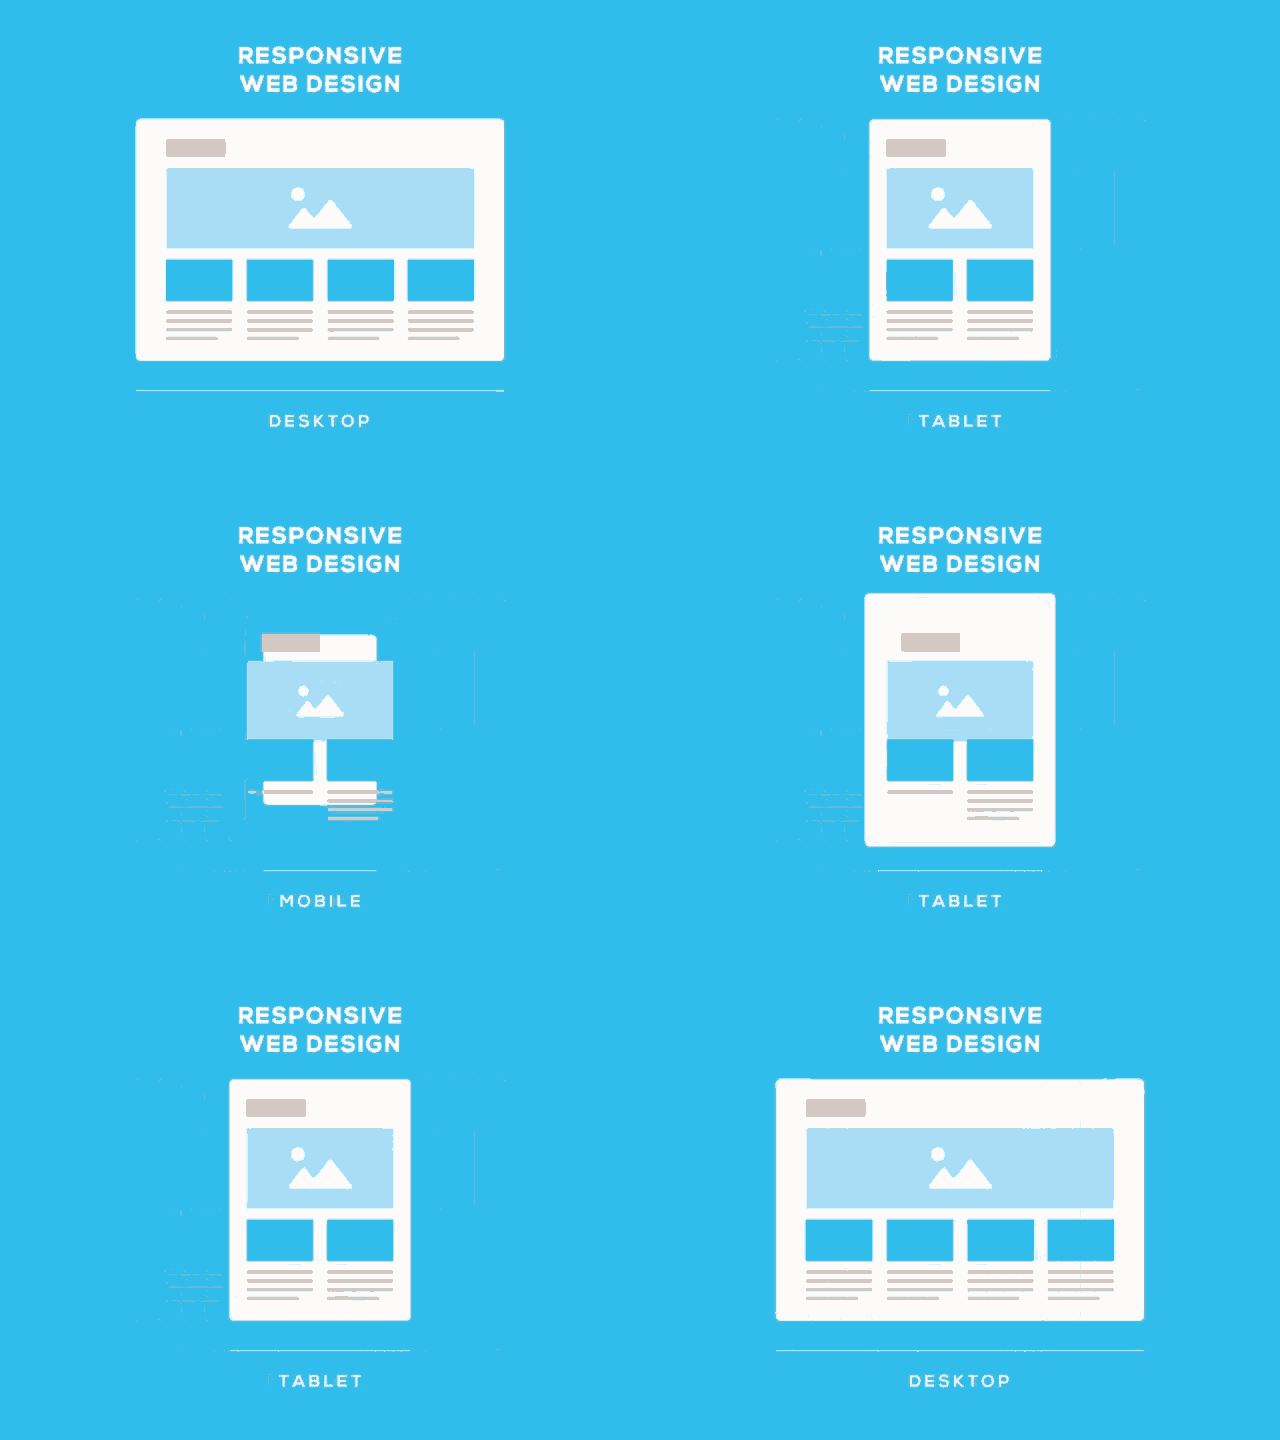
In today’s mobile-centric landscape, responsive design is no longer an option; it’s a necessity. Whether you’re crafting an email or designing a landing page, ensure that your layout adapts flawlessly to various screen sizes, from desktops to smartphones.

Account Engagement offers responsive email templates that automatically adjust content to fit different devices, allowing you to reach your audience wherever they are. Similarly, when creating landing pages, use responsive design principles to guarantee a seamless experience and better engagement.

Design Must #2: Establish Visual Cohesion through Consistent Branding

Consistency is key in branding, and it extends to your email and landing page designs. Maintain a consistent color palette, typography, and imagery that align with your brand identity. You can leverage Account Engagement’s customizable templates to infuse your emails and landing pages with your brand’s visual elements, reinforcing familiarity and trust among your audience. 

A unified brand presence boosts recognition and enhances the overall user experience.

Design Must #3: Capture Attention Instantly through Compelling Imagery

Visuals are powerful tools for storytelling and grabbing attention. 

Incorporate high-quality, relevant images that resonate with your audience’s interests and needs. In emails, use eye-catching visuals that complement your message and entice recipients to read further. 

On landing pages, leverage impactful imagery to convey the value proposition of your offer instantly. Remember, a picture is worth a thousand words, so choose visuals that amplify your message effectively.

Example: Sercante Landing Page Created in Account Engagement

Design Must #4: Guide User Actions with Clear Call to Actions (CTAs) 

The purpose of your email and landing page is to drive specific actions. Whether it’s encouraging recipients to click through to your website or enticing them to fill out a form, your CTAs must be prominent and action-oriented. Use contrasting colors, persuasive language, and compelling design elements to draw attention to your CTAs.


The Account Engagement drag-and-drop email and landing page editors enable you to create visually appealing buttons that stand out, leading users to take the desired actions effortlessly.

Example: Bold and clear CTA

Design Must #5: Streamline Layouts to Enhance Readability and Navigation

Cluttered and confusing designs can deter users from engaging with your content. Keep your layouts clean, organized, and easy to navigate. 

In emails, use headings, subheadings, and bullet points to break up text and improve readability. On landing pages, employ a clear hierarchy to guide users’ attention toward key information. 

Account Engagement design tools empower you to structure your content in a user-friendly manner, ensuring that recipients and visitors can quickly grasp your message and offerings.

Be an Awesome Account Engagement Asset Designer 

Mastering the art of designing impactful emails and landing pages within the Pardot platform requires a blend of design aesthetics and marketing strategy. 

By adhering to these five design musts — responsive design, consistent branding, compelling imagery, clear CTAs, and streamlined layouts — you’ll create experiences that captivate your audience, encourage interaction, and ultimately drive conversions. 

Embrace these principles to unleash the full potential of Account Engagement and leave a lasting impression on your target audience. And reach out to the team at Sercante when you’re ready to take your Account Engagement Assets to the next level.

Are you a small business owner who is interested in using Salesforce for your business all the way up until you saw the pricing? If so, Salesforce Starter was created just for you!

I know what you’re thinking: Salesforce is a big, expensive CRM platform. But Salesforce Starter is different. It’s a low-cost, lightweight version of Salesforce that’s designed specifically for small businesses. Coming in at $25 USD per month/per user, it’s a downright smoking deal to be honest.

There’s even a 30-day free trial to test it out and see if it’s right for you and your team! 

Salesforce Starter Capabilities

Here’s a quick rundown of some of the stuff you can do with Salesforce Starter RIGHT OUT OF THE BOX!

  • Track your leads and customers
  • Manage your sales pipeline
  • Automate your marketing campaigns
  • Manage customer cases
  • Write knowledge articles for your support reps  

Ease of Use is key to Salesforce Starter

What do I mean by that? I mean, it literally guides you through accessing objects (types of records) based on a picklist (dropdown) menu right after you log in (via your homepage)! 

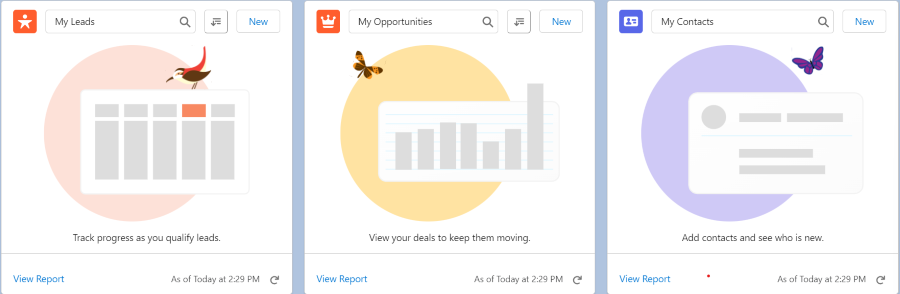
Also featured on the home page are premade dashboard components that display your leads, contacts, opportunities, tasks, and any recommended actions! You can also see any recent records.

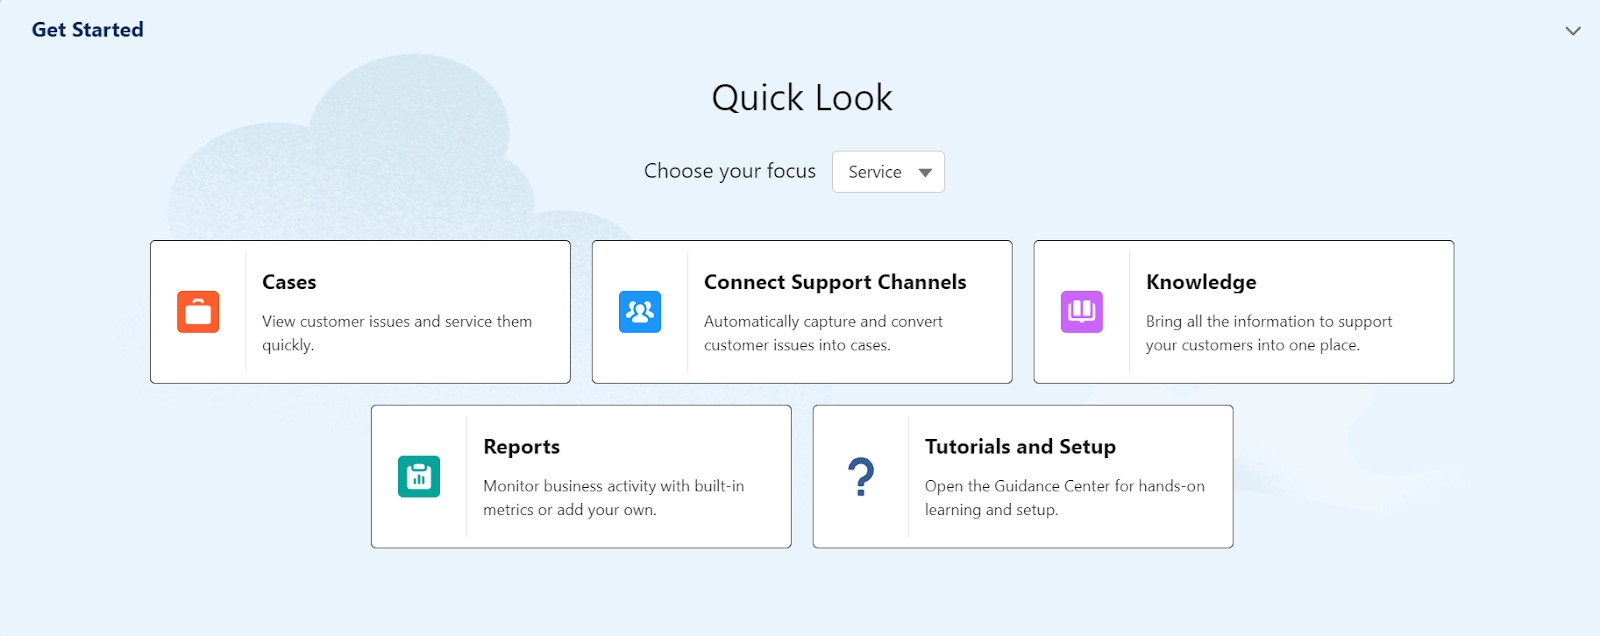
If your team’s focus is centered around Sales (Revenue), Marketing (Hello, Sercante) or Service (Support), choose those in the Quick Look picklist and your options change. 

Salesforce Starter for Sales

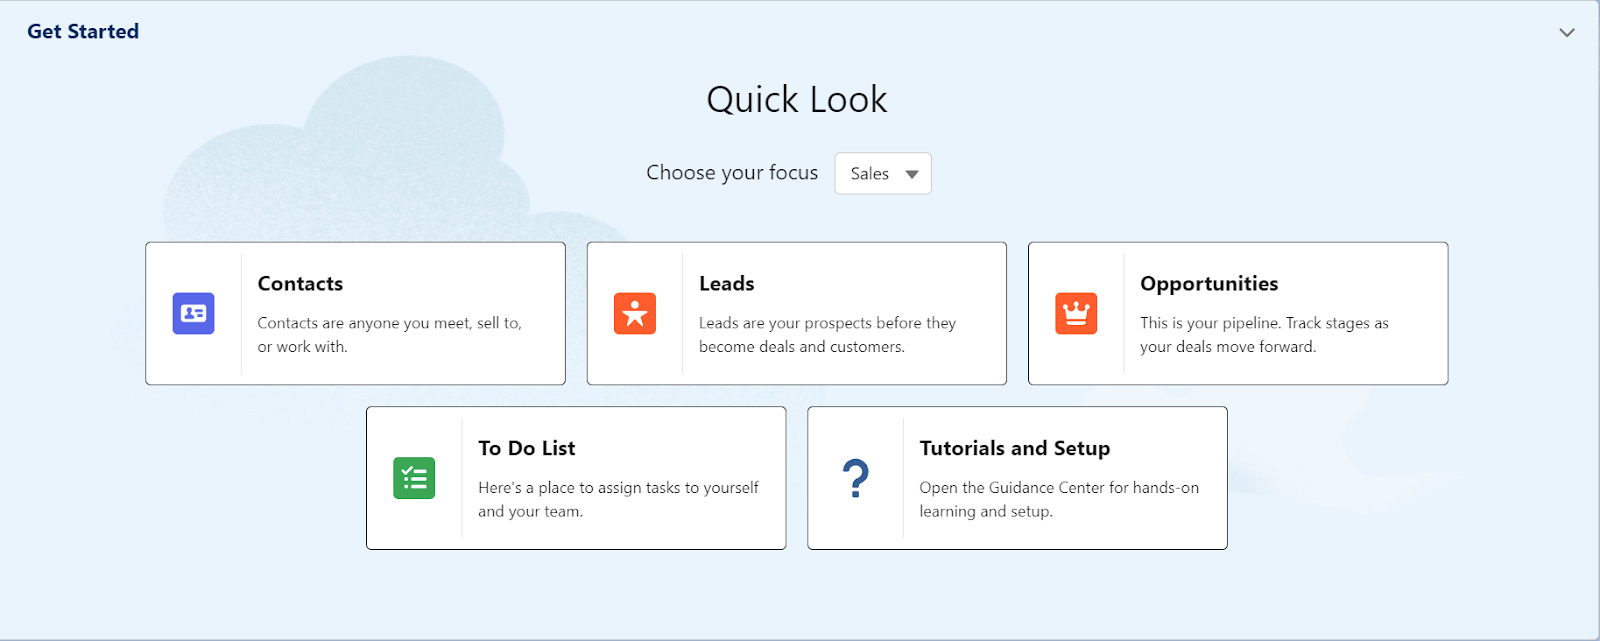
First up is Sales, the lifeblood of your business. If Sales is your focus, then Salesforce is built for you! Choosing Sales as your focus brings up Contacts (people), Leads (prospects), Opportunities (deals), To Do list (Tasks) along with Tutorials and Setup. 

Salesforce Starter for Marketing

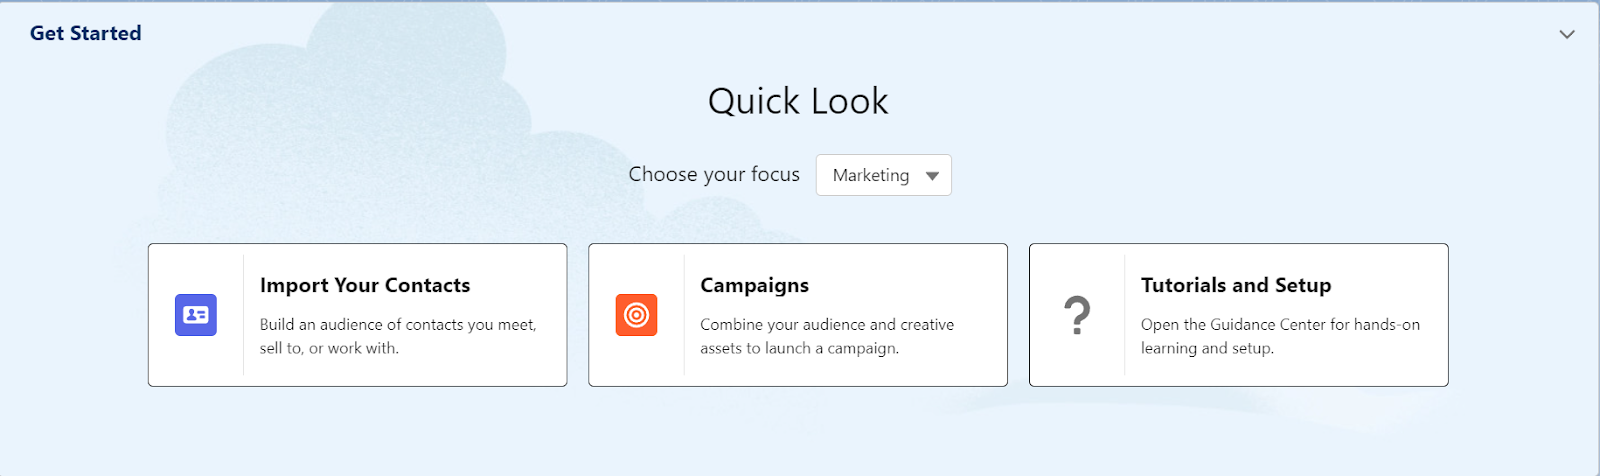
Selecting Marketing as your focus gives you the option to import your Contacts (people), create Campaigns (think email or direct mail campaigns), and has links directly to tutorials and setup. 

Salesforce Starter for Service

Choosing Service opens up access to Cases (customer support requests), Connecting Support Channels (think email or web forms), Knowledge (think help articles), Reports (probably the most important part of Salesforce!), along with links to tutorials and setup.  

Clicking on any of these will take you directly to a list of records of that type (List View) that you have in your organization, and allow you to view, edit, or delete them as you desire. 

Connect Salesforce Starter to email accounts for Einstein Activity Insights

Salesforce Starter even prompts you to connect your Microsoft or Google email accounts so you can sync your calendars and get Einstein Activity Insights (AI recommendations) on your incoming emails. 

The data science and machine learning from Einstein is built to analyze external new sources and your account data to help build a data model that provides relevant updates to help you win more deals. Sounds like a win-win!

Go for all three

One last thought here, you aren’t limited to one or the other, you have access to Sales, Service, AND Marketing!

OK Jason, that’s great. But what if we grow out of Salesforce Starter? 

Salesforce Starter is built on the same foundation as Salesforce Professional, Enterprise, and Unlimited. So as your CRM needs grow, Salesforce can grow with you. All you have to do is contact your Account Executive (AE) to upgrade your edition and I’m pretty sure they just hit a magic button* and BOOM you’ve upgraded! 

(*This is unverified, but I imagine that they have a big red upgrade button they smack when a client wants to upgrade followed by a confetti explosion and 30-second dance party.)

Alright, I’m kind of convinced. Where do I start? 

Well any good SaaS (Software-as-a-Service) has a trial and that’s where you begin with the Salesforce Starter package. 

Sign up for 30-day Salesforce Starter trial

Click this link and you’ll head over to the Salesforce Starter site, where you can sign up for your own 30-day trial, check out a demo, or read some customer stories. 

Then, what’s next?

If you want to know more about how it works, I would recommend taking a look at the Salesforce Starter Quick Look Module on Trailhead. 

If you’re not familiar with Trailhead, it’s where all of us Salesforce nerds go to learn about our favorite CRM in a fun, gameified way! It’s free to sign up, and use and can lead to some awesome new skills. 

Please feel free to leave any questions in the comments below.

Marketing Cloud Account Engagement Progressive Profiling is an out-of-the-box functionality and a powerful solution for B2B marketers who want to get detailed prospect data without overwhelming them with a large number of form fields to complete.

This advanced form feature allows marketers to gather additional information about prospects over time, without creating lengthy forms. On one hand, it helps the marketers gain higher conversion rates, while on the other it enhances the user experience and reduces form fill burnout.

How does Progressive Profiling work?

Through Progressive Profiling, Marketing Cloud Account Engagement replaces the form fields for which data is already collected with new fields.

So when a prospect visits your progressive profiling enabled form, it will only present the fields they haven’t

filled out before, unless the ‘Always display even if previously completed’ setting is enabled. By doing so, you gradually collect more information about your prospects over multiple interactions.

  • When a prospect first interacts with your marketing content, Marketing Cloud Account Engagement should display a short form with essential fields such as first name, last name, email address, and company name. The goal is to capture basic prospect data to initiate the engagement.
  • Upon subsequent engagement, Marketing Cloud Account Engagement flips previously completed fields with new ones. For instance, if the prospect has completed the Company Name field, the next time they interact with a form, it could be replaced with the Job title field.
  • Through every interaction, Marketing Cloud Account Engagement will ask the prospect to provide additional data beyond what is collected already.
  • Gradually you can build a comprehensive profile of your prospects, and it can be used to tailor your marketing campaigns to cater to their specific needs and preferences.

Key Benefits of Progressive Profiling

  • Progressive profiling ensures that quality prospect data is collected, as the risk of data entry errors is minimized due to this gradual approach of presenting fields.
  • Since the number of fields displayed at a time is limited, it makes the form submission exercise seamless, reduces burnout and increases the likelihood of getting more form submissions.
  • Segmentation and targeting of prospects also becomes a lot more easier and effective as more and more prospect data is collected.
  • Through better segmentation, marketers can send personalized content to the prospects and improve the chances of conversion.
  • Collecting additional information regarding the needs and preferences of the prospects can aid marketers in channelizing marketing efforts in the right areas.

How to set up progressive profiling in Account Engagement

  • Create Custom Fields:

Before setting up progressive profiling, you need to ensure the custom fields to collect the incremental prospect data are created.

  • Create your Marketing Cloud Account Engagement Form:

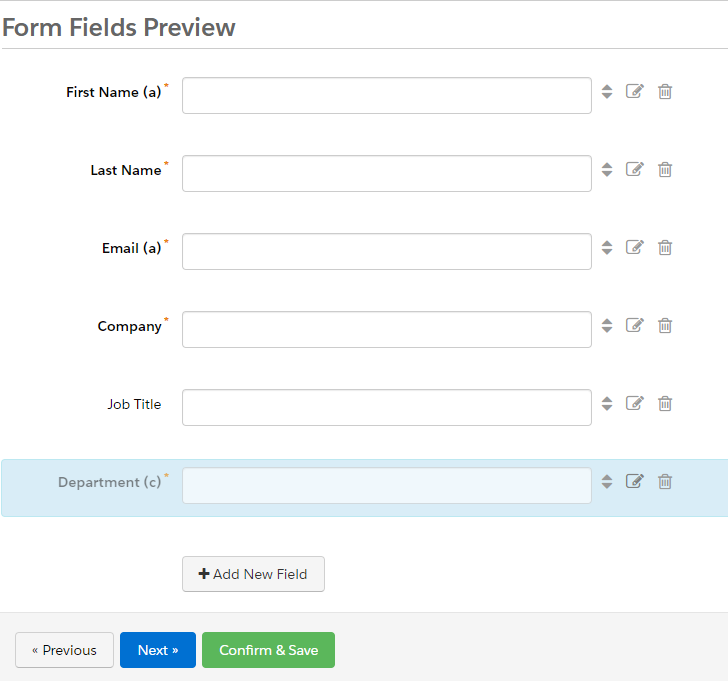
This feature requires you to first create the forms you intend to use for capturing prospect data. Create a form and either add new fields or use the existing ones such as First Name, Last Name, Email and Company.

  • Enable progressive profiling for your form:
    • In the form editor, click on the pencil icon adjacent to the form fields you seek to progressively profile.
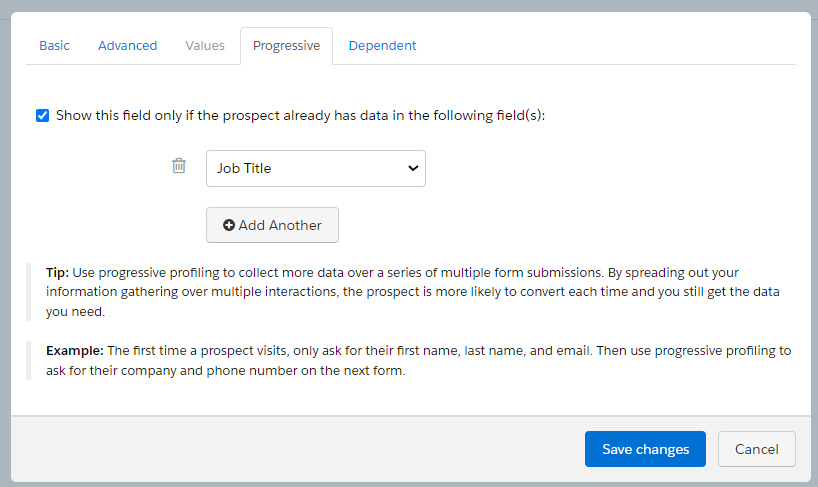
      (The screenshots below show the example of progressive profiling on the ‘Department’ field, which will be displayed only when the ‘Job Title’ field is already completed.)
  • Then, in the form settings dialogue box, switch to the ‘Progressive’ tab and enable progressive profiling by checking the checkbox labeled as ‘Show this field only if the prospect already has data in the following field(s)
  • When adding multiple progressive profile fields, you can also manage the sequence in which they are displayed.
  • Remember to save the changes you made to the form settings, and click the ‘Confirm and save’ button before exiting the form editor.

Conclusion 

Overall, progressive profiling addresses the issue of form fill burnout by creating a dynamic, user-friendly and incremental approach to collect prospect data. It ensures quality data is collected and aids segmentation and targeting. 

This approach also ensures that marketers respect their prospect’s time and effort in the form completion process, while increasing engagement and prospect data quality. When using this approach remember to maintain a balance between asking information and honoring the prospect’s preferences.

Need help creating sophisticated prospect profiles and segmentation strategies? Reach out to the team at Sercante to get the conversation going.

No more posts to show