Category

API & Integration

Did you know there are actually two versions of the Pardot to Salesforce connector? If you purchased your Pardot account after February 2019, you’ve likely always had the newer V2 Connector, however, if you purchased before February 2019 and haven’t upgraded, you will still be on the V1 Connector.

Pardot released a path to upgrade from V1 to V2 in the 2020 Summer release, but I’ve found that a lot of Pardot admins are still hesitant to upgrade. In this post I’ll cover all the considerations and options you have when upgrading your connector and help you squash those “this upgrade is irreversible” anxieties. 

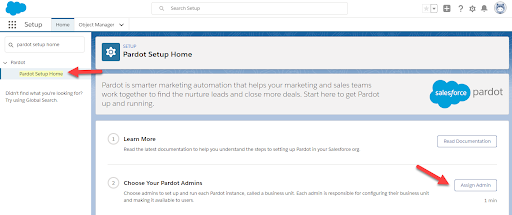
If you don’t know which connector version your Pardot instance is currently using, follow these steps to check.

Salesforce-Pardot Connector V1 vs V2: What’s the difference?

The V2 connector has improved security and instant metadata sync, but the feature that catches the attention of most day to day admins is you can pause the sync! Gone are the days where you have to disconnect the Salesforce connector completely and then fear something will go wrong when you try to connect it again. Now you have a simple “Pause” and “Resume” button to use to your heart’s content. Wait, am I the only one who got super anxious about disconnecting the Salesforce connector? Ok fine, moving on…

With the V2 Connector you also have the option to use the B2BMA Integration user instead of a connector user. This is fantastic because

  • The B2BMA Integration user does not require a paid Salesforce license
  • Since no one can log into Salesforce as the B2BMA Integration User you can give this user all the access and permissions Pardot needs 

Connecting via the integration user also gives you access to Marketing Data Sharing, which allows you to get more granular about which records are eligible to sync from Salesforce to Pardot. 

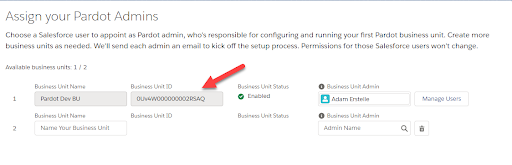
Finally, for multiple Pardot Business Units, the V2 connector gives you access to the Business Unit Switcher which allows you to seamlessly switch between Pardot Business Units without needing a unique login to each unit. 

Considerations for the Salesforce-Pardot V2 Connector

  • Upgrading to the V2 Connector is irreversible! I know, “irreversible” is not my favorite word when it comes to new features, but take a deep breath, change is good.
  • You can’t change the Salesforce instance that your Pardot account is connected to after the upgrade. If you are thinking about moving Salesforce instances or creating a new Salesforce instance in the near future, do not upgrade.
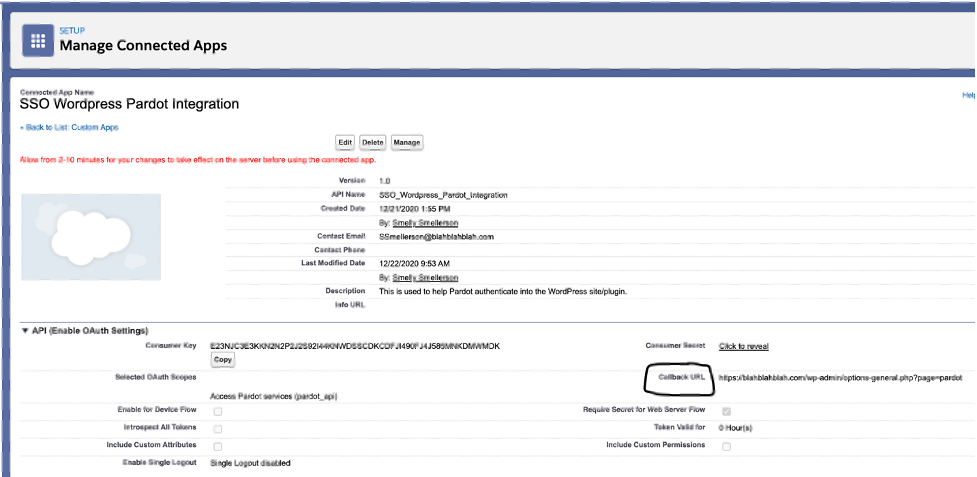
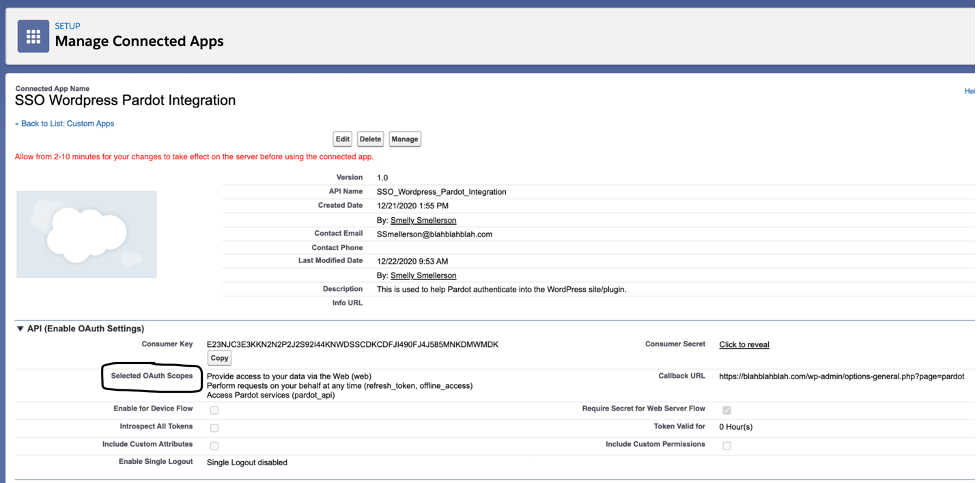
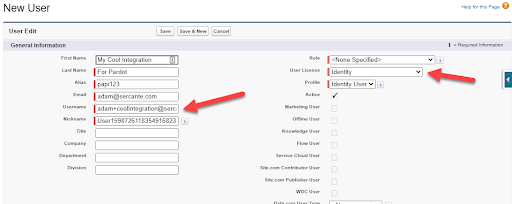
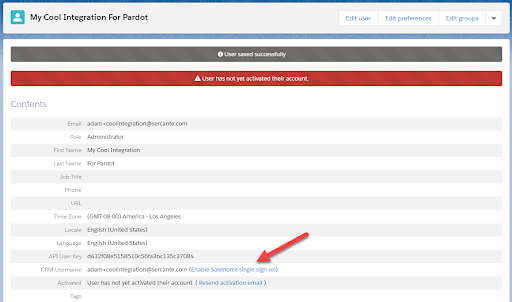
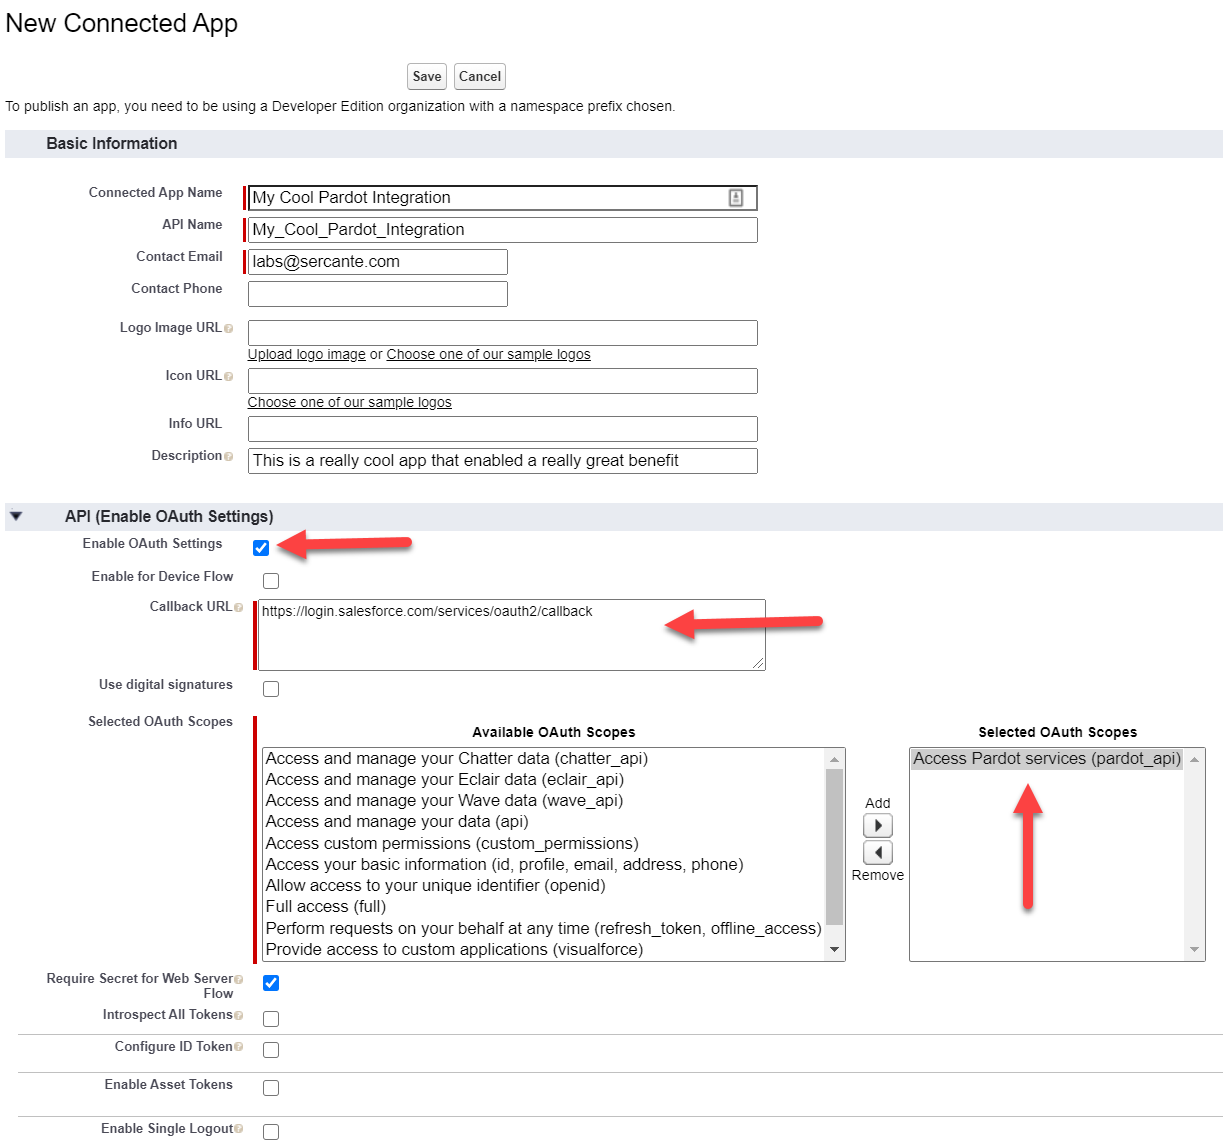
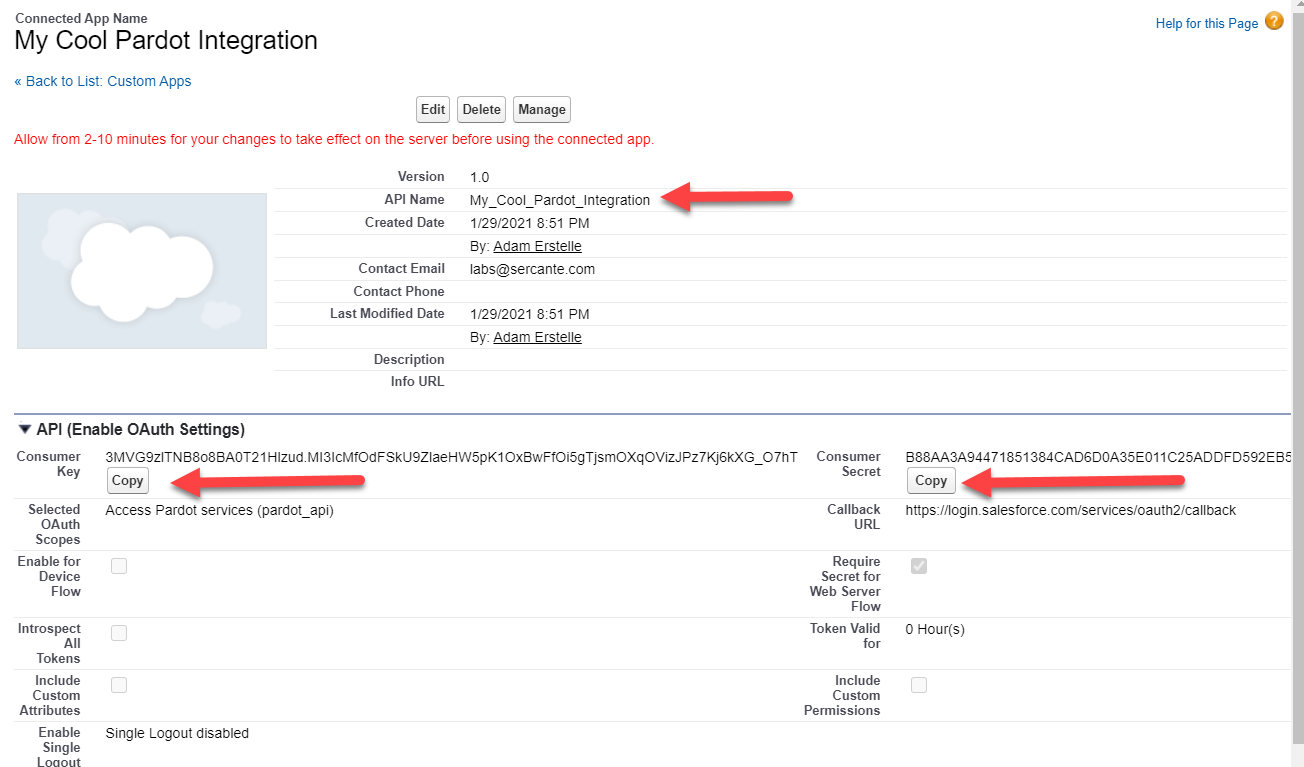
  • If you continue to use the existing connector user rather than the B2B Integration User, make sure your connector user has access to the Pardot_to_SF_Integration_Secure_Connected_App connected app before you upgrade.
  • If you need to restrict which records are eligible to sync from Salesforce to Pardot and do not have access to Marketing Data Sharing, stick to using a connector user with the V2 Connector.
  • The V2 Connector will be created in a paused state, so don’t forget to resume the connection after the upgrade!

How to Upgrade to the Salesforce-Pardot V2 Connector

If you’re ready to upgrade to the V2 Connector, you can either dive in by upgrading and moving to the integration user at the same time, or you can take a more gradual approach in order to upgrade and then later move to the integration user.

To dive in:

  1. Open your connectors in Pardot
    1. Classic: Admin > Connectors
    2. Lightning: Pardot Settings > Connectors
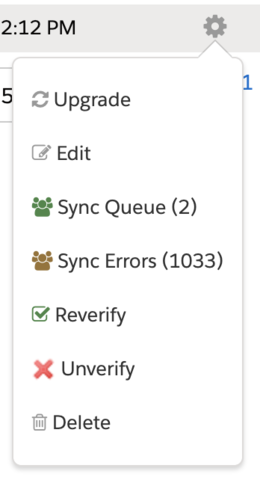
  2. Select the Action Wheel next to your Salesforce Connector and click Upgrade
  1. Select the “I have read the documentation. I understand how the upgrade changes my account, and I understand that this change is permanent” checkbox and select Next
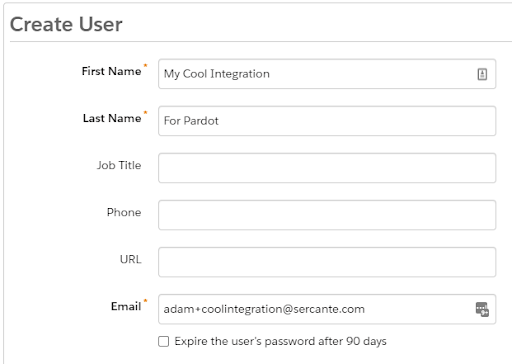
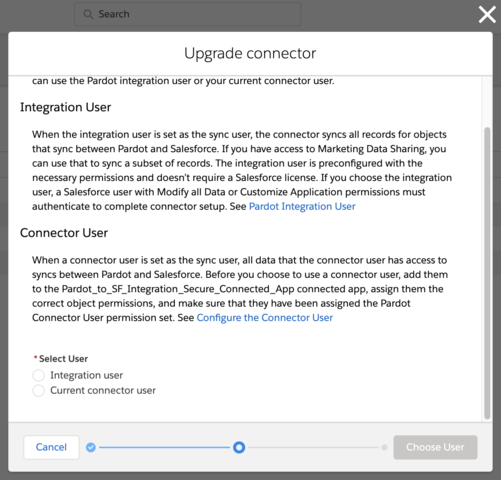
  2. Next, select the Integration User and select Choose User
  1. Your upgrade will likely take 10-15 minutes to complete. The connector will be created in a paused state, so make sure you resume the connection!

If you’d prefer a more gradual approach:

  1. Ensure your connector user has access to the Pardot_to_SF_Integration_Secure_Connected_App connected app in Salesforce
  2. Follow the steps above, but choose “Current connector user” when you are at step 4

When you are ready to move from the Connector User to the Integration User later:

  1. Open your connectors in Pardot
    • Classic: Admin > Connectors
    • Lightning: Pardot Settings > Connectors
  2. Select the Action Wheel next to your Salesforce Connector and click Pause Sync
  3. Select the Action Wheel again and click Edit Settings
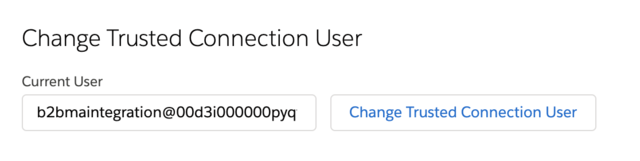
  4. Enter the B2BMA integration username in the connector user box and click “Change Trusted Connection User”.
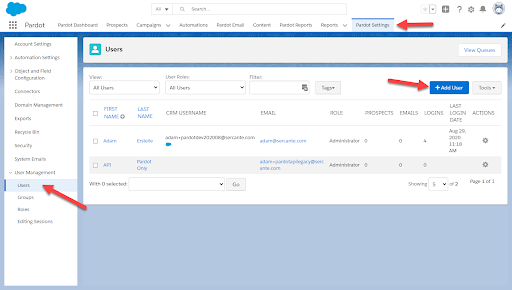
    • The B2BMA Integration username is unique for each Salesforce instance so make sure you grab the correct username from your Salesforce users table.
  5. Resume the connector

Conclusion

And easy-peasy-lemon-squeezy, your Salesforce-Pardot connector is upgraded to the V2 Connector. Hopefully this post has squashed your “this upgrade is irreversible” anxieties and you are ready to take steps to the upgrade. If you still have questions or concerns after reviewing all the considerations and options for upgrading to the V2 connector, leave a comment below and we can help you through it.

The Pardot User-Migration deadline is fast approaching. There is a lot of guidance on setting up our human users for success, but what about our code? Currently, there is a lack of specifics available on how to make changes to custom code & scripts that talk to the Pardot API. So we wrote this guide specifically for connecting Pardot API from APEX

Also see Part 3B: Connecting to Pardot API from Custom Code.

We’ve come across our fair share of APEX code written in Salesforce that works with the Pardot API, and in the past it was fairly simple to set up. Just get the username, password and API key of the Pardot User, copy some APEX code examples and you were ready to go.  Now that we need to authenticate through Salesforce SSO, we’ve taken the time to detail out what you need to set up. Hang on, as there’s a lot to do.

In summary we will:

  1. Create a new User for this integration
  2. Create a Salesforce Self-Signed Certificate
  3. Create a Connected App, allowing our User to be pre-authorized
  4. Create a Named Credential
  5. Write some Basic APEX that demonstrates this all working

Step 1: Create a new user

It is our recommended advice that each integration has its own user. For this Pardot integration, a Salesforce User (with an Identity License profile) linked to a Pardot SSO User should be sufficient.

In Salesforce, create a new user, commonly using the Identity Profile.

  1. In Salesforce Lightning, Navigate to Setup
  2. Navigate to Users under Administration > Users, click on New User
  3. Use the following values (or use whatever makes sense for you)
    • First Name: Pardot
    • Last Name: APEX
    • Alias: pdotapex
    • Email: use an email address you have access to
    • Username: create a username that uniquely identifies this integration
    • User License: Identity
  4. When complete, the section should look like this
  5. Using the Salesforce activation email, be sure to login, which will ask you to set a password and recovery options. Save this info somewhere.
  6. If you are using User Sync, complete one more step: in Salesforce Setup navigate to Pardot Setup > Account Setup > Manage Users. Edit User Assignments and make sure your new user is Selected (or is added as a member of a selected group or role).

In Pardot, create a new user (skip step 1 if you are not using User Sync): 

  1. If you are using User Sync, update the profile and role mapping to make sure the Salesforce profile (e.g. Identity User) is mapped to a Pardot Role that matches the abilities you want your API integration to have.
  2. Navigate to the Users page in Pardot by navigating to Admin (Pardot Settings in the Lightning app), and then User Management | Users.
  3. Click the +Add User button and complete the required information, using the same values (where possible) that you used when creating the Salesforce User
  4. In the CRM Username dropdown menu, select the new API integration User you created in Salesforce.
  5. When complete, the section should look like this
  6. After saving the new User record, click the “Enable Salesforce single sign-on” link. (If you have already enabled User Sync for this user/profile, this will be completed automatically.)

A Permission Set is what will enable our User to connect via the Connected App without needing to manually authorize it.

  1. In Salesforce Lightning, Navigate to Setup
  2. Navigate to Permission Sets under Administration > Users, click on New
  3. Use the following values (or use whatever makes sense for you)
    • Label: Pardot API Access
    • API Name: let it auto populate
    • Description: Grants access to Pardot via API. No permissions specified
    • Click Save
  4. Add the new Permission Set to the User created/chosen above
    • When viewing the Permission Set, click Manage Assignments
    • Click Add Assignments, and select the correct User

Step 2: Create a Salesforce Self-Signed Certificate

Certificates are actually composed of 2 pieces: a private key (often called just a key) and a public key (often called just a cert/certificate). For our purposes, the private key is used to “prove” that it is actually your code that is trying to login, and is the reason that passwords and security tokens are not required. For our purposes, the public key is used to verify that the correct (authorized) process is trying to access Salesforce.

  1. In Salesforce Lightning, Navigate to Setup
  2. Navigate to Certificate and Key Management under Security, click Create Self-Signed Certificate
  3. Use the following values (or use whatever makes sense for you)
    • Label: Pardot Integration Certificate
    • Unique Name: let it auto populate
    • Key Size: Leave it as the default value
  4. When complete, the section should look like this:
  5. Save the Certificate
  6. Once saved, click the Download Certificate button, as  you will need it when setting up the Connected App later on.

It is important to note that this certificate is only going to be valid for 1 year. You can create a longer-lived certificate, but you will have to import it from a Keystore and we will leave that for another blog post.

Step 3: Create the Connected App

A Salesforce Connected App is how you enable external code / systems access to use the Salesforce API.  Now it may seem a little weird as your APEX is already inside Salesforce, however the Authentication methods work the same way.

  1. In Salesforce Lightning, Navigate to Setup
  2. Navigate to App Manager under Platform Tools > Apps, click on New Connected App
  3. Use the following values for Basic Information
    • Connected App Name: APEX Access to Pardot
    • API Name: (let it auto populate, or make up your own name)
    • Contact Email: use a company email address
    • Description: Grants access to Pardot from our APEX
    • When complete, the section should look like this:
  4. Use the following values for API (Enable OAuth Settings)
    • Enable OAuth Settings: Checked
    • Callback URL: https://login.salesforce.com/services/oauth2/callback
    • Use digital signatures: Checked
    • Browse: Use the certificate you downloaded earlier
    • Selected OAuth Scopes:
      1. pardot_api (allows you to actually call the Pardot API
      2. offline_access (allows your code to make API calls when it needs to)
    • When complete, the section should look like this:
  5. Save the new Connected App, click Continue after observing the warning
  6. From the Saved Record screen, take special note of the Consumer Key, you will need to use it in your APEX

Preauthorize user to use Pardot API

Regardless of how the Connected App was set up (above), we need to pre-authorize the correct user to use the Pardot API.

  1. In Salesforce Lightning, Navigate to Setup
  2. Navigate to App Manager under Platform Tools > Apps, find the APEX Access to Pardot app, click the drop down menu and then Manage
  3. Click Edit Policies
  4. Under OAuth Policies > Permitted Users, change to: Admin approved users are pre-authorized, Save
  5. Back at the Connected App, new sections have appeared. In Permission Sets, click Manage Permission Sets
  6. Assign the Pardot API Access permission set

Step 4: Create a Named Credential

The Named Credential is what allows your APEX code to login and be able to actually use the Pardot API.

  1. In Salesforce Lightning, Navigate to Setup
  2. Navigate to Named Credentials under Security, click New Legacy Named Credential (use the dropdown next to the New button)
  3. Use the following values
    • Label: APEX Pardot Credential
    • Name: (let it auto populate, or make your own name)
    • URL: https://pi.pardot.com/api (adjust if https://pi.demo.pardot.com/api)
    • Certificate: leave this blank, this is used for 2-way SSL connections
    • Identity Type: Named Principal
    • Authentication Protocol: JWT Token Exchange
    • Token Endpoint URL: https://login.salesforce.com/services/oauth2/token (adjust if test.salesforce.com)
    • Issuer: OAuth Consumer Key that you created earlier
    • Named Principal Subject: The username of the User you want to use (from the first steps of this post)
    • Audiences: https://login.salesforce.com (adjust if required)
    • Token Valid for: 30 Seconds
    • JWT Signing Certificate: Pardot Integration Certificate
    • Callout Options: leave all these at their default settings.
  4. When complete, this section should look like this
  5. Save

Sample working APEX

The following APEX code can be called to demonstrate a working solution.

public class PardotTesting {
    public static void tryItOut() {
        HttpRequest req = new HttpRequest();
        req.setEndpoint('callout:APEX_Pardot_Credential/account/version/4/do/read?format=json');
        req.setHeader('Pardot-Business-Unit-Id', '0Uv4W0000000056SAA');
        req.setMethod('GET');
        Http http = new Http();
        HTTPResponse res = http.send(req);
        //Ideally you would parse the JSON response and work with it
        System.debug(res.getBody());
    }
}

Key things to note: Setting the Request’s Endpoint, the Name of the Named Credential is used in the String. Following the Named Credential is the rest of the Pardot API endpoint you want to hit.

Conclusion 

Following the above steps will get your code ready for SSO in preparation for the February 15th deadline. Have some additional insights? We would love for you to  share your experiences and tips as you work through getting your code ready for SSO. Stuck and need help – let us know and we would be glad to help audit your unique instance needs

Learn more

Pardot API and Getting Ready with Salesforce SSO Users Series: 

The Salesforce SSO deadline is fast approaching, and there isn’t a lot of specifics out there on how to make changes to our custom code & scripts that talk to the Pardot API. There is a lot of guidance on setting up our human users for success, but what about our code? So we wrote this guide specifically for connecting Pardot API from Custom Code

Also See Part 3A: Connecting to Pardot API from APEX

We’ve come across our fair share of custom code that works with the Pardot API, and in the past it was really easy to set up. Just get the username, password, and API key of the Pardot User, copy some code examples and you were ready to go.  Now that we need to authenticate through Salesforce SSO, we’ve got the details here on what you need to set up. Hang on, as there’s a lot to do. In summary, we will:

  1. Create a new user for this integration
  2. Create a Self Signed Certificate
  3. Create a Connected App, allowing our User to be pre-authorized
  4. Run some custom code, with examples in different languages

Create a new user

It is our recommended advice that each integration has its own user. For this Pardot integration, a User with an Identity License profile should be sufficient.

In Salesforce, create a new user, possibly using the Identity Profile.

  1. In Salesforce Lightning, Navigate to Setup
  2. Navigate to Users under Administration > Users, click on New User
  3. Use the following values (or use whatever makes sense for you)
    • First Name: Pardot
    • Last Name: Python
    • Alias: pypardot
    • Email: use an email address you have access to
    • Username: create a username that uniquely identifies this integration
    • User License: Identity
  4. When complete, the section should look like this
  5. Using the Salesforce activation email, be sure to login which asks you to set a password and recovery options. Save this info somewhere.
  6. If you are using User Sync, complete one more step: in Salesforce Setup navigate to Pardot Setup > Account Setup > Manage Users. Edit User Assignments and make sure your new user is Selected (or is added as a member of a selected group or role).

In Pardot, create a new user (skip step 1 if you are not using User Sync): 

  1. If you are using User Sync, update the profile and role mapping to make sure the Salesforce profile (e.g. Identity User) is mapped to a Pardot Role that matches the abilities you want your API integration to have.
  2. Navigate to the Users page in Pardot by navigating to Admin (Pardot Settings in the Lightning app), and then User Management | Users.
  3. Click the +Add User button and complete the required information, using the same values (where possible) that you used when creating the Salesforce User
  4. In the CRM Username dropdown menu, select the new API integration User you created in Salesforce.
  5. When complete, the section should look like this
  6. After saving the new User record, click the “Enable Salesforce single sign-on” link. (If you have already enabled User Sync for this user/profile, this will be completed automatically.)

A Permission Set is what will enable our User to connect via the Connected App without needing to manually authorize it.

  1. In Salesforce Lightning, Navigate to Setup
  2. Navigate to Permission Sets under Administration > Users, click on New
  3. Use the following values (or use whatever makes sense for you)
    • Label: Pardot API Access
    • API Name: let it auto populate
    • Description: Grants access to Pardot via API. No permissions specified
    • Click Save
  4. Add the new Permission Set to the User created/chosen above
    • When viewing the Permission Set, click Manage Assignments
    • Click Add Assignments, and select the correct User

Create a Self-Signed Certificate

Certificates are actually composed of 2 pieces:

  1. a private key (often called just a key)
  2. a public key (often called just a cert/certificate)

For our purposes, the private key is used to “prove” that it is actually your code that is trying to login, and is the reason that passwords and security tokens are not required. For our purposes, the public key is used to verify that the correct (authorized) process is trying to access Salesforce.

For our example, we will use a Command Line Interface app called openssl to generate our certificate.

  1. Make sure you have openssl installed
  2. Open a Terminal / Command Prompt
  3. Issue the following command:
    openssl req -x509 -sha256 -nodes -days 36500 -newkey rsa:2048 -keyout mycoolcert.key -out mycoolcert.crt
    • You will be prompted to provide some information. These are all optional, though it is not a bad idea to fill it out, especially since Salesforce will show the info when you look at the Connected App later on
    • What this command does, is create a 100 year certificate with the Private Key being stored in the .key file, and the Public Key being stored in the .crt file. Both of these files are text files that you can view with any text editor.
    • You will want to protect the .key file, as it is very uniquely created for YOU. This .key file will be used by your code as part of the authentication process.
    • The .crt file will be used when creating the Connected App

Create the connected app

A Salesforce Connected App is how you enable external code / systems access to use the Salesforce API.  

  1. In Salesforce Lightning, Navigate to Setup
  2. Navigate to App Manager under Platform Tools > Apps, click on New Connected App
  3. Use the following values for Basic Information
    • Connected App Name: Internal JWT Access to Pardot
    • API Name: (let it auto populate, or make up your own name)
    • Contact Email: use a company email address
    • Description: Grants access to Pardot from our own custom written solutions
    • When complete, the section should look like this:
  4. Use the following values for API (Enable OAuth Settings)
    • Enable OAuth Settings: Checked
    • Callback URL: https://login.salesforce.com/services/oauth2/callback
    • Use digital signatures: Checked
    • Browse: Use the certificate you created earlier
    • Selected OAuth Scopes:
      1. pardot_api (allows you to actually call the Pardot API
      2. offline_access (allows your code to make API calls when it needs to)
    • When complete, the section should look like this:
  5. Save the new Connected App, click Continue after observing the warning
  6. From the Saved Record screen, take special note of the Consumer Key, you will need to use it in your code later on

Preauthorize user to use Pardot API

Regardless of how the Connected App was set up (above), we need to pre authorize the correct user to use the Pardot API.

  1. In Salesforce Lightning, Navigate to Setup
  2. Navigate to App Manager under Platform Tools > Apps, find the Internal JWT Access to Pardot app (that you just created moments ago), click the drop-down menu and then Manage
  3. Click Edit Policies
  4. Under OAuth Policies > Permitted Users, change to: Admin approved users are pre-authorized, Save
  5. Back at the Connected App, new sections have appeared. In Permission Sets, click Manage Permission Sets
  6. Assign the Pardot API Access permission set

Sample working code

Here we aim to provide a few different samples of working code. Note: because these are samples, we are following some Minimal, Reproducible Example guidelines. These should help you understand how to incorporate the approach into your well-architected code projects.

Python sample code

This sample code was extended from a great GitHub Gist from booleangate. Save it locally as pythonExample.py

#!/usr/bin/env python3
# pip install jwt cryptography requests

from datetime import datetime
import jwt, time, requests

# *** Update these values to match your configuration ***
IS_SANDBOX = False
KEY_FILE = ‘mycoolcert.key’
ISSUER = ‘YOUR_OAUTH_CONSUMER_KEY’
SUBJECT = ‘YOUR_SALESFORCE_IDENTITY_USERNAME’
BUSINESS_UNIT_ID = ‘0Uv…..’
pardotUrl = ‘https://pi.demo.pardot.com/api/account/version/4/do/read?format=json’
# *******************************************************

DOMAIN = ‘test’ if IS_SANDBOX else ‘login’

print(‘Loading private key…’)
with open(KEY_FILE) as fd:
    private_key = fd.read()

print(‘Generating signed JWT assertion…’)
claim = {
    ‘iss’: ISSUER,
    ‘exp’: int(time.time()) + 604800,
    ‘aud’: ‘https://{}.salesforce.com’.format(DOMAIN),
    ‘sub’: SUBJECT,
}
assertion = jwt.encode(claim, private_key, algorithm=’RS256′, headers={‘alg’:’RS256′}).decode(‘utf8’)

#you could take the JWT and paste it in https://jwt.io to see what it ends up looking like
print(‘assertion=%s’ % assertion)
print(‘Making OAuth request…’)
loginResponse = requests.post(‘https://{}.salesforce.com/services/oauth2/token’.format(DOMAIN), data = {
    ‘grant_type’: ‘urn:ietf:params:oauth:grant-type:jwt-bearer’,
    ‘assertion’: assertion,
})

print(‘Status:’, loginResponse.status_code)
print(loginResponse.json())
accessToken = loginResponse.json().get(‘access_token’)

# Now for doing the Pardot Fun Stuff
pReqHeaders = {
    ‘Authorization’: ‘Bearer ‘+ accessToken,
    ‘Pardot-Business-Unit-Id’: BUSINESS_UNIT_ID
}

print(‘Making Pardot Account API request…’)
accountResponse = requests.get(url=pardotUrl, headers=pReqHeaders).json()
print(accountResponse)

Some tips to get this code working for you:

  1. Be sure to put the Private Key file from your self-signed certificate in the same directory as this code sample
  2. Be sure to replace the configuration values at the top of the script to match what you created
  3. Add print() statements where you want to further understand values that are being setup
  4. Make the code file executable, then just call it directly:  ./pythonExample.py and watch the output

Conclusion 

Following the above steps will get your code ready for SSO in preparation for the February 15th deadline. Have some additional insights? We would love for you to  share your experiences and tips as you work through getting your code ready for SSO. Stuck and need help – let us know and we would be glad to help audit your unique instance needs

Learn more

Pardot API and Getting Ready with Salesforce SSO Users Series: 

In only a few weeks, Salesforce is moving all Pardot users to single sign-on (SSO) and all API integrations must use Salesforce OAuth.

If you’re adjusting the Pardot plugin on your WordPress website to get ready for these changes and, despite following the steps in our first blog, are hitting authentication errors, this blog may help.

In this post, we’re going to cover how to resolve common errors that may come up as you authenticate the Pardot Plugin in WordPress and the final step to authenticate user account settings for SSO.

1. Callback URL Error

After entering the Consumer Key, Consumer Secret and Business Unit, it’s time to click the “Authenticate with Salesforce” button. When doing so, if the button pulls up the following error on a new white page window, you likely have a problem with your connected app’s callback URL.

error=redirect_uri_mismatch&error_description=redirect_uri%20must%20match%20configuration

In order to fix this error, edit your connected app’s callback URL to be the URL of the Pardot plugin’s settings page. For example, the callback URL should be something similar to the following URL.

https://yourdomain.com/wp-admin/options-general.php?page=pardot

2. Generic OAuth Error

If your previous errors change to the following OAuth Error, don’t fret, we have you covered. This error can be caused by the OAuth scopes field on your connected app.

Edit the app once more and add both the “Provide access to your data via the Web (web)” and “Perform requests on your behalf at any time (refresh_token, offline_access)” options in addition to your Pardot API option that should have been added from the first blog.

3. Authenticate your user account settings for SSO (without errors)

All that’s left to do now is to turn that ugly red text into beautiful green affirmation. Click “authenticate with salesforce” and use your Salesforce login credentials (with 2FA if enabled) to complete your SSO setup.

Get ready for the SSO user updates coming in February

Hopefully, by following the steps above, you feel more prepared for the API and single sign-on updates coming up soon. What are other questions you have about the coming changes? And what have you done to prepare? Let us know in the comments.  

Back in June, Salesforce announced that the way we work with the Pardot API will be changing and that, beginning in early 2021, all Pardot users will be required to use Salesforce single sign-on. In preparation for this change, some services have started rolling out their updates, but how do you as a Pardot admin actually get ready? 

This blog post will provide step-by-step instructions on how to prepare, where to gather all the critical information you need, and a quick guide on testing that you are prepared for these changes.

IMPORTANT: There are a bunch of different ways to set up a Connected App, and the integration you will be working with MAY require different steps. This blog is specifically written to enable success within the steps of this blog and may differ from the steps to enable your own integration. Be sure to check out Part 3a: JWT with APEX and Part 3b: JWT with Custom Code.

Before we dive in, there is something you might need to consider: You have the option of having a single Salesforce User with multiple Connected Apps (one for each integration).You also have the option of a single Connected App with multiple Salesforce Users (one for each integration) as well as any combination of the two options.

Our recommendation is to have a single Connected App and multiple Salesforce Users (with CRM identity licenses from the bundle provided by Pardot). This option creates a direct connection between the Pardot user and the app and allows Pardot admins to easily identify which API connection made changes to Pardot if an issue ever arises. 

If you don’t have the available license count to make this work, try to segment your integrations into something that makes sense. Just make sure that the combination of Connected App and User is different for each integration (especially if 3rd party).

Ok, let’s dive in. Here are the steps to set up Pardot users with Salesforce single sign-on. 

Step 1: Set up a Salesforce User

  1. In Salesforce Setup, search for Users and click New User
    Salesforce user
  2. For this user, try to keep it integration specific. If you have 5 integrations, plan to create 5 users. Use a unique username which indicates the purpose of this integration, and be sure to select the Identity User License. (If you pick another license by mistake, you can’t downgrade the license to Identity, so be careful!)
    Salesforce user

  3. Save the new user, and then activate the account from the email that Salesforce sent out (I usually do this in a new Private Browser / Incognito Mode).
  4. As part of activating the account, pick a new, very strong password.
  5. Now that you are in, you will need to generate a security token. Click on your user at the top right, and then go to My Settings.
    reset security token

  6. Go to Reset My Security Token, then click the button.
    reset token
  7. You should get a token in your email. Keep this, you will need it later. You can now close your private/incognito browser, as the rest of the steps will be done with your main accounts.

Step 2: Setup Pardot User

Now that our Salesforce User has been set up, we need to create a Pardot User that it will be synced with.

  1. In Salesforce, launch the Pardot app, go to Pardot Settings, Users and Add User
    launch Pardot app
  2. Provide the name and email address you used for the Salesforce User
    create user
  3. Optional, but recommended: note the time zone, or maybe adjust it to match the time zone that the Integration is running in. If these don’t match, you might get some really weird results later when you use the API because of the differences in day boundaries if you use datetime based queries.
  4. Pick the CRM Username that you just created in Salesforce (you will likely need to refresh the list of users). Also, pick the Role. Sales Manager will give you access to Prospect data, and not much for Pardot assets, Marketing will likely give you what most Pardot API integrations need for access, but if you need to create custom fields, you will need to grant the Admin role. Custom roles for API access control is also supported and recommended if you have access to them.
    crm username


  5. Optional, but recommended: Disable all emails that will be sent to the integration user’s mailbox.
  6. Click Create User
  7. Click the Enable Salesforce single sign-on link to complete this process.
    enable single sign-on

Step 3: Create Salesforce Connected App

If you have been following along, you will note that almost all the previous steps were pretty standard for any SSO user, and you are right! Besides the Security Token this stuff is pretty straightforward.

The next bit is where the Pardot Authentication docs don’t really give much guidance, but we got ya.

  1. In Salesforce Setup, go to App Manager, click New Connected App
  2. Fill in the Basic information, Enable OAuth Settings, specify the Callback URL and select the Access Pardot services OAuth Scope. Some integrations may ask you to include the Perform requests on your behalf at any time, so you may need to include that one as well.
  3. You do not need to put anything in for the other sections (Web App Settings, Custom Connected App Handler, Mobile App Settings, Canvas App Settings). Click Save
  4. You may get a prompt to wait for a while before using this app. Click Continue
  5. Once saved, you should be looking at the details of the App you just created. Be sure to copy the Consumer Key and the Consumer Secret, as you will need it later.

Step 4: Get the Pardot Business Unit

One last piece of information needed, the Pardot Business Unit Id that you will be using the API with. You need to do this step even if you are not using the “Multiple Business Units” feature. The steps are the same for a single Pardot account, just follow along.

  1. Switch back to Lightning Experience, launch Setup
  2. Search for Pardot Setup Home, click Assign Admin to get to the list of Business Units
    assign admin
  3. Grab your Business Unit ID.
    business unit ID

Step 5: Testing it all

Ok great, now that we have all the information, let’s test it out. Our favorite tool for testing APIs is Postman, and we have created a Postman Collection for Pardot that should help you get started.

  1. Install Postman and Import our collection.
  2. Click the Environment Setup button so that you can provide the information we built in all the previous steps.
    Environment Setup
  3. Click Pardot API – Salesforce SSO to configure that environment
    Pardot API
  4. Provide all the relevant information, click the Reset All link, then scroll down to click Update
     Manage environments
    Update
    1. If you are using the Pardot feature “Allow Multiple Prospects with Same Email Address” you need to specify api_version 4.
    2. If you are using a demo instance of Pardot, you need to change the pardot_domain to pi.demo.pardot.com
    3. If you prefer / need XML as output instead of JSON, replace the value for output_format to “xml”
  5. Close out of Manage Environments, then make sure that Postman is using it
    close
  6. In the Pardot API – Salesforce SSO collection, expand Getting Started and click the Login Request. Click Send.
    Click Send
  7. Optional: Check out the Body of the request to see how the information is being passed to Salesforce to complete the login request. Note how the Password is actually a concatenation of the Salesforce Password with the Salesforce Security Token
    Salesforce Security Token
  8. With a successful login, you should get a response that has an Access Token. This is 1 of the 2 pieces that Pardot needs.
    Successful login
  9. Now that you have an access token, you can start experimenting with other Pardot API requests. If you check out the other requests in the Getting Started section, you can start to see how things are tied together. Note the Headers for any of the requests, they all have the Authorization and Pardot-Business-Unit-Id headers.
    headers

Getting Ready for Salesforce Winter ‘21 Release

Hopefully, by following the steps above, you feel more prepared for the API and single sign-on updates coming early next year. What are you doing to prepare for upcoming Pardot and Salesforce releases? Let us know in the comments.  Want some help getting ahead of the curve? Give us a shout and we’ll hook you up.

Whether you’re new to account based marketing or your strategy centers on ABM, you’re going to want to check out the Terminus + Pardot integration.

Terminus’ recent blog post outlines some of the new tools, which promise to help marketers drive an account-centric strategy with the benefit of shared data, improved analytics, advanced reporting, and lead-to-account mapping capabilities. 

Major benefits of the Pardot and Terminus integration

In a nutshell, here are the major benefits the integration provides: 

Bi-directional data sync

Build better segments for targeted advertising in Terminus based on Pardot data, or activate drip marketing campaigns in Pardot at precisely the right time with account engagement data from Terminus. Alert sales and customer success in real-time about important or at-risk accounts or opportunities

Improved analytics

Observe account-based engagement simultaneously with Pardot marketing activities, understand the impact of email marketing campaigns on revenue

Sales and customer success intelligence

Help outbound teams prioritize outreach to the most engaged and best-fit target accounts, and provide timely alerts about at-risk accounts coming up for renewal 

Lead-to-account matching and data hygiene

Improve Salesforce data hygiene by mapping all orphaned leads to the appropriate account, build customized marketing programs around the entire buying group within an account, uncover missing decision-makers within a target account 

Because ABM is all about putting accounts front and center across Sales and Marketing, this integration is great for marketers looking to combine account data from Terminus with prospect records in Pardot 

How Pardot admins can put the Terminus integration to work for them

If you’re already using Pardot and Terminus, this is a happy day for you! Your two tools can now talk to each other and you can start combining campaigns that span across Terminus ABM ads and Pardot marketing and nurture programs. Read on to explore some interesting use cases.  

If you’re not using Terminus, but you’re a Pardot admin with an ABM strategy, this could be a great time to expand your tech stack while keeping your ABM efforts nice and organized within Pardot, making sure you get credit for all your hard-earned marketing wins.  

10 examples of the Pardot + Terminus integration in action

Once you’re up to speed on the integration and your ABM strategy is ready to rock, here are some use cases for how you can take Terminus fields and reports and make them actionable in Pardot : 

1. Segment your data in Pardot using Terminus Account Segments and intelligence data 

Segmenting your Pardot database through dynamic lists is a key Pardot feature. With the Terminus integration, you can now create custom fields in Pardot that map to Terminus account fields. From there, you can build dynamic lists and automations based on Terminus data and how you want to segment your lists. 

Here are some examples…

Access Terminus account lists in Pardot segments:

You can also access Terminus behavioral signal in Pardot segments: 

There are LOTS of possible applications of having this data avaliable in Pardot. Additional Terminus fields available in Pardot include: 

2. Engage entire buying teams easily from within Pardot Engagement Studio

Building off of point #1, once you’ve segmented your lists using Terminus account data, you can then use those lists to fuel Engagement Studio to lead prospects down a funnel in Pardot.

Support an ABM strategy using Terminus account data to guide your sales cycle and nurture strategy, keeping the messaging and steps focused on guiding your target accounts to the next stage. 

3. Use Pardot program logic with Terminus data to drive customer-facing workflows 

Taking Pardot’s Engagement Studio to the next level, Terminus helps create complex workflows that guide prospects down a path based on various account scores gathered by Terminus. 

In this example, target renewal accounts run through different paths based on whether they’re at risk or happy. The ESP attempts to improve account relationships by creating Salesforce tasks, adding prospects to Salesforce campaigns and making the Terminus relationship status visible in Salesforce. 

4. Pardot + Terminus ABM reporting and dashboards in Salesforce 

Being able to identify an account’s level of engagement or whether they’re at risk is incredibly important when personalizing messaging and prioritizing Sales efforts. By combining Pardot engagement metrics with Terminus account data, marketers and sales teams can focus their efforts more efficiently. 

Here are some examples of Terminus dashboards that could be used to inform and alert sales based on which accounts are engaging with marketing. 

5. Build on scoring categories for target accounts 

One specific report you could build in Salesforce using Pardot and Terminus data is to combine Terminus spiking accounts with Pardot scoring category data using a joint report. This view will allow you to see what marketing content is resonating with your highest potential accounts. 

(More to come on this use case in a future blog post.)

6. Temporarily bump Pardot grade up when an account is spiking

Pardot grading is great for highlighting prospects on an account for possible escalation to the Sales Team via Tasks when they do something “interesting.”

In this example, you’ll create an Automation Rule that looks to see if an account has spiked in the last 7 days and is considered an ABM New Target Account. If it matches those criteria, then change the grading profile criteria.  

And when the Account isn’t spiking, you’ll want to put that temporary scoring bump back down. Notice: you can set the rule to identify when the prospect is no longer in the ABM New Target Account profile OR that the most recent spike has ended.

This trick allows you to use Pardot grades to keep Sales focused on accounts that are most active and highest potential in a given moment. 

7. Automations to flag prospects and keep your data clean and up to date

Moving your ABM strategy into Pardot can help you develop creative strategies and automations to keep your database clean and focused on the highest potential accounts. Based on your target account list, you can filter Pardot prospects into lists, add to campaigns, assign to queue, change prospect custom field value, apply tags, and more. 

8. Use Dynamic Content to tailor messaging for target accounts 

As you pull in Terminus field values like behavioral score and spiking accounts, you can use that data to personalize content through Pardot features like Dynamic Content. 

For example, maybe you send an email promoting a new feature, but want your top target accounts to feel a little extra love. Use Dynamic Content to serve spiking accounts a promotion or exclusive offer that the rest of the email recipients don’t see. 

9. Use data to improve marketing performance 

Take the guess work out of where to focus your efforts in Pardot by measuring engagement at the account and campaign level. By building campaign influence reports that allow you to see which marketing activities are driving pipeline and revenue, you can you use the data to: 

  • See which content is driving results
  • Allocate budget to the channels that fill your funnel
  • Work seamlessly with Pardot Programs and Email
  • Measure revenue results of every Pardot interaction not just on the records synced to Salesforce

10. Read inferred account data on Salesforce leads from within Pardot 

Terminus writes inferred account data on leads allowing sales and marketing teams to operate with total account-centricity from Sales Cloud and Pardot.  

Now, with the Pardot integration, you can sync this lead-to-account data into Pardot so even your leads can be account-centric! 

Tighten your sales and marketing alignment by running an ABM strategy through Pardot 

Many companies are adjusting their sales and marketing strategies to be more account-centric. This integration between Terminus and Pardot will make that shift easier and more effective as marketers are given the tools to support sales’ efforts to reach and engage a set of target accounts. 

What are some creative ways you’ve targeted, engaged, and measured target accounts through an ABM strategy? Let us know in the comments. 

No more posts to show