
The Pardot User-Migration deadline is fast approaching. There is a lot of guidance on setting up our human users for success, but what about our code? Currently, there is a lack of specifics available on how to make changes to custom code & scripts that talk to the Pardot API. So we wrote this guide specifically for connecting Pardot API from APEX.
Also see Part 3B: Connecting to Pardot API from Custom Code.
We’ve come across our fair share of APEX code written in Salesforce that works with the Pardot API, and in the past it was fairly simple to set up. Just get the username, password and API key of the Pardot User, copy some APEX code examples and you were ready to go. Now that we need to authenticate through Salesforce SSO, we’ve taken the time to detail out what you need to set up. Hang on, as there’s a lot to do.
In summary we will:
- Create a new User for this integration
- Create a Salesforce Self-Signed Certificate
- Create a Connected App, allowing our User to be pre-authorized
- Create a Named Credential
- Write some Basic APEX that demonstrates this all working
Step 1: Create a new user
It is our recommended advice that each integration has its own user. For this Pardot integration, a Salesforce User (with an Identity License profile) linked to a Pardot SSO User should be sufficient.
In Salesforce, create a new user, commonly using the Identity Profile.
- In Salesforce Lightning, Navigate to Setup
- Navigate to Users under Administration > Users, click on New User
- Use the following values (or use whatever makes sense for you)
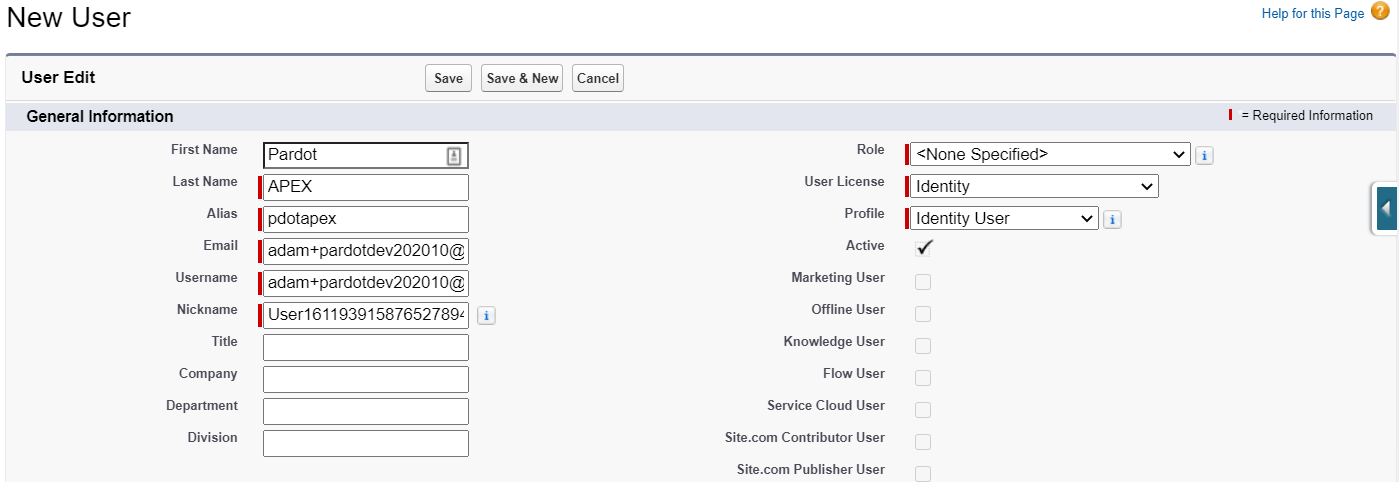
- First Name: Pardot
- Last Name: APEX
- Alias: pdotapex
- Email: use an email address you have access to
- Username: create a username that uniquely identifies this integration
- User License: Identity
- When complete, the section should look like this
- Using the Salesforce activation email, be sure to login, which will ask you to set a password and recovery options. Save this info somewhere.
- If you are using User Sync, complete one more step: in Salesforce Setup navigate to Pardot Setup > Account Setup > Manage Users. Edit User Assignments and make sure your new user is Selected (or is added as a member of a selected group or role).
In Pardot, create a new user (skip step 1 if you are not using User Sync):
- If you are using User Sync, update the profile and role mapping to make sure the Salesforce profile (e.g. Identity User) is mapped to a Pardot Role that matches the abilities you want your API integration to have.
- Navigate to the Users page in Pardot by navigating to Admin (Pardot Settings in the Lightning app), and then User Management | Users.
- Click the +Add User button and complete the required information, using the same values (where possible) that you used when creating the Salesforce User
- In the CRM Username dropdown menu, select the new API integration User you created in Salesforce.
- When complete, the section should look like this

- After saving the new User record, click the “Enable Salesforce single sign-on” link. (If you have already enabled User Sync for this user/profile, this will be completed automatically.)

A Permission Set is what will enable our User to connect via the Connected App without needing to manually authorize it.
- In Salesforce Lightning, Navigate to Setup
- Navigate to Permission Sets under Administration > Users, click on New
- Use the following values (or use whatever makes sense for you)
- Label: Pardot API Access
- API Name: let it auto populate
- Description: Grants access to Pardot via API. No permissions specified
- Click Save
- Add the new Permission Set to the User created/chosen above
- When viewing the Permission Set, click Manage Assignments
- Click Add Assignments, and select the correct User
Step 2: Create a Salesforce Self-Signed Certificate
Certificates are actually composed of 2 pieces: a private key (often called just a key) and a public key (often called just a cert/certificate). For our purposes, the private key is used to “prove” that it is actually your code that is trying to login, and is the reason that passwords and security tokens are not required. For our purposes, the public key is used to verify that the correct (authorized) process is trying to access Salesforce.
- In Salesforce Lightning, Navigate to Setup
- Navigate to Certificate and Key Management under Security, click Create Self-Signed Certificate
- Use the following values (or use whatever makes sense for you)
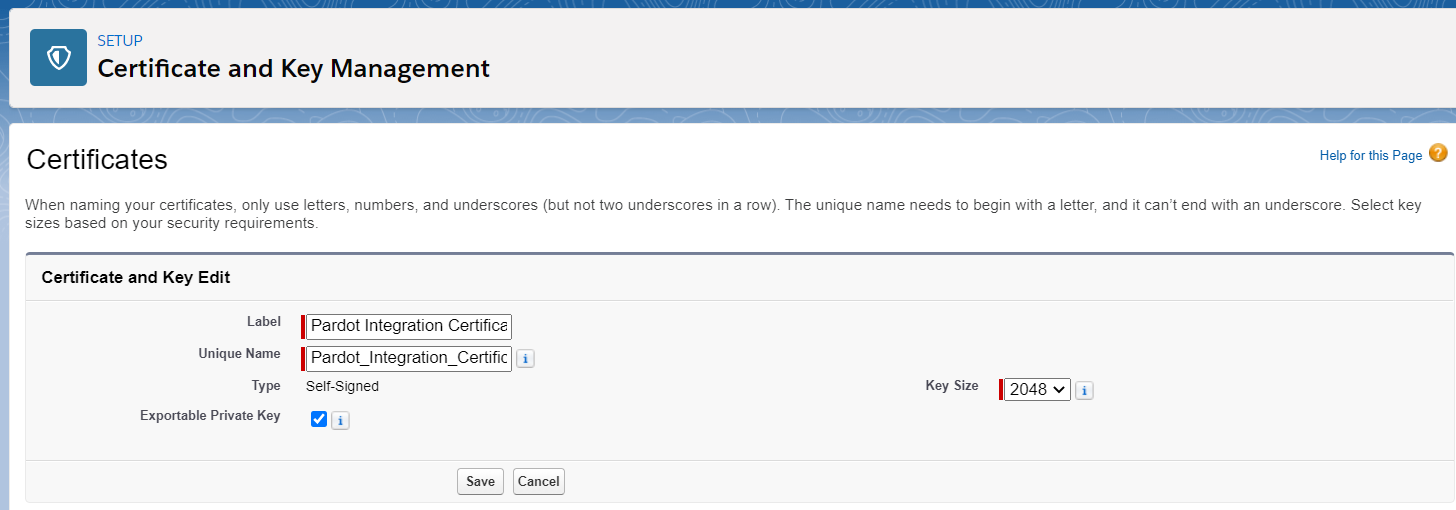
- Label: Pardot Integration Certificate
- Unique Name: let it auto populate
- Key Size: Leave it as the default value
- When complete, the section should look like this:
- Save the Certificate
- Once saved, click the Download Certificate button, as you will need it when setting up the Connected App later on.
It is important to note that this certificate is only going to be valid for 1 year. You can create a longer-lived certificate, but you will have to import it from a Keystore and we will leave that for another blog post.
Step 3: Create the Connected App
A Salesforce Connected App is how you enable external code / systems access to use the Salesforce API. Now it may seem a little weird as your APEX is already inside Salesforce, however the Authentication methods work the same way.
- In Salesforce Lightning, Navigate to Setup
- Navigate to App Manager under Platform Tools > Apps, click on New Connected App
- Use the following values for Basic Information
- Connected App Name: APEX Access to Pardot
- API Name: (let it auto populate, or make up your own name)
- Contact Email: use a company email address
- Description: Grants access to Pardot from our APEX
- When complete, the section should look like this:
- Use the following values for API (Enable OAuth Settings)
- Enable OAuth Settings: Checked
- Callback URL: https://login.salesforce.com/services/oauth2/callback
- Use digital signatures: Checked
- Browse: Use the certificate you downloaded earlier
- Selected OAuth Scopes:
- pardot_api (allows you to actually call the Pardot API
- offline_access (allows your code to make API calls when it needs to)
- When complete, the section should look like this:
- Save the new Connected App, click Continue after observing the warning
- From the Saved Record screen, take special note of the Consumer Key, you will need to use it in your APEX


Preauthorize user to use Pardot API
Regardless of how the Connected App was set up (above), we need to pre-authorize the correct user to use the Pardot API.
- In Salesforce Lightning, Navigate to Setup
- Navigate to App Manager under Platform Tools > Apps, find the APEX Access to Pardot app, click the drop down menu and then Manage
- Click Edit Policies
- Under OAuth Policies > Permitted Users, change to: Admin approved users are pre-authorized, Save
- Back at the Connected App, new sections have appeared. In Permission Sets, click Manage Permission Sets
- Assign the Pardot API Access permission set
Step 4: Create a Named Credential
The Named Credential is what allows your APEX code to login and be able to actually use the Pardot API.
- In Salesforce Lightning, Navigate to Setup
- Navigate to Named Credentials under Security, click New Legacy Named Credential (use the dropdown next to the New button)
- Use the following values
- Label: APEX Pardot Credential
- Name: (let it auto populate, or make your own name)
- URL: https://pi.pardot.com/api (adjust if https://pi.demo.pardot.com/api)
- Certificate: leave this blank, this is used for 2-way SSL connections
- Identity Type: Named Principal
- Authentication Protocol: JWT Token Exchange
- Token Endpoint URL: https://login.salesforce.com/services/oauth2/token (adjust if test.salesforce.com)
- Issuer: OAuth Consumer Key that you created earlier
- Named Principal Subject: The username of the User you want to use (from the first steps of this post)
- Audiences: https://login.salesforce.com (adjust if required)
- Token Valid for: 30 Seconds
- JWT Signing Certificate: Pardot Integration Certificate
- Callout Options: leave all these at their default settings.
- When complete, this section should look like this
- Save

Sample working APEX
The following APEX code can be called to demonstrate a working solution.
public class PardotTesting {
    public static void tryItOut() {
        HttpRequest req = new HttpRequest();
        req.setEndpoint('callout:APEX_Pardot_Credential/account/version/4/do/read?format=json');
        req.setHeader('Pardot-Business-Unit-Id', '0Uv4W0000000056SAA');
        req.setMethod('GET');
        Http http = new Http();
        HTTPResponse res = http.send(req);
        //Ideally you would parse the JSON response and work with it
        System.debug(res.getBody());
    }
}
Key things to note: Setting the Request’s Endpoint, the Name of the Named Credential is used in the String. Following the Named Credential is the rest of the Pardot API endpoint you want to hit.
Conclusion
Following the above steps will get your code ready for SSO in preparation for the February 15th deadline. Have some additional insights? We would love for you to share your experiences and tips as you work through getting your code ready for SSO. Stuck and need help – let us know and we would be glad to help audit your unique instance needs.
Learn more
Pardot API and Getting Ready with Salesforce SSO Users Series:
- Part 1: Preparing for SSO
- Part 2: WordPress Pardot Plugin Edition
- Part 3A:Connecting to Pardot API from APEX
- Part 3B:Connecting to Pardot API from Custom Code