
The Salesforce SSO deadline is fast approaching, and there isn’t a lot of specifics out there on how to make changes to our custom code & scripts that talk to the Pardot API. There is a lot of guidance on setting up our human users for success, but what about our code? So we wrote this guide specifically for connecting Pardot API from Custom Code.
Also See Part 3A: Connecting to Pardot API from APEX
We’ve come across our fair share of custom code that works with the Pardot API, and in the past it was really easy to set up. Just get the username, password, and API key of the Pardot User, copy some code examples and you were ready to go. Now that we need to authenticate through Salesforce SSO, we’ve got the details here on what you need to set up. Hang on, as there’s a lot to do. In summary, we will:
- Create a new user for this integration
- Create a Self Signed Certificate
- Create a Connected App, allowing our User to be pre-authorized
- Run some custom code, with examples in different languages
Create a new user
It is our recommended advice that each integration has its own user. For this Pardot integration, a User with an Identity License profile should be sufficient.
In Salesforce, create a new user, possibly using the Identity Profile.
- In Salesforce Lightning, Navigate to Setup
- Navigate to Users under Administration > Users, click on New User
- Use the following values (or use whatever makes sense for you)
- First Name: Pardot
- Last Name: Python
- Alias: pypardot
- Email: use an email address you have access to
- Username: create a username that uniquely identifies this integration
- User License: Identity
- When complete, the section should look like this

- Using the Salesforce activation email, be sure to login which asks you to set a password and recovery options. Save this info somewhere.
- If you are using User Sync, complete one more step: in Salesforce Setup navigate to Pardot Setup > Account Setup > Manage Users. Edit User Assignments and make sure your new user is Selected (or is added as a member of a selected group or role).

In Pardot, create a new user (skip step 1 if you are not using User Sync):
- If you are using User Sync, update the profile and role mapping to make sure the Salesforce profile (e.g. Identity User) is mapped to a Pardot Role that matches the abilities you want your API integration to have.
- Navigate to the Users page in Pardot by navigating to Admin (Pardot Settings in the Lightning app), and then User Management | Users.
- Click the +Add User button and complete the required information, using the same values (where possible) that you used when creating the Salesforce User
- In the CRM Username dropdown menu, select the new API integration User you created in Salesforce.
- When complete, the section should look like this
- After saving the new User record, click the “Enable Salesforce single sign-on” link. (If you have already enabled User Sync for this user/profile, this will be completed automatically.)

A Permission Set is what will enable our User to connect via the Connected App without needing to manually authorize it.
- In Salesforce Lightning, Navigate to Setup
- Navigate to Permission Sets under Administration > Users, click on New
- Use the following values (or use whatever makes sense for you)
- Label: Pardot API Access
- API Name: let it auto populate
- Description: Grants access to Pardot via API. No permissions specified
- Click Save
- Add the new Permission Set to the User created/chosen above
- When viewing the Permission Set, click Manage Assignments
- Click Add Assignments, and select the correct User
Create a Self-Signed Certificate
Certificates are actually composed of 2 pieces:
- a private key (often called just a key)
- a public key (often called just a cert/certificate)
For our purposes, the private key is used to “prove” that it is actually your code that is trying to login, and is the reason that passwords and security tokens are not required. For our purposes, the public key is used to verify that the correct (authorized) process is trying to access Salesforce.
For our example, we will use a Command Line Interface app called openssl to generate our certificate.
- Make sure you have openssl installed
- Open a Terminal / Command Prompt
- Issue the following command:
openssl req -x509 -sha256 -nodes -days 36500 -newkey rsa:2048 -keyout mycoolcert.key -out mycoolcert.crt- You will be prompted to provide some information. These are all optional, though it is not a bad idea to fill it out, especially since Salesforce will show the info when you look at the Connected App later on
- What this command does, is create a 100 year certificate with the Private Key being stored in the .key file, and the Public Key being stored in the .crt file. Both of these files are text files that you can view with any text editor.
- You will want to protect the .key file, as it is very uniquely created for YOU. This .key file will be used by your code as part of the authentication process.
- The .crt file will be used when creating the Connected App
Create the connected app
A Salesforce Connected App is how you enable external code / systems access to use the Salesforce API.
- In Salesforce Lightning, Navigate to Setup
- Navigate to App Manager under Platform Tools > Apps, click on New Connected App
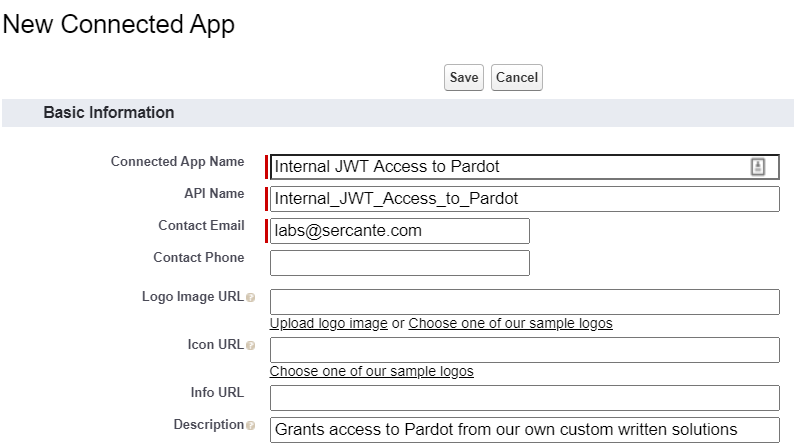
- Use the following values for Basic Information
- Connected App Name: Internal JWT Access to Pardot
- API Name: (let it auto populate, or make up your own name)
- Contact Email: use a company email address
- Description: Grants access to Pardot from our own custom written solutions
- When complete, the section should look like this:
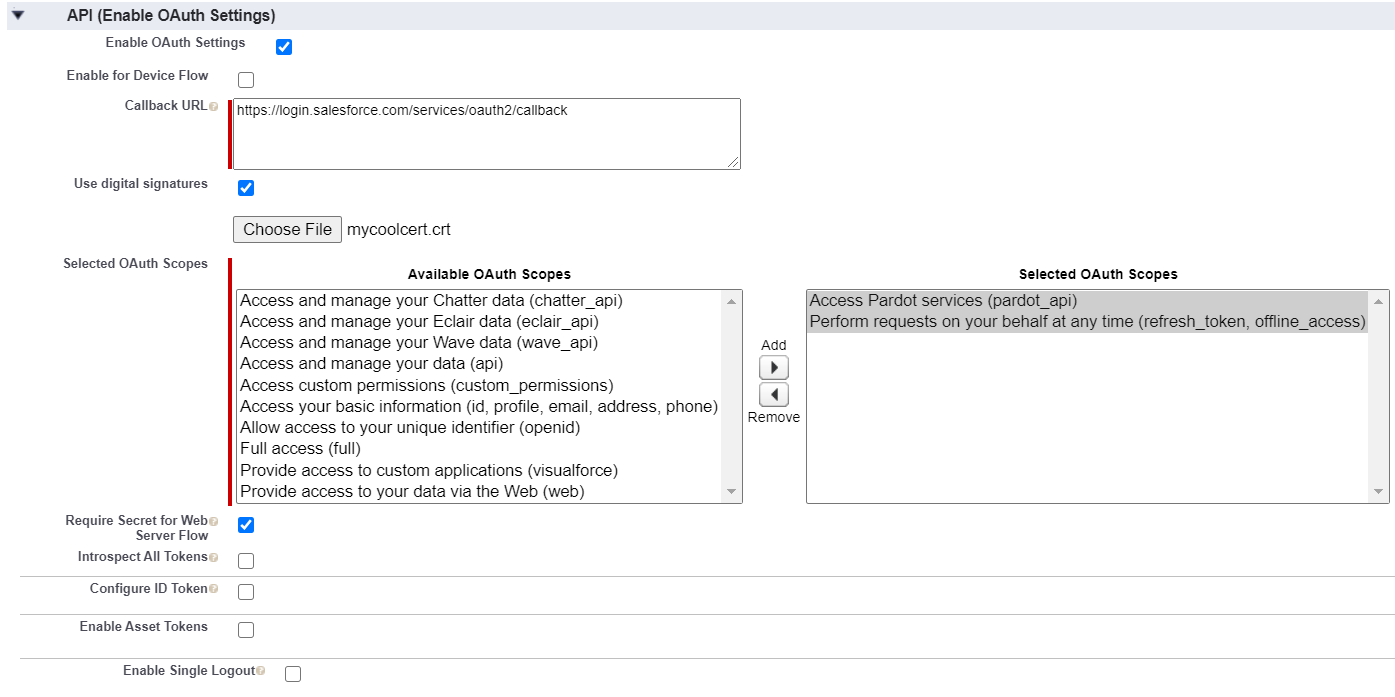
- Use the following values for API (Enable OAuth Settings)
- Enable OAuth Settings: Checked
- Callback URL: https://login.salesforce.com/services/oauth2/callback
- Use digital signatures: Checked
- Browse: Use the certificate you created earlier
- Selected OAuth Scopes:
- pardot_api (allows you to actually call the Pardot API
- offline_access (allows your code to make API calls when it needs to)
- When complete, the section should look like this:
- Save the new Connected App, click Continue after observing the warning
- From the Saved Record screen, take special note of the Consumer Key, you will need to use it in your code later on
Preauthorize user to use Pardot API
Regardless of how the Connected App was set up (above), we need to pre authorize the correct user to use the Pardot API.
- In Salesforce Lightning, Navigate to Setup
- Navigate to App Manager under Platform Tools > Apps, find the Internal JWT Access to Pardot app (that you just created moments ago), click the drop-down menu and then Manage
- Click Edit Policies
- Under OAuth Policies > Permitted Users, change to: Admin approved users are pre-authorized, Save
- Back at the Connected App, new sections have appeared. In Permission Sets, click Manage Permission Sets
- Assign the Pardot API Access permission set
Sample working code
Here we aim to provide a few different samples of working code. Note: because these are samples, we are following some Minimal, Reproducible Example guidelines. These should help you understand how to incorporate the approach into your well-architected code projects.
Python sample code
This sample code was extended from a great GitHub Gist from booleangate. Save it locally as pythonExample.py
#!/usr/bin/env python3
# pip install jwt cryptography requests

from datetime import datetime
import jwt, time, requests

# *** Update these values to match your configuration ***
IS_SANDBOX = False
KEY_FILE = ‘mycoolcert.key’
ISSUER = ‘YOUR_OAUTH_CONSUMER_KEY’
SUBJECT = ‘YOUR_SALESFORCE_IDENTITY_USERNAME’
BUSINESS_UNIT_ID = ‘0Uv…..’
pardotUrl = ‘https://pi.demo.pardot.com/api/account/version/4/do/read?format=json’
# *******************************************************

DOMAIN = ‘test’ if IS_SANDBOX else ‘login’

print(‘Loading private key…’)
with open(KEY_FILE) as fd:
    private_key = fd.read()

print(‘Generating signed JWT assertion…’)
claim = {
    ‘iss’: ISSUER,
    ‘exp’: int(time.time()) + 604800,
    ‘aud’: ‘https://{}.salesforce.com’.format(DOMAIN),
    ‘sub’: SUBJECT,
}
assertion = jwt.encode(claim, private_key, algorithm=’RS256′, headers={‘alg’:’RS256′}).decode(‘utf8’)

#you could take the JWT and paste it in https://jwt.io to see what it ends up looking like
print(‘assertion=%s’ % assertion)
print(‘Making OAuth request…’)
loginResponse = requests.post(‘https://{}.salesforce.com/services/oauth2/token’.format(DOMAIN), data = {
    ‘grant_type’: ‘urn:ietf:params:oauth:grant-type:jwt-bearer’,
    ‘assertion’: assertion,
})

print(‘Status:’, loginResponse.status_code)
print(loginResponse.json())
accessToken = loginResponse.json().get(‘access_token’)

# Now for doing the Pardot Fun Stuff
pReqHeaders = {
    ‘Authorization’: ‘Bearer ‘+ accessToken,
    ‘Pardot-Business-Unit-Id’: BUSINESS_UNIT_ID
}

print(‘Making Pardot Account API request…’)
accountResponse = requests.get(url=pardotUrl, headers=pReqHeaders).json()
print(accountResponse)
Some tips to get this code working for you:
- Be sure to put the Private Key file from your self-signed certificate in the same directory as this code sample
- Be sure to replace the configuration values at the top of the script to match what you created
- Add print() statements where you want to further understand values that are being setup
- Make the code file executable, then just call it directly: ./pythonExample.py and watch the output
Conclusion
Following the above steps will get your code ready for SSO in preparation for the February 15th deadline. Have some additional insights? We would love for you to share your experiences and tips as you work through getting your code ready for SSO. Stuck and need help – let us know and we would be glad to help audit your unique instance needs.
Learn more
Pardot API and Getting Ready with Salesforce SSO Users Series:
- Part 1: Preparing for SSO
- Part 2: WordPress Pardot Plugin Edition
- Part 3A:Connecting to Pardot API from APEX
- Part 3B:Connecting to Pardot API from Custom Code