Capturing data is a key piece of any marketing strategy. It’s imperative that you capture the right data so you can continue improving your marketing efforts. Pardot is the vehicle we see many companies use to capture form submission data, but what if that data needs to be shared?
As marketing grows, it’s become more of a common place for two companies to work together on a campaign or an event. The tricky thing is sharing data. Traditionally, marketing teams use the spreadsheets – oh, the dreaded spreadsheets – to pass over data to their co-marketing partner.
Is it possible to automate the distribution of data when a user submits a form? With Pardot, it’s surprisingly easy to do away with spreadsheets and move to a completely automated system.
There are two ways to trigger this kind of automation. We’ll go into detail on both of these options, but first here’s a 10,000 ft view of each.
The initial submission is captured via a Pardot Form then data is passed directly to a Pardot Form Handler. Two fictitious companies, Utica Paper and Printers Rock are co-marketing an event. Utica Paper is the main host of the event and they leverage a Pardot form for registrations. In the Pardot form’s completion actions, they have added JavaScript code to forward submission data to a form handler. This Pardot form handler is tied to Printers Rock Pardot org. To simplify, this process is a Pardot Form (Utica Paper) > Pardot Form Handler (Printers Rock).
A Pardot Form Handler captures the initial submission and the data is forwarded to a second Pardot Form Handler. In this scenario, The Halpert Company, uses their website to host a registration page for an upcoming event. After a form is submitted, they capture data in Pardot via a form handler. The Halpert Company has partnered with Utica Paper on this campaign. They leverage the data forwarding option on Pardot form handlers to send submission data over to Utica Paper immediately after a form is submitted. To simplify, this solution is Pardot form handler (Halpert Industries) to Pardot form handler (Utica Paper).
Let’s dive into the details…
Scenario: Pardot Form to Pardot Form Handler
Create Pardot Form in the Primary Pardot Org Utica Paper created their Pardot form to capture form submissions.
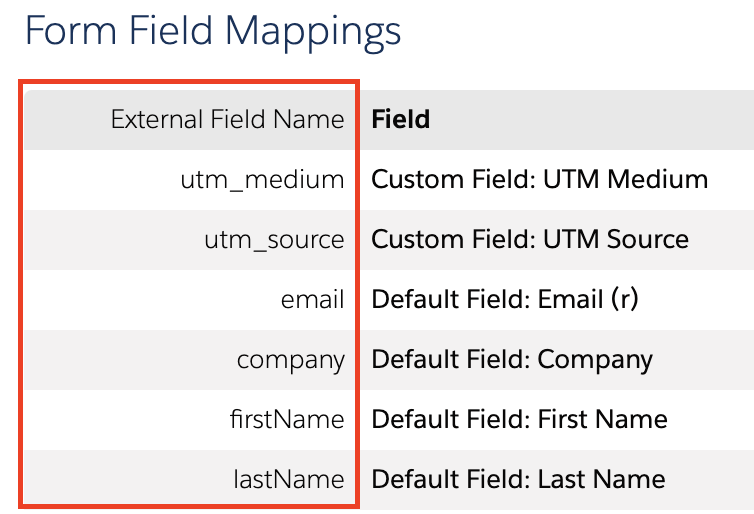
Create a Pardot Form Handler in the secondary Pardot Org This is where Printers Rock created a form handler inside Pardot. They include fields for all the data points they’d like to capture. All fields should be left as optional except the email address field. As a final step, Printers Rock sent over the form handler endpoint url and a list of field names (see red box in screenshot) to Utica Paper, so they would know where to map the data to.
Connect the Pardot Form to the Form Handler Utica Paper incorporates the field names from Printer Rock into a JavaScript post. This gets tricky so let’s take it step-by-step:
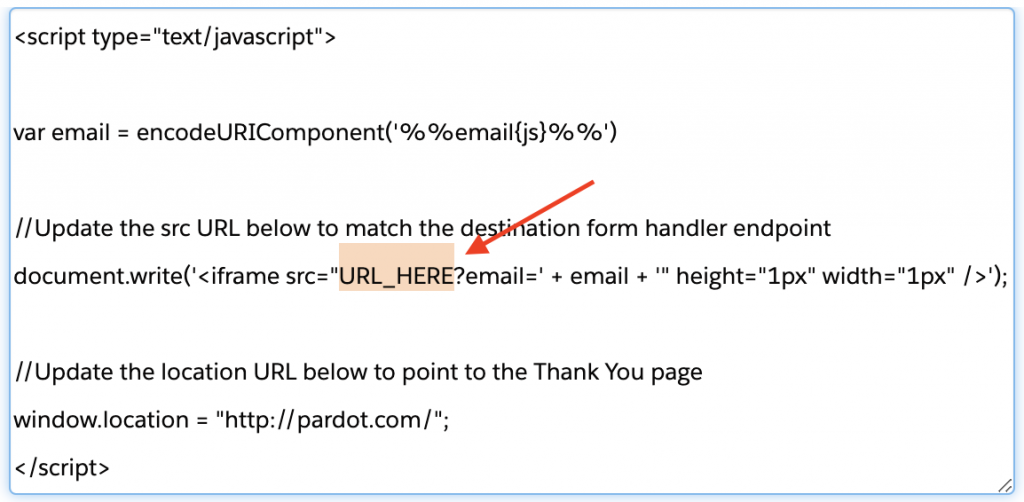
a. Copy / Paste the following JavaScript code into the Thank You code section on the Pardot Form.
<script type=”text/javascript”>
var email = encodeURIComponent(‘%%email{js}%%’)
//Update the src URL below to match the destination form handler endpointdocument.write(‘<iframe src=”URL_HERE?email=’ + email + ‘” height=”1px” width=”1px” />’);

//Update the location URL below to point to the Thank You pagewindow.location = “http://pardot.com/”;
</script>
b. Within the JavaScript code, replace the URL_HERE (highlighted below) with the form handler URL. In our example, Utica Paper would paste the endpoint url that they received from Printers Rock.
Important: make sure you use the secure HTTPS link.
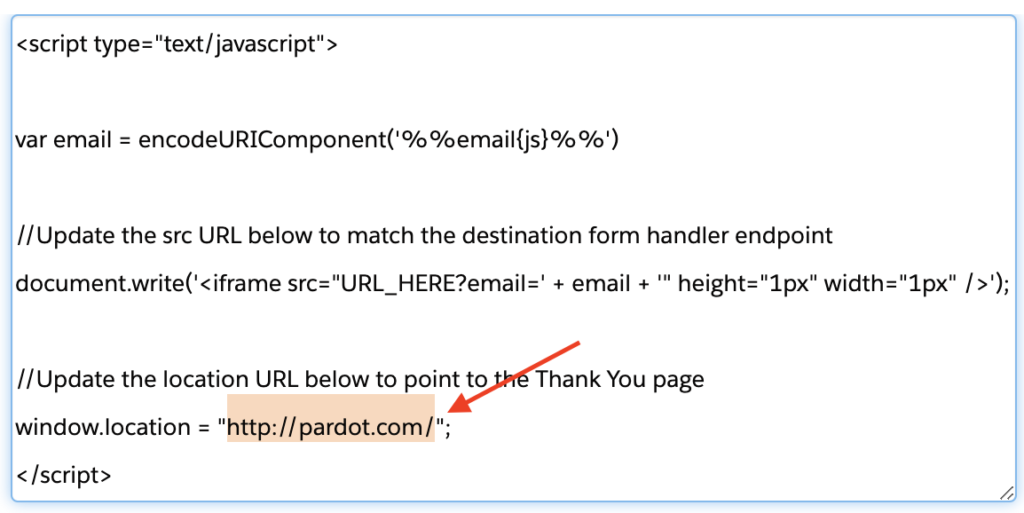
c. Within the JavaScript, update the final destination URL. Replace the highlighted text with your thank you page link. This is the page users will be directed to after the form is submitted.
d. Save and test! Submit a test through the Pardot form. The expected behavior is that the submission will be captured in the Pardot form and the Pardot form handler will display a submission too (email only). Your browser should redirect to the link you updated in the previous step. If anything does not fire correctly, review the above steps again to make sure your configuration matches.
Now you have a fully configured script that will pass the email address to a form handler url. Optionally you can add in additional fields to capture in this submission. To do so, navigate back to the Pardot thank you code section. You’ll want to add in additional variables, one for each additional field you’d like to send to the form handler. First add in the variable tags and then update the encoded url framework.
Variable Tags
var email = encodeURICompenent (‘%%email{js}%%’)
1. Copy the line you see above, hit return, and paste it as a new row.
2. Replace email (1) with the field name that’s defined on the form handler. In our example, this is the data sent over from Printers Rock in Step 2.
3. Replace email (2) with the Pardot field name. This is the field name in the Pardot instance that’s tied to the Pardot form. You’ll want to navigate to the field itself in Pardot to find the field ID (see screenshot below).
Update the Encoded URL
Right before the circled plug button, add the following:
+ ‘&formHandlerFieldName=’ + variableName
The Pardot form handler field name is the external field name listed on the form handler. Make sure you create one without spaces. Replace ONLY the highlighted part with the field name, leave the quotes, ampersand, and equal sign.
The variableName is the name you created in the Variable Tags section. If you followed the suggestion, this will match your Pardot Field Name.
Note: Replicate the Variable Tag and Update Encoded URL section for each field you want to sync to the Form Handler.
Final step: TEST EVERYTHING! Don’t skip this step – trust me, your future self will thank you. Testing will ensure that data is being captured and passed between the two Pardot instances. The last thing you want is to launch a shiny new campaign to find out a week later your data was not captured properly.
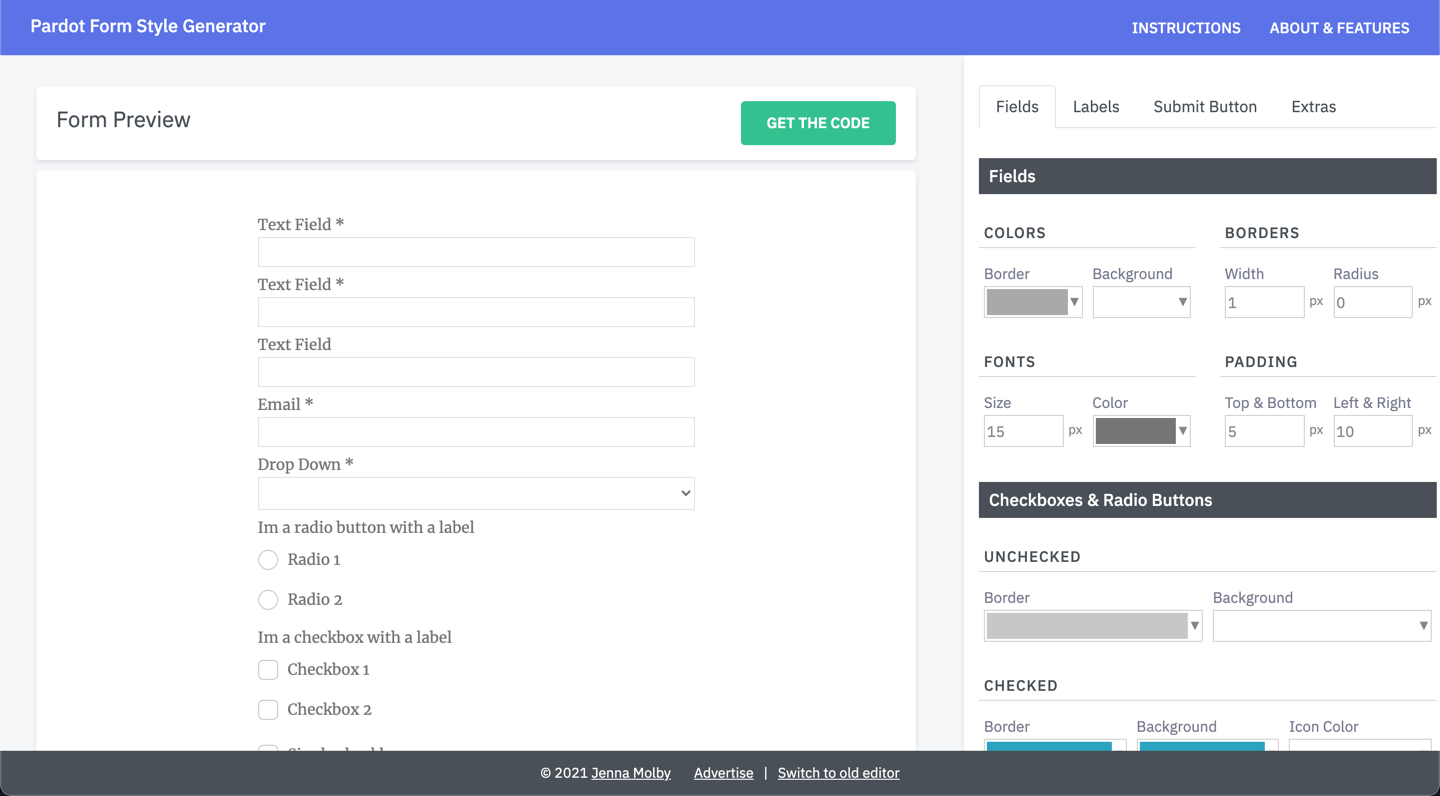
I’m so excited to finally launch version 2.0 of the Pardot Form Style Generator. With the new version comes a new UI and some cool new features, including customized checkboxes and radio buttons, embedded Google Fonts, new submit button options and more.
What is the Pardot Form Style Generator?
The Pardot Form Style Generator is a free tool you can use to easily customize your Pardot forms with no coding required. With a couple of clicks, you can customize almost every form element, including fields, checkboxes, buttons, labels and more. When you’re done customizing your form, the generator will compile custom CSS that you can copy and paste into your Layout Template within Pardot.
The generator has a complete new look, making it easier to customize your form.
Starts from a template
The old version started with the default Pardot form CSS. This new version starts with a template I use frequently within projects, meaning there are less tweaks needed to create a beautiful form.
Customized checkboxes & radio buttons
Change the border color, background color for radio buttons and checkboxes.
Embedded Google Fonts
The most popular Google Fonts are loaded directly within the editor, including Roboto, Lato, Open Sans and more.
Set a border color for fields on focus
Select a border color that will be displayed when a prospect clicks into a form field.
Create a full-width submit button
Check the box to enable a full-width submit button or select one of the alignment options from the dropdown.
Select hover colors for the submit button
Change the border colour, font color, and background color for the submit button.
Try it yourself
Check out all the new features and send me any questions via Twitter (@jennamolby), or leave a comment below.
In this post, I’ll show you how to create a page that asks for feedback as to why the prospect is unsubscribing. The goal is to use the standard Marketing Cloud Account Engagement (Pardot) unsubscribe page and ask them why they have unsubscribed on the confirmation page. This gives the prospect the option to complete this information, but it’s not required for them to be unsubscribed from emails.
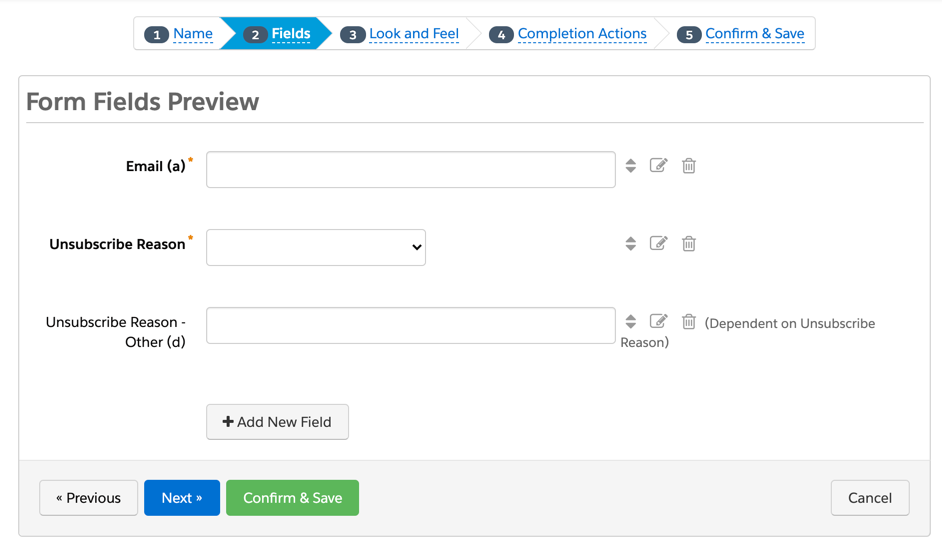
Unsubscribe Reason Page Preview
Here’s what the completed page looks like.
Implementation Steps
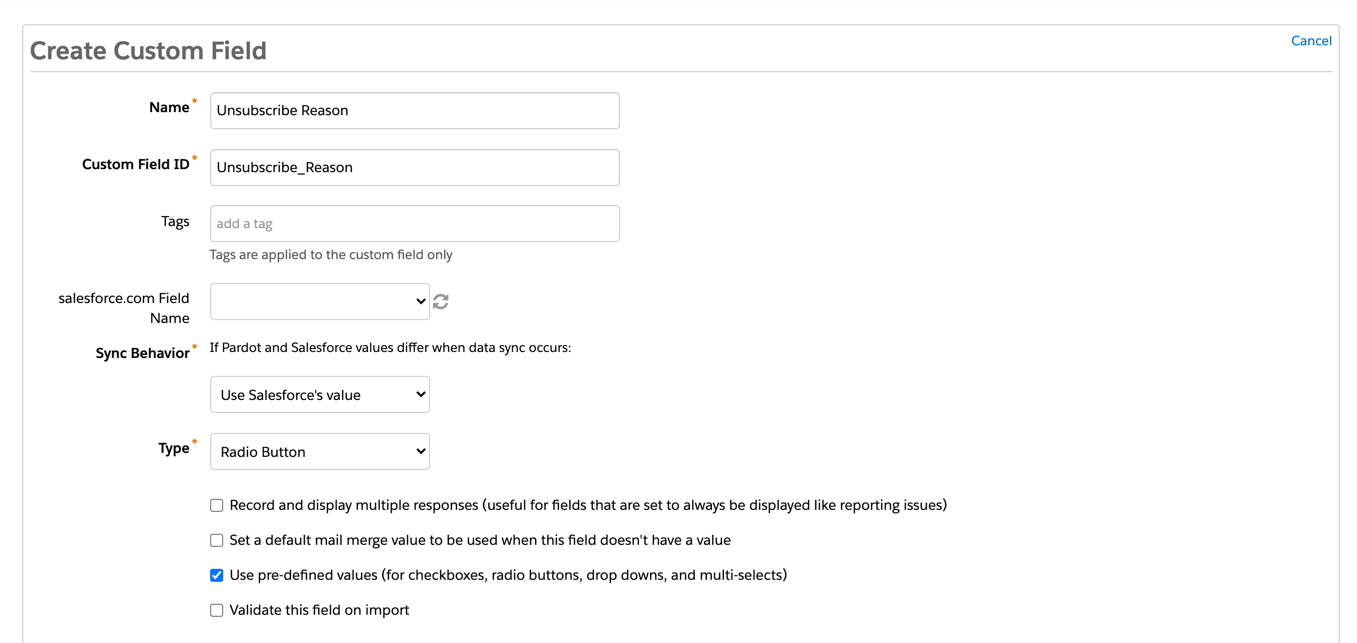
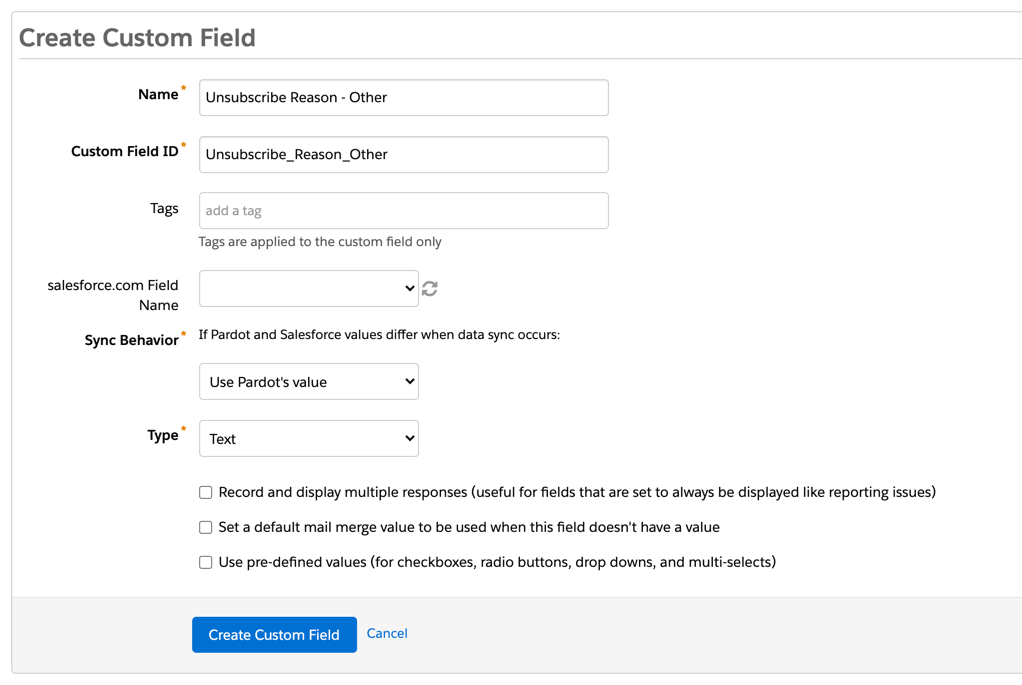
Step 1: Create the custom field(s)
First, create a field in Pardot that will be used to capture the unsubscribe reason.
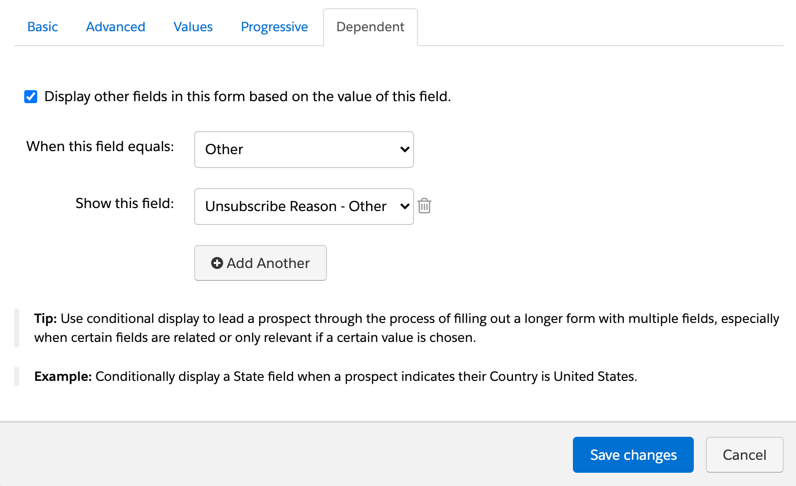
Optionally, you can create an additional field to capture the reason if “other” is selected in the form.
Step 2: Create the unsubscribe reason form
Create a new form and add your new fields.
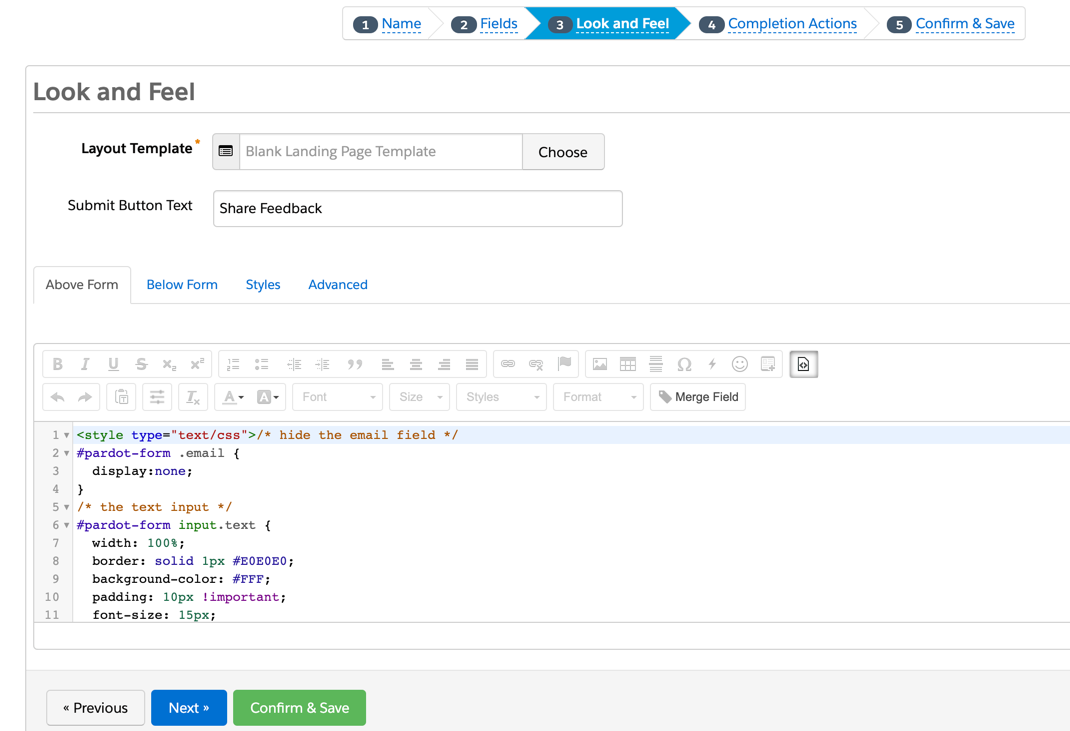
Step 3: Style the unsubscribe reason form
Add some CSS to the unsubscribe form in the Above Form section.
Since the only way to get to the unsubscribe reason page will be from an email, I highly recommend hiding the email address field from the form by adding this CSS:
#pardot-form .email {
  display:none;
}
Here’s what my full CSS looks like for my form:
<style type="text/css">
/* hide the email field */
#pardot-form .email {
  display:none;
}
/* the text input */
#pardot-form input.text {
  width: 100%;
  border: solid 1px #E0E0E0;
  background-color: #FFF;
  padding: 10px !important;
  font-size: 15px;
  box-sizing:border-box;
}
/* the dropdown field */
#pardot-form select {
  width: 100%;
  border: solid 1px #E0E0E0;
  background-color: #FFF;
  padding: 10px !important;
  font-size: 15px;
  border-radius: 0;
  -moz-border-radius: 0;
  -webkit-border-radius: 0;
  -moz-appearance: none;
  -webkit-appearance: none;
  appearance: none;
  background-position: right center;
  background-repeat: no-repeat;
  background-size: 1ex;
  background-origin: content-box;
  color: #868686;
  outline:none;
  background-image: url("data:image/svg+xml;base64,PD94bWwgdmVyc2lvbj0iMS4wIiBlbmNvZGluZz0iVVRGLTgiIHN0YW5kYWxvbmU9Im5vIj8+CjxzdmcKICAgeG1sbnM6ZGM9Imh0dHA6Ly9wdXJsLm9yZy9kYy9lbGVtZW50cy8xLjEvIgogICB4bWxuczpjYz0iaHR0cDovL2NyZWF0aXZlY29tbW9ucy5vcmcvbnMjIgogICB4bWxuczpyZGY9Imh0dHA6Ly93d3cudzMub3JnLzE5OTkvMDIvMjItcmRmLXN5bnRheC1ucyMiCiAgIHhtbG5zOnN2Zz0iaHR0cDovL3d3dy53My5vcmcvMjAwMC9zdmciCiAgIHhtbG5zPSJodHRwOi8vd3d3LnczLm9yZy8yMDAwL3N2ZyIKICAgdmVyc2lvbj0iMS4xIgogICBpZD0ic3ZnMiIKICAgdmlld0JveD0iMCAwIDM1Ljk3MDk4MyAyMy4wOTE1MTgiCiAgIGhlaWdodD0iNi41MTY5Mzk2bW0iCiAgIHdpZHRoPSIxMC4xNTE4MTFtbSI+CiAgPGRlZnMKICAgICBpZD0iZGVmczQiIC8+CiAgPG1ldGFkYXRhCiAgICAgaWQ9Im1ldGFkYXRhNyI+CiAgICA8cmRmOlJERj4KICAgICAgPGNjOldvcmsKICAgICAgICAgcmRmOmFib3V0PSIiPgogICAgICAgIDxkYzpmb3JtYXQ+aW1hZ2Uvc3ZnK3htbDwvZGM6Zm9ybWF0PgogICAgICAgIDxkYzp0eXBlCiAgICAgICAgICAgcmRmOnJlc291cmNlPSJodHRwOi8vcHVybC5vcmcvZGMvZGNtaXR5cGUvU3RpbGxJbWFnZSIgLz4KICAgICAgICA8ZGM6dGl0bGU+PC9kYzp0aXRsZT4KICAgICAgPC9jYzpXb3JrPgogICAgPC9yZGY6UkRGPgogIDwvbWV0YWRhdGE+CiAgPGcKICAgICB0cmFuc2Zvcm09InRyYW5zbGF0ZSgtMjAyLjAxNDUxLC00MDcuMTIyMjUpIgogICAgIGlkPSJsYXllcjEiPgogICAgPHRleHQKICAgICAgIGlkPSJ0ZXh0MzMzNiIKICAgICAgIHk9IjYyOS41MDUwNyIKICAgICAgIHg9IjI5MS40Mjg1NiIKICAgICAgIHN0eWxlPSJmb250LXN0eWxlOm5vcm1hbDtmb250LXdlaWdodDpub3JtYWw7Zm9udC1zaXplOjQwcHg7bGluZS1oZWlnaHQ6MTI1JTtmb250LWZhbWlseTpzYW5zLXNlcmlmO2xldHRlci1zcGFjaW5nOjBweDt3b3JkLXNwYWNpbmc6MHB4O2ZpbGw6IzAwMDAwMDtmaWxsLW9wYWNpdHk6MTtzdHJva2U6bm9uZTtzdHJva2Utd2lkdGg6MXB4O3N0cm9rZS1saW5lY2FwOmJ1dHQ7c3Ryb2tlLWxpbmVqb2luOm1pdGVyO3N0cm9rZS1vcGFjaXR5OjEiCiAgICAgICB4bWw6c3BhY2U9InByZXNlcnZlIj48dHNwYW4KICAgICAgICAgeT0iNjI5LjUwNTA3IgogICAgICAgICB4PSIyOTEuNDI4NTYiCiAgICAgICAgIGlkPSJ0c3BhbjMzMzgiPjwvdHNwYW4+PC90ZXh0PgogICAgPGcKICAgICAgIGlkPSJ0ZXh0MzM0MCIKICAgICAgIHN0eWxlPSJmb250LXN0eWxlOm5vcm1hbDtmb250LXZhcmlhbnQ6bm9ybWFsO2ZvbnQtd2VpZ2h0Om5vcm1hbDtmb250LXN0cmV0Y2g6bm9ybWFsO2ZvbnQtc2l6ZTo0MHB4O2xpbmUtaGVpZ2h0OjEyNSU7Zm9udC1mYW1pbHk6Rm9udEF3ZXNvbWU7LWlua3NjYXBlLWZvbnQtc3BlY2lmaWNhdGlvbjpGb250QXdlc29tZTtsZXR0ZXItc3BhY2luZzowcHg7d29yZC1zcGFjaW5nOjBweDtmaWxsOiMwMDAwMDA7ZmlsbC1vcGFjaXR5OjE7c3Ryb2tlOm5vbmU7c3Ryb2tlLXdpZHRoOjFweDtzdHJva2UtbGluZWNhcDpidXR0O3N0cm9rZS1saW5lam9pbjptaXRlcjtzdHJva2Utb3BhY2l0eToxIj4KICAgICAgPHBhdGgKICAgICAgICAgaWQ9InBhdGgzMzQ1IgogICAgICAgICBzdHlsZT0iZmlsbDojMzMzMzMzO2ZpbGwtb3BhY2l0eToxIgogICAgICAgICBkPSJtIDIzNy41NjY5Niw0MTMuMjU1MDcgYyAwLjU1ODA0LC0wLjU1ODA0IDAuNTU4MDQsLTEuNDczMjIgMCwtMi4wMzEyNSBsIC0zLjcwNTM1LC0zLjY4MzA0IGMgLTAuNTU4MDQsLTAuNTU4MDQgLTEuNDUwOSwtMC41NTgwNCAtMi4wMDg5MywwIEwgMjIwLDQxOS4zOTM0NiAyMDguMTQ3MzIsNDA3LjU0MDc4IGMgLTAuNTU4MDMsLTAuNTU4MDQgLTEuNDUwODksLTAuNTU4MDQgLTIuMDA4OTMsMCBsIC0zLjcwNTM1LDMuNjgzMDQgYyAtMC41NTgwNCwwLjU1ODAzIC0wLjU1ODA0LDEuNDczMjEgMCwyLjAzMTI1IGwgMTYuNTYyNSwxNi41NDAxNyBjIDAuNTU4MDMsMC41NTgwNCAxLjQ1MDg5LDAuNTU4MDQgMi4wMDg5MiwwIGwgMTYuNTYyNSwtMTYuNTQwMTcgeiIgLz4KICAgIDwvZz4KICA8L2c+Cjwvc3ZnPgo=");
}
/* the field labels */
#pardot-form label {
  font-size: 14px;
  color: #868686;
  font-weight:normal;
  padding-bottom:5px;
}
/* the submit button container */
body form.form p.submit {
  margin-left:0;
  text-align:center;
}
/* the submit button */
body form.form p.submit input {
  background:#56CFD2;
  color:#FFF;
  border:0;
  padding:10px 35px;
  font-style: normal;
  font-weight: 800;
  text-transform: uppercase;
  line-height: 1.6923em;
  letter-spacing: 2px;
  cursor:pointer;
}
body form.form p.submit input:hover {
background: #4ebfc2;
}
/* the form */
body form.form {
  line-height: 1.6923em;
  font-size:14px;
  color:#868686;
}
</style>
Step 4: Edit or create a layout template
If your unsubscribe page does not have a dedicated layout template, create a new layout template to use for the unsubscribe page. You can find the layout template name on the settings page for your unsubscribe page.
Navigate to your layout template and click on the Form tab. Find the %%form-before-form-content%%tag within the HTML and replace it with the iFramed version of your unsubscribe reason form. Also, add any text you want to include before or after the embedded form.
Here’s the HTML I replaced the %%form-before-form-content%% tag with:
<!-- START the custom unsubscribe content -->
<h3>Please take a moment and let us know why you unsubscribed.</h3>

<p><iframe allowtransparency="true" frameborder="0" height="250" src="https://go.pardot.com/l/xxx/xxxx-xx-xx/6vr8db" style="border: 0" type="text/html" width="100%"></iframe></p>
<div class="resubscribe">
<h3>Unsubscribed by mistake?</h3>
<p>Click the re-subscribe button below to opt back in.</p>
</div>
<!-- END the custom unsubscribe content-->
And here’s what the full HTML looks like in the Form tab of the layout template:
<form accept-charset="UTF-8" method="post" action="%%form-action-url%%" class="form" id="pardot-form">
%%form-opening-general-content%%
%%form-if-thank-you%%
%%form-javascript-focus%%
%%form-thank-you-content%%
%%form-thank-you-code%%
%%form-end-if-thank-you%%
%%form-if-display-form%%
<!-- START the custom unsubscribe content -->
<h3>Please take a moment and let us know why you unsubscribed.</h3>
<p><iframe allowtransparency="true" frameborder="0" height="250" src="https://go.pardot.com/l/xxx/xxxx-xx-xx/6vr8db" style="border: 0" type="text/html" width="100%"></iframe></p>
<div class="resubscribe">
<h3>Unsubscribed by mistake?</h3>
<p>Click the re-subscribe button below to opt back in.</p>
</div>
<!-- END the custom unsubscribe content-->
%%form-if-error%%
<p class="errors">Please correct the errors below:</p>
%%form-end-if-error%%
%%form-start-loop-fields%%
<p class="form-field %%form-field-css-classes%% %%form-field-class-type%% %%form-field-class-required%% %%form-field-class-hidden%% %%form-field-class-no-label%% %%form-field-class-error%% %%form-field-dependency-css%%">
%%form-if-field-label%%
<label class="field-label" for="%%form-field-id%%">%%form-field-label%%</label>
%%form-end-if-field-label%%
%%form-field-input%%
%%form-if-field-description%%
<span class="description">%%form-field-description%%</span>
%%form-end-if-field-description%%
</p>
<div id="error_for_%%form-field-id%%" style="display:none"></div>
%%form-field-if-error%%
<p class="error no-label">%%form-field-error-message%%</p>
%%form-field-end-if-error%%
%%form-end-loop-fields%%
%%form-spam-trap-field%%
<!-- forces IE5-8 to correctly submit UTF8 content -->
<input name="_utf8" type="hidden" value="☃" />
<p class="submit">
<input type="submit" accesskey="s" value="%%form-submit-button-text%%" %%form-submit-disabled%%/>
</p>
%%form-after-form-content%%
%%form-end-if-display-form%%
%%form-javascript-link-target-top%%
</form>
Lastly, here’s my HTML for the entire Layout tab of my layout template.
There have been some reported issues with the email address not populating in the unsubscribe reason form. This is because the form depends on cookies in order to populate the email address. The prospect might have a browser setting enabled or they are in Incognito Mode. There are two workarounds to solve this:
Workaround #1: Show the email address field if it’s not populated automatically.
The first workaround is to show the email address field if the email field is not populated automatically. To do this, navigate to your unsubscribe reason form, go to the Look and Feeltaband paste this jQuery code in the Below Formsection.
<script src="https://ajax.googleapis.com/ajax/libs/jquery/1.11.2/jquery.min.js"></script>
<script>
    $(document).ready(function() {
    if($('.email input').val() == ''){
    	//show the email field if it's not automatically populated
    	$('#pardot-form .email').show();
   }
});
</script>
Workaround #2: Hide the unsubscribe reason form if the email address is not populated automatically.
The second workaround is to hide the form altogether if the email address is not populated automatically. To do this, navigate to your unsubscribe reason form, go to the Look and Feel tab and paste this jQuery code in the Below Form section. Update the jQuery with your own messages.
<script src="https://ajax.googleapis.com/ajax/libs/jquery/1.11.2/jquery.min.js"></script><script>
    $(document).ready(function() {
    // Add the header to the unsubscribe reason form instead
    $('#pardot-form').before('<h3>Please take a moment and let us know why you unsubscribed.</h3>');
    // check to see if the email field is empty
    if($('.email input').val() == ''){
    // hide the form and the header if the email field is empty
      $('#pardot-form, h3').hide();
    // display an unsubscribe message instead
      $('#pardot-form').before('You have been unsubscribed');
   }
});
</script>
Lastly, remove the header from your unsubscribe layout template since the header is placed within the form instead.
Testing
To test the unsubscribe reason page, you must send yourself a REAL email. The page will not show up if you are using one of the email test features.
Questions?
Send me a tweet @jennamolby or leave a comment below.
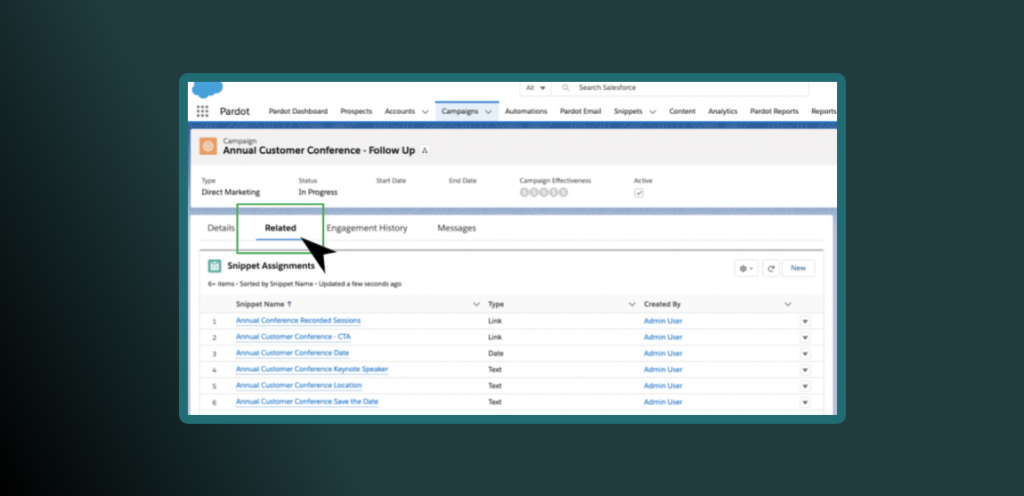
Snippets were added to the Pardot functionality toolset fairly recently as a way to help the marketers of the world stay organized and reuse their content across multiple templates or Pardot Business Units without copy and pasting (*cues angelic music*).
In short, Pardot Snippets are a content block of dates, links, images*, or plain text that you can leverage across your Pardot instance (or Business Units) with one central hub to manage them – your campaigns. The way Pardot snippets work focuses more on the relationship between the content block and the campaign, versus individual prospect data. Currently this feature is only accessible to marketers via the Pardot Lightning App.
Snippets are incredible for marketers who are running multiple campaigns and need to edit tiny bits of information across multiple landing pages, email templates, etc. If you have had to do this in the past with Pardot, it can be a long process which is prone to errors like forgetting to update one of your templates. Snippets now grant you flexibility as to where you can place the different content you create – – for example different messages customer types of event different Business Units. You can also configure who within your organization can see, create, and use Snippets. This flexibility is great for global marketing teams that would like to limit access to specific assets by region, campaign or Business Unit without custom user roles within Pardot.
In this blog, we will tackle some common questions we have received about Snippets.
This can be configured in Sales Cloud and may need Salesforce Admin support
This also usually required SSO to be enabled for your Pardot/Salesforce User
Enable Handlebars Merge Language (HML)
For older accounts, there’s usually a pop-up for this each time you login
Connected Campaigns must be enabled
This can be turned on under your connector/account settings and may need Pardot Administrator support
Access to create and edit Campaigns
Requires the Marketing User checkbox to be enabled in your Salesforce and may need Salesforce Admin support
Be assigned the Sales Cloud, CRM, or Service Cloud permission set license
This can be configured in Sales Cloud and may need Salesforce Admin support
If you have a brand new instance, you should have automatically or manually configure most of these settings already (as part of the Pardot Setup Wizard in Sales Cloud) but it never hurts to take a second look. Make sure your Snippets tab isn’t hidden from your profile, this is usually the only thing preventing you from using Snippets.
Everything you need to know about Pardot Snippets: A Q&A
What are Snippets?
Based on the Salesforce help article, Snippets are reusable pieces of content that streamline how you create recurring marketing assets for your campaigns and business as a whole. Snippets can be leveraged in list emails, email templates, forms, and landing pages.
Why use Snippets?
This feature can save you time during setup and maintenance of your templates and content blocks across Pardot (or Business Units). Snippets can be used to populate and manage repeatable content across your Pardot assets (such as emails, forms and landing pages). These can be short character strings or full paragraphs of information that are tied to specific campaigns (or Business Units). They are also available in standard Salesforce reports.
Can I use Snippets in Pardot Classic?
It is important to note that although you can use Snippets in Pardot Classic’s WYSIWYG editor, you must first create them in the Pardot Lightning App as there is no tab to direct you to the Snippet library from within the Pardot Classic interface. You also cannot manage settings of Snippets such as which campaigns they are associated with from within the Pardot Classic UI.
What are some popular use cases for Snippets?
You can use snippets at the Business Unit level or the campaign level (and share it with as many campaigns/people as you want). Below are some examples of how we can leverage snippets to help you save time across Pardot assets:
Emails (use in headers, footers, content blocks, additional CTA’s, navigation and more)
Webinar information – imagine being able to update details across multiple templates/landing pages, especially for series from one place
Forms (use in before or after text, thank you content, etc)
Confirmation information – imagine adding “Add to Calendar” on multiple places without having to copy and paste, directly from the editor
Accessibility requests – imagine adding directions for customer support or privacy notices to all your forms and being able to updates it from one place
Can I use Snippets across different Pardot Business Units?
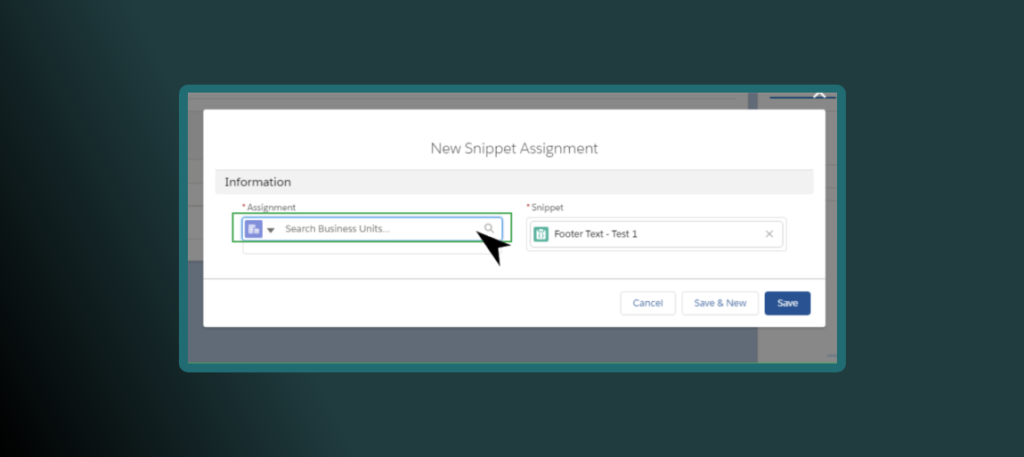
Yes, you can. To be able to use a Snippet in a different Business Units, simply assign it to the right one using the assignment wizard. A Snippet can be used across multiple Pardot Business Units. This allows your team to leverage work used in one Business Unit without having to recreate it. You can also do the opposite, which in this case is limit the content to one Business Unit.
Can I limit who sees/uses Snippet?
Within the Pardot Lightning App, you are able to limit who can see the Snippet NavigationTab (you can hide the Snippets tab from their User Profile), which ultimately prevents you from accessing it. Additionally, you can prevent certain people using Snippets if they don’t have access to edit the campaign object. If someone does not have the Marketing User checkbox enabled in Salesforce, they won’t be able to create Campaigns which are required to attach to a Snippet.
What if I want a Snippet to be available for multiple/all campaigns?
When you assign the Snippet you can go to each campaign and assign it on the campaign level. If you only have one Business Unit and you don’t want it to be restricted to one or a few campaigns, simply assign it to the Business Unit as illustrated in the step above.
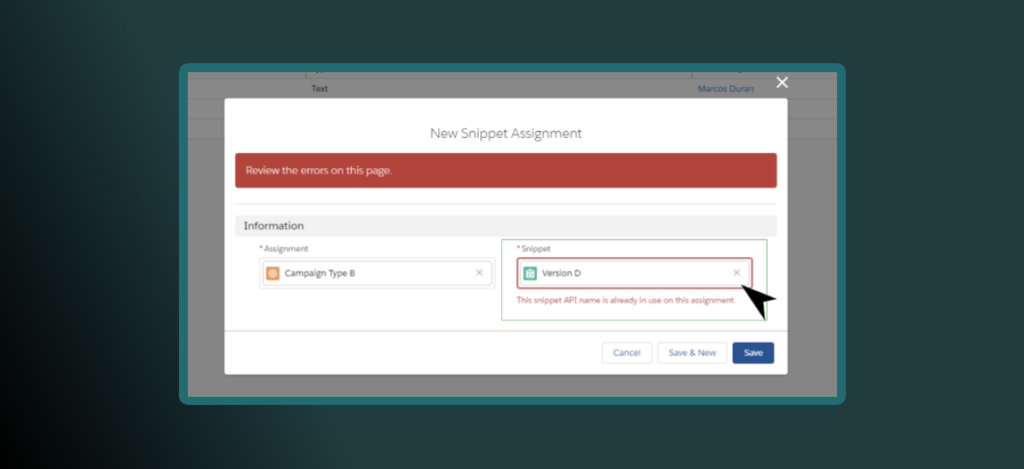
I made a clone of my Snippet but I can’t seem to tie it to the right campaign. Why am I having issues with this?
When you Clone a Snippet it keeps the same API_NAME which is the unique identifier for the Snippet. Even if you change the Snippet Name, the API Name must be updated as well. Normally this won’t happen when you create a Snippet from scratch.
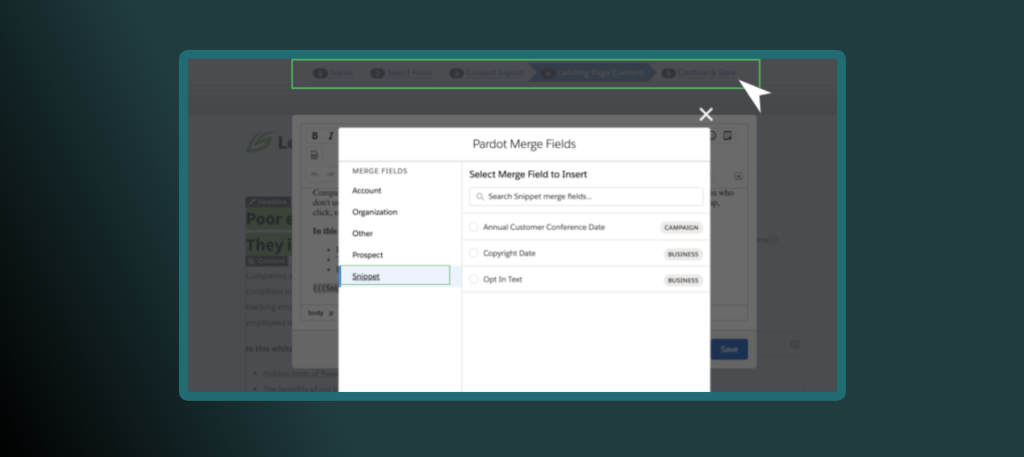
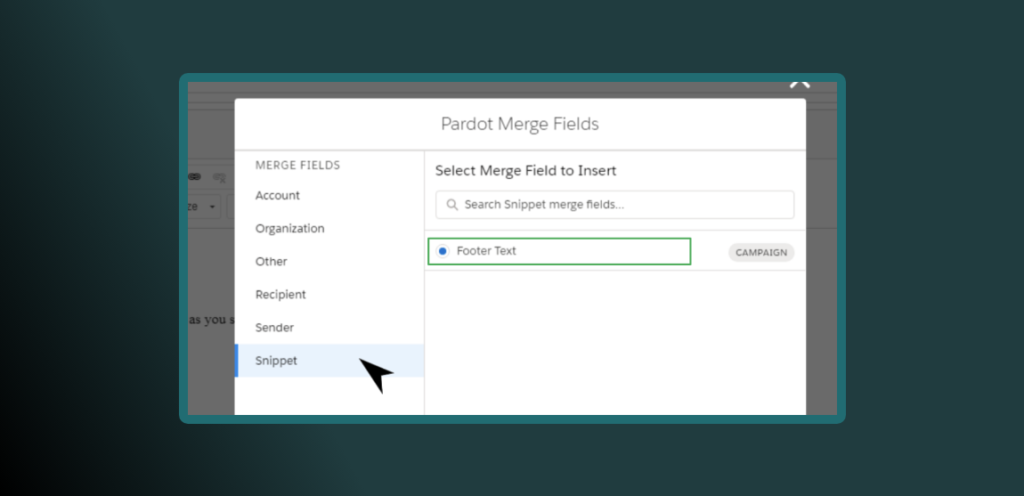
Why can I not see the Snippet tab in the Merge Field picker?
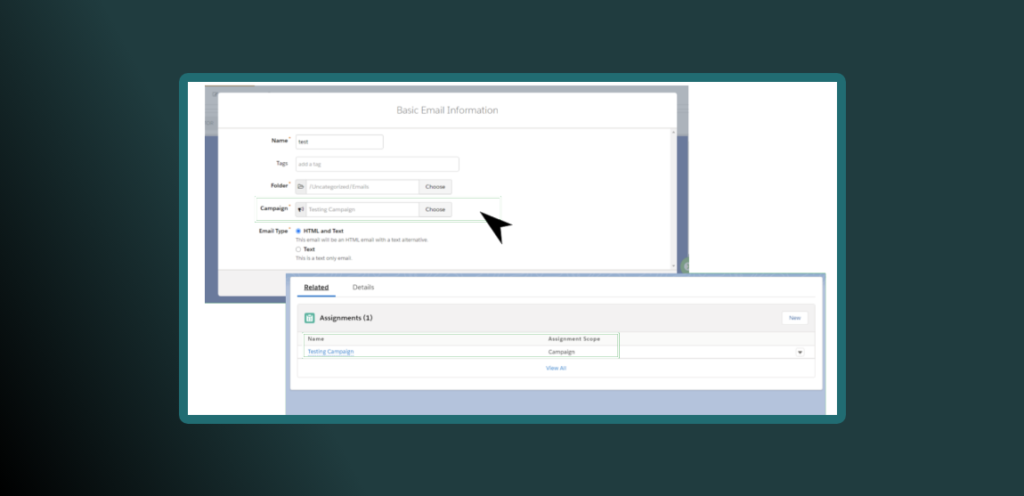
The first thing I would check is to see if you actually created a Snippet, otherwise this won’t appear. However, there are requirements to enable Snippets which could be the cause of you not being able to see them, and usually this is the issue – proper visibility. The first thing to check is to see if the email template or list email you are building has the same campaign associated with it. Nine times out of ten that’s the reason why you can’t see it, the snippet and campaign are not associated correctly (you can check the related list for that campaign), especially if you copied the template and updated the campaign.
Why can I not see my new Snippet but see others?
Notice that there is a short sync period. Usually waiting a few minutes (similar to campaign syncing period) is enough to get it to appear. If this doesn’t resolve on its own, then check the campaign or Business Unit that the Snippet is associated with.
If I edit Snippets, do they mass update or do I have to update each one manually?
Yes, Snippets will mass update, that’s the magical part of this feature. Similar to Dynamic Content any updates will go across all your templates. For example, think of being able to replace the privacy notice jargon on all your templates from one spot, that’s what Snippets can do! No more editing 100 templates. Need I say more?
Additionally, you can open this feature up to other people in your organization (in Sales Cloud) who might be the point of contact for those details.
Will a Snippet update if the email has already been sent? What about updating a landing page?
Similar to other Pardot functionality when an email has been sent already, the Snippet will NOT update after it has been sent. Future email sends with Snippets embedded will provide the latest updated information at the point of the send.
Landing pages, on the other hand, are different and will update close to real time as long as you are referring to the right snippet (via HML) and the campaign associated with this asset allows for the use of Snippets.
I tried adding an image and I can’t see an upload button or a gallery icon. Am I missing something?
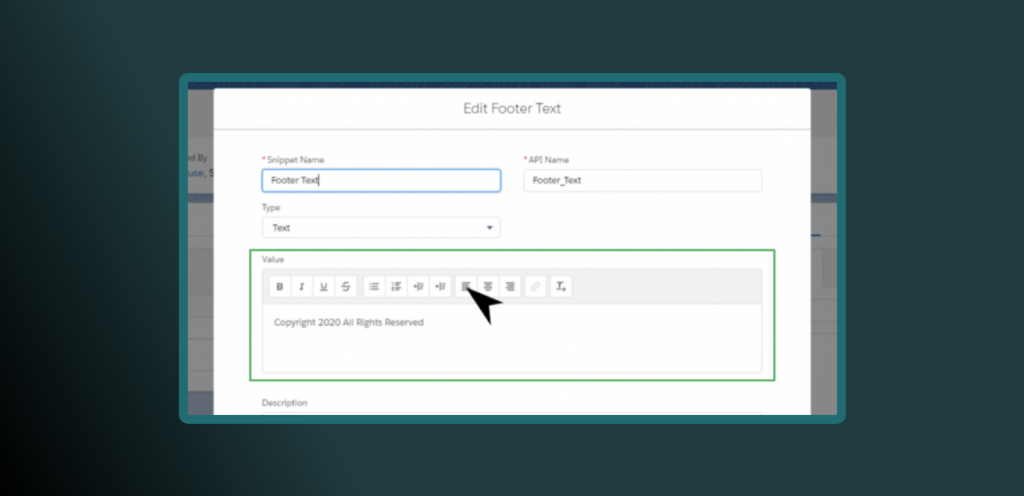
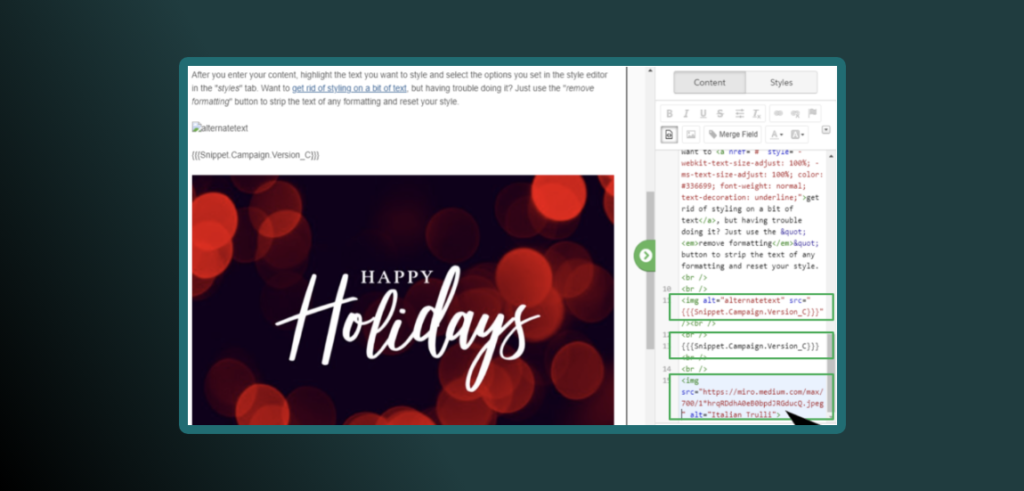
At the moment the image tab is for organization only, you can input an image URL in it but this URL won’t render as an actual image. I tried the URL on its own, the URL within some HTML in the email and the same HTML without the URL reference just the direct reference. The only one that displayed it was the direct URL reference on the template preview, so if you want the actual image to display just add the image on the template, Snippets won’t work for this.
What happens if you dissociate the campaign of the asset that the snippet is on?
You will still see the HML that describes the Snippet name within the email builder. However, if you click on the preview tab, this shows as a blank, similar when you use HML to display a field and it’s empty. I received no warnings about this from the system when trying to save or publish a template.
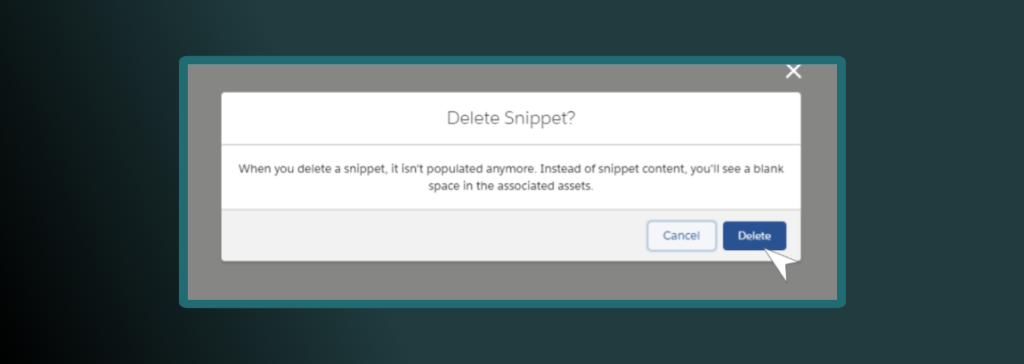
What happens if you delete a Snippet that’s currently being used?
Although the system gives you a warning, it doesn’t act like other assets that prevent you from deleting it if there are dependencies associated with the Snippet. Proceed with caution if you delete a Snippet. Review the Related section under the Snippet tab and remove the Snippet from the assets associated with it prior to deleting it. If you delete a Snippet, it is not removed from your assets, but it will stop working. You would see a blank space where the Snippet should populate.
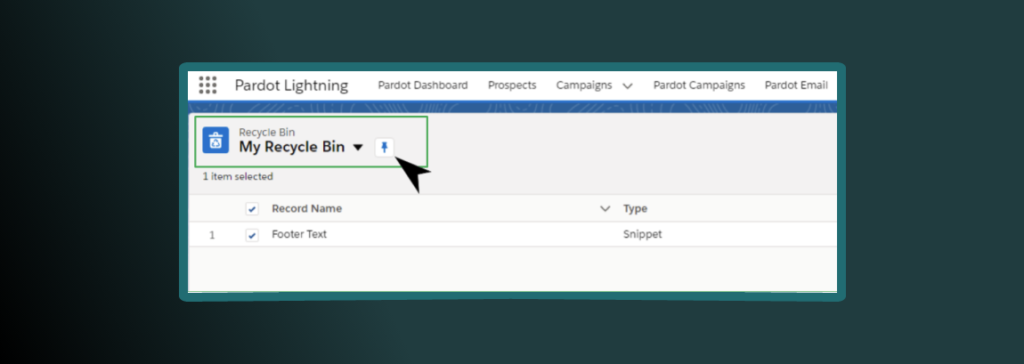
How do I restore a Snippet if I accidentally delete it?
In the App Launcher (in Sale Cloud), search “Recycle Bin” and it should be the top thing there. You can hit the down arrow at the right of the row to restore it. You may need a Salesforce Admin to support you in bringing it back if you can’t see the Recycle Bin. This option is available to you for 30 days.
Can I use standard Salesforce functionality to edit Snippets?
Yes you can. I actually learned this from Marianne Fields at ParDreamin’. In her presentation, she used Flow within Sales Cloud to look up a custom event object and pull data from it into her Snippets, while also automating the information updates from when her events team had changes to any of the event logistics, this would then update in Pardot and when it was time to send emails from Pardot, all the data was in the right spot. This is a great alternative for anyone on the Pardot Growth Tier, who may not have access to Dynamic Content or want more control in editing and approving content that goes out the door.
Wait, I already use Dynamic Content. What is the difference?
The difference here is that Dynamic Content depends on a prospects record data to populate information based on the criteria you established, it also has a limitation of 25 variations of content. Snippets on the other hand are “static” for everyone (meaning everyone sees the same thing) but can be updated universally similar to Dynamic Content. Snippets can be used by anyone with a Pardot instance, while Dynamic Content requires a Pardot Plus account or higher to be able to access it.
Although you can use Dynamic Content and HML together, using Snippets inside Dynamic Content or vice-versa don’t seem to be available at this time. There is no HML button in the Snippet wizard creator but you can manually add HML to Snippets.
This sounds great. How do I enable Snippets for Pardot in my account?
Review the prerequisites at the beginning of this post (and definitely the Salesforce documentation). If all that is completed, then make sure your profile has the Snippets tab turned on (set to Default On), then you can add the Snippets Related list to the Campaign page layout (and Lightning Record Pages if applicable) in order to see associations at the Campaign object level.
Lastly, you must be a Pardot Admin or Marketer User in order to be able to use Snippets within the Pardot Lightning App. Snippets however can be accessed from within Salesforce similar to Campaigns so don’t necessarily require a Pardot login to access.
Conclusion
With marketing teams and budgets changing during this pandemic, one thing is for sure. The winners will be the companies that can pivot quickly by leveraging all the tools at their disposal. Now that you know a little more about Snippets you can start to tinker with them to help you save time and effort. From going through this exercise three times in a week, I can say that it takes longer to set these up initially than actually using Snippets, but that’s a good thing given all the options for sharing and visibility. After that it’s a walk in the park!
Remember to be patient as you experiment with these and feel free to reach out if you need support leveraging this new feature or switching to Pardot Lightning from Classic.
What are some interesting use cases you have seen using Snippets in the wild?
Have you ever wished you could have multiple conditional form completion actions in a single Pardot form?
If you answered “OF FREAKIN’ COURSE I HAVE”, you’re in luck because I am going to teach you how in just 5 easy steps.
As you know it is super easy to add a single completion action to a Pardot form. But what would you do if you wanted to add multiple completion actions to a form and tie those actions to specific form elements.
I know, it’s a head scratcher right (and you’ve probably heard: “Nope, can’t do it”)? Never fear I’ll guide you through the dragon’s den.
When we combine the magic of Pardot together with the superpowers of JavaScript anything is possible.
But, before we take our first step down the path to knowledge, let’s set the scene. Imagine that we are promoting multiple webinar events with a single registration form.
In this scenario, we want to have one landing page that has a list of upcoming webinars. Visitors can choose one or more of those webinars to attend and only need to fill out one Pardot form. Then, we need that registration information to register the visitor (now a Prospect) in the appropriate GoToWebinar sessions.
So where do we start?
Step 1: Configure the Custom Fields.
Our first step is to identify the field(s) we will use on the form and to which form elements we will apply the conditional completion actions.
We need to note the API field name (field ID) for the field(s) we’ve selected. These can be found with one of the following navigations depending upon your chosen experience:
In Pardot (classic), navigate to Admin | Configure Fields | Prospect Fields.
In the Pardot Lightning app, click the Pardot Settings tab, then click Object and Field Configuration | Prospect Fields.
For our scenario we’ll create 4 custom fields for 4 upcoming webinars so our future prospects can register for any or all of our webinar options.
Our list of the unique Field IDs:
Webinar_topic_1
Webinar_topic_2
Webinar_topic_3
Webinar_topic_4
Keep these IDs somewhere you can access them easily. They’ll be needed in our final step.
Step 2: Create a Pardot form (or edit an existing one).
Make sure to select the fields that you wish to use for your completion actions and make sure they are checkbox fields, text fields, or radio buttons. If they are Checkbox fields, they must have EXACTLY ONE selection option. When selecting your inputs make sure to uncheck the required option.
For our scenario, I’ve created 4 custom checkbox fields and added each to the form. Each has exactly one value, and was step up like this:
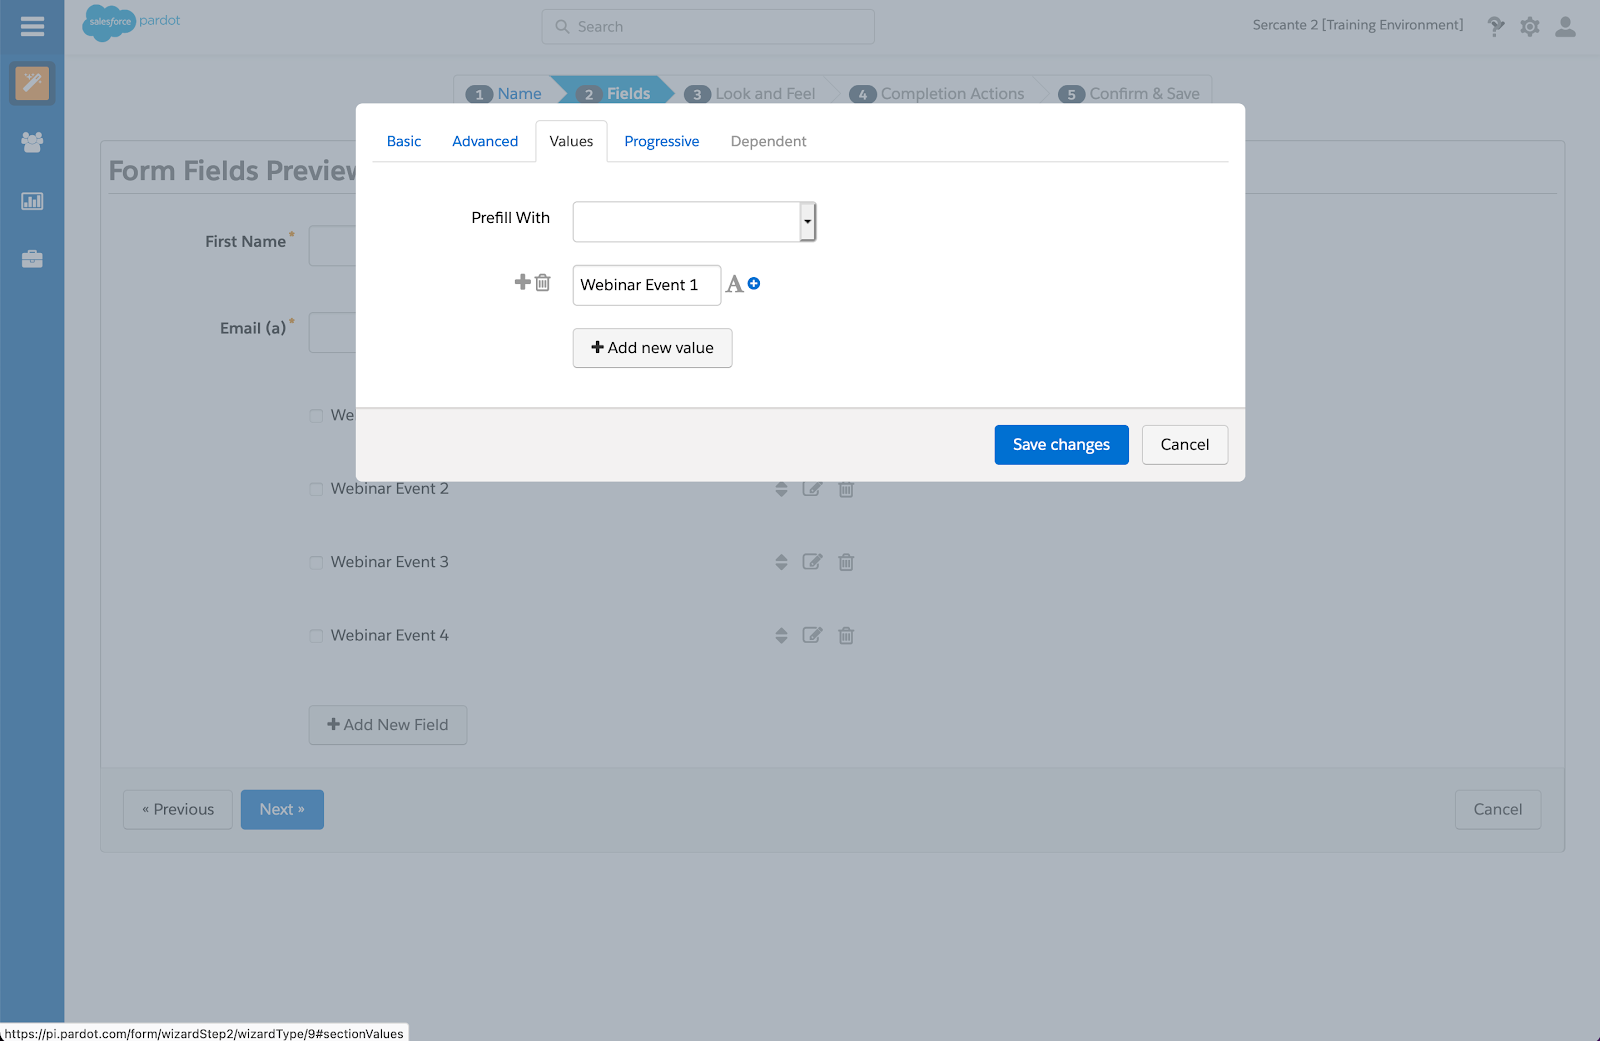
First select the Prospect Field “Webinar Topic 1”, select type of Checkbox and Data Form of “Text”.
Now click on the Values tab. Enter the Value that you want to display on the form (in this case, our Value is Webinar Event 1). Keep a record of this value handy. We’ll need it in step 5 when we start customizing our JavaScript.
Note that for each form field value on which you want to apply a unique completion action, you will need to create a unique form handler. In our example we’ll be using 4 completion actions and therefore 4 form handlers.
These are our Field ID and Value pairs so far:
FieldID: Webinar_topic_1 Form Value: Webinar Event 1
FieldID: Webinar_topic_2 Form Value: Webinar Event 2
FieldID: Webinar_topic_3 Form Value: Webinar Event 3
FieldID: Webinar_topic_4 Form Value: Webinar Event 4
I know the naming is not 100% awesome. I want to keep it generic though so Fields can be reused as needed. If we gave each one very specific names our solution would be too brittle (meaning easy to break, hard to scale).
Step 3: Create a Pardot form handler for each field value you’d like to apply completion actions.
Start by only adding the email field to the form handler. Then, add the corresponding completion action for each value. Save. Take note of the form handler endpoint URL (specifically the HTTPS version) as you’ll need this in step 5 and match it to the related Values from the form.
Note: make sure that the “External Field Name” is: “email” (all lower case), and make sure that “Disable Visitor Activity throttling” has been checked (so that multiple submissions of the form all work flawlessly)
As we continue with our multiple webinar example, I’ve repeated the step 4 times and created a form handler to use for each of the 4 custom fields created in step 2.
Here is a list of the 4 form handlers and their endpoint URLs and how they map to the field values set up above:
Step 4: Copy this script and paste into your Pardot form’s Thank You Code.
Copy the code below and paste it directly into the Thank You “Code” in Pardot’s “Completion Actions” tab.
<script>
var fieldsConfig = [
{//this block of lines is for option 1
    fieldValue: '%%your_field_id_1{js}%%',
    checkboxVal: 'VALUE_1',
    endpointUrl: 'FORM_HANDLER_1_URL'
},
{//this block of lines is for option 2
    fieldValue: '%%your_field_id_2{js}%%',
    checkboxVal: 'VALUE_2',
    endpointUrl: 'FORM_HANDLER_2_URL'
}
//add more blocks if you need them
];
// DO NOT CHANGE BELOW THIS LINE
var email = encodeURIComponent('%%email{js}%%');
var thankYouContainer = document.querySelector('.form-thank-you') || document.body;

fieldsConfig.forEach(function (field) {
//console.log('Expecting '+field.checkboxVal+', got: '+field.fieldValue);
  if (field.checkboxVal === field.fieldValue) {
//console.log('matched! adding iFrame to endpoint URL: '+iFrameUrl);
var iframeUrl = field.endpointUrl +'?email=' +email + '&t=' + Date.now();
    var iframe = document.createElement('iframe');
    iframe.setAttribute('height', '1px');
    iframe.setAttribute('width', '1px');
    iframe.setAttribute('src', iframeUrl);
    thankYouContainer.append(iframe);
  }
});
</script>
Note: remove the commented console.log statements to observe how it works
After pasting the code into the thank you code input area make sure the “Always display form after submission” checkbox is checked — otherwise this method will not work and the script will run in a loop! Which will cause a total computer meltdown and all pictures of cats on the internet to disappear. Ok that last bit is a small exaggeration but seriously don’t forget the checkbox. You’ve been warned.
Step 5: Time to modify some JavaScript
The code we pasted into our thank you content in step 4 is a bit of boilerplate to get us started. It will need to be updated for each unique use. I know it’s a bit daunting but we’ll take it slow and be very mindful of the characters we adjust.
For our webinar scenario I’ve duplicated the first code block two additional times for a total of 4 blocks of field/value/url. This is a necessary step because we have 4 form handlers and custom fields to match up. If we were only working with 2 we would not need to duplicate this code block.
Notice how each code block is contained in a set of curly braces and separated by a comma. There is no trailing comma on the last block:
{//this block of lines is for option 1
    fieldValue: '%%your_field_id_1{js}%%',
    checkboxVal: 'VALUE_1',
    endpointUrl: 'FORM_HANDLER_1_URL'
},
{//this block of lines is for option 2
    fieldValue: '%%your_field_id_2{js}%%',
    checkboxVal: 'VALUE_2',
    endpointUrl: 'FORM_HANDLER_2_URL'
},
{//this block of lines is for option 3
    fieldValue: '%%your_field_id_3{js}%%',
    checkboxVal: 'VALUE_3',
    endpointUrl: 'FORM_HANDLER_3_URL'
},
{//this block of lines is for option 4
    fieldValue: '%%your_field_id_4{js}%%',
    checkboxVal: 'VALUE_4',
    endpointUrl: 'FORM_HANDLER_4_URL'
}
First thing we need to update is your_field_id_1. Let’s replace that with the Pardot field ID that you want to perform completion actions on. A couple of things to note:
the name must be wrapped in %%, and
a {js} modifier must be added at the end of the name.
For example, if your field id is custom_field_1, it should look like %%custom_field_1{js}%% not %%custom_field_1%%or%custom_field_1{js}%
Now that we know what to watch out for let’s start making edits. First we’ll replace the “your_field_id” placeholders with the values of prospect field IDs (step 1):
%%your_field_id_1{js}%% = %%Webinar_topic_1{js}%%
%%your_field_id_2{js}%% = %%Webinar_topic_2{js}%%
%%your_field_id_3{js}%% = %%Webinar_topic_3{js}%%
%%your_field_id_4{js}%% = %%Webinar_topic_4{js}%%
Next, we replace the placeholder values for “VALUE”. Using our example, the values are what we used in the Pardot form checkbox value tab – Please note that if there are special characters like ampersands (&) in the form values, they MUST be replaced with HTML entity code like: & (that’s the & symbol followed by the letters amp and ended with a semicolon. Probably best to avoid special characters in the Values if at all possible):
VAULE_1 = Webinar Event 1
VAULE_2 = Webinar Event 2
VALUE_3 = Webinar Event 3
VALUE_4 = Webinar Event 4
Finally, each value that we’re searching for in our form will trigger a unique form handler. So, each code block will need to be updated with the correct endpoint URL. Make sure to match the correct endpoint URL with the correct form field. Here the endpoints created in step 3 are used in place of the FORM_HANDLER_1_URL variables.
The final block of code from our example looks like this:
<script>
var fieldsConfig = [
{//this block of lines is for option 1
    fieldValue: '%%Webinar_topic_1{js}%%',
    checkboxVal: 'Webinar Event 1',
    endpointUrl: 'https://sercante.com/l/876401/2020-11-30/gny9d5'
},
{//this block of lines is for option 2
    fieldValue: '%%Webinar_topic_2{js}%%',
    checkboxVal: 'Webinar Event 2',
    endpointUrl: 'https://sercante.com/l/876401/2020-11-30/gny9df'
},
{//this block of lines is for option 3
    fieldValue: '%%Webinar_topic_3{js}%%',
    checkboxVal: 'Webinar Event 3',
    endpointUrl: 'https://sercante.com/l/876401/2020-11-30/gny9dk'
},
{//this block of lines is for option 4
    fieldValue: '%%Webinar_topic_4{js}%%',
    checkboxVal: 'Webinar Event 4',
    endpointUrl: 'https://sercante.com/l/876401/2020-11-30/gny9dh'
}
];
// DO NOT CHANGE BELOW THIS LINE
var email = encodeURIComponent('%%email{js}%%');
var thankYouContainer = document.querySelector('.form-thank-you') || document.body;

fieldsConfig.forEach(function (field) {
//console.log('Expecting '+field.checkboxVal+', got: '+field.fieldValue);
  if (field.checkboxVal === field.fieldValue) {
//console.log('matched! adding iFrame to endpoint URL: '+iFrameUrl);
var iframeUrl = field.endpointUrl +'?email=' +email + '&t=' + Date.now();
    var iframe = document.createElement('iframe');
    iframe.setAttribute('height', '1px');
    iframe.setAttribute('width', '1px');
    iframe.setAttribute('src', iframeUrl);
    thankYouContainer.append(iframe);
  }
});
</script>
Step 6: Just kidding there is no step six
While it’s technically true for the purpose of this blog post, there is no step 6, but if there was it would look something like this:
Test, Test, Test.
Make sure to thoroughly test your landing page, form and JavaScript to ensure everything is working as expected.
And there you have it. Our future prospects will be able to select multiple webinar events with our form checkboxes. Then our unique form actions will run based on the prospect action of selecting one or more of the form elements.
Let’s take a moment to recap what we’ve learned today
We created a custom solution that allows multiple completion actions to fire based on a value recorded by Pardot form in 5 easy steps.
In our imaginary situation we want a user to be able to register for multiple webinar events in one simple form.
We started by creating Prospect Fields and connected form inputs to them.
After linking all the values and Prospect fields we created Pardot form handlers for each form element we want to interact with.
Next we copied a bit of boilerplate JavaScript into the forms Thank you content section and updated the code replacing the generic values with our real content.
Finally we made sure to test all the things and confirm everything is working correctly.
Huge congratulations for making it all the way through with us. Give yourself a big pat on the back and make sure everyone at your company knows how awesome you are with your newly gained wizardry. Come back to visit any time.
If you have any questions or would like help solving other interesting ideas, let us know about it in the comments.
I once forwarded an anonymous email to five friends. It proclaimed:
“We’ve been discovered, flee immediately!”
I have not seen two of them since. I learned my lesson about forwarding emails that day, but for the wrong reasons.
Whether pretending your friends’ nefarious activities are about to be uncovered… or just trying to share a beautiful sales email… forwarding is problematic.
(By the way — this is the case with emails that you’re building in Pardot, and emails built in any other ESP. No email is safe.)
Note: The AddThis connector for Account Engagement is being retired as of May 31st, 2023. Currently there is no alternative functionality to support forwarding Account Engagement emails. See the Salesforce announcement for more details.
We’ll add a solution as soon as we find out what that is. In the meantime, enjoy this classic post with waning relevancy.
So why do emails break when forwarded?
This a question that I hear often… and root issue is really that there is no agreed upon standard for email code. As such, differences in rendering occur across email clients. When an email client reads code it decides what it needs to display to the end user and discards the rest.
Outlook receives an email and it thinks:
“Hey, we don’t need all this code that talks to Gmail. We’re Outlook, baby!”
So, it removes it. When you forward that email to a Gmail user they receive a hot mess because all that Gmail code is now gone. Purged by a vengeful and jealous Outlook.
An example of what happens when an email is forwarded
Here is an example of what happens to an HTML table when it’s been rendered by Apple Mail.
Notice how the Apple mail client is adding “3D” and “=” all over the place?
This is going to be really bad for other email clients. When the email is forwarded from Apple mail, the HTML now includes all of the additional information that only make sense inside of Apple mail.
Let’s say the email is forwarded from Apple to Outlook. When Outlook receives the code with the addition of “3D” everywhere, it does the best it can to interpret the code even though it is no longer valid HTML. So the email looks all kinds of crazy.
How to tell if people are forwarding your Pardot email
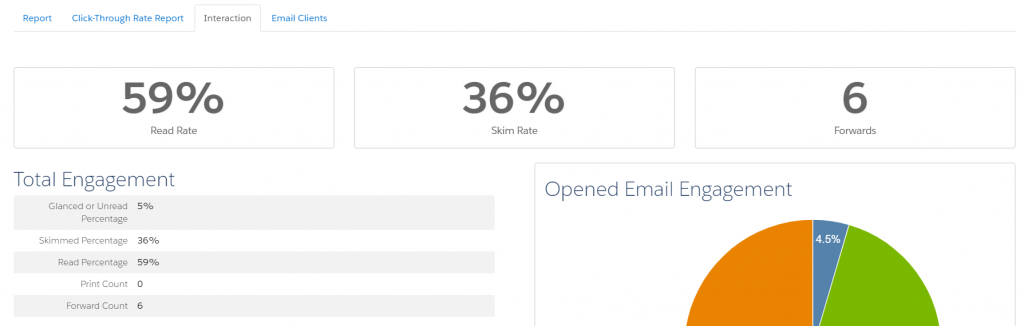
You can see within Pardot how often your emails are being forwarded. Navigate to Reports > Marketing Assets > Email > List Emails, and click into any recent email to view this report.
On the Interaction tab, you should see something like this:
In this example, we can see the email has been forwarded 6 times (along with other interesting data points on the level of engagement).
How to protect your email from issues when it’s forwarded
If your emails are being forwarded a lot, remain calm. There are tactics to minimize risk and ensure your audience can view the beautiful electronic missive you’ve sent them.
Keep it simple
Reducing the complexity of your email is a great way to improve accessibility all around. Using single column layouts is a great place to start.
There is ultimately nothing we can do with email development to stop the email clients from changing the code when it’s rendered by the application — but keeping your design as simple as possible frequently reduces the amount of removed code. The closer your email is to a basic text email, the less likely it is to suffer problems when forwarding.
Include a ‘View in Browser’ link
A “View this email in my browser” link helps users access a working version of your email. Web browsers are much better at reading HTML & CSS and are less likely to suffer from rendering issues.
If you discover a high volume of forwards, you could word the link as “Is this looking wonky? Click here to view in browser” (or something to that effect.)
Forward to a friend feature
Another issue to keep in mind for forwarding email sent via marketing automation is tracking. When Pardot sends an email, it’s tracking links unique to that specific prospect/recipient — and when an email is forwarded, Pardot may still track activity on that email back to the specific prospect.
Extra prospects’ activity can be tracked on the original recipient’s prospect account. This can also lead to a visitor association change. For example, if Joe forwards an email to Bob, and Bob clicks the link Pardot is monitoring for Joe… things start to get a bit confused.
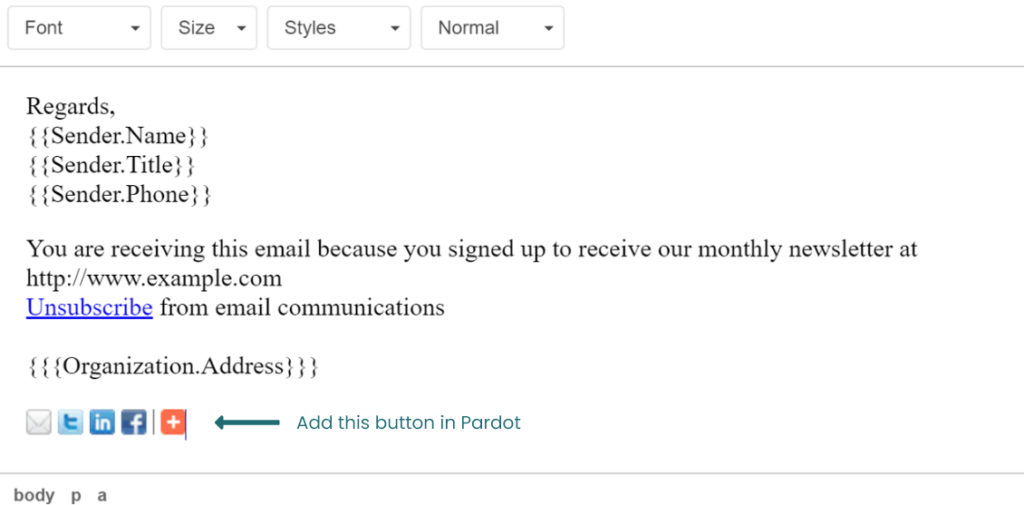
Using the AddThis Connector can remedy this issue. The Add This Connector allows you to insert little buttons in your email that prompt the user to click to forward to a friend or post to social. This will generate a link that is no longer tracked and will not be associated with the recipients prospect account.
These buttons look a little like this:
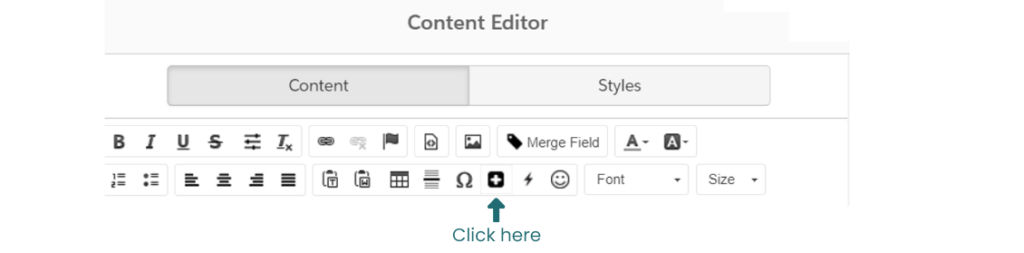
Once you have installed the connector, you will be able to add these by clicking here in the email editor:
can add the forwarding link in your email. This will generate a link that is no longer tracked and will not be associated with the recipients prospect account. A good place for this link may be beside your view in browser link.
Pardot & email forwarding
What questions do you have about forwarding emails in Pardot? Any best practices you’d recommend to fellow readers?