Product Note:Marketing Cloud Growth and Advanced are editions of Marketing Cloud Next and have also been referred to as Agentforce Marketing.
One of my all time favorite hacks is using flow to generate consistent campaign names in Salesforce. With the release of Marketing Cloud Growth Edition and the move to a more campaign-centric model, I wondered if this old trick would still work. Like any good consultant, I created a demo org and did some testing. Stick around to find out what I learned.
Campaign-Centric Approach
If you have not played with Marketing Cloud Growth yet, let’s set the stage. Marketing Cloud Growth has a very campaign focused workflow for creating new marketing initiatives. I really like this structure as all components are visible and accessible in a single location. This includes the content (emails/SMS messages/landing pages), segment, and the flow (this is a big change too – flows are used to send messages).
Campaign Anatomy
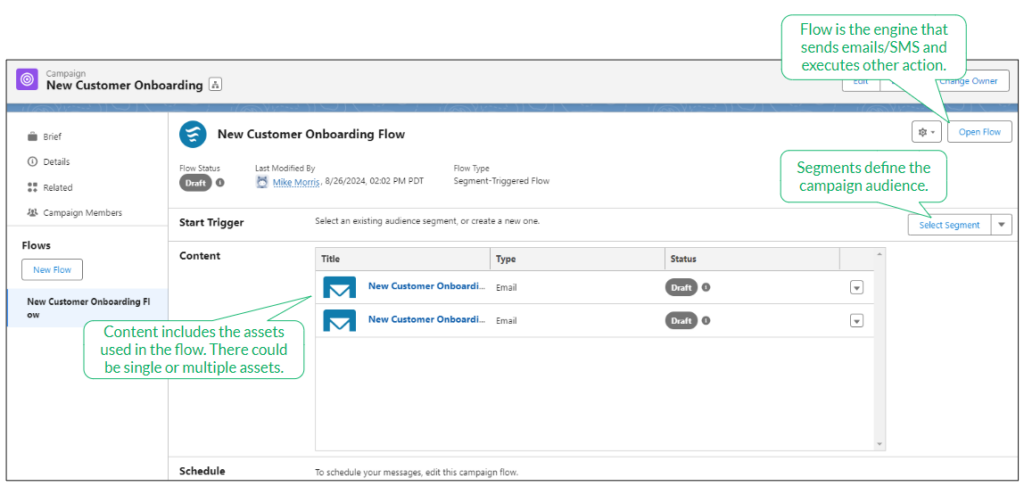
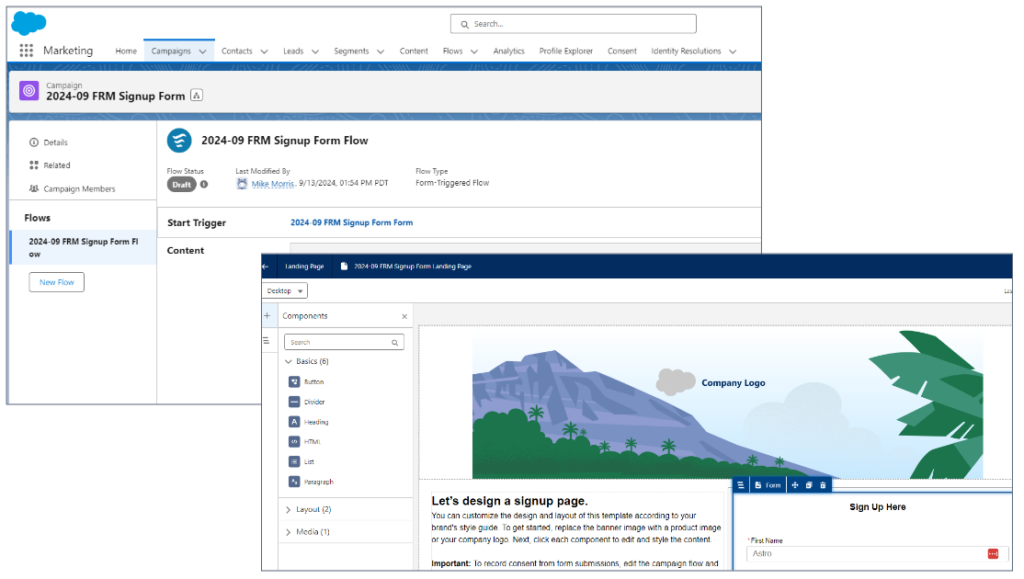
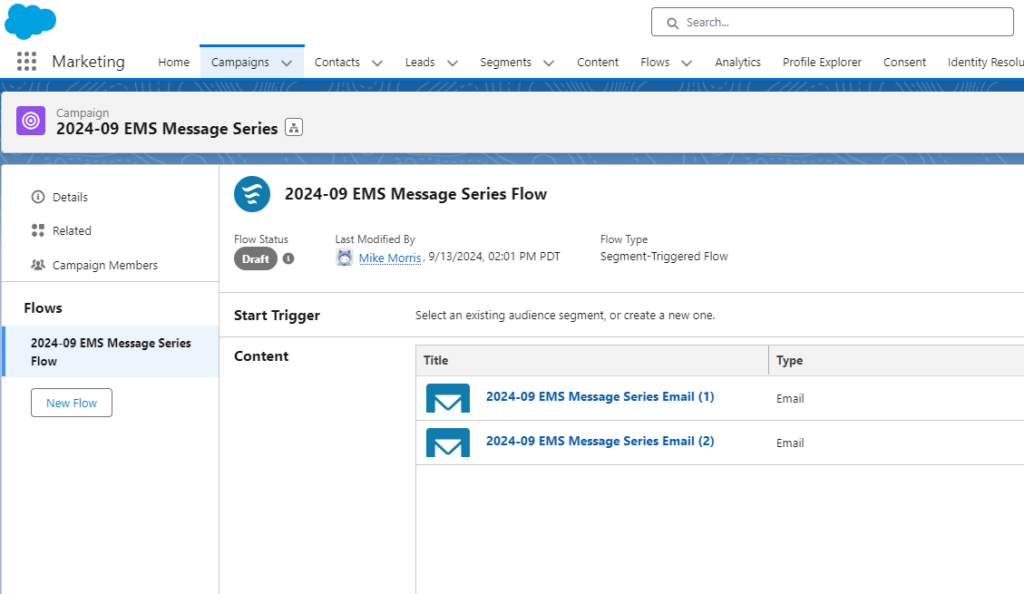
Marketing Cloud Growth uses the standard Salesforce campaign object, but the look is different when accessed from the Marketing app. The campaign is divided into sections containing the flow, start trigger, and content. This makes it easy to access everything in one place.
When campaigns are created, content and flow names are derived from the campaign name. This is another great out-of-the-box feature designed to make reporting easier by relating linked assets. It’s this feature that inspired my test.
Campaign Types
Before we get too deep into testing, let’s consider the types of campaigns that we’ll be creating. Most of us are accustomed to using the default or customized version of the campaign type picklist on the campaign page layout.
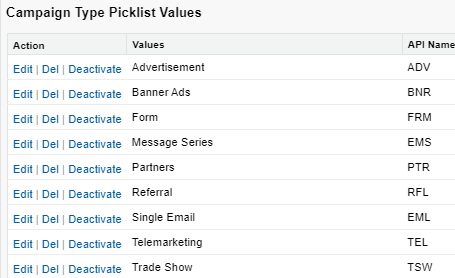
Marketing Cloud Growth campaigns are used for emails and nurtures, but they are also used for forms. Based on this, you might want to consider adding some more values to your type picklist to mirror the templates.
Example Type Additions
Single Email
Message Series
Form
Single SMS Message
Let’s Get Testing!
Now that the baseline is set, let’s get testing. The goal of this test is to do the following:
Determine if flow can be used to update the campaign name in Marketing Cloud Growth based on a standardized naming convention.
Confirm that the standardized naming convention will also be applied to the campaign components (flows and content).
1 ) Determine Campaign Naming Convention
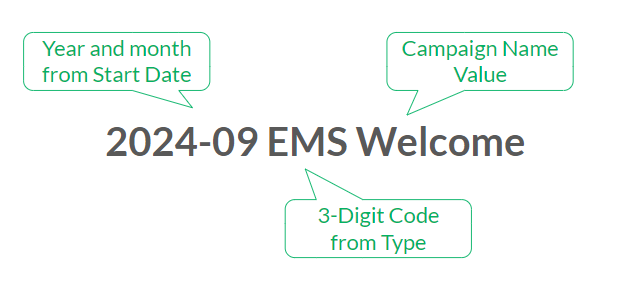
I’m keeping my convention pretty simple, but you can use whatever structure best suits the needs of your organization. My structure is as follows:
2) Update the Campaign Object
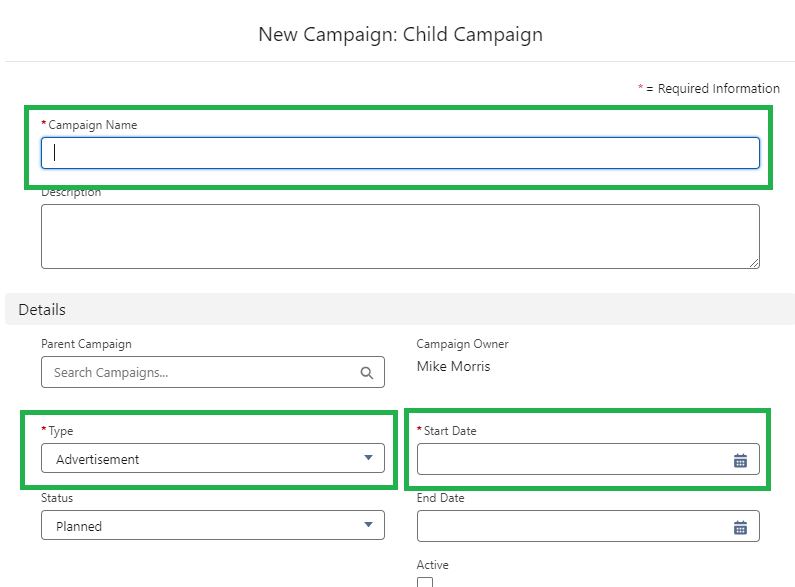
There are a few updates that need to be made to the campaign object. We’ll take them one by one.
1. Customize Type picklist values and update API names to 3-digit codes (these are what will be included in our campaign names)
2. Update page layouts to make needed fields required
3. Create a formula field on the campaign object to calculate the standardized campaign name
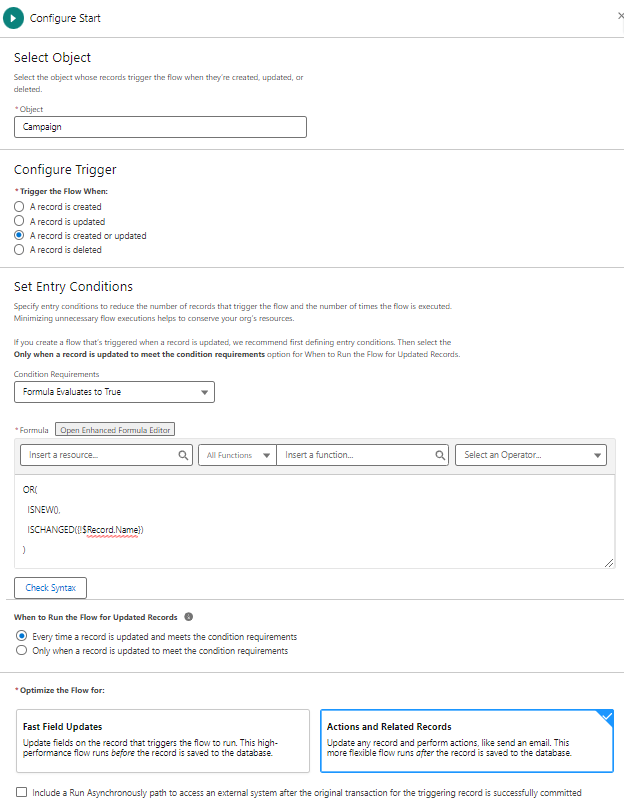
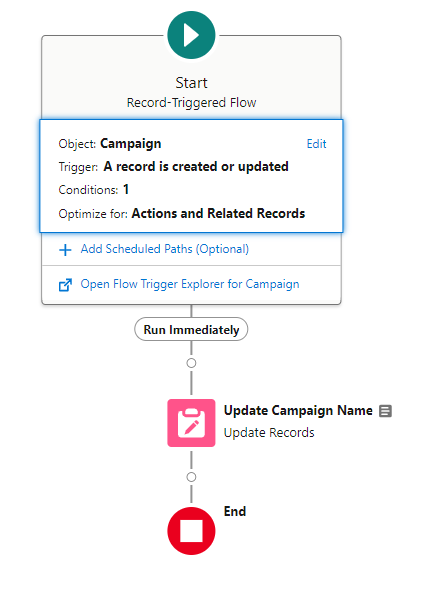
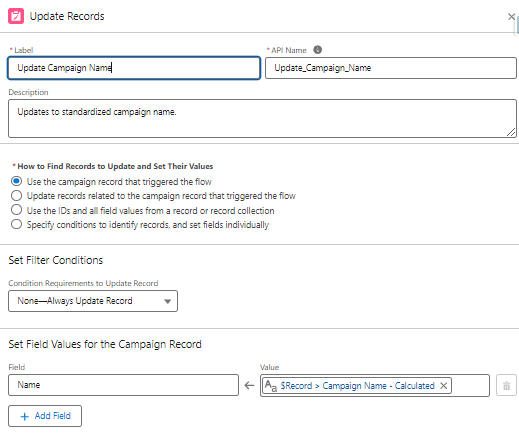
This a straightforward record-triggered flow based on the campaign object that updates the name field on the campaign with the value from the Campaign Name – Calculated field.
Start Element
Flow Canvas
Update Records Element
4) Activate and Test
Test 1: Signup Form
The campaign, landing page, form, and flow were all generated using the correct naming convention.
Test 2: Message Series
The campaign, emails, and flow were all generated using the correct naming convention.
Takeaways
Linking campaign names and components makes consistent naming conventions more important than ever. I’m excited that my favorite hack still works and will be even more valuable going forward.
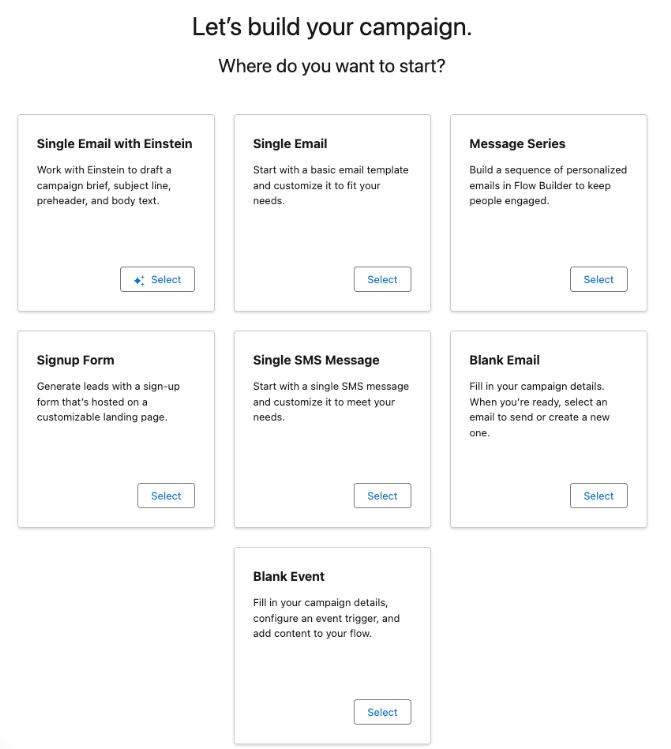
Like all good things, there is one “gotcha” to watch out for. Whether using this solution or the default functionality, the names of campaign components are generated at creation and are not updated if the campaign name is later changed. My advice is to ensure you have the correct campaign name before choosing your campaign template (from the “Let’s build your campaign.” screen).
If you have any questions about Marketing Cloud Growth or this solution, feel free to reach out!
Product Note:Marketing Cloud Growth and Advanced are editions of Marketing Cloud Next and have also been referred to as Agentforce Marketing.
I’m not going to be the guy who says “I told you so,” but Flow Builder has officially expanded from being an automation tool used exclusively by Salesforce Admins into the realm of marketing. Flow Builder is the engine used by Marketing Cloud Growth Edition to send emails and SMS messages and perform other automated tasks. If you’re not familiar with Flow, that’s OK. In this post, we’ll walk you through the process of building a message series with Flow in Marketing Cloud Growth Edition.
Getting Started
If you are new to flow, I would encourage you to take a moment to read Heather Rinke’s post An Introductory Guide to Salesforce Flow for Marketers before going any further. This is a great overview of flows and will provide context to the topics that we’ll be discussing.
If you have questions about Marketing Cloud Growth Edition, I’ve got you covered there too. Check out Erin Duncan’s post All the FAQs on Marketing Cloud Growth Edition for all your answers.
Building a Message Series
Confirm User Access
Marketing Cloud Growth (aka MCG) includes two permission sets out of the box. It also requires that users be added as a contributors to the CMS workspace and the Marketing Landing Pages site (see the Implementation Guide: Marketing Cloud Growth for more details).
Name
Description
Marketing Cloud Admin
Access to Salesforce Setup, Data Cloud Setup, and full control on campaigns, segments, and flows. Access to MCG’s setup assistant is also being added as part of the Winter ‘25 release.
Marketing Cloud Manager
Full control to manage campaigns, segments, and campaign (non-admin) flows.
One of the things that I really like about Marketing Cloud Growth is the campaign-centric approach. This is very logical and easy to use.
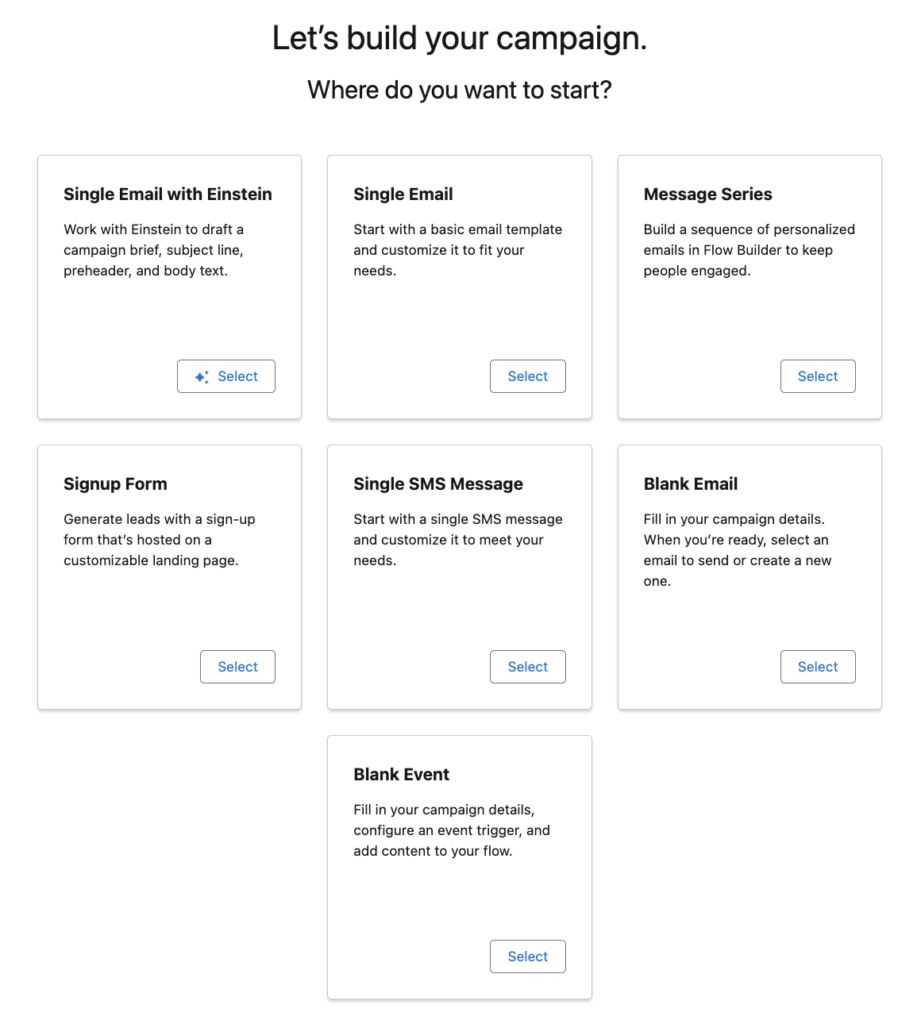
To get started navigate to the Campaigns tab in the Marketing App and click the New button. After completing the fields on the campaign page layout, you’ll be presented with the screen below. This is where the fun begins!
We’re going to select the Message Series option as that’s our goal for today.
Pro Tip: If you see this message when clicking one of the “Where do you want to start?” options, go back up and confirm your user access. Chances are you have not been added to the CMS as a contributor.
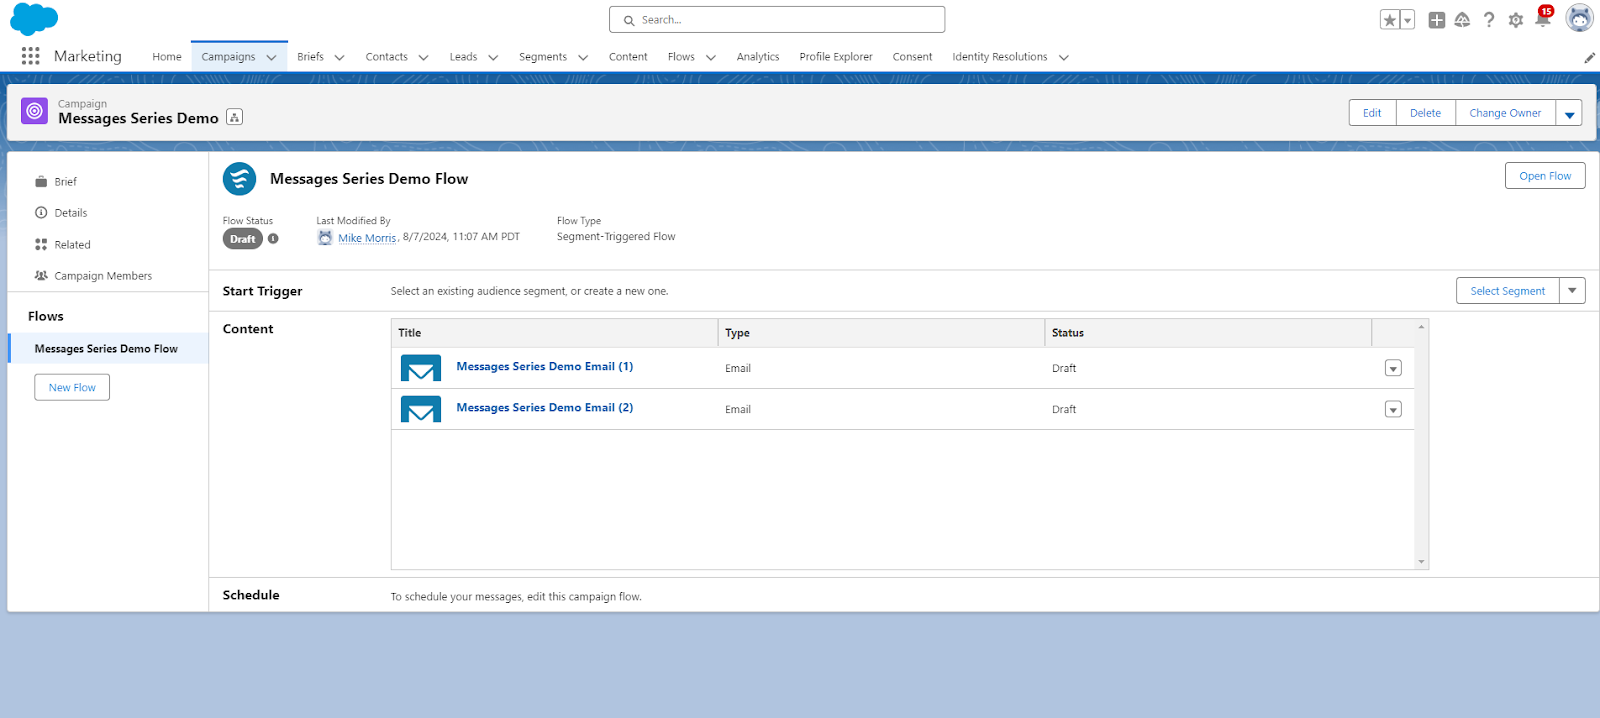
After selecting the Message Series option, you’ll notice that Marketing Cloud Growth has created your campaign, email templates, and a basic flow. This automation is a real time-saver and provides a great starting point for marketers.
Flow Access
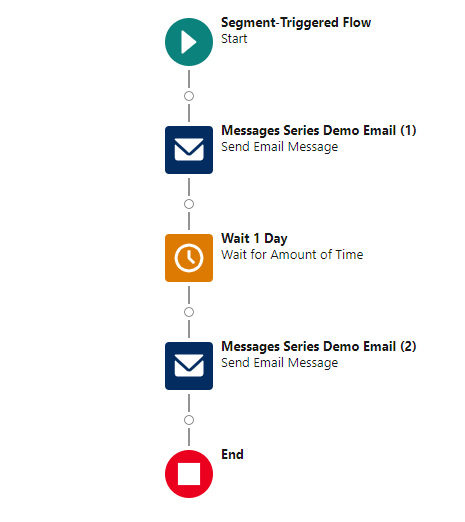
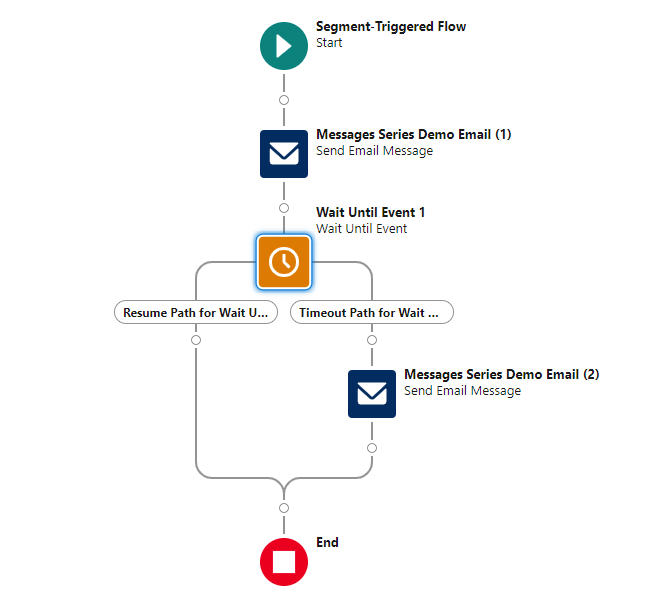
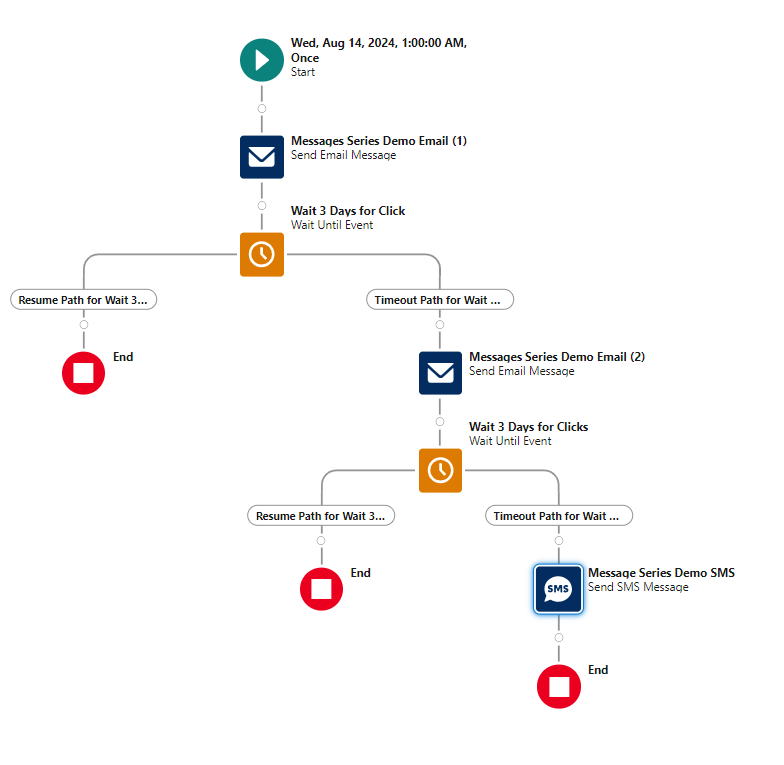
You can access the pre-built flow by clicking the “Open Flow” button within the campaign or by searching for “flow” in the App Launcher. This is a basic Segment-Triggered flow that sends an initial email, waits a specified period, and then sends a follow-up message. It’s a good starting point, but you’ll likely need to customize it to meet your specific requirements.
Customizing Your Flow
Flow Capabilities
If you are a Salesforce Admin who has experience with flows, you’ll immediately notice that this is not the same version of flow that you are accustomed to. Marketing Cloud Growth uses a streamlined version of Flow Builder and different trigger methods (Segment-Triggered and Form-Triggered). Most elements are available, but there are some limitations. See Marketing Cloud Growth Campaign Flows vs. Salesforce Flows by Lucy Mazalon for a great overview. Some limitations that stood out to me were the inability to access the Toolbox or create formulas, but don’t stress too much as this is a new product and capabilities will be expanded in future releases.
Pro Tip: Marketing Cloud Managers can access and edit flows, but their permissions are limited compared to Marketing Cloud Admins. Key missing elements include assignment, get records, and loop functions.
Current Capabilities
Set Schedule
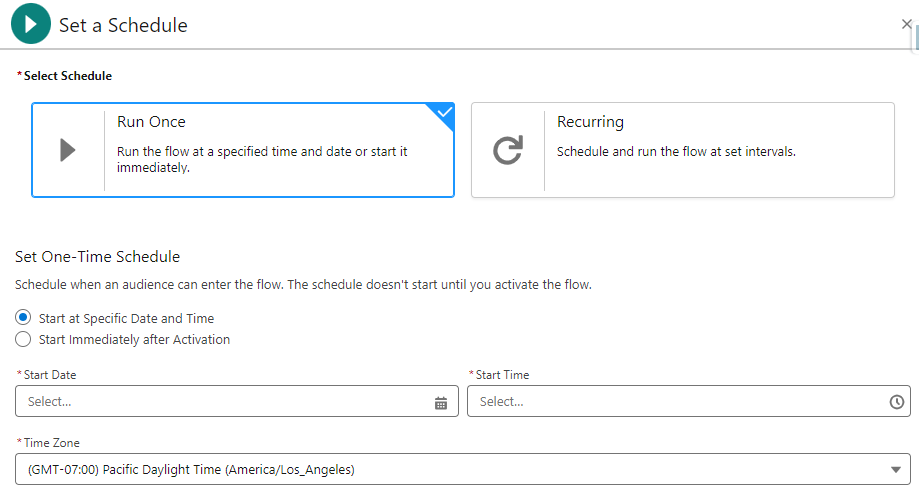
Unlike Record-Triggered flows, Segment-Triggered flows run on set schedules. This is due to the linkage with Data Cloud and its consumption-based pricing model. Credits are used when segments are processed so it’s recommended that segments only be refreshed prior to sending a communication or at intervals relevant to data updates (if data is added weekly, don’t refresh daily).
The schedule can be set by clicking + Set Schedule in the Start element. From there you’ll have the option to run once or set a recurring schedule.
Select Segment
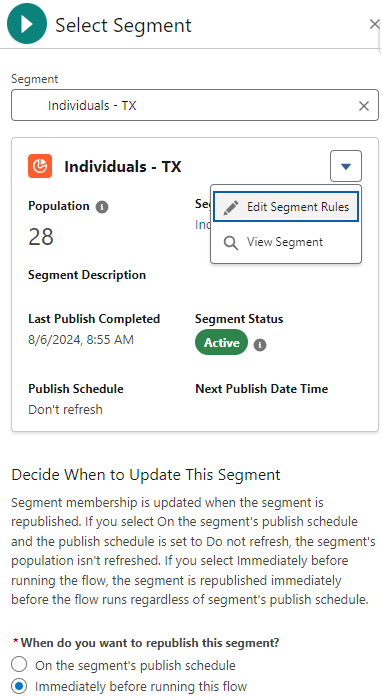
Speaking of segments, they can be added to the flow from the Start element by clicking + Select Element or directly from the campaign page by clicking Select Segment. I prefer adding the segment from the flow start element as it provides some additional features that I find very handy.
After selecting a segment from the Segment dropdown, a summary of the segment is provided. The population, description, last publish date, and publish schedule are also displayed. If the segment population seems too large or too small, you can access and edit the segment rules. Keep in mind, any edits to the segment will be applied wherever the segment is used.
The final consideration is the republishing schedule. You can immediately publish the segment before running the flow (to make sure the most recently added individuals are included) or default to the publishing schedule defined in the segment. The interface design helps make the decision very easy by clearly displaying the segment publish schedule so you can make an informed decision.
Pro Tip: If you see that your segment is not set to refresh, it’s important that you select the “immediately before running the flow” option. If this option is not selected, you risk missing newly added individuals.
Update Wait Elements
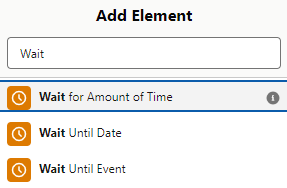
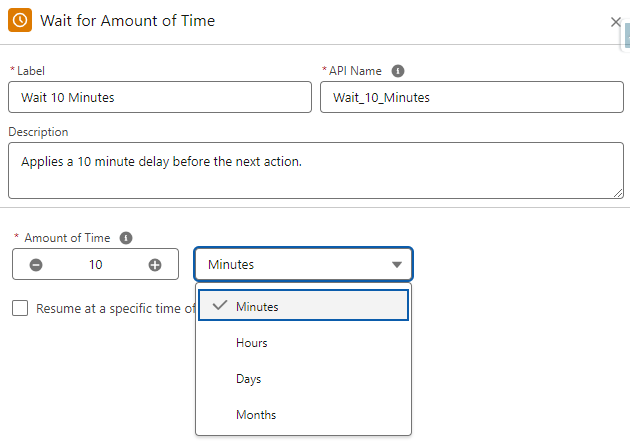
Flow includes three wait elements that provide a lot of flexibility. These elements can easily be added to your flow by hovering over the circle between elements, clicking the + sign, and then entering “Wait” as the search criteria.
One big advantage over Account Engagement’s Engagement Studio is the ability to have wait times down to the minute in the Wait for Amount of Time and Wait Until Event elements.
Apply Branch Logic
Branch logic can be added using the Wait Until Event or a Decision element. Let’s look at both.
Wait Until Event
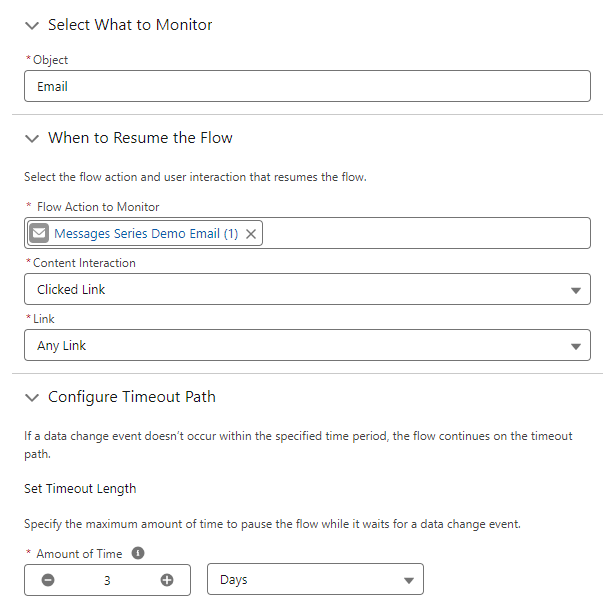
This element allows you to monitor for an action in the flow and then branch based on the engagement. As an example, you could monitor for individuals who clicked a link (and link or a specific link) in the first email in your series and then branch based on the interaction (or lack thereof). This can also be applied to SMS messages.
Decision Element
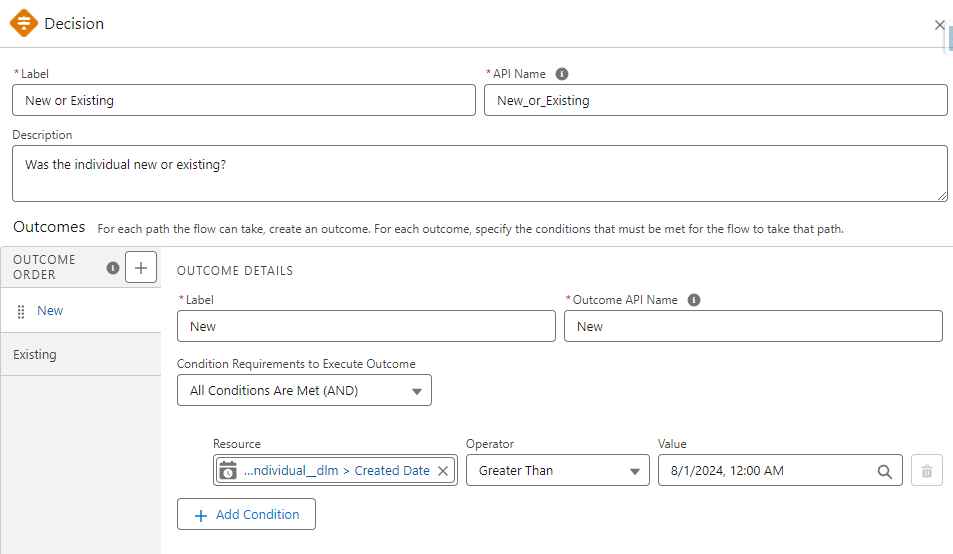
This decision element is another way to apply branch logic by specifying criteria for outcomes. The cool thing here is that you are not limited to two branches, additional outcomes can be added as needed creating multiple branches.
The actual resource fields accessible in decision elements are somewhat limited right now. This is certainly an area to keep an eye on as it will become even more valuable in future releases.
Vary Communication Methods
Another great thing about Marketing Cloud Growth is the ability to easily integrate SMS messages into flow. This is a great way to try a different outreach method if individuals don’t respond or to customize nurtures based on individual preferences.
In the example below, the intent is to get individuals to engage (click). After sending two emails and not getting a response, an SMS message is sent to see if a different communication method gets the desired interaction.
Learn More About Marketing Cloud Growth Edition & Flow
Marketing Cloud Growth is an exciting new offering from Salesforce and it’s only going to get better with each release. If you would like to learn more about this product, be sure to check out our Marketing Cloud Growth Edition Bootcamp.
Getting hands-on with flow is something that I highly recommend. Fortunately, Trailhead has a wealth of flow-related training available for free. Here are a couple of recommendations to help get you started.
Finally, Data Cloud is at the core of segmentation in Marketing Cloud Growth Edition. The Data Cloud Basics for Marketers trail is a great way to learn some of the benefits and key terms of Data Cloud that you will run across.
Student expectations today are vastly different than they were a decade ago. It’s causing technology leaders at the most successful educational institutions to rethink their data infrastructure and student journeys through real-time interaction management strategies.
Today’s students want a personalized, seamless, engaging journey that keeps pace with their brand experiences outside of higher education. At the same time, more and more individuals are bypassing the traditional college education routes altogether. That means higher education institutions (HEIs) need to exceed student expectations to reach enrollment and retention goals and ultimately deliver successful student outcomes.
Combating Headwinds in Higher Ed: A three-part series
Throughout this three-part blog series, you will learn about using your institutional data to create personalized student experiences at scale and in real-time within your college or university.
Part one: Real-time interaction management and real-time interaction for student success
Part two: Overview of Salesforce Data Cloud for higher education professionals, potential use cases, and best practices for successfully using Data Cloud
Part three: Building a unified data vision and then activating your data to build a CRM + AI + data strategy for your institution
This series was co-authored by Kirsten Schlau, VP of Technology at Sercante, and Dr. Bradley Beecher (email), Director, Student Experience at Salesforce.
Harnessing data to navigate and overcome challenges in higher education
To help combat higher ed headwinds, there’s a tremendous untapped opportunity for HEIs to use their data by improving organization-wide data infrastructure.
Yes, you’re probably reading this and thinking things like:
We do use data — we analyze our data to maximize the value of resources and stay ahead of constituent needs.
Or even…
We use our data to create strategic plans, execute them efficiently, and analyze their results to differentiate our institution, proactively improve student outcomes, and report outcomes to government agencies and ranking organizations.
Oftentimes though, that data is trapped inside campus systems that don’t easily integrate with each other. It’s time-consuming to piece together a cohesive and accurate story when the data is trapped, but there’s a better way. It involves creating a fully integrated single source of truth to manage student data.
Unifying student data can help your institution to:
Generate real-time institutional reporting
Create a unified student record
Take action from the data
Personalize the student experience to reinforce a sense of belonging
Taking cues from non-HEIs to use data for growth and retention
What if we told you there’s an opportunity more specifically to use that data on an individual basis, at a 1:1 scale to personalize the student experience in real-time?
This is happening in other industries. In fact, you might have experienced personalization like this as an online shopper. Here are a few examples.
What is real-time interaction management (RTIM)?
Real-time interaction management, also known as RTIM, uses customer interactions, predictive modeling, and machine learning to deliver consistent, personalized customer experiences across channels in real-time.
“Forrester Research analyst Rob Brosman originated the term Real-Time Interaction Management in 2012, and three years later Rusty Warner, another Forrester analyst, offered the formal definition of, “Enterprise marketing technology that delivers contextually relevant experiences, value, and utility at the appropriate moment in the customer life cycle via preferred customer touchpoints.” – Source
RTIM equips marketers to gain immediate visibility into critical moments within the shopping or user experience, which can deliver better consumer experiences and outcomes. This includes generating relevant offers and product suggestions on the right devices at the right time to drive customer engagement, satisfaction, and, in turn, revenue growth.
Impact of real-time interaction management in the real world
As an everyday consumer, you’ve likely already experienced the effects of RTIM (or you’ve experienced a scenario where you wish RTIM was in place).
Example scenario illustrating RTIM in e-commerce:
Let’s say a customer, Maria, visits an online fashion retailer’s website:
Browsing Products: Maria lands on the retailer’s homepage and starts browsing through summer dresses.
Real-Time Data Capture: As Maria navigates through the website, her behavior is captured in real-time. This includes the pages she visits, the products she clicks on, her past purchase history, demographic information, and any other relevant data.
Real-Time Analysis: The e-commerce platform analyzes Maria’s behavior and data in real-time. It identifies her preferences based on her browsing history, past purchases, items in her shopping cart, and any other available data points.
Personalized Recommendations: Using RTIM, the e-commerce platform dynamically generates personalized recommendations for Maria. It might suggest summer dresses similar to the ones she’s viewing based on her style preferences and past purchases. These recommendations are displayed prominently on the website in real-time.
Real-Time Engagement: While Maria is still browsing, a pop-up notification appears offering her a limited-time discount on a dress she had previously shown interest in. This real-time engagement aims to incentivize Maria to make a purchase.
Adaptive Pricing: As Maria continues to browse, she adds a couple of dresses to her cart but hesitates to complete the purchase. In response, the e-commerce platform dynamically adjusts the prices of the items in her cart, offering her personalized discounts or free shipping to encourage her to proceed to checkout.
Abandoned Cart Recovery: If Maria leaves the website without completing her purchase, the e-commerce platform sends her a personalized email reminder within minutes to remind her about the items in her cart. These reminders offer her an additional discount or incentive to complete the purchase.
Cross-Channel Consistency: Whether Maria interacts with the retailer’s website or mobile app, or when she receives an email, the messaging and recommendations remain consistent across all channels for a seamless and personalized shopping experience.
In this example, RTIM enables the e-commerce retailer to engage with Mary in real time, providing her with personalized recommendations, discounts, and reminders tailored to her preferences and behavior. This ultimately increases the likelihood of conversion and enhances customer satisfaction.
Additionally, some online retailers are now using RTIM not only in their marketing efforts but also as a way to offer seamless customer experiences.
Harnessing RTIM at colleges, universities, and other post-secondary education institutions
In the e-commerce example above, the experiences were grounded in segmentation and, of course, made up of various data points.
It’s no different for HEIs. The ability to segment and provide greater personalized content and experiences leads to a great student experience.
We’ll share a few examples of how other professionals in higher education are doing this today.
Real-time interaction for student success
Imagine a world where student advisors can gain a full 360° picture of their students in a single view. This could include:
Past class enrollment records and performance indicators
Required courses that support their designated degree path
Intelligence to recommend courses based on individual interests and passions outside of their degree path
Automatic insights into things such as on target to graduate, at risk, potential for drop-out, and any other insights unique to your institution.
Oh! And one more thing to add: this is all done at scale with minimal manual effort put on the advisor.
Step 1 to building an RTIM strategy: Unify data to create a single source of truth
This vision can become a reality when your data is not trapped in siloed campus systems.
You might say, “How is that possible?”
Here’s how you can start building a student-centric RTIM strategy.
All of this data aggregation and related insights are powered by Salesforce Data Cloud and Einstein 1 Platform. They are the building blocks to creating personalized student experiences with real-time capabilities. And they can also help advisors to gain more time to focus on making meaningful connections with their advisees and ensuring their long-term success.
How does the Einstein 1 Platform support RTIM strategy for HEIs?
The Salesforce Einstein 1 Platform (A.K.A. “Salesforce core”) unifies your data, AI, CRM, development, and security into a single platform. It’s an extensible AI platform (meaning, it easily connects with other Salesforce platform products and third-party integrations), and it can facilitate the fast development of generative apps and automations.
Through Einstein 1, your institution can appropriately address students’ most common, basic, or foundational questions through alerts and automated workflows. Then your advisors’ interactions with students can center on deeper and more meaningful advising conversations.
Creating unified student profiles with connected data
A unified student profile, aggregating student data into a single student record allows advisors to meet with more students and encourage those meaningful conversations. For example, instead of talking through the required courses advisees need for their program, they get automated alerts listing which courses to take next. Then, the advisee’s open office hours can become career exploration sessions or deep dives to help students better understand complex concepts.
At institutions with siloed data, creating alerts like those in the example requires a ton of manual effort and time. And let’s face it — advisors don’t have time to spare.
How Data Cloud solves the RTIM puzzle
With Salesforce Data Cloud, advisors can provide more proactive and holistic support for students. That’s because campus data for each student is unified in a single record — something that benefits both students and the institution.
In turn, students make more informed and thoughtful decisions with this proper support from academic advisors. Getting automated alerts supports students as they navigate the university/academic program policies and procedures, and, more importantly, offers an exceptional college experience.
Ultimately, Data Cloud will help build better staff experiences with a unified student record and a seamless student experience that meets their modern expectations.
In the next post in this series, we will provide an overview of Data Cloud for Higher Education, examples of potential use cases, and best practices for using Data Cloud.
Ready to transform your student experience through real-time interaction management?
Discover how real-time interaction management can elevate the way you engage with students, and enhance their experiences with personalized, timely interactions that make a real difference.
Learn more about Salesforce Education Cloud here to understand the platform and how it compares and relates to your current technology stack.
I recently ran into a situation where a client needed to exclude select campaign types from being populated as the Primary Campaign Source field on opportunities. While this might sound unusual on the surface, the use case was very logical and likely impacts other organizations too. Read on to learn how we solved it to customize primary sources on opportunities using Salesforce flow.
Use Case
Before getting too deep into the solution, let’s first review the use case for relevancy in your organization. In this particular situation, the sales teams were leveraging Salesforce campaigns as a way to group records for outreach. Some of the outreach campaigns became quite large over time and began skewing data in the Primary Campaign Source field on opportunities.
Many reports in the organization were based on the Primary Campaign Source field and the outreach campaigns were undermining the impact of true marketing campaigns. It was determined that reporting would be more accurate if outreach campaigns were excluded and the Primary Campaign Source field was populated using the last “responded” campaign (based on the responded checkbox).
Primary Campaign Source Field Review
Before we get into the solution, let’s do a quick recap of the Primary Campaign Source field on opportunities. Campaign attribution can be a confusing topic, so it never hurts to review.
How is the Primary Campaign Source Populated?
Lead Conversion (with Opportunity) – The Primary Campaign Source field will be populated with the campaign that was most recently associated with the lead.
Opportunity Creation (from Contact) – The campaign that the contact was most recently associated with will populate the Primary Campaign Source field when a new opportunity is being created from a contact record. Users have the ability to change the value before saving the record.
Manually – Users can manually update the Primary Campaign Source field on the opportunity using the picklist of active campaigns.
Automation – The Primary Campaign Source field can also be updated based on an automated process in Salesforce (generally a Flow).
Do Auto-Association Rules Apply?
Great question! Auto-association rules are part of campaign influence in Salesforce and are used to create campaign influence records. They are not factored into the population of the Primary Campaign Source field on opportunities.
Primary Campaign Source Field (on Opportunities) vs. Primary Source Campaign Influence Model
Primary Campaign Source Field (on Opportunities) – Lookup field on the opportunity that links it to a single campaign.
Primary Source Campaign Influence Model – Campaign influence model that attributes 100% of the influence to the campaign noted in the Primary Campaign Source field on an opportunity.
Solution Review
Now that we’ve laid the foundation, let’s address the solution.
Step 1 – Determine Exclusions & Actions
The first question to answer is “What campaigns should be excluded from the Primary Campaign Source field?”. Depending on your organization, this could be a campaign type, a campaign record type, or a combination of both.
Step 2 – Determine Actions
Now that we know what campaigns we would like to exclude, what should we do when we run across an opportunity with an excluded value? The default Salesforce behavior is to use the last associated campaign. We could go that route and use the last “valid” campaign that a lead or contact was associated with or we could go a step further and use the last campaign that has the “responded” box checked.
I prefer prioritizing my “valid” campaigns based on the “responded” checkbox. Similar to how I configure auto-association rules, I just don’t like giving credit to a campaign if the lead/contact has not actually engaged with it.
We also need to consider how the Primary Campaign Source will be populated if no valid campaigns are found. You can choose to keep the excluded value (as a reference point), clear the value, or populate with a default value. I elected to retain the excluded value (prefer data to no data), but you have options!
Step 3 – Build it in Flow (Sandbox)
For illustrative purposes, I created a flow in my dev org to show you how this solution could work for you. Here are the assumptions that were used.
Campaigns with the type of “Sales Prospecting” should be excluded.
When updating the Primary Campaign Source field, the most recent responded campaign (checkbox checked) should be used.
If a valid campaign is not found (or the only campaign has a non-responded member status), the Primary Campaign Source field should be populated with the most recent campaign (basically defer to the default Salesforce behavior).
Since this data is used for reporting purposes, real-time updates are not needed.
Flow Summary
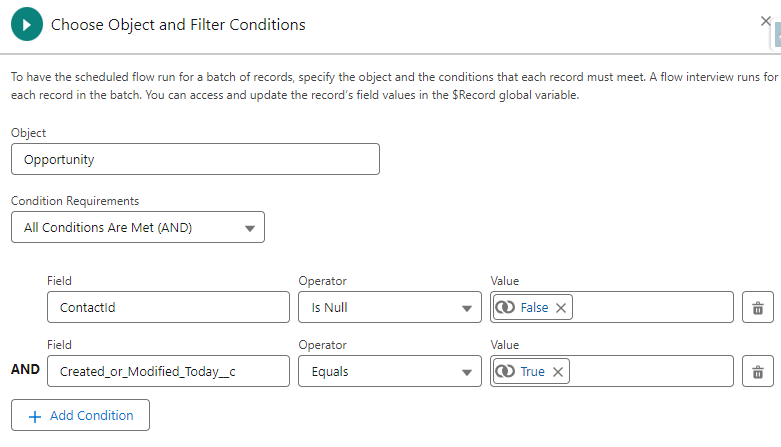
This solution uses a scheduled flow based on the opportunity object. The flow runs nightly and processes all opportunities that were created or updated that day.
Note: Relative dates can’t be used in the filter conditions of scheduled flows. To address this, create a custom checkbox field on the opportunity object that will evaluate TRUE if the opportunity was created or updated today and use it in your criteria.
Below is my filter. It’s selecting opportunities that have contact roles and were created or updated today.
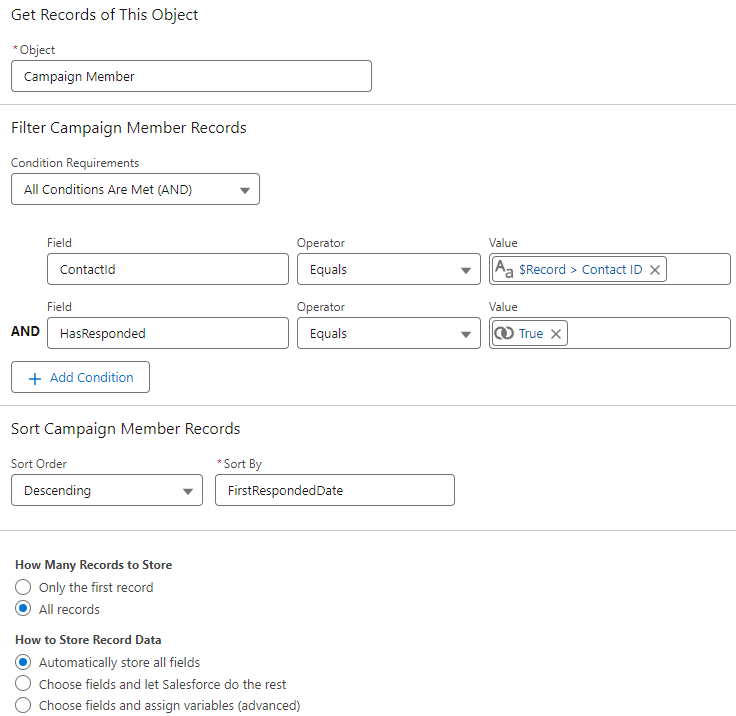
Get campaign members for contact roles
In this step, we get all the responded campaign member records (for the contact role) and sort them so the most recent is first.
Loop through campaign members
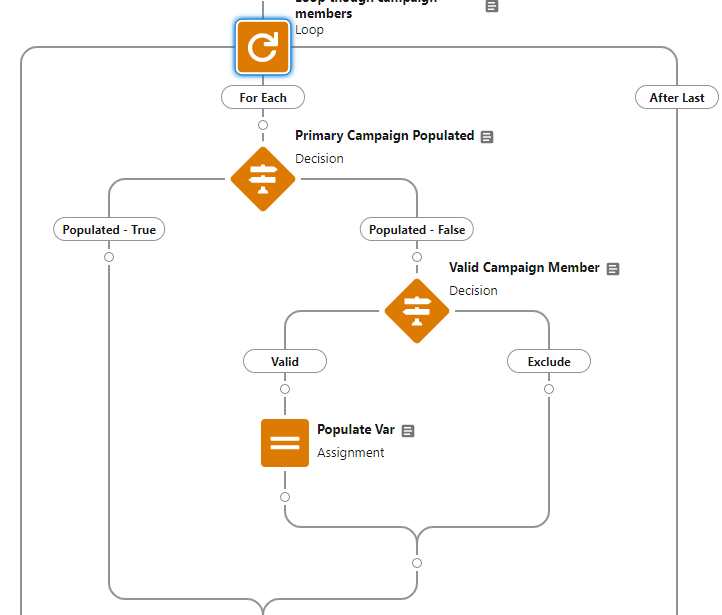
Next, we loop through each of the campaign member records related to the contact role, find the first valid campaign (responded), and save it to the assignment variable.
Update the opportunity record
Finally, we update the Primary Campaign Source field on the opportunity with the campaign ID stored in the assignment variable.
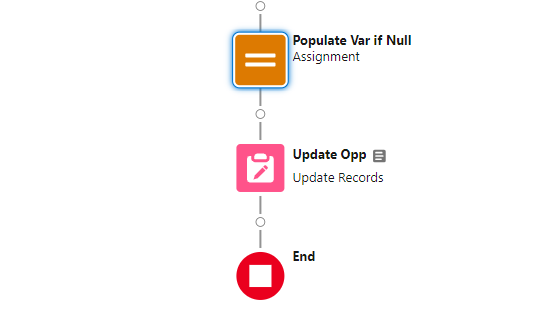
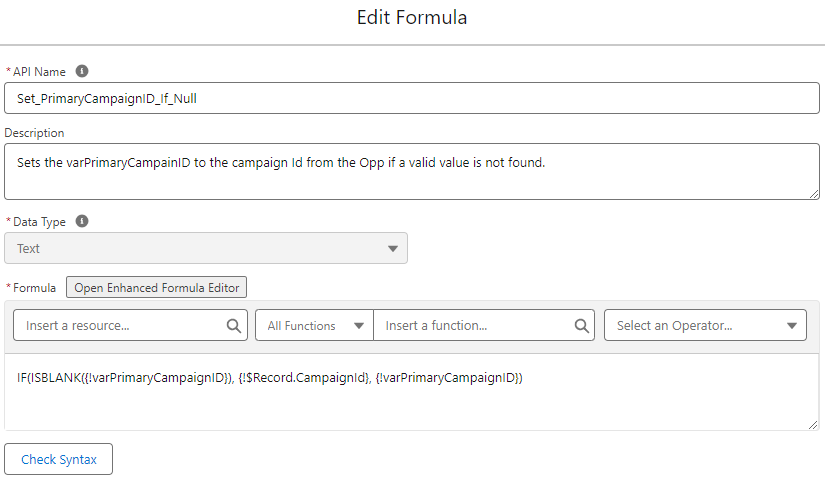
Note: If you decide to keep the most recent campaign as the Primary Campaign Source (if a valid campaign is not found), you will need to add a final assignment element prior to updating the record. The element uses a formula to ensure that the variable has been populated with a valid value and updates to the original campaign ID (even if it’s an excluded value) if blank. This prevents the Primary Campaign Source from being updated to a null value by the flow.
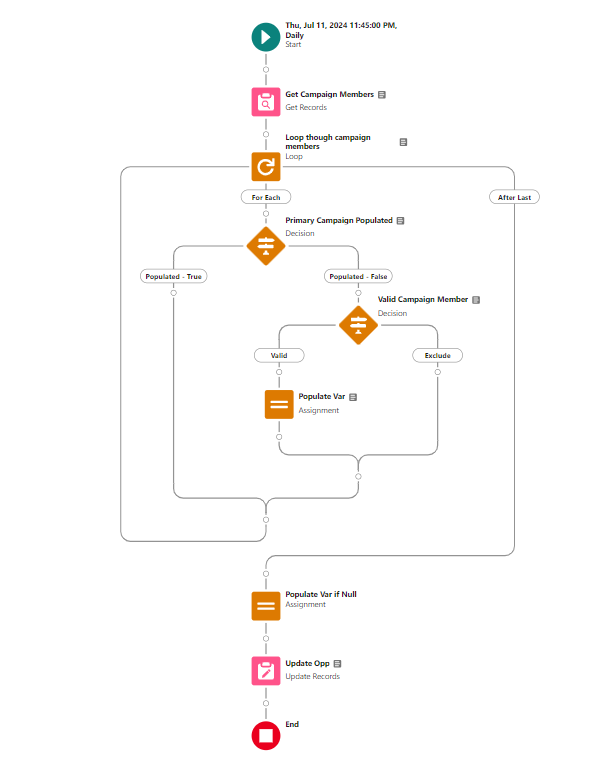
Complete Flow
Here’s a look at my final flow.
Step 4 – Test & Validate
As with any flow, test, test, and test again before deploying to production. Below are some test scenarios to use for validation.
Create a new opportunity at lead conversion
Lead with a single valid campaign
Lead with multiple valid campaigns
Lead with an excluded campaign (most recent) and a valid campaign
Lead with a single excluded campaign
Lead with a single non-responded campaign membership
Create a new opportunity from a contact
Contact with a single valid campaign
Contact with multiple valid campaigns
Contact with an excluded campaign (most recent) and a valid campaign
Contact with a single excluded campaign
Contact with a single non-responded campaign membership
Update Primary Campaign Source on an existing opportunity
Update to an excluded value (make sure that there’s a contact role who has a valid campaign)
Test Table
When testing and validating flows, I like creating tables to record results for review. This helps me organize my thoughts and ensure that everything is working as intended.
Scenario
Original Value
Expected Value
Pass/Fail
Lead – Single Valid
2023-09 TSW Dreamforce
PASS
Lead – Multiple Valid
2024-06 SLS Sales Prospecting
2023-06 WBR Product Update Webinar
PASS
Lead – Excluded + Valid
2024-06 SLS Sales Prospecting
2023-09 TSW Dreamforce
PASS
Lead – Single Excluded
2024-06 SLS Sales Prospecting
PASS
Lead – Single Non-Responded
2023-09 TSW Dreamforce
PASS
Contact – Single Valid
2024-05 TSW Events
2024-05 TSW Events
PASS
Contact – Multiple Valid
2023-06 WBR Product Update Webinar
PASS
Contact – Excluded + Valid
2024-06 SLS Sales Prospecting
2023-09 TSW Dreamforce
PASS
Contact – Single Excluded
2024-06 SLS Sales Prospecting
PASS
Contact – Single Non-Responded
2023-09 TSW Dreamforce
PASS
Updated – Existing Updated to Excluded
2024-06 SLS Sales Prospecting
2023-09 TSW Dreamforce
PASS
Is the Primary Campaign Source field meeting your needs?
If you are using the Primary Campaign Source field in your reporting I encourage you to take a closer look at your campaigns to see if your data is being skewed. If so, this solution is a great way to prioritize valid campaigns and put more emphasis on engagement. You can even completely filter out specific types of campaigns if you choose. Don’t sell your marketing efforts short!
If you’re like many, setting up an SMS program is not part of your everyday tasks. And if I were a betting woman (I’m not), I’d bet you’ve likely never done it before. If you have, then you likely need a refresh.
Moreover, if you have an existing SMS program and now find yourself in a situation where you’re switching providers, you might be even more unsure of where to even begin.
TDLR: Whether newbie or pro, there’s a lot to consider and unpack not only from a strategy perspective but the technical stuff as well. In this post, we’ll cover everything you’ll need to consider for your SMS mobile strategy — whether you’re new to SMS or rethinking your SMS program.
SMS Mobile Strategy Considerations
Many times, when organizations begin on the path of charting out their SMS communication they naturally start down the path of wanting to replicate all the communications they currently have for the email channel.
DON’T BE THAT PERSON.
Instead, consider the following.
The purpose of your program
Why do you want to communicate with people via SMS, to begin with? Better yet, what’s the benefit to the organization, and more importantly, to your customers?
A common purpose of an SMS program is to provide direct, efficient ways to engage, which leads to improved customer satisfaction and better business outcomes. The net on this point is to ensure you’re doing it for good reason. You may be in an industry where an SMS program just doesn’t make sense, and that’s ok!
Examples of typical SMS communications
By refining the purpose of your program, you can begin to back into what makes sense to send via SMS.
Consider your customer experience: What are the types of things that might be beneficial to receive via text? If you think about the intent of a text message in general and why we send them in our day-to-day lives, you’re usually sending a text because:
Your message is short, direct, and doesn’t require live dialogue.
It’s something timely and you’re desiring a response back quickly.
It’s efficient.
With that lens in mind, let’s think about the types of messages your organization sends and what fits into this criteria mentioned above.
Here are some examples of communications that make sense to send via SMS:
Appointment Reminders: Remind customers or clients of upcoming appointments, reservations, or important deadlines.
Order Updates: Notify customers about the status of their orders, including order confirmation, shipping updates, and delivery notifications.
Account Notifications: Send account-related notifications such as payment reminders, account balance alerts, or security alerts (e.g., suspicious login attempts).
Promotional Offers: Inform customers about special promotions, discounts, or exclusive deals to drive sales and increase customer engagement.
Event Invitations: Send invitations or RSVP reminders for events, webinars, conferences, or workshops.
Customer Support: Provide quick and efficient customer support by allowing customers to text inquiries, report issues, or request assistance.
Emergency Alerts: Send timely alerts and updates during emergencies, natural disasters, or other critical situations to ensure the safety and well-being of customers or employees.
Surveys and Feedback Requests: Gather feedback from customers by sending SMS surveys or requesting feedback after a transaction or interaction.
Authentication Codes: Use SMS for two-factor authentication (2FA) or one-time passwords (OTPs) to verify user identities during account sign-in or transaction authorization processes.
Appointment Scheduling: Allow customers to schedule appointments, consultations, or service bookings via SMS, with automated confirmation messages.
Membership Renewals: Remind members or subscribers about upcoming membership renewals, subscription expirations, or important membership-related updates.
Event Reminders: Send reminders about important dates, deadlines, or milestones related to events, campaigns, or initiatives.
Internal Communications: Communicate important updates, announcements, or reminders to employees, contractors, or stakeholders within the organization.
Educational Messages: Deliver educational content, tips, or tutorials related to products, services, or industry trends to inform and engage customers.
Feedback and Reviews: Prompt customers to leave reviews, ratings, or testimonials after a purchase or interaction with the organization.
More times than not, these communications fall into the transactional bucket. But as you saw above, they don’t have to. When deciding which communications to send via SMS, it’s essential to consider the relevance, timing, and audience preferences to ensure that messages are well-received and contribute to a positive customer experience.
Real-world SMS example: Player communication for a bocce ball league
Incorporating SMS into a communication strategy doesn’t have to be all or nothing either. There are instances when sending both an email and text makes sense.
Here’s a real-life example: I play in a bocce ball league (yes, those exist), and if the courts are too wet because of rain, they’ll cancel. The challenge is since there are no makeups, they really try to avoid canceling. It really comes down to the wire for making the decision to cancel. The league used to send an email as soon as they decided, but chances are you didn’t see it until you were already there.
To improve this customer experience, they developed not only a rain hotline (via webpage), which shows the last time it was updated (e.g., “10 mins ago” with status updates like “we will make a decision by x time”). The league will now also send a text message via SMS letting you know the status of your game as soon as it’s canceled.
They also must have gotten tired of fielding emails and phone calls (who knew us bocce ballers were such a passionate group) that they now remind everyone via text message that the rain hotline exists, and they send a link that you can access via mobile as well.
End Destination
Once you’ve established ‘the why’ of your SMS messaging and what you’re sending, don’t forget about the end destination. This is where the true professionals shine.
Ensure your end destination is mobile-optimized. For example, there’s nothing worse than sending an SMS to provide feedback via survey, and it takes you to a non-mobile-optimized web page. Not only have you wasted money, effort, and time setting up this message, but you are creating a customer experience of friction (which is likely the opposite of what you’re trying to achieve). To add more fuel to the fire, this extra stinks — especially when it comes to getting feedback, which is already hard to receive. The oversight means you’ve just blown your chance. WOMP WOMP.
Real-world SMS example: Frequent flyer
So, let’s talk about a positive SMS example. If you’re like me and fly a decent amount, you’ve got your flight app (Delta in my case) up and running the day of your flight. It works great (most of the time… I could do another blog post on that… but another day), and if you remember to open the app and look at it on occasion, you’ll see that a gate might have changed or the time of flight has been updated.
However, I’m not always able to check the app when I’m on the move. So, Delta is sending SMS notifications as soon as these changes occur. This is especially helpful — I can see these notifications pop up on my phone without having to open the app to learn more. I also see them on my watch (when the battery isn’t dead). And if I want to see more from the text, I can click the link and it delivers me to the app, which makes the end destination all that more valuable.
I’ve seen some brands come close to excellence where they will drop you off to a mobile-optimized page. However, the real pros consider app downloads too.
As new tech and consumers evolve, so should a marketer’s strategy. SMS programs are tablestakes these days, so getting your strategy right is a must for most consumers.
Technical Considerations for SMS Messaging
How SMS marketing works
With a solid grasp of what a mobile strategy should entail, we can pivot to the technical piece. Let’s start with how SMS works for marketers as a whole, taking Salesforce as our platform of choice in this example.
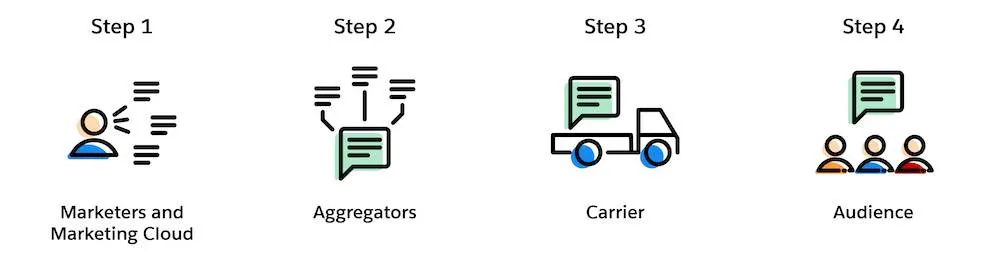
For Salesforce users, there are 4 steps to send an SMS message:
Marketing creates a personalized text message in Marketing Cloud Mobile Studio
Aggregator preps message for delivery to the appropriate carrier (Aggregator = Salesforce partners that connect our messaging platform with carrier networks around the world) (Carrier = mobile providers across the globe)
Carrier receives messages and delivers them to the final audience
The customer receives a personalized text message
Preparing for SMS Sending
But for those simple steps to happen, there’s a bit of preparation involved, especially if this is your first time.
Here are the steps to prepare for SMS sending:
Determine your code needs – Short vs long code, dedicated or private. Learn more about these options here.
Select an SMS platform provider and negotiate a contract – Many times as part of your contract they will acquire the code for you, but provisioning is extra.
Provision your short code (this can be done with a consulting partner like Sercante or directly with the provider, which is typically more costly than going with a partner).
Once the shortcode is made available within the platform, you’ll need to set up your required keywords, and messages as well as obtain consent. (Keep on reading to learn about opt-in best practices).
To migrate or not migrate your SMS program
If you’ve had the luxury of setting up your organization’s SMS program once and are now looking to switch providers, you might be scratching your head and thinking about what’s better: migrating our existing one or spinning up a new one?
In true consultant fashion, the answer is: IT DEPENDS 🙂.
Like with many options in life, it all goes back to what’s important — in this case — time, money, and customer experience.
Let’s look at the pros and cons of both scenarios:
Scenario
Pros
Cons
Migrate Existing
Risk of losing people is low
There could be up to 8-12 weeks of downtime as you move your code across platform providers, aggregators, and the like. It can get complicated — especially from a lease/ownership perspective
Acquire New
The implementation process is relatively straightforward, sometimes quicker than the migration route. There’s no downtime in the ability to send SMS
Education of new code may be required for existing subscribers. There’s a risk of retention losses.
SMS migration route — let’s stay friends
If keeping your existing code outweighs the downtime you’ll encounter, there will be a decent amount of coordination between both old and new providers.
Below are some high-level steps of what’s involved when migrating SMS programs:
Contact existing provider – Let them know your intention to retain the existing shortcode and inquire about the process for releasing the shortcode to use with the new provider, as well as any associated fees or requirements. Please note: not every provider will release their shortcode.
Verify Contractual Obligations – Review your contract or agreement with the current to understand any terms or obligations related to the shortcode. Ensure that you comply with any contractual requirements before proceeding with the migration.
Coordinate with the new provider – Let them know you desire to transfer your existing shortcode to their platform. Provide any necessary information or documentation requested by the new provider to facilitate the transfer process.
Coordinate Timing– Coordinate the timing of the shortcode transfer between old and new to minimize disruption to your messaging campaigns. As mentioned in the cons, there’s normally a downtime where your code will not be operational. Ensure that there’s a smooth transition between the two providers.
Update Opt-in Process – If necessary, update your opt-in/opt-out process to ensure compliance with regulatory requirements when using the shortcode via the new provider. Obtain opt-in consent from subscribers to receive messages on the new platform.
Once this is all squared away and your shortcode is available in the new platform, you can proceed to set up your ‘from’ keywords and ‘to’ message. While migration of an existing code has its perks, the timeline is typically elongated compared to its counterpart.
New SMS code route — Team ‘New Friends’
So if downtime, or getting up and running is more your concern, a new code may be the best (friend) route.
All joking aside, when acquiring a new shortcode it’s essential to ensure compliance with regulations like the Telephone Consumer Protection Act (TCPA) and General Data Protection Regulation (GDPR) if applicable. And with that responsibility of re-opting everyone in here are some general best practices.
New SMS code best practices
Inform: Send out a clear and transparent communication informing subscribers about the change in shortcode and the reason behind it. Explain any benefits they might gain from the transition.
Highlight Benefits: Emphasize any advantages or improvements associated with the new shortcode, such as better service, more relevant content, or enhanced security measures.
Request Opt-In: Clearly ask subscribers to re-opt-in to continue receiving messages by sending a specific keyword or opting in through a designated method (e.g., texting a certain number, clicking a link, filling out a form).
Provide Instructions: Offer simple and straightforward instructions on how to opt in. This could include step-by-step guidelines via text, email, or on your website.
Assure Privacy and Security: Reassure subscribers that their privacy and security are a priority and that their information will be handled in accordance with relevant regulations.
Offer Incentives (Optional): Consider offering incentives or rewards for those who re-opt-in, such as discounts, exclusive content, or entry into a giveaway.
Set Deadline (if applicable): If there’s a deadline for re-opting in to ensure uninterrupted service, clearly communicate this to subscribers to create a sense of urgency.
Follow-Up: Send reminders to those who haven’t opted in yet, closer to the deadline if applicable, to ensure they don’t miss out on staying connected.
Respect Opt-Outs: Honor any opt-outs or preferences expressed by subscribers who choose not to re-opt-in and ensure they’re removed from the communication list associated with the old shortcode.
Track and Monitor: Monitor the opt-in process closely and track the success rate. Analyze any feedback received to improve future communication strategies.
Remember to maintain transparency throughout the process and make it as easy as possible for subscribers to re-opt-in to the new shortcode.
Evolving with your customers
In conclusion, as technology and consumer behaviors evolve, marketers must adapt their mobile program strategies to remain effective. SMS marketing, as a powerful tool, provides a direct and personal way to reach customers. By incorporating SMS into your overall communication strategy, you can enhance customer engagement, drive traffic to your website or app, and ultimately achieve your marketing goals.
A successful SMS marketing program requires careful planning, compliance with regulations, and a focus on delivering valuable and relevant content to your subscribers. By following best practices and continually optimizing your campaigns, you can leverage SMS to create a strong connection with your audience and drive business growth.
As part of the Winter ‘24 release, Account Engagement users gained the ability to copy assets to and from Account Engagement Sandboxes. This allows marketers to test automations and assets before pushing them to their Production Account Engagement org. It also allows them to pre-populate Sandboxes with assets so they don’t have to start from scratch.
The Account Engagement to Sandbox-to-Production Flow currently supports seven asset types:
Log back into the Sandbox org with your credentials. Doing so finalizes the authentication for the named credential.
Running the Flow
Before you run the flow, ensure the destination org has at least one Folder, Campaign, and Tracker Domain. If your destination does not have these assets, you will run into issues with the flow.
In your Source Org (Production), navigate to Setup > Flow
Open the Account Engagement Sandbox-Production Bulk Asset Copy Flow
Select Run
For “Named Credential for Salesforce API Access” select the Metadata API Access (step 4 above)
For “Named Credential for Account Engagement API Access” select the MCAE API Access (step 3 above)
Select Next
Select your direction of Copy
From a Sandbox to Production
From Production to a Sandbox
Select your Production and Sandbox Business Units
Select Next
Select assets to copy over, select Next
Confirm the Assets, select Next
Select your Folder, Campaign, and Tracker Domain for your new assets
Select Copy Assets
The final screen will provide details regarding the copied assets as well as let you know if there were any errors.
Considerations for Using the Sandbox to Production Flow
Since this is a new capability for Account Engagement, there are some details and settings that do not come over when copied. I thoroughly tested each asset type and below are the considerations that I found.
Tracker Domain
You must verify the Tracker Domain in your Sandbox. Otherwise, Email Templates, Custom Redirects, and Files will fail when the unverified Tracker Domain is selected. You can use the default tracker domain (go.pardot.com) but this will cause issues when copying over any Custom Redirects with a Vanity URL.
Email Templates
When copied, the email sender will be replaced by a General User with the email [email protected]. This applies even if you have a sender hierarchy specified using “Assigned User” and ‘Account Owner.”
Email Templates containing Dynamic Content will not copy over. This is because dynamic content is unique to the Business Unit. Even if you have the same Dynamic Content in each Business Unit, they will have a different asset ID and merge tag.
If the Email Template contains a merge tag for a field that is not in the destination org, the flow will fail. Ensure all needed fields are copied to the destination org before copying over any assets that use custom field merge tags.
Custom Redirects
A Custom Redirect’s Completion Action(s) will not copy over, however, the Google Analytics Parameter values do.
Files
During my testing, I tested PNG, JS, JPG, GIF, SVG, CSS, and PDF file types, and all successfully copied over!
Custom Fields
When you copy custom fields, only the following information comes over:
Field Name
Field API Name
Field Type
Engagement Programs
When you copy an Engagement Studio Program (ESP) only the ESP structure is copied. The Recipient List, Suppression lists, Send days/times, and “Allow prospects to enter more than once” settings do not come over and will need to be reconfigured.
The assets specified in a Trigger or Action node, such as email templates, landing pages, and forms, will need to be reselected in the new ESP. However, the number of wait days specified in the node will copy over.
If an Action node looks at a Prospect field (i.e. Prospect default field “Job Title” is not blank) and that field is in both Production and Sandbox, then the node will be copied to the new ESP with the field and value/settings specified. If the field does not exist in both Production and Sandbox, then the Action node will still be in the ESP but the field and value/settings will need to be reconfigured.
Layout Templates
If you use Dynamic Content within your Layout Templates, keep in mind that the Dynamic Content will not come over when the Layout Template is copied. You can copy the Dynamic Content over as a separate asset, but you will still need to edit the Layout Template in your destination Business Unit to make sure it has the correct Dynamic Content ID.
Form Handler
Ensure all the fields on the Form Handler exist in the environment you are copying to before copying the Form Handler.
If your Form Handler only uses Default Prospect Fields, then all of the fields will come over when the Form Handler is copied. However, if your Form Handler uses any Custom Prospect Fields, the custom field needs to be in the destination org before you copy the Form Handler.
When copied, the Success Location and Error Location details will copy over to the new asset. Completion Actions do not copy over.
Now it’s even easier to work with Account Engagement Sandboxes!
This new Flow is a huge step toward making Account Engagement Sandboxes user-friendly for testing and staging. What other capabilities would you like to see in this Flow? Let us know in the comments!