
It’s very common for sales and marketing teams to leverage title-based “personas” to influence their activities. Knowing who you are speaking to can radically alter the message content, type, and frequency needed to progress the buying process. In this post, we’ll address why and how to update marketing persona fields in Salesforce using Flow to assist sales and marketing.

Why Use Flow to Update Marketing Personas?
Let’s start with a very simple question. Why flow? The answer is really based on where your data lives and who needs access to it. I’ve used Engagement Studio in Account Engagement to update persona values in the past, but what happens if the prospect is not in Account Engagement? That’s right — no persona will be updated.
This solution accounts for the fact that all Salesforce data might not be syncing to Account Engagement (or Marketing Cloud Engagement) and that sales still needs persona values.
Step 1 – Understand Your Buyers and Influencers
Before we can classify records, we first need to understand who is buying from us, who is influential in the purchase decision, and who is not (this is just as important). This is best achieved by analyzing data and speaking to your sales team.
Analyze the data
Create reports based on closed won opportunities and look at the contact roles for job titles that stand out. Odds are there will be clear winners – titles that appear with greater frequency. It’s also likely that you’ll see a mix of the people who actually use your product and a level above them (based on the purchasing authority needed to complete the transaction).
Talk to sales
Chat with some of the top sales representatives to find out where they are having success. Are there certain leads that they cherry-pick based on job titles? Are there certain leads that they deprioritize based on the same criteria?
Step 2 – Group your data
Now that we know what titles we should be going after (and those that we should avoid), we need to group them into “Personas” (think of these as containers that hold records with similar/related titles). These are the values that we will be populating from our flow and will be used in future segmentation.
It’s important to create values for those that you want to target and those that you do not. An exclusion persona can be just as valuable as a target persona.
Target Personas
Records that are buying from you or are key influencers in the purchase process.
Exclusion Personas
Records that are in your system that do not buy from you and should not be included in campaigns.
- Examples could include: Marketing, Sales, Students, and Human Resources to name a few.
Once you have your target and exclusion persona values defined, create custom “Persona” fields (picklist) on the lead and contact objects. I like using global picklists when creating picklists with the same values between objects. Global picklists speed the setup, are great for ensuring consistency, and make maintenance a breeze (should more values need to be added in the future).
Don’t forget to:
- Use the same API name on both objects when creating custom fields (this is critical if you want to map the fields back to Account Engagement).
- Map the lead field to the contact field on conversion.
Example: Global Picklist Value Set
Step 3 – Determine Keywords
Now that we know what titles we should be going after (and those that we should avoid), and we’ve defined the groups that we would like to use for categorization, we need to identify keywords that can be used to query the records (actually – we’ll be using them in formulas). It would be great if titles were standardized, but they are not. Based on this, we are going to look for common factors.
Example: Marketing
Here are some common marketing titles. It would be great if “marketing” was included in all of them, but it’s not. Therefore, we’re going to use keywords like: marketing, brand manager, campaign, content, media relations, product research, SEM, and SEO in our formula to make sure that we properly tag our records.
- Brand manager
- Campaign manager
- Channel marketing director
- Chief marketing officer
- Content marketing manager
- Content specialist
- Digital marketing manager
- Director of email marketing
- Internet marketing specialist
- Media relations coordinator
- Product research analyst
- SEM manager
- SEO specialist
- Web marketing manager
Step 4 – Create the Flow (In Sandbox)
We’re going to use a record-triggered flow to update our persona values. The flow will automatically update the persona value when the title field is updated. Since contacts and leads are distinct objects, a flow will need to be created for each object.
Here’s an example of what a very basic flow would look like. This flow is just updating the value to be Marketing, Human Resources, or Other. A full version of this flow would contain many more paths. 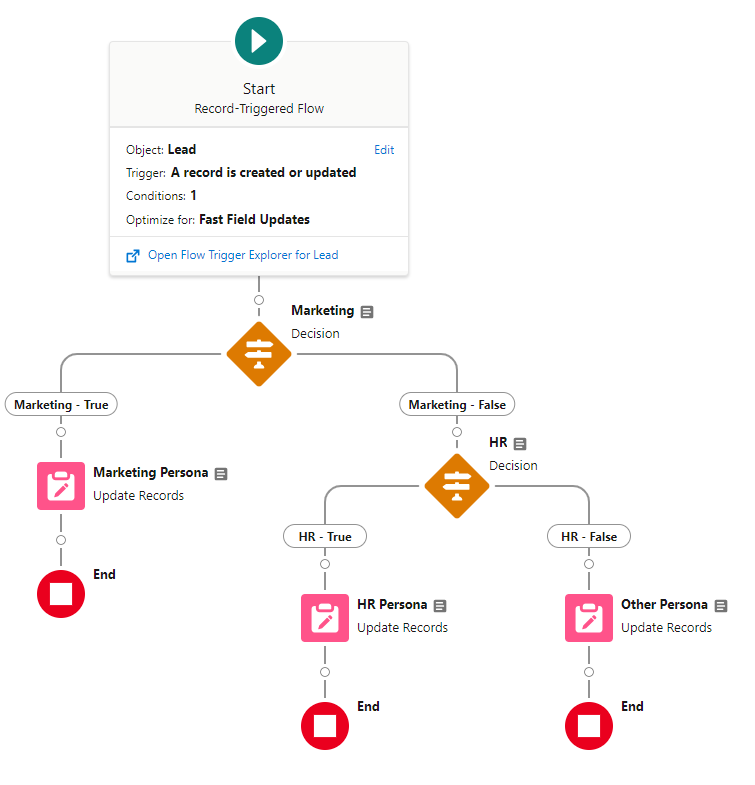
Configure Start
This flow is based on the lead object and is triggered when a record is created or updated. Since we don’t want to trigger the flow whenever a lead is updated, we’re using a formula to set the entry conditions. We want the flow to run only when new leads are created (and the title is not blank) or the title field of existing leads is updated to a non-blank value.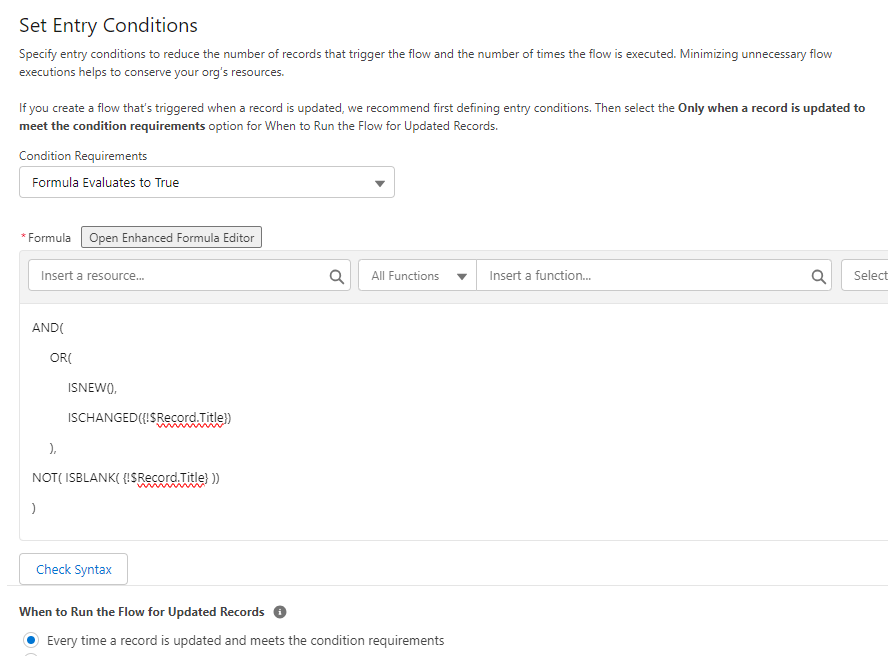
Finally, the flow will be optimized for Fast Field Updates, since we are updating fields on the same object.
Create Persona Formulas
This is probably the hardest part of this process. We are going to need to create formulas for each of our persona groups using the keywords that we’ve already defined. It’s important to note that formulas are case-sensitive by default. This is good in some cases but could cause records to be missed in other situations. Fortunately, we can address this as well.
Sample Formula 1
This formula selects the marketing keywords that we identified, but it’s case-sensitive. It would evaluate “True” for a lead with the title “digital marketing manager”, but would not for the title “Digital Marketing Manager”.
OR(
/* Title contains any of these title strings */
CONTAINS({!$Record.Title}, “marketing”),
CONTAINS({!$Record.Title}, “brand manager”),
CONTAINS({!$Record.Title}, “campaign”),
CONTAINS({!$Record.Title}, “content”),
CONTAINS({!$Record.Title}, “Content marketing manager”),
CONTAINS({!$Record.Title}, “media relations”),
CONTAINS({!$Record.Title}, “product research”),
CONTAINS({!$Record.Title}, “SEM”),
CONTAINS({!$Record.Title}, “SEO”)
)
Sample Formula 2
This updated formula evaluates the same keywords that were identified but addresses the case sensitivity issue. Here, we’ve used a function to convert the titles to lowercase and then compared them to a lowercase value. This formula would evaluate “True” for the titles “digital marketing manager”, “Digital Marketing Manager”, or “DIGITAL MARKETING MANAGER”.
OR(
/* Title contains any of these title strings */
CONTAINS(LOWER({!$Record.Title}), “marketing”),
CONTAINS(LOWER({!$Record.Title}), “brand manager”),
CONTAINS(LOWER({!$Record.Title}), “campaign”),
CONTAINS(LOWER({!$Record.Title}), “content”),
CONTAINS(LOWER({!$Record.Title}), “content marketing manager”),
CONTAINS(LOWER({!$Record.Title}), “media relations”),
CONTAINS(LOWER({!$Record.Title}), “product research”),
CONTAINS(LOWER({!$Record.Title}), “sem”),
CONTAINS(LOWER({!$Record.Title}), “seo”)
)
Sample Formula 3
Sometimes, you are going to need a mix of case sensitivity and case insensitivity. As an example, we would not want to update any job title that contains “hr” to Human Resources. This could lead to a lot of false matches. In this case, only titles that contain “HR” in all capitals will evaluate “True”.
OR(
/* Title contains any of these title strings */
CONTAINS(LOWER({!$Record.Title}), “human resources”),
CONTAINS({!$Record.Title}, “HR”)
)
Sample Formula 4
There are also going to be times when you need to look for a specific value, like CEO, and also look for title strings. We can do that too!
OR(
/* Title is any of these values */
{!$Record.Title} = “CEO”,
/* Title contains any of these title strings */
CONTAINS(LOWER($Record.Title), “chief executive”),
CONTAINS(LOWER($Record.Title), “president”)
)
As you can see, there’s a fair bit of work involved in creating and testing the formulas. That’s why working in a sandbox is critical. If you can get all the formulas to update all the values exactly as you would like on the first try, I encourage you to check out our careers page!
Configure Flow Elements
Each path includes a Decision and an Update Records element (learn more about Flow Elements). We’ll walk through the marketing paths and the same logic can be applied to additional paths. The only difference is that the “No” outcome for the final decision should update the persona value to “Other”. We want to add a value to leads that don’t match any of our formulas for two reasons.
- We want to verify that they were processed by the flow.
- We want to be able to identify the leads that were not matched by our formulas so we can evaluate and improve. This is VERY important.
Decision Element
The element is pretty straightforward. The “True” outcome looks for leads where the marketing formula evaluates to “True”. Leads that do not evaluate true progress down the “False” outcome and move to the next decision element.

Update Records
Leads that match the “True” outcome conditions then proceed to the Update Records element. This is where the magic happens and the record is updated in Salesforce.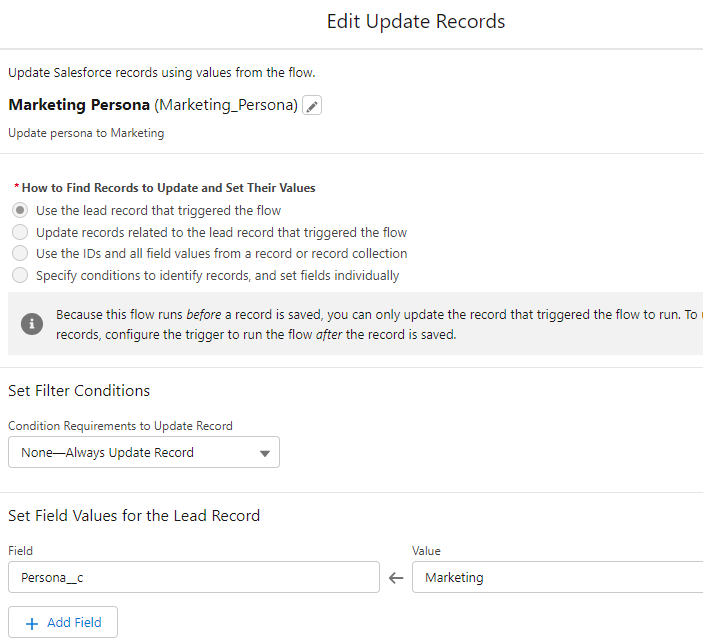
Debug
The final step before activating your flow is to do some debugging. Test by updating the titles of a few leads to make sure that they progress down the correct path, Be sure to vary the case of the titles to make sure that upper, lower, and mixed cases work as expected.
Step 5 – Rinse and Repeat
Once deployed into production, your flow is not going to be perfect. There are going to be some records that are classified as “Other” that should fall into other categories. That’s OK!
The final step is to do regular reviews and updates of the records that have the “Other” persona. It’s possible that we missed a keyword on our first pass or that a new hot title has emerged. I compare this a lot to scores in Account Engagement. You don’t quit once you define your scoring model, you evaluate and refine it. The same process applies here.
Give it a Shot!
We’ve done a lot in a short post. I encourage you to give this a shot in your sandbox. You’ll be surprised by the number of records that you’ll be able to update and the value that it will bring to your sales and marketing teams. If you get stuck, let us know. That’s why we are here!
Shout out to Heather Rinke and Jason Ventura for their collaboration in building this process!

