The Salesforce Winter ‘25 release notes are out! Let’s dive into Winter ’25 highlights and what Account Engagement (f.k.a. Pardot) users can expect to see come October.
Back in 2021 we got the Email Uniqueness field that told us whether or not a Prospect’s email address was unique to the prospect. Although this field is super handy, you can’t export its data and it only tells you if there is a duplicate email somewhere in the system.
Now, All Account Engagement editions are getting bonafide duplicate management capabilities.
As part of the Winter ‘25 release, Account Engagement Optimizer will help users keep their database squeaky clean by enabling them to view and merge duplicate prospect records.
If you receive system notification emails from Account Engagement, for instance the Daily Prospect Activity report, then you know these emails typically include pi.pardot.com (a.k.a. Pardot Classic) links rather than the, now standard, Account Engagement Lightning App links.
Fortunately, with the Salesforce Winter ‘25 release, all orgs will be updated to have their Account Engagement system emails to use Lightning App links, directing users to the right app or prospect without having to log into pi.pardot.com.
Now the only link this update won’t fix is the “Account Engagement URL” field on Salesforce Leads and Contacts. This field will continue to have a pi.pardot.com link. However, you can create a Formula field on the Lead and Contact objects to display the Lightning link instead.
Making sure you update the section in red with your own Salesforce URL. While the Pardot Classic App will forever hold a piece of my heart. I’m excited to see this last remaining vestige of the Classic interface go away.
Account Engagement and Data Cloud’s integration continues to grow with each release. Orgs will now be able to connect form, landing page, and tracked website engagement data to Data Cloud for personalized marketing efforts, calculated insights, and improved segmentation.
Speaking of Data Cloud Segments, Account Engagement can now have 25 Data Cloud segments per business unit (an increase from 5)! Currently the segment increase only applies to Account Engagement users with Growth or Plus edition.
One of the worst feelings as an admin of any system is accidentally deleting something you shouldn’t have. Even worse is when it is a permanent deletion.
Thankfully, Salesforce is helping you avoid that feeling of dread and doom but allowing for these table actions to be paused or outright canceled. Deletion requests can be paused/canceled in the Table Action Manager found within Account Engagement Optimizer.
Get help understanding the Salesforce Winter ‘25 release and how it affects Account Engagement orgs
What questions do you have about the new features coming to Account Engagement? Let us know in the comments or reach out to the team at Sercante to start a conversation.
Product Note:Marketing Cloud Growth and Advanced are editions of Marketing Cloud Next and have also been referred to as Agentforce Marketing.
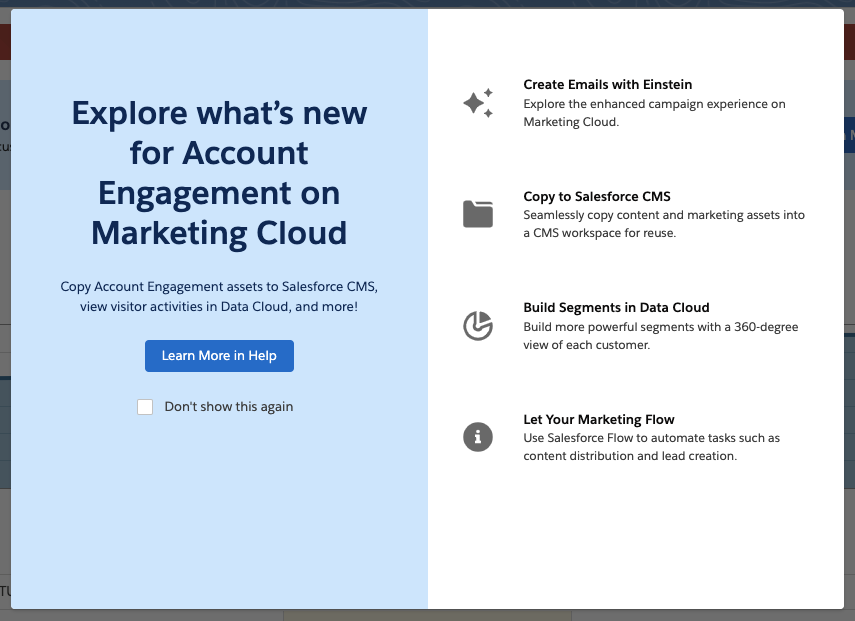
In February 2024, Salesforce released Marketing Cloud Growth Edition, its first marketing automation platform built fully on the Einstein 1 Platform (a.k.a. “On Core”). Marketing Cloud Growth Edition has been rapidly evolving and expanding the features of this new solution ever since, and Account Engagement (f.k.a. Pardot) users are about to get a taste of it.
Update! In the Dreamforce ‘24 Marketing Keynote, Salesforce announced that all Account Engagement orgs can get Marketing Cloud Growth provisioned at no additional cost. Previously, this offer was only for orgs with Growth Edition Account Engagement, but it now includes all orgs with a current edition of Account Engagement. A banner notifying all Account Engagement orgs that they can now get access to Marketing Cloud Growth Edition was published on October 15th. This blog has been updated to reflect the most recent news around this offering.
In this post, we’ll cover how to take advantage of the offer and use Marketing Cloud Growth alongside Account Engagement.
A Note on Naming
Now the naming of this new tool has caused quite a bit of confusion in the Salesforce community as it seems to change on a weekly basis. When launched, this new solution was referred to as “Marketing Cloud Growth Edition” or “Marketing Cloud on the Einstein 1 Platform”. During Dreamforce, Advanced Edition was announced, so this solution became “Marketing Cloud Growth or Advanced Edition” or “Marketing Cloud built on Data Cloud”. Finally, during the Winter ‘25 release, this tool started showing up in Salesforce documentation as just “Marketing Cloud” or the “Marketing Cloud App”, much to the chagrin of Marketing Cloud Engagement users. Now, if you are using Marketing Cloud Growth with Account Engagement, it is being referred to as “Account Engagement on Marketing Cloud” but also “Account Engagement powered by Data Cloud”.
Confused? Yes, me too. But all this is to say there is one new Salesforce Marketing tool that is built on core to bring users a truly unified marketing experience. For simplicity, we will continue to refer to this tool as “Marketing Cloud Growth” for this blog post.
What Account Engagement Users Need to Access Marketing Cloud Growth Edition
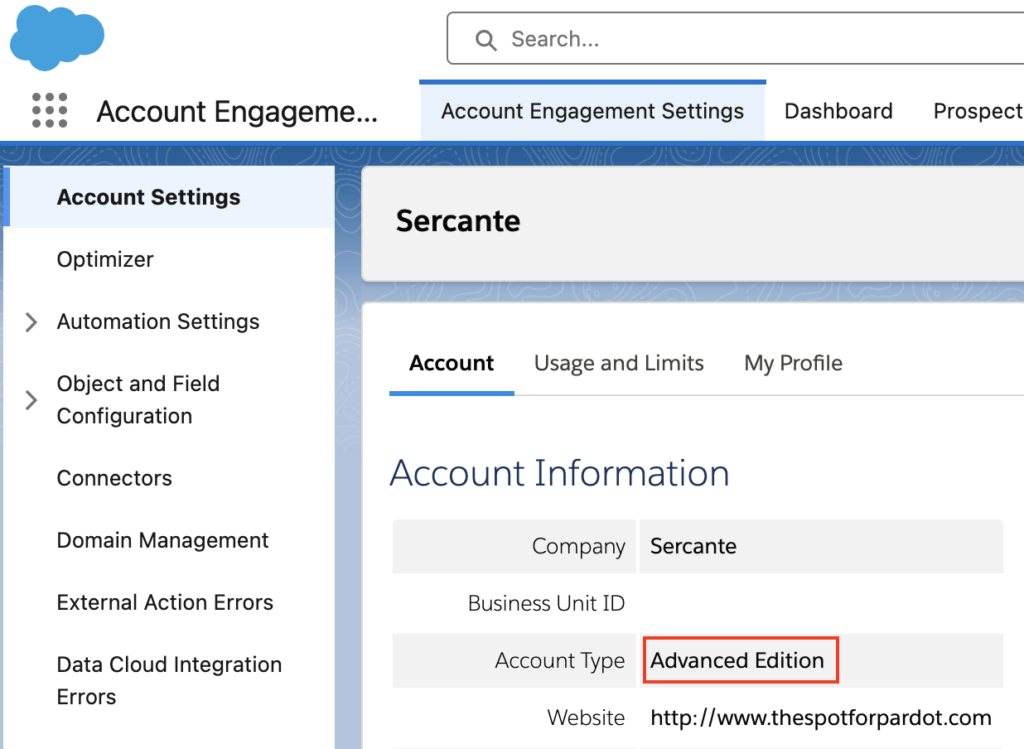
A current instance of a Marketing Cloud Account Engagement This includes Growth, Plus, Advanced, and Premium editions of Marketing Cloud Account Engagement (MCAE). Your MCAE Admins can view your Edition by going to the Account Engagement Settings tab.
Data Cloud Data Cloud not only unifies customer data for use within Marketing Cloud Growth, but also ensures data continuity between Account Engagement and Marketing Cloud Growth. Free Data Cloud is available for orgs with Enterprise and Unlimited Edition Salesforce customers. If you have a lower edition of Salesforce, check out more information on provisioning and access here.
If you are brand new to Data Cloud or don’t have a Data Cloud Architect at your disposal, don’t fret! Marketing Cloud Growth comes with Data Kits that help map your Marketing and CRM Data to Data Cloud. The free Data Cloud SKU + Marketing Cloud Growth’s out of the box data kits will cover everything most orgs need to get started, but if you’d like assistance with additional Data Cloud Data Streams or want to dive into more advanced Data Cloud use cases, we’re happy to help!
Data Cloud Credits
Marketing Cloud Growth uses Data Cloud’s credits to fuel its activities. So, although MCAE users will get Marketing Cloud Growth at no additional charge, orgs still need to purchase credits to fuel Marketing Cloud Growth. Think of it like you’re being given a car, but you still have to purchase the gas to make it run.
If you’re new to Data Cloud’s consumption model, our previous blog post and this Trailhead module will help give you an idea of how this works and the different types of credits available. If you’re using the Free Data Cloud SKU to get started, note that this does include some credits to fuel data ingestion and unification. However, orgs will need to reach out to their AE to purchase the credits that fuel sending emails, sending SMS, compiling Segments, and using Einstein.
You don’t necessarily have to purchase these credits before implementing Marketing Cloud Growth for testing purposes, but you may be limited in the features you can play around with without them.
Getting Started
Here are a few things to keep in mind as you start using Account Engagement and Marketing Cloud Growth side by side.
Understanding Consent and Subscriptions
Consent works a little differently between the two systems.
Account Engagement has a permission-based marketing policy, meaning that although there is no default “Opt-in” field, users must certify that they only contact prospects who have expressly consented to receive marketing communications.
In Marketing Cloud Growth Edition, consent is a bit more rigid. To send marketing communications, each prospect must have a Consent Record comprising of:
The Contact Point (email or phone number)
The Marketing Channel (Email, SMS, etc.)
The Communication Subscription (Webinars, Events, Product updates, etc.)
The Date and Time the prospect opted in
More considerations for Consent and Subscriptions are available in this Salesforce Help article.
Import Consent Data
Before you import consent data, make sure the contact point exists in Marketing Cloud Growth Edition. A consent import can update consent information for existing contact points, but it can’t create new leads or contacts or update other fields (at least as of the Winter ‘25 release).
First, export your list from Account Engagement:
In Account Engagement, navigate to Prospects > Segmentation > Segmentation Lists
Locate and open the preference list you would like to import into Growth
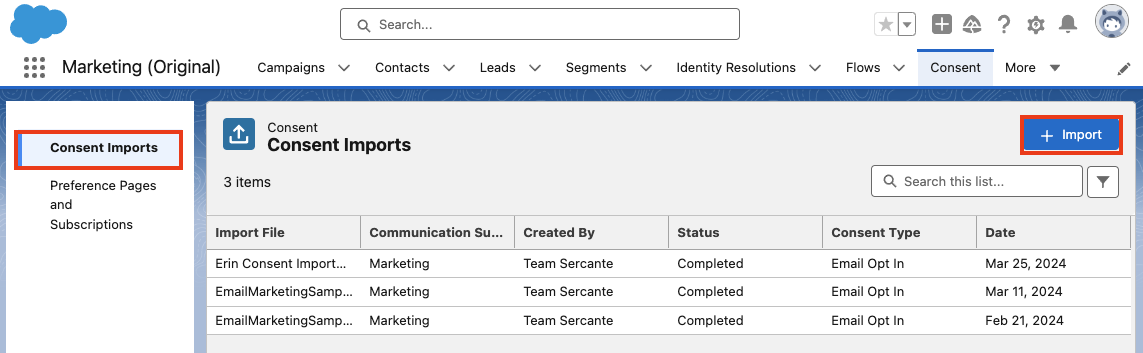
Within Marketing Cloud Growth, navigate to the Consent tab
Ensure you are on the Consent Imports tab, then select + Import
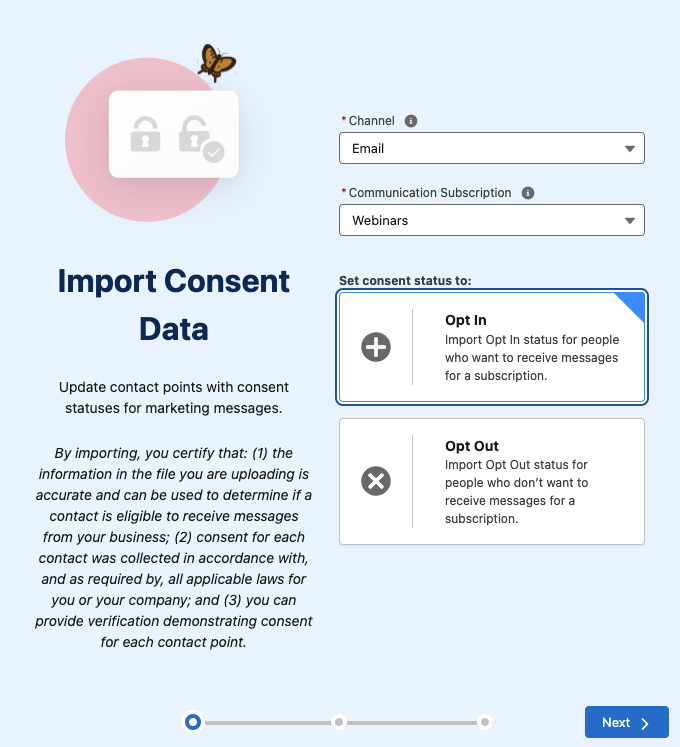
Select your Channel, Communication Subscription, and whether this list is opted in or opted out
Select Next
Upload your CSV, select Next
Review the import preview and select Import
Select Done
Send Account Engagement Images to CMS
Use images in both Account Engagement and Marketing Cloud Growth by enabling “Copy to CMS”.
In Salesforce, navigate to Marketing Setup > Copy to CMS
Use the dropdown menu next to your Account Engagement business unit to select Enable
Repeat for additional Account Engagement business units
This will create a CMS Workspace named, “Content Workspace for Marketing Cloud Account Engagement – Copied Content – [business unit name]”. To avoid issues, do not change the workspace name or remove the B2BMA Integration user as a contributor.
Copy Images from Account Engagement to the Growth Edition CMS Workspace
Next, you’ll need to copy the images from Account Engagement to your new CMS Workspace.
In Account Engagement, navigate to Content > Files
Use the checkboxes on the left-hand side to select the files you would like to move. Once selected, use the dropdown menu at the bottom of the table to select Copy to CMS
Select Go
Use the New Growth Edition Email Editing Experience
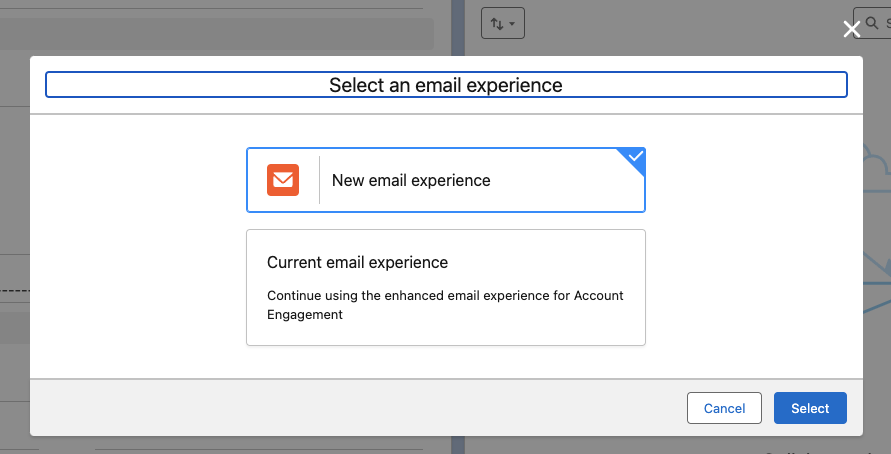
Now you can build emails that are available in both Account Engagement and Growth Edition. When creating or editing Email Content in the Lightning Email Builder, select New Email Experience to use Marketing Cloud Growth Edition’s editor.
Account Engagement Campaign Considerations
Account Engagement and Marketing Cloud Growth Edition cannot currently share campaigns, so you’ll want to have distinct naming conventions to easily identify which campaigns belong to each platform. You can also keep Marketing Cloud Growth’s campaigns from syncing to Account Engagement by creating a new campaign record type for Growth.
Read more about Campaigns for Marketing Cloud Growth in this help article.
Using Account Engagement & Growth Edition Together
Current users of Account Engagement probably have long-standing engagement studio programs that are set up to run on a recurring basis. Account Engagement thrives in this situation and provides flexibility for enrolling prospects and ensuring that the marketing journey you want to happen actually happens. Let’s look at instances where you can use this existing functionality with all the bells and whistles Growth offers.
Use cases for combining the two platforms
SMS functionality. In Account Engagement, You may have a pre-existing engagement studio program set up for every event your company puts on, thanking attendees for joining and sharing pertinent details. If you want to send a reminder text message to people who have registered for the event, you can now take advantage of native Marketing Cloud Growth functionality to do so.
Using cross-object personalization. Say you have a recurring monthly email sent out to your customers letting them know their account status, YTD savings with your company, and other information pertinent to the customer on an ongoing basis. If this information is stored within custom objects, it’s difficult to populate an Account Engagement email with those details. With Marketing Cloud Growth Edition, users can create Data Graphs for cross-object personalization, allowing marketers to personalize emails with data from any object.
Custom processes for post-form-fill actions. Another great example of how you can use Marketing Cloud Growth Edition alongside Account Engagement is when you want to implement a custom process when someone submits a form.
Since Growth uses Flow for automation, the actions taken after a form is completed can be customized to each unique need. For instance, you can standardize field values or send data to several objects within Salesforce before the Lead/Contact record is updated.
There you have it
You are now ready to start experiencing Marketing Cloud Growth Edition. The future of Salesforce marketing is bright and evolving every day.
Stay tuned for Growth’s next iterations. In the meantime, use these resources to get started:
Marketers can now send Operational (aka Transactional) emails via Engagement Studio Programs! This is a game changer for any orgs that need to send renewal reminders, shipping notices, invoices etc. through Account Engagement. To use this new feature, ensure Operational emails are enabled in your Account Engagement Business Unit and make sure you’re familiar with what does, and does not, count as Operational.
Salesforce CMS workspaces rolled out for Account Engagement users with the Lightning Builders. However, if you are using both the Classic and Lightning builders, you’ve likely struggled with your content being in two places. With this new feature, you can easily copy images from your Account Engagement Business Unit over to CMS to help ensure everything is in one easily accessible place.
If you’re not yet using the Account Engagement Optimizer, I highly recommend checking it out. This feature provides critical insights into the performance of your Account Engagement Business Unit and highlights actionable measures to keep your org running smoothly. With the Summer ‘24 release, a new messaging section is being added to Optimizer to make it even easier to view alerts and feature recommendations.
Product Note:Marketing Cloud Growth and Advanced are editions of Marketing Cloud Next and have also been referred to as Agentforce Marketing.
Even though Marketing Cloud Growth Edition just launched in February, it’s already receiving a ton of new features as part of the Salesforce Summer ‘24 release! I feel like this will be par for the course for Growth Edition and I personally cannot wait to see what this application will be able to do by Dreamforce. Below are just a few of the highlights coming to Growth Edition in the upcoming release.
Flow functionality for Growth Edition is, well, growing as part of the Summer ‘24 release. Users can now create Marketing Consent records directly from form fills, set criteria for when records should exit a Flow, and check for and manage duplicates. Data Graph attributes can also be pulled in, allowing Marketers to work with related objects within their Flow logic.
Personalize your marketing assets with data from related objects! If you’ve ever wanted to pull in a Record’s Account Owner’s information or their most recent Opportunity details to personalize your marketing asset, you’ve likely experienced how this is a more complex ask than most people think. However, with the help of Data Cloud Data Graphs, Marketers can now add other objects and fields as related attributes and then use those attributes as merge fields within the Flow.
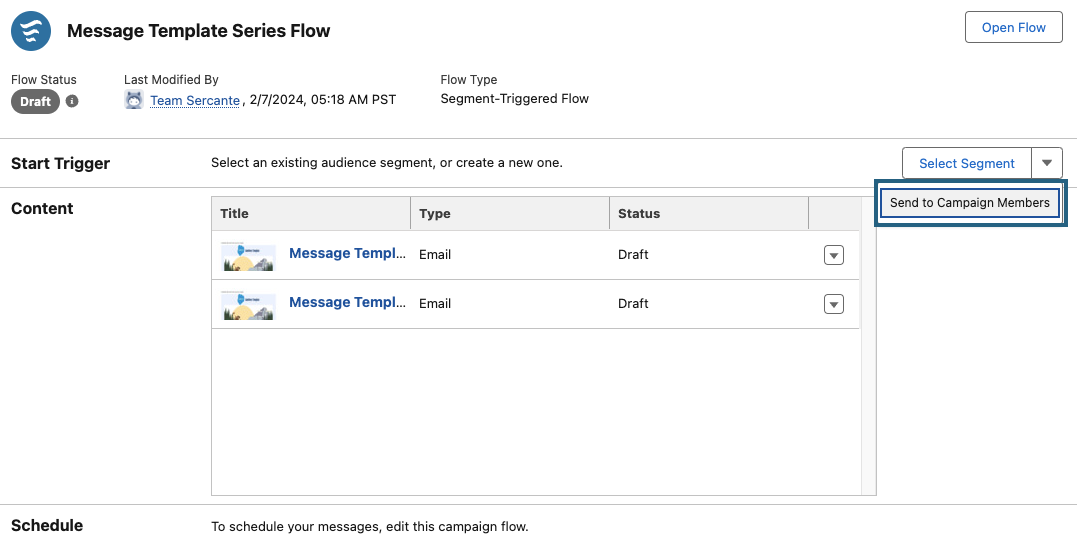
Campaigns continue to be a central part of any Marketing initiative. With the Summer ‘24 release, Growth Edition is getting a few new functionalities that will make working with Campaigns even more seamless. Users can now add templated flows to campaigns, easily preview and test campaign content, and quickly send communications to Campaign members.
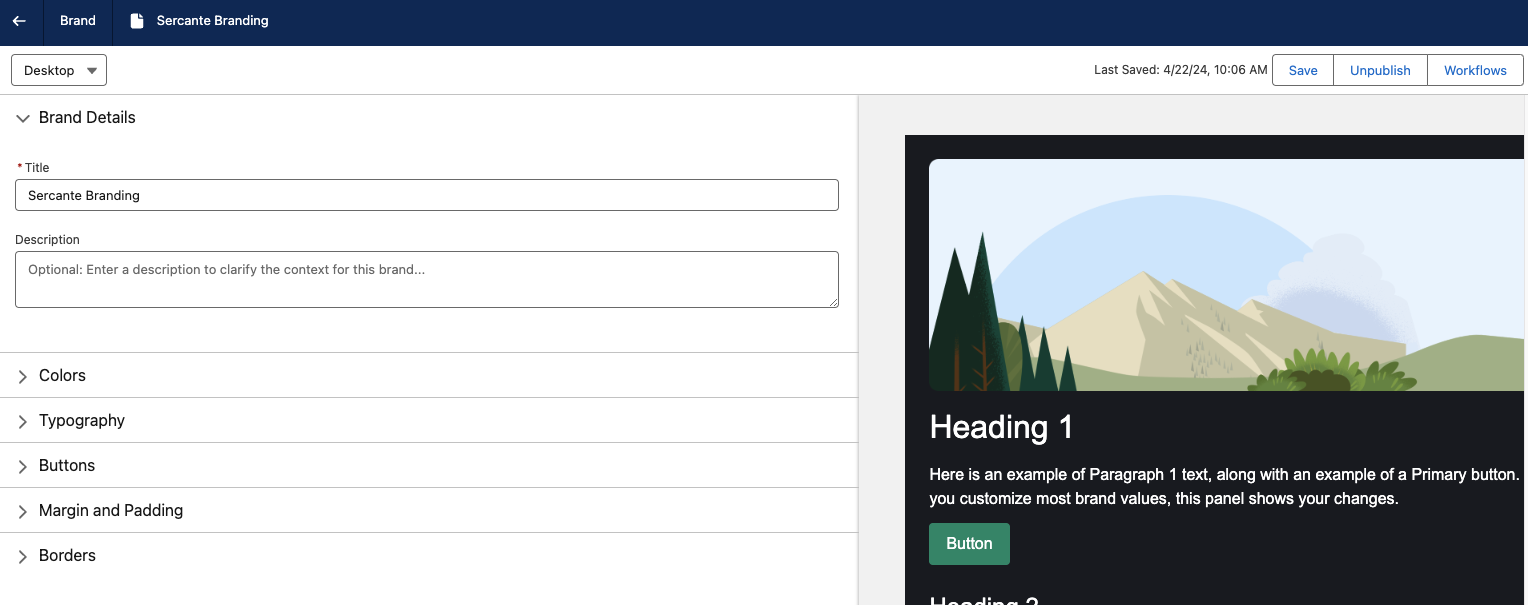
One of my favorite features of Growth Edition, Brand Guidelines, is moving from Beta to Generally Available. With this move, Marketers can now specify new aspects of their branding, such as spacing, borders, and text formatting. Marketers can also view how their branding will look within assets while configuring their guidelines. Separate Brand Guidelines can also be created for Desktop and Mobile versions of Landing Pages to ensure a great viewing experience no matter the device.
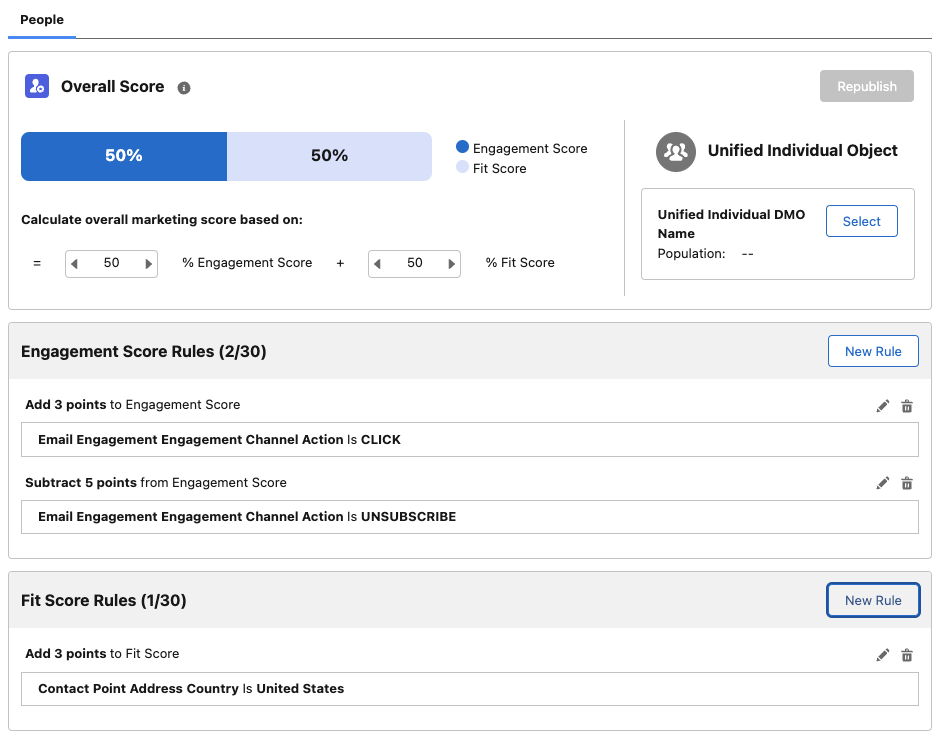
Engagement Scoring in Growth Edition can now be customized to fit your company’s needs. The updated scoring functionality allows you to add your own Engagement Score Rules (up to 30) and add or subtract points when a record meets a rule. Fit Scoring is also being introduced as part of this update. Fit Scoring is similar to Account Engagement Grading, whereas its goal is to tell Marketing and Sales how closely the individual and their company matches the ideal client persona. Fit Scoring rules can be added for the individual and/or their Account.
Again, this is just some of Marketing Cloud Growth Edition’s Summer ‘24 features. If you’re interested in using Growth Edition, I highly recommend reading through the full notes to see the long list of features coming your way!
As part of the Winter ‘24 release, Account Engagement users gained the ability to copy assets to and from Account Engagement Sandboxes. This allows marketers to test automations and assets before pushing them to their Production Account Engagement org. It also allows them to pre-populate Sandboxes with assets so they don’t have to start from scratch.
The Account Engagement to Sandbox-to-Production Flow currently supports seven asset types:
Log back into the Sandbox org with your credentials. Doing so finalizes the authentication for the named credential.
Running the Flow
Before you run the flow, ensure the destination org has at least one Folder, Campaign, and Tracker Domain. If your destination does not have these assets, you will run into issues with the flow.
In your Source Org (Production), navigate to Setup > Flow
Open the Account Engagement Sandbox-Production Bulk Asset Copy Flow
Select Run
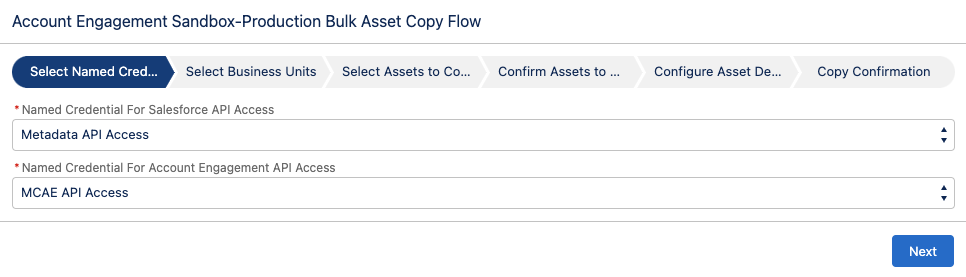
For “Named Credential for Salesforce API Access” select the Metadata API Access (step 4 above)
For “Named Credential for Account Engagement API Access” select the MCAE API Access (step 3 above)
Select Next
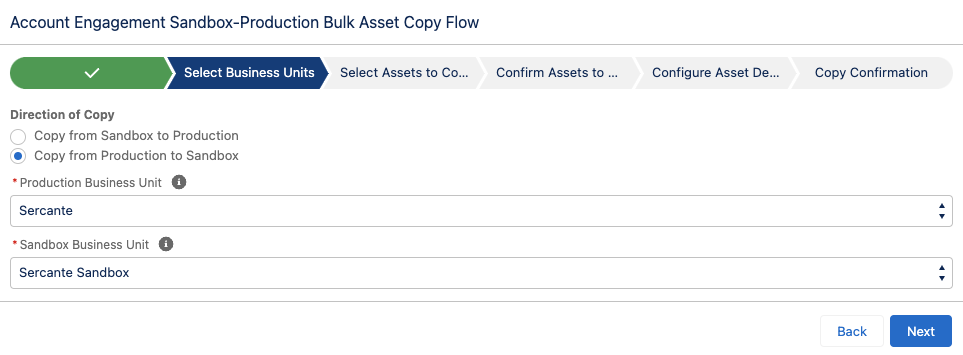
Select your direction of Copy
From a Sandbox to Production
From Production to a Sandbox
Select your Production and Sandbox Business Units
Select Next
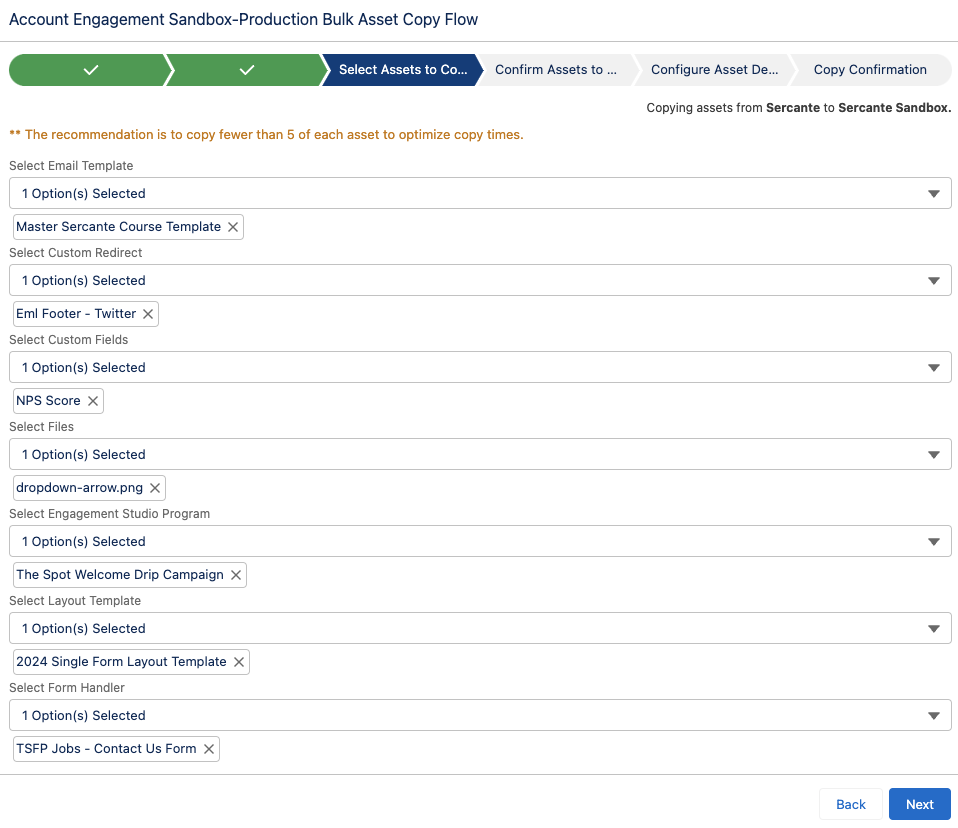
Select assets to copy over, select Next
Confirm the Assets, select Next
Select your Folder, Campaign, and Tracker Domain for your new assets
Select Copy Assets
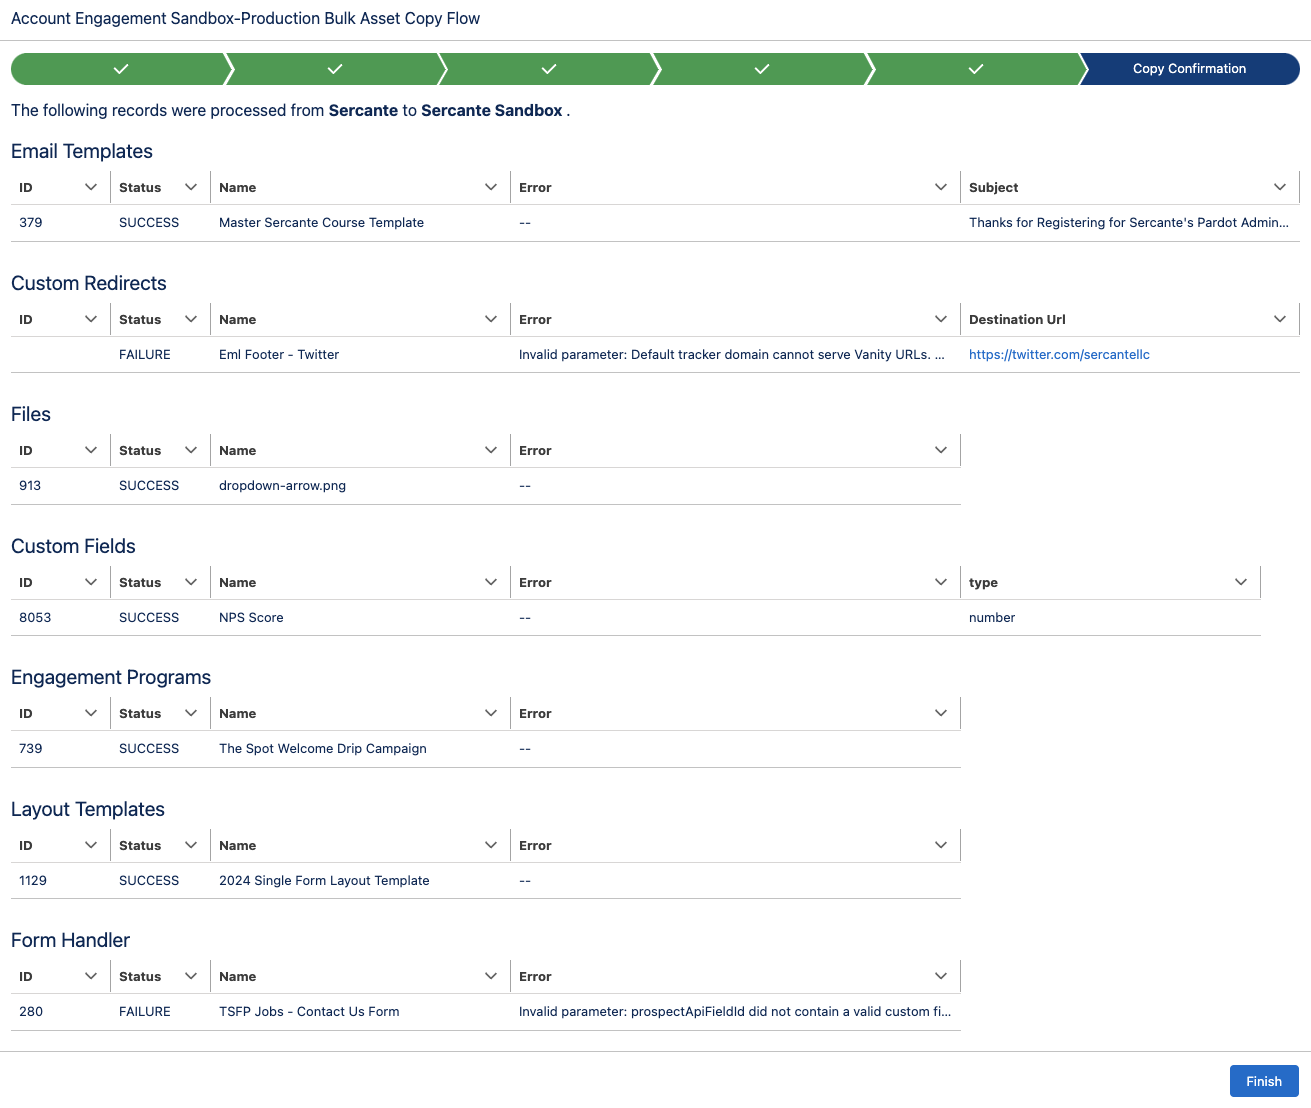
The final screen will provide details regarding the copied assets as well as let you know if there were any errors.
Considerations for Using the Sandbox to Production Flow
Since this is a new capability for Account Engagement, there are some details and settings that do not come over when copied. I thoroughly tested each asset type and below are the considerations that I found.
Tracker Domain
You must verify the Tracker Domain in your Sandbox. Otherwise, Email Templates, Custom Redirects, and Files will fail when the unverified Tracker Domain is selected. You can use the default tracker domain (go.pardot.com) but this will cause issues when copying over any Custom Redirects with a Vanity URL.
Email Templates
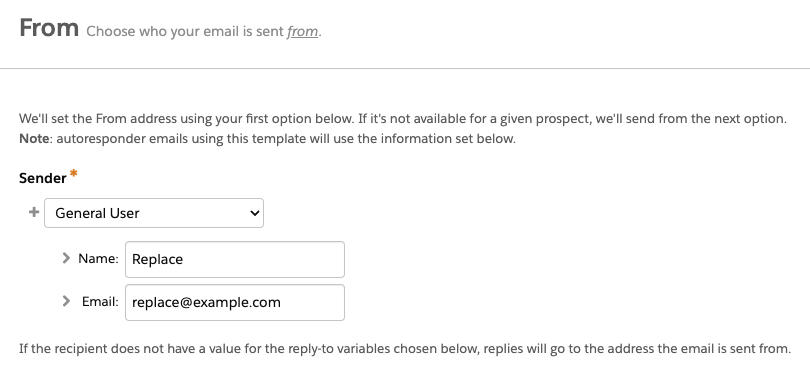
When copied, the email sender will be replaced by a General User with the email [email protected]. This applies even if you have a sender hierarchy specified using “Assigned User” and ‘Account Owner.”
Email Templates containing Dynamic Content will not copy over. This is because dynamic content is unique to the Business Unit. Even if you have the same Dynamic Content in each Business Unit, they will have a different asset ID and merge tag.
If the Email Template contains a merge tag for a field that is not in the destination org, the flow will fail. Ensure all needed fields are copied to the destination org before copying over any assets that use custom field merge tags.
Custom Redirects
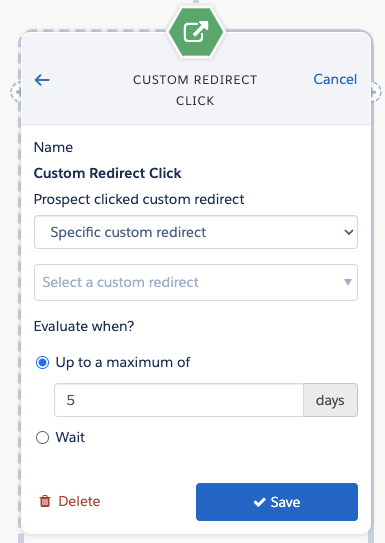
A Custom Redirect’s Completion Action(s) will not copy over, however, the Google Analytics Parameter values do.
Files
During my testing, I tested PNG, JS, JPG, GIF, SVG, CSS, and PDF file types, and all successfully copied over!
Custom Fields
When you copy custom fields, only the following information comes over:
Field Name
Field API Name
Field Type
Engagement Programs
When you copy an Engagement Studio Program (ESP) only the ESP structure is copied. The Recipient List, Suppression lists, Send days/times, and “Allow prospects to enter more than once” settings do not come over and will need to be reconfigured.
The assets specified in a Trigger or Action node, such as email templates, landing pages, and forms, will need to be reselected in the new ESP. However, the number of wait days specified in the node will copy over.
If an Action node looks at a Prospect field (i.e. Prospect default field “Job Title” is not blank) and that field is in both Production and Sandbox, then the node will be copied to the new ESP with the field and value/settings specified. If the field does not exist in both Production and Sandbox, then the Action node will still be in the ESP but the field and value/settings will need to be reconfigured.
Layout Templates
If you use Dynamic Content within your Layout Templates, keep in mind that the Dynamic Content will not come over when the Layout Template is copied. You can copy the Dynamic Content over as a separate asset, but you will still need to edit the Layout Template in your destination Business Unit to make sure it has the correct Dynamic Content ID.
Form Handler
Ensure all the fields on the Form Handler exist in the environment you are copying to before copying the Form Handler.
If your Form Handler only uses Default Prospect Fields, then all of the fields will come over when the Form Handler is copied. However, if your Form Handler uses any Custom Prospect Fields, the custom field needs to be in the destination org before you copy the Form Handler.
When copied, the Success Location and Error Location details will copy over to the new asset. Completion Actions do not copy over.
Now it’s even easier to work with Account Engagement Sandboxes!
This new Flow is a huge step toward making Account Engagement Sandboxes user-friendly for testing and staging. What other capabilities would you like to see in this Flow? Let us know in the comments!
Engagement Studio Programs (ESPs) are key for nurturing prospects until they are ready to send over to your sales team. But have you ever thought about A/B testing in ESPs?
ESPs allow you to automatically send your cold prospects awareness content and consistently stay top of mind so they can gradually warm up to a sales-ready stage. Although ESPs can be used for everything from basic email sends to complex process automations, one feature it lacks is native functionality for A/B testing. The feature exists natively (and wonderfully) for list emails, but in the realm of automated emails and ESPs, this is something marketers are chomping at the bit for.
Let’s dig into some of the creative workarounds that make A/B testing possible in ESPs as well as the pros and cons of each option.
How does native A/B Testing work?
Within the native functionality of list emails, A/B testing is very user-friendly. You can:
Create and edit two versions of your email (Version A & B) via the WYSIWYG editor or by editing the HTML
Specify if the email versions should be measured by email opens or email clicks (we prefer clicks)
Determine the length of the A/B testing period (1 hour to 30 days)
Determine the percentage of your audience that is tested
Automating the A/B testing process
The beauty of A/B testing with list emails is that so much of the process is automated.
Once the criteria have been set, Account Engagement automatically and randomly splits the test recipients from the intended recipient lists, sends the email variations to the test group, and, once a winner has been selected, automatically sends the winning version of the email to the remaining recipients on the list.
This native functionality allows marketers to fine-tune their marketing content by testing which subject lines, CTAs, and even images best resonate with their target audience.
A/B Testing in an ESP
To A/B Test in an ESP, you have a few options:
Split your recipient list before starting the ESP
Split recipients by last name
Split recipient by a random number from Salesforce
Split recipient lists using Prospect Updater
Using Native Split List Functionality
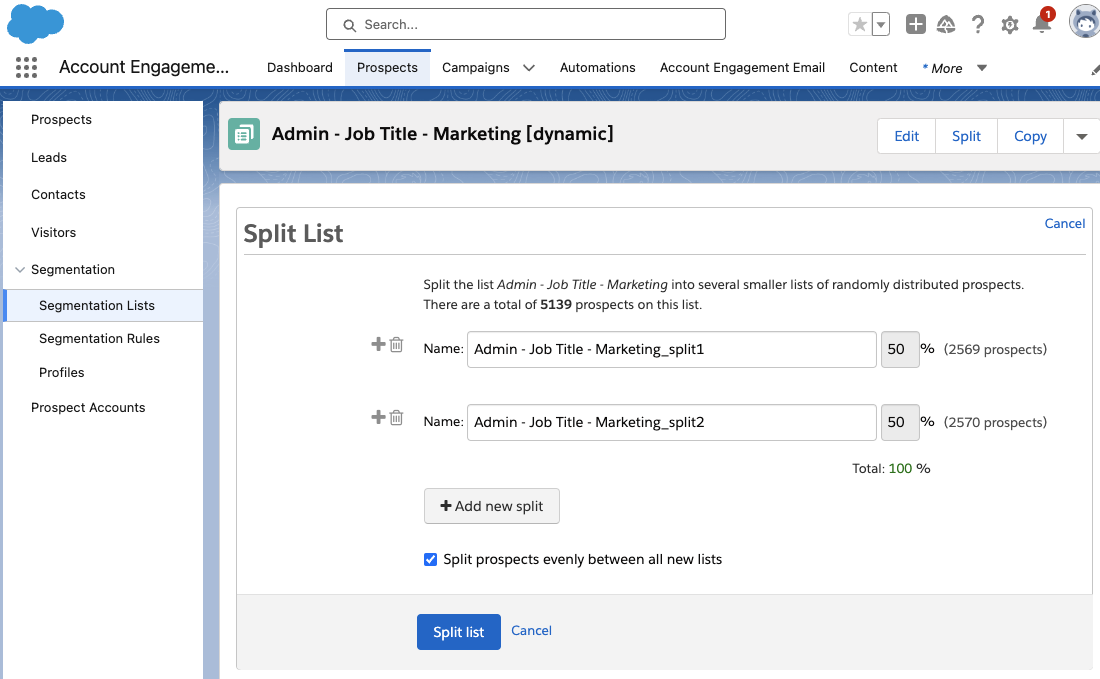
All Account Engagement Static and Dynamic lists can be split into smaller lists. While viewing your list, the split option will be available in the top right-hand corner. This allows you to split lists evenly, or specify the percentage on each list.
It’s important to remember that when splitting a dynamic list, the resulting lists will be static.
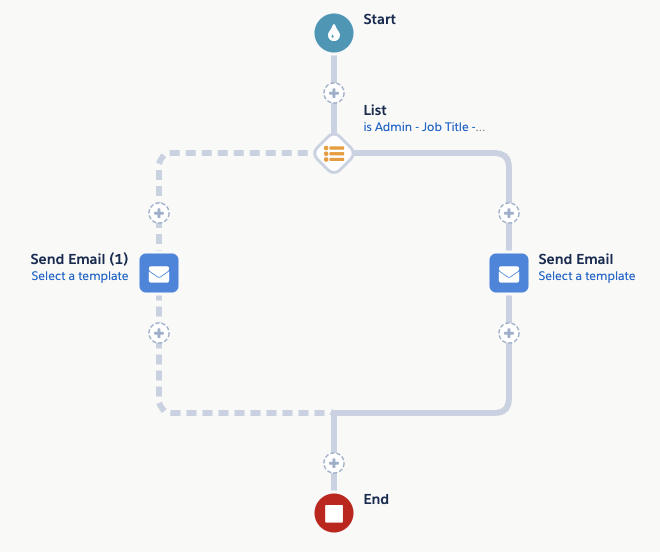
When using this option in an ESP, add an Action node before your email send that checks if the recipient is on split list 1. If they are a member of this list, they receive version A of your email. If they are not, they receive version B.
This option works best when your ESP has a static recipient list that you are not adding to later, for example, an event follow-up nurture. If you intend on gradually adding more prospects to this ESP, there isn’t a way to easily and automatically split the new prospects between the two lists.
Splitting by Last Name
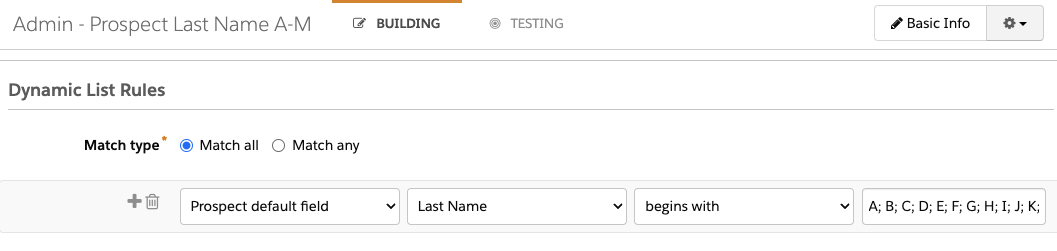
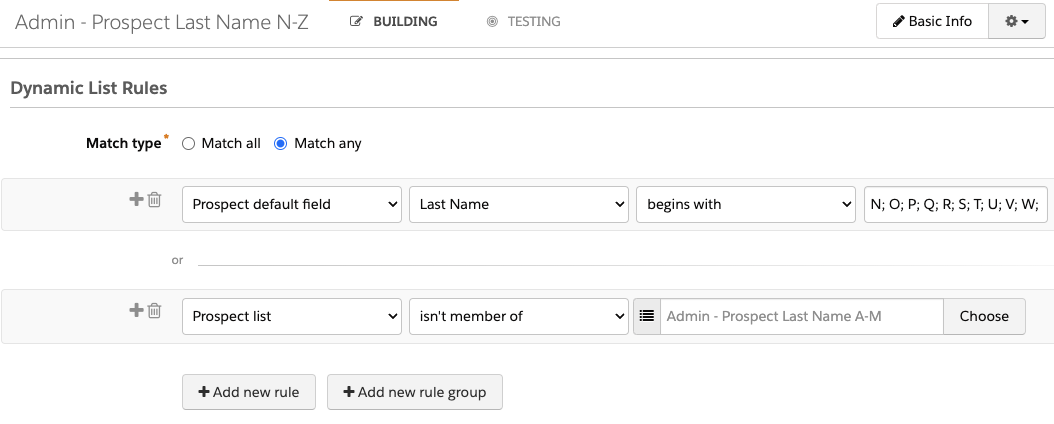
Another strategy is to split the recipients by last name. This allows you to split recipients with dynamic lists so you can continually add new recipients to the ESP. To do so, you’ll need two dynamic lists.
Your first list will capture prospects with last names starting with A-M:
Your second list will capture any prospects with last names beginning with N-Z, as well as any prospects with last names that start with characters, non-English letters, or numbers.
Finally, use these lists to split ESP recipients between your email variations.
Things to keep in mind
The drawback to this solution is that splitting by last name is not likely to evenly split your recipients. S, B, H, M, and C are the most common initials for last names, so if you split your recipients by “last name begins with A-M” and “last name begins with N-Z”, the “A-M” list is likely to be larger and can skew your data.
Generate a Random Number in Salesforce
Another strategy for randomly splitting your recipient list is by using Salesforce’s Auto Number functionality. This allows you to auto-generate a random number for each Lead or Contact and push this data down to Account Engagement.
In Salesforce Setup, select Object Manager then Lead
Select Fields & Relationships
Select New
Select Auto Number then Next
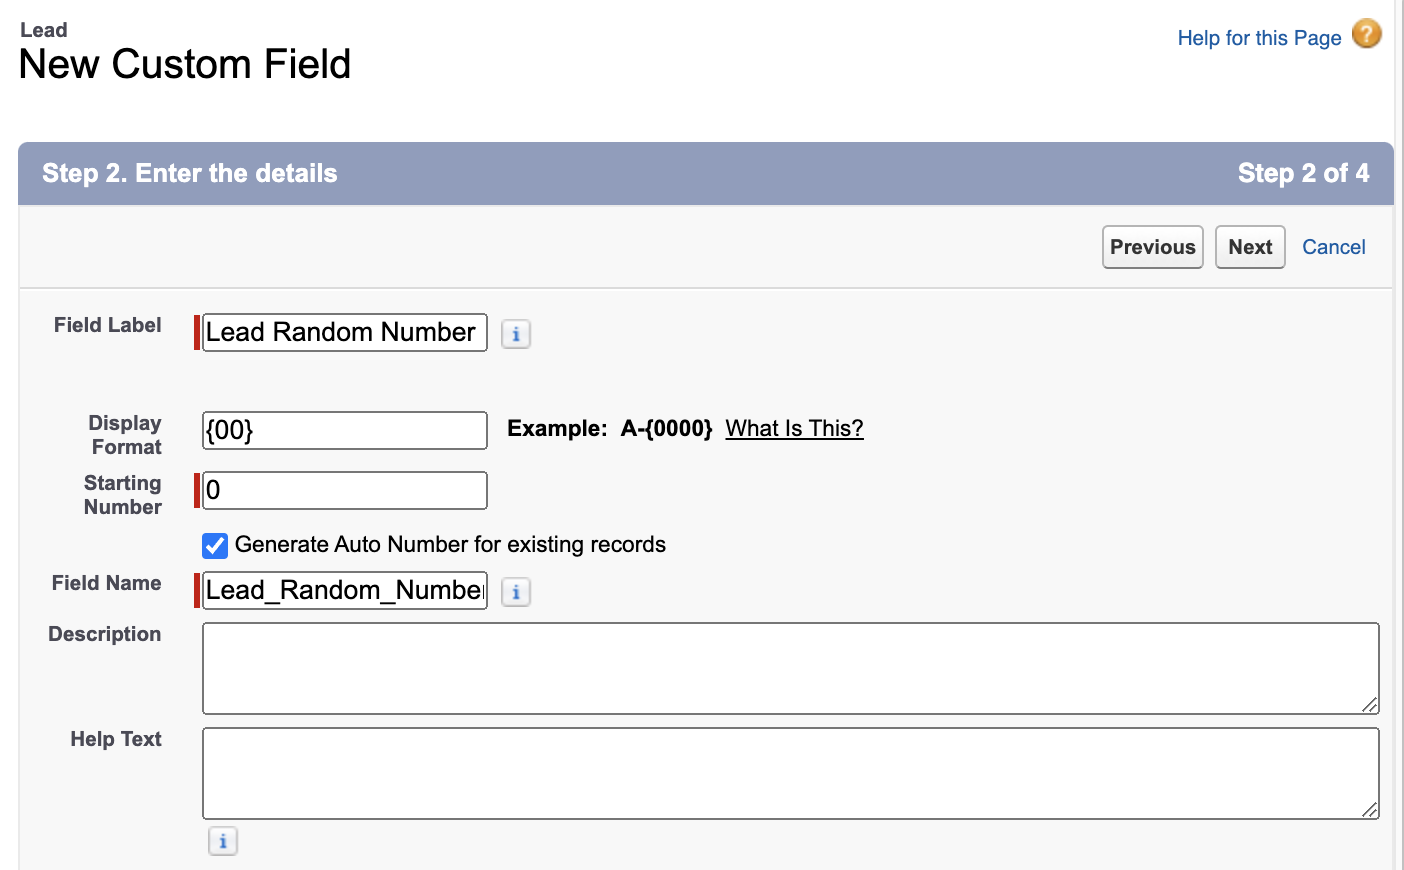
Enter the following details
Field Label: Lead Random Number
Display Format: {00}
Starting Number: 0
Generate Auto Number for existing records: Selected
Select Next
Select which profiles have access to view this field.
Select Next
Select any Lead pages where this field should appear. I recommend leaving this field off your page layouts. Select Save.
Next, create a Formula field. While still in the Fields & Relationships tab of the Lead object, select New
Select Formula, then Next
Enter the following details
Field Label: Email Random Number
Formula Return Type: Number
Options – Decimal Places: 0
Select Next
Enter the formula MOD(VALUE({! Lead_Random_Number__c}) ,9)
Select Next
Select which profiles have access to view this field. Ensure the B2BMA Integration User profile, or your connector user’s profile, has access so Account Engagement can map to this field.
Select Next
Select any Lead pages where this field should appear. I recommend leaving this field off your page layouts. Select Save.
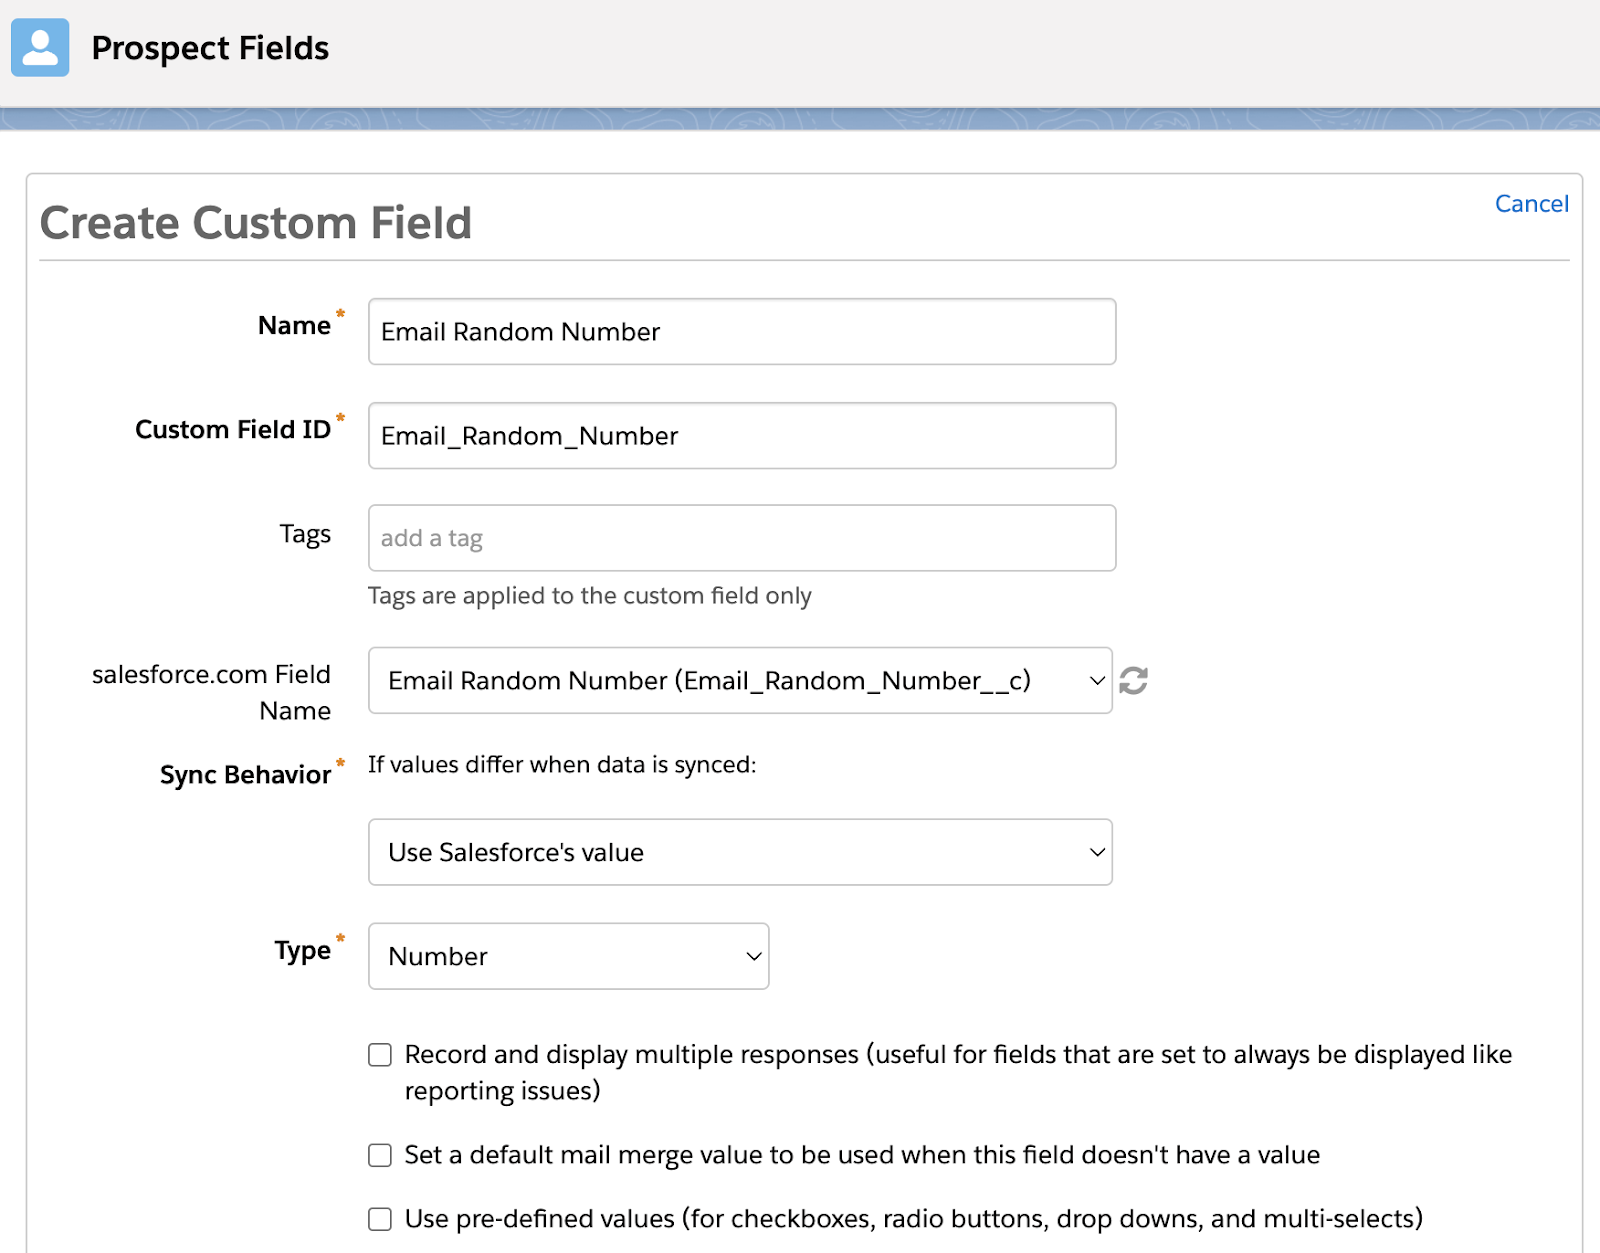
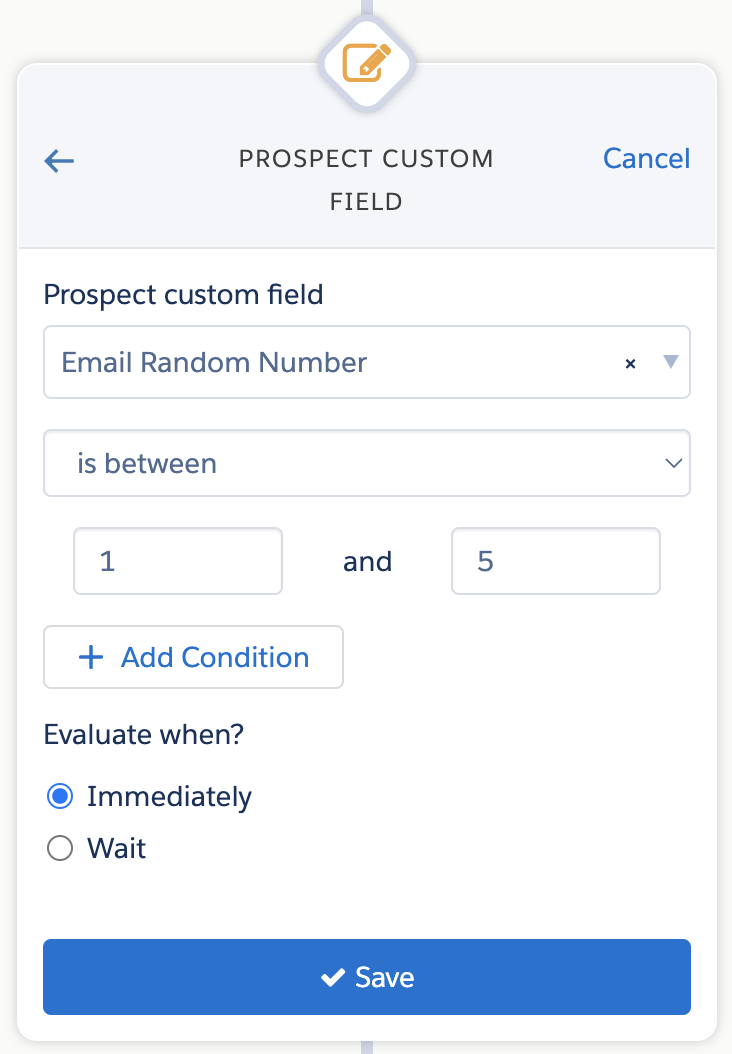
This formula field will auto-generate a random number between 1-9 for each Lead. Optionally, repeat the steps above for the Contact object. Finally, map the “Email Random Number” field to Account Engagement so this new field can be used to randomly split ESP recipients for an A/B Test.
Now, the only downside of this approach is that all your Account Engagement prospects must be synced to Salesforce before they will get an Email Random Number value. If you regularly nurture prospects in Account Engagement before syncing them over to Salesforce, you could use a combination of the Random Number and Last Name methods, or you can move to our last option.
Use Prospect Updater
Sercante’s Prospect Updater is a Swiss army knife for advanced data updates, cleansing, and manipulation within Account Engagement. This solution allows you to work with your prospect data in more streamlined ways and enables you to create a truly random recipient list split without your data being in Salesforce.
With Prospect Updater, you can use a RANDBETWEEN function to auto-generate a random number and stamp the number on new prospect records within minutes of them being added to Account Engagement. Then, use an Action node in an ESP to split your prospects into your A/B test groups.
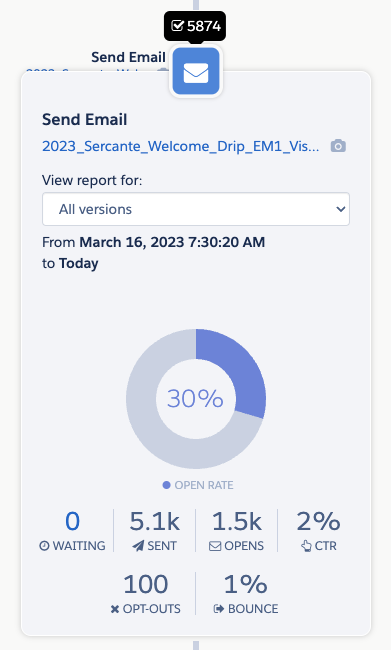
After you’ve selected your method of A/B testing and let your ESP run, it’s time to choose a winner and, optionally, consolidate your ESP down to 1 email version. The best way to compare the data between your A and B email versions is by using the ESP reporting tooltips. While on the Reporting tab of your ESP, select the email send node to view the metrics for that particular send.
The tooltips allow you to easily view the number of sends and opens as well as your click-through rate. If you want to dive deeper into each template’s metrics, select the name of the template from within the tooltip view to open the full email template report.
Start A/B testing in Engagement Studio Programs
It’s clear that Engagement Studio Programs (ESPs) are the backbone of effective prospect nurturing, guiding them along the journey until they’re ripe for the sales pitch.
So, let’s embrace the challenge, get creative, and make the most of our ESPs. With a bit of ingenuity and a keen eye on the metrics, we can craft killer campaigns that resonate with our audience and drive those all-important conversions. Here’s to pushing the boundaries and unleashing the full potential of our ESPs.
Remember, you can always reach out to the team at Sercante for help setting up your Account Engagement (Pardot) Engagement Studio Programs and configuring your A/B tests within them.