Category

Mike Morris

A common segmentation need with Marketing Cloud Growth or Advanced Edition and Data Cloud is creating a segment based on a Contact’s Record Type within the CRM. While this is possible by adding the Record Type field to the Contact Data Stream and mapping the field to the individual Data Lake Object (DLO), this is not very user-friendly or intuitive. Record types are stored as IDs, and who wants to build a segment based on a Salesforce ID? No worries, I’ve got a better solution!

So What’s the Problem?

Before we get into the solution, let’s first define the problem we’re addressing.

When working with record types in Salesforce, you’ll see labels displayed. These familiar values, such as “Contact,” are easy to understand. However, behind the scenes, Salesforce stores these values as IDs.
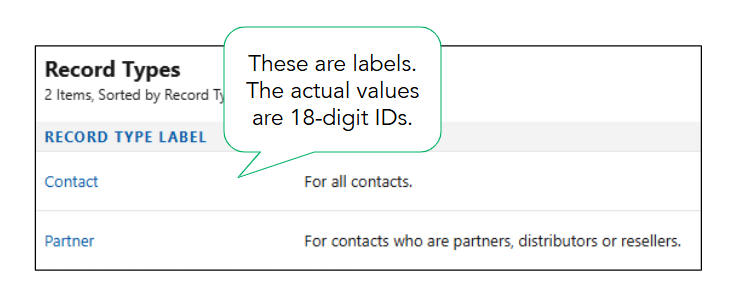
The actual values for these record types are 18-digit IDs that can be found in each record type’s URL.

Record Type LabelField Value
Contact012Hs000001p5dvIAA
Partner012Hs000001p5duIAA


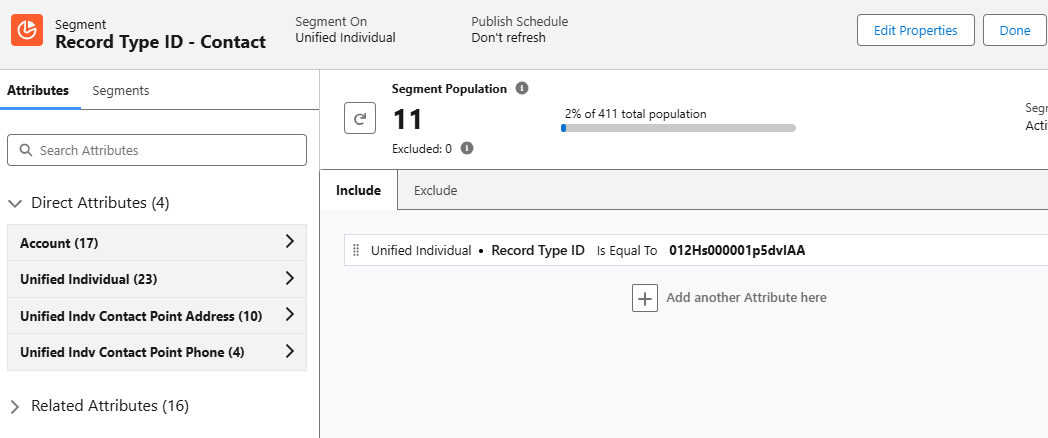
Segments can be created using the field values (18-digit IDs), but this method is just asking for trouble. The IDs are very similar and could be easily confused. It takes a keen eye to spot the differences between the field values when compared side-by-side. Imagine trying to segment or personalize based on these values!

Now that we know the problem, let’s fix it!

Solution Summary

To simplify segmentation and personalization, we will create a formula field on the contact data stream to convert the 18-digit ID into text values. We will then map the formula field to a custom field on the individual DMO and add to the data graph. Lastly, we’ll verify that all data has been successfully updated.

Step 1: Create the Formula Field

Formula fields in Data Cloud are a powerful way to transform data into formats that are easier to understand and utilize. In this case, we’ll create a transformation formula in the contact data stream to generate text values for the record type IDs.

You might be wondering if it’s possible to create a formula field on the contact object in Salesforce and ingest it directly into the data stream. While this sounds like a viable option, it can’t be done due to the fact that formula fields in Salesforce are dynamically calculated and don’t have a corresponding value stored in the database.

Creating the Transformation Formula

  • Navigate to the Contact data stream in Data Cloud.
    • Data Cloud > Data Streams > Contact_Home
  • Select the data stream and then click the “New Formula Field Button”.
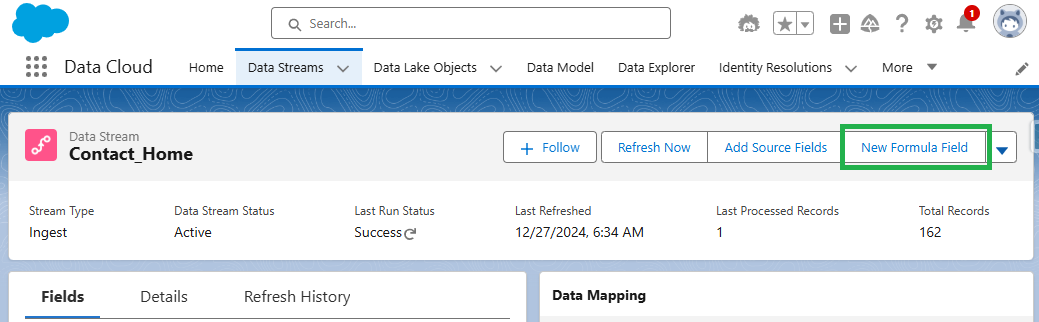
  • Enter the requested values and formula text.
    • The formula for this example is below.
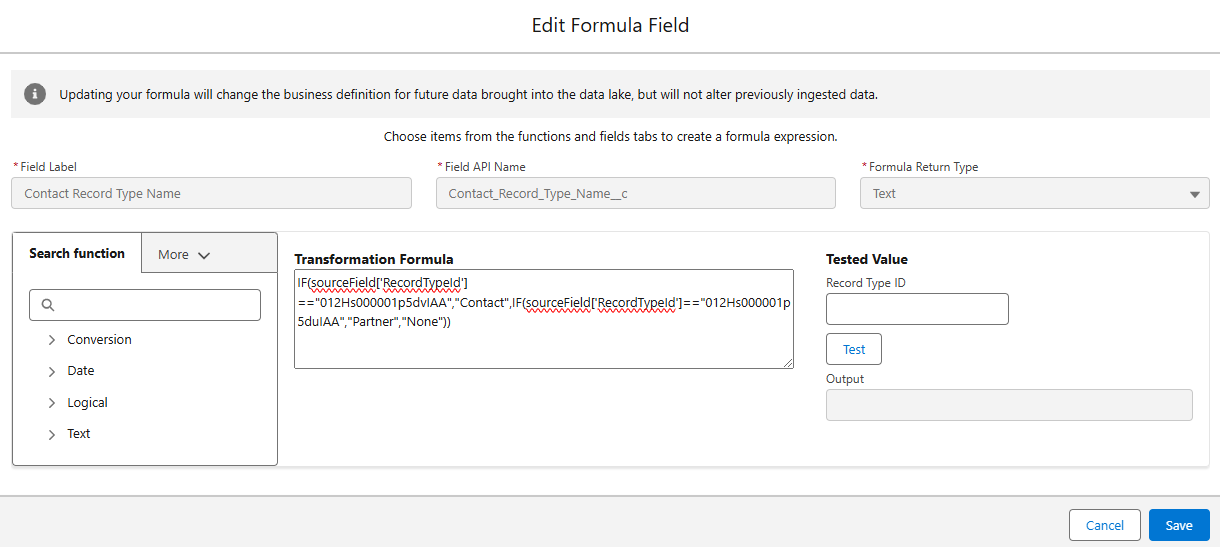
      • IF(sourceField[‘RecordTypeId’] ==”012Hs000001p5dvIAA”,”Contact”,IF(sourceField[‘RecordTypeId’]==”012Hs000001p5duIAA”,
        “Partner”,”None”))
      • Remember: Your record type IDs can be found in the URL of the record type page.
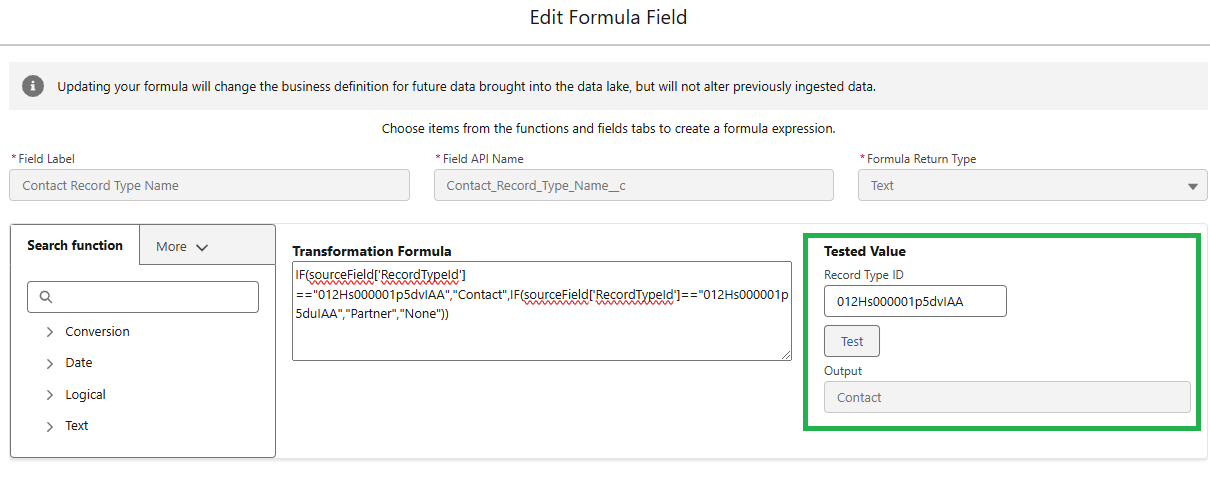
  • Test the formula for each Record Type ID.
    • Confirm the formula is returning the correct output for each Record Type ID and save.

Step 2: Map to the Individual DMO

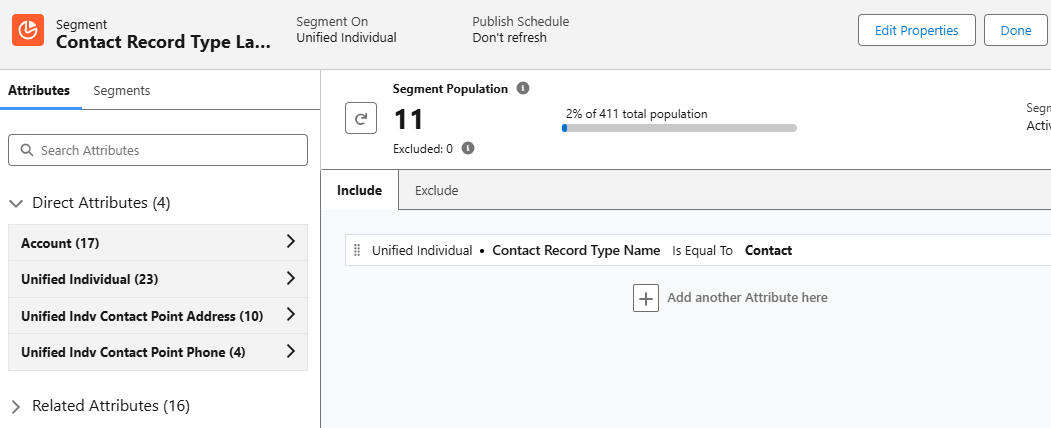
Next, we need to map the new formula field to the unified individual DMO. This mapping creates a direct attribute for each unified individual, allowing us to use the text value in Data Cloud segments. For example, this will allow us to create a segment of all unified individuals where Contract Record Type Name is equal to “Contact”.

Mapping Contact Fields

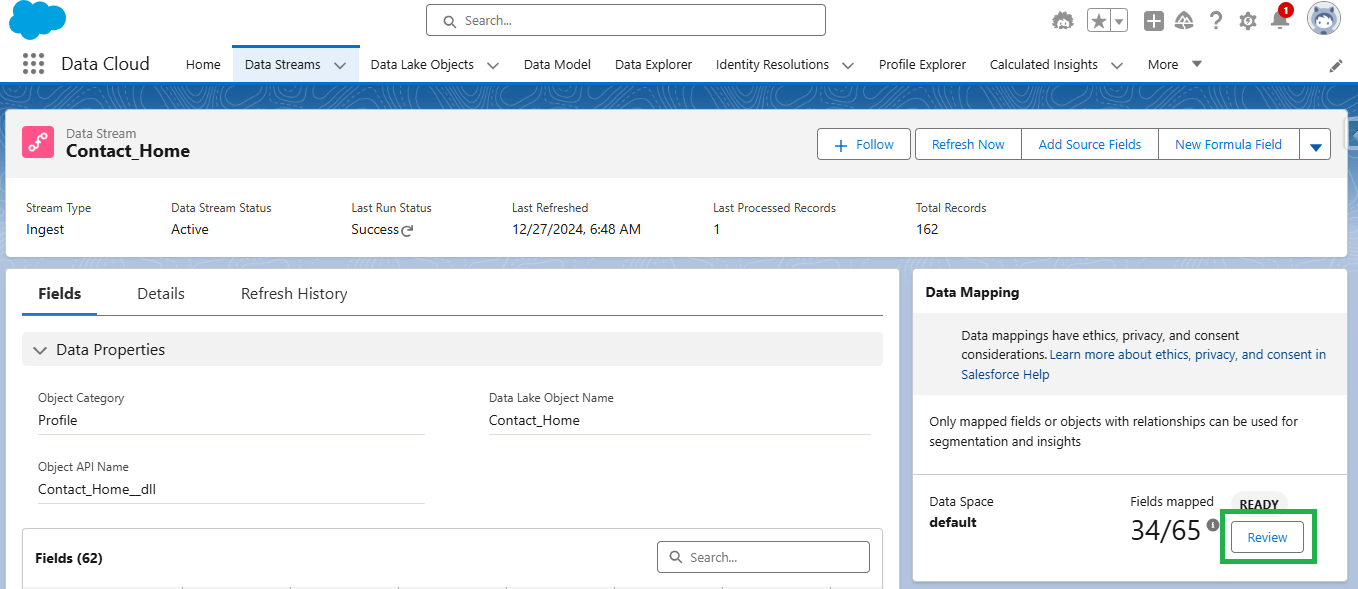
  1. Select the “Review” button in the Data Mapping section of the contact data stream.
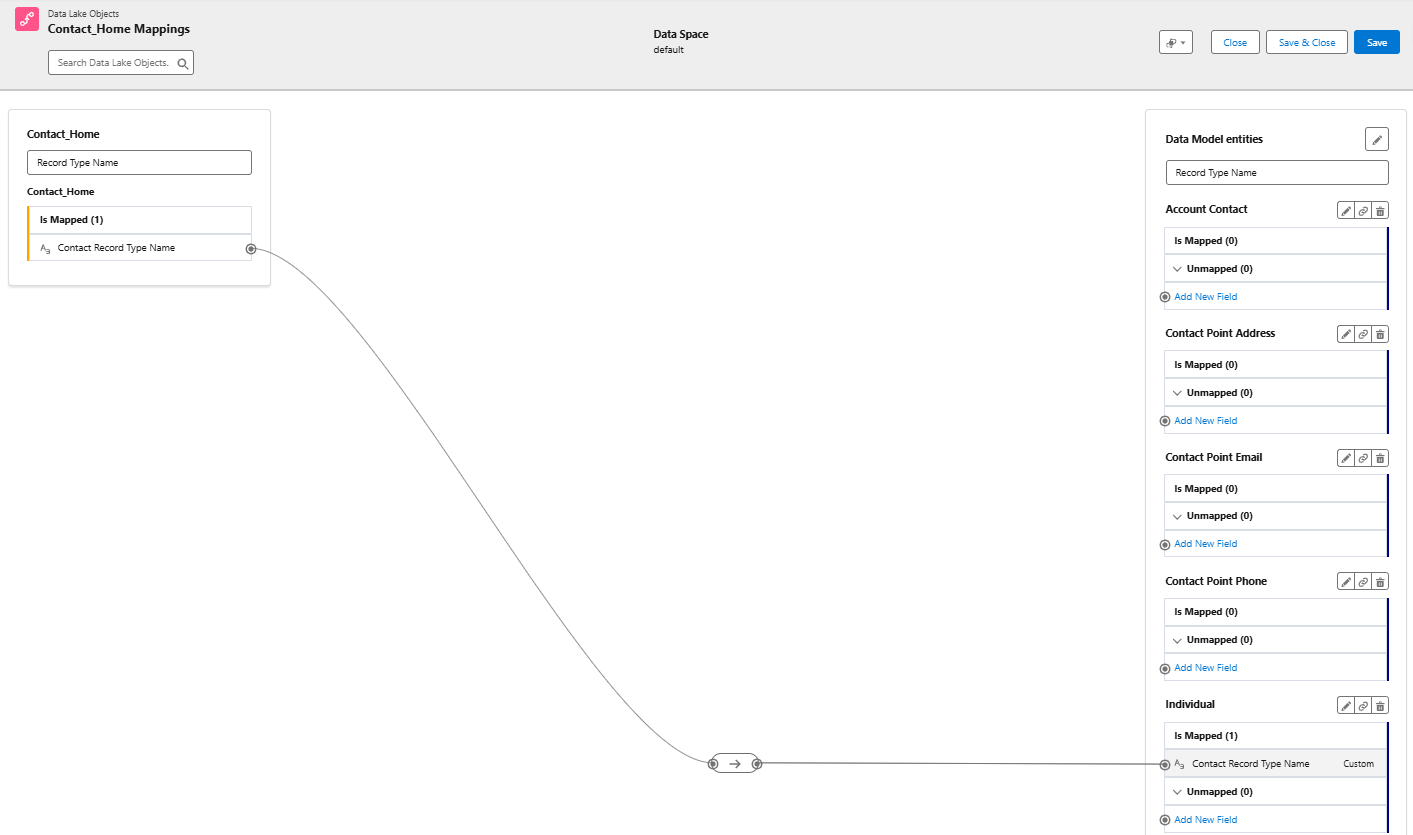
  1. Create a new field in the Individual DMO using the “Add New Field” option.
  2. Map the Contact Record Type Name field from the contact DLO to the custom field created in the individual DMO. Save & Close.
 
Step 3: Edit the Data Graph

Data Graphs are required for personalization and dynamic content in Marketing Cloud Growth and Advanced editions. To effectively personalize your emails, ensure your data graph includes all fields required by marketing (including the new formula field that we created). When updating your data graph, it’s also a good idea to review it to confirm it meets all requirements for sending emails as detailed in the second resource below.

Data Graph Resources

Step 4: Refresh the Data

Adding and mapping the new formula field will not trigger a full refresh of the data stream. You must trigger a Total Replace of the data stream and also run the identity resolution ruleset to fully refresh the data and populate the values of the formula field in the unified individual record.

Replacing Data Stream & Running Identity Resolution Ruleset

  1. Add any existing field from the contact object to the data stream.
    • You can do this by clicking “Add Source Fields” within the data stream settings and selecting any available field. This action forces a complete refresh of the data stream, ensuring all data is updated correctly.
  2. Run the identity resolution ruleset.
    • After the data stream refresh completes, manually run the identity resolution ruleset. This ensures that your unified individual records are also updated with the new information. You can find this in Data Cloud by going to Identity Resolutions > Run Ruleset. 

Step 5: Verify the Data

Once your data stream has refreshed and the identity resolution ruleset has run, it’s important to check that your formula field has populated correctly. You can do this by running a Salesforce report using the Unified Individual report type.

Confirm all unified individuals with a value in the “Record Type ID” field also have a value in the “Contract Record Type Name” field by comparing the number of records with values in each field. If the numbers don’t match,  some of your data may not have been updated yet.

Keep in mind that data streams and identity resolution rulesets run on schedules. You might occasionally see differences in the numbers due to these refresh cycles. If you encounter a mismatch, wait for the next refresh cycle and check the report again.

Segmentation Simplified

While both segments below produce the same result, there’s a clear winner in terms of usability. Enabling users to create segments using easily understood, text-based values will improve accuracy and speed of creation. Additionally, these same text values can be used to enhance personalization through merge fields and dynamic content.
Personalization & Dynamic Content

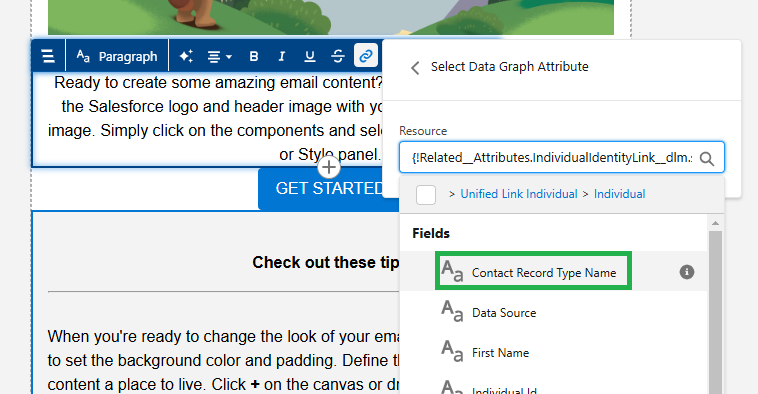
Since our newly created Contact Record Type Name field is related to the individual object, it can be used as a merge field and dynamic content.

Merge Field

Adding the “Contact Record Type Name” field as a merge field in your email will dynamically insert the contact’s record type (Customer or Partner) into the email copy. To prevent blank spaces if a contact doesn’t have a record type assigned, fallback text can be defined. This ensures a smooth and personalized experience for all recipients, even if some data is missing.
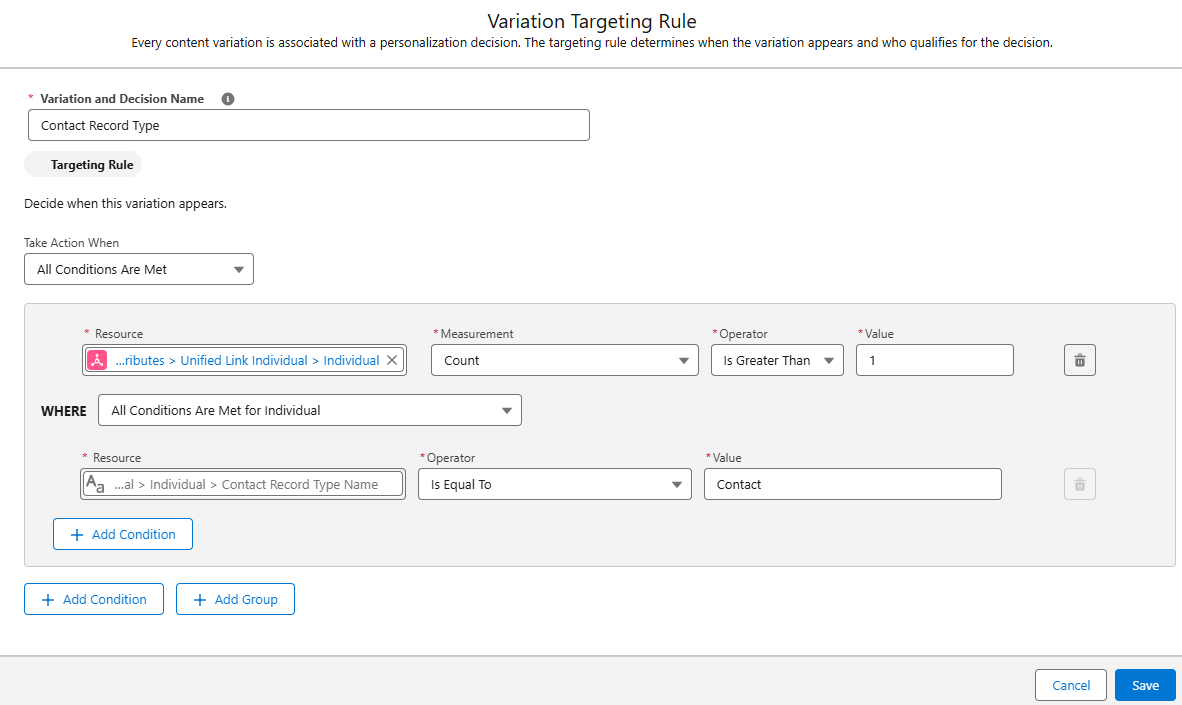
Dynamic Content

This is a great way to vary content within an email. For example, a single newsletter could be sent to customers and partners, but display different information based on the Contact Record Type Name field. Customers might see upcoming events, while partners receive a list of partner training resources.

Summary

Segmentation and personalization based on ID fields doesn’t need to be complicated. By investing time upfront in creating and mapping formula fields, marketers can significantly enhance their efficiency and accuracy. This solution minimizes the risk of errors, saves time on backend processes, and enables marketers to confidently create targeted segments and deliver personalized communications.

Big thanks to my friend and colleague Adam Babcock for his collaboration in developing this solution.

Product Note: Marketing Cloud Growth and Advanced are editions of Marketing Cloud Next and have also been referred to as Agentforce Marketing.

One of my all time favorite hacks is using flow to generate consistent campaign names in Salesforce. With the release of Marketing Cloud Growth Edition and the move to a more campaign-centric model, I wondered if this old trick would still work. Like any good consultant, I created a demo org and did some testing. Stick around to find out what I learned.

Campaign-Centric Approach

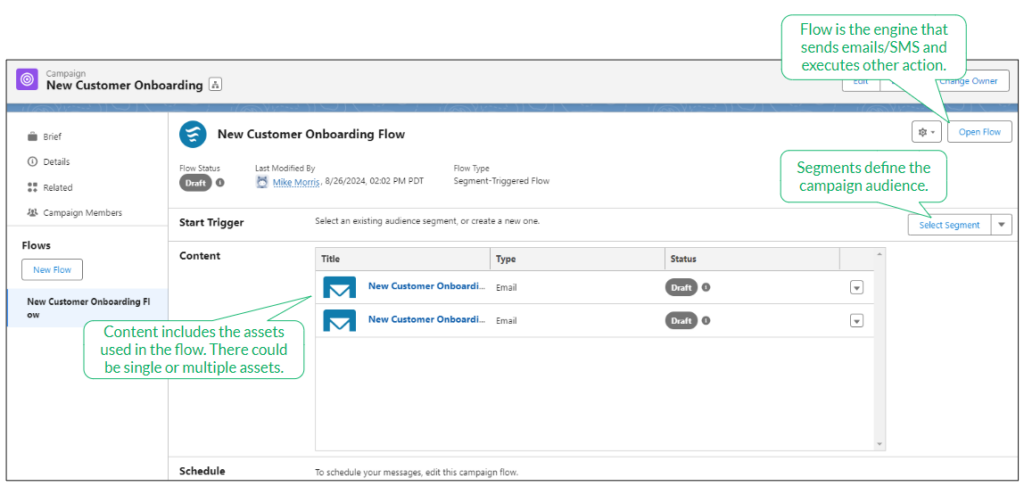
If you have not played with Marketing Cloud Growth yet, let’s set the stage. Marketing Cloud Growth has a very campaign focused workflow for creating new marketing initiatives. I really like this structure as all components are visible and accessible in a single location. This includes the content (emails/SMS messages/landing pages), segment, and the flow (this is a big change too – flows are used to send messages).

Campaign Anatomy

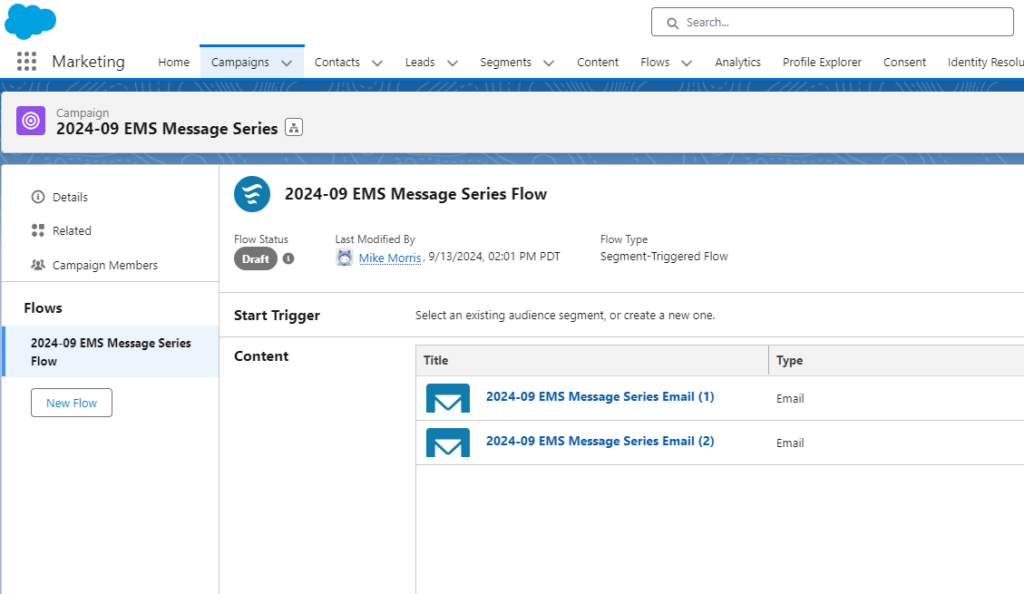
Marketing Cloud Growth uses the standard Salesforce campaign object, but the look is different when accessed from the Marketing app. The campaign is divided into sections containing the flow, start trigger, and content. This makes it easy to access everything in one place.

When campaigns are created, content and flow names are derived from the campaign name. This is another great out-of-the-box feature designed to make reporting easier by relating linked assets. It’s this feature that inspired my test.

Campaign Types

Before we get too deep into testing, let’s consider the types of campaigns that we’ll be creating. Most of us are accustomed to using the default or customized version of the campaign type picklist on the campaign page layout.

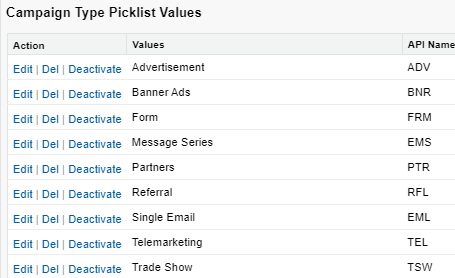
Marketing Cloud Growth campaigns are used for emails and nurtures, but they are also used for forms. Based on this, you might want to consider adding some more values to your type picklist to mirror the templates.

Example Type Additions

  • Single Email
  • Message Series
  • Form
  • Single SMS Message

Let’s Get Testing!

Now that the baseline is set, let’s get testing. The goal of this test is to do the following:

  • Determine if flow can be used to update the campaign name in Marketing Cloud Growth based on a standardized naming convention.
  • Confirm that the standardized naming convention will also be applied to the campaign components (flows and content).

1 ) Determine Campaign Naming Convention

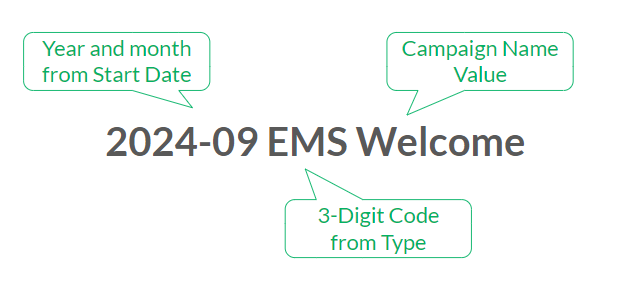
I’m keeping my convention pretty simple, but you can use whatever structure best suits the needs of your organization. My structure is as follows:

2) Update the Campaign Object

There are a few updates that need to be made to the campaign object. We’ll take them one by one.

1. Customize Type picklist values and update API names to 3-digit codes (these are what will be included in our campaign names)

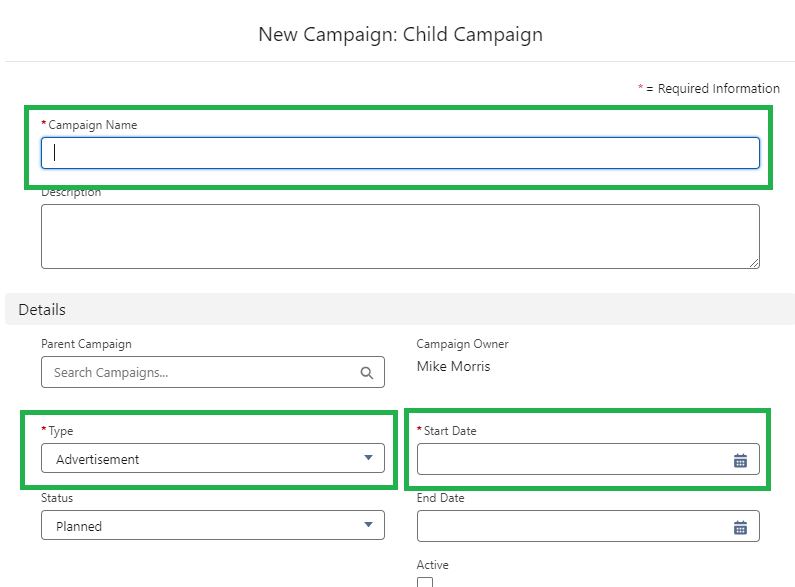
2. Update page layouts to make needed fields required

3. Create a formula field on the campaign object to calculate the standardized campaign name

  • Field Name: Campaign Name – Calculated
  • Formula: Text(Year(StartDate))&”-“&LPAD(Text(Month(StartDate)),2,”0″)&” “&Text(Type)&” “&(Name)

3) Create the Flow

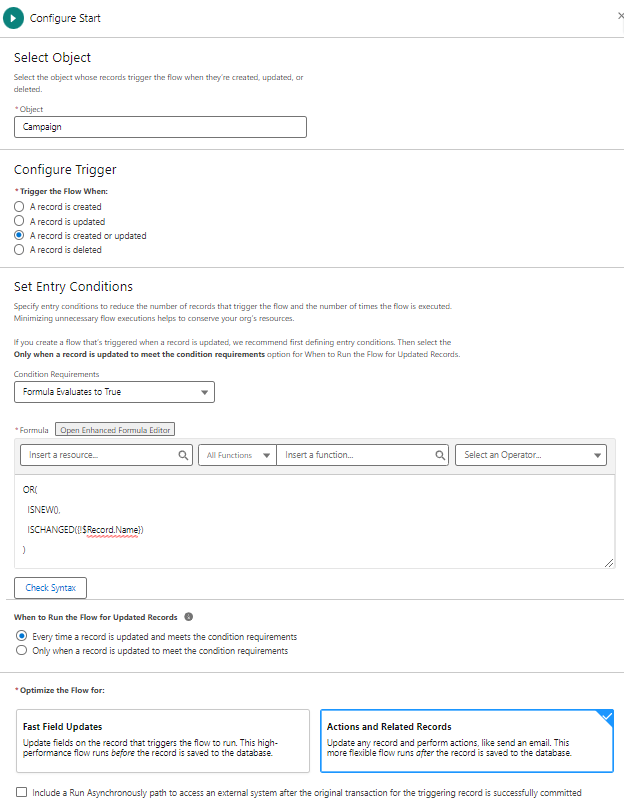
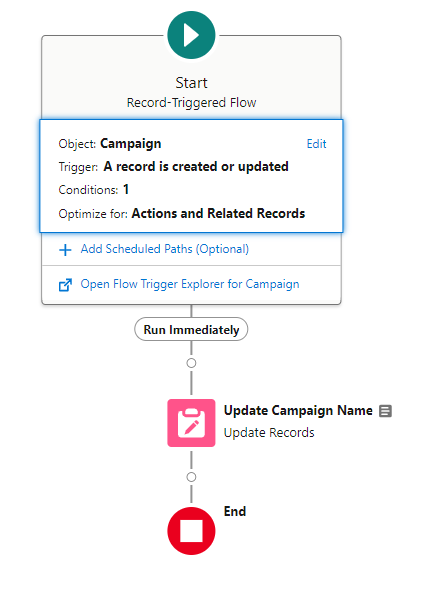
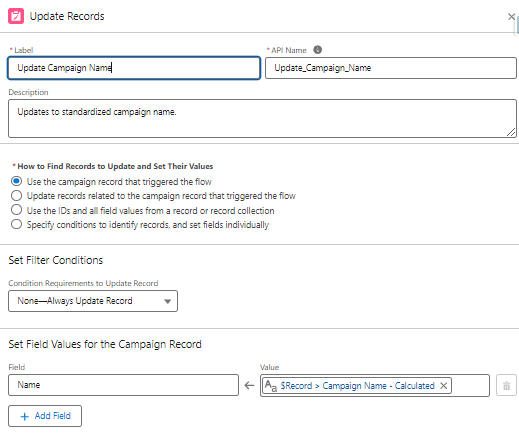
This a straightforward record-triggered flow based on the campaign object that updates the name field on the campaign with the value from the Campaign Name – Calculated field.

Start Element

Flow Canvas

Update Records Element

4) Activate and Test

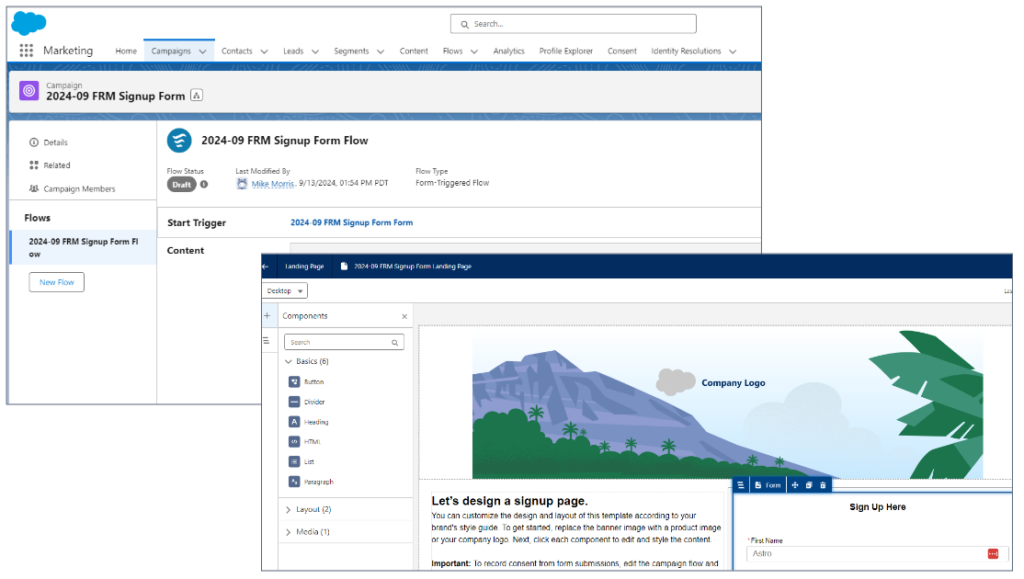
Test 1: Signup Form

The campaign, landing page, form, and flow were all generated using the correct naming convention.

Test 2: Message Series

The campaign, emails, and flow were all generated using the correct naming convention.

Takeaways

Linking campaign names and components makes consistent naming conventions more important than ever. I’m excited that my favorite hack still works and will be even more valuable going forward.

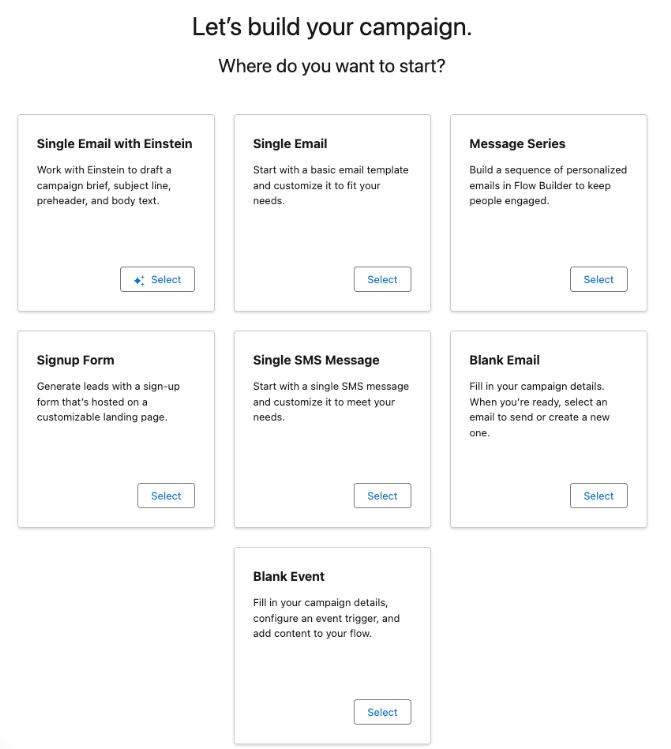
Like all good things, there is one “gotcha” to watch out for. Whether using this solution or the default functionality, the names of campaign components are generated at creation and are not updated if the campaign name is later changed. My advice is to ensure you have the correct campaign name before choosing your campaign template (from the “Let’s build your campaign.” screen).

If you have any questions about Marketing Cloud Growth or this solution, feel free to reach out!

Product Note: Marketing Cloud Growth and Advanced are editions of Marketing Cloud Next and have also been referred to as Agentforce Marketing.

I’m not going to be the guy who says “I told you so,” but Flow Builder has officially expanded from being an automation tool used exclusively by Salesforce Admins into the realm of marketing. Flow Builder is the engine used by Marketing Cloud Growth Edition to send emails and SMS messages and perform other automated tasks. If you’re not familiar with Flow, that’s OK. In this post, we’ll walk you through the process of building a message series with Flow in Marketing Cloud Growth Edition.

Getting Started

If you are new to flow, I would encourage you to take a moment to read Heather Rinke’s post An Introductory Guide to Salesforce Flow for Marketers before going any further. This is a great overview of flows and will provide context to the topics that we’ll be discussing.

If you have questions about Marketing Cloud Growth Edition, I’ve got you covered there too. Check out Erin Duncan’s post All the FAQs on Marketing Cloud Growth Edition for all your answers.

Building a Message Series

Confirm User Access

Marketing Cloud Growth (aka MCG) includes two permission sets out of the box. It also requires that users be added as a contributors to the CMS workspace and the Marketing Landing Pages site (see the Implementation Guide: Marketing Cloud Growth for more details).

NameDescription
Marketing Cloud AdminAccess to Salesforce Setup, Data Cloud Setup, and full control on campaigns, segments, and flows. Access to MCG’s setup assistant is also being added as part of the Winter ‘25 release.
Marketing Cloud ManagerFull control to manage campaigns, segments, and campaign (non-admin) flows.

User Permissions in Marketing Cloud Growth

It All Starts With A Campaign

One of the things that I really like about Marketing Cloud Growth is the campaign-centric approach. This is very logical and easy to use.

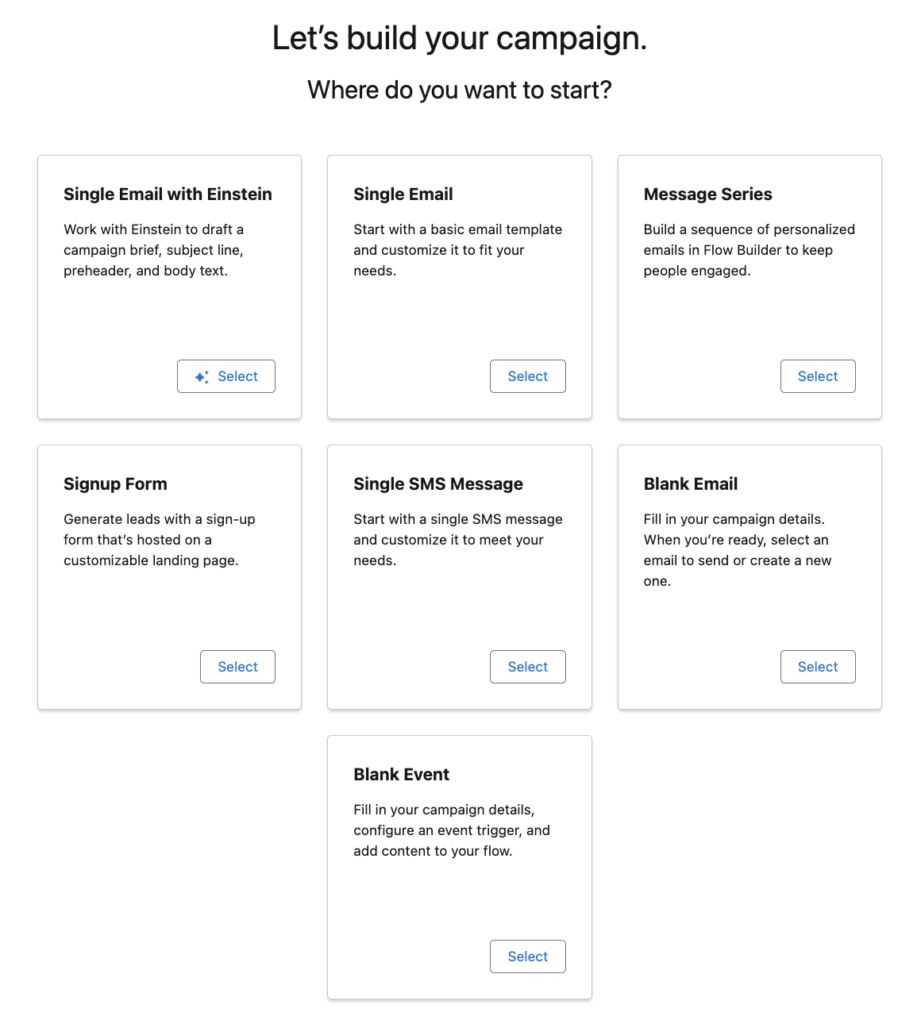
To get started navigate to the Campaigns tab in the Marketing App and click the New button. After completing the fields on the campaign page layout, you’ll be presented with the screen below. This is where the fun begins!

We’re going to select the Message Series option as that’s our goal for today.

Pro Tip: If you see this message when clicking one of the “Where do you want to start?” options, go back up and confirm your user access. Chances are you have not been added to the CMS as a contributor.

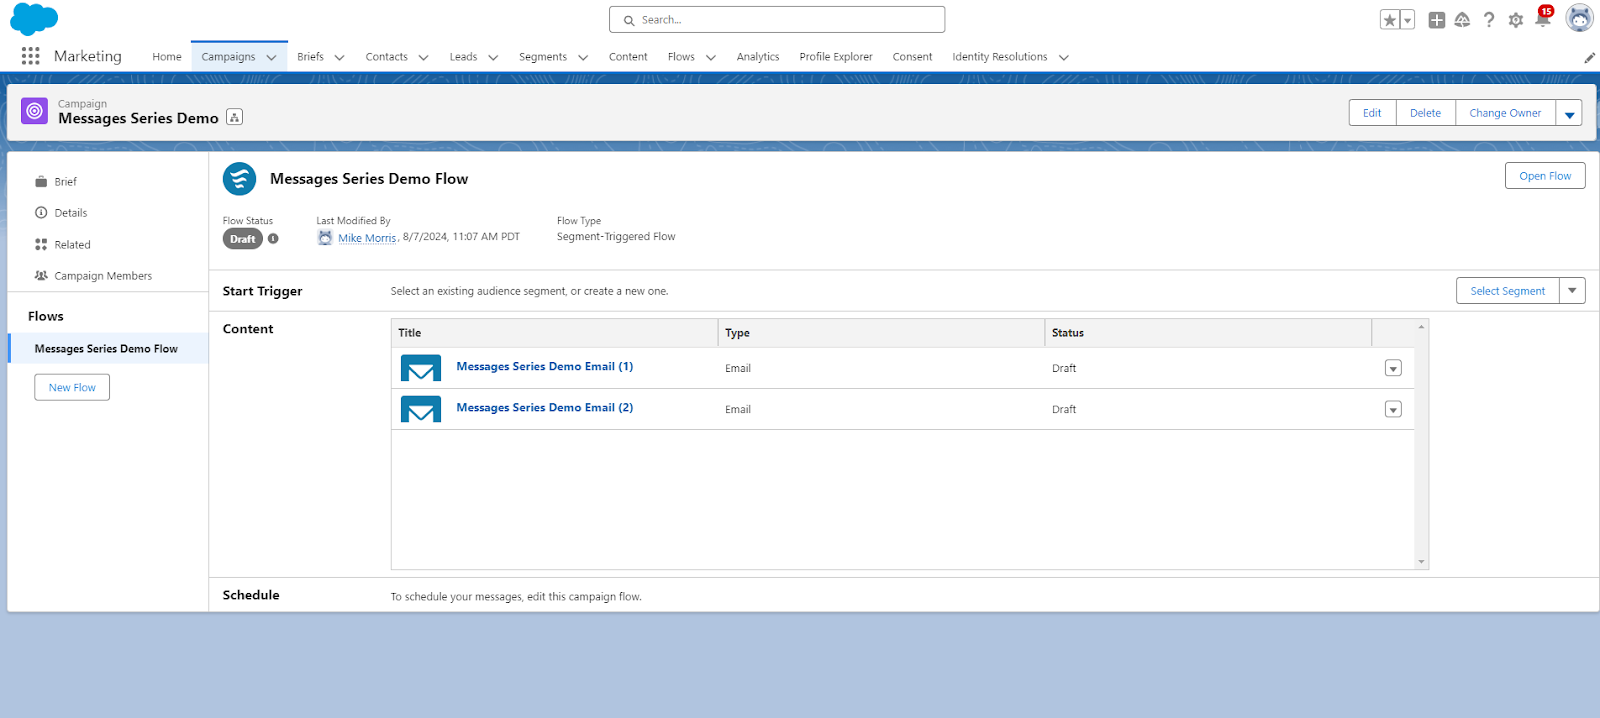
After selecting the Message Series option, you’ll notice that Marketing Cloud Growth has created your campaign, email templates, and a basic flow. This automation is a real time-saver and provides a great starting point for marketers.
  

Flow Access

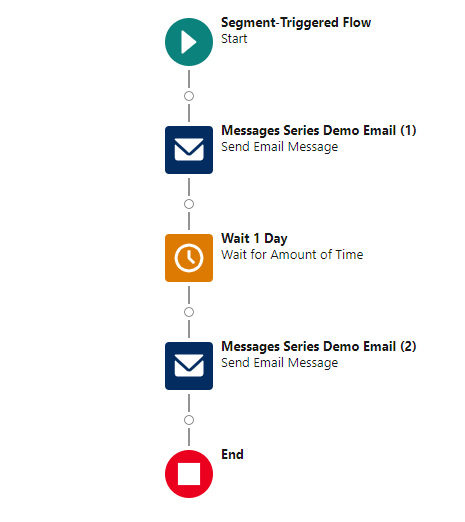
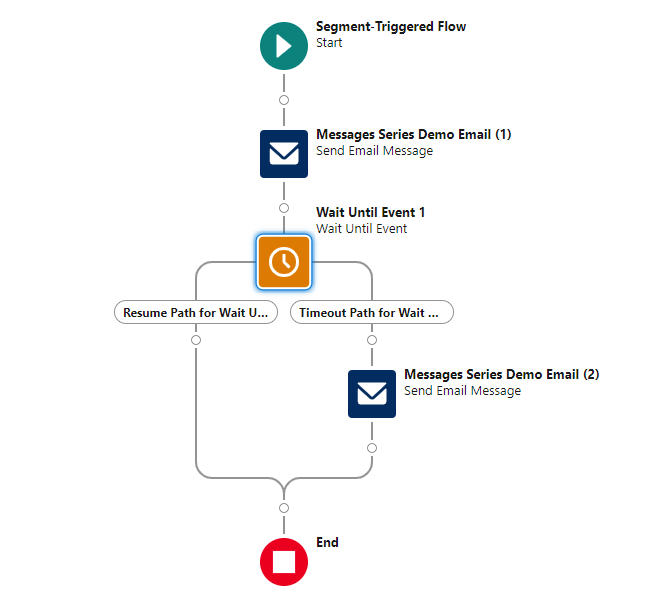
You can access the pre-built flow by clicking the “Open Flow” button within the campaign or by searching for “flow” in the App Launcher. This is a basic Segment-Triggered flow that sends an initial email, waits a specified period, and then sends a follow-up message. It’s a good starting point, but you’ll likely need to customize it to meet your specific requirements.

Customizing Your Flow

Flow Capabilities

If you are a Salesforce Admin who has experience with flows, you’ll immediately notice that this is not the same version of flow that you are accustomed to. Marketing Cloud Growth uses a streamlined version of Flow Builder and different trigger methods (Segment-Triggered and Form-Triggered). Most elements are available, but there are some limitations. See Marketing Cloud Growth Campaign Flows vs. Salesforce Flows by Lucy Mazalon for a great overview. Some limitations that stood out to me were the inability to access the Toolbox or create formulas, but don’t stress too much as this is a new product and capabilities will be expanded in future releases.

Pro Tip: Marketing Cloud Managers can access and edit flows, but their permissions are limited compared to Marketing Cloud Admins. Key missing elements include assignment, get records, and loop functions.

Current Capabilities

Set Schedule 

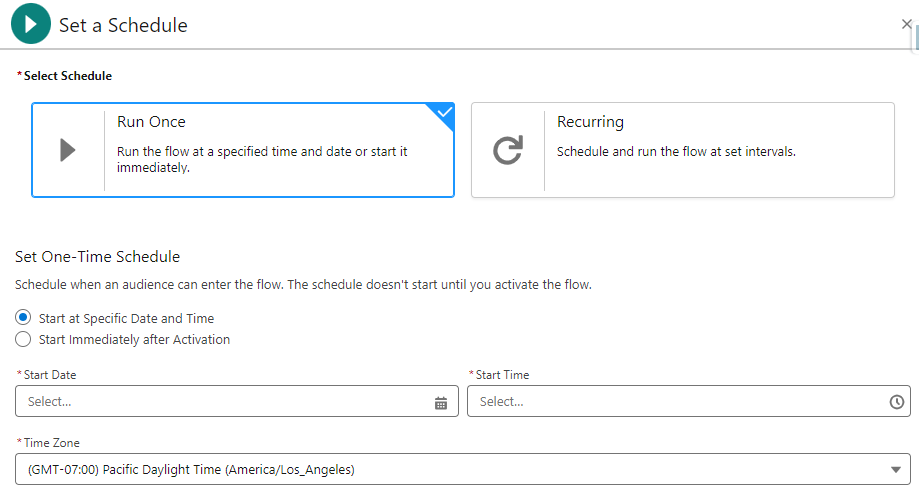
Unlike Record-Triggered flows, Segment-Triggered flows run on set schedules. This is due to the linkage with Data Cloud and its consumption-based pricing model. Credits are used when segments are processed so it’s recommended that segments only be refreshed prior to sending a communication or at intervals relevant to data updates (if data is added weekly, don’t refresh daily).

The schedule can be set by clicking + Set Schedule in the Start element. From there you’ll have the option to run once or set a recurring schedule.

Select Segment 

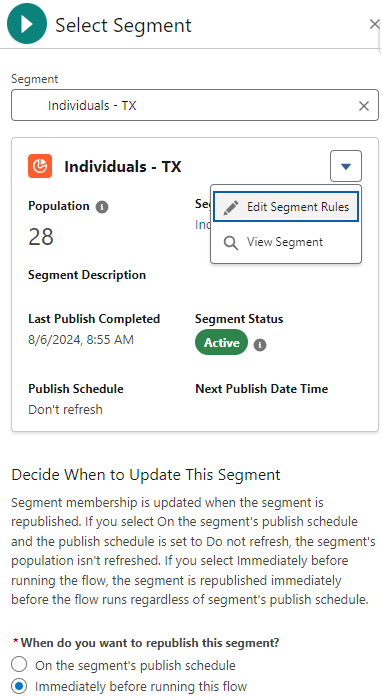
Speaking of segments, they can be added to the flow from the Start element by clicking + Select Element or directly from the campaign page by clicking Select Segment. I prefer adding the segment from the flow start element as it provides some additional features that I find very handy. 

After selecting a segment from the Segment dropdown, a summary of the segment is provided. The population, description, last publish date, and publish schedule are also displayed. If the segment population seems too large or too small, you can access and edit the segment rules. Keep in mind, any edits to the segment will be applied wherever the segment is used.

The final consideration is the republishing schedule. You can immediately publish the segment before running the flow (to make sure the most recently added individuals are included) or default to the publishing schedule defined in the segment. The interface design helps make the decision very easy by clearly displaying the segment publish schedule so you can make an informed decision.

Pro Tip: If you see that your segment is not set to refresh, it’s important that you select the “immediately before running the flow” option. If this option is not selected, you risk missing newly added individuals.

Update Wait Elements 

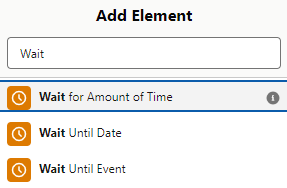
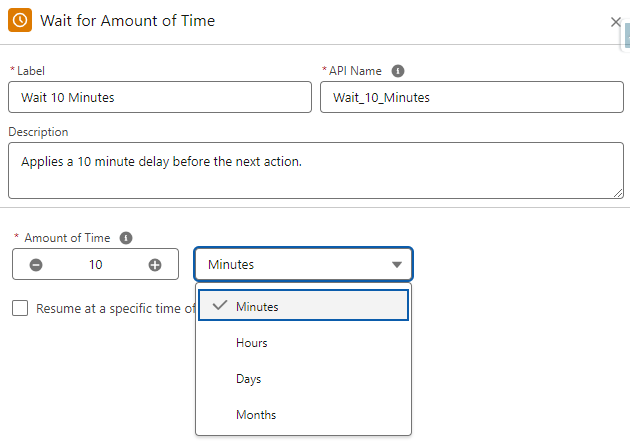
Flow includes three wait elements that provide a lot of flexibility. These elements can easily be added to your flow by hovering over the circle between elements, clicking the + sign, and then entering “Wait” as the search criteria.

One big advantage over Account Engagement’s Engagement Studio is the ability to have wait times down to the minute in the Wait for Amount of Time and Wait Until Event elements.

Apply Branch Logic

Branch logic can be added using the Wait Until Event or a Decision element. Let’s look at both.

Wait Until Event

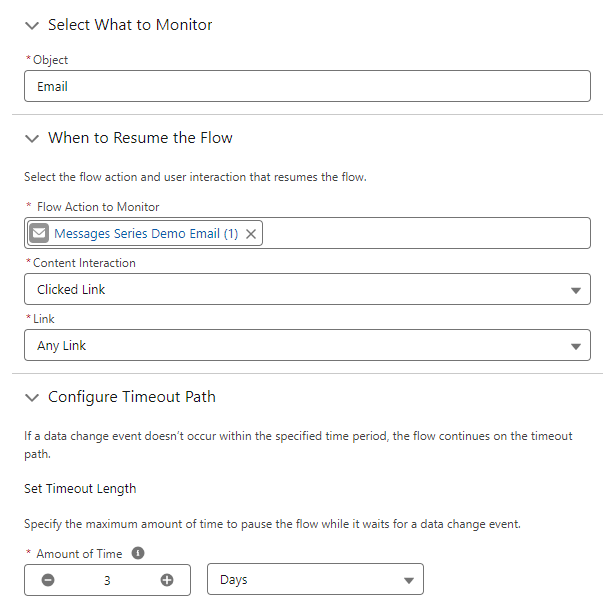
This element allows you to monitor for an action in the flow and then branch based on the engagement. As an example, you could monitor for individuals who clicked a link (and link or a specific link) in the first email in your series and then branch based on the interaction (or lack thereof). This can also be applied to SMS messages.

Decision Element

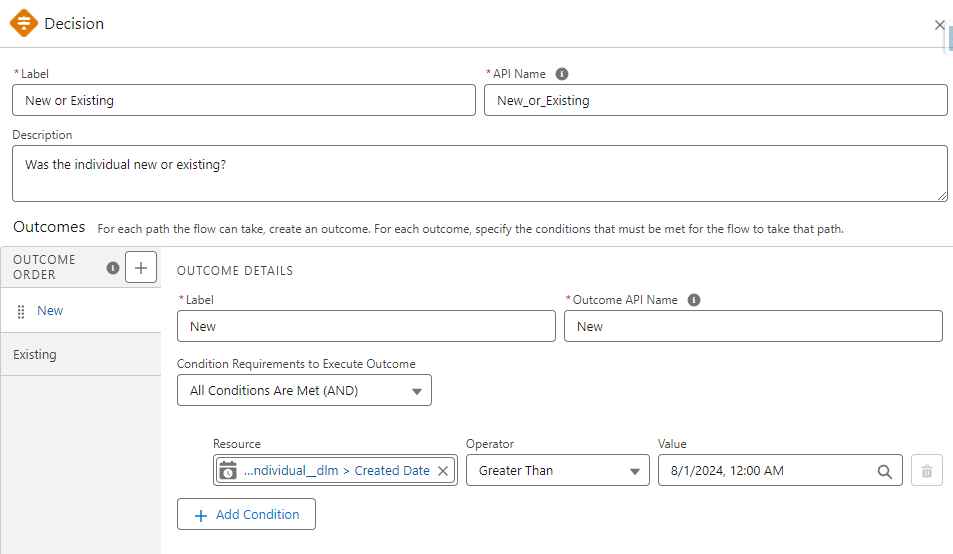
This decision element is another way to apply branch logic by specifying criteria for outcomes. The cool thing here is that you are not limited to two branches, additional outcomes can be added as needed creating multiple branches.

The actual resource fields accessible in decision elements are somewhat limited right now. This is certainly an area to keep an eye on as it will become even more valuable in future releases.

Vary Communication Methods

Another great thing about Marketing Cloud Growth is the ability to easily integrate SMS messages into flow. This is a great way to try a different outreach method if individuals don’t respond or to customize nurtures based on individual preferences.

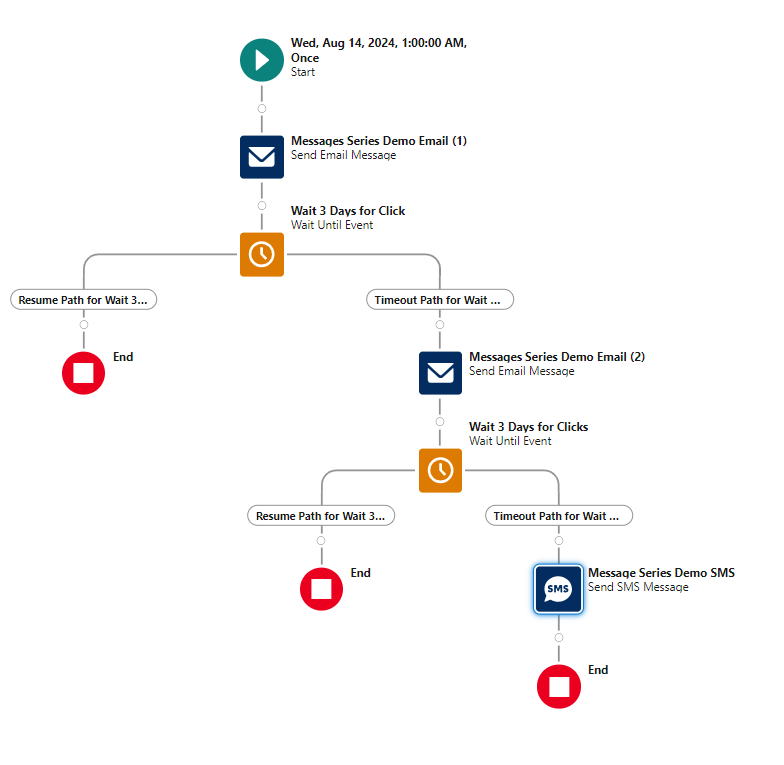
In the example below, the intent is to get individuals to engage (click). After sending two emails and not getting a response, an SMS message is sent to see if a different communication method gets the desired interaction.

Learn More About Marketing Cloud Growth Edition & Flow

Marketing Cloud Growth is an exciting new offering from Salesforce and it’s only going to get better with each release. If you would like to learn more about this product, be sure to check out our Marketing Cloud Growth Edition Bootcamp.

Getting hands-on with flow is something that I highly recommend. Fortunately, Trailhead has a wealth of flow-related training available for free. Here are a couple of recommendations to help get you started.

Finally, Data Cloud is at the core of segmentation in Marketing Cloud Growth Edition. The Data Cloud Basics for Marketers trail is a great way to learn some of the benefits and key terms of Data Cloud that you will run across.

I recently ran into a situation where a client needed to exclude select campaign types from being populated as the Primary Campaign Source field on opportunities. While this might sound unusual on the surface, the use case was very logical and likely impacts other organizations too. Read on to learn how we solved it to customize primary sources on opportunities using Salesforce flow.

Use Case

Before getting too deep into the solution, let’s first review the use case for relevancy in your organization. In this particular situation, the sales teams were leveraging Salesforce campaigns as a way to group records for outreach. Some of the outreach campaigns became quite large over time and began skewing data in the Primary Campaign Source field on opportunities.

Many reports in the organization were based on the Primary Campaign Source field and the outreach campaigns were undermining the impact of true marketing campaigns. It was determined that reporting would be more accurate if outreach campaigns were excluded and the Primary Campaign Source field was populated using the last “responded” campaign (based on the responded checkbox).

Primary Campaign Source Field Review

Before we get into the solution, let’s do a quick recap of the Primary Campaign Source field on opportunities. Campaign attribution can be a confusing topic, so it never hurts to review.

How is the Primary Campaign Source Populated?

  • Lead Conversion (with Opportunity) – The Primary Campaign Source field will be populated with the campaign that was most recently associated with the lead.
  • Opportunity Creation (from Contact) – The campaign that the contact was most recently associated with will populate the Primary Campaign Source field when a new opportunity is being created from a contact record. Users have the ability to change the value before saving the record. 
  • Manually – Users can manually update the Primary Campaign Source field on the opportunity using the picklist of active campaigns.
  • Automation – The Primary Campaign Source field can also be updated based on an automated process in Salesforce (generally a Flow).

Do Auto-Association Rules Apply?

Great question! Auto-association rules are part of campaign influence in Salesforce and are used to create campaign influence records. They are not factored into the population of the Primary Campaign Source field on opportunities.

Primary Campaign Source Field (on Opportunities) vs. Primary Source Campaign Influence Model

  • Primary Campaign Source Field (on Opportunities) – Lookup field on the opportunity that links it to a single campaign.
  • Primary Source Campaign Influence Model – Campaign influence model that attributes 100% of the influence to the campaign noted in the Primary Campaign Source field on an opportunity.  

Solution Review

Now that we’ve laid the foundation, let’s address the solution.
Step 1 – Determine Exclusions & Actions

The first question to answer is “What campaigns should be excluded from the Primary Campaign Source field?”. Depending on your organization, this could be a campaign type, a campaign record type, or a combination of both. 

Step 2 – Determine Actions

Now that we know what campaigns we would like to exclude, what should we do when we run across an opportunity with an excluded value? The default Salesforce behavior is to use the last associated campaign. We could go that route and use the last “valid” campaign that a lead or contact was associated with or we could go a step further and use the last campaign that has the “responded” box checked.

I prefer prioritizing my “valid” campaigns based on the “responded” checkbox. Similar to how I configure auto-association rules, I just don’t like giving credit to a campaign if the lead/contact has not actually engaged with it.

We also need to consider how the Primary Campaign Source will be populated if no valid campaigns are found. You can choose to keep the excluded value (as a reference point), clear the value, or populate with a default value. I elected to retain the excluded value (prefer data to no data), but you have options!

Step 3 – Build it in Flow (Sandbox)

For illustrative purposes, I created a flow in my dev org to show you how this solution could work for you. Here are the assumptions that were used.

  • Campaigns with the type of “Sales Prospecting” should be excluded.
  • When updating the Primary Campaign Source field, the most recent responded campaign (checkbox checked) should be used.
  • If a valid campaign is not found (or the only campaign has a non-responded member status), the Primary Campaign Source field should be populated with the most recent campaign (basically defer to the default Salesforce behavior).
  • Since this data is used for reporting purposes, real-time updates are not needed. 

Flow Summary 

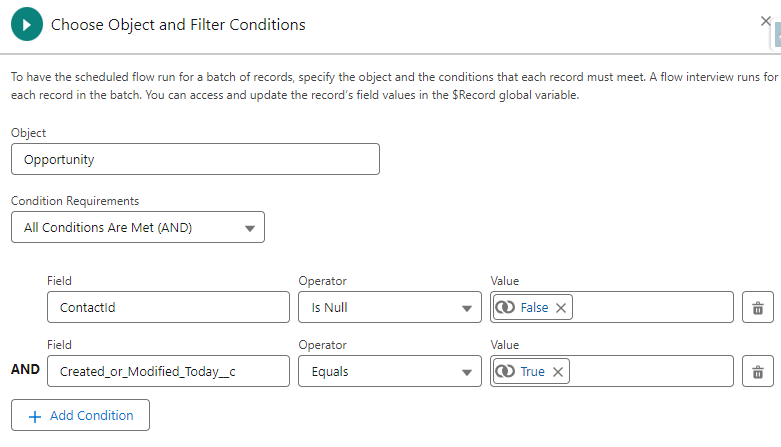
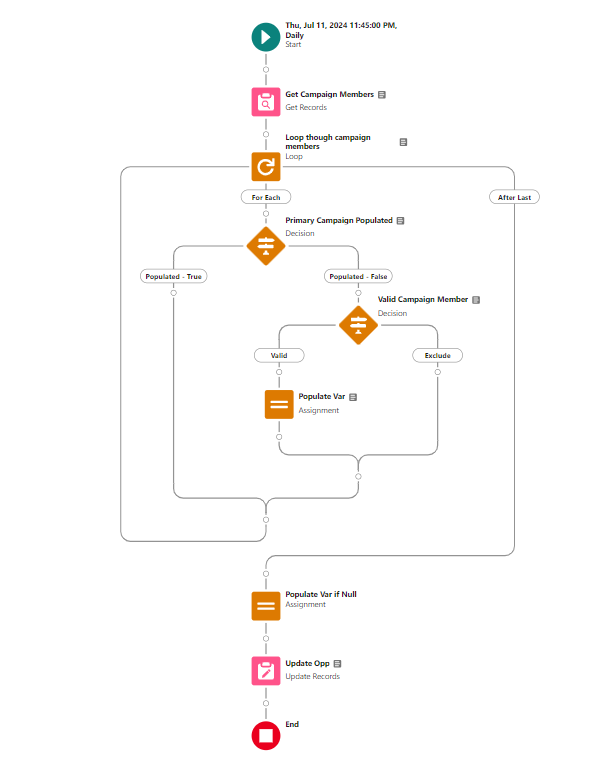
  • This solution uses a scheduled flow based on the opportunity object. The flow runs nightly and processes all opportunities that were created or updated that day.
    • Note: Relative dates can’t be used in the filter conditions of scheduled flows. To address this, create a custom checkbox field on the opportunity object that will evaluate TRUE if the opportunity was created or updated today and use it in your criteria.
    • Below is my filter. It’s selecting opportunities that have contact roles and were created or updated today.
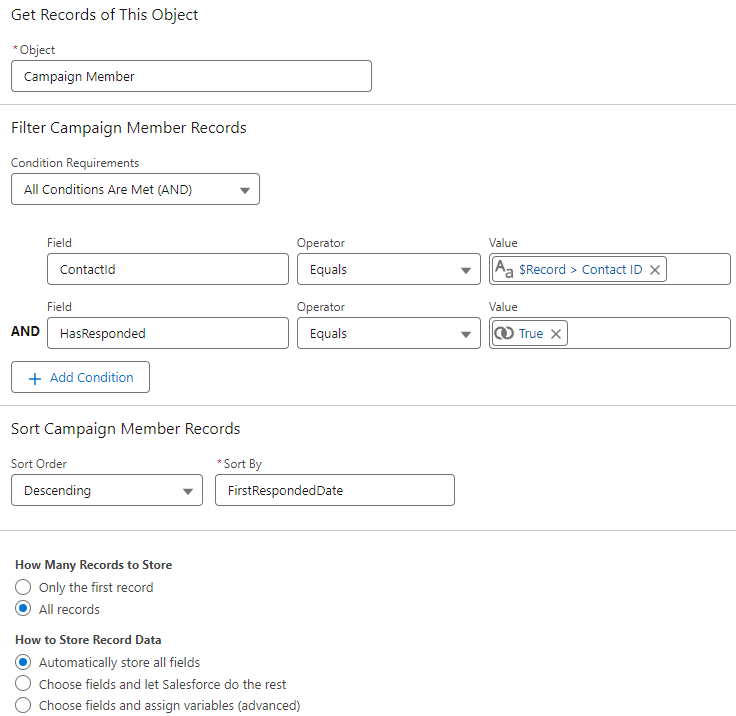
  • Get campaign members for contact roles
    • In this step, we get all the responded campaign member records (for the contact role) and sort them so the most recent is first.
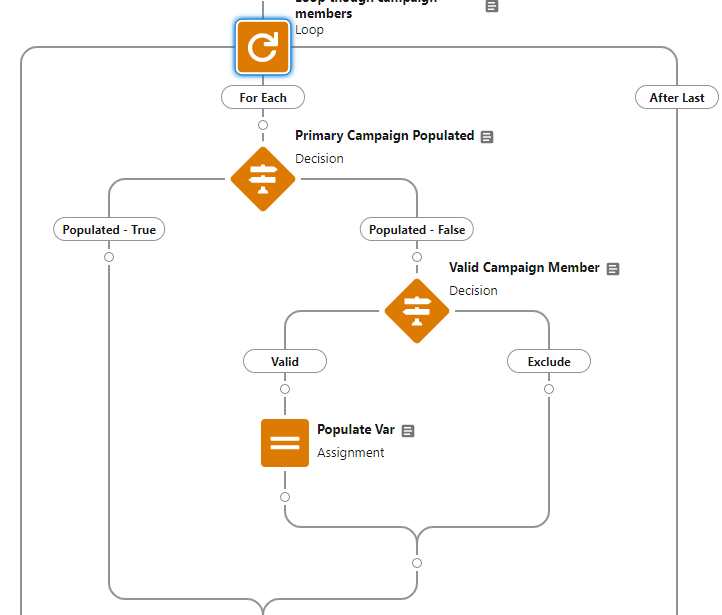
  • Loop through campaign members
    • Next, we loop through each of the campaign member records related to the contact role, find the first valid campaign (responded), and save it to the assignment variable.
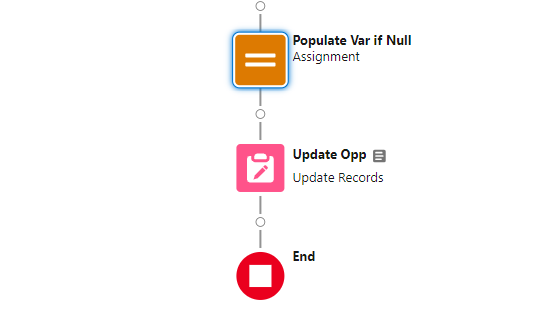
  • Update the opportunity record
    • Finally, we update the Primary Campaign Source field on the opportunity with the campaign ID stored in the assignment variable.
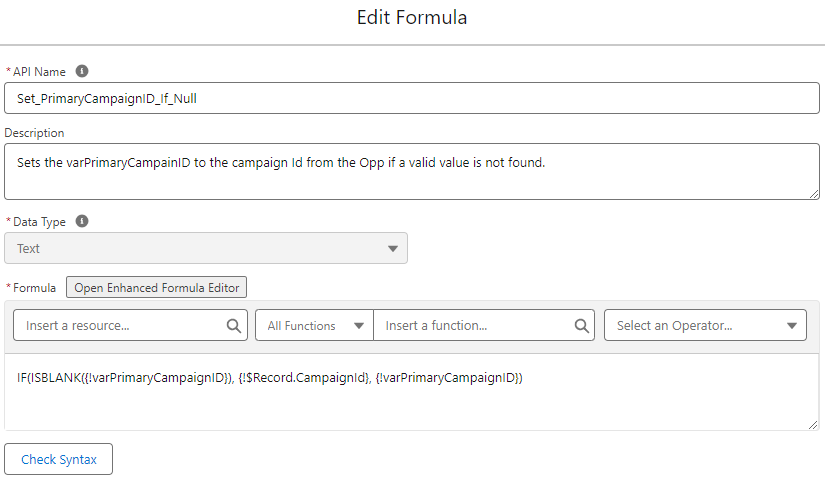
    • Note: If you decide to keep the most recent campaign as the Primary Campaign Source (if a valid campaign is not found), you will need to add a final assignment element prior to updating the record. The element uses a formula to ensure that the variable has been populated with a valid value and updates to the original campaign ID (even if it’s an excluded value) if blank. This prevents the Primary Campaign Source from being updated to a null value by the flow.

Complete Flow 

Here’s a look at my final flow.

Step 4 – Test & Validate

As with any flow, test, test, and test again before deploying to production. Below are some test scenarios to use for validation.
Create a new opportunity at lead conversion 

  • Lead with a single valid campaign
  • Lead with multiple valid campaigns 
  • Lead with an excluded campaign (most recent) and a valid campaign 
  • Lead with a single excluded campaign 
  • Lead with a single non-responded campaign membership

Create a new opportunity from a contact 

  • Contact with a single valid campaign 
  • Contact with multiple valid campaigns 
  • Contact with an excluded campaign (most recent) and a valid campaign 
  • Contact with a single excluded campaign
  • Contact with a single non-responded campaign membership

Update Primary Campaign Source on an existing opportunity

  • Update to an excluded value (make sure that there’s a contact role who has a valid campaign) 

Test Table

When testing and validating flows, I like creating tables to record results for review. This helps me organize my thoughts and ensure that everything is working as intended.

ScenarioOriginal ValueExpected ValuePass/Fail
Lead – Single Valid2023-09 TSW Dreamforce2023-09 TSW DreamforcePASS
Lead – Multiple Valid2024-06 SLS Sales Prospecting2023-06 WBR Product Update WebinarPASS
Lead – Excluded + Valid2024-06 SLS Sales Prospecting2023-09 TSW DreamforcePASS
Lead – Single Excluded2024-06 SLS Sales Prospecting2024-06 SLS Sales ProspectingPASS
Lead – Single Non-Responded2023-09 TSW Dreamforce2023-09 TSW DreamforcePASS
Contact – Single Valid2024-05 TSW Events2024-05 TSW EventsPASS
Contact – Multiple Valid2023-06 WBR Product Update Webinar2023-06 WBR Product Update WebinarPASS
Contact – Excluded + Valid2024-06 SLS Sales Prospecting2023-09 TSW DreamforcePASS
Contact – Single Excluded2024-06 SLS Sales Prospecting2024-06 SLS Sales ProspectingPASS
Contact – Single Non-Responded2023-09 TSW Dreamforce2023-09 TSW DreamforcePASS
Updated  – Existing Updated to Excluded2024-06 SLS Sales Prospecting2023-09 TSW DreamforcePASS

Is the Primary Campaign Source field meeting your needs?

If you are using the Primary Campaign Source field in your reporting I encourage you to take a closer look at your campaigns to see if your data is being skewed. If so, this solution is a great way to prioritize valid campaigns and put more emphasis on engagement. You can even completely filter out specific types of campaigns if you choose. Don’t sell your marketing efforts short!

More Salesforce Flow resources

Product Note: Marketing Cloud Growth and Advanced are editions of Marketing Cloud Next and have also been referred to as Agentforce Marketing.

Marketing Cloud Growth Edition is here and its infrastructure represents a fundamental shift compared to Account Engagement. While Account Engagement is “near core,” Marketing Cloud Growth Edition is built on the Einstein 1 platform and leverages Data Cloud, Flow, and Einstein capabilities. This signals a shift in the skills that marketers will need in the future. But don’t worry, we’ve curated some resources to help you get a head start.   

Is Marketing Cloud Account Engagement being retired? 

Absolutely not. This question has come up in just about every social post that I’ve seen and has been addressed in detail in the blogs below by Andrea Tarrell and Erin Duncan, so we’re not going to dig too deeply into it here. 

The short reason is that Marketing Cloud Growth Edition is a distinct offering geared toward small to medium-sized businesses (SMBs). However, innovations and features from this product will make their way into Marketing Cloud Account Engagement, so there will be a need for marketers to evolve their skills.

What are these new skills that you keep mentioning? 

After playing with Marketing Cloud Growth Edition a bit, three areas really stood out to me.

  • Audiences are created using Data Cloud
  • Assets are built with Experience Cloud
  • Automations (including email series) are powered by Salesforce Flow

While Data Cloud, Experience Cloud, and Flow might sound a little scary, these represent great opportunities for Account Engagement pros to develop new skills. To make things even easier, Salesforce has provided excellent learning resources for all these topics in Trailhead. Let’s get started!

Data Cloud

Data Cloud is a dream come true for marketers. Imagine having all your customer data from different applications centralized in a single location and available when creating your marketing segments. Imagine no more as that’s exactly what Data Cloud delivers.

Marketers need a general understanding of the tool and key terminology. They will also need to be able to utilize Data Cloud to build segments.

Key Data Cloud Terms

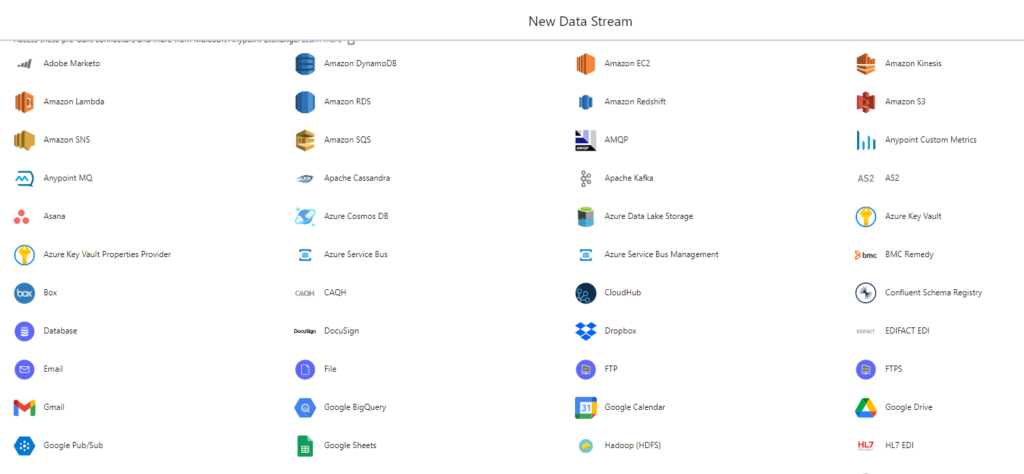
  • Data Stream: A data source ingested into Data Cloud. Examples include Salesforce CRM and Amazon S3 – and many more.
  • Data Lake Object (DLO): A storage container for the data ingested into data streams.
  • Data Model Object (DMO): A Data Cloud object created from data streams, insights, and other sources.
  • Customer 360 Data Model: Data Cloud’s standard canonical data model. Data ingested into Data Cloud is mapped to DMOs found in the Customer 360 Data Model.
  • Starter Data Bundles: A Salesforce-defined data stream that includes mapping to the Data Cloud DMO structure.

Here are some of the sources that can be used as data streams in Data Cloud

Recommended Trailhead Modules

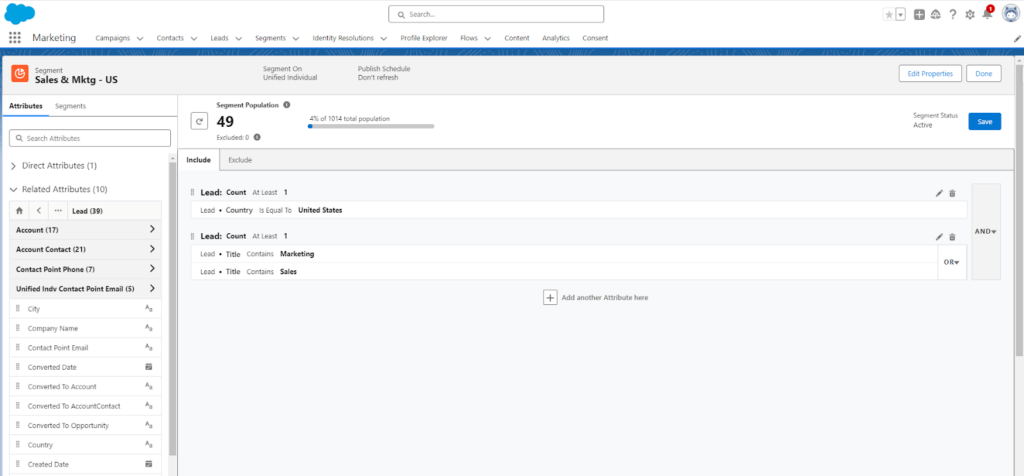
Here’s an example of how a segment focusing on Sales and Marketing titles based in the United States would look in Marketing Cloud Growth Edition.
Experience Cloud

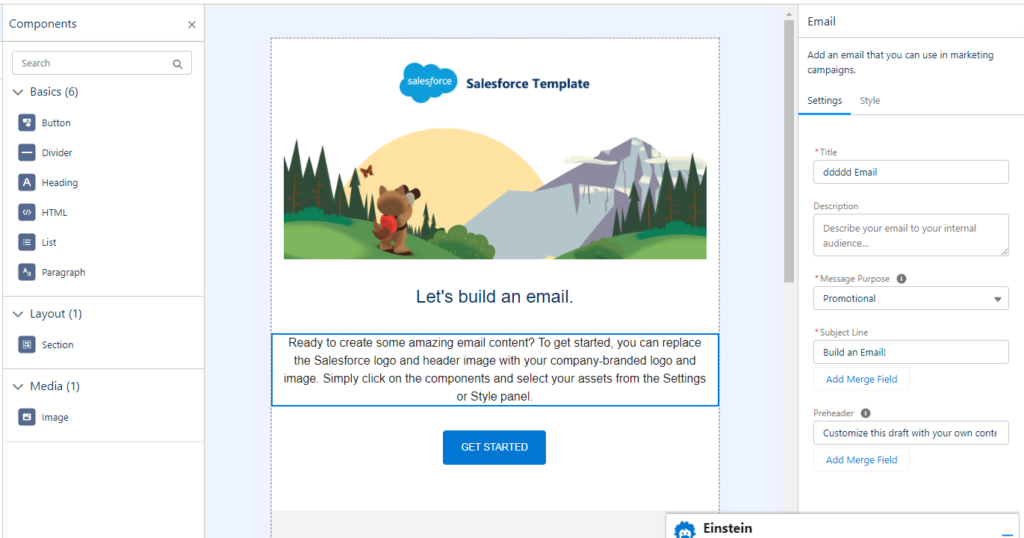
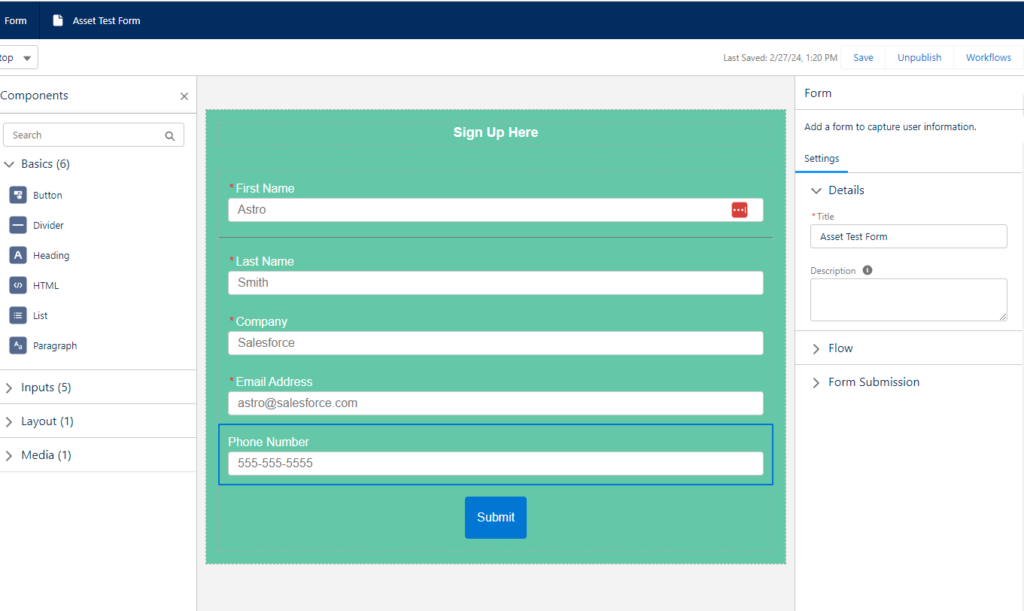
Assets in Marketing Cloud Growth are built using Experience Cloud. The experience feels similar to the Account Engagement Lighting Builders, but the foundation is different and there are some cool upgrades. I’m a big fan of the campaign-based workflow, the ability to publish/unpublish forms, and the ease with which forms can be styled — without the need for CSS.

Marketing Cloud Growth Email Builder


Marketing Cloud Growth Form Builder

At this time, the best way to prepare for the asset-building experience in Marketing Cloud Growth is to get hands-on with the lightning builders in Account Engagement. If you have not yet enabled them in your org, take a moment to do so using this blog as a guide. You can still access and use the classic builder after the lighting builder is activated, so you are not locked into a single builder.

Recommended Trailhead Modules

Salesforce Flow

Salesforce Flow is at the heart of Marketing Cloud Growth and represents a great learning opportunity for account engagement pros. Flow has historically been the solution of choice for Salesforce admins when creating declarative automations within Salesforce, but it’s now a marketing tool as well (and you’re going to love it).

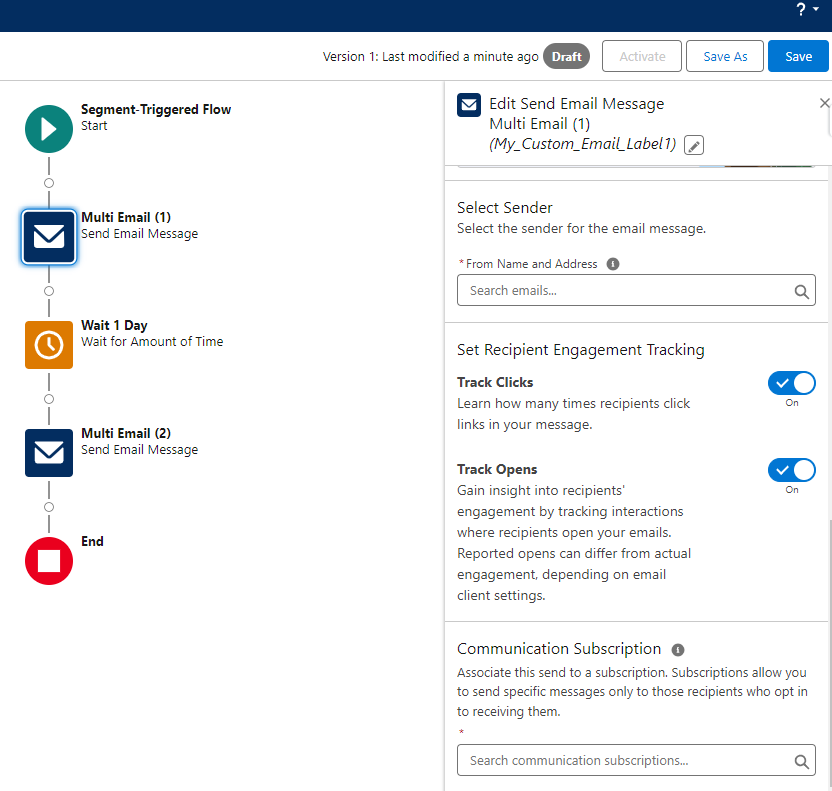
Marketing Cloud Growth generates a pre-built flow when assets are created. These are an excellent starting point and can be customized to specify tracking (for emails), subscriptions, and wait step times (in minutes, hours, days, months, or a specific time of day).  Branch logic can also be added to further customize the recipient journey and more features are on the roadmap for future releases.

Flow is one of the tools that is best learned by doing. Fortunately, there are plenty of great Trailhead modules, projects, and superbadges on this topic. If you learn better with the help of an instructor, our Salesforce Flow Basics For Marketers Workshop is for you!

Recommend Trailhead Modules

There are also a few posts on the Spot that will guide you, step-by-step, through creating flows that address common marketing needs. These are fun little projects that are highly relevant, so be sure to check them out. As always, practice in your sandbox or Trailhead org.

Start building your Marketing Cloud Account Engagement skills for the future 

The current release of Marketing Cloud Growth Edition is not a replacement for Account Engagement, but it does give us a glimpse into the future. Many innovations and features from  Marketing Cloud Growth Edition will make their way into Marketing Cloud Account Engagement, so it’s time to begin evolving your skills in preparation.

Scores in Marketing Cloud Account Engagement play a critical role in getting the right lead to the right person at the right time. However, scores can become unreliable and actually distract sales if they are not periodically decayed. In this post, we’ll address the importance of score decay and provide several methods that can be used in your organization. 

A Primer on Scoring

Before we get into score decay, let’s level set on Account Engagement scores. Account Engagement scores are a measure of calculating engagement with your account engagement assets. Prospects with higher scores have had greater engagement and are therefore more sales-ready.

Base Scoring

All Account Engagement accounts come with base scoring rules configured. These rules add and subtract points for actions like email opens, form submissions, page views, link clicks, and more and are intended to be a starting point. It’s highly recommended that you customize these rules based on your organizational needs and conduct periodic reviews to ensure that prospects are not scoring up too slowly or too quickly. 

Review Your Scoring Rules 

Account Engagement Settings > Automation Settings > Scoring

Additional Scoring

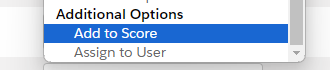
Scores can also be increased in Account Engagement manually at the prospect level, using automations (automation rules, completion actions, and engagement studio programs), or in bulk when importing prospects into Account Engagement (by mapping to “Add to Score”).

Suggested Reading 

If you want to learn more about scoring and grading, check out the following posts:

The Importance of Score Decay

Time is possibly the most important consideration that influences the quality of leads.

Think of leads as fresh-baked cookies. Who doesn’t want a chocolate chip cookie hot out of the oven? Those same cookies are still pretty good after they’ve cooled a bit, but they get a bit stale after sitting around for a few days. The same applies to your leads.

It’s important to make sure the hot leads get to sales as quickly as possible and that they are easy to identify. Let’s say that 100 points is your threshold for passing a lead to sales. Which lead would you want to call?

  • “Roy” has a score of 150, but his last engagement was 30 days ago.
  • “Katie” has a score of 101, but engaged today and passed the 100-point mark as a result.

It’s pretty clear that “Katie” is the better lead in this scenario, but we have all the facts. The reality is that your sales team has a lot of leads assigned to them and they don’t have time to learn the story behind each. It’s very possible that sales could prioritize “Roy” over “Katie” based on score alone. This would be logical, but incorrect. We can take the guesswork out of this situation by applying score decay so that “Roy’s” score falls below the 100-point threshold based on his inactivity.

Score Decay Methods

There are two primary ways that scores can be decayed –  Activity Based Decay and User Based Decay.

  • Activity Based Decay is based on activity (or inactivity in Account Engagement). This method simply decays scores to a set value (or reduces by a set amount) based on the last activity date of the prospect. 
  • User Based Decay is score decay that’s triggered by internal Salesforce users based on updates to the contact or lead record. This could be actions like updating the status or any other field.  

Activity-Based Decay

Activity-Based Decay is very simple to implement but requires a few decisions to be made in advance.

  •  When should a lead be decayed?
  • By how much should the score be decayed?

The “when” question differs greatly between organizations and is often related to the length of sales cycles. Organizations with longer sales cycles tend to tolerate longer periods of inactivity while those that are more “transactional” in nature tend to decay scores quicker.

The decay amount is also based on the organization and its scoring model, but I can offer some guidance and best practices based on experience.

  • Tip #1 – Don’t decay all the way to 0. I like to keep some points associated with the prospect as an indicator of past engagement. As a starting point, I would recommend decaying by 50% of your threshold for passing leads to sales. If 100 is your threshold, decay to 50. 
  • Tip #2 – Decay to a set number vs. by a specific amount. Scores in Account Engagement continue to increase over time – if measures are not taken. It’s not uncommon to see some older prospects with very high point values. As an example, if a prospect has a score of 275 and you reduce by 50 points, you still have a lead with a score of 225 points who has not been active in an extended period of time. This really does not help at all. My recommendation is to reduce it to a set value so you can be assured that the lead drops off the radar or your sales team – until new engagement is recorded.

Implementing Activity-Based Decay

  1. Create an automation rule in Account Engagement with a descriptive name.
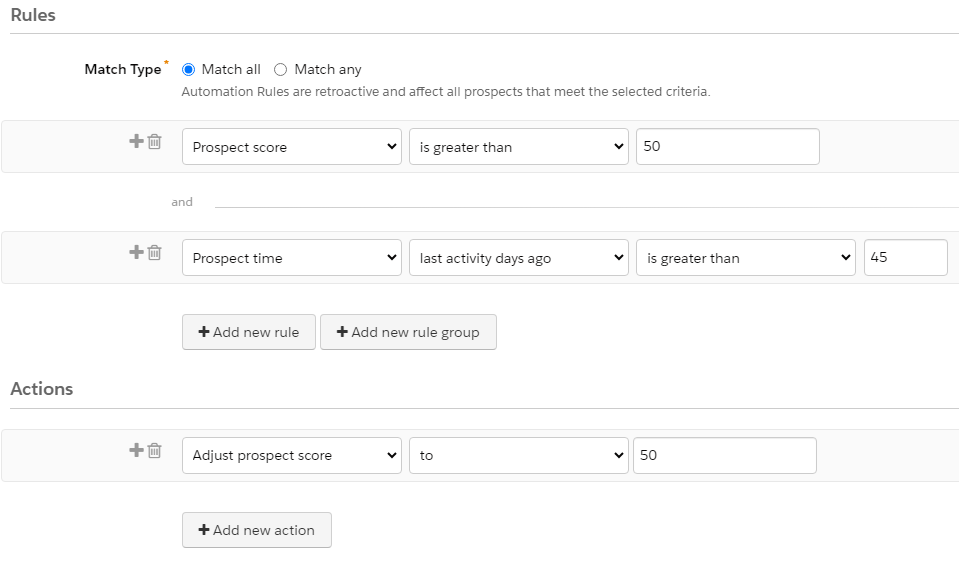
    • Example: Score Decay – Last Activity > 45 Days Ago
  2. Make use of the “Description” section to summarize what actions the rule will take and when.
    • Example: Decays scores that are greater than 50 to 50 if the last activity is greater than 45 days ago. 
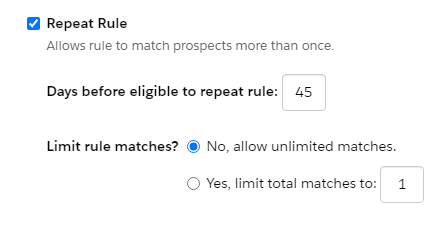
  3. Set the rule to repeat and specify the number of days before eligible to repeat.
  1. Configure the rules and actions.
    • The example below is very simple, but you can add additional rules as needed. For example, you can omit records that have open opportunities or are being worked by sales so their scores are not decayed.
  1. Since this rule will be altering the scores of prospects, be sure to preview the matches before activating. Also, be sure to review all automations in Account Engagement and Salesforce that could be triggered as a result of score adjustments.
     

User-Based Decay

Account Engagement scores are intended as an indicator of engagement within Account Engagement. Since scores can only be changed in Account Engagement, decaying scores based on actions taken in Salesforce requires a bit of ingenuity and a “handshake” between the platforms. The goal is to tell Account Engagement to decrease the score based on an action that occurred in Salesforce.

In this example, we are going to use flows and custom fields to trigger score decay in Account Engagement from Salesforce. I like this option due to the ability to easily set the criteria that triggers the action and the fact that code is not required.

Scenario

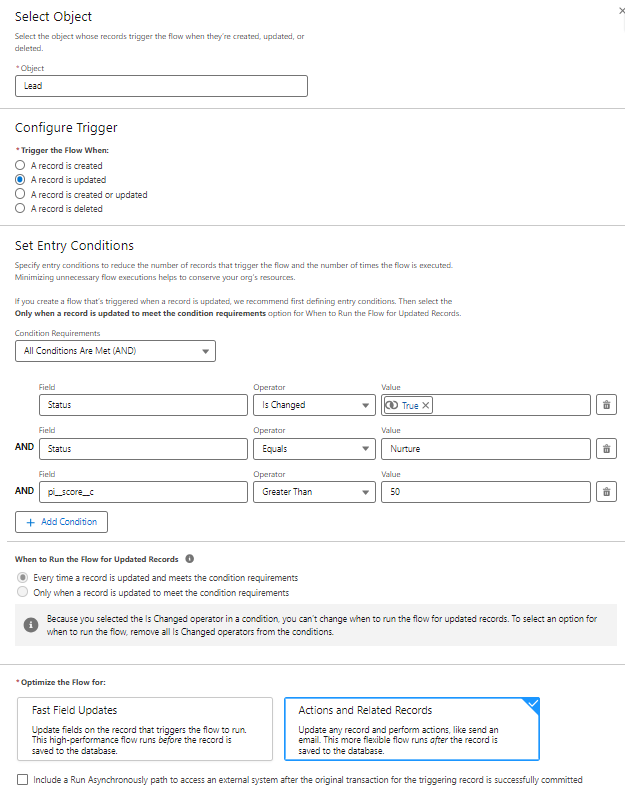
Scores should be decayed to 50 if the status is changed to “Nurture” by a user in Salesforce.

Implementing User-Based Decay

  1. Create “Trigger Score Decay” custom fields on the contact and lead objects in Salesforce.
    • Data type = Checkbox
    • Default value = Unchecked
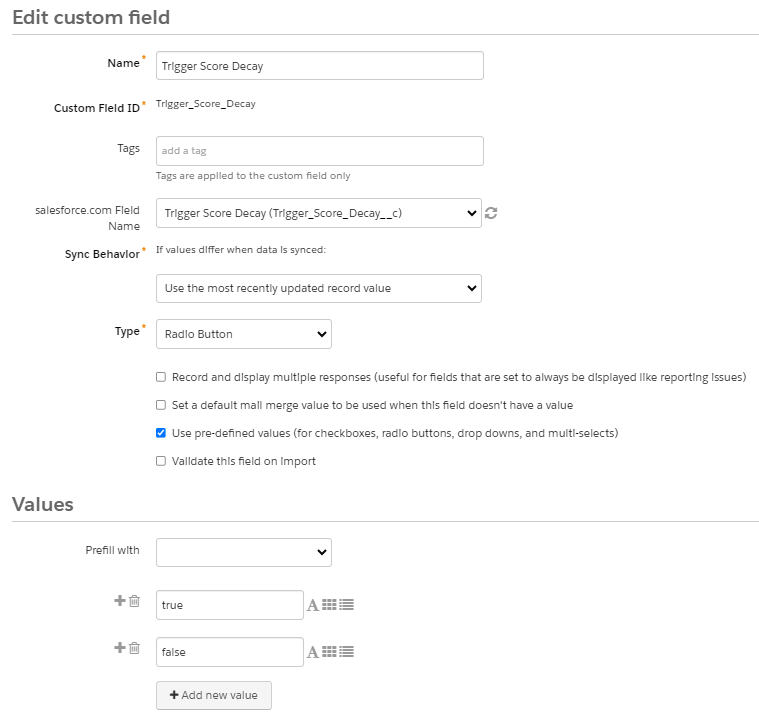
  2. Create a “Trigger Score Decay” custom field in Account Engagement.
    • Type = Radio Button
    • Sync behavior = Use the most recently updated record value
    • Values (these are case sensitive)
      • true
      • false
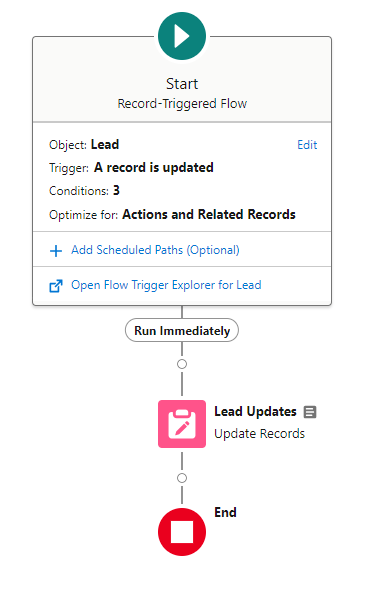
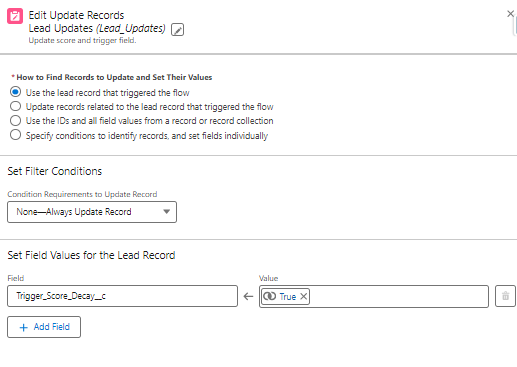
  1. Create flows on the contact and lead objects to update the “Trigger Score Decay” checkbox based on the defined entry criteria. This is a straightforward flow that uses a single element to update a checkbox field. The checkbox will later be used to trigger an automation rule in Account Engagement.

Full Flow

Entry Conditions Configuration

Update Triggering Records Element

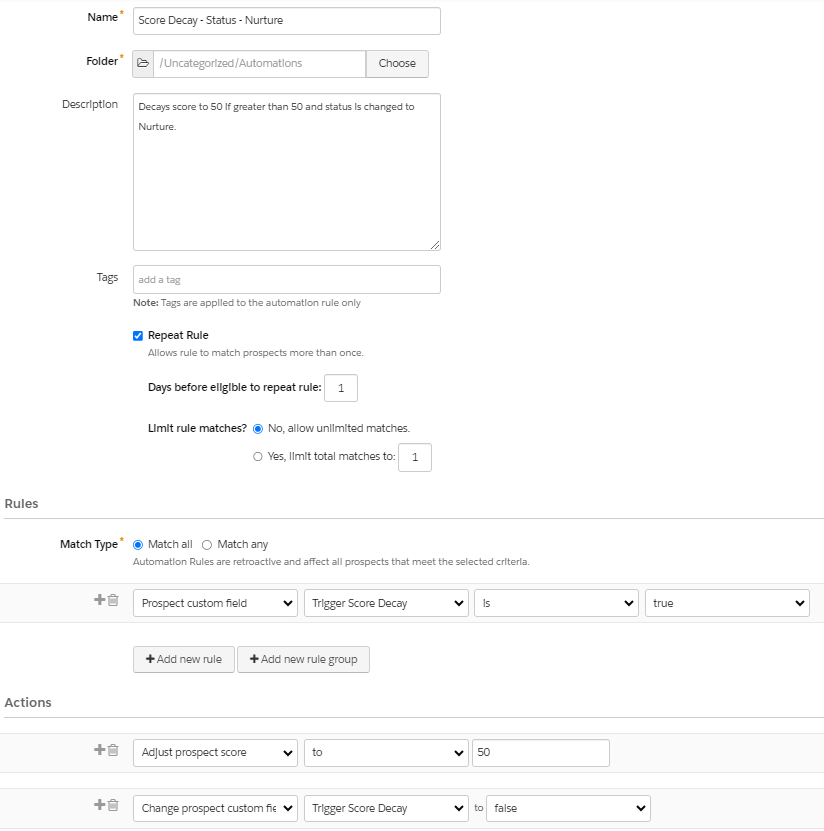
  1. The final step is to create an automation rule in Account Engagement that will decay the score if the “Trigger Score Decay” checkbox is checked. The rule will also need to uncheck the box as a way of “resetting” the record. 

Score Decay – Status – Nurture Automation Rule

  1. Test, validate, and activate. As with all automations, be sure to test by debugging your flows and previewing automation rule matches before activation.

Address Overinflated Scores

Scores in Account Engagement are meant to identify prospects that are actively engaging with your marketing. If scores are not decayed, identifying prospects with recent activity can become a challenge and lead to confusion for your sales teams.

Score decay is fairly simple to implement, but should not be done in a vacuum. It’s very likely that there are processes in your Salesforce or Account Engagement orgs that could be triggered when the score of a contact or lead is decayed. For this reason, it’s highly recommended that testing is conducted in a sandbox organization prior to implementation in production and that key stakeholders are included in the process. 

Need help along the way? Send us a message to see how we can help you reach your goals.

No more posts to show