Do you have an organized brain, enjoy project managing across multiple stakeholders and departments, love visualizing a process, and want to prove it with a new Salesforce certification? Well, then the Salesforce Business Analyst Certification is the right one for you!
Here is our guide to passing the Salesforce Business Analyst Certification exam. Good luck!
Step 1. Review the Salesforce Business Analyst Exam Guide & Schedule Your Test
Quick reminder that there are no longer any prerequisites for the Business Analyst exam! It is helpful to know or have experience with Salesforce and understand platform functionality and terminology though.
According to the Salesforce Business Analyst exam guide, this certification is “designed for Business Analysts with Salesforce experience. The successful candidate understands business needs, captures requirements, and collaborates with stakeholders to support the development of Salesforce solutions which drive business improvements.”
If you are interested in refreshing your Salesforce skills or earning one of the related certifications first, here are two helpful resources:
The exam guide goes into each objective in more detail and also describes the person who is more likely to succeed with this certification (a.k.a. you!).
Schedule Your Exam
Once you have confirmed that this is the certification for you, schedule your test so we have a deadline to study for. Here is the link to make this the easiest step.
Step 2. Organize Your Study Resources
We already established we have well-organized, to-do list, and process-visualization brains so I’ve gone ahead and done the pre-work (Googling) for you to track down our favorite resources, practice tests, and study guides. Plus we’ve included some key topics to revisit based on our experience earning the Business Analyst certification.
This is an essential step for the Salesforce Business Analyst certification! You need to get in the head of the Salesforce test writers to best understand the use cases and user stories they are presenting because at first glance, most of the answers are going to appear correct. However, we want to choose the best process, steps, model, team structure, etc. that matches the specifics of the situation outlined.
Cert Prep: Salesforce Business Analyst – free, there are good practice questions within the Trailhead modules (not the questions at the end for checking understanding, but these are helpful too)
Salesforce certifications are difficult. Lucky for us, there are a ton of welcoming communities that we can reach out to for support.
One of our favorites is co-led by one of our own Sercante team members, the Boston Area Community Group with Jordyn Jaffer. This group hosts annual, virtual certification camps that are run completely by attendees. The attendees work together to present different topics each week to help each other prepare for taking the certification. Jordyn says, “ We are in our fourth year of facilitating these and are tackling the Salesforce Advanced Administrator Certification (for the second time!).” Check out their upcoming camps on their Trailblazer Community page here – Boston Women in Tech.
Topics Worthy of a Second Glance
Know the process chart names and when to best use them based on the use case described. There are specific matches Salesforce will be looking for and there are going to be a lot of lengthy use case and user story questions.
Understand the order of the four phases of the implementation lifecycle.
Step 3. Ready? Pass the Salesforce Business Analyst Certification!
You might never feel ready to take the Business Analyst test – there are endless ways to think about processes and user stories and everything in between. But just like the solutions we are managing and building, there has to be an activation date.
Test-Taking Tips from the Sercante Dragons
Find Keywords
These phrases in the questions can indicate the answer or what you can eliminate as an answer.
Mark Questions for Review & Read Them Carefully
Always refer back to the full question during or at the end of the exam when you are starting to second guess yourself, there might be something key you missed when you first read it.
The correct answers for this exam are going to be very order-dependent so make sure you read them slowly.
Pay Attention to How Questions Answer Each Other
The use cases being described usually highlight a specific title or department so consider that when choosing the correct answer.
Think about how they phrased other questions as that might help you focus on the correct answer for a question you were unsure of.
Don’t Overthink Questions that Seem Easy
There are going to be a lot of questions that sound the same in this exam – don’t get stuck in a second-guessing loop when the answer seems too simple.
Using Synonyms of Words Can Help Answer a Question
For example, “what is the best diagram for this?” One of the correct answers is “the big picture.”
Have a General Understanding of the Main Salesforce Products
There will be questions and answers that list actual Salesforce platforms or functionality by name. For example, “your team/client/customer has this problem, which feature/product would help solve this?”
Good luck, you’ve got this!
Share any resources or problem topics in the comments section to help prepare the next group of Salesforce Business Analyst test takers.
If you’re like many, setting up an SMS program is not part of your everyday tasks. And if I were a betting woman (I’m not), I’d bet you’ve likely never done it before. If you have, then you likely need a refresh.
Moreover, if you have an existing SMS program and now find yourself in a situation where you’re switching providers, you might be even more unsure of where to even begin.
TDLR: Whether newbie or pro, there’s a lot to consider and unpack not only from a strategy perspective but the technical stuff as well. In this post, we’ll cover everything you’ll need to consider for your SMS mobile strategy — whether you’re new to SMS or rethinking your SMS program.
SMS Mobile Strategy Considerations
Many times, when organizations begin on the path of charting out their SMS communication they naturally start down the path of wanting to replicate all the communications they currently have for the email channel.
DON’T BE THAT PERSON.
Instead, consider the following.
The purpose of your program
Why do you want to communicate with people via SMS, to begin with? Better yet, what’s the benefit to the organization, and more importantly, to your customers?
A common purpose of an SMS program is to provide direct, efficient ways to engage, which leads to improved customer satisfaction and better business outcomes. The net on this point is to ensure you’re doing it for good reason. You may be in an industry where an SMS program just doesn’t make sense, and that’s ok!
Examples of typical SMS communications
By refining the purpose of your program, you can begin to back into what makes sense to send via SMS.
Consider your customer experience: What are the types of things that might be beneficial to receive via text? If you think about the intent of a text message in general and why we send them in our day-to-day lives, you’re usually sending a text because:
Your message is short, direct, and doesn’t require live dialogue.
It’s something timely and you’re desiring a response back quickly.
It’s efficient.
With that lens in mind, let’s think about the types of messages your organization sends and what fits into this criteria mentioned above.
Here are some examples of communications that make sense to send via SMS:
Appointment Reminders: Remind customers or clients of upcoming appointments, reservations, or important deadlines.
Order Updates: Notify customers about the status of their orders, including order confirmation, shipping updates, and delivery notifications.
Account Notifications: Send account-related notifications such as payment reminders, account balance alerts, or security alerts (e.g., suspicious login attempts).
Promotional Offers: Inform customers about special promotions, discounts, or exclusive deals to drive sales and increase customer engagement.
Event Invitations: Send invitations or RSVP reminders for events, webinars, conferences, or workshops.
Customer Support: Provide quick and efficient customer support by allowing customers to text inquiries, report issues, or request assistance.
Emergency Alerts: Send timely alerts and updates during emergencies, natural disasters, or other critical situations to ensure the safety and well-being of customers or employees.
Surveys and Feedback Requests: Gather feedback from customers by sending SMS surveys or requesting feedback after a transaction or interaction.
Authentication Codes: Use SMS for two-factor authentication (2FA) or one-time passwords (OTPs) to verify user identities during account sign-in or transaction authorization processes.
Appointment Scheduling: Allow customers to schedule appointments, consultations, or service bookings via SMS, with automated confirmation messages.
Membership Renewals: Remind members or subscribers about upcoming membership renewals, subscription expirations, or important membership-related updates.
Event Reminders: Send reminders about important dates, deadlines, or milestones related to events, campaigns, or initiatives.
Internal Communications: Communicate important updates, announcements, or reminders to employees, contractors, or stakeholders within the organization.
Educational Messages: Deliver educational content, tips, or tutorials related to products, services, or industry trends to inform and engage customers.
Feedback and Reviews: Prompt customers to leave reviews, ratings, or testimonials after a purchase or interaction with the organization.
More times than not, these communications fall into the transactional bucket. But as you saw above, they don’t have to. When deciding which communications to send via SMS, it’s essential to consider the relevance, timing, and audience preferences to ensure that messages are well-received and contribute to a positive customer experience.
Real-world SMS example: Player communication for a bocce ball league
Incorporating SMS into a communication strategy doesn’t have to be all or nothing either. There are instances when sending both an email and text makes sense.
Here’s a real-life example: I play in a bocce ball league (yes, those exist), and if the courts are too wet because of rain, they’ll cancel. The challenge is since there are no makeups, they really try to avoid canceling. It really comes down to the wire for making the decision to cancel. The league used to send an email as soon as they decided, but chances are you didn’t see it until you were already there.
To improve this customer experience, they developed not only a rain hotline (via webpage), which shows the last time it was updated (e.g., “10 mins ago” with status updates like “we will make a decision by x time”). The league will now also send a text message via SMS letting you know the status of your game as soon as it’s canceled.
They also must have gotten tired of fielding emails and phone calls (who knew us bocce ballers were such a passionate group) that they now remind everyone via text message that the rain hotline exists, and they send a link that you can access via mobile as well.
End Destination
Once you’ve established ‘the why’ of your SMS messaging and what you’re sending, don’t forget about the end destination. This is where the true professionals shine.
Ensure your end destination is mobile-optimized. For example, there’s nothing worse than sending an SMS to provide feedback via survey, and it takes you to a non-mobile-optimized web page. Not only have you wasted money, effort, and time setting up this message, but you are creating a customer experience of friction (which is likely the opposite of what you’re trying to achieve). To add more fuel to the fire, this extra stinks — especially when it comes to getting feedback, which is already hard to receive. The oversight means you’ve just blown your chance. WOMP WOMP.
Real-world SMS example: Frequent flyer
So, let’s talk about a positive SMS example. If you’re like me and fly a decent amount, you’ve got your flight app (Delta in my case) up and running the day of your flight. It works great (most of the time… I could do another blog post on that… but another day), and if you remember to open the app and look at it on occasion, you’ll see that a gate might have changed or the time of flight has been updated.
However, I’m not always able to check the app when I’m on the move. So, Delta is sending SMS notifications as soon as these changes occur. This is especially helpful — I can see these notifications pop up on my phone without having to open the app to learn more. I also see them on my watch (when the battery isn’t dead). And if I want to see more from the text, I can click the link and it delivers me to the app, which makes the end destination all that more valuable.
I’ve seen some brands come close to excellence where they will drop you off to a mobile-optimized page. However, the real pros consider app downloads too.
As new tech and consumers evolve, so should a marketer’s strategy. SMS programs are tablestakes these days, so getting your strategy right is a must for most consumers.
Technical Considerations for SMS Messaging
How SMS marketing works
With a solid grasp of what a mobile strategy should entail, we can pivot to the technical piece. Let’s start with how SMS works for marketers as a whole, taking Salesforce as our platform of choice in this example.
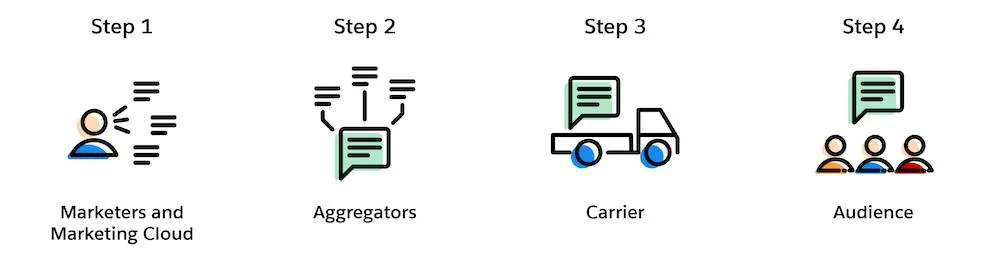
For Salesforce users, there are 4 steps to send an SMS message:
Marketing creates a personalized text message in Marketing Cloud Mobile Studio
Aggregator preps message for delivery to the appropriate carrier (Aggregator = Salesforce partners that connect our messaging platform with carrier networks around the world) (Carrier = mobile providers across the globe)
Carrier receives messages and delivers them to the final audience
The customer receives a personalized text message
Preparing for SMS Sending
But for those simple steps to happen, there’s a bit of preparation involved, especially if this is your first time.
Here are the steps to prepare for SMS sending:
Determine your code needs – Short vs long code, dedicated or private. Learn more about these options here.
Select an SMS platform provider and negotiate a contract – Many times as part of your contract they will acquire the code for you, but provisioning is extra.
Provision your short code (this can be done with a consulting partner like Sercante or directly with the provider, which is typically more costly than going with a partner).
Once the shortcode is made available within the platform, you’ll need to set up your required keywords, and messages as well as obtain consent. (Keep on reading to learn about opt-in best practices).
To migrate or not migrate your SMS program
If you’ve had the luxury of setting up your organization’s SMS program once and are now looking to switch providers, you might be scratching your head and thinking about what’s better: migrating our existing one or spinning up a new one?
In true consultant fashion, the answer is: IT DEPENDS 🙂.
Like with many options in life, it all goes back to what’s important — in this case — time, money, and customer experience.
Let’s look at the pros and cons of both scenarios:
Scenario
Pros
Cons
Migrate Existing
Risk of losing people is low
There could be up to 8-12 weeks of downtime as you move your code across platform providers, aggregators, and the like. It can get complicated — especially from a lease/ownership perspective
Acquire New
The implementation process is relatively straightforward, sometimes quicker than the migration route. There’s no downtime in the ability to send SMS
Education of new code may be required for existing subscribers. There’s a risk of retention losses.
SMS migration route — let’s stay friends
If keeping your existing code outweighs the downtime you’ll encounter, there will be a decent amount of coordination between both old and new providers.
Below are some high-level steps of what’s involved when migrating SMS programs:
Contact existing provider – Let them know your intention to retain the existing shortcode and inquire about the process for releasing the shortcode to use with the new provider, as well as any associated fees or requirements. Please note: not every provider will release their shortcode.
Verify Contractual Obligations – Review your contract or agreement with the current to understand any terms or obligations related to the shortcode. Ensure that you comply with any contractual requirements before proceeding with the migration.
Coordinate with the new provider – Let them know you desire to transfer your existing shortcode to their platform. Provide any necessary information or documentation requested by the new provider to facilitate the transfer process.
Coordinate Timing– Coordinate the timing of the shortcode transfer between old and new to minimize disruption to your messaging campaigns. As mentioned in the cons, there’s normally a downtime where your code will not be operational. Ensure that there’s a smooth transition between the two providers.
Update Opt-in Process – If necessary, update your opt-in/opt-out process to ensure compliance with regulatory requirements when using the shortcode via the new provider. Obtain opt-in consent from subscribers to receive messages on the new platform.
Once this is all squared away and your shortcode is available in the new platform, you can proceed to set up your ‘from’ keywords and ‘to’ message. While migration of an existing code has its perks, the timeline is typically elongated compared to its counterpart.
New SMS code route — Team ‘New Friends’
So if downtime, or getting up and running is more your concern, a new code may be the best (friend) route.
All joking aside, when acquiring a new shortcode it’s essential to ensure compliance with regulations like the Telephone Consumer Protection Act (TCPA) and General Data Protection Regulation (GDPR) if applicable. And with that responsibility of re-opting everyone in here are some general best practices.
New SMS code best practices
Inform: Send out a clear and transparent communication informing subscribers about the change in shortcode and the reason behind it. Explain any benefits they might gain from the transition.
Highlight Benefits: Emphasize any advantages or improvements associated with the new shortcode, such as better service, more relevant content, or enhanced security measures.
Request Opt-In: Clearly ask subscribers to re-opt-in to continue receiving messages by sending a specific keyword or opting in through a designated method (e.g., texting a certain number, clicking a link, filling out a form).
Provide Instructions: Offer simple and straightforward instructions on how to opt in. This could include step-by-step guidelines via text, email, or on your website.
Assure Privacy and Security: Reassure subscribers that their privacy and security are a priority and that their information will be handled in accordance with relevant regulations.
Offer Incentives (Optional): Consider offering incentives or rewards for those who re-opt-in, such as discounts, exclusive content, or entry into a giveaway.
Set Deadline (if applicable): If there’s a deadline for re-opting in to ensure uninterrupted service, clearly communicate this to subscribers to create a sense of urgency.
Follow-Up: Send reminders to those who haven’t opted in yet, closer to the deadline if applicable, to ensure they don’t miss out on staying connected.
Respect Opt-Outs: Honor any opt-outs or preferences expressed by subscribers who choose not to re-opt-in and ensure they’re removed from the communication list associated with the old shortcode.
Track and Monitor: Monitor the opt-in process closely and track the success rate. Analyze any feedback received to improve future communication strategies.
Remember to maintain transparency throughout the process and make it as easy as possible for subscribers to re-opt-in to the new shortcode.
Evolving with your customers
In conclusion, as technology and consumer behaviors evolve, marketers must adapt their mobile program strategies to remain effective. SMS marketing, as a powerful tool, provides a direct and personal way to reach customers. By incorporating SMS into your overall communication strategy, you can enhance customer engagement, drive traffic to your website or app, and ultimately achieve your marketing goals.
A successful SMS marketing program requires careful planning, compliance with regulations, and a focus on delivering valuable and relevant content to your subscribers. By following best practices and continually optimizing your campaigns, you can leverage SMS to create a strong connection with your audience and drive business growth.
Welcome to the marketing side of Salesforce! As a Salesforce admin, you may occasionally need to assist your marketing team in developing processes or generating reports from data in Salesforce and Marketing Cloud Account Engagement (Pardot). Understanding Account Engagement and how it affects your Salesforce org can enhance your ability to contribute to those initiatives.
7 Account Engagement Facts Salesforce Admins Must Know
In this blog, we will review several fundamental concepts in Account Engagement and how they relate to your role as a Salesforce Administrator. This guide is designed to provide you with insights from a Salesforce perspective about Account Engagement so that you can best support marketing and other teams using the platform. While these features are available to all organizations, access to the features can vary based on your org configuration and tier.
Tip 1: We call people “prospects”
In Salesforce, you are accustomed to working with Leads and Contacts. While this does carry over, the platform labels “people-records” as Prospects. Prospects can exist solely in Account Engagement or be synced with existing Salesforce records.
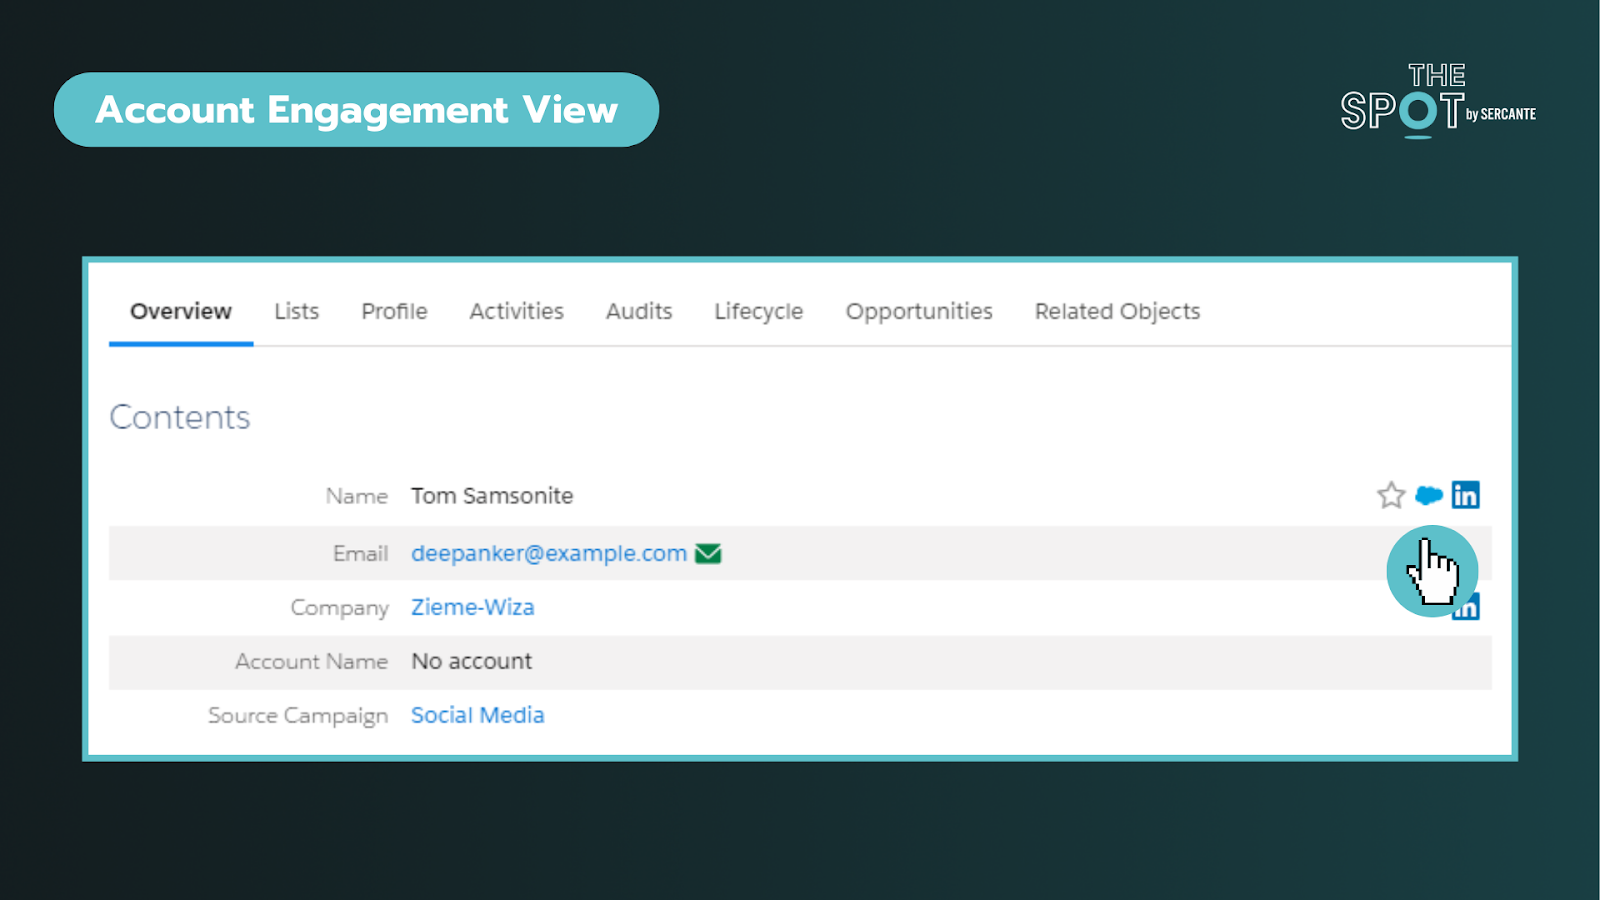
Verifying Prospects are linked to Salesforce records
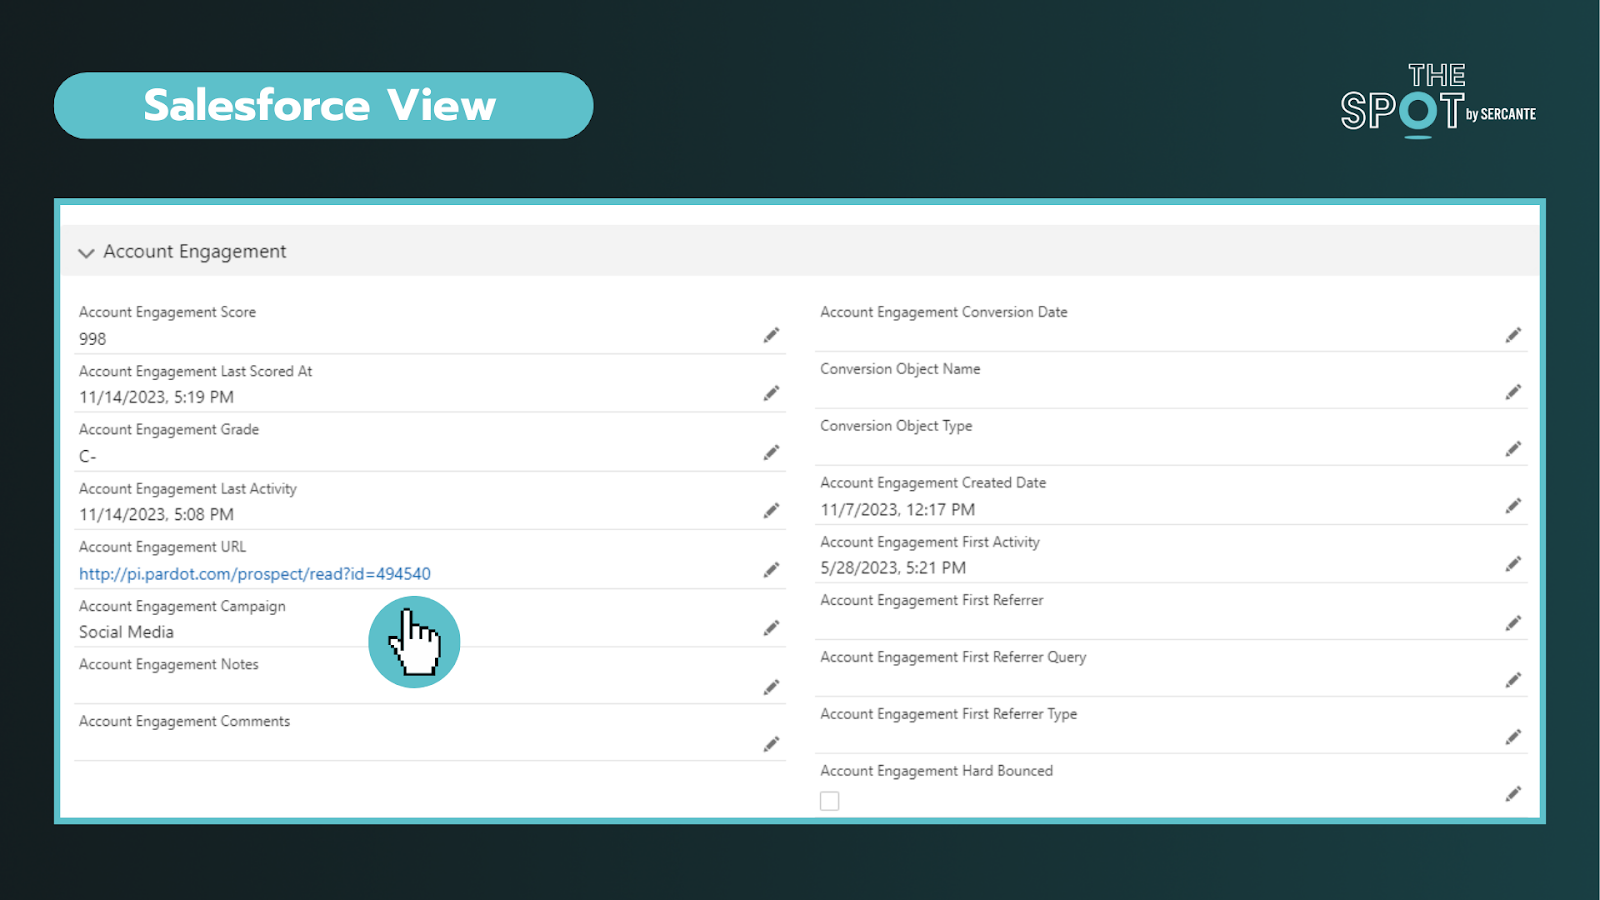
To verify that a Prospect is linked to a Salesforce record, you can click on an individual record and look for the Salesforce cloud icon listed on the right of their name (see above) or by the CRM ID listed at the bottom of the record. Clicking on this cloud icon will take you to the connected Salesforce record. In Salesforce, you can click the Account Engagement URL to bring you into the platform. This is particularly helpful when you are trying to diagnose data sync issues.
Key reminders:
Records are matched using 18-digit IDs and email (if no matching record is found)
You can navigate from Salesforce to Account Engagement records and vice versa
Managing deleted records and duplicates may require additional effort across both platforms
Tip 2: Add visibility for sales and marketing teams in Salesforce
Enabling Account Engagement introduces several new fields, components, and features exclusive to the integration. You should review the implementation guide and work with your team to align on what information is valuable for sales and marketing to deliver on their respective functions.
The package includes fields like engagement score, fit (grading), what “object” they converted on, and a log of their latest activity in Account Engagement, to name a few. Additionally, depending on your tier, you may also find additional components you can take advantage of, such as B2B Marketing Analytics.
When mapping fields, not all Salesforce field types transfer seamlessly to Account Engagement. To avoid data loss, review your fields (including matching API names) and ensure they are mapped across objects in Salesforce before attempting to sync any data into Account Engagement.
Key reminders:
Field types may affect your ability to map fields into Account Engagement
Beware that Formula fields do not trigger sync updates in Account Engagement
Field level permissions and user profile access on the integration user can affect dataflow
Tip 3: Security matters but looks and works differently
Security is the #1 pillar of any Salesforce Admin role.
There are different levels of access you can give to Salesforce users via permission sets. Those levels include:
No access to Account Engagement data – on either platform: This is usually for operations teams who don’t need access
Access to Account Engagement data on a page layout in Salesforce: This is usually for sales/SDR teams
Access to the Account Engagement app: This is usually for marketing and creative teams
To enter the Account Engagement app, the user’s record must be mapped into Account Engagement. No user in Account Engagement, no access to it regardless of permissions in Salesforce.
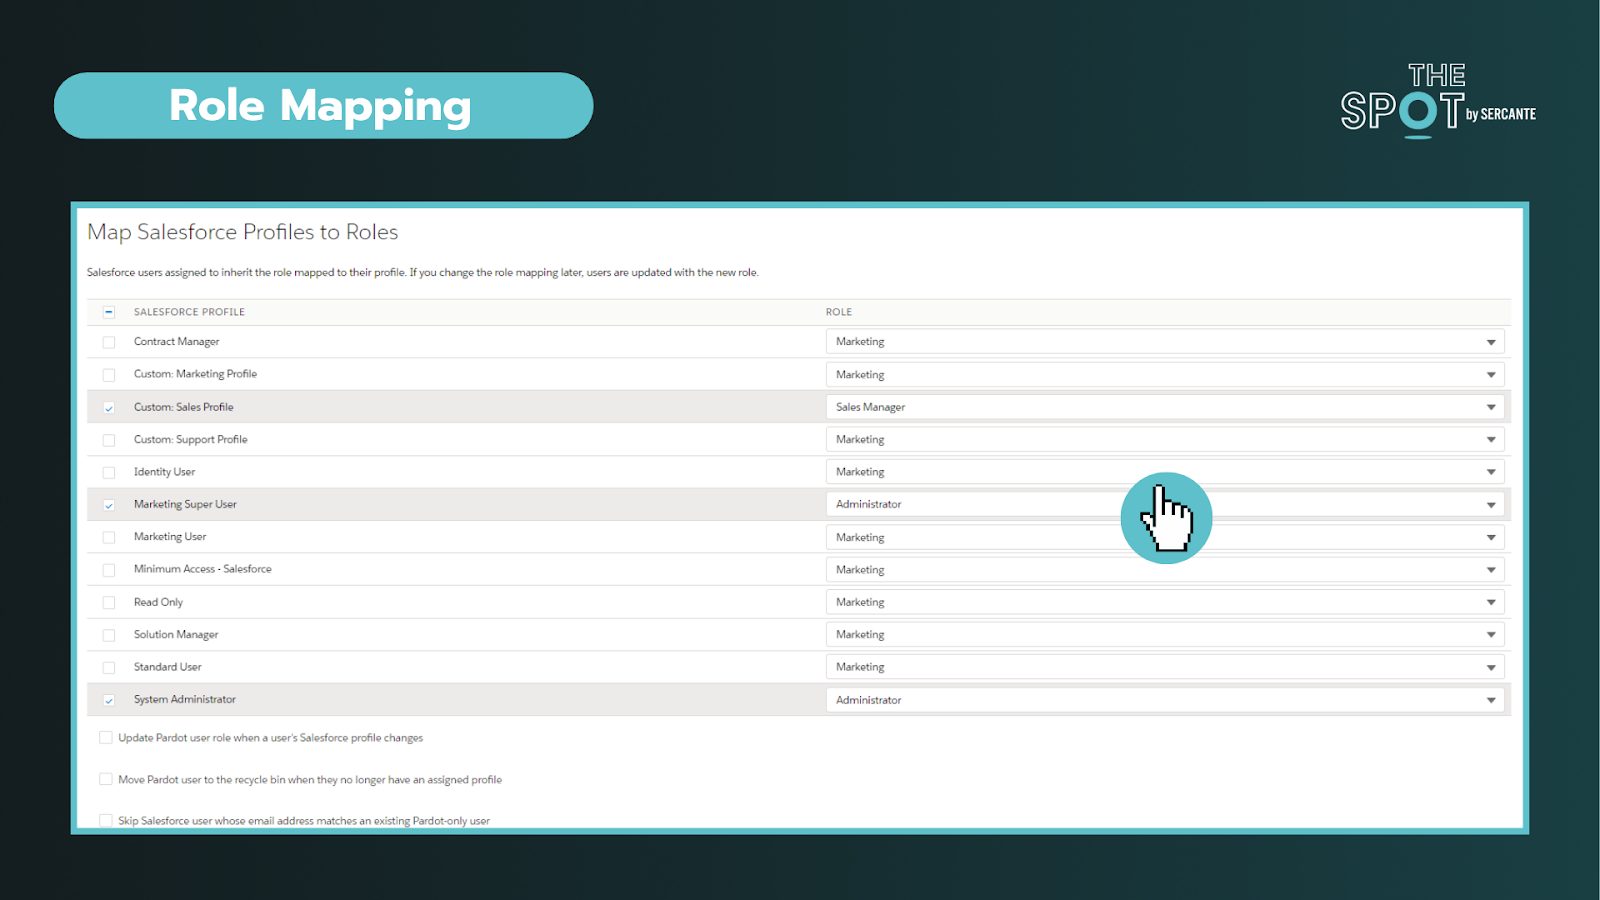
Secondly. while you may be familiar with profiles and roles in Salesforce, well Account Engagement adds another layer of complexity to the mix. Account Engagement has its own “roles” and they do completely different things. These roles only apply within Account Engagement and allow you to see and do specific activities (build segments, forms, etc) on the platform.
Default Account Engagement user roles include Administrators, Marketing, Sales Manager, and Sales. You can configure these roles under the account settings section and connect profiles to roles within the Salesforce connector section in Account Engagement.
To conclude, you can personalize the levels of access to different Users. You’ll ultimately need two “keys” to get into Account Engagement (a Salesforce permission set and an Account Engagement role assigned to a synced User). It is important to work with marketing to outline the level of access needed to perform daily tasks.
Key reminders:
You can create custom roles in Account Engagement (may require an add-on)
All the users with the same role, have the same access in Account Engagement, regardless of their permissions in Salesforce
Tip 4: The Salesforce Integration is flexible
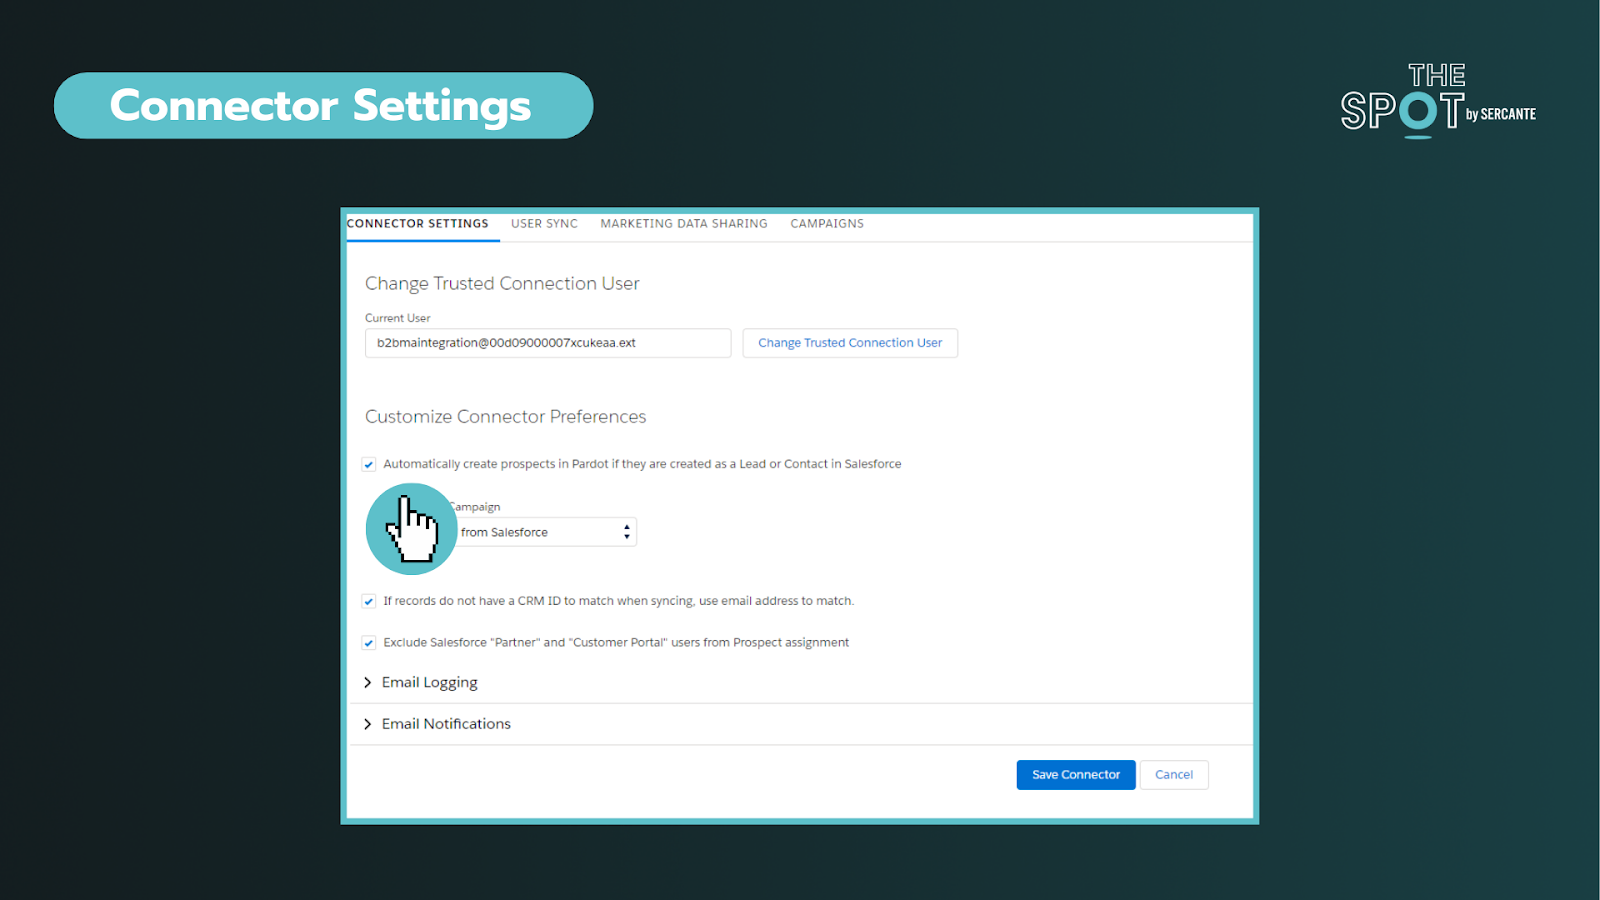
This integration (or connector) is the key to aligning your data between two systems. Through the connector, we can sync everything from Users, objects, fields, and campaigns. You can deep dive into the individual components here.
In these settings, you can choose if you want to allow a bi-directional sync or not. This is your on/off switch. Most customers want this feature enabled.
As data comes circulates between the platforms we can be met with conflicts between the two systems. For most teams, these conflicts can be attributed to their use of validation rules or restricted field values and dependencies. The conflicts are called sync errors in Account Engagement.
These conflicts can be found under the Salesforce connector gear icon (under Connectors) and can range from:
Access issues – Connector user lacks access to read/write to an object
Data formatting issues – Issues with field types or values
Process alignment issues – dependencies between fields or steps in a process
As an admin, is important to support your team in resolving these issues as quickly as possible to restore data sync on those records. These sync errors offer opportunities to improve communication between teams and for process improvements. Our team at Sercante often uses ProspectUpdater to help customers fix data formatting issues at a scale.
Key reminders:
Enabling a bi-directional sync of data is recommended but optional
Large imports can cause bottlenecks – if you notice this becoming an issue you may want to check daily processes as well
Tip 5: Account settings are the key to understanding your org
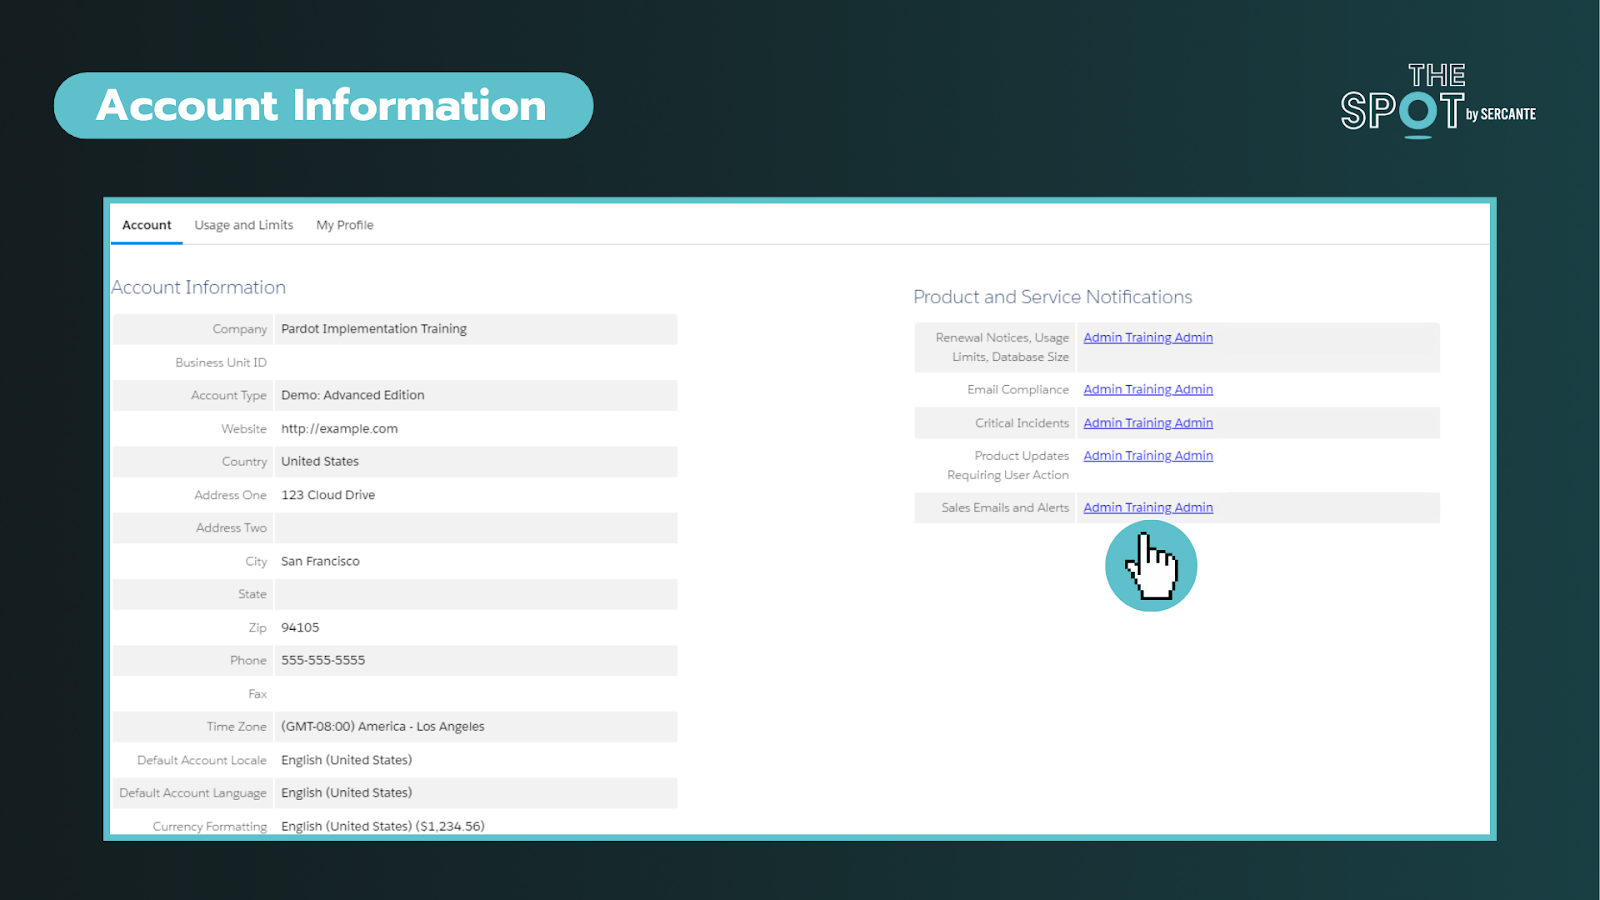
This section can help you identify important information about your account such as the Business Unit ID, when the account was enabled, admin alerts, and account limits. On the right side of the screenshot below, you will find the ability to personalize who gets alerts about these items. To ensure these alerts are taken seriously, ensure these are received by team members who are active in the org.
The recycle bin in Account Engagement doesn’t autodelete after 30 days, feel free to use it to free up space (exclusions may apply)
Your account ID, account tier, and API key can all be found here and may be useful for certain integrations
Tip 6: Leverage Account Engagement forms
You’re probably familiar with web-to-lead forms. While these mechanisms can help do more with Salesforce they do not cookie leads or contacts upon completion. Why does that matter? Cookies help us identify prospects and avoid duplicates.
With Account Engagement you can simplify the form creation and management (say goodbye to your external tools) or form handlers (similar to webhooks) to streamline your inbound marketing and processes. The forms can be embedded as Iframes on your website, Account Engagements’ landing pages, or stand-alone.
Upon completing a form, you can set a cookie on the Prospect. You can still do notifications (email and Slack), send emails, add to segments, and so much more without complex flows or other Salesforce automation.
Key reminders:
Testing forms incognito mode is strongly recommended
Cookie length can be adjusted under your account settings or by individual user browser settings
Tip 7: Encourage campaign collaboration
First thing is first, Account Engagement has campaigns too! However, these are exclusively used in Account Engagement for capturing the 1st touch interactions (all time). This makes it challenging to see the life of the lead across time and also makes reporting difficult.
Luckily, we can create and sync Salesforce campaigns into Account Engagement for the same purposes AND to capture the multiple touches on their journey to conversion and beyond.
By leveraging Account Engagement’s automation to add prospects to Salesforce campaigns, we avoid doing multiple imports to update the Campaign member records. This functionality also allows us to take advantage of standard Campaign reports in Salesforce that can help us see ROI and campaign influence across our initiatives. To help find the latter, we created a Campaign Influence Started Pack, go check it out.
Key reminders:
When creating campaigns, leverage campaign member statuses and make sure to check the “active” checkbox to sync over into Account Engagement
Keep an eye on campaign members and campaign influence records, which can eat up your Salesforce storage if created in large volumes over time
Learn the essential Account Engagement concepts for Salesforce admins
While Account Engagement predominately serves marketing functions, Salesforce Admins play a crucial role in understanding and supporting its broader impact. By acting as the bridge between IT and marketing, admins can help facilitate more collaboration and more effective project rollouts on projects affecting users across the organization.
If you are struggling with any of these tasks/concepts, please reach out for assistance. Together, we can foster more seamless experiences that drive transformative outcomes!
Engagement Studio Programs (ESPs) are key for nurturing prospects until they are ready to send over to your sales team. But have you ever thought about A/B testing in ESPs?
ESPs allow you to automatically send your cold prospects awareness content and consistently stay top of mind so they can gradually warm up to a sales-ready stage. Although ESPs can be used for everything from basic email sends to complex process automations, one feature it lacks is native functionality for A/B testing. The feature exists natively (and wonderfully) for list emails, but in the realm of automated emails and ESPs, this is something marketers are chomping at the bit for.
Let’s dig into some of the creative workarounds that make A/B testing possible in ESPs as well as the pros and cons of each option.
How does native A/B Testing work?
Within the native functionality of list emails, A/B testing is very user-friendly. You can:
Create and edit two versions of your email (Version A & B) via the WYSIWYG editor or by editing the HTML
Specify if the email versions should be measured by email opens or email clicks (we prefer clicks)
Determine the length of the A/B testing period (1 hour to 30 days)
Determine the percentage of your audience that is tested
Automating the A/B testing process
The beauty of A/B testing with list emails is that so much of the process is automated.
Once the criteria have been set, Account Engagement automatically and randomly splits the test recipients from the intended recipient lists, sends the email variations to the test group, and, once a winner has been selected, automatically sends the winning version of the email to the remaining recipients on the list.
This native functionality allows marketers to fine-tune their marketing content by testing which subject lines, CTAs, and even images best resonate with their target audience.
A/B Testing in an ESP
To A/B Test in an ESP, you have a few options:
Split your recipient list before starting the ESP
Split recipients by last name
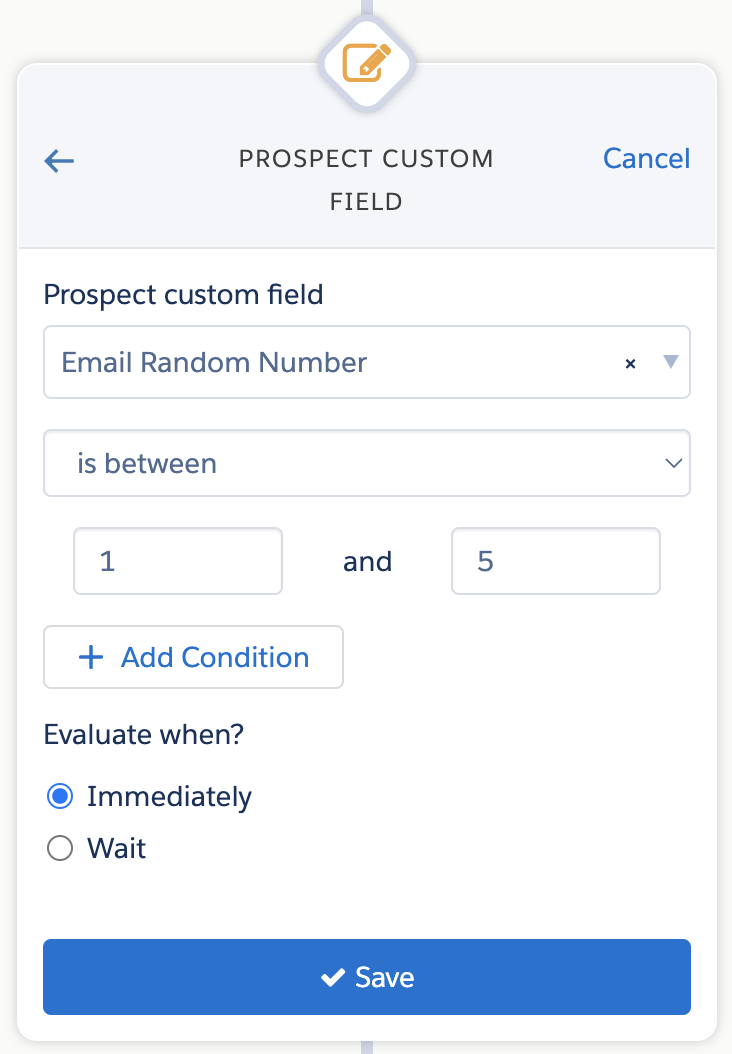
Split recipient by a random number from Salesforce
Split recipient lists using Prospect Updater
Using Native Split List Functionality
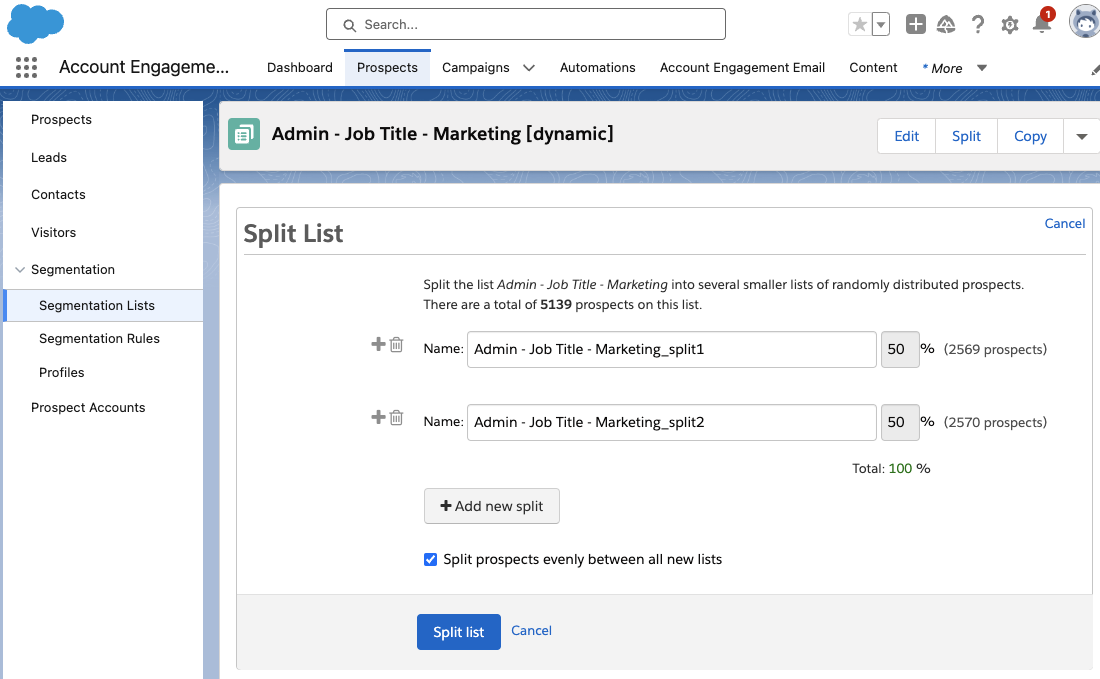
All Account Engagement Static and Dynamic lists can be split into smaller lists. While viewing your list, the split option will be available in the top right-hand corner. This allows you to split lists evenly, or specify the percentage on each list.
It’s important to remember that when splitting a dynamic list, the resulting lists will be static.
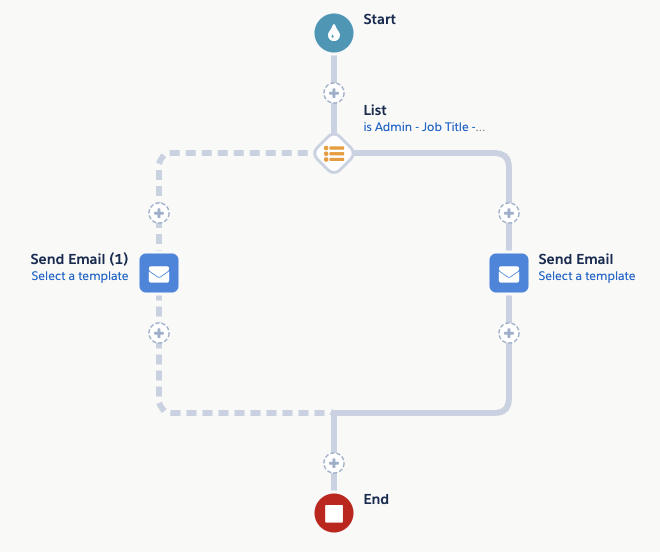
When using this option in an ESP, add an Action node before your email send that checks if the recipient is on split list 1. If they are a member of this list, they receive version A of your email. If they are not, they receive version B.
This option works best when your ESP has a static recipient list that you are not adding to later, for example, an event follow-up nurture. If you intend on gradually adding more prospects to this ESP, there isn’t a way to easily and automatically split the new prospects between the two lists.
Splitting by Last Name
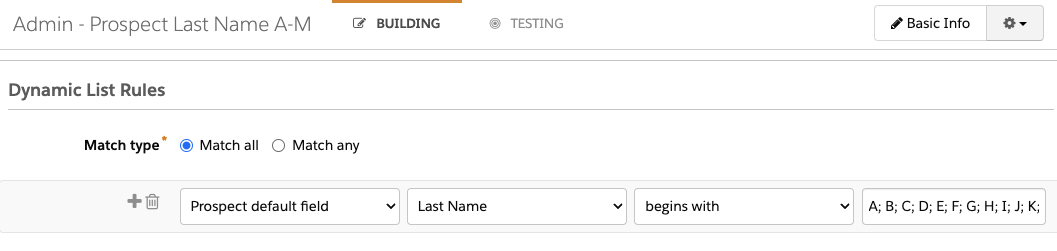
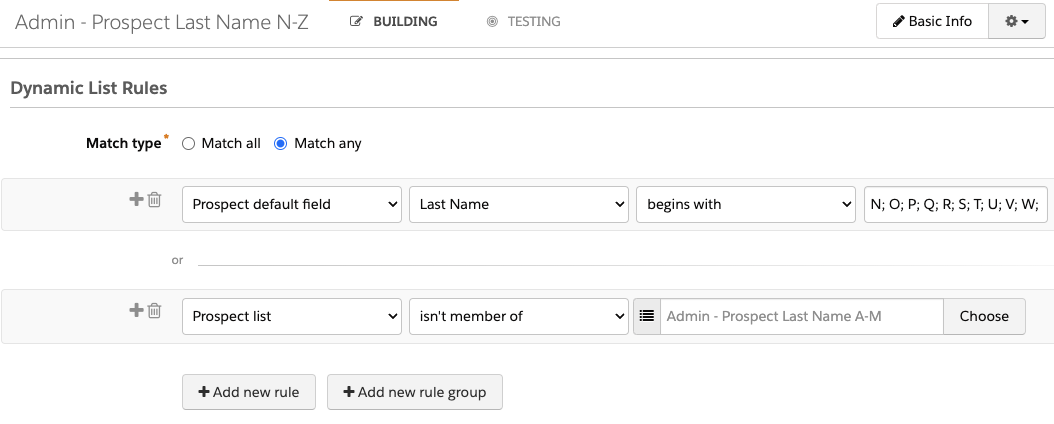
Another strategy is to split the recipients by last name. This allows you to split recipients with dynamic lists so you can continually add new recipients to the ESP. To do so, you’ll need two dynamic lists.
Your first list will capture prospects with last names starting with A-M:
Your second list will capture any prospects with last names beginning with N-Z, as well as any prospects with last names that start with characters, non-English letters, or numbers.
Finally, use these lists to split ESP recipients between your email variations.
Things to keep in mind
The drawback to this solution is that splitting by last name is not likely to evenly split your recipients. S, B, H, M, and C are the most common initials for last names, so if you split your recipients by “last name begins with A-M” and “last name begins with N-Z”, the “A-M” list is likely to be larger and can skew your data.
Generate a Random Number in Salesforce
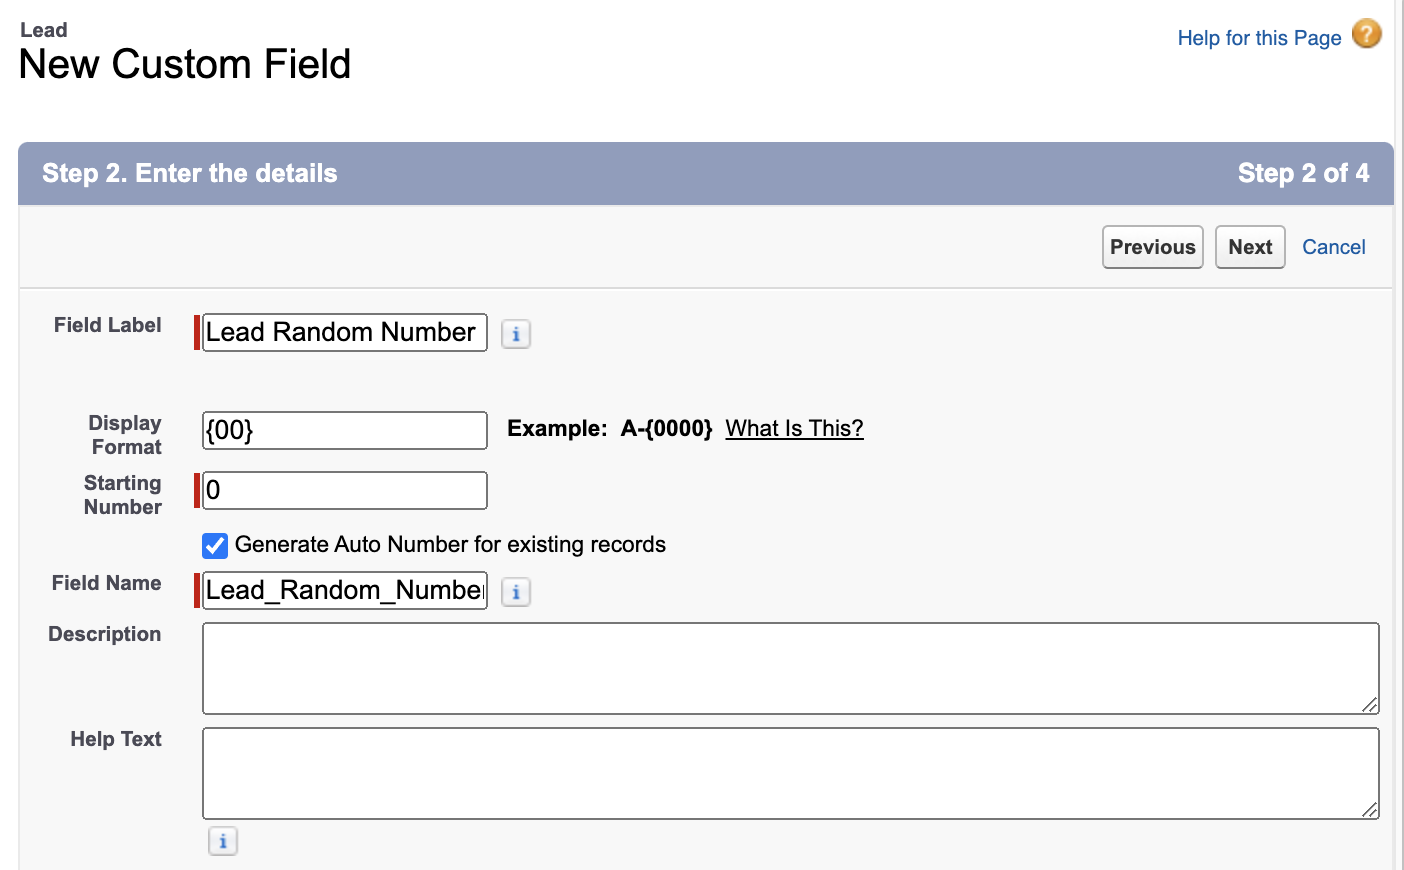
Another strategy for randomly splitting your recipient list is by using Salesforce’s Auto Number functionality. This allows you to auto-generate a random number for each Lead or Contact and push this data down to Account Engagement.
In Salesforce Setup, select Object Manager then Lead
Select Fields & Relationships
Select New
Select Auto Number then Next
Enter the following details
Field Label: Lead Random Number
Display Format: {00}
Starting Number: 0
Generate Auto Number for existing records: Selected
Select Next
Select which profiles have access to view this field.
Select Next
Select any Lead pages where this field should appear. I recommend leaving this field off your page layouts. Select Save.
Next, create a Formula field. While still in the Fields & Relationships tab of the Lead object, select New
Select Formula, then Next
Enter the following details
Field Label: Email Random Number
Formula Return Type: Number
Options – Decimal Places: 0
Select Next
Enter the formula MOD(VALUE({! Lead_Random_Number__c}) ,9)
Select Next
Select which profiles have access to view this field. Ensure the B2BMA Integration User profile, or your connector user’s profile, has access so Account Engagement can map to this field.
Select Next
Select any Lead pages where this field should appear. I recommend leaving this field off your page layouts. Select Save.
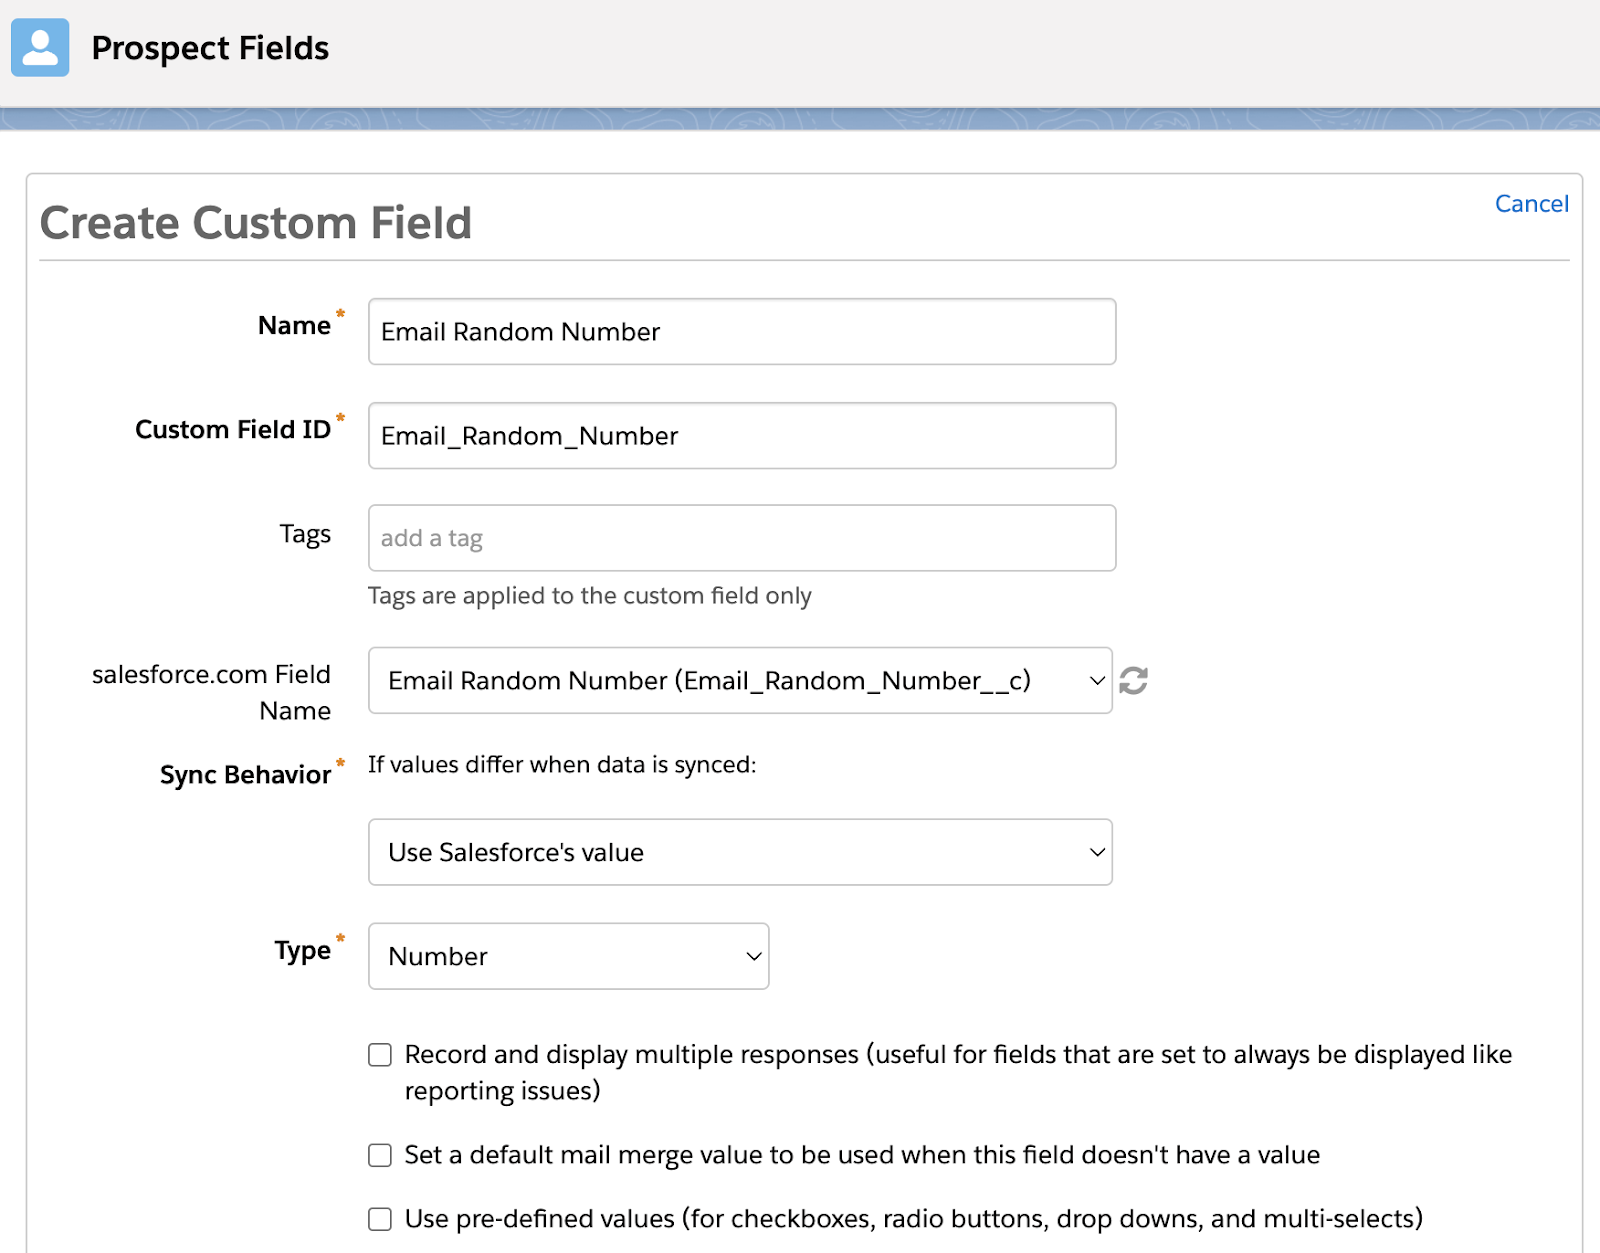
This formula field will auto-generate a random number between 1-9 for each Lead. Optionally, repeat the steps above for the Contact object. Finally, map the “Email Random Number” field to Account Engagement so this new field can be used to randomly split ESP recipients for an A/B Test.
Now, the only downside of this approach is that all your Account Engagement prospects must be synced to Salesforce before they will get an Email Random Number value. If you regularly nurture prospects in Account Engagement before syncing them over to Salesforce, you could use a combination of the Random Number and Last Name methods, or you can move to our last option.
Use Prospect Updater
Sercante’s Prospect Updater is a Swiss army knife for advanced data updates, cleansing, and manipulation within Account Engagement. This solution allows you to work with your prospect data in more streamlined ways and enables you to create a truly random recipient list split without your data being in Salesforce.
With Prospect Updater, you can use a RANDBETWEEN function to auto-generate a random number and stamp the number on new prospect records within minutes of them being added to Account Engagement. Then, use an Action node in an ESP to split your prospects into your A/B test groups.
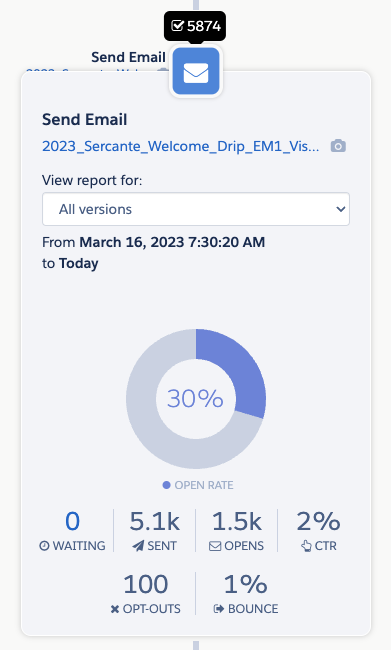
After you’ve selected your method of A/B testing and let your ESP run, it’s time to choose a winner and, optionally, consolidate your ESP down to 1 email version. The best way to compare the data between your A and B email versions is by using the ESP reporting tooltips. While on the Reporting tab of your ESP, select the email send node to view the metrics for that particular send.
The tooltips allow you to easily view the number of sends and opens as well as your click-through rate. If you want to dive deeper into each template’s metrics, select the name of the template from within the tooltip view to open the full email template report.
Start A/B testing in Engagement Studio Programs
It’s clear that Engagement Studio Programs (ESPs) are the backbone of effective prospect nurturing, guiding them along the journey until they’re ripe for the sales pitch.
So, let’s embrace the challenge, get creative, and make the most of our ESPs. With a bit of ingenuity and a keen eye on the metrics, we can craft killer campaigns that resonate with our audience and drive those all-important conversions. Here’s to pushing the boundaries and unleashing the full potential of our ESPs.
Remember, you can always reach out to the team at Sercante for help setting up your Account Engagement (Pardot) Engagement Studio Programs and configuring your A/B tests within them.
Product Note:Marketing Cloud Growth and Advanced are editions of Marketing Cloud Next and have also been referred to as Agentforce Marketing.
You may have heard Salesforce’s announcement of Marketing Cloud Growth Edition, their new marketing automation platform built on the Einstein 1 platform (also known as “Core”), intended for SMB marketers to help them more efficiently engage their audience at scale. This thrilling new announcement came with a lot of questions, one of them being, what is the campaign asset creation process like with Marketing Cloud Growth Edition? Well, here’s how it works.
Campaign Asset Creation with Marketing Cloud Growth Edition
When it comes to building your campaign in Marketing Cloud Growth Edition, you will be presented with five options:
Single Email with Einstein
Single Email Template
Message Template Series
Signup Form Template
Blank Email Campaign
Single Email with Einstein
When you use Single Email with Einstein, this starts your team off with using Einstein Co-create. The type of campaign you are planning will determine which option you choose from above, but when you use Einstein Co-create it expedites the campaign brief process.
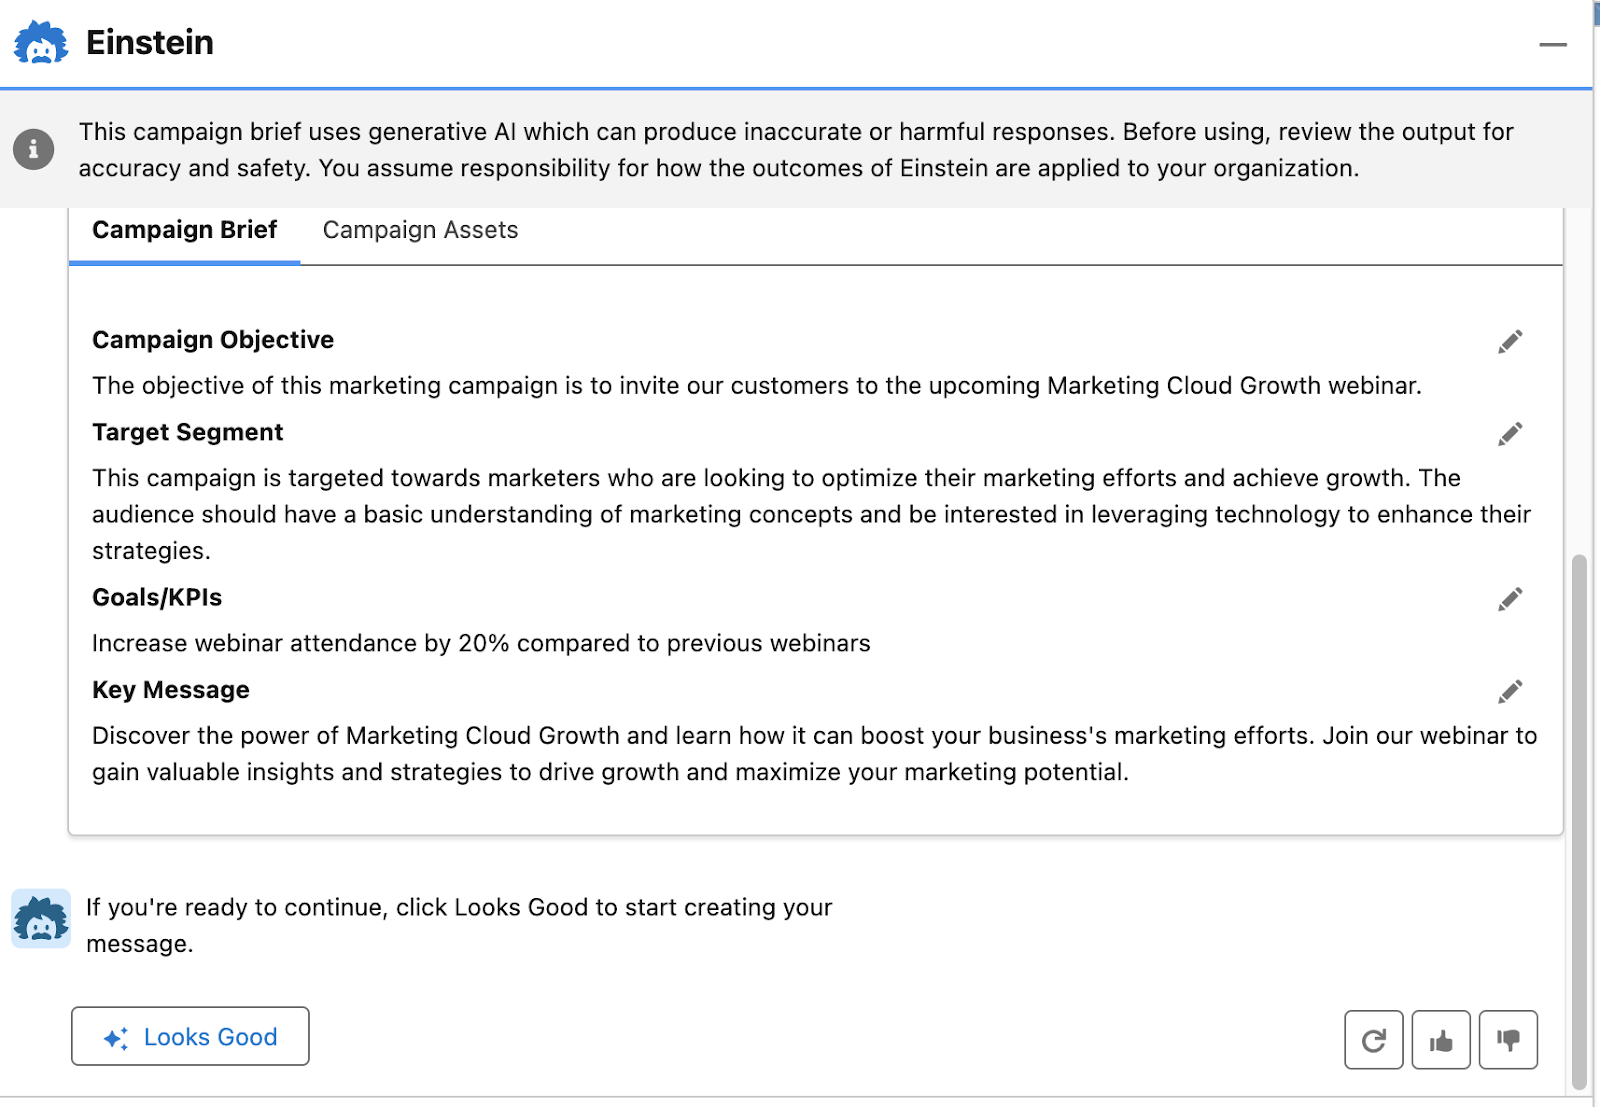
Einstein Co-create campaign brief
Your campaign brief is essentially the written plan for your campaign strategy. When you use Einstein Co-create, you provide the prompt to Einstein, sharing what your campaign is about the general goal you are looking to achieve, and your target segment and it will then generate a campaign brief with the below elements:
Campaign Objective
Target Segment
Goals/KPIs
Key Message
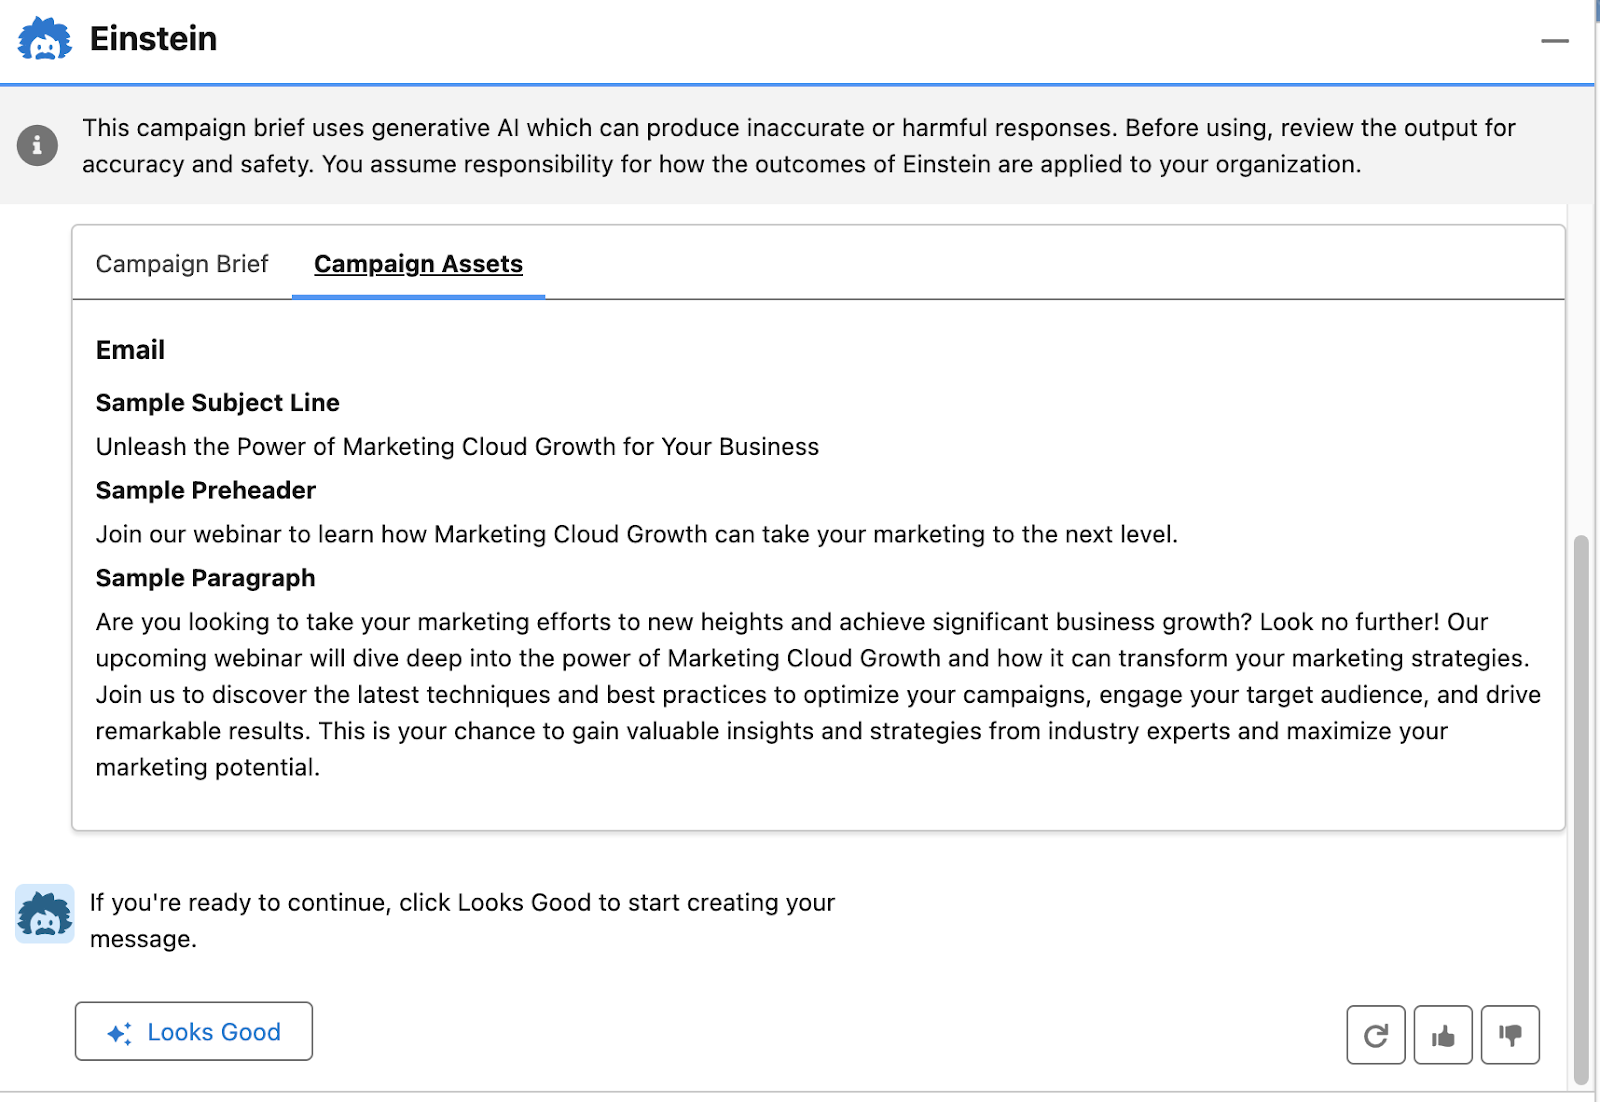
In addition, because the original selection here was Single Email with Einstein, the platform will also automatically generate a Campaign Asset with an Email Subject Line, Preheader, and Body Copy.
You can upvote, downvote, or refresh the content to help the AI improve. Select Looks Good to generate your Campaign Assets.
It’s the same campaign strategy principles, new platform, and a more efficient way to generate campaign briefs along with the email for your campaign. If you select Single Email Template from the campaign asset creation options, it is the same interface as the previous selection, just without automatic content generation.
Message Template Series
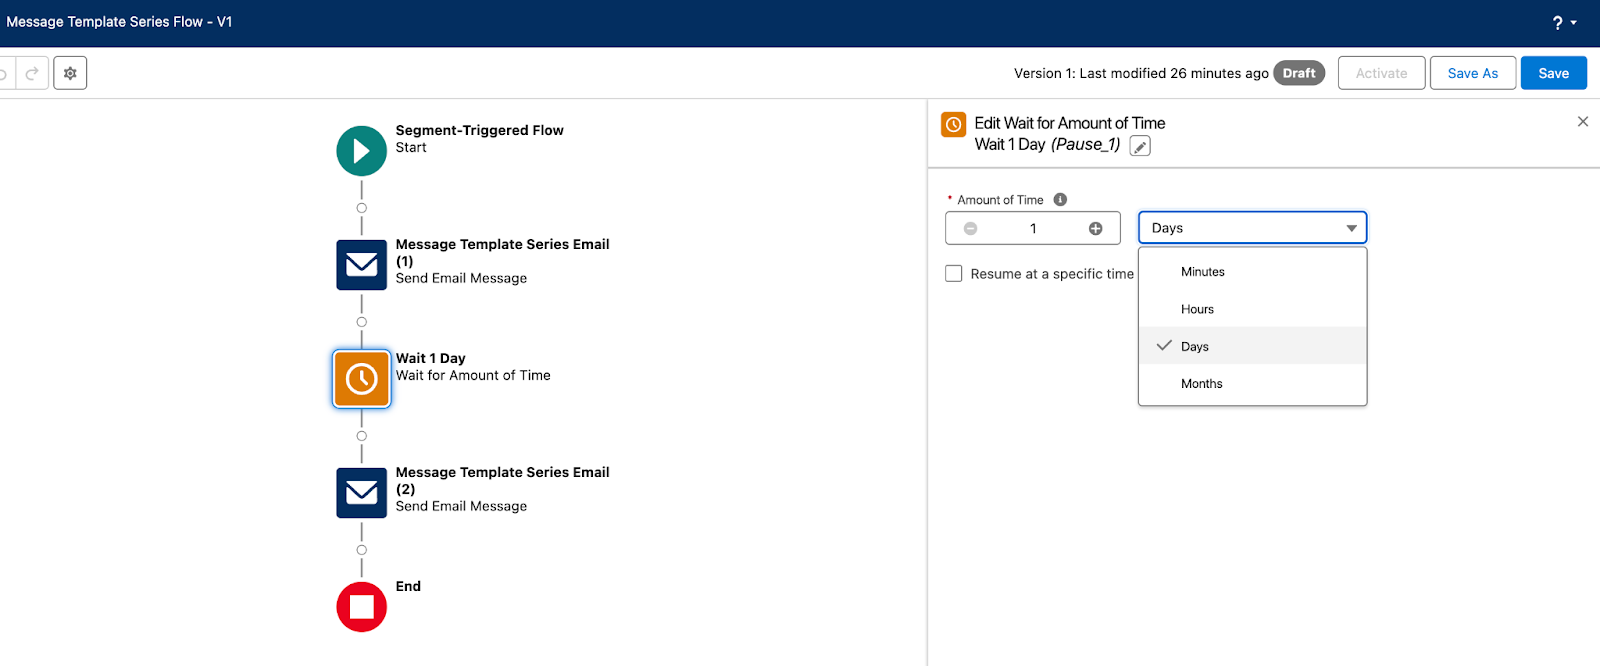
The Message Template Series selection allows you to create two emails customized to your campaign set up from a flow sequence with a Wait 1 Day step between email sends that can be edited to wait minutes, hours, days, months, or resume at a specific time of day.
Sticking with the Marketing Cloud Growth Edition webinar example from the previous campaign brief generated with Einstein Co-create, the first email could serve as the invitation to our recipient list of marketers and the two emails in this series could serve as the reminder email and the last chance to register email, while suppressing the people who have already registered.
We could also create a second message template series to start engaging with our prospects who have already registered for the webinar. Maybe for the first email we send them a piece of content that shares an introduction about Marketing Cloud Growth Edition providing initial tips and tricks for how they could get started with the platform and then the second email could be sent on the day of the webinar, reminding registrants it will start in an hour.
There is a lot that your team can do with this option, it just depends on what your plan is for how you will achieve your campaign goal. You already defined the goal, measurement, and audience, with your strategy, but you also need to determine the how.
How are you going to promote this campaign to increase registrants?
How will you compel your audience to attend the webinar to reach the goal of increasing attendance by XX%?
How do you plan on following up with registrants and attendees after the webinar to maximize the results from this webinar three months after, six months after, twelve months after? (This is also where a collaboration with sales comes in.)
What has worked well in the past?
What has not worked well that should either be nixed for the future or improved upon?
All of this should be defined after you frame your initial campaign strategy and before you and your team start creating the campaign assets, so that when the team starts going down the path of execution, everyone is aligned and focused on the campaign initiatives that will make the greatest impact.
Single Form Template
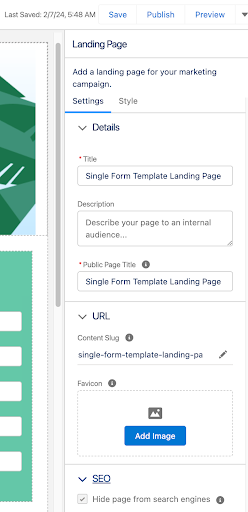
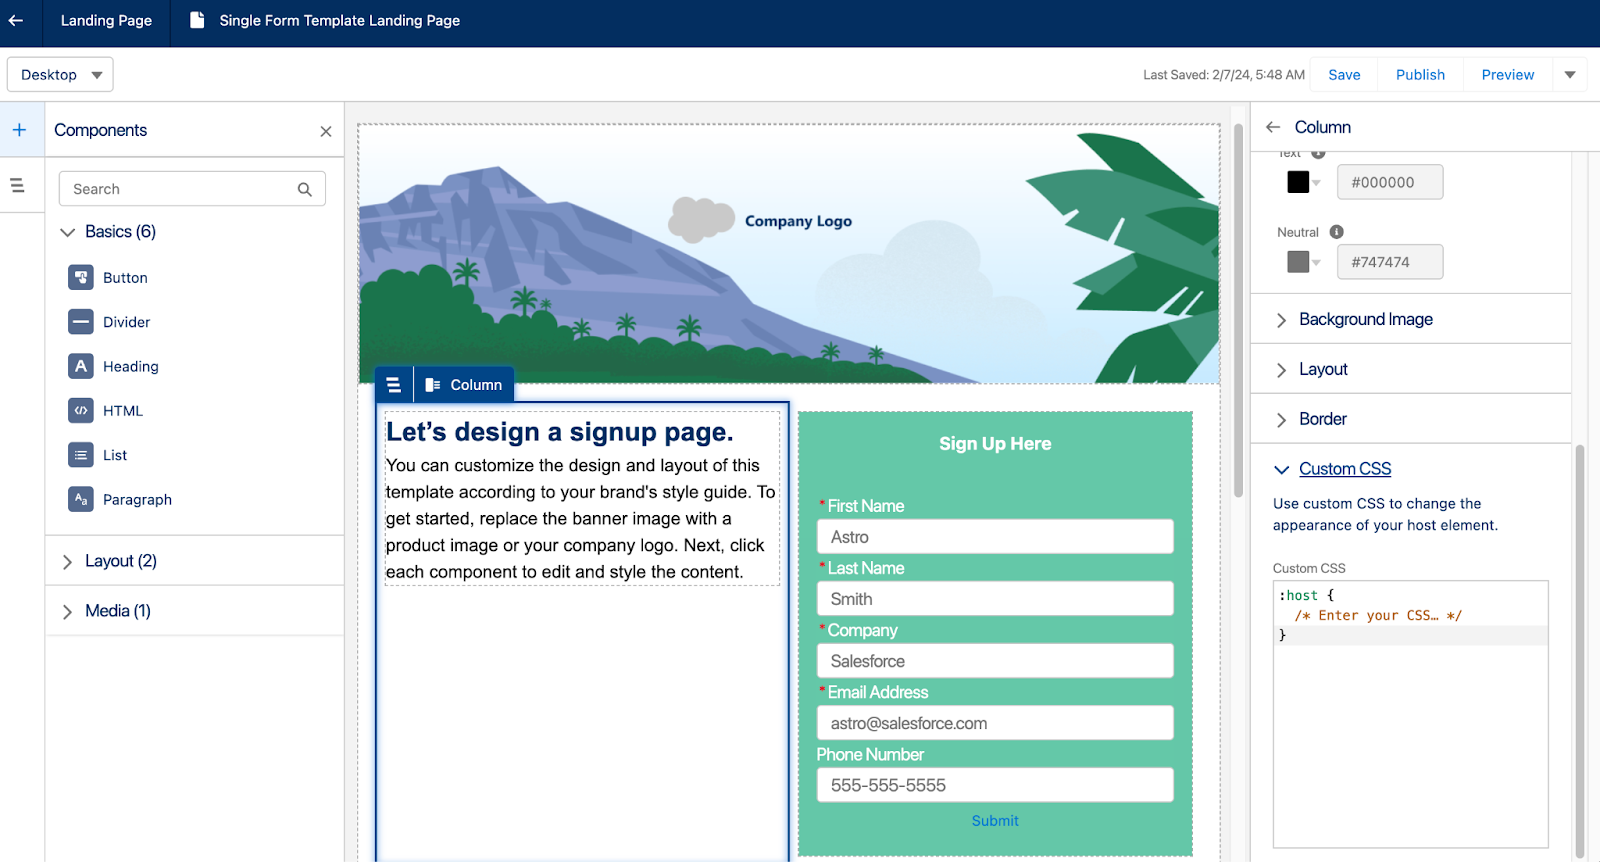
The Single Form Template option is what you would use to create the registration form and landing page for the webinar. The platform starts you out with creating a landing page that includes a form. The Landing Page includes a form, but the form can be switched out for another form that exists in your org. This campaign also includes a flow to create new Leads when the form is completed.
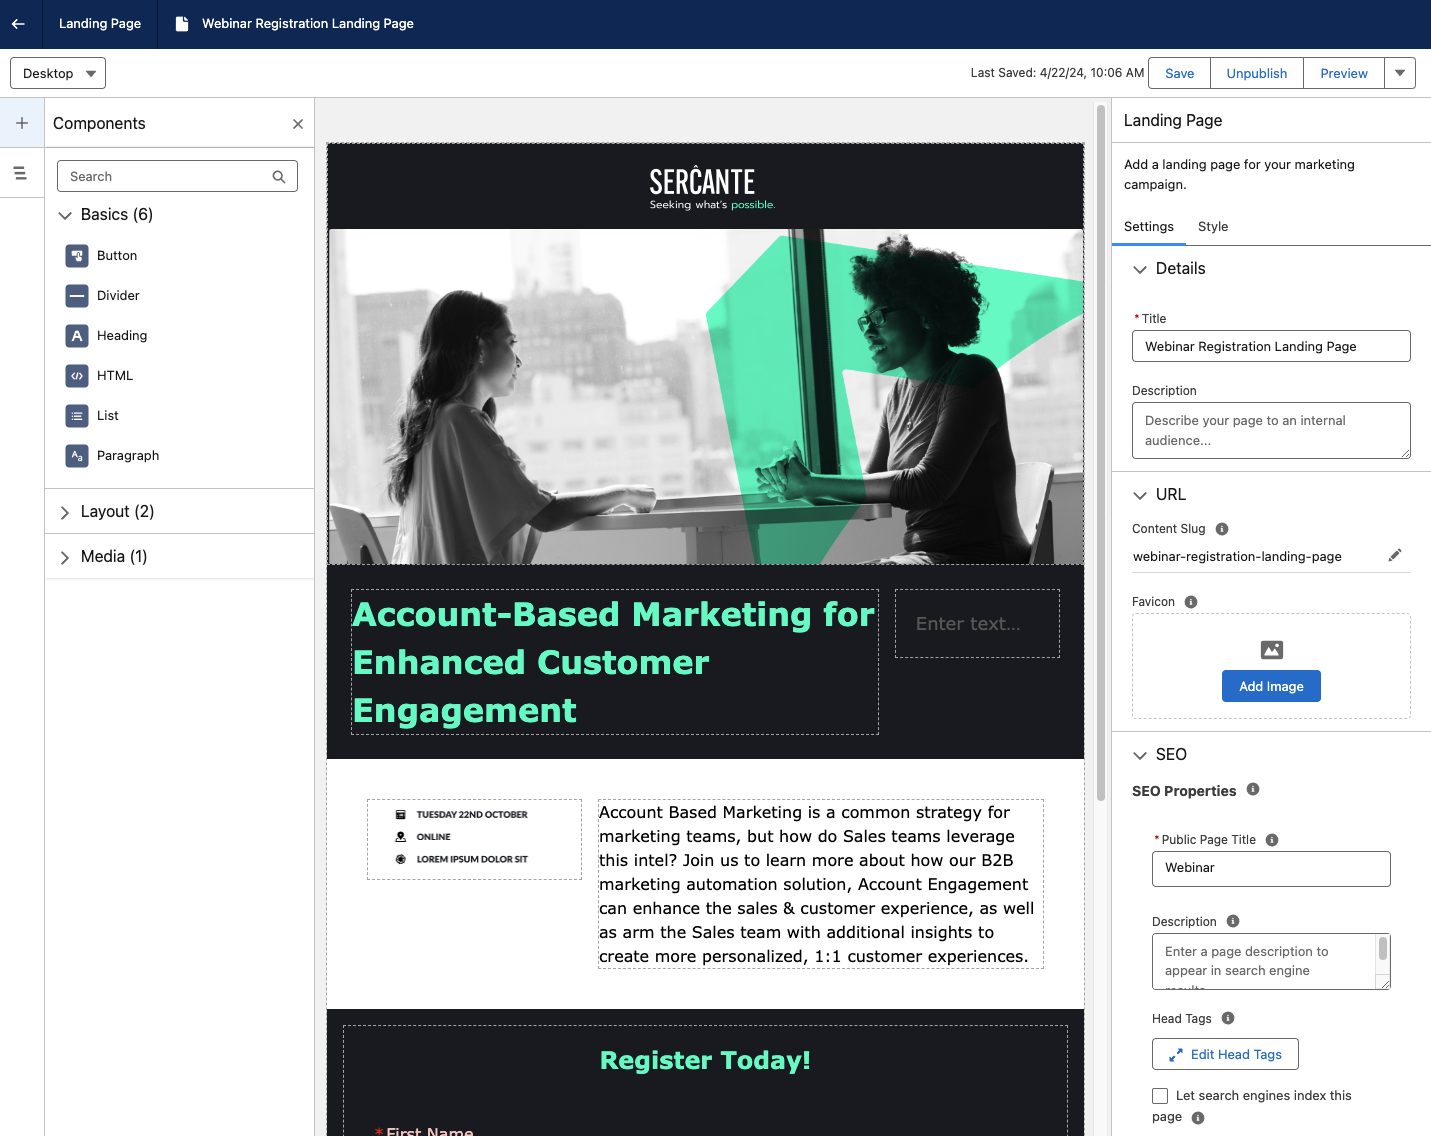
The landing page builder comes with the following features:
Title, Description, and Public Page Title can be customized
URL Content Slug can be edited for a custom landing page URL
Favicons can be added
Landing Pages can be hidden from Search Engine indexing
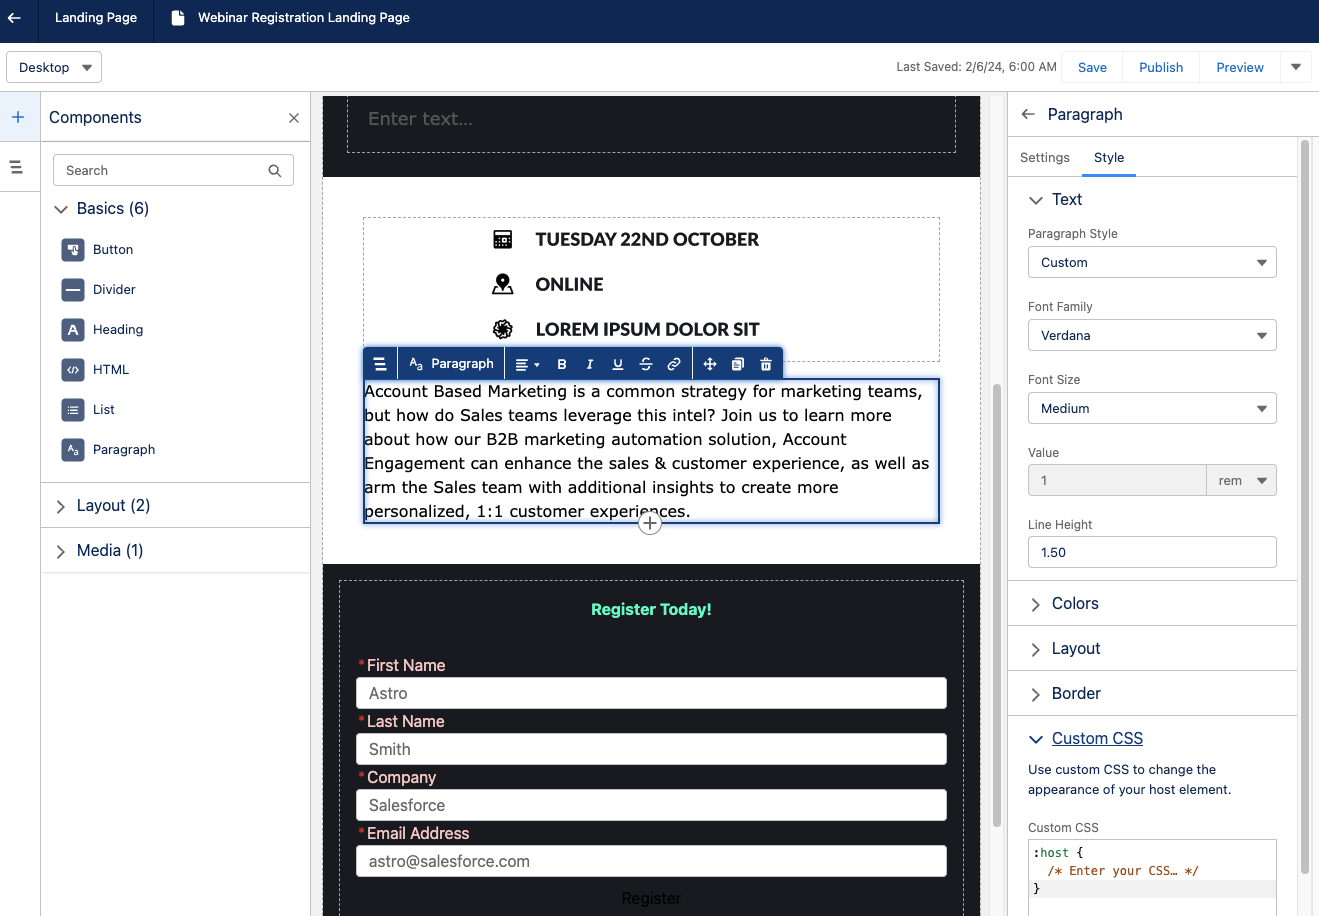
Building the landing page content is similar to the Lightning Builder experience for Account Engagement. Each component on the Landing page also includes a Custom CSS field.
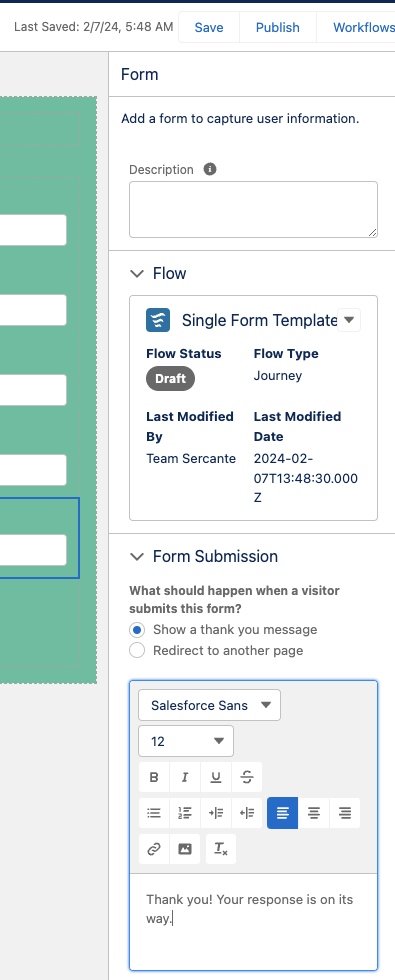
As you build the landing page for the webinar, you can then move to the registration form. The form features for Marketing Cloud Growth Edition can show a Thank You message or redirect to another URL, such as a thank you page.
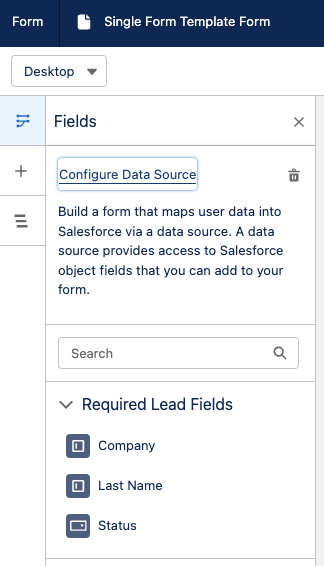
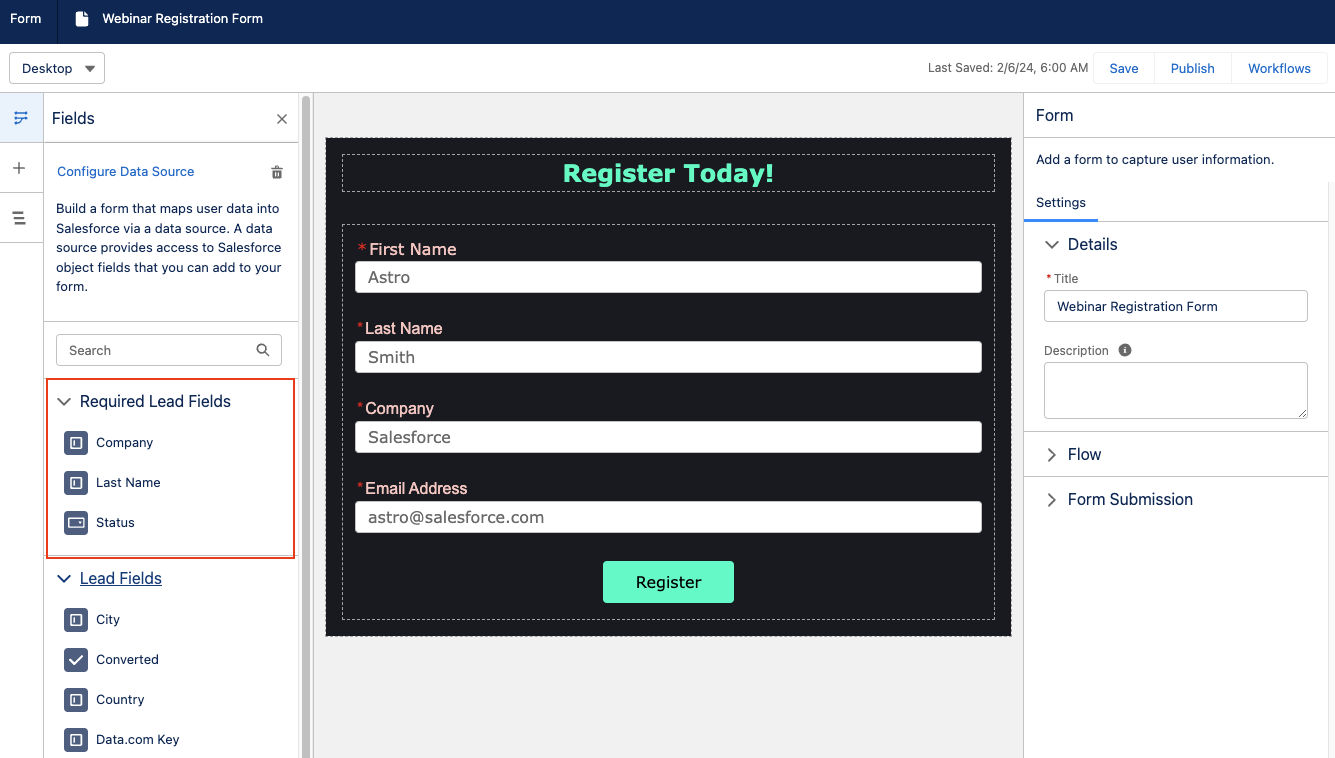
When adding the fields to your form, you can use the Configure Data Source feature to pull in Lead, Contact, or Account fields into your form. If you do not want to use this feature to pull in the fields, you can simply add the fields to your form and then map them accordingly in the flow.
By default, the flow will create new Leads upon form submission. If you have existing leads and contacts that are expected to be registering for the webinar, you will need to customize the flow to update existing records.
Keep in mind that editing the fields on the form does not update the flow. Make sure you edit the flow to include the final fields selected for the form.
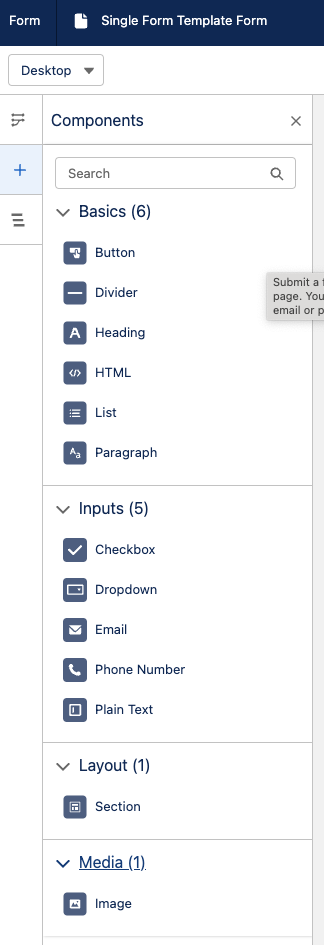
As you continue moving through building your registration form, there are quite a few form options to choose from such as adding dividers, text, and new sections as well as adding images to forms. If your team has not tried any of these options before, it could be worth a test to see if this increases registrations. The main thing to keep in mind here though is user experience. Will the registration form you are creating provide the best experience for your audience? Delighting and connecting with them is the focus.
Blank Email Campaign
The last option you can choose from for the campaign asset creation process is the Blank Email Campaign. This selection only contains a Flow to send an email message. For this you will need to:
Create or select a segment
Create an email or use an email that already exists in the org
Currently, you can only add one email to this campaign type. There is no option to add a Landing page or form to these campaigns.
Customize and activate your flow
The process with this option is a little more manual, but it is an option in case your team wants this type of experience.
No matter the platform, campaign creation comes back to the strategy.
We are all smiles about the announcement of Marketing Cloud Growth Edition and are looking forward to having SMB marketing teams dive into the platform and experience all that can be accomplished with it. The new technology may seem overwhelming, but remember your foundational approach to marketing campaign strategy remains the same, which guides you through the campaign asset creation process. It is just a matter of getting used to where to click and pull in the different features that you want to use to get the best results. And if at any point it seems scary and you want an expert guide, we’ll be here to help you.
Product Note:Marketing Cloud Growth and Advanced are editions of Marketing Cloud Next and have also been referred to as Agentforce Marketing.
Marketing Cloud Growth Edition builders enable marketers to build beautiful landing pages and forms with ease. The builders have a robust set of styling and functionality options that allow Marketers to customize their assets without needing extensive custom coding. Let’s dive into the features of these builders and walk through how to build your first Growth Edition assets.
Creating a New Landing Page
Users can create a new landing page in two ways:
Option 1
Navigate to Content > CMS Workspace for Marketing Cloud
Select Add > Content
Select Landing Page
This option starts you with a completely blank canvas and does not auto-generate a form or flow for your page.
Option 2
Navigate to Campaigns and create a new campaign
Select Save
Select the Signup Form Template
This option starts you with a Salesforce Landing Page that can be easily customized with your own content and styling. It also auto-generates a form and flow for the form.
Landing Page Builder
Once you’re in the landing page builder, you can begin setting up the landing page’s basic info.
This includes:
Internal title and description
URL content slug, this is the URL-friendly name for your page (a.k.a. vanity URL)
Favicon
Public page title (max 70 characters)
Public Description (max 2000 characters)
If SEO indexing is enabled and this field is blank, the search engine results display the first text that the search engine finds on the page.
Head Tags
Whether or not the Landing Page should be hidden from search engine indexing
You can also optionally set a background image for the Landing Page on the Style tab.
Drag-and-drop components
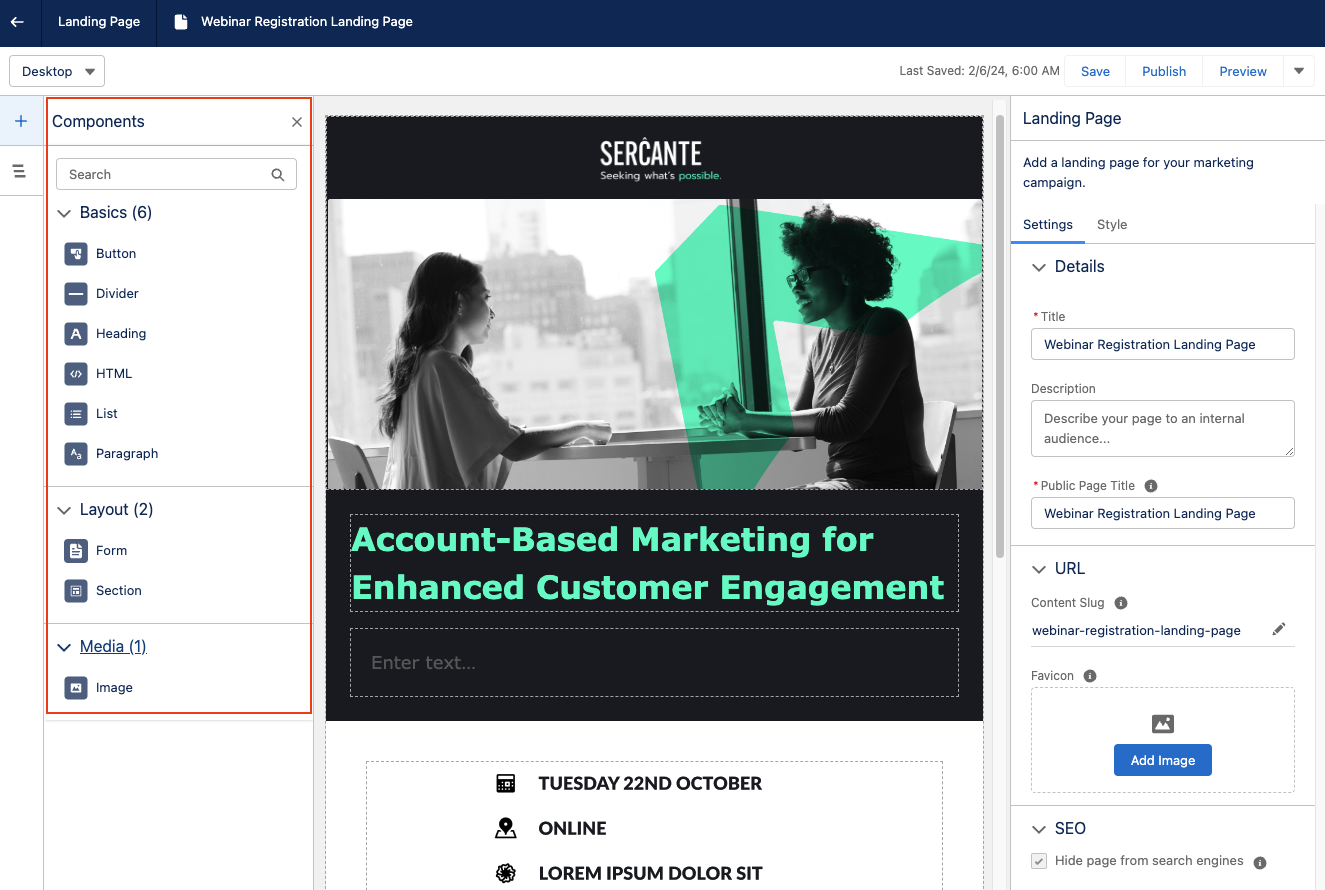
Similar to the Lightning Builder experience for Account Engagement, you can begin building your Landing Page by dragging and dropping components from the left-hand components menu.
I always like to start with a Sections component so I can divide up my section and set the style before dragging in another component for my content. The Sections component can be divided up to 12 and includes an option to stack columns when the page is viewed on mobile.
Add more components to the section
Once you’ve formatted your section, you can drag and drop additional components into said section. This includes:
Buttons
Dividers
Headings
HTML
Lists
Paragraphs
Forms
Images
All components and sections have robust editing options and have an optional area to enter Custom CSS for more granular customization.
Add form to landing page
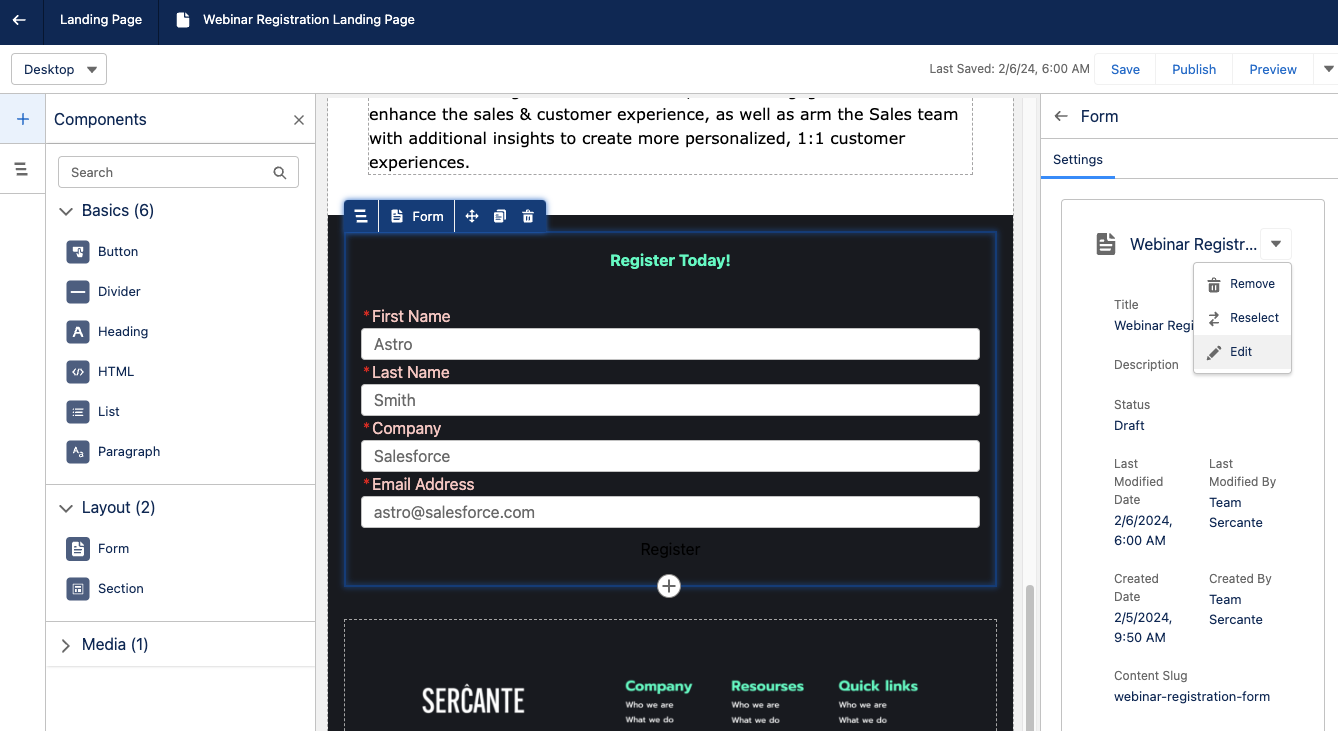
To add a form to your Landing Page, drag and drop a form component anywhere on the builder canvas. Once a form component is added, select the existing form you’d like to use. You cannot create a new form while in the landing page builder, but you can open the form builder to edit an existing form or switch out the form later. You can only have one form on your Landing Page.
Form Builder
Build your form by selecting edit within the form component on your landing page. Once in the form builder, you have the option to configure a data source to pull in Lead, Contact, or Account fields into your form. Doing so allows you to easily see which fields are required to create a new record of that type.
If you opt to not configure a data source, just ensure your fields are mapped accordingly within the flow.
Customize your form
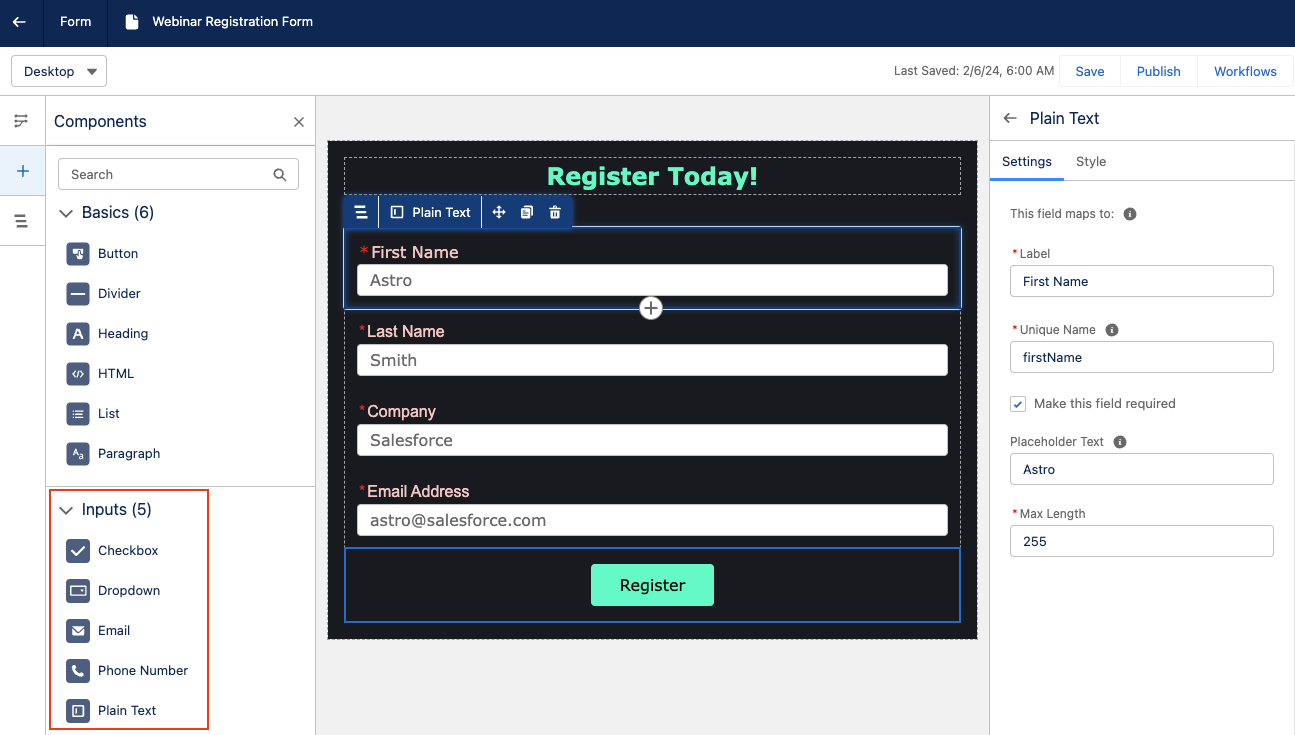
The components panel has several options for customizing your form. You can enter buttons, dividers, headings, HTML, lists, and paragraphs above, below, or in between form fields. You can also create a new section or insert images. The following form field types (aka Inputs) are supported in this form builder:
Email
Phone Number
Plain Text
Checkbox
This is an individual checkbox, but multiple checkbox components can be added in if you want a multi-picklist.
Dropdown
You must manually enter the picklist options for dropdown components. Labels and Unique Names can be set for each value within the field.
Drag and drop Inputs into your form to add new fields. Options to add placeholder text, make the field required, and set the max length of the entered data are available on the right-side panel. You can also fully customize the field’s text styling, background, padding, border etc., as well as insert Custom CSS.
Edit any flows
Keep in mind that adding or removing fields from the form does not automatically update the flow that is associated with it. When you are done building your form, you will need to edit your flow to correctly map the final form fields to their destinations.
Publishing your Landing Page
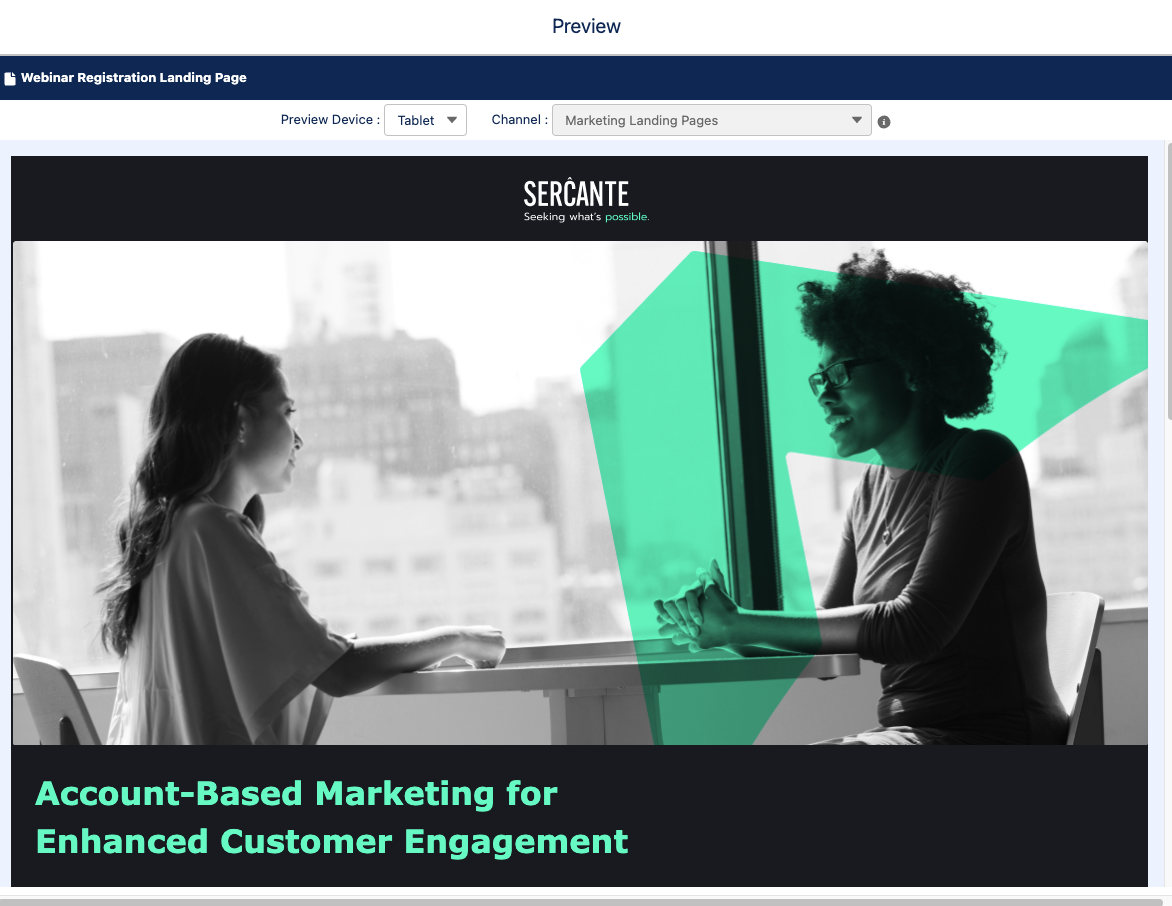
Once you’re ready to test and publish your landing page, select the Preview option from the top right-hand corner. The Preview will allow you to view your landing page in Desktop, Tablet, and Mobile views to ensure everything looks good no matter how your audience is viewing the page.
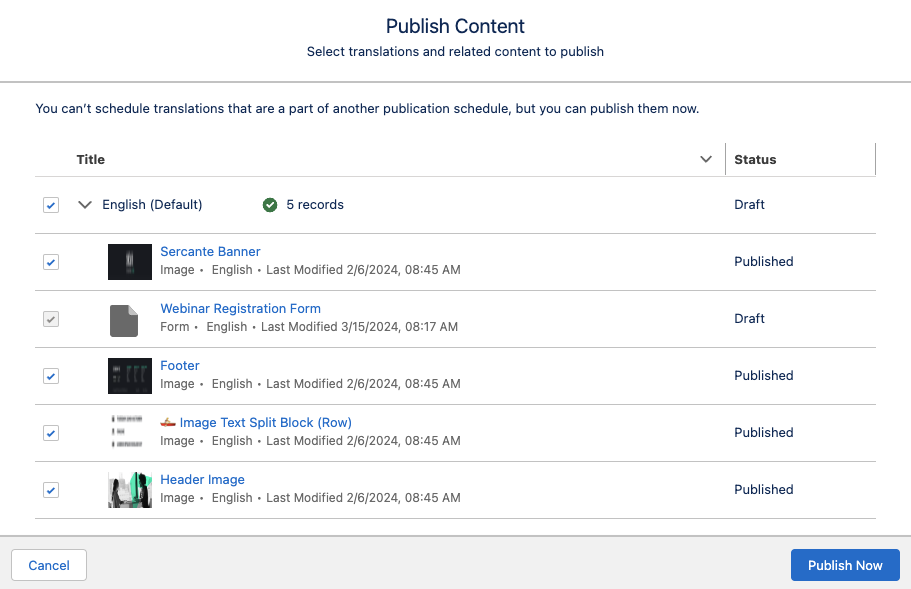
When you are ready to push the landing page live, select the Publish button in the top right-hand corner. You can then confirm the related content that needs to be published with your landing page, such as images used on the page, translations, and your form.
Activate URL Alias
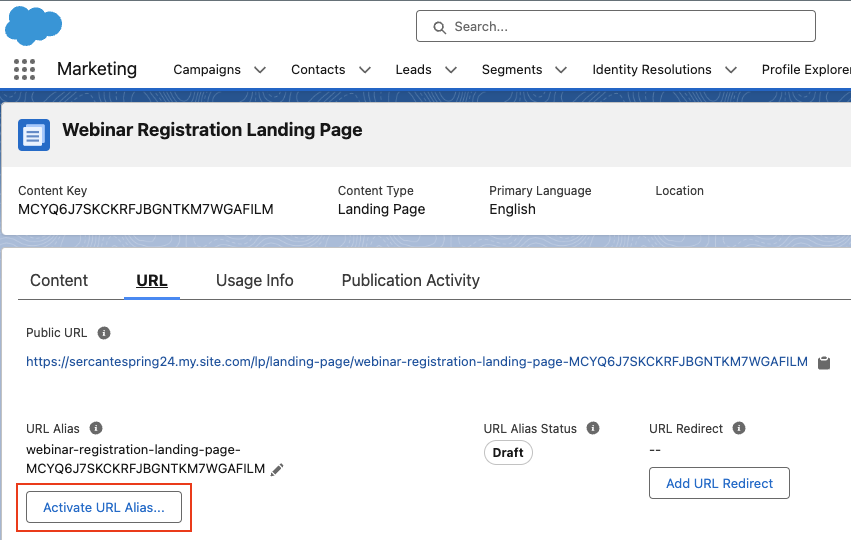
Once published, you also need to activate your URL alias. Publishing a landing page indicates that the content is ready to be made available online, but the content isn’t accessible until you also activate the URL alias. To do so,
Navigate to Content > CMS Workspace for Marketing Cloud
Select your landing page
Select the URL tab
Select Activate URL Alias
Select Activate
Start Building in Growth!
Now you’re ready to build your first landing page in Marketing Cloud Growth Edition! Be sure to return to The Spot for more posts about Marketing Cloud Growth. We’ll dive into Flows, building emails and all our other Growth learnings in future blog posts.