Category

Marketing Automations

Engagement Studio Programs (ESPs) are key for nurturing prospects until they are ready to send over to your sales team. But have you ever thought about A/B testing in ESPs?

ESPs allow you to automatically send your cold prospects awareness content and consistently stay top of mind so they can gradually warm up to a sales-ready stage. Although ESPs can be used for everything from basic email sends to complex process automations, one feature it lacks is native functionality for A/B testing. The feature exists natively (and wonderfully) for list emails, but in the realm of automated emails and ESPs, this is something marketers are chomping at the bit for. 

Let’s dig into some of the creative workarounds that make A/B testing possible in ESPs as well as the pros and cons of each option.

How does native A/B Testing work?

Within the native functionality of list emails, A/B testing is very user-friendly. You can:

  • Create and edit two versions of your email (Version A & B) via the WYSIWYG editor or by editing the HTML
  • Specify if the email versions should be measured by email opens or email clicks (we prefer clicks)
  • Determine the length of the A/B testing period (1 hour to 30 days)
  • Determine the percentage of your audience that is tested

Automating the A/B testing process

The beauty of A/B testing with list emails is that so much of the process is automated. 

Once the criteria have been set, Account Engagement automatically and randomly splits the test recipients from the intended recipient lists, sends the email variations to the test group, and, once a winner has been selected, automatically sends the winning version of the email to the remaining recipients on the list. 

This native functionality allows marketers to fine-tune their marketing content by testing which subject lines, CTAs, and even images best resonate with their target audience. 

A/B Testing in an ESP

To A/B Test in an ESP, you have a few options:

  1. Split your recipient list before starting the ESP
  2. Split recipients by last name
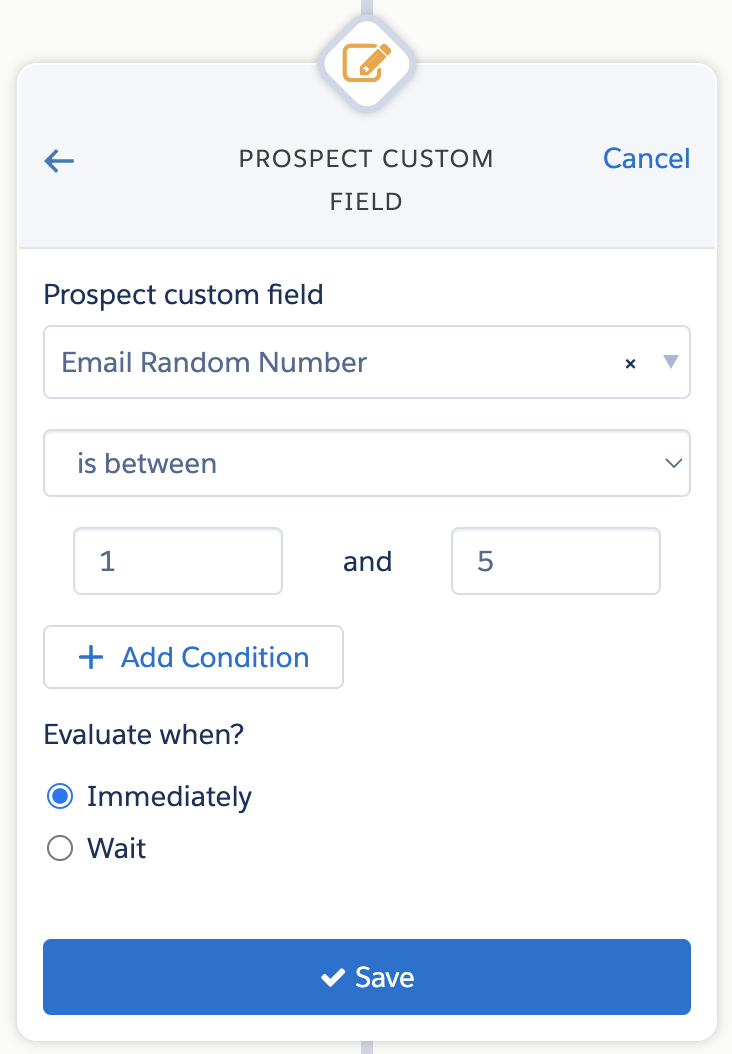
  3. Split recipient by a random number from Salesforce
  4. Split recipient lists using Prospect Updater

Using Native Split List Functionality

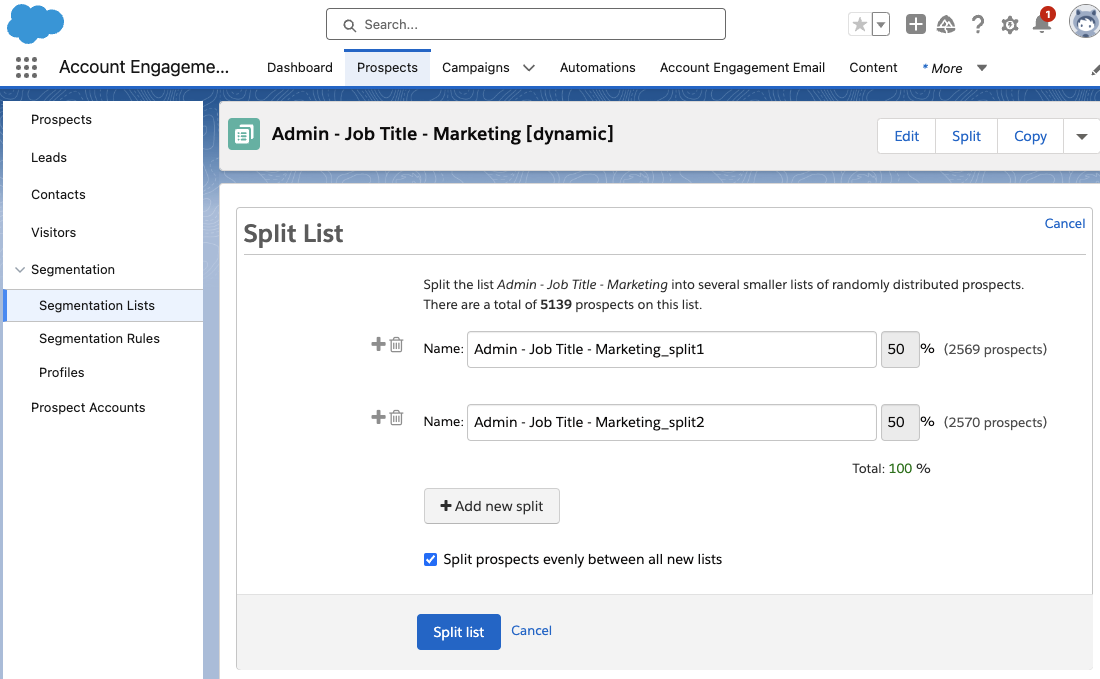
All Account Engagement Static and Dynamic lists can be split into smaller lists. While viewing your list, the split option will be available in the top right-hand corner. This allows you to split lists evenly, or specify the percentage on each list. 

It’s important to remember that when splitting a dynamic list, the resulting lists will be static. 

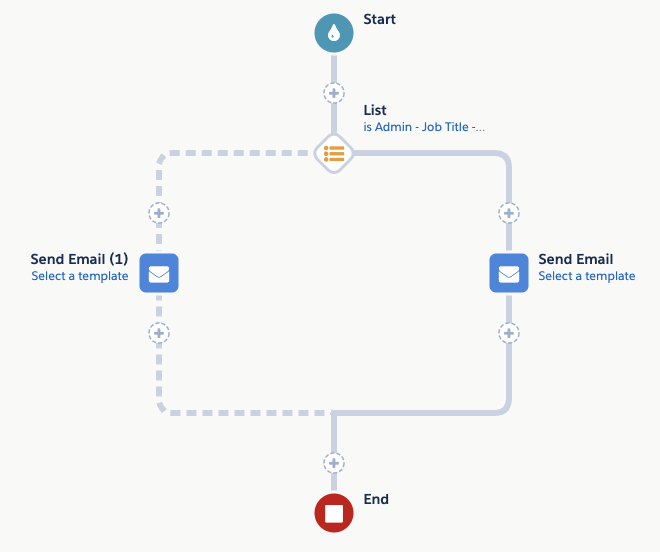
When using this option in an ESP, add an Action node before your email send that checks if the recipient is on split list 1. If they are a member of this list, they receive version A of your email. If they are not, they receive version B.

This option works best when your ESP has a static recipient list that you are not adding to later, for example, an event follow-up nurture. If you intend on gradually adding more prospects to this ESP, there isn’t a way to easily and automatically split the new prospects between the two lists. 

Splitting by Last Name

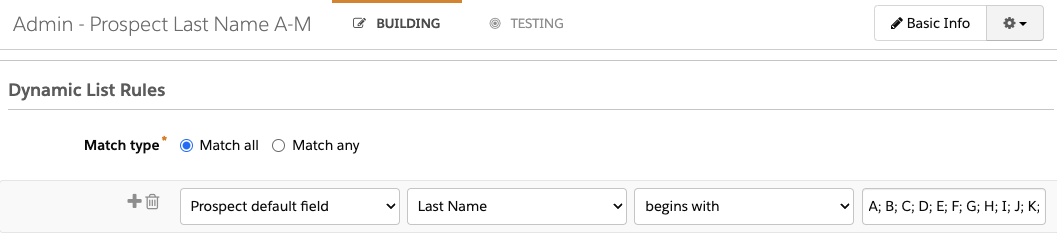
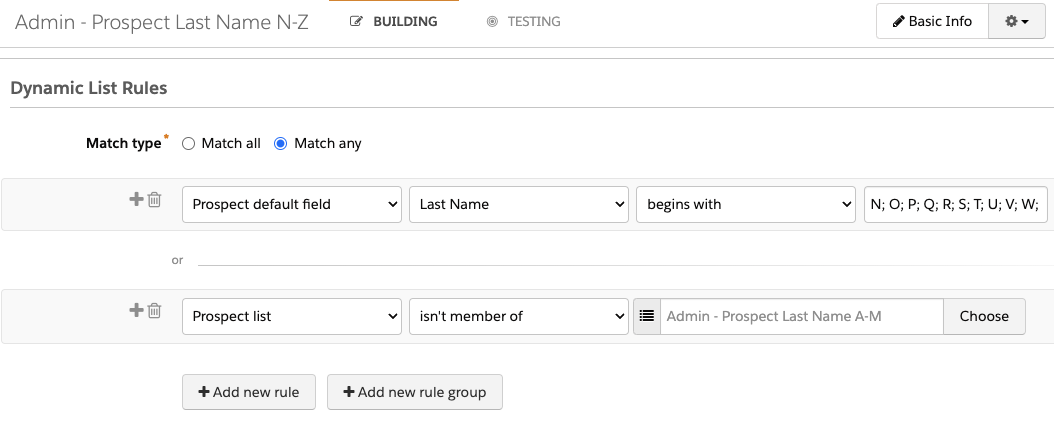
Another strategy is to split the recipients by last name. This allows you to split recipients with dynamic lists so you can continually add new recipients to the ESP. To do so, you’ll need two dynamic lists. 

Your first list will capture prospects with last names starting with A-M:  

Your second list will capture any prospects with last names beginning with N-Z, as well as any prospects with last names that start with characters, non-English letters, or numbers. 

Finally, use these lists to split ESP recipients between your email variations. 

Things to keep in mind

The drawback to this solution is that splitting by last name is not likely to evenly split your recipients. S, B, H, M, and C are the most common initials for last names, so if you split your recipients by “last name begins with A-M” and “last name begins with N-Z”, the “A-M” list is likely to be larger and can skew your data.

Generate a Random Number in Salesforce 

Another strategy for randomly splitting your recipient list is by using Salesforce’s Auto Number functionality. This allows you to auto-generate a random number for each Lead or Contact and push this data down to Account Engagement.

  1. In Salesforce Setup, select Object Manager then Lead
  2. Select Fields & Relationships
  3. Select New
  4. Select Auto Number then Next
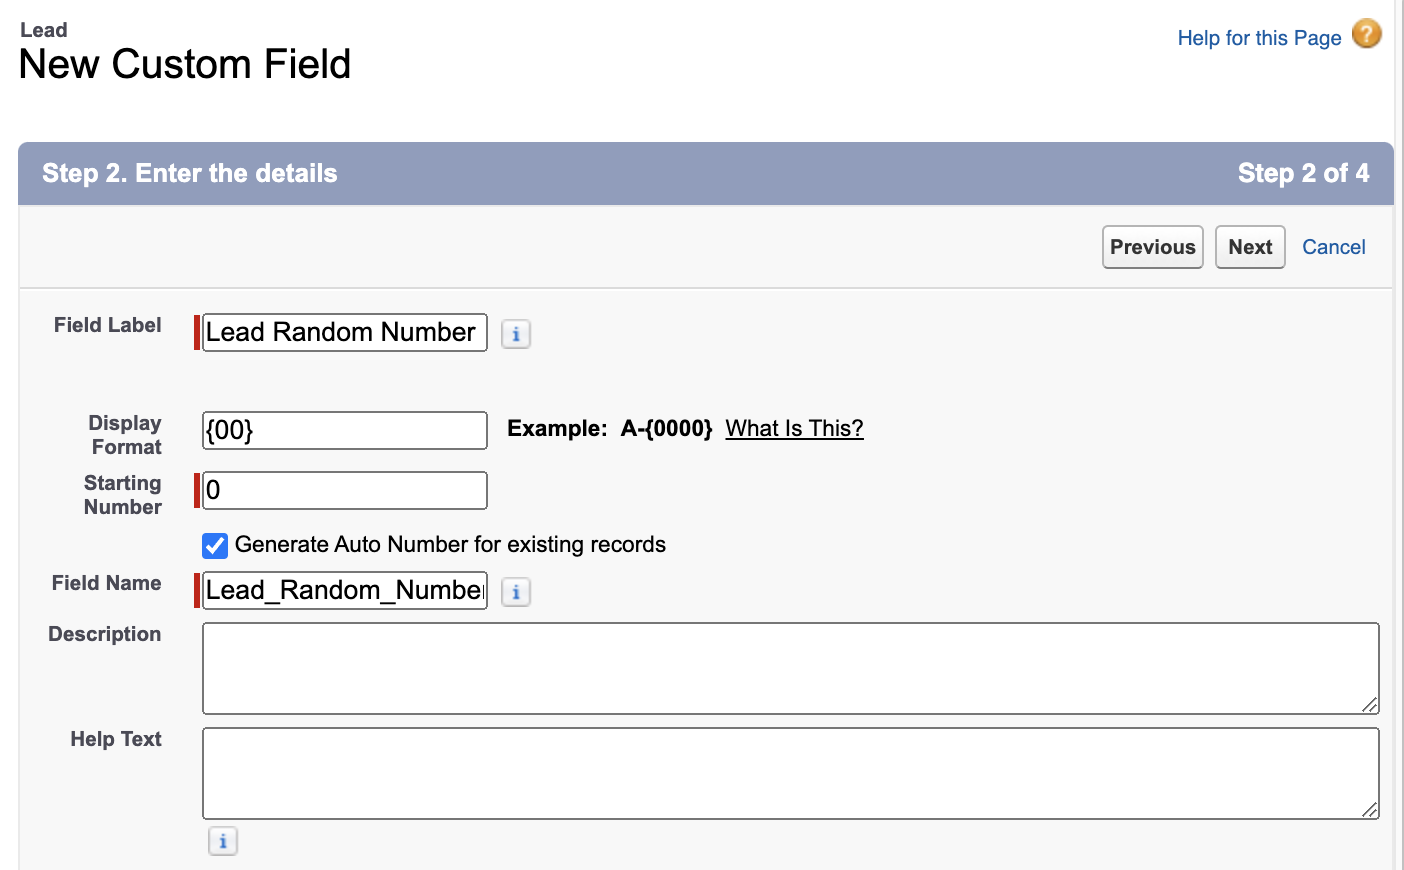
  5. Enter the following details
    1. Field Label: Lead Random Number
    2. Display Format: {00}
    3. Starting Number: 0
    4. Generate Auto Number for existing records: Selected
  1. Select Next
  2. Select which profiles have access to view this field.
  3. Select Next
  4. Select any Lead pages where this field should appear. I recommend leaving this field off your page layouts. Select Save.
  5. Next, create a Formula field. While still in the Fields & Relationships tab of the Lead object, select New
  6. Select Formula, then Next
  7. Enter the following details
    • Field Label: Email Random Number
    • Formula Return Type: Number
    • Options – Decimal Places: 0
  8. Select Next
  9. Enter the formula MOD(VALUE({! Lead_Random_Number__c}) ,9)
  10. Select Next
  11. Select which profiles have access to view this field. Ensure the B2BMA Integration User profile, or your connector user’s profile, has access so Account Engagement can map to this field. 
  12. Select Next
  13. Select any Lead pages where this field should appear. I recommend leaving this field off your page layouts. Select Save.

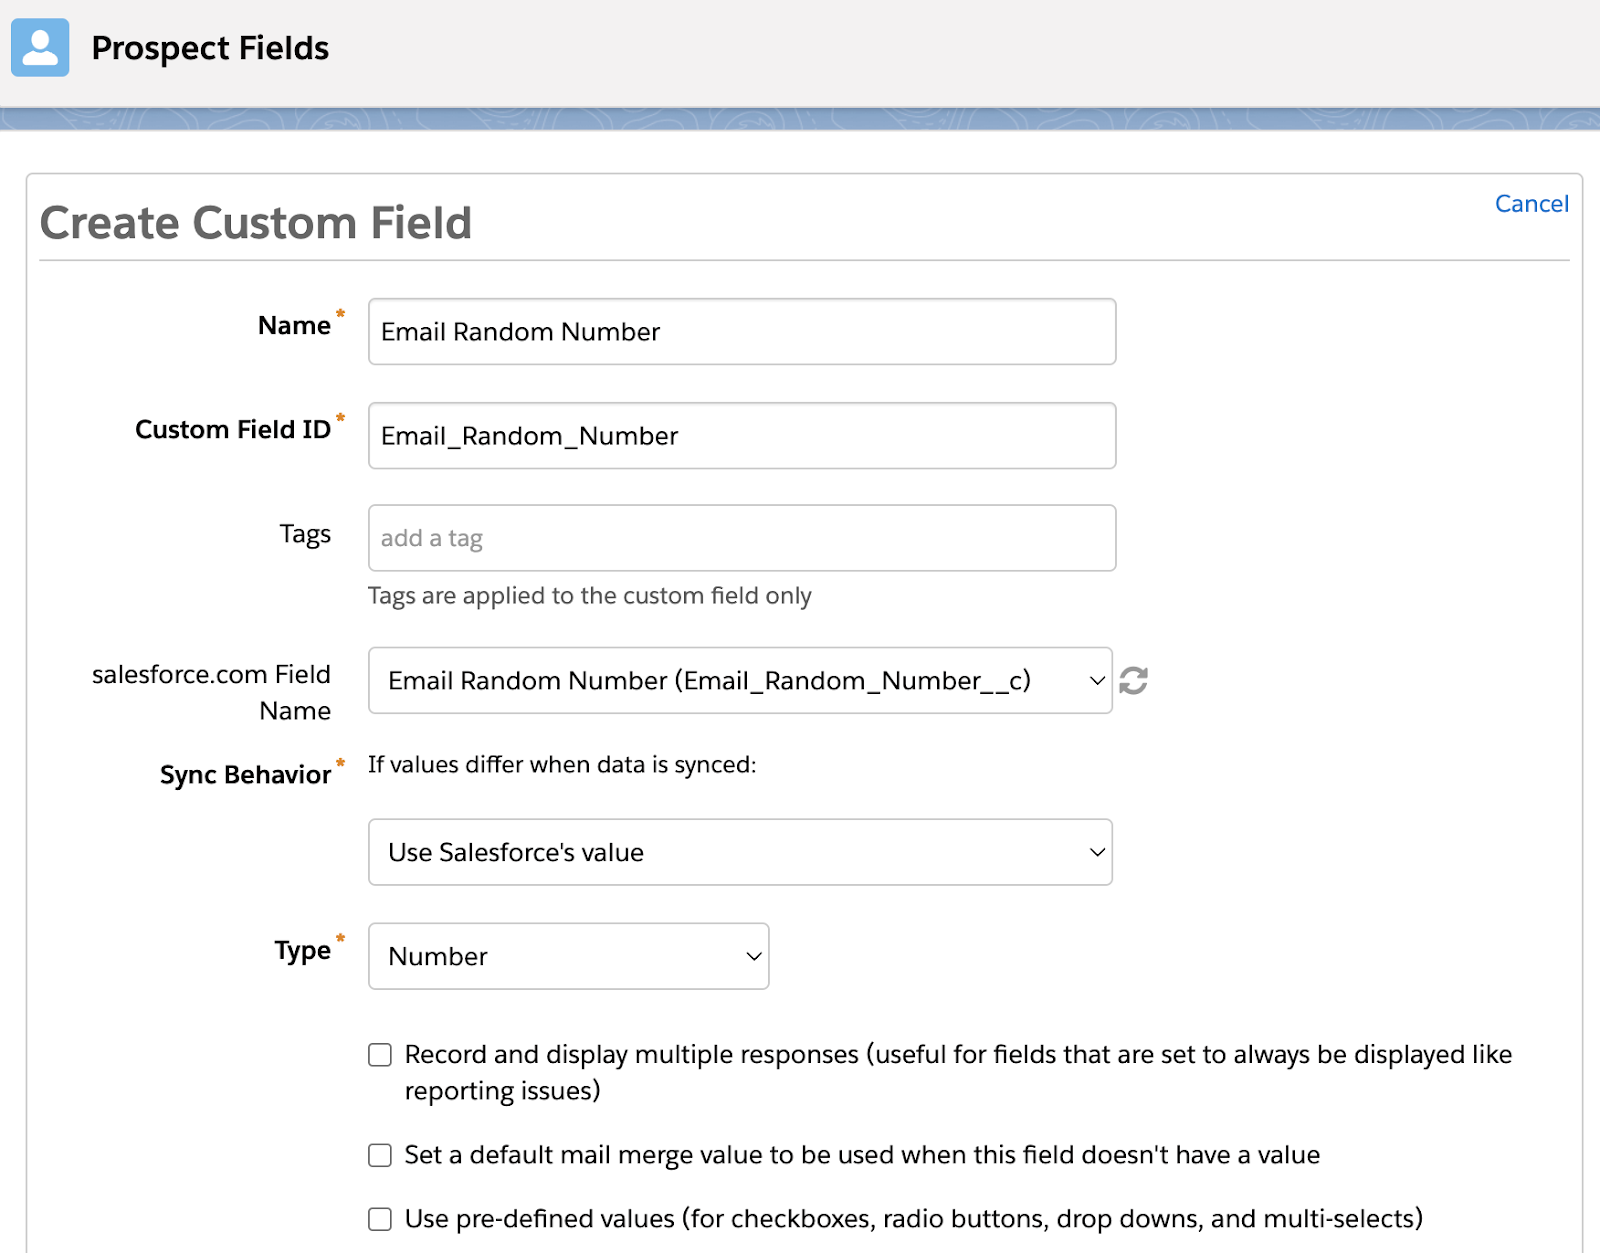
This formula field will auto-generate a random number between 1-9 for each Lead. Optionally, repeat the steps above for the Contact object. Finally, map the “Email Random Number” field to Account Engagement so this new field can be used to randomly split ESP recipients for an A/B Test. 

Now, the only downside of this approach is that all your Account Engagement prospects must be synced to Salesforce before they will get an Email Random Number value. If you regularly nurture prospects in Account Engagement before syncing them over to Salesforce, you could use a combination of the Random Number and Last Name methods, or you can move to our last option.

Use Prospect Updater

Sercante’s Prospect Updater is a Swiss army knife for advanced data updates, cleansing, and manipulation within Account Engagement. This solution allows you to work with your prospect data in more streamlined ways and enables you to create a truly random recipient list split without your data being in Salesforce. 

With Prospect Updater, you can use a RANDBETWEEN function to auto-generate a random number and stamp the number on new prospect records within minutes of them being added to Account Engagement. Then, use an Action node in an ESP to split your prospects into your A/B test groups. 

If you want to learn more about Prospect Updater, check out our Supercharge sales ‘speed to lead’ with clean Pardot data and Creating a Pardot Spam Identification Process with Prospect Updater blog posts or contact us!

Selecting a Winner

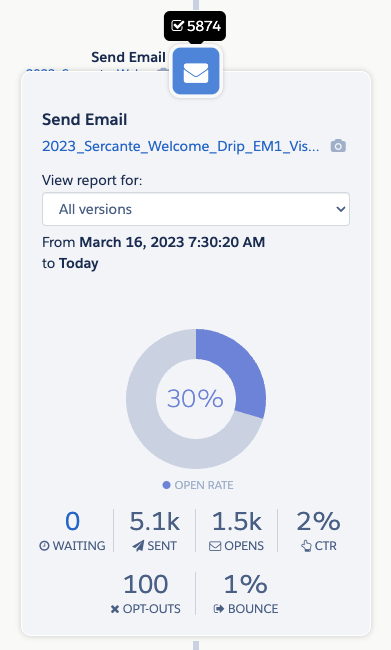
After you’ve selected your method of A/B testing and let your ESP run, it’s time to choose a winner and, optionally, consolidate your ESP down to 1 email version. The best way to compare the data between your A and B email versions is by using the ESP reporting tooltips. While on the Reporting tab of your ESP, select the email send node to view the metrics for that particular send. 

The tooltips allow you to easily view the number of sends and opens as well as your click-through rate. If you want to dive deeper into each template’s metrics, select the name of the template from within the tooltip view to open the full email template report. 

Start A/B testing in Engagement Studio Programs

It’s clear that Engagement Studio Programs (ESPs) are the backbone of effective prospect nurturing, guiding them along the journey until they’re ripe for the sales pitch. 

So, let’s embrace the challenge, get creative, and make the most of our ESPs. With a bit of ingenuity and a keen eye on the metrics, we can craft killer campaigns that resonate with our audience and drive those all-important conversions. Here’s to pushing the boundaries and unleashing the full potential of our ESPs.

Remember, you can always reach out to the team at Sercante for help setting up your Account Engagement (Pardot) Engagement Studio Programs and configuring your A/B tests within them.

Salesforce tasks are one of the unsung heroes of Account Engagement. You can use Salesforce tasks to let the sales team know there’s work to be done, and using tasks can eliminate one of the common arguments for creating duplicate leads.

Yet, many are unhappy with the rigid options for creating tasks through Account Engagement. That leads us to our solution. We can make tasks even better, perfectly better in fact! We can make Salesforce tasks that are set up exactly how we want through Account Engagement using an External Action.

External Actions are a way to make things happen outside Account Engagement via Salesforce CRM Flow and APEX code.  We can create an External Action that creates a task with what we want in it and our merge fields in the body of the task comment so we can capture exactly what was on a form fill.

Process Overview: Creating custom Salesforce tasks with Account Engagement External Actions

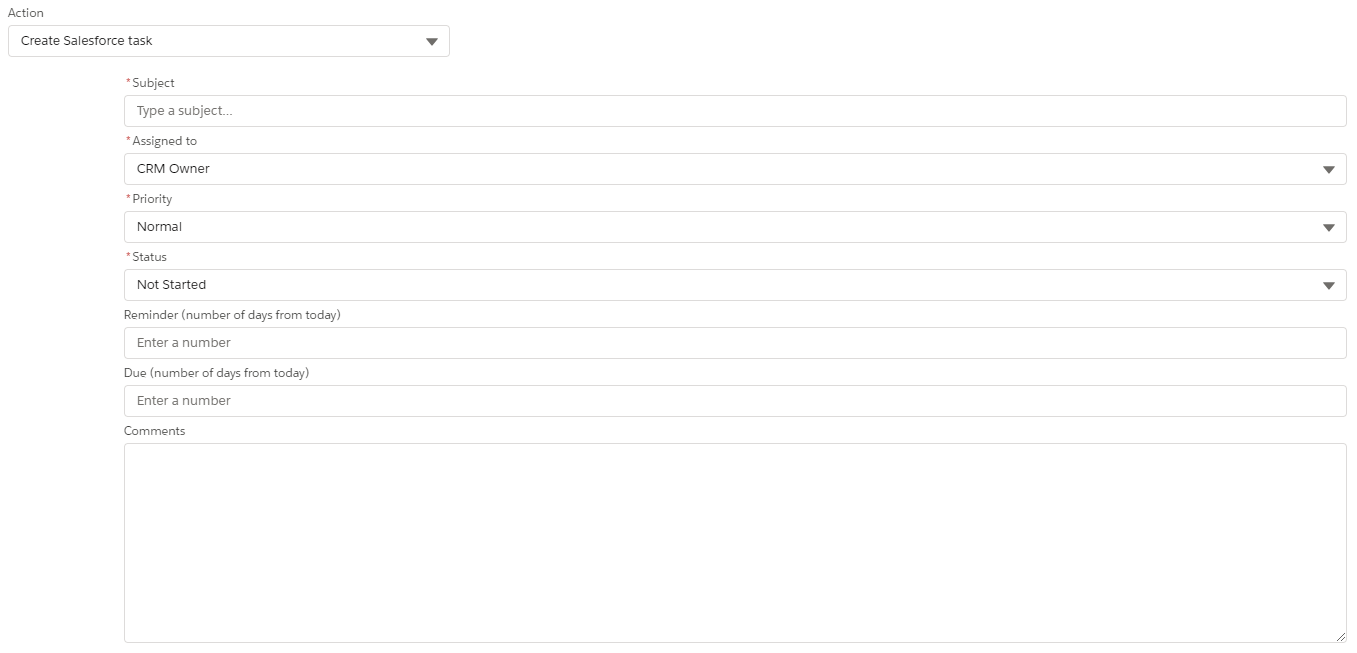
Normally we would add a completion action to a form called “Create Salesforce Task,” which prompts us for a few rigid text fields that don’t support merge fields. 


Now we can add an ‘External Action’ for creating a task that has as few or as many fields as we want and allows us to add merge fields. 

Building this new Create Salesforce Task external action

There are a few steps we need to follow to build this. We start in the CRM and work backwards, toward Account Engagement.

Here’s the order you’ll complete the steps:

  1. Create a flow.
  2. Create an External Activity.
  3. Create the completion action.

Creating the Flow

First, we want to create an Autolaunched Flow.

Create variables

Next, let’s create some variables. The RecordID is the only required variable. (We need to attach the task to something). The rest of the variables are optional, but having them will give us more flexibility when we create the completion action.  All variables should have the ‘Available for Input’ checkbox checked. 

VariableData TypeRequired
RecordIDTextYES
Product_InterestTextNO
Task_InstructionsTextNO
Form_CommentsTextNO
Task_SubjectTextNO

Build the Flow

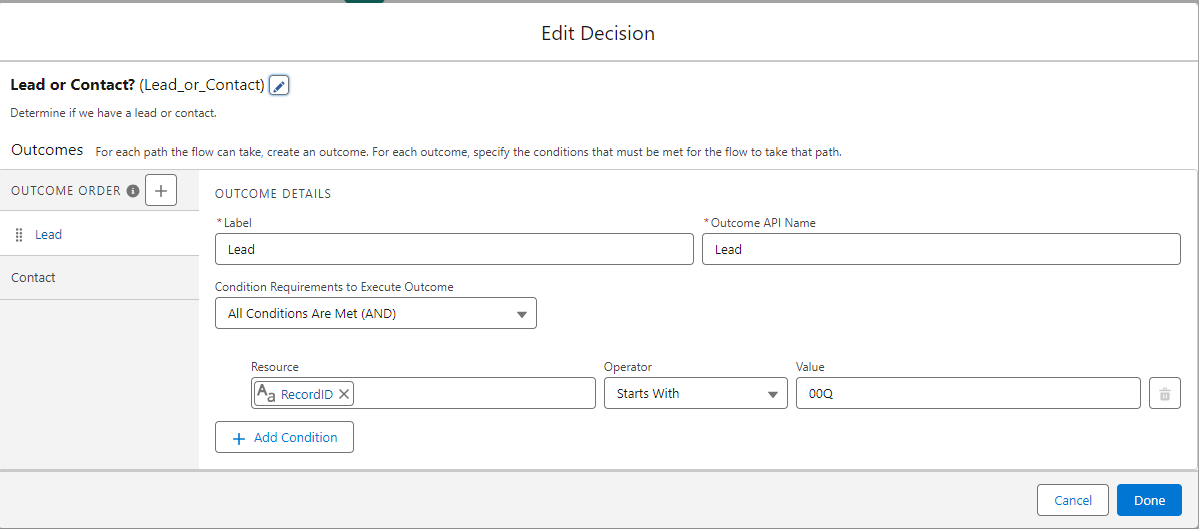
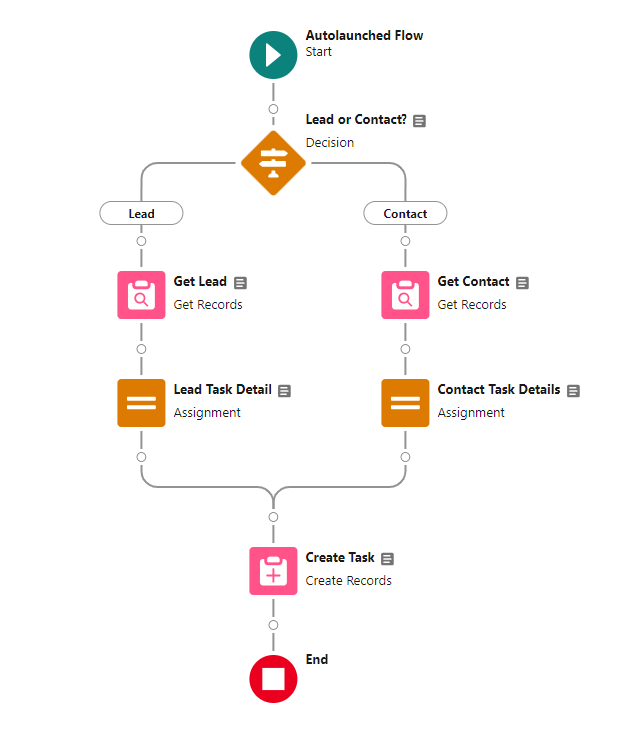
After creating the variables, we can get build the Flow. Start with the Decision Element to create a different path for Leads vs. Contacts. We’ll need to look up the record owner in the CRM, as Account Engagement doesn’t give us access to that as a merge field. To do this, we need to know whether to look up a Lead or Contact record. Use the table below to set up your lead path filter.

FieldOperatorValue
RecordIDStarts withOOQ

Update the label for the default path to “Contact”.

Add a ‘Get Records’ element

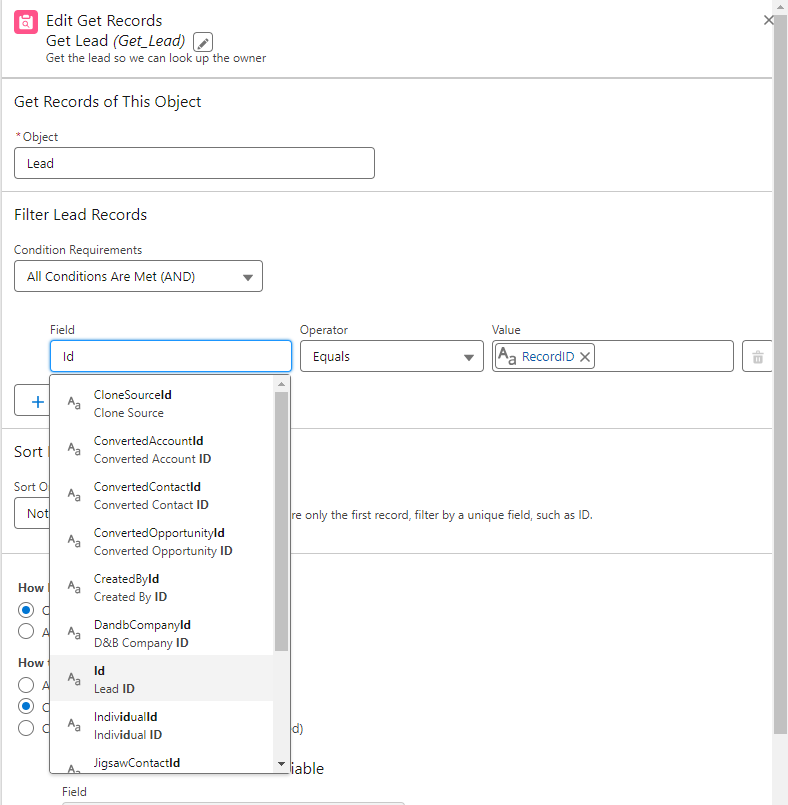
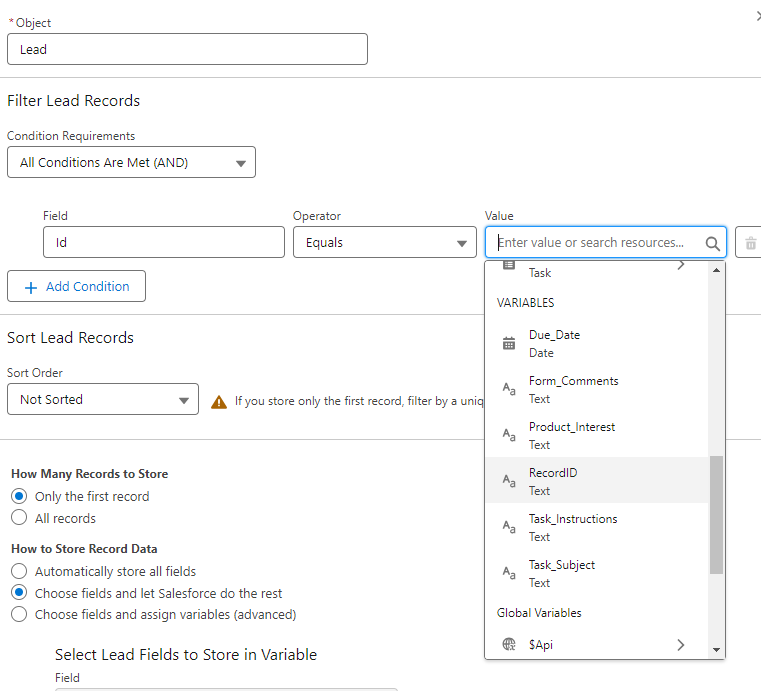
For each path, we will need to add a ‘Get Records’ element.  Select the correct object and then set the following filter:

FieldOperatorValue
IDEQUALSRecord ID

Create task details

Next, let’s create the task details. Start by creating another variable using the details below. Do not check the “available for input” box for this variable. 

Variable NameData TypeObject
NewTaskRecordRecordTask

Add an Assignment element

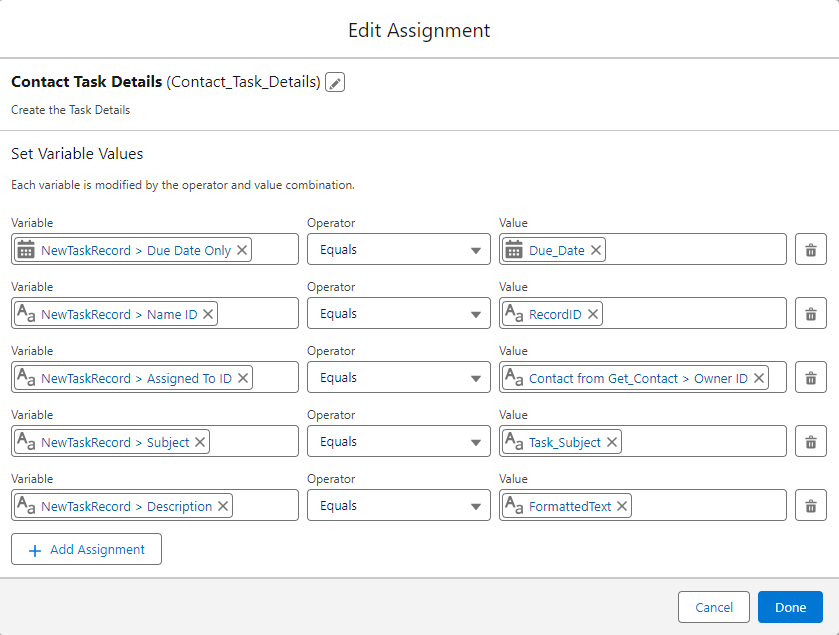
Then, add an Assignment element for each path to fill in the details. The Assigned To ID for the new task is the record owner from the object we looked up. Lead owner ID if it was a lead, Contact OwnerID if it was a contact.

Optional Step: Description formula

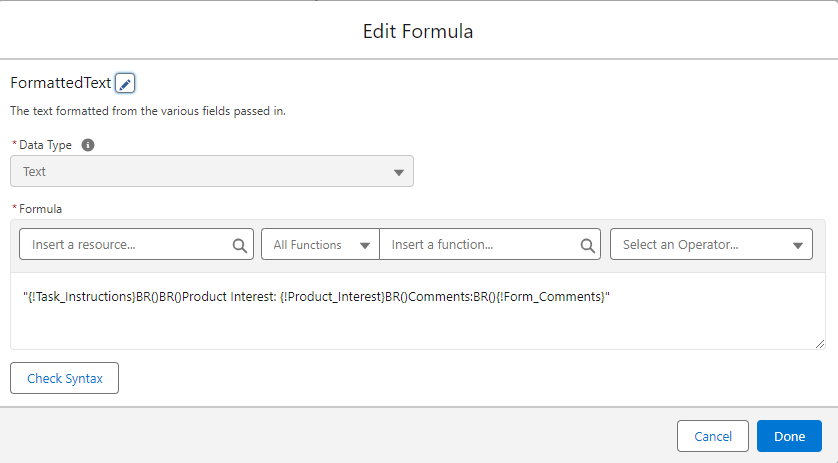
For the description, we can use a formula to put together the description that we want using a combination of our other variables.  To do this, create another variable with the type “formula”. Name it “FormattedText” and input this as the formula: “{!Task_Instructions}BR(){!Form_Comments}”

This will update the description field on the task to display the information inputted from Task Instructions and Form Comments. You can input a formula to include the variable values that are important to you. See another example in the screenshot below.

Create task record

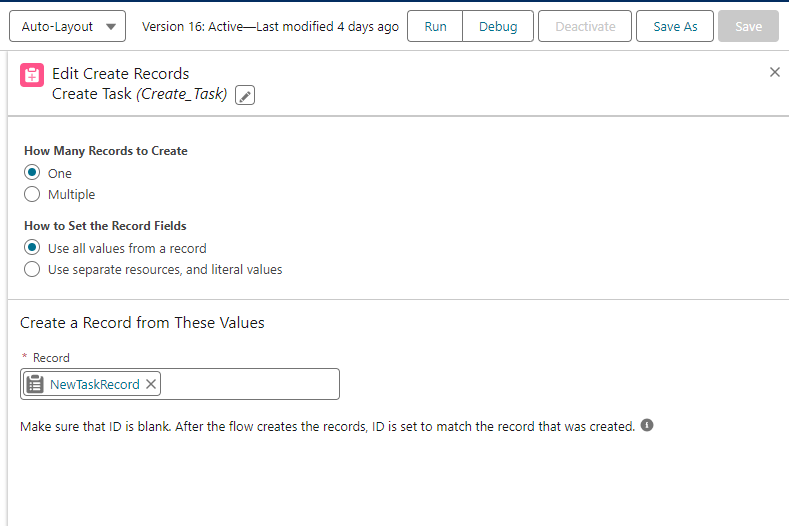
Our last step in the flow will be to create the task record. Use the “Create record” element and add the variable “NewTaskRecord” under the “record” drop-down. Leave the other settings as is.

Flow is complete

When you are complete, your flow should look like this:

Your flow is complete. You can debug using an existing record. You will need to activate the flow before moving on to the next step.  

Marketing Extensions External Action

Next we want to create the External Action. Be careful with these,  we can’t currently delete any we make by mistake. If you have access to an Account Engagement Sandbox, this could be a good time to use it when building your first External Action.

Create a new Extension

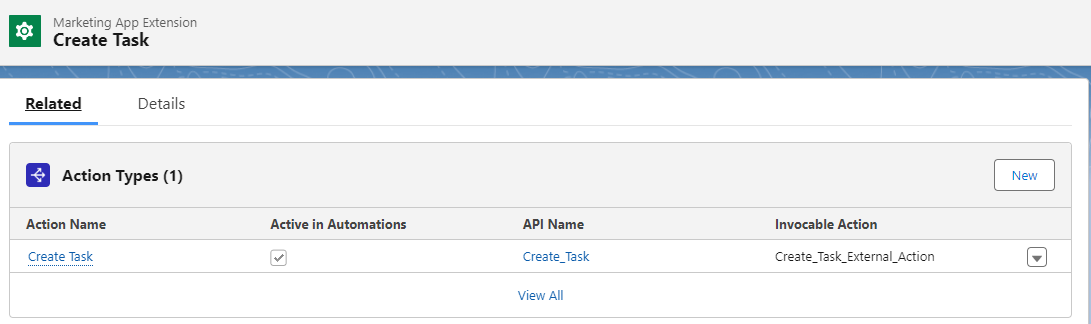
In Marketing Setup> Marketing App Extensions, we will want to create a new Extension.  Name it “Create Task” and select the box “Active in Automation”.  

Create a new Action Type

Once it’s created, go to the Related Tab, and create a new “Action Type”.

Name it “Create Task” and Search for the flow we just created under “Invocable Action”. The flow must be activated.  Check the box for “active in automations” . 

The Action Type will write an Action Schema for us. We can simply click save, and we are done.

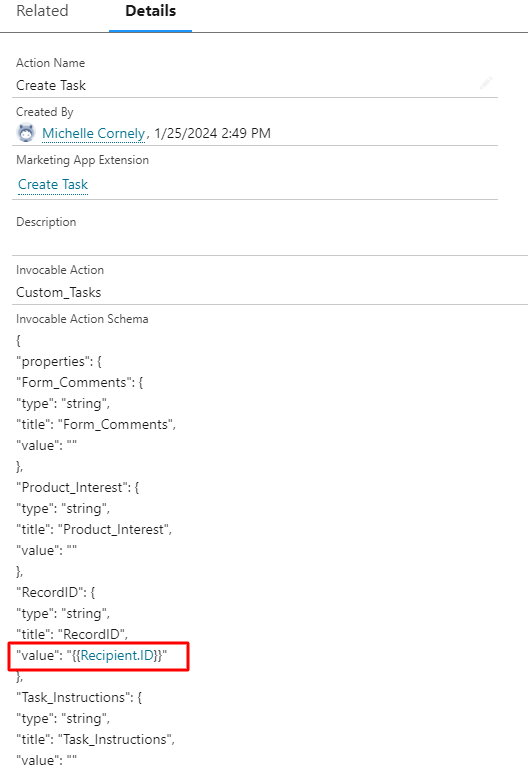
Optional Step: Adjust default details

We can also adjust the default details, providing Account Engagement default merge fields, and reordering the fields in the ‘view’ section, and even making fields required, such as our RecordID field. These adjustments can make our new tool easier to use! In the screenshot below, we’ve added in the merge field for RecordID so that we do not have to have our end users do this in Account Engagement.

Select business unit

Under the related tab, select “New” under Business Unit Assignments. Search for your business unit name and select it.  If you are unsure of your business unit name, go to Marketing Setup > Business UnitSetup.

Completion Action

Now we can use our shiny new Task!

Finalize with completion action option

When our Marketing App Extensions have all the bits ‘Active’ and we have assigned our business unit, we will get a new Completion Action option on forms and Engagement Studio Programs.

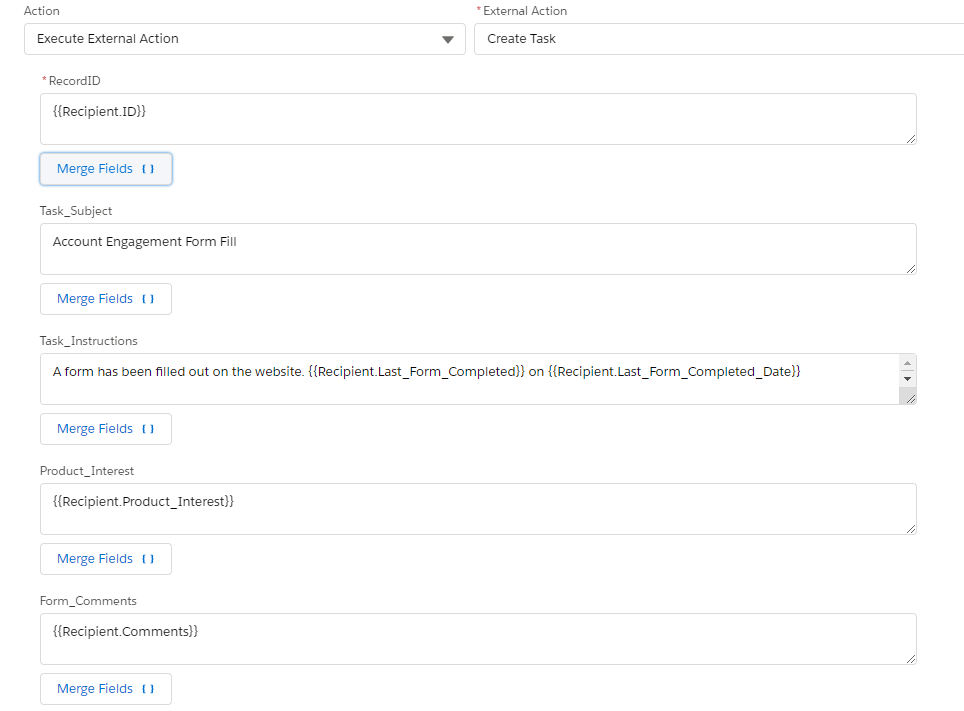
Fill in all the fields

This is where we can fill in all the fields we created as flow variables. We can use Account Engagement merge fields to fill them in, or just start typing text. Or a bit of both!

If you look at the ‘Task_Instructions’ in this example, you can see we can fill in text with a bunch of merge fields. Those merge fields are other completion actions on a form.

Start Creating Custom Tasks!

We used to be able to create a task and only have a generic “Follow up with this Contact” in the description. With custom tasks, the descriptions can now be populated dynamically with the exact information that prospects input on a form.  

Tasks can hold custom information like support questions or product interests, which can help streamline the next steps for the users receiving the task. So if your sales team is getting the tasks sent to them, then they can check the task to understand the best route to take.

Need help understanding how external actions and Salesforce tasks fit into your overall business strategy? Reach out to the team at Sercante to start a conversation.

Thank you to Mike Creuzer for contributing his expertise to write this post!

Are you ready to ignite your digital marketing efforts? The collaboration between Marketing Cloud Account Engagement and Advertising Audiences, both powerful tools in their own right, will skyrocket your success in digital marketing. In this blog post, we’ll show you how Account Engagement and Advertising are powerful tools when they’re coupled with one another.

Marketing Cloud Account Engagement

Account Engagement is the Salesforce B2B marketing automation software. Its main uses are account-based marketing, cross-channel campaigns, and lead generation. And though it does so much more than that to optimize your marketing efforts and provide out-of-this-world analytics, it cannot help you run your digital advertising campaigns. 

Marketing Cloud Advertising

Advertising Audiences, powered by Marketing Cloud Advertising, seamlessly integrates with online advertising platforms, including social media, Google Ads, and more, to target your Prospects specifically. It enables marketers to easily reach existing customers, generate new leads, suppress a subset of Prospects, and re-engage. 

This all sounds great, right? Absolutely! But wouldn’t it be cool if your advertising efforts were linked to your marketing automation efforts? 

Why should I connect Account Engagement with Advertising Audiences?

That’s easy! Pairing these tools can help you to automate your processes, improve cross-channel campaigns, and expand your footprint. Who doesn’t want this for their business?

Automate Processes

Getting leads from social media campaigns is often a manual process of exporting and importing. Bleh! Who has time for that? With this integration,  you can automate lead transfers directly from your social media and paid ad campaigns to Account Engagement. This also lessens the chance of human error and ensures that you are staying within legal guidelines at a global level.

Improve Campaigns

There are many digital touchpoints: email, Facebook, LinkedIn, Instagram, Google Ads, etc. With Account Engagement and Advertising Audiences, you can unite all of these touch points into a centralized hub and be able to track and report on them seamlessly. This combo gives you a more accurate preview of sources and measures of what is and isn’t working for your company. It also allows you to use first-party data to create and target lookalike audiences, improving your chances of getting new leads.

Expand Your Footprint

When running campaigns via media buys and email, you can now target and re-engage inactive Prospects, target Prospects based on behavior, and enable exclusions based on data, demographics, or purchase history. And this is all done in real time. Does this not seem like a great return on investment?

I’m ready to launch Advertising and Account Engagement. How do I make this happen?

The setup can be cumbersome and often requires work with a Salesforce Partner, but it’s quite straightforward if you are comfortable in the Salesforce ecosystem. 

The good news is that it’s done once it is in place. It’s all about building new audiences or tweaking existing audiences from then on. 

You will need access to Sales Cloud, Marketing Cloud Account Engagement, and Marketing Cloud Advertising to get started. You will also need to ensure that all connectors are active. 

Here’s a high-level look at what it takes to get this launched:

Sales Cloud

  1. Create a Salesforce Campaign
  2. Build a Salesforce Report

Account Engagement

  1. Build automation(s) to populate your audience(s):
    • Automation Rule
    • Page Actions
    • Completion Actions
    • Engagement Studio

Advertising Audiences

  1. Generate a Data Import
  2. Create an Automation
  3. Build your Audience

If you are ready to expand your digital footprint, the obvious next step is having all the tools you need at your fingertips. The power of Account Engagement combined with Advertising Audiences is among the most effective tools. 

To learn more about the implementation process, click here. Need help? Contact Sercante to learn more.

Recently I was perusing the Salesforce IdeaExchange for interesting features to upvote and came across a common issue with over 4k upvotes, “Automate contact owner update when account owner changes.” 

Now, I would LOVE for this to be a native Salesforce feature of course, but there is a simple solution to this that I couldn’t find documented anywhere. 

So let’s get to it!

The problem with Account and Contact Owner mismatches 

Depending on how your sales team manages Account and Contacts, Account and Contact Owner mismatches can cause a lot of headaches. 

In most Salesforce orgs I’ve worked with, the Account Owner is responsible for nurturing all Contacts within the Account, but if Sales Rep A owns the Account and Sales Rep B owns half of the Contacts under the Account it can cause issues.

Those issues include:

  • Sales Rep A missing Contacts when viewing reports
  • Account Engagement “Create Salesforce Task” completion actions get assigned to the wrong user
  • Contact Activities get missed by the Salesperson who needs to act on them
  • Multiple Sales reps nurturing the same Contact at the same time

To solve for this common issue we’re going to build two items:

  1. Formula Field on the Contact
  2. Schedule-Triggered Flow for Contacts

Identify Owner Mismatches

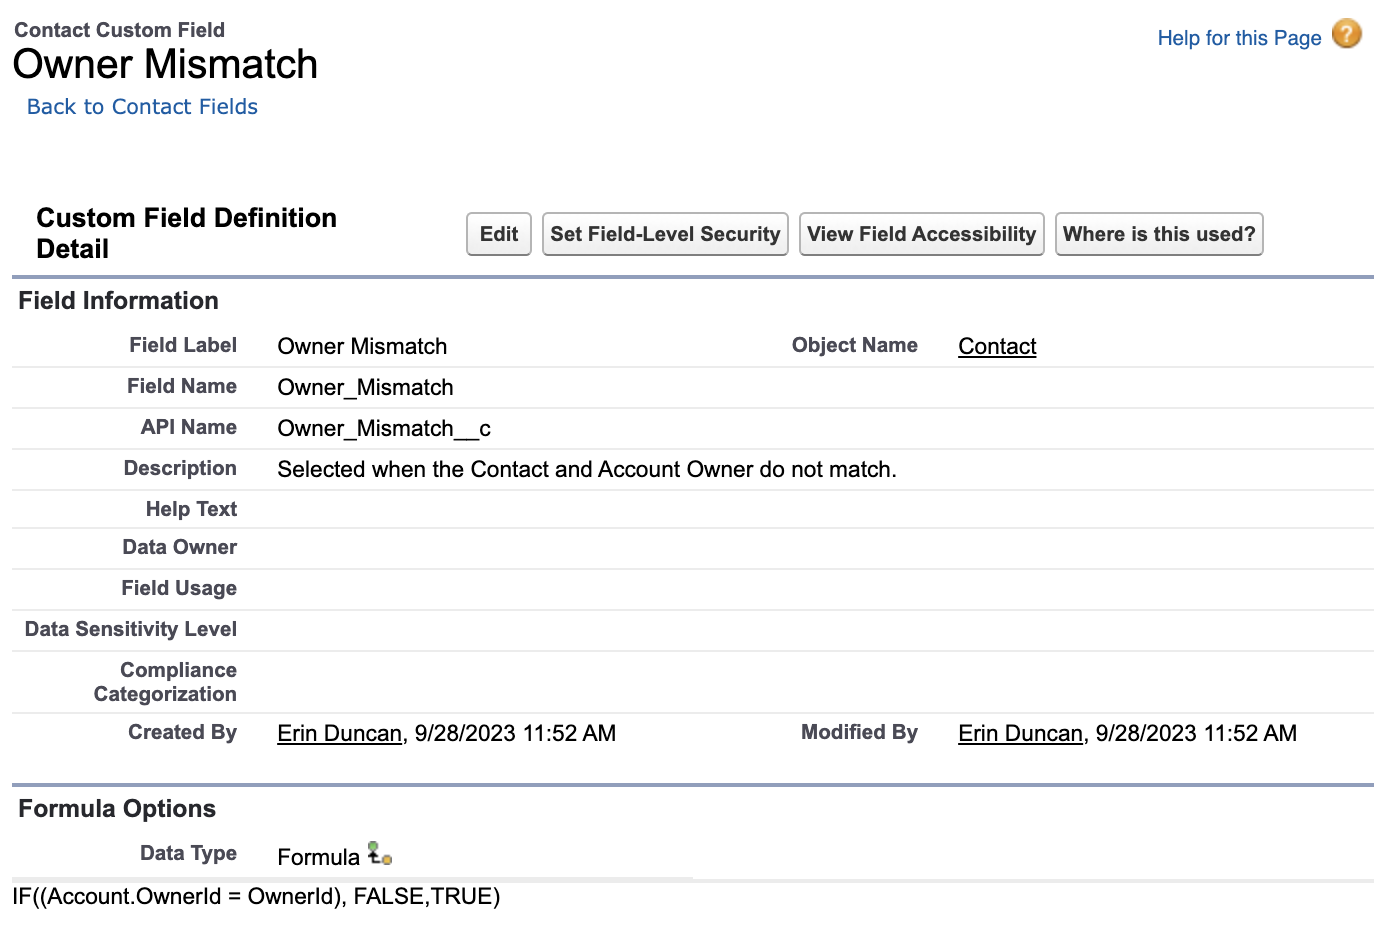
The first step is identifying records with an Account and Contact Owner mismatch. To do so, we want to build a Formula Checkbox field.

  1. Navigate to Setup > Object Manager > Contact > Fields & Relationships
  2. Select New
  3. Choose Formula, then Next
  4. Name the field “Owner Mismatch”
  5. Select Checkbox, then Next
  6. For the Formula, enter “IF((Account.OwnerId = OwnerId), FALSE,TRUE)”
    • If you are not familiar with Salesforce formulas, what this essentially says is if the Account Owner’s ID equals the Contact Owner’s ID the checkbox should be False, or unchecked. If the two Owner IDs do not match, the checkbox should be True, or checked. 
  7. Enter an Description so other users know what this field is for, and select Next
  8. Select the users who should have access to this field and the page layouts you’d like the fields added to, then select Save

Automatically Update Contact Owners

Next, we’ll create a flow to automatically update your Contact Owner to match your Account Owner. This flow is very simple, so don’t abandon ship if you are not yet a Flow super user!

  1. Navigate to Setup > Flows
  2. Select New Flow
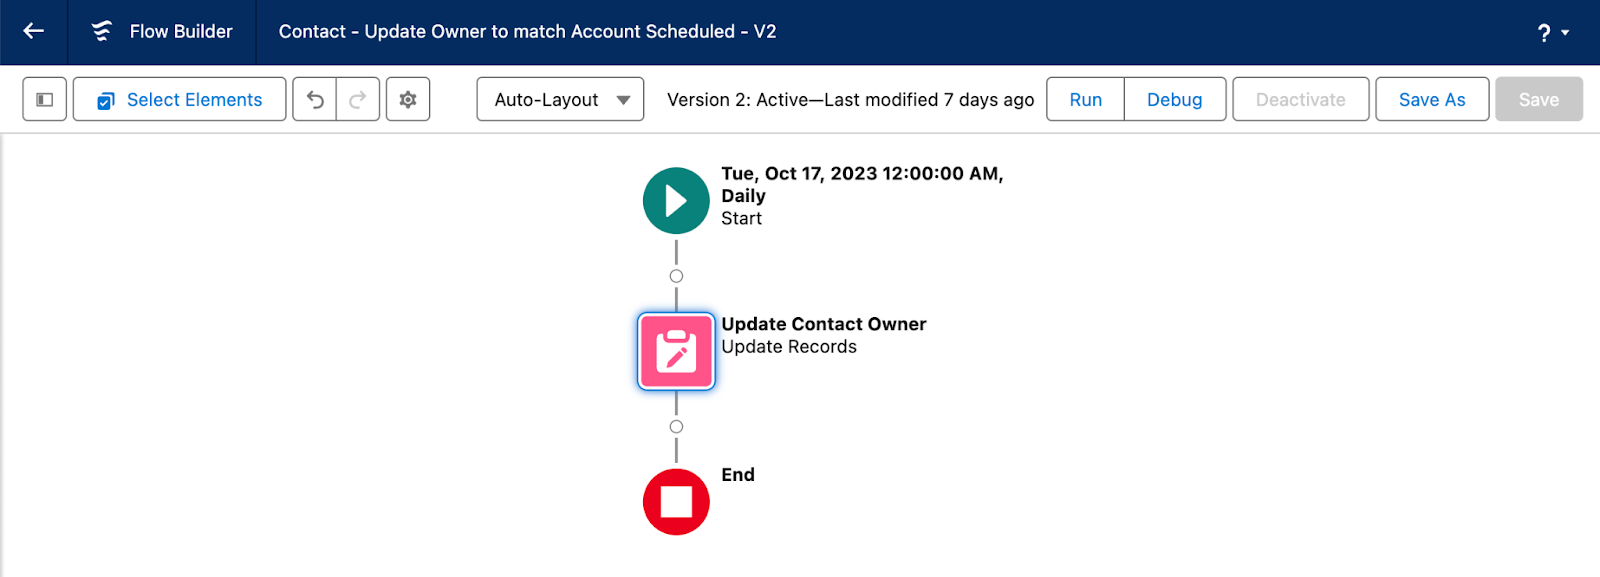
  3. Select Schedule-Triggered Flow
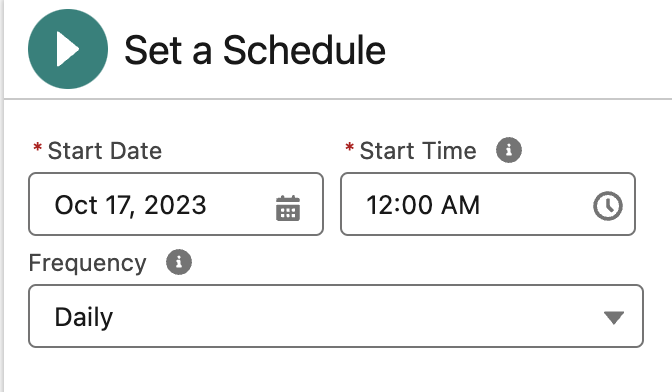
  4. Fill in the “Set a Schedule” details as below
    • Start Date: Today’s date
    • Start Time: I recommend you set this flow to run outside of business hours. For my flow, I chose 12:00 AM
    • Frequency: Daily
  1. Next, select + Choose Object
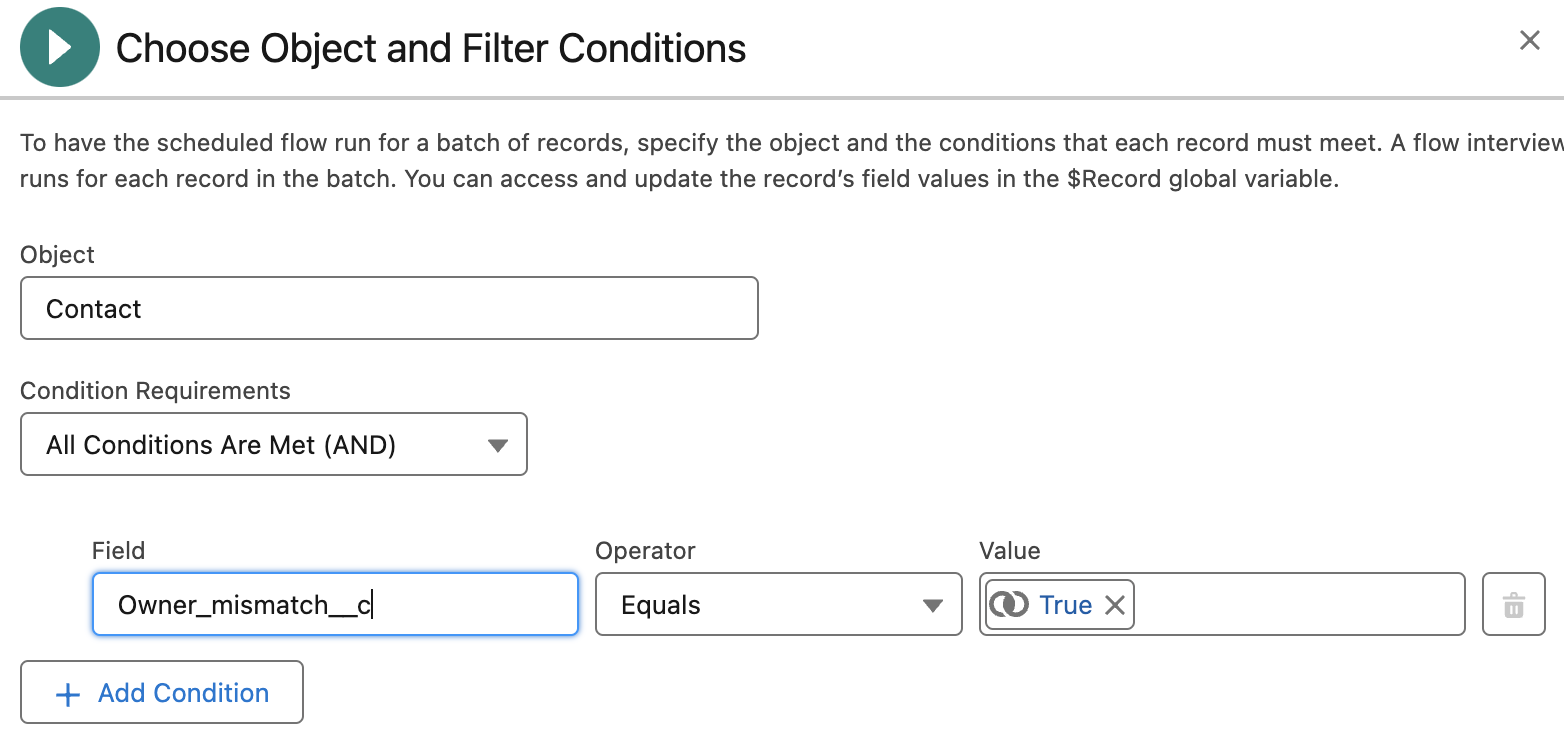
  2. Fill in the Configure Start details outlined below
  3. Select Contact
  4. Enter the condition as below
    • Field: Owner_Mismatch__c
    • Operator: Equals
    • Value: True
  1. Under your Start element, select the plus symbol to add a new element
  2. Select Update Records
  3. Label the Element “Update Contact Owner”
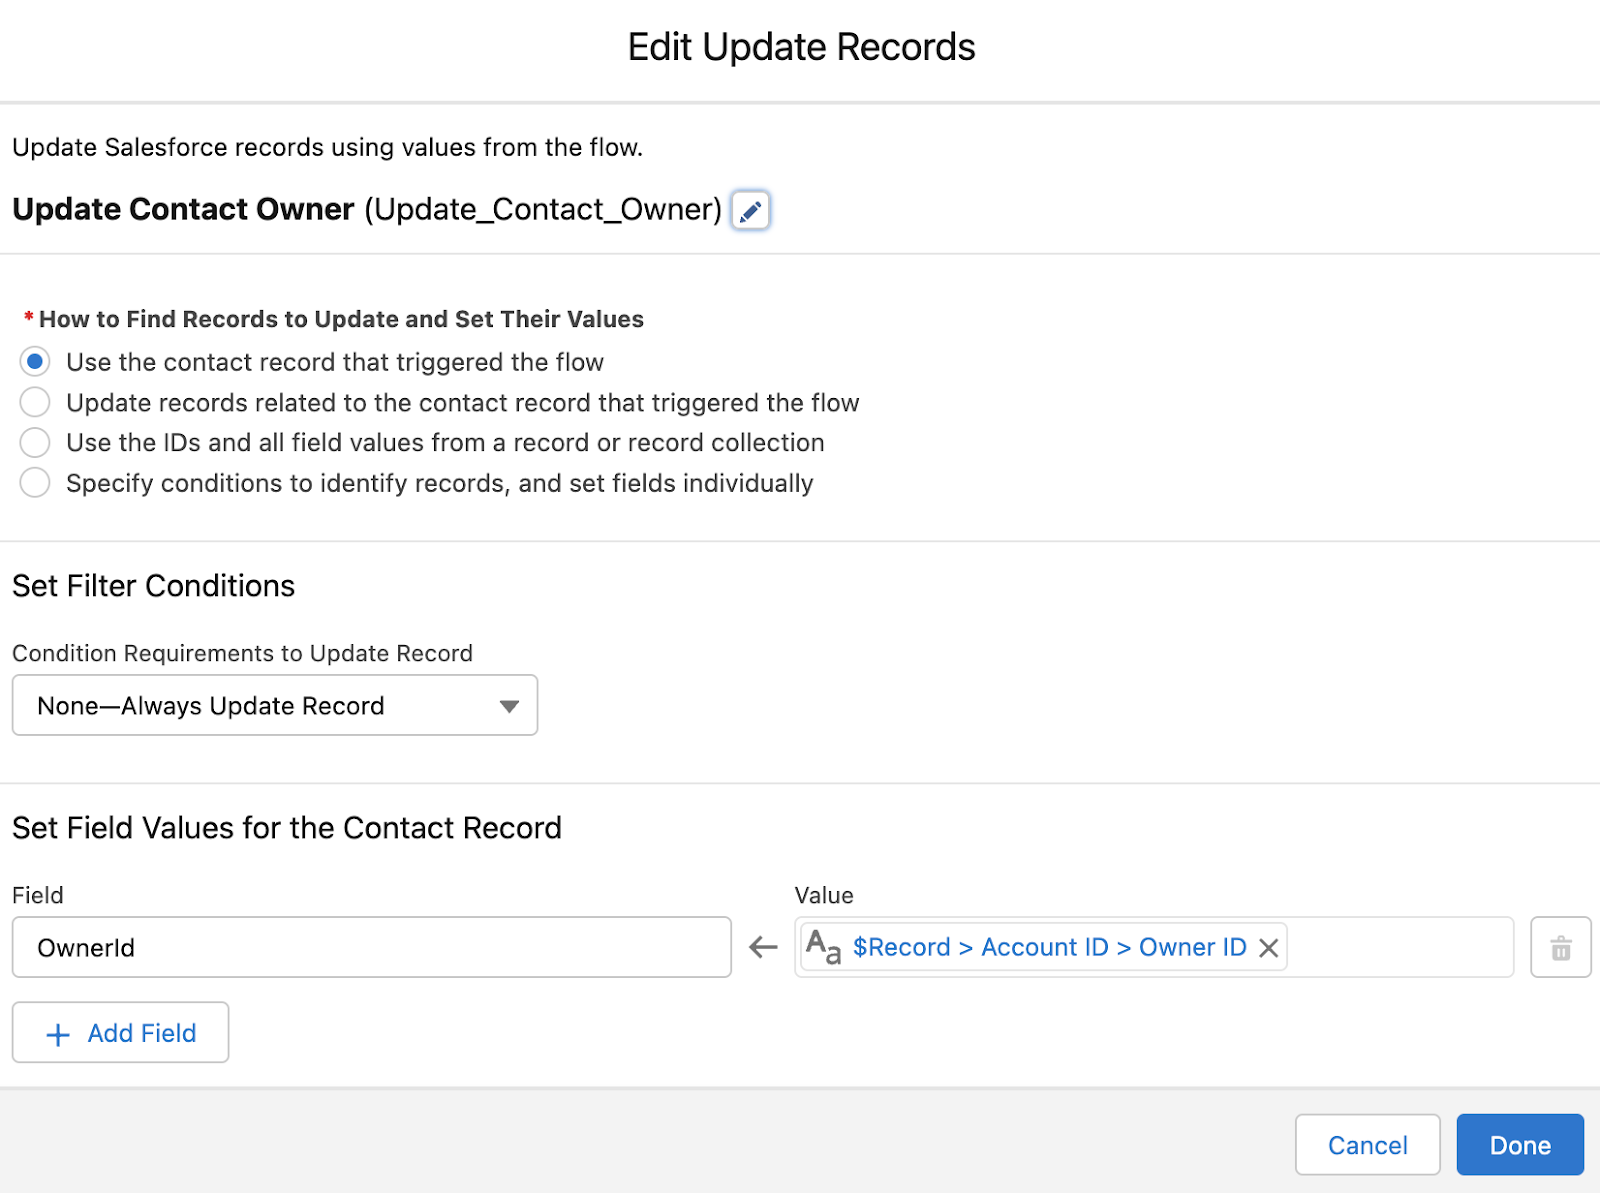
  4. Under “Set Field Values for the Contact Record” set the Field to OwnerID and set the Value to {!$Record.Account.OwnerId}
  1. Select Done
  2. Select Save from the top right hand corner and name your Flow “Contact – Update Owner to Match Account”
  1. Select Save
  2. Finally, Debug your Flow to ensure it works as expected, then Activate it! 

Now sit back and let everyone marvel at how clean Account and Contact owners are in the org. 

Get more solutions like this from Sercante

Need help figuring it all out? Reach out to the team at Sercante to get a conversation going.

If you’re new to Marketing Cloud Engagement, you may be feeling overwhelmed. Salesforce’s powerful marketing platform can do a lot. And that comes with a steep learning curve.

I’ve been on my Marketing Cloud Engagement journey for a while now and still feel the sense of having so much to learn. My learning journey has consisted of hands-on experience, boot camp-style training courses, and of course, all the Trailheads. 

Florida Dreamin’ Session – How to Write like a Marketer: Intro to AMPscript for Salesforce Marketing Cloud

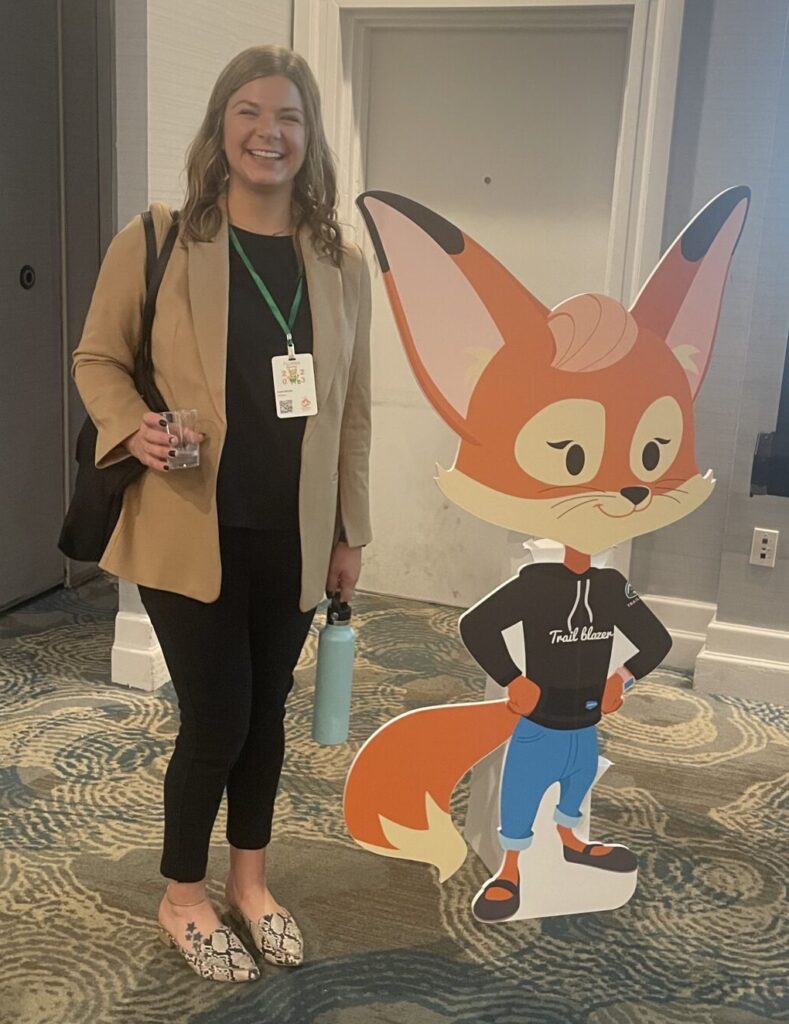
I knew when I was given the opportunity to attend this year’s Florida Dreamin’, finding Marketing Cloud Engagement sessions was at the top of my event bucket list. That’s why I was super excited to attend Tatiana Romanko’s presentation, How to Write like a Marketer: Intro to AMPscript for Salesforce Marketing Cloud.  

Romanko took a complex topic and simplified it, making her content easy to understand by providing real-world use cases every marketer could relate to. This session was a great introduction to AMPSprcipt for Marketing Cloud Engagement users who are still on that learning curve, and even seasoned veterans took away a thing or two. 

What I especially loved about her session is that, like me, Romanko doesn’t have a coding background. Her message really resonated with me: with hard work and hands-on experience, you too can learn the technical intricacies of Salesforce Marketing Cloud. 

What is AMPScript? 

Before jumping right into a complex topic, Romanko set the stage with a quick introduction to AMPscript. “AMPscript is Marketing Cloud’s proprietary scripting language for advanced dynamic content in emails, landing pages, SMS, and push messages.”

“AMPscript expands Marketing Cloud functionality to help you create the one-to-one, personalized communications that are so coveted by digital marketers. https://trailhead.salesforce.com/content/learn/modules/ampscript-for-nondevelopers/get-to-know-ampscript) 

AMPscript is used to:

  • Personalize emails using subscriber or contact data.
  • Create complex, highly dynamic emails using conditional logic.
  • Clean and format data.
  • Add real-time information to emails such as date or time.
  • Track impressions.”

(source: https://trailhead.salesforce.com/content/learn/modules/ampscript-for-nondevelopers/get-to-know-ampscript) 

What is AMPScript used for in Marketing Cloud Engagement?

AMPScript does a lot. At Sercante, we use it to help our clients with personalizing their emails, creating dynamic content, and much more. What I liked about Romanko’s session is that she really honed in on three common use cases that every marketer can relate to. 

Personalization

If you’re a marketer, you already know the power of personalization. One study found that emails featuring personalized subjects are 50% more likely to be opened. AMPScript in Marketing Cloud Engagement allows you to use your subscriber data to personalize your marketing. 

Creating a personalized greeting in Marketing Cloud Engagement through a personalization string isn’t complicated. What I liked about Romanko’s use case is she focused on something I often times see clients overlook: what happens when you don’t have a subscriber’s first name? In this case, we could use AMPscript to set a generic value (Customer) as our greeting if we don’t have this data. 

Formatting Your Data

As a marketer, I’ve seen customers input their data in every way imaginable. Romanko gave the example of asking someone to provide their favorite color. In this instance, we could get a few different variations: 

  • Pink
  • pink
  • PINK

So what happens when we go to pull this data into an email? It could end up looking like we either don’t know our basic grammar, or come across like we are YELLING at our reader. 

Romanko highlighted AMPScript’s ProperCase function here, “which capitalizes the first letter in the specified string and any other letters in the string that follow any character other than a letter. It converts all other letters into lowercase.”

AMPScript Resources

As you can see, Romanko gave some great use cases for using AMPScript. She also provided her audience with some really great resources on where to go to learn more:

Soak in all the lessons learned at Florida Dreamin’

Be sure to check out these other posts from my fellow dragons who attended Florida Dreamin’ with me and shared details about their favorite sessions there.

It’s very common for sales and marketing teams to leverage title-based “personas” to influence their activities. Knowing who you are speaking to can radically alter the message content, type, and frequency needed to progress the buying process. In this post, we’ll address why and how to update marketing persona fields in Salesforce using Flow to assist sales and marketing.

Why Use Flow to Update Marketing Personas?

Let’s start with a very simple question. Why flow? The answer is really based on where your data lives and who needs access to it. I’ve used Engagement Studio in Account Engagement to update persona values in the past, but what happens if the prospect is not in Account Engagement? That’s right — no persona will be updated.

This solution accounts for the fact that all Salesforce data might not be syncing to Account Engagement (or Marketing Cloud Engagement) and that sales still needs persona values. 

Step 1 – Understand Your Buyers and Influencers

Before we can classify records, we first need to understand who is buying from us, who is influential in the purchase decision, and who is not (this is just as important). This is best achieved by analyzing data and speaking to your sales team.

Analyze the data

Create reports based on closed won opportunities and look at the contact roles for job titles that stand out. Odds are there will be clear winners – titles that appear with greater frequency. It’s also likely that you’ll see a mix of the people who actually use your product and a level above them (based on the purchasing authority needed to complete the transaction).

Talk to sales

Chat with some of the top sales representatives to find out where they are having success. Are there certain leads that they cherry-pick based on job titles? Are there certain leads that they deprioritize based on the same criteria? 

Step 2 – Group your data

Now that we know what titles we should be going after (and those that we should avoid), we need to group them into “Personas” (think of these as containers that hold records with similar/related titles). These are the values that we will be populating from our flow and will be used in future segmentation.

It’s important to create values for those that you want to target and those that you do not. An exclusion persona can be just as valuable as a target persona.

Target Personas

Records that are buying from you or are key influencers in the purchase process.

Exclusion Personas

Records that are in your system that do not buy from you and should not be included in campaigns.

  • Examples could include: Marketing, Sales, Students, and Human Resources to name a few.  

Once you have your target and exclusion persona values defined, create custom “Persona” fields (picklist) on the lead and contact objects. I like using global picklists when creating picklists with the same values between objects. Global picklists speed the setup, are great for ensuring consistency, and make maintenance a breeze (should more values need to be added in the future).

Don’t forget to: 

  • Use the same API name on both objects when creating custom fields (this is critical if you want to map the fields back to Account Engagement).
  • Map the lead field to the contact field on conversion.

Example: Global Picklist Value Set

Step 3 – Determine Keywords

Now that we know what titles we should be going after (and those that we should avoid), and we’ve defined the groups that we would like to use for categorization, we need to identify keywords that can be used to query the records (actually – we’ll be using them in formulas). It would be great if titles were standardized, but they are not. Based on this, we are going to look for common factors.

Example: Marketing

Here are some common marketing titles. It would be great if “marketing” was included in all of them, but it’s not. Therefore, we’re going to use keywords like: marketing, brand manager, campaign, content, media relations, product research, SEM, and SEO in our formula to make sure that we properly tag our records.

  • Brand manager
  • Campaign manager
  • Channel marketing director
  • Chief marketing officer
  • Content marketing manager
  • Content specialist
  • Digital marketing manager
  • Director of email marketing
  • Internet marketing specialist
  • Media relations coordinator
  • Product research analyst
  • SEM manager
  • SEO specialist
  • Web marketing manager

Step 4 – Create the Flow (In Sandbox)

We’re going to use a record-triggered flow to update our persona values. The flow will automatically update the persona value when the title field is updated. Since contacts and leads are distinct objects, a flow will need to be created for each object.

Here’s an example of what a very basic flow would look like. This flow is just updating the value to be Marketing, Human Resources, or Other. A full version of this flow would contain many more paths. 


Configure Start

This flow is based on the lead object and is triggered when a record is created or updated. Since we don’t want to trigger the flow whenever a lead is updated, we’re using a formula to set the entry conditions. We want the flow to run only when new leads are created (and the title is not blank) or the title field of existing leads is updated to a non-blank value.


Finally, the flow will be optimized for Fast Field Updates, since we are updating fields on the same object.

Create Persona Formulas

This is probably the hardest part of this process. We are going to need to create formulas for each of our persona groups using the keywords that we’ve already defined. It’s important to note that formulas are case-sensitive by default. This is good in some cases but could cause records to be missed in other situations. Fortunately, we can address this as well.

Sample Formula 1 

This formula selects the marketing keywords that we identified, but it’s case-sensitive. It would evaluate “True” for a lead with the title “digital marketing manager”, but would not for the title “Digital Marketing Manager”.

OR( 

  /* Title contains any of these title strings */ 

  CONTAINS({!$Record.Title}, “marketing”), 

  CONTAINS({!$Record.Title}, “brand manager”), 

  CONTAINS({!$Record.Title}, “campaign”), 

  CONTAINS({!$Record.Title}, “content”), 

  CONTAINS({!$Record.Title}, “Content marketing manager”), 

  CONTAINS({!$Record.Title}, “media relations”), 

  CONTAINS({!$Record.Title}, “product research”), 

  CONTAINS({!$Record.Title}, “SEM”), 

  CONTAINS({!$Record.Title}, “SEO”) 

)

Sample Formula 2 

This updated formula evaluates the same keywords that were identified but addresses the case sensitivity issue. Here, we’ve used a function to convert the titles to lowercase and then compared them to a lowercase value. This formula would evaluate “True” for the titles “digital marketing manager”, “Digital Marketing Manager”, or “DIGITAL MARKETING MANAGER”.


OR(

    /* Title contains any of these title strings */

    CONTAINS(LOWER({!$Record.Title}), “marketing”),

    CONTAINS(LOWER({!$Record.Title}), “brand manager”),

    CONTAINS(LOWER({!$Record.Title}), “campaign”),

    CONTAINS(LOWER({!$Record.Title}), “content”),

    CONTAINS(LOWER({!$Record.Title}), “content marketing manager”),

    CONTAINS(LOWER({!$Record.Title}), “media relations”),

    CONTAINS(LOWER({!$Record.Title}), “product research”),

    CONTAINS(LOWER({!$Record.Title}), “sem”),

    CONTAINS(LOWER({!$Record.Title}), “seo”)

)

Sample Formula 3

Sometimes, you are going to need a mix of case sensitivity and case insensitivity. As an example, we would not want to update any job title that contains “hr” to Human Resources. This could lead to a lot of false matches. In this case, only titles that contain “HR” in all capitals will evaluate “True”.

OR(

  /* Title contains any of these title strings */

    CONTAINS(LOWER({!$Record.Title}), “human resources”),

    CONTAINS({!$Record.Title}, “HR”)

)

Sample Formula 4

There are also going to be times when you need to look for a specific value, like CEO, and also look for title strings. We can do that too! 


OR(

    /* Title is any of these values */

    {!$Record.Title} = “CEO”,

    /* Title contains any of these title strings */

    CONTAINS(LOWER($Record.Title), “chief executive”),

    CONTAINS(LOWER($Record.Title), “president”)

)


As you can see, there’s a fair bit of work involved in creating and testing the formulas. That’s why working in a sandbox is critical. If you can get all the formulas to update all the values exactly as you would like on the first try, I encourage you to check out our careers page!

Configure Flow Elements

Each path includes a Decision and an Update Records element (learn more about Flow Elements). We’ll walk through the marketing paths and the same logic can be applied to additional paths. The only difference is that the “No” outcome for the final decision should update the persona value to “Other”. We want to add a value to leads that don’t match any of our formulas for two reasons.

  1. We want to verify that they were processed by the flow.
  2. We want to be able to identify the leads that were not matched by our formulas so we can evaluate and improve. This is VERY important.

Decision Element 

The element is pretty straightforward. The “True” outcome looks for leads where the marketing formula evaluates to “True”. Leads that do not evaluate true progress down the “False” outcome and move to the next decision element.


Update Records 

Leads that match the “True” outcome conditions then proceed to the Update Records element. This is where the magic happens and the record is updated in Salesforce.

Debug

The final step before activating your flow is to do some debugging. Test by updating the titles of a few leads to make sure that they progress down the correct path, Be sure to vary the case of the titles to make sure that upper, lower, and mixed cases work as expected.

Step 5 – Rinse and Repeat

Once deployed into production, your flow is not going to be perfect. There are going to be some records that are classified as “Other” that should fall into other categories. That’s OK!

The final step is to do regular reviews and updates of the records that have the “Other” persona. It’s possible that we missed a keyword on our first pass or that a new hot title has emerged. I compare this a lot to scores in Account Engagement. You don’t quit once you define your scoring model, you evaluate and refine it. The same process applies here. 

Give it a Shot! 

We’ve done a lot in a short post. I encourage you to give this a shot in your sandbox. You’ll be surprised by the number of records that you’ll be able to update and the value that it will bring to your sales and marketing teams. If you get stuck, let us know. That’s why we are here! 

Shout out to Heather Rinke and Jason Ventura for their collaboration in building this process!

No more posts to show