Category

Marketing Automations

We’ve all been there. You’ve set up an awesome automation in Salesforce Marketing Cloud Automation Studio. But what do you do when you see errors? 

It’s time to put on your detective hat. Follow these 4 steps to get to the cause and resolve the error. Then you can get back to what you do best… marketing! 

Step 1: Understand the error

First, you need to understand the error that’s being thrown out.

Tip: Bookmark this Salesforce article. It will be your go-to resource when it comes to understanding errors.

You can find the error you’re working with by hovering over the red step icon that will appear in your automation. 

This will detail what errored and the reason. Head over to the linked Salesforce article, and search for the error. This will give you your starting point. 

Automation Studio Error Example

Error: Invalid column name ‘{{column name}}’.

Meaning: Either the Source or the Destination has a field that was renamed or deleted.

Suggested Action: Confirm that columns and fields haven’t been changed or deleted.

The big clues in this error are:

  • The what – Column name
  • The where – Source or destination
  • The why – A field has been deleted

This approach will be the same for any error you get. Use it to find the what, where, and why.

Use a table like this to take notes as you investigate your Automation Studio error.

The WhatThe WhereThe WhyMarketing CloudSalesforceConnector
a field nameautomation sourcedeleted fieldX
example

Step 2: Check out the what, where and why in Marketing Cloud

In the above example, our “what” was a particular field. The “where” was either the source (the thing that kicks off our automation) or the destination (where our automation goes to). And our “why” was that the field had been either deleted or renamed. 

Go to both the source and destination (the where) and see if there have been any changes to the what.

If there has been a change, you’ll need to either update the automation to reflect that change or reverse the change.

If the “what” is no longer there and you cannot re-add it in the source or destination Data Extension, go to Step 3. 

Some other common errors that could be solved directly in Marketing Cloud are:

  • The source or destination Data Extension name or external key has been changed
  • The source or destination Data Extension has been deleted
  • Field types and/or lengths do not match in the source and destination Data Extension 
  • File upload naming patterns do not match the configuration 

Step 3: Head over to Salesforce

If your Marketing Cloud instance is connected to Salesforce, and you don’t see anything wrong with your setup in Marketing Cloud or nothing has disappeared (such as a field), then it’s time to check out your Salesforce instance. 

You may need a Salesforce admin for this part of the investigation. Check out Celine Newsome’s blog post Why Should Marketing Admins Have Salesforce Access? for help making the case in case you don’t have access.

Using your knowledge of how the automation studio has been set up, find “the what” this could mean going to the Salesforce object and finding the field, has anything changed? Other things you may need to check in Salesforce, depending on your error

  • Has a field been deleted or renamed?
  • Have permissions changed? Remember your Marketing Cloud Connect user in Salesforce will need to be able to see everything you want to see in Marketing Cloud
  • Has field or object visibility changed?

At this point, if you find something not quite right in Salesforce, you are no longer in Marketing territory. You’ll need to work with your Salesforce admin to

  1. Understand why the change was made 
  2. Find out if it can be reversed
  3. Inform them of the impact on marketing if it can’t be reversed and put a plan in place in Marketing Cloud

We don’t want to go in and start changing things back, as there could be good reasons for the change in Salesforce. 

If you find the reason for your automation errors in Marketing Cloud is because of changes made in Salesforce, then it’s probably a good time to open up this blog post in another tab and read it after this one “Why Salesforce and Marketing Admins Work Better Together”

Step 4: Check your connector 

If you’re at step 4, I’m going to assume you’ve found nothing in Marketing Cloud and nothing in Salesforce. Here I’d suggest reviewing your Salesforce connector in Marketing Cloud to make sure that’s the case.

  • You still have a Salesforce System User listed. You can find this by going to set up in Marketing Cloud > Apps > Salesforce Integration 
  • Check that the user listed above is still integrated with Salesforce. You can do this by going to users in Marketing Cloud and checking the Salesforce.com Status.
  • Make sure your connector user is still active in Salesforce and has all the permissions needed to work with Marketing Cloud.

Work together with Salesforce admins to prevent Automation Studio errors

While there are lots of different errors that can appear in your Automation Studio, a simple process of elimination can often surface why the error occurred and help you fix it. Finally, knowing your Marketing Cloud set up and working with your Salesforce admin is a great step to take to help avoid errors.

What are the common errors you see in Marketing Cloud Automation Studio? Let us know in the comments.

Many organizations assign Marketing Cloud Account Engagement (Pardot) prospects who are not yet sales ready to a “Cold” leads queue in Salesforce so data syncs and is available for reporting. The problem is that Pardot can’t reassign these leads once they “score up” and many get stuck in the cold leads queue in perpetuity.

In this post, we’ll discuss how leads can be automatically reassigned from the cold leads queue with the help of Salesforce Flow and some Apex code. This solution allows marketing teams to have full-funnel lead reporting in Salesforce without burdening sales with unqualified leads.

To Sync or Not to Sync?

The question of when to sync prospects from Pardot to Salesforce is one that comes up quite often when speaking to my clients. The answers from marketing and sales often differ. And both sides are passionate about it with compelling arguments.

The Marketing Perspective 

I need to show the full impact of my marketing activities and the leads my team is generating. If leads are only synced to Salesforce when they are sales ready, my numbers are going to be understated. That means my budget is going to be questioned — and probably slashed.

The Sales Perspective 

My time is valuable and I’m working on a commission. I don’t want to be distracted by a bunch of junk leads. I need to focus my time and energy on leads who have an interest in what we have to offer. I have a quota to hit!

I’m often pulled into these conversations and asked for my recommendation. Without hesitation, my answer is always the same — it depends. Some organizations need all prospects in Salesforce for reporting purposes and some only want sales ready leads added into Salesforce. Both approaches have merit and are correct based on the needs of the organization. 

However, you can have your cake and eat it too! Enter — the cold leads queue.

The Salesforce Cold Leads Queue

My favorite solution to satisfy the needs of my friends in marketing and sales is the introduction of a cold leads queue. 

The cold leads queue is the best of both worlds solution. It allows all the Pardot prospects to sync immediately to Salesforce — which allows for accurate lead reporting for marketing while not burdening sales with leads that are not yet ready. The cold leads queue is also a great place for sales teams to find additional leads to call in the event they are running low on MQLs to call.


So What’s the Catch?

Like all good things, there is a catch to using a cold leads queue. By design (and for good reason), Pardot can only assign prospects if they are currently unassigned. Once the prospect is assigned and synced to Salesforce, Pardot can’t change the assignment.

I’m sure you see where I’m going with this. In our case, we would assign a lead that does not meet our MQL criteria to the colds leads queue (in Pardot), so it will sync to Salesforce. This is perfect as the lead is in Salesforce for reporting purposes and is not cluttering the lists views of our sales teams. 

But what happens when that prospect interacts with our marketing campaign and “scores up” to meet our MQL criteria? Houston, we have a problem!  


Reassigning MQLs from the Salesforce Cold Leads Queue

I’ve seen this many times. Leads get stuck in the cold leads queue and are not reassigned once they hit the MQL threshold. 

Why does this happen? Well, there are a few reasons.

  1. People forget that Pardot can’t reassign previously assigned leads and assume that their automation rule is doing the trick!
  2. Since reassignment has to be done in Salesforce, the marketing team does not have the proper permissions to do the job.
  3. Manual reassignment of leads is not a fun or glamorous job that Salesforce Admins look forward to doing.
  4. People just plain forget about leads once they hit the cold leads queue.

So what’s the solution to this issue? I’m glad you asked. 

The solution is to use a Salesforce flow and Apex combined to automate it.

Let’s Start With Some Definitions

Apex 

Apex is a strongly typed, object-oriented programming language that allows developers to execute Flow and transaction control statements on Salesforce servers in conjunction with calls to the API. Using syntax that looks like Java and acts like database stored procedures, Apex enables developers to add business logic to most system events, including button clicks, related record updates, and Visualforce pages. Apex code can be initiated by Web service requests and from triggers on objects.

Flow 

A flow is an application that can execute logic, interact with the Salesforce database, call Apex classes, and collect data from users. You can build flows by using Flow Builder.

*Definitions from the Salesforce Glossary

The Big Reveal

I know I talked about having your cake and eating too at the beginning of this post. Well, it’s time for cake! The trick to using cold lead queues effectively is automating the process of “promoting” leads from the queue and into the hands of your sales team — and here’s how you do it.

  • Step 1 – Determine the criteria that should trigger the reassignment of leads that are in the cold leads queue. This could be a Pardot score crossing a threshold or the change in a custom field value.
  • Step 2 – Review your Lead Assignment Rules (Salesforce) for accuracy and make and needed updates.
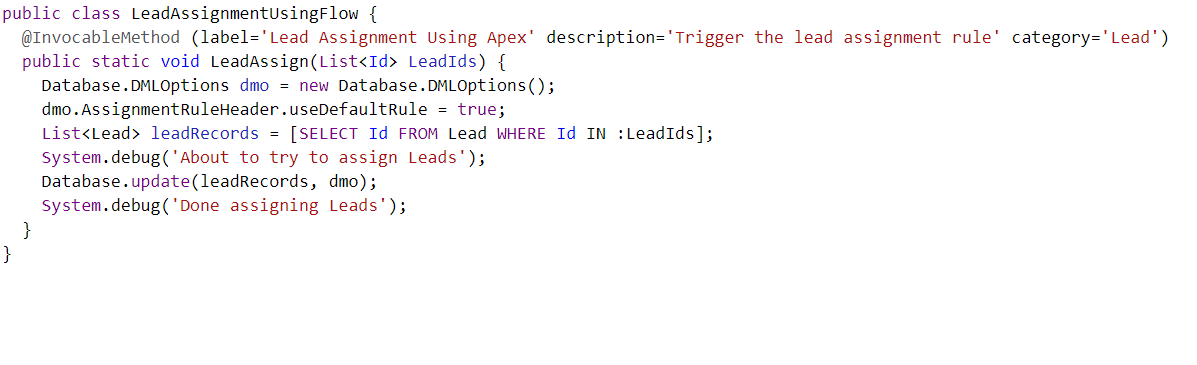
  • Step 3 – Create an Apex class to call your lead assignment rules from Salesforce — in sandbox. This is an invocable process and can be called by flow. Below is an example of how this code could look.


  • Step 4 – Create a test class to ensure code coverage. You’ll need to have 75% code coverage in sandbox before your code can be pushed to production.
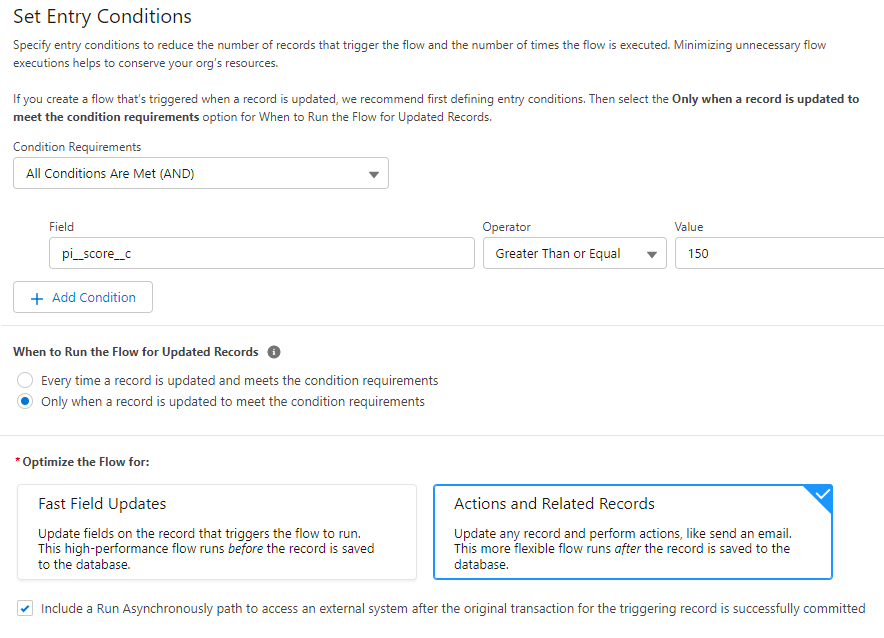
  • Step 5 – Create a record triggered-flow based on your MQL criteria. As an example, your flow could be triggered when a lead is updated and their Pardot score exceeds 150 points.

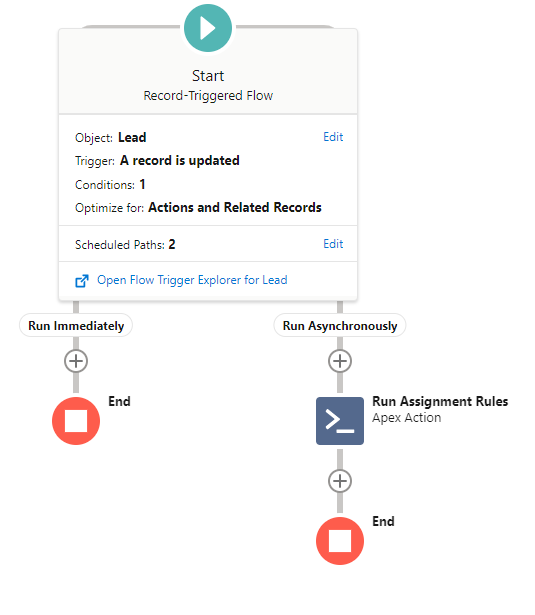
When creating your Flow, it’s important that you include an asynchronous path. This will ensure that the flow runs after the changes to the lead record (that triggered the flow) are complete.

The rest of the Flow is pretty basic and will look something like this.

  • Step 6 – Test and validate. Test your Flow first using Debug to make sure it’s being triggered when your lead score is changed to exceed the target score. Once verified, activate the flow in sandbox and test on some actual leads.
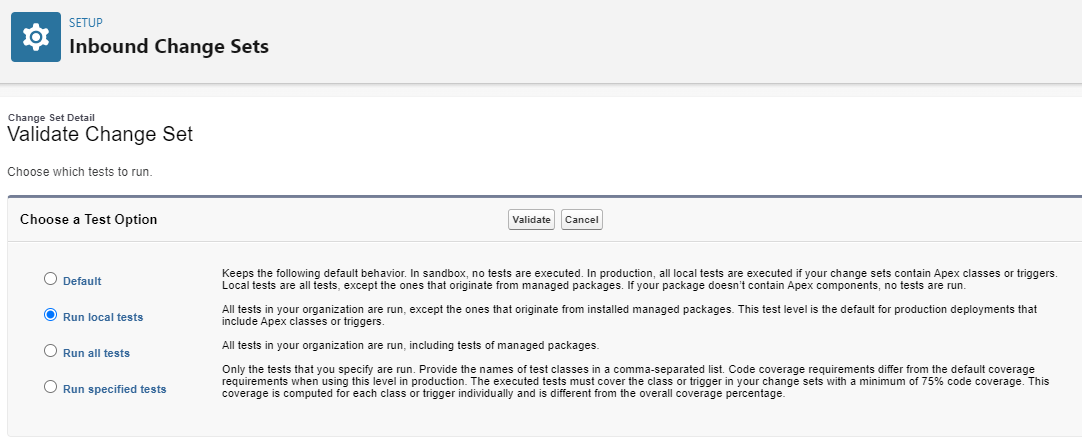
  • Step 7 – After validating your flow in sandbox, create your outbound changeset. In production, validate your inbound change set (since this change set does include Apex code, be sure to run all local tests). Deploy once validated.
  • Step 8 – Activate your flow and relax — knowing that no good leads are going to go bad in your cold lead queue!

Get Those Lead to Sales!

This post provided a high-level overview of how to automate the reassignment of leads from your cold leads queue. This is a common problem and addressing it is a great way to get some great leads into the hands of your sales team immediately. 

If you need a hand setting up the actual process, contact us with your questions.

As inbound marketing efforts continue to grow across industries, marketers are having to come up with new ways to qualify the best of these new leads. Once they’ve been qualified by marketing, the next challenge is making sure the sales team gets the lead at the right time in their journey to capitalize on their interest. 

With Marketing Cloud Account Engagement (Pardot) you can use prospect scoring and grading together to surface the most relevant leads. Combined with the automation tools built into the platform, you can save time by automatically qualifying leads and routing them to the appropriate sales person or team. 

In this blog, we’ll discuss how these two systems work together and the best ways to automate your approach.

Pardot Prospect Grading

Prospect grading takes place once you have set up your company’s ideal customer profile (ICP) and have a set of factors to evaluate a new prospect on. The best ICP’s are made up of quantifiable data, like number of employees, industry, job title and location. 

Once you have determined your criteria, you can provide the information to Pardot, and the system will automatically apply a letter grade (A-F) to prospects as new data is collected. 

To learn more about setting this up, check out Pardot Grading 101. 

For now, let’s take a look at some of the common criteria that marketers use to grade their prospects:


  • Location – If your organization uses geography to prioritize leads, you can adjust a prospect grade based on what location they provide.
  • Industry – Market and sell only to the industries that your business is targeting.
  • Job Title – Be sure you’re reaching the influencers and decision makers at an organization.
  • Company Size – Be Goldilocks and only reach out to the companies that are just right for you.


Try it out for yourself!

Not sure how prospect grading works in the real world? Here’s a chance for you to see how this functionality might work in your own organization.

Tell Us About Your Ideal Lead:

What sized companies do you target?

What industry do you typically target?

What department do you sell to?

Who are you typically targeting?


Joe is new inbound lead
D+

Pardot Prospect Scoring

You can use the Pardot prospect score in conjunction with the prospect grade to make sure only the best leads are being passed on to the sales team as qualified. Lead scores are a numerical value that can help you determine how interested a prospect is in working with your company. 

With prospect scoring, you assign points to the actions you decide are the most important. These points are totaled up and displayed as the prospect score and helps you determine how engaged a prospect has been with your marketing materials.

Let’s take a look at some of the actions you could use to influence a prospect score:

  • Page Views – Increase a prospect score with every page visit on your website.
  • Form Submission/Landing Page Success – Add points if a prospect fills out an important form on your website or landing page.
  • File Access – Adjust a score based on a prospect downloading an important file. 
  • Email Clicks – Good interaction with your email content may be an important indicator of how interested a prospect is in your offerings.

Let’s see it in action

I mentioned earlier that using prospect scoring and grading together can help to only qualify the best leads and send them to the sales team. Using these two tools can give you a better understanding of the prospects you’re working with and how to market to them appropriately. 

Check out each of the leads below to learn more about how their score and grade impact marketing efforts.

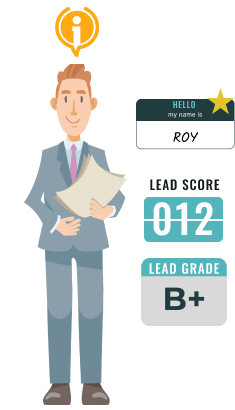
Roy

Roy is a great fit for your product or service, but either hasn't had time to do any research, or doesn’t know that your product exists yet. This lack of activity is why he has a high grade, but a low score.

Recommended Action: Call him or place him on a nurturing campaign.

Ryan

Ryan is a student interested in an internship with your company. All of his activity on your site (like browsing your careers page) has given him a great score, but since he is not going to purchase, he receives a low grade.

Recommended Action: Do not assign Ryan to a sales rep.

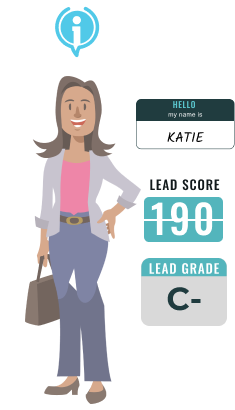
Katie

Katie is enthusiastic about your company, but may not be the best fit for your product. This gives her a decent score, but moderate grade.

Recommended Action: Nurture Katie with a drip campaign to conserve resources.

Renee

Renee is a great lead who has been working with your sales team for a while. She has done her research, has a lot of interest in your product, and fits your ideal profile. This gives her a great grade and terrific score.

Recommended Action: Send Renee pricing and bottom-of-funnel resources.

Better Together: Pardot Prospect Scoring and Grading

Prospect scoring and grading can work fine separately, but I think they work best when used together as seen in the example above. 

With automation rules, you’re able to tell Pardot to send prospects to the appropriate sales representative and add them to lists or engagement studio programs when they reach the right combination of score and grade. This helps to ensure only the best leads are being sent to the sales team, and that you’re sending the right information to the right prospects at their stage of the buying cycle.

Don’t be afraid to subtract points or letter grades for bad matches, either! You can use page actions to subtract points from a prospects score if they (for example) visit your careers page. You’re also able to set up grading to lower a prospects letter grade if they’re the exact opposite of your ideal customer profile. 

Let me know in the comments if you’ve got more questions about these two tools, or reach out to us for help with your own prospect scoring and grading strategy.

With Salesforce moving to Flow as its go to low-code automation tool, and Workflow Rules and Process Builder planned for retirement, it’s a good idea to migrate your existing automations to Flow. Here are best practices to get started on this process BEFORE you begin migrating.

Reviewing Your Current Automation Stack

Depending on how old your org is, it may have a lot of legacy configurations from old or obsolete business processes that don’t mean anything for your organization today. Do you really need to bring all of that technical debt along in your migration process? Or would you rather have an opportunity for a fresh start with your automations?

Before jumping in and migrating all of your current automations, this is a good opportunity to develop a migration strategy so that the changes being made now will meet the current and future needs of your organization. 

Develop a Salesforce Flow Migration Strategy

STEP 1: Audit your current workflow rules and process builders

First, inventory your list of workflow rules and process builders and perform an analysis. Here is a template you can use for your audit (click File > Make a copy).

When looking at your current automation, consider the following questions:

  • Which automations are active?
  • What automations are still relevant?
  • How many automations are there per object?
  • How complex is each automation?
  • Can any automations be combined?
  • Which automations make updates to the same record that triggered it?

STEP 2: Decide Which Automations to Migrate

After completing the audit, you will have a better idea of the automations in your org, which are still relevant and need to be migrated, and which can be decommissioned. 

This is also a great time to decide on which you will consolidate. Candidates for consolidation are:

  • Automations on the same object with the same trigger criteria. For example if you have 3 workflow rules that trigger from a Lead Status change, these may be a good candidate for combining into a single flow.
  • Automations that include field updates on the triggering record.
  • Automations that have similar components that could be combined into a subflow that’s called from each flow.

STEP 3: Prioritize Your Migration Plan

As you assess the automations in your org, you will become aware of those that are critical vs nice to have, and which can be combined into a single well performing flow. Use this understanding to prioritize the workflow rules and process builders you want to tackle first.

STEP 4: Get Familiar with Salesforce Flow

If you’re not familiar with Flow, and the types of flows available, this should be your next step before jumping in, to help make informed decisions about your flow strategy.

There are many resources available to help you get started.

You can check out my recent blog post for more information and links to a few great resources. Or this one from Mike Morris that outlines a process to manage Salesforce campaign activation with Flow.

STEP 5: Decide on a Flow Strategy

Ok so you know what workflow rules and processes need to be migrated and which to tackle first. So how are you going to actually migrate them? 

Salesforce Migrate to Flow Tool
  • Salesforce provides a Migrate to Flow Tool to help with the process of migrating current Workflow Rules and Process Builder to flow.
    • Support for migrating Workflow Rules is generally available as of Summer ’22.
    • Support for migrating Process Builder is coming and estimated early 2023.
  • The tool is very easy to use and does pretty much all of the lift in the migration process, creating the flow with start criteria and each action, and even makes it easy for you to deactivate the old and active the new.
  • One consideration is that the current version of the tool will migrate each workflow rule into its own flow. So if you have 20 workflow rules and use the tool to migrate you will end up with 20 flows. Will this work for your org?
Third-Party Migration Tools
  • The UnofficialSF site has a tool called ConvertToFlow v2 that can be used to convert Workflow Rules and Process Builder. I personally have not used it but it has been recommended in the community.
Building Flows Manually

If you have identified automations that can be combined, or are migrating process builders, you will no doubt build some flows. Before clicking that New Flow button, decide on:

  • Will this be a ‘Before Save’ vs ‘After Save’ record-triggered Flow?
    • Will the flow make an update on the same record that triggered the flow? If yes then a Before Save flow may be the best fit for better performance.
    • Will this flow be invoking an action or creating/updating related records? Then you will want to create an After Save flow.
  • Is there an existing flow with the same entry conditions? Can it be updated to include the logic you are currently migrating?
  • Is there an existing flow that has the same components involved? Can those components be converted into a subflow to be used in each of the flows?

Step 5: Build your Flow(s)!

Now that you have completed all of this awesome prep work, you are ready to roll up your sleeves and get building!

Questions about using Salesforce Flow? 

Let us know how you’re using Salesforce Flow in the comments section, or reach out to us with any questions.

We’re here to help!

This blog delves into the value that Salesforce Marketing Cloud Interaction Studio provides to marketers (B2B and B2C). We’ll discuss Interaction Studio and its key capabilities with a focus on identity stitching and machine-learning-based recommendations.  

In addition, we’ll talk about the integration capabilities with Salesforce products including the three Marketing Cloud tools that could benefit marketers, which are Open-time email, Journey Builder, and Automation Studio.

Interaction Studio Use Case Example

An example of a use case with Interaction Studio is when customers view a product in-store, browse through the web, download a mobile app to use a voucher, make a purchase, and talk to a sales representative after a few days, multiple touchpoints and delivering a consistent experience is needed. 

That’s where Interaction Studio comes in, unifying the customer experience with its features.

Web

Based on the user’s interaction with the website (e.g. what content they read, or what products view, how much time they are on a particular page), a personalized banner based on on-site behavior and backend preference is enabled. 

Instead of a static banner on the homepage, Interaction Studio activates a dynamic banner in conjunction with the user’s behavior and data.

Email

A personalized email is uniquely catered based not only on aspects such as name, or city but with micro nuances such as user behavior. 

Omni-channel

Interaction with a user happens on a specific channel, but reaching out happens on another channel. What we’re looking at here is adding a user on a journey or a nurture campaign when they sign up from a form on the website.

Common Thread between Interaction Studio use cases

Each of the three use cases is unique in its own features but a common thread to all of them is personalization. 

Interaction Studio puts web tracking cookies on your website to listen for all the data that comes.

Top 3 Features of Interaction Studio

Today, in this world where we have interactions happening across multiple channels, it’s really important that all your sales, service, and marketing departments talk in the same language. That can be a huge challenge at times. 

Interaction Studio is related back to contextual data such as a product catalog or a content catalog. It can bridge the two resulting in a unified view of a customer. From the data of the customer, you can make a centralized decision leading to an orchestrated delivery across all touchpoints. 

Open-Time Email

Delivers personalized content and product recommendations at the time an email is opened by the recipient, which is rendered in true real-time, utilizing the most current information of every user in your subscriber list. 

The solution is designed to work with any email or marketing provider. 

Journey Builder

Based on API. Interaction Studio listens through web, mobile, API, and data feeds, constantly gathering data about visitors, then updates existing segments in real-time. Use these segments to add customers to Journey Builder within moments of data changing.

Automation Studio

Import or export segments between IS and SFMC. Export segments from IS to SFMC/Pardot using IS SFTP — one time or nightly. 

Use Automation Studio to import data into SFMC DE. Import data into IS — Marketing Cloud data extensions are extracted using Interaction Studio SFTP as a destination in Automation Studio.

Ultimate goal

As we learned, Interaction Studio unifies multiple touchpoints of user behavior from viewing a product through a website all the way to talking to a sales representative after a purchase. From these features, it all comes down to a better understanding of the customer’s needs, making it the best experience for them as possible. 

Learn more from the original content of Deboleena Bhattacharyya here. Or, check out more MarDreamin videos here. 

Do you have connected campaigns with Pardot and would like to see email engagement data in one place? In this blog, we are able to see how easy it is to build a Pardot Email Engagement in Salesforce

Reasons for a marketing email dashboard in Salesforce:

  • Your team does not have access to B2BMA or Analytics Studio.
  • You need more transparency and shareability cross-departmentally
  • You’re looking for an easy solution.

Prerequisites:

Building the Report in Salesforce

  • Click: Campaigns > Campaigns with List Emails
    • The report will pull up both list and automated (Engagement Studio) emails
    • If you don’t see the data, you may check with your Salesforce admin on the settings

Filters Settings on the Report

  • Show me > All Campaigns
  • Create Date > All Time
  • Subject > does not contain proof
  • Total sent > greater than 0

Outline Setting on the Report

  • Group Rows by Scheduled Date and Type
  • Select the Columns of your choice
  • For the Rates and Ratio – Select Average

Building a dashboard

  • Use the “Campaigns with List Email Report” as the basis the dashboard components
  • You may use metric chart for the headers
  • Set colors to express performance satisfaction
  • Use Line Chart for Open and CTR%
  • Stacked Vertical Bar Chart for Email Record Count
  • Vertical Bar Chart for Custom Campaigns field metric

Original content from Karla Vince. Watch more sessions like hers at this year’s MarDreamin’, a conference for marketers on Salesforce.

No more posts to show