Category

Pro Tips

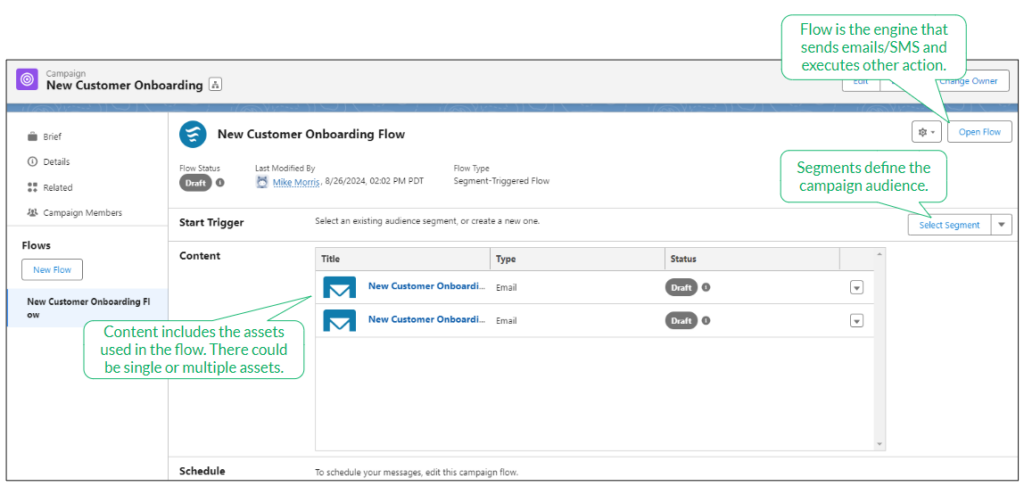
A common segmentation need with Marketing Cloud Growth or Advanced Edition and Data Cloud is creating a segment based on a Contact’s Record Type within the CRM. While this is possible by adding the Record Type field to the Contact Data Stream and mapping the field to the individual Data Lake Object (DLO), this is not very user-friendly or intuitive. Record types are stored as IDs, and who wants to build a segment based on a Salesforce ID? No worries, I’ve got a better solution!

So What’s the Problem?

Before we get into the solution, let’s first define the problem we’re addressing.

When working with record types in Salesforce, you’ll see labels displayed. These familiar values, such as “Contact,” are easy to understand. However, behind the scenes, Salesforce stores these values as IDs.

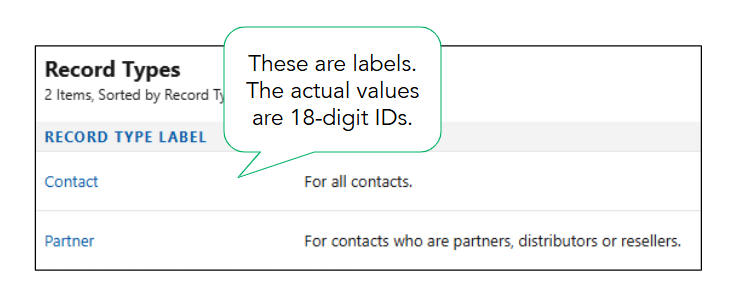
The actual values for these record types are 18-digit IDs that can be found in each record type’s URL.

Record Type LabelField Value
Contact012Hs000001p5dvIAA
Partner012Hs000001p5duIAA


Segments can be created using the field values (18-digit IDs), but this method is just asking for trouble. The IDs are very similar and could be easily confused. It takes a keen eye to spot the differences between the field values when compared side-by-side. Imagine trying to segment or personalize based on these values!

Now that we know the problem, let’s fix it!

Solution Summary

To simplify segmentation and personalization, we will create a formula field on the contact data stream to convert the 18-digit ID into text values. We will then map the formula field to a custom field on the individual DMO and add to the data graph. Lastly, we’ll verify that all data has been successfully updated.

Step 1: Create the Formula Field

Formula fields in Data Cloud are a powerful way to transform data into formats that are easier to understand and utilize. In this case, we’ll create a transformation formula in the contact data stream to generate text values for the record type IDs.

You might be wondering if it’s possible to create a formula field on the contact object in Salesforce and ingest it directly into the data stream. While this sounds like a viable option, it can’t be done due to the fact that formula fields in Salesforce are dynamically calculated and don’t have a corresponding value stored in the database.

Creating the Transformation Formula

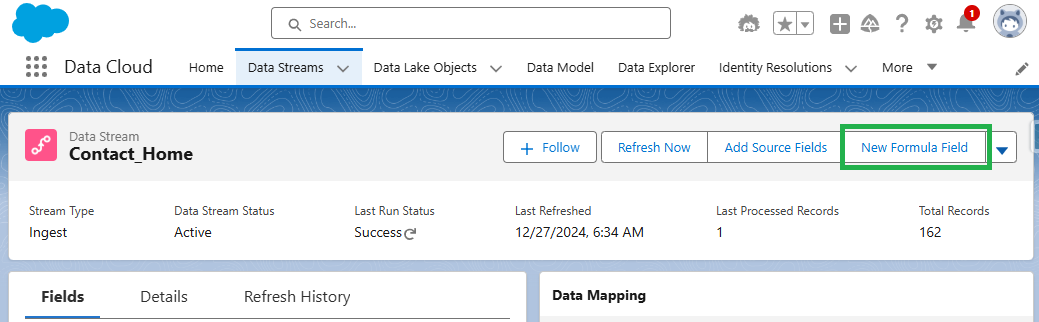
  • Navigate to the Contact data stream in Data Cloud.
    • Data Cloud > Data Streams > Contact_Home
  • Select the data stream and then click the “New Formula Field Button”.
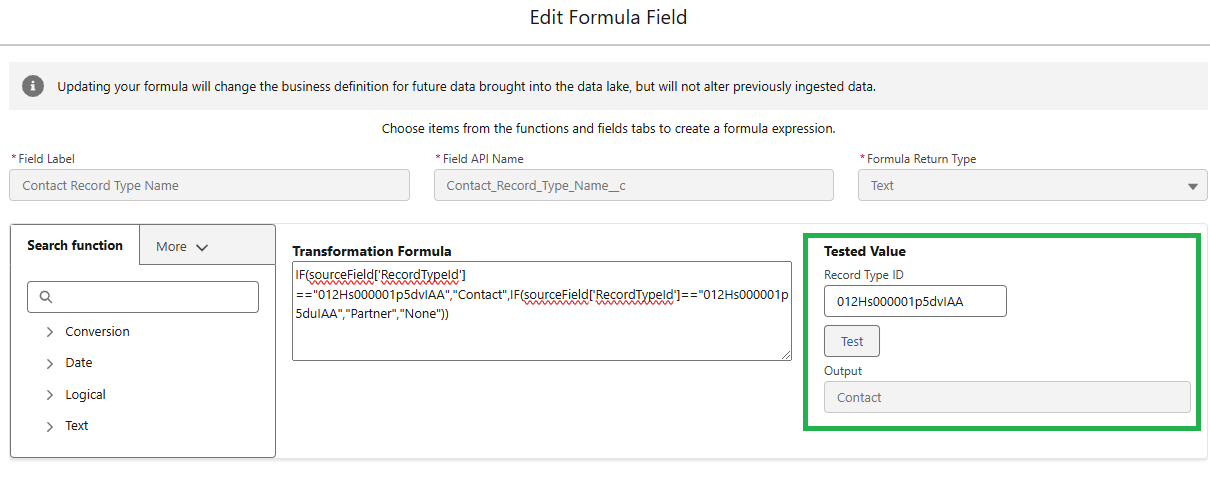
  • Enter the requested values and formula text.
    • The formula for this example is below.
      • IF(sourceField[‘RecordTypeId’] ==”012Hs000001p5dvIAA”,”Contact”,IF(sourceField[‘RecordTypeId’]==”012Hs000001p5duIAA”,
        “Partner”,”None”))
      • Remember: Your record type IDs can be found in the URL of the record type page.
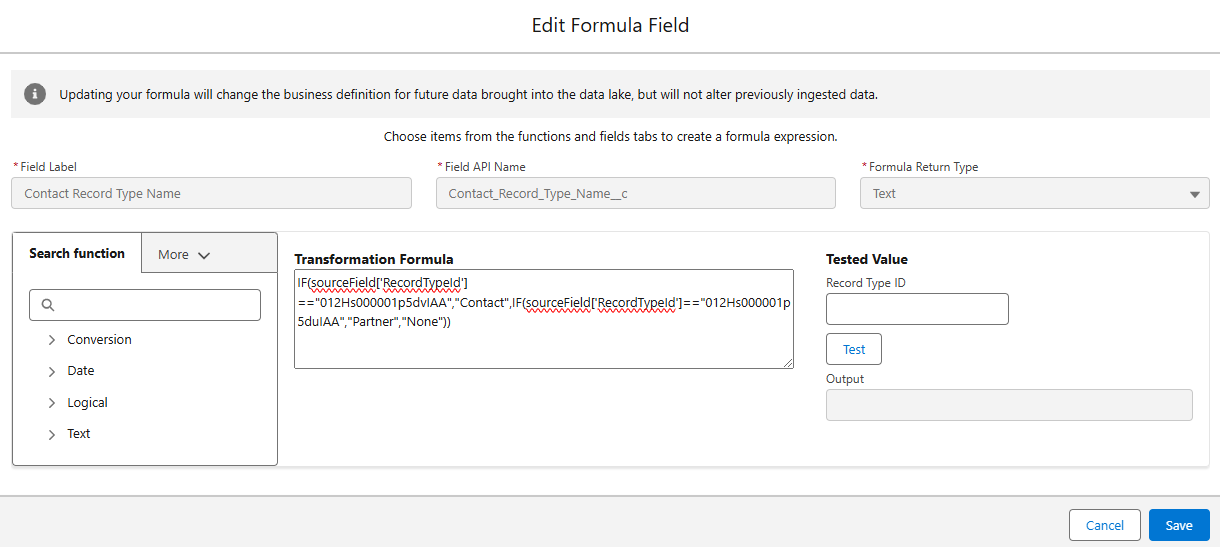
  • Test the formula for each Record Type ID.
    • Confirm the formula is returning the correct output for each Record Type ID and save.


Step 2: Map to the Individual DMO

Next, we need to map the new formula field to the unified individual DMO. This mapping creates a direct attribute for each unified individual, allowing us to use the text value in Data Cloud segments. For example, this will allow us to create a segment of all unified individuals where Contract Record Type Name is equal to “Contact”.

Mapping Contact Fields

  1. Select the “Review” button in the Data Mapping section of the contact data stream.
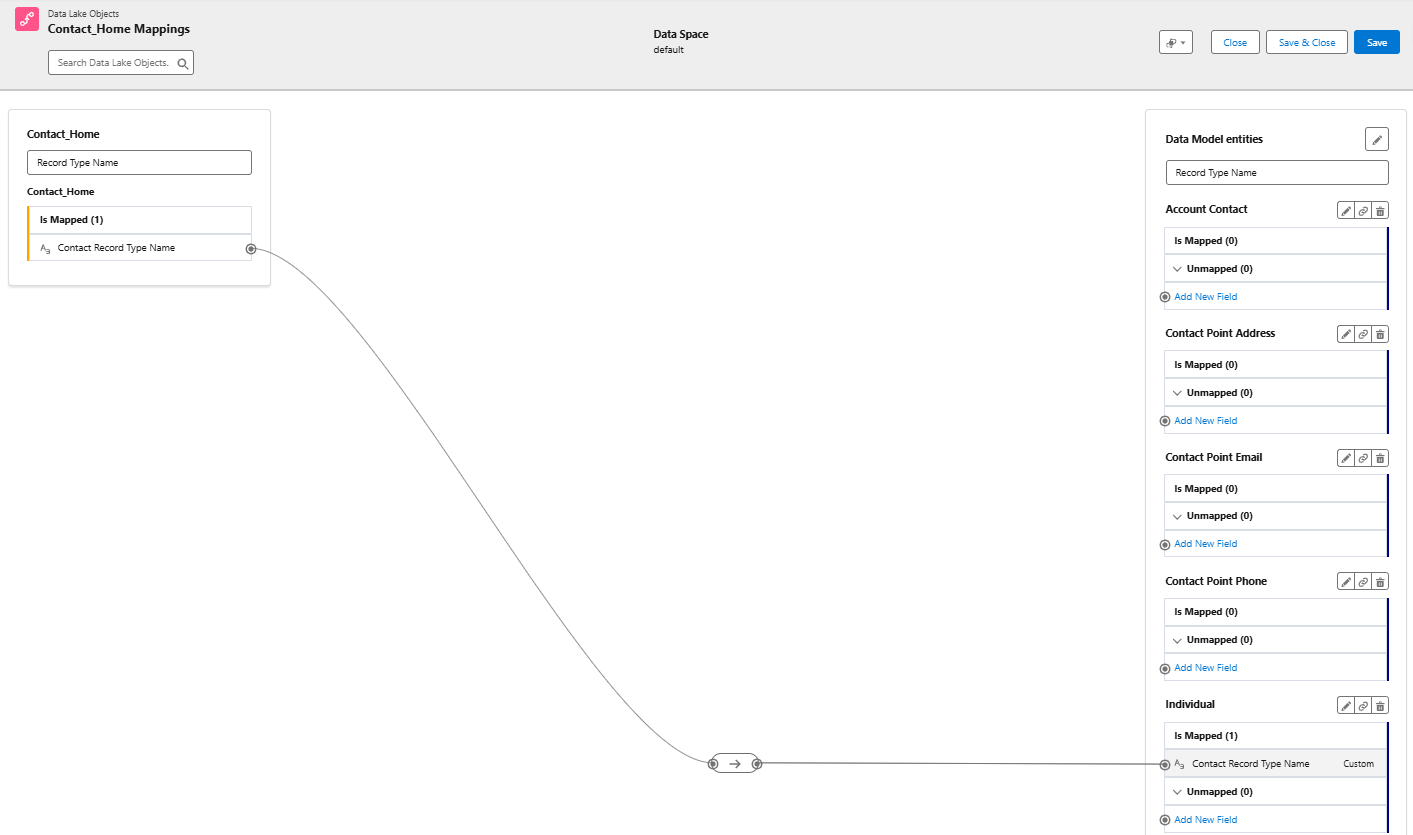
  1. Create a new field in the Individual DMO using the “Add New Field” option.
  2. Map the Contact Record Type Name field from the contact DLO to the custom field created in the individual DMO. Save & Close.

 
Step 3: Edit the Data Graph

Data Graphs are required for personalization and dynamic content in Marketing Cloud Growth and Advanced editions. To effectively personalize your emails, ensure your data graph includes all fields required by marketing (including the new formula field that we created). When updating your data graph, it’s also a good idea to review it to confirm it meets all requirements for sending emails as detailed in the second resource below.

Data Graph Resources

Step 4: Refresh the Data

Adding and mapping the new formula field will not trigger a full refresh of the data stream. You must trigger a Total Replace of the data stream and also run the identity resolution ruleset to fully refresh the data and populate the values of the formula field in the unified individual record.

Replacing Data Stream & Running Identity Resolution Ruleset

  1. Add any existing field from the contact object to the data stream.
    • You can do this by clicking “Add Source Fields” within the data stream settings and selecting any available field. This action forces a complete refresh of the data stream, ensuring all data is updated correctly.
  2. Run the identity resolution ruleset.
    • After the data stream refresh completes, manually run the identity resolution ruleset. This ensures that your unified individual records are also updated with the new information. You can find this in Data Cloud by going to Identity Resolutions > Run Ruleset. 

Step 5: Verify the Data

Once your data stream has refreshed and the identity resolution ruleset has run, it’s important to check that your formula field has populated correctly. You can do this by running a Salesforce report using the Unified Individual report type.

Confirm all unified individuals with a value in the “Record Type ID” field also have a value in the “Contract Record Type Name” field by comparing the number of records with values in each field. If the numbers don’t match,  some of your data may not have been updated yet.

Keep in mind that data streams and identity resolution rulesets run on schedules. You might occasionally see differences in the numbers due to these refresh cycles. If you encounter a mismatch, wait for the next refresh cycle and check the report again.

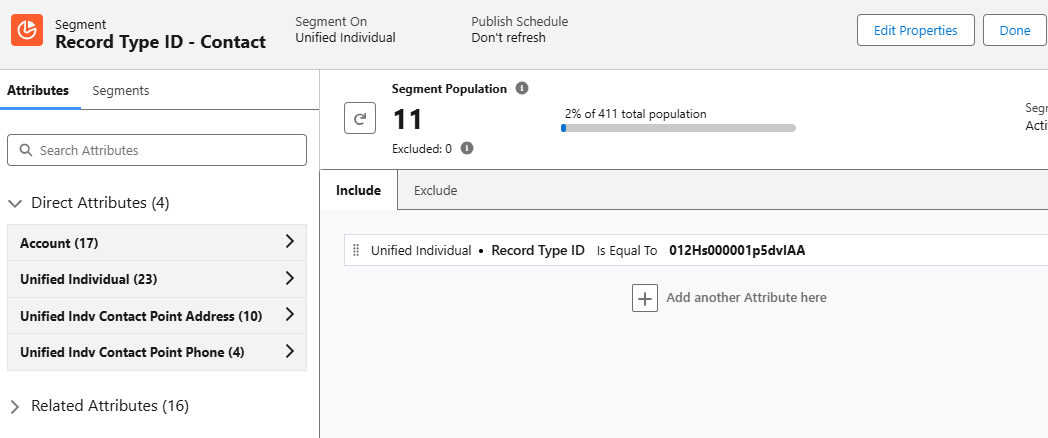
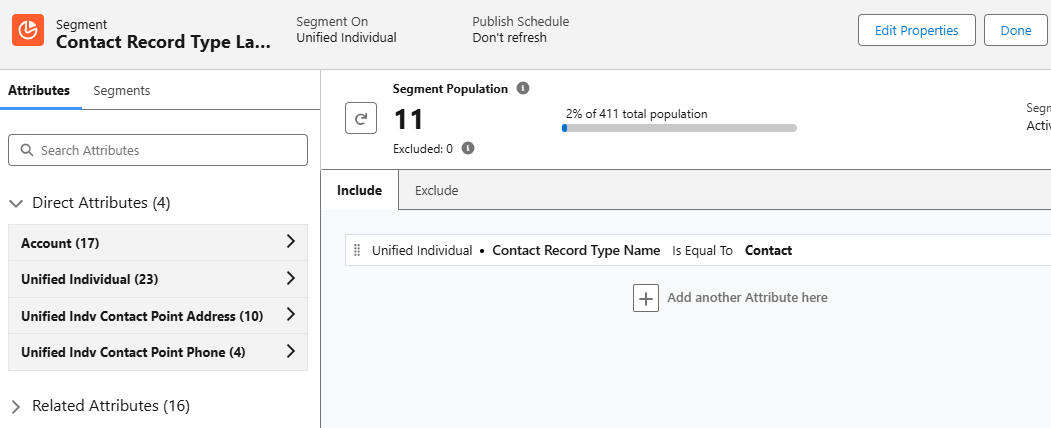
Segmentation Simplified

While both segments below produce the same result, there’s a clear winner in terms of usability. Enabling users to create segments using easily understood, text-based values will improve accuracy and speed of creation. Additionally, these same text values can be used to enhance personalization through merge fields and dynamic content.

Personalization & Dynamic Content

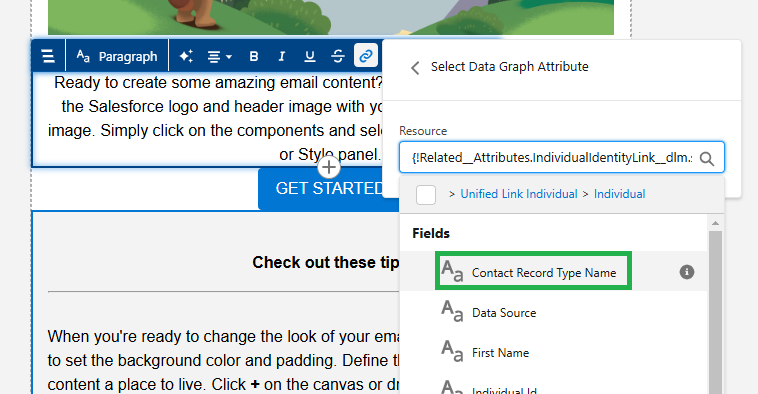
Since our newly created Contact Record Type Name field is related to the individual object, it can be used as a merge field and dynamic content.

Merge Field

Adding the “Contact Record Type Name” field as a merge field in your email will dynamically insert the contact’s record type (Customer or Partner) into the email copy. To prevent blank spaces if a contact doesn’t have a record type assigned, fallback text can be defined. This ensures a smooth and personalized experience for all recipients, even if some data is missing.
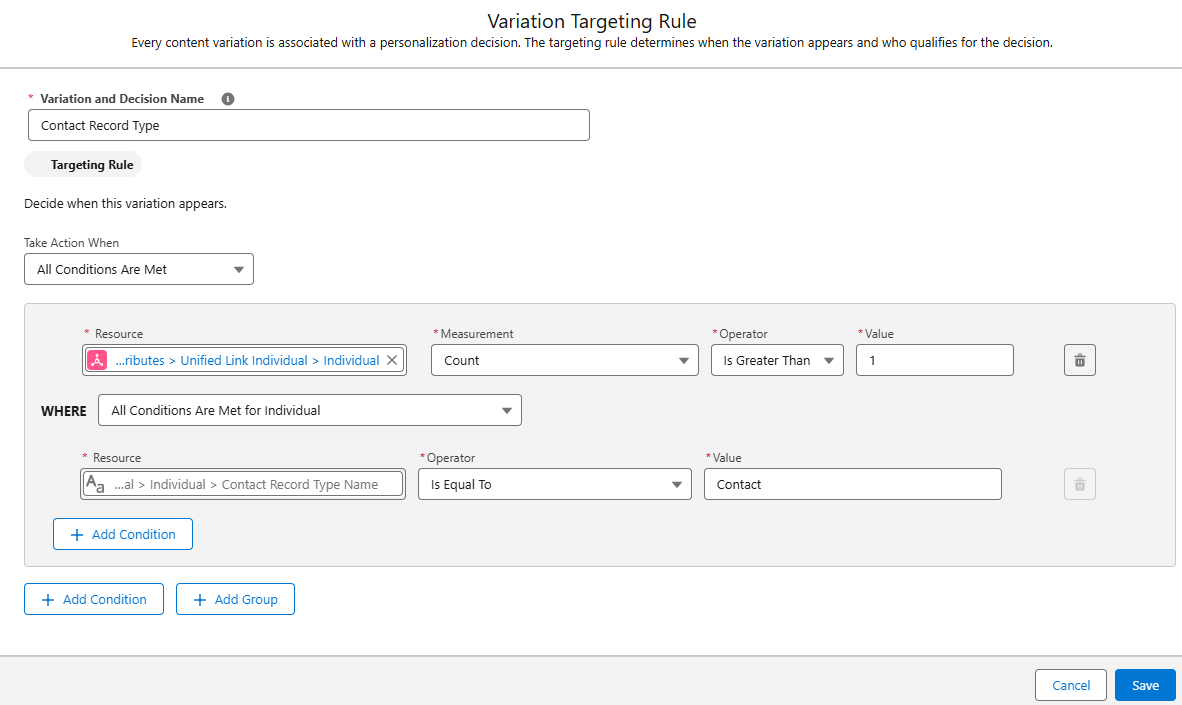
Dynamic Content

This is a great way to vary content within an email. For example, a single newsletter could be sent to customers and partners, but display different information based on the Contact Record Type Name field. Customers might see upcoming events, while partners receive a list of partner training resources.


Summary

Segmentation and personalization based on ID fields doesn’t need to be complicated. By investing time upfront in creating and mapping formula fields, marketers can significantly enhance their efficiency and accuracy. This solution minimizes the risk of errors, saves time on backend processes, and enables marketers to confidently create targeted segments and deliver personalized communications.

Big thanks to my friend and colleague Adam Babcock for his collaboration in developing this solution.

Autonomous AI is transforming the way organizations operate, and Salesforce’s Agentforce is at the forefront of this revolution. The product was made generally available by Salesforce in October 2024. Whether you want to streamline case management, enhance lead nurturing, or delight customers, Agentforce empowers businesses to accomplish more with fewer resources. In this post, we’ll share five practical tips to help you successfully implement and use Agentforce. 

Feeling anxious about diving all in with Agentforce? Contact the Sercante team for an Agentforce readiness assessment. That way, you can be sure you’re getting set up for success before you implement Agentforce in your org.

Understanding Agentforce

Before diving into the tips, let’s take a closer look at what Agentforce is.

Agentforce enables autonomous AI agents to perform tasks without human intervention, acting as digital workers within Salesforce or external customer channels. These agents enhance productivity by automating routine tasks and assisting with complex ones. With tools like Agent Builder, you can customize agents using pre-built topics and actions or create entirely new ones tailored to your organization’s needs.

Agentforce integrates seamlessly across the Salesforce platform, leveraging Data Cloud for reasoning and learning. Out-of-the-box agents include Service Agents for case deflection, with more capabilities to be released in December 2024, such as SDR and sales coaching agents.

Unleashing the Power of Agentforce: Five Steps to Get Started

Follow these five steps to get started on the right foot when you dive into Agentforce.

Tip 1: Identify Use Cases

Start by identifying where Agentforce can deliver the most value in your organization. Ask yourself:

  • How are you using your CRM today?
  • What are the current pain points in your processes?
  • Are there routine tasks that could be automated to free up team capacity?
  • Are there new processes you’ve avoided due to resource constraints?

Examples of use cases include automating FAQ responses for service teams, generating campaign briefs for marketing, or assisting sales reps with lead prioritization and moving deals faster.

Then for each use case, think about what would be needed to transition to an agent:

  • What job should they do?
  • What actions will they need to take?
  • What actions should they NOT take?  (This is just as if not more important to make sure you have defined the lane where an agent should operate within that use case)

Your responses to those questions are going to help you to understand the level of effort involved in use case. This in turn is going to help you to prioritize based on the level of effort and potential value

Tip 2: Define Success Metrics

To gauge the success of your Agentforce implementation, establish clear goals and KPIs. 

Questions you can ask:

  • What does success mean? How will we know we have addressed our problem? 
  • What metrics are we tracking today that we want to see improvement on?
  • Are there additional metrics that will let us know we are seeing success?

For example:

  • Reducing average case handling time by 20%
  • Improving lead response times
  • Increasing campaign ROI by automating content creation

Ensure you have baseline data for comparison and that the necessary measurement tools are in place to help you track success.

Tip 3: Assess Your Data

Your AI agents are only as good as the data they access. For the use cases identified, evaluate your data readiness:

  • What data do need? 
  • Where is it located? Is it in your CRM, Data Cloud, or other external systems?
  • Is it accessible from your CRM? If it’s stored in an external system, do you have APIs in place to get that information?
  • Is the data clean, accurate, and up-to-date?
    • Follow this blog post for tips on how to keep your imported Pardot prospect data clean.
  • Do you have a single view of the customer across systems?
  • Lastly, are knowledge bases and metadata structured for easy access? 
    • Agents need knowledge to inform how they will operate and answer questions. This is all of the background configurations your agents actions will rely on — flows, prompts, and Apex for example — they need to also be clearly identifiable and accessible. 
    • When you add actions to your topics, it uses the descriptions to help fuel the instructions. The naming conventions of your resources will also make it easier to determine what the inputs and outputs need to be.

Data and metadata are the backbone of AI performance, so this is an important area to pay attention to.

Tip 4: Start Small

After completing the previous steps, you may have more than one great use case to start with. Here’s where you ask yourself: What are the quick wins that we can get started on that can move the needle and that we can expand on as we mature?

It’s really easy to get caught up on how this can solve ALL the things. There are many challenges to starting a complex process all at once. If a lot of effort is required to get the data in place or to get the actions set up, it will be more difficult to roll out, not to mention making it potentially disruptive and prone to issues 

Avoid the temptation to tackle complex processes right away. Instead, focus on a simple, high-impact use case to pilot Agentforce. There are many out-of-the-box topics and actions that make getting started easier. For example, automating a single FAQ response or generating summaries for sales reps.

Starting small helps build confidence, momentum, and organizational buy-in, and it also reduces the risk of missteps.

Tip 5: Nail Down Clear Instructions

When designing agents, clarity is key. Use the Agent Builder to create and test well-defined topics and actions:

  • Topics – Include precise instructions for classifying user requests, setting guardrails, and outlining scope.
  • Actions – Clearly define what the agent should do, including required inputs and expected outputs.

Salesforce Agentforce Topic Instruction Best Practices

Instructions are the foundation for grounding how agents perform. They set the guardrails for how the agent should behave and give the agent the context it needs to do its job. 

Here are a few best practices for writing Agentforce topic instructions:

  • Start simple
    • Start with the main use case first to ensure the agent is performing as expected. Then, add in more detail to address edge cases. Be sure to test existing instructions for any conflict. You don’t want to confuse the agent! 
  • Use plain language
    • Use concise natural language to describe what your action does. Keep it to 1-3 sentences, and it can include the goal of the action, any use cases, and the objects or records it uses or modifies. 
    • In general, the more relevant detail you include in your instructions, the easier it is for the agent to differentiate between actions. Also, be sure to vary the words you use. For example, use a mix of “Get,” “Find,” “Retrieve,” or “Identify” for actions that will query records.
  • Avoid industry or company jargon
    • Write like you are instructing someone who doesn’t know your business. Even terms like ‘qualified lead’ could mean something different from one organization to another. Give context where necessary, and reference clear criteria using the data it will have access to. 
    • For example, instead of vague terms like “qualify lead,” specify conditions such as “lead status equals MQL.” 
    • The agent isn’t not going to know your business processes either, so be explicit about the sequence of instructions or any conditions a conversation must meet for an agent to apply an action.
  • Think of all the paths
    • You want to go through every possible permutation to determine the actions required. For example: a customer reaches out because they didn’t receive their order. 
    • First think about the order status ( Order Shipped, Delayed, Not Found, Processing). If the status is Shipped then there could be different tracking statuses (In Transit or Delivered for example). If the order is showing as Delivered, was it delivered to the customer’s correct address? Was it stolen? …and so on.
  • Remember the Guardrails
    • Keep the Agent in its lane by providing clear instructions on what the agent should not do to prevent unwanted responses. In cases where the agent is customer-facing, be sure to also give clear direction on when an interaction should be routed to a human.

Test these instructions thoroughly in the Agent Builder’s testing environment to ensure your agents behave as expected.

Ready to Explore Agentforce?

Agentforce offers an exciting opportunity to enhance productivity and streamline operations. By identifying the right use cases, preparing your data, and starting with manageable projects, you can set your organization up for success.

Want to learn more? Check out Salesforce’s Agentforce Trailhead and virtual workshops to get hands-on experience. Need expert guidance? Contact the Sercante team for an Agentforce readiness assessment.

Product Note: Marketing Cloud Growth and Advanced are editions of Marketing Cloud Next and have also been referred to as Agentforce Marketing.

One of my all time favorite hacks is using flow to generate consistent campaign names in Salesforce. With the release of Marketing Cloud Growth Edition and the move to a more campaign-centric model, I wondered if this old trick would still work. Like any good consultant, I created a demo org and did some testing. Stick around to find out what I learned.

Campaign-Centric Approach

If you have not played with Marketing Cloud Growth yet, let’s set the stage. Marketing Cloud Growth has a very campaign focused workflow for creating new marketing initiatives. I really like this structure as all components are visible and accessible in a single location. This includes the content (emails/SMS messages/landing pages), segment, and the flow (this is a big change too – flows are used to send messages).

Campaign Anatomy

Marketing Cloud Growth uses the standard Salesforce campaign object, but the look is different when accessed from the Marketing app. The campaign is divided into sections containing the flow, start trigger, and content. This makes it easy to access everything in one place.

When campaigns are created, content and flow names are derived from the campaign name. This is another great out-of-the-box feature designed to make reporting easier by relating linked assets. It’s this feature that inspired my test.

Campaign Types

Before we get too deep into testing, let’s consider the types of campaigns that we’ll be creating. Most of us are accustomed to using the default or customized version of the campaign type picklist on the campaign page layout.

Marketing Cloud Growth campaigns are used for emails and nurtures, but they are also used for forms. Based on this, you might want to consider adding some more values to your type picklist to mirror the templates.

Example Type Additions

  • Single Email
  • Message Series
  • Form
  • Single SMS Message

Let’s Get Testing!

Now that the baseline is set, let’s get testing. The goal of this test is to do the following:

  • Determine if flow can be used to update the campaign name in Marketing Cloud Growth based on a standardized naming convention.
  • Confirm that the standardized naming convention will also be applied to the campaign components (flows and content).

1 ) Determine Campaign Naming Convention

I’m keeping my convention pretty simple, but you can use whatever structure best suits the needs of your organization. My structure is as follows:

2) Update the Campaign Object

There are a few updates that need to be made to the campaign object. We’ll take them one by one.

1. Customize Type picklist values and update API names to 3-digit codes (these are what will be included in our campaign names)

2. Update page layouts to make needed fields required

3. Create a formula field on the campaign object to calculate the standardized campaign name

  • Field Name: Campaign Name – Calculated
  • Formula: Text(Year(StartDate))&”-“&LPAD(Text(Month(StartDate)),2,”0″)&” “&Text(Type)&” “&(Name)

3) Create the Flow

This a straightforward record-triggered flow based on the campaign object that updates the name field on the campaign with the value from the Campaign Name – Calculated field.

Start Element

Flow Canvas

Update Records Element

4) Activate and Test

Test 1: Signup Form

The campaign, landing page, form, and flow were all generated using the correct naming convention.

Test 2: Message Series

The campaign, emails, and flow were all generated using the correct naming convention.

Takeaways

Linking campaign names and components makes consistent naming conventions more important than ever. I’m excited that my favorite hack still works and will be even more valuable going forward.

Like all good things, there is one “gotcha” to watch out for. Whether using this solution or the default functionality, the names of campaign components are generated at creation and are not updated if the campaign name is later changed. My advice is to ensure you have the correct campaign name before choosing your campaign template (from the “Let’s build your campaign.” screen).

If you have any questions about Marketing Cloud Growth or this solution, feel free to reach out!

For fundraising-focused nonprofits, the challenge of tracking campaigns, engaging donors, and optimizing strategy can be overwhelming. Many nonprofits don’t realize that Salesforce Campaigns—often associated with marketing — are also one of the most powerful tools for fundraising.

In this post, we’ll explore how leveraging Salesforce Campaigns and a strategic Campaign Hierarchy can streamline your fundraising, improve constituent engagement, and enable data-driven decisions to maximize impact.

What are Salesforce campaigns, and why are they valuable for nonprofits?

Salesforce Campaigns are a versatile feature within the Salesforce Data Model, allowing organizations to track fundraising initiatives with the same level of detail that many associate with marketing. Campaigns are particularly useful for nonprofits because they allow organizations to organize, monitor, and analyze fundraising efforts.

Using Account Engagement? Read about the advantages of using Salesforce and Pardot connected campaigns in this blog post from Nick Loeser.

Benefits of Using Salesforce Campaigns for Fundraising

Here’s how Salesforce campaigns can help with fundraising efforts for nonprofits.

Track Funds Raised Across Campaigns

By using Salesforce Campaigns, nonprofits can directly associate dollars raised with specific appeals, campaigns, or events.

Gain Insights into Donor Engagement

Salesforce Campaigns enable organizations to see which constituents engage with various fundraising efforts.

Make Data-Driven Decisions

With clear data on the effectiveness of each campaign, nonprofits can focus on the strategies that drive the best results.

Building a Campaign Hierarchy for Fundraising Success

A Campaign Hierarchy is like an organizational chart for your fundraising efforts. Each level represents different campaigns or appeals, structured in a way that allows you to aggregate or drill down into specific data based on need. This structure provides a “big picture” view and the flexibility to analyze campaign performance at granular levels.

Key Steps to Design Your Campaign Hierarchy

To create a Campaign Hierarchy that aligns with your fundraising goals, start by asking yourself these critical questions:

  1. What Are Your Organization’s Recurring Fundraising Efforts? Identify consistent, repeating campaigns, like quarterly appeals or specific annual events. These will form the foundational tiers in your hierarchy.
  2. What Is the Timing and Frequency of Each Effort? Consider how often each campaign or appeal occurs. For example, an annual fund may include multiple campaigns, such as end-of-year and quarterly appeals.
  3. Do Certain Periods Include Multiple Campaigns? Some fundraising periods may include various appeals, each targeting different audiences or using different methods (e.g., direct mail, online ads). Structuring these as child campaigns under a “parent” campaign (like “Year-End Giving”) allows you to track each specific effort while also reviewing total results.
  4. Who Are the Campaigns Targeting? Determine whether campaigns are reaching general audiences or specific segments, such as major donors. For general campaigns, you may skip campaign members, but for targeted campaigns, tracking engagement with specific constituent segments can provide valuable data on who responds to what.

Tips for Designing Your Campaign Hierarchy

  • Visualize your structure. Use tools like Lucidchart, a whiteboard, or even pen and paper to sketch your hierarchy before building it in Salesforce. Read Jenna Molby’s blog post on organizing Salesforce campaigns here.
  • Cross-check with stakeholders. Ensure your Campaign Hierarchy aligns with other departments’ needs for data reporting and access.

Steps to Set Up Your Campaign Hierarchy in Salesforce

Once you’ve mapped out a Campaign Hierarchy, it’s time to implement it in Salesforce. Here’s a step-by-step guide:

  1. Start with the top-level campaign. Begin with a broad, overarching campaign, such as a year-based or major donor-focused campaign, and then add more specific levels.
  2. Add sub-campaigns for specific appeals. For instance, if you’re A/B testing different mailers, create individual campaigns for each version. Include Campaign Members to track the results for each segment.
  3. Review and reassess annually. Your initial hierarchy may need adjustments as campaigns evolve. Plan to review your structure annually to ensure it still aligns with your fundraising goals and strategies.

Maintain and Optimize Your Campaign Hierarchy

To get the most out of your Campaign Hierarchy, schedule regular maintenance. After a year of active campaigns, sit down with your stakeholders to evaluate the performance and structure.

Are there campaigns to add or remove? Have certain appeals gained traction while others have not?

Use this time to update your hierarchy so it stays relevant and effective.

TIP: Check out this Salesforce Campaign Hierarchy Report blog post from Theron Troxel on how to create a Salesforce report to show the impact of related campaigns within a campaign hierarchy.

Get strategic with your fundraising campaigns

Salesforce Campaigns offer nonprofits an organized, data-driven way to approach fundraising. With a well-thought-out Campaign Hierarchy, your organization can see which campaigns resonate with donors, track funds raised, and make decisions based on real-time data.

Ready to create a streamlined, impactful fundraising strategy? Reach out to us at Sercante to discuss how we can help you set up or optimize your Salesforce Campaign Hierarchy!

Product Note: Marketing Cloud Growth and Advanced are editions of Marketing Cloud Next and have also been referred to as Agentforce Marketing.

During the Marketing & Commerce Keynote at Dreamforce 2024, Salesforce announced the latest edition of Marketing Cloud built on Data Cloud  — Marketing Cloud Advanced Edition! Expected to be released in November 2024, this new edition expands the features and functionalities of Marketing Cloud Growth Edition, released in February of this year. 

What Comes with Advanced Edition?

Let’s dive into what Marketing Cloud Advanced Edition brings to the table. 

Path Experiment

Path Experiment allows Marketers to maximize engagement with your audience through testing. This new feature allows marketers to test variations within marketing content, such as different subject lines, variations in channels, such as sending an SMS instead of an email, and even variations in cadence, such as sending an email in 3 days versus 1. Path experiment allows marketers to test up to 10 paths within a single experiment, customize the distribution percentage across the paths, and automatically randomize individuals between the paths to help ensure fair, unbiased results. There is no limit to the number of Path Experiments that can be included in one Flow. 

Marketing Cloud Advanced Edition - Path Experiment

Einstein Engagement Frequency 

Einstein’s capabilities will also be expanded in Marketing Cloud Advanced Edition. First, we have Einstein Engagement Frequency which assists Marketers in sending the right number of messages to their audience. Einstein Engagement Frequency provides insights into the distribution of email sends and subscriber engagement, suggesting the optimal frequency to maximize engagement. This data can then be used to create segments, allowing marketers to suppress or target subscribers who are over or under-saturated. 

Marketing Cloud Advanced Edition - Einstein Engagement Frequency 

Einstein Engagement Scoring

Next, we have Einstein Engagement Scoring, which helps predict how likely each subscriber is to open, click, and stay subscribed to an email communication. Einstein Engagement Scoring’s data can be used to create segments, send subscribers down different Flow paths, or even help personalize content more effectively. 

Marketing Cloud Advanced Edition - Einstein Engagement Scoring

Unified Conversations with SMS

With the new Digital Engagement add-on, Marketing Cloud Advanced Edition enables marketers to transform one-way promotions into a conversation with their audience. Marketers can respond to messages in real time using the unified customer data within Data Cloud and automate interactions with connected chatbots. 

Marketing Cloud Advanced Edition - Unified Conversations with SMS

Looking Toward the Future

What other features and functionality would you like to see Salesforce bring to Marketing Cloud Growth or Advanced Edition? Let us know in the comments!

Product Note: Marketing Cloud Growth and Advanced are editions of Marketing Cloud Next and have also been referred to as Agentforce Marketing.

Like many people in the Salesforce ecosystem, you may be intrigued by the announcement of Marketing Cloud Growth Edition — especially since access to the platform is available to current Marketing Cloud Account Engagement (Pardot) users on the “Growth Edition” tier. However, a key differentiator between the platforms is that Growth Edition gives marketers access to Data Cloud credits.

In this post, we’ll explain how Account Engagement users can tap into those Data Cloud credits through Growth Edition, the differences between both platforms’ billing models, and strategies for marketers to follow while using Data Cloud credits.

Understanding the Consumption-Based Billing Model

Whether you’re a marketer, an operations manager, an admin, or something in between, there’s a lot to look forward to as functionality moves into Salesforce core. For example, consider the flexibility of segmentation with Data Cloud and leveraging Einstein AI to supercharge your campaigns. 

As you start to explore this toolset and feature set, however, there is an important mindset shift in the structure of the product to be aware of.

Like Data Cloud, Marketing Cloud Growth Edition is a consumption-based toolset. That means your team’s feature usage within the platform determines how many credits are used and what your organization will pay each billing cycle.

Back up a second — Account Engagement has usage limits, too?

Yes, Account Engagement has certain feature limits. If you’re an admin, you’re probably familiar with navigating to the usage tab and checking your mailable prospect database or how many repeating engagement studios you have in play (if you’re not, check out our blog post on monitoring your mailable database). 

How does the Account Engagement billing model differ from Growth Edition’s?

Outside of total mailable database count and feature limits based on your edition, segmentation and email sending are generally open season for users. Dynamic lists can be run and emails can be sent to your heart’s content. 

The Einstein toolsets available in the more premium editions of the platform also generally run for the whole database and have no specific consumption considerations.

In comparison, Marketing Cloud Growth Edition is structured so there are credits for many of the core actions taken. This aligns with the structure of Data Cloud, which serves as the segmentation engine for Growth campaigns. 

Marketing Cloud Growth Edition Standard Credits

For new setups of Growth Edition, these are the standard credits provisioned:

  • 10K Marketing Unified Profiles
  • 240K Data Cloud Credits
  • 10K Segment and Activation Credits
  • 1TB Data Cloud Storage
  • 180K Emails/year
  • 20K Einstein Co-Create Requests for email content generation

These numbers may depend on your edition and specific agreement with Salesforce, and all of these areas can be extended with additional credits

Other business segments may have Data Cloud

Also worth considering — Data Cloud is not solely a marketing tool, and Data Cloud may already be in use by other divisions of your organization. But don’t fret, that’s a good thing!

A key benefit of the toolset and moving to Growth is gaining the ability to align customer experience processes across all departments.

Is there an easy way to monitor my consumption-based credits?

Glad you asked! Yes, Salesforce released a feature called Digital Wallet to help admins keep track of consumption-based tools.

The Consumption Card tab can be accessed by users with appropriate permissions and provides an overview page to monitor credit usage.

This page also includes access to insights that help you understand how usage is trending over time and where you might need to plan for expansion.

How do I go about strategically using these? What is a “credit” worth, anyways?

Different considerations are at play for different consumption metrics within Marketing Cloud Growth.  Email send credits and Einstein Co-Create credits are relatively straightforward — the total number of emails launched and uses of AI copy generation for the content, respectively. 

Where complexity lies is the data harmonization and segmentation process in Data Cloud and credits needed there — calculated based on rows in your database used and processed for different actions.

You can see a more detailed breakdown of the calculations here

Data Cloud Credit Usage Examples for Growth Edition Marketers 

In practice, these areas are likely where a marketer will consume Data Cloud credits.

Data Harmonization and Unified Individuals

  • Target Audience: As opposed to “prospects” within Account Engagement, users create segments in Data Cloud for Marketing Cloud Growth Edition campaigns via Unified Individual profiles.

    Instead of 1:1 syncing with a lead or contact, these unified profiles can link multiple data sources to create a 360-degree view of the customer, with data from Salesforce and external data sources. 
  • Identity Resolution: To make sure these unified profiles are accurate to your map of data, identity resolution rules are created in Data Cloud to join datasets by the relationships you define.

    The harmonization process this executes does utilize Data Cloud credits, so data complexity here can affect the requirements for this process. Learn more about the process in this Trailhead!
  • Growth Edition also includes a set of features for incorporating consent per channel into this profile, determining whether the individual can be sent communications and helping you maintain privacy and compliance for your audience.

Pulling and Refreshing Segments

  • Segment Creation: When you create a new segment or modify an existing one, Data Cloud Credits are used to execute the data queries that define the segment criteria. This process involves filtering and aggregating large volumes of data to isolate specific audiences.
  • Segment Refresh: To keep your segments up-to-date, you’ll need to refresh them regularly. Each time you perform a refresh, credits are consumed as the system reprocesses the data to ensure the segment reflects the most current information.

Using Einstein’s AI Capabilities 

Note: this refers to Einstein Features within Data Cloud, not Einstein Co-Create content generation within Marketing Cloud Growth. You can get more on the specific rate consumption for AI models with Data Cloud here.

  • Predictive Scoring: Einstein AI can analyze historical data and predict future behaviors. Utilizing predictive models or scoring capabilities consumes Data Cloud Credits based on the complexity and volume of data processed.
  • Recommendation Engines: Whether you want to personalize content or recommend products, Einstein’s recommendation engines leverage AI to analyze user behavior and preferences. This process also requires Data Cloud Credits, reflecting the computational resources needed for these advanced features.
  • Automated Insights: Einstein provides actionable insights and analytics by examining trends and patterns within your data. Accessing these insights involves credit consumption, especially when dealing with extensive datasets or detailed analyses.

How to make the most of your Data Cloud credits

To make sure you’re using Data Cloud as efficiently as possible, keep the following considerations in mind.

  • Efficient Querying: Optimize your segment queries to be as efficient as possible. Reducing the complexity of queries or breaking them into smaller, more manageable tasks can help conserve credits.
  • Scheduled Refreshes: Instead of frequent manual refreshes, schedule them during off-peak times or based on data needs. This reduces unnecessary credit usage while ensuring segments remain accurate.
  • Strategic AI Usage: Use Einstein’s AI capabilities strategically. Prioritize features that deliver the most value for your marketing goals and ensure that the credit expenditure aligns with your objectives.
  • AI Models Management: Regularly review and refine AI models to maintain their accuracy and relevance. Properly trained models can yield better insights, maximizing the return on your credit investment.

Take advantage of the consumption-based model to understand what you’ll need as you scale

Hopefully, this gave you a good introduction to the concepts needed to monitor and understand credit usage as you consider using Marketing Cloud Growth Edition and Data Cloud alongside Account Engagement.

 Don’t let this scare you off — while there are new concepts to learn, the toolset opens possibilities for marketers ready to use data to create the best possible customer experience and segmentation. 

As the “Growth” name implies, it sets your business up for cost-efficiency in the short term and scalability in the long term. As you continue to scale and incorporate new data sources and channels, there’s a more defined method to ingest this data, improve your personalization, and predict the impact to your costs over time. 

As you explore more, please check out our FAQ article on Marketing Cloud Growth or send us a message if you have any other questions.

No more posts to show