Category

Nick Loeser

Email templates are essential to marketers who want to create emails efficiently and protect the brand consistency of their communications. Agentforce Marketing email templates became available in the Winter ‘26 release but some exciting new features and updates became available in Spring ‘26! Let’s take a look at the features of email templates and some of the quirky aspects of using them that you’ll want to know.

Product Note: In previous blog posts, Agentforce Marketing has also been referred to or known as Marketing Cloud on Core and Marketing Cloud Next. This product may have also been referred to under its Edition names, Marketing Cloud Growth and Marketing Cloud Advanced.

Creating a custom template

To get started with a new email template, navigate to your Content Workspace for Marketing Cloud, then select Add > Email Template.

How to get started with a new email template

You’ll see two options, “Select A Template” and “Use Components”.

Selecting an email template creation method

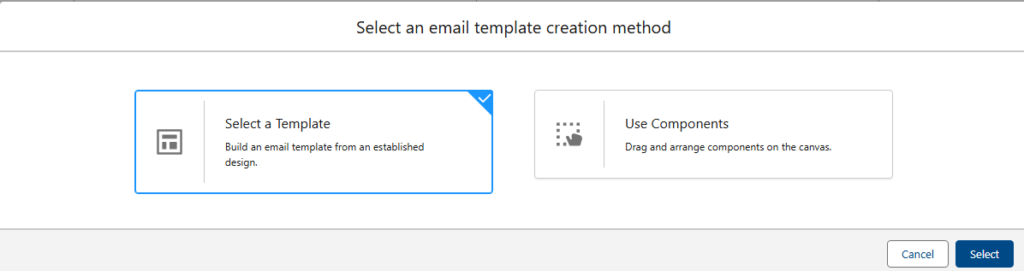
The Components option will launch the drag and drop Email Builder for Marketing Cloud and will provide the email building experience you’re accustomed to. 

Important: You cannot save an Email as an Email Template, or an Email Template as an Email, so be sure you’re selecting the correct content type before building!

New: Prebuilt Templates

With the Spring ‘26 release came 17 new pre-built email templates (also 17 pre-built Landing Page templates. These templates are customized by use case, your options are:

  1. About Us – Brand Story
  2. Appointment Scheduling
  3. Coming Soon – Launch
  4. Free Trial – Demo Request
  5. Gated Content
  6. Lead Generation
  7. Localized Offer
  8. Newsletter
  9. Offer Promotion
  10. On-Demand Content
  11. Partnership Program
  12. Product – Service Deep Dive
  13. Survey – Feedback
  14. Testimonial – Case Study
  15. Thank You – Confirmation
  16. Waitlist – Early Access
  17. Webinar

You can select each template to get a preview of its layout and components on the right hand side. 

Each template has a header component for your logo, a stylized footer, content and image components, and at least one CTA button. 

Selecting a template

To use a prebuilt template, select the template and then click Select in the bottom right corner. You can also view and access the email templates you’ve saved in your CMS by selecting the Custom Templates header. 

Once you’ve selected the email template you’d like to start with, easily stylize the template by applying your brand from the right side menu. 

Applying your brand to the email template you chose

The standard templates can be completely customized like any other template. The stock photos they include are automatically saved in the same location as the email template.

Important: Don’t worry, you cannot overwrite the standard templates. You can customize a standard template to your company and brand and save it as a customized template for future use. This will give you  a custom template based on the standard design, but the original standard template is preserved.

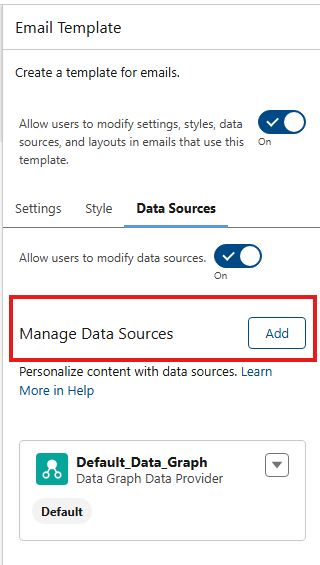
New: Change Data Sources

Email templates and Emails can be associated with Data Sources. This allows you to add personalization from a specific data source, including Events.

As of Spring ’26, you can only add one Event Data Provider, meaning you can only add a single unique form (Event) to an email as a data source. By adding an Event Data Provider you’re able to personalize the email with data that was provided in the Event (aka, the form). So if you ask someone their food preference on an event registration form, you can add that field from the form inside the email.  This allows you to add the email to an event flow and create a follow-up email in the flow without waiting the standard 24 hours for Unification of the record*. 

*Personalization is typically only available in an email for Unified Individuals because the Data Graph (which powers personalization) must run first. So in our example, if a user supplies a food preference in a form, you must wait for the Data Graph to run so the data is added to the Unified Individuals profile and available for use in personalization. Adding an Event Data Provider bypasses the need to do this. 

Two important notes: You can only add a single Event Data Provider, you’ll need a unique email for each form you wish to personalize with form data. Furthermore, once you add a data source you cannot remove it! Be careful when adding a data source. If you add the wrong source you’ll need to start a new email to correct your error.

Manage data sources
Email and file attachment options

New: Lockable Elements

Marketers and brand managers are going to love the ability to lock elements inside a template! But, this new found power comes with a few quirks.

Newly Created Templates are Automatically Locked!

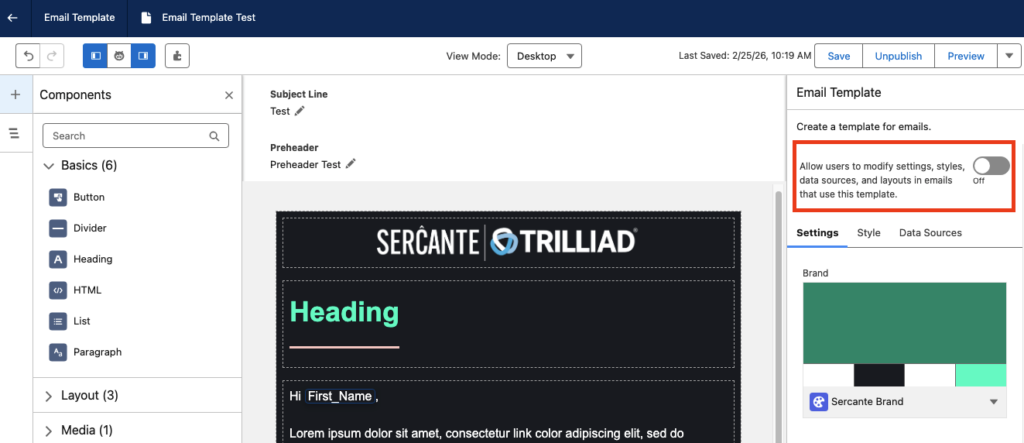
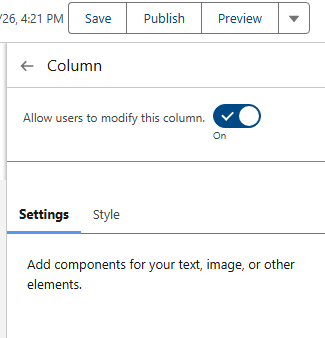
Post Spring ‘26 release, new email templates are locked by default. You’re able to either manually unlock specific sections you would like marketers to be able to edit or use the “Allow users to modify settings, styles, data sources, and layouts in emails that use this template” toggle option found on the settings tab to unlock all sections. When creating a new template, the toggle will be off.

New email templated are locked by default, how to manually unlock sections.

Lock only certain content, but not all

If you wish to restrict users from editing only some content, for example a branded header or footer, but you want to leave the rest of the content open to editing, you have to unlock the sections one at a time. It’s a bit counterintuitive, but everything must be locked first, then sections are individually unlocked.

Step 1: Make sure the  “Allow users to modify…” toggle is OFF, meaning no content in the email is currently editable.

Step 2:  Select the individual component you wish to unlock and change the toggle to On. This unlocks the one section component you have selected on the canvas.

Allow users to modify this column

Don’t forget your subject line and preheader

If you’re locking down your template and only unlocking certain sections, it’s easy to overlook the Subject line and preheader! On the Email Settings panel, scroll down to the Subject Line and Preheader section and click the lock icon to unlock these settings for your users. This enables your users to change the subject line and preheader when using the template for an email.

Subject line and preheader

Use of templates, important caveats

One final note on using templates, your order of operations is important. As mentioned previously, you cannot save an “Email” as an “Email Template”. Likewise, you cannot save a template as an email. When you’re ready to create an email that’s using a template, make sure you select “Add > Email”, then select a template. 

Lastly, something that I learned the hard way after creating a 6-email series for a nurture campaign. Segment Triggered Flows (nurture series) only use Emails, not Email Templates (so the opposite like Account Engagement Engagement Studio Programs). So when you’re adding emails to a flow you will only see Emails, not templates.

Final thoughts

Email templates are a much-needed addition to Agentforce Marketing and I’m excited to see how they grow from here. I love the functionality they offer, like customized data sources and lockable regions. They also did a terrific job creating a large variety of standard templates to get you started!

Agentforce Marketing Form Flows can take time to add all of the elements needed, such as autoresponders, lead notifications, and whatnot. Let’s use a handy Marketing Cloud flow template to solve a few problems with one simple subflow!

Product Note: In previous blog posts, Agentforce Marketing has also been referred to or known as Marketing Cloud on Core and Marketing Cloud Next. This product may have also been referred to under its Edition names, Marketing Cloud Growth and Marketing Cloud Advanced.

What Problem Are We Solving?

When someone fills out a form we need a scaleable, reusable way to determine if the person filling out the form is an existing Lead and/or Contact in Salesforce. If you include an email component to your form flow, such as an autoresponse email, then the first node in your form flow must be a create element. This makes it arduous to check for existing records and send an autoresponder in the same flow. 

Form Triggered Flows

When creating a new form in Agentforce Marketing you may have received the error message below warning you that a form triggered flow must begin with a Create Record. 

Error message that warns you that a form triggered flow must begin with a Create Record.

This can be frustrating because sometimes you want to first check if there is an existing record that matches what was just entered in the form, then decide if you should create or update a record.

Now you can!

Introducing: Upsert a Record for a Person (Flow Template)

This handy flow template makes life easier. It is also the ONLY exception to the rule above about starting with a Create Element. You can also start your form flow with a subflow that uses the “Upsert a Record for a Person” template, which is very useful.

The main benefit of creating a subflow is that you can call the same subflow from multiple form flows, no reinventing the wheel needed to scale. This new flow will handle the following:

  • Check if a Contact exists > Update if found
  • If no Contact exists, check if a Lead exists > Update if found
  • If no Lead exists, create a new Lead

Optionally we can also add email alerts, add to campaign elements, and more. 

Let’s Build the Flow

  1. In the Marketing App, select the Flows tab
  2. Click New 
  3. In the search window, search for “Person”
  4. Select the template Upsert a Record for a Person
When building a flow you need to select the template "Upsert a Record for a Person."

Your flow should open to the following canvas layout.

This image shows what your flow should look like when you open it.

The flow is autolaunched because we’ll call it from another flow (our form triggered flow).

  1. Click Next
  2. Name the flow “Look for Existing Contact/Lead”
  3. Click Create

This flow will ingest data from your form triggered flow and return a recordId. For this to work, we need to first create the variables in the subflow so that we can send the necessary data. 

  1. Within the flow builder, select the Toolbox
    1. You should see three variables: company, lastName, recordId. These are the default variables because they’re technically all that’s required to create a record. You certainly will need more than this.

Important: when you add a new variable, like firstName, for example, you’ll need to make sure the checkbox for “Available for Input” is checked. This insures that any new variables you add will be able to accept the data from the form flow that this new flow is connected to. You’ll notice the three default variables already have that option checked.

This image shows that when you're in the flow builder, select the Toolbox and you'll see three variables: company, lastName, and recordld. These are the default variables.

Next we will create any necessary variables. Any data that your form is going to capture should be a variable for this flow to ingest. For example, firstName, phone, favoriteCandy, whatever!

  1. Within the Toolbox, select New Resource
  2. Select the Resource Type Variable
  3. Enter your API Name, well use email for our example
  4. Select your Data Type, this will typically be Text
  5. Select Done
This image shows that when creating a new resource you will see these prompts: resource type variable, API name, data type.
  1. Repeat for any additional variables 

Customize the Sub Flow

Now that the basic setup of the sub flow is done we can configure the elements to suit our needs.

  1. Start by selecting the Get Contact element.
    1. By default the template only looks for lastName to determine if a matching Contact exists. We’ll switch this out for a more reliable unique identifier, email address.
In this photo we see the "get records" section and when selecting "Get Contact" element it automatically looks for lastName but we want to change to email address.
  1. Select + Add Condition
  2. Enter the Record Field Email equals variable Email
When in "get records" this image shows how to make the Record Field Email equal the variable Email.
  1. Select the trash can icon next to the Last Name condition to remove it

Important: When mapping the fields remember your variables represent the inbound data from your form, the field represents the object’s fields in Salesforce.

5.  Once complete, you should be mapping (at least) the Email field with the email variable you created. 

2. Next selecting the Decision element. 

  1. The Decision element will determine if there is an existing Contact found. Name the element “Does Contact Exists?”.
  2. Under Outcomes, let’s name the first outcome “Yes”. 
  3. For the Yes outcome, your Resource should be the Contact ID from the Get Contact element. So if the Get Contact found a Contact, there will be a Contact ID present.
  4. Map the Get Contact > Contact ID with the Operator “Is Null” which should equal False.
Shows outcome details and mapping the Get Contact > Contact ID with the Operator “Is Null” which should equal False.

If a contact is found the Contact ID will not be null.

  1. For the default outcome, simply name it No. There is no criteria needed because either the new record is a contact or it’s not.

3. If it’s NOT a contact.

If your new record is not a Contact you’ll see by how the template is laid out, it will go down the right hand path and hit another set of checks to look for an existing Lead.

A. Configure your Get Lead node the same way you did with your Get Contact, mapping your Lead Email field with the email variable. This means it will look for any lead records that match that email address.

B. Configure the Decision element in the same way you did the Contact Decision element. You want to determine if it found a Lead ID from the Get Lead node above.

This shows outcome details and determines if it found a Lead ID from the Get Lead node.

Finally, we’re either creating or updating records.

On the left path, where a record will travel if a matching contact record is found, we’ll update the existing Contact with the details from our variables. Remember, the variables represent the data that the person entered into the form. Map the variables to the appropriate Contact fields to update the values.

Important: As of this writing, if a variable has a null value because the form field was optional, and the person did not fill in the field, that null value will overwrite the value on the contact record! For example, if your phone field is optional and a person doesn’t fill that out and their existing contact record does have a phone number, it will be overwritten with a null value and you will lose that data. If you would like to prevent this from happening, see Solution #2 of this blog post for a workaround. 

On the right path, records that are not existing contacts will travel to check for an existing Lead. If a Lead is found, you’ll configure the Update Lead node and map your lead fields with the variables.

If a lead is not found, you’ll create a new lead. Configure the Create Lead node, mapping your variables to the lead fields.

Very important last step for this flow:

For each update or create element at the end of the branches you must check the box for “Manually assign variables (advanced)” and store the variable in your recordId variable. If you don’t do this the flow won’t send the recordId back to your original form flow.

Setting field values for the lead. Make sure to check "Manually assign variables."

Once all the elements are configured and you’re sure that each exit point (create or update element) will store the recordId, you’re done with this flow and can save and activate. The flow must be activated before returning to your form flow.

Wait a minute, doesn’t the Create Records element include a check for matching records?

Yes, it does! That will work for your forms but you first need to know if the person filling out the form is a lead or contact. This subflow is the only way to first determine if the person filling out the form is an existing contact, lead or brand new. 

Let’s go back to our form flow

Now that we’re back in our original form triggered flow, we have much less work to do to create an effective way to check for existing records before we decide if we want to create a lead or contact, or update an existing record. 

When you start your form flow, instead of using a Create element, add your subflow.

  1. Delete the default “Create Lead” element that’s usually added
  2. Click the plus icon to add an element directly after your start
  3. Select the Interaction element “Subflow”
  4. One the right hand menu of flows, search for the flow you just created. You may have called it “Look for Existing Records” or something similar.
  5. Configuring the subflow node is important. You’ll see a toggle next to each variable you created in the subflow. This allows you to map your Form Fields directly to your variables in the subflow.
  6. Click the toggle and map all of the fields from your form.

Note: you do NOT need to map all of the fields, only the ones you want to use to create or update records in your subflow. You may include extra variables in your subflow to make it scaleable. For example, your subflow may include “favoriteColor” but you may not collect this data in all of your forms. That’s ok, you can toggle it on any of the forms you collect that data.

A workflow diagram with blocks for form submissions.

Using the recordId that was found in the subflow

What’s really nice about this subflow is that your form receives back a recordId for the record that was either found and updated, or the newly created record. There is no 24 hour wait. If you want to take additional steps in your form flow, like adding people to a campaign you’re going to need that recordId. 

Final thoughts

Creating and calling a subflow might seem intimidating to newer platform users, but if you take the time to configure it you will have an invaluable, reusable resource. In simplest terms you’re bypassing Data 360’s 24 hour wait period for checking a form submission for existing records and you’re receiving back (almost instantly) the recordId of the existing record or newly created record. This opens up all sorts of options in your form flow and makes them much easier to scale.

I also encourage you to have the subflow do as much work as possible. The more you have your subflow do, the less work your individual form flows need to do which means you’re up and running with new forms really quickly. For example, I recently set up a subflow that checks for existing records, adds the person to a campaign based on the UTM value in their form submission and sends the sales team an email alert, all within that subflow. 

One additional added benefit to the subflow strategy is that it’s far easier to deactivate, add-to and debug a regular flow. Form flows are notoriously fickle, so once activated, I like to leave them alone. But the subflow behaves similarly to any other admin flow in Salesforce that can be added to and edited as needed. (eh ahem, in the sandbox, of course). 
Special thanks to our friend, Francois Perret for his terrific article on the subject.

Product Note: Marketing Cloud Growth and Advanced are editions of Marketing Cloud Next and have also been referred to as Agentforce Marketing.

Since Marketing Cloud Growth was introduced at the beginning of last year, more and more innovations with the platform have been coming out at a rapid pace by the team at Salesforce. The upcoming Winter 26’ release is no exception to this momentum. Note, the Winter ’26 updates will be available starting September 19th.

TL;DR – What’s the point, what do we love the most?

While the Winter 26’ release brings a ton of new features and enhancements, there are definitely some that stand out to us. Here’s a list of our favorites.

  1. Form fields can be set to “hidden” using a simple checkbox on the configuration screen. 
  2. Form fields can be given a default value, and in addition, you can automatically set that value with a URL parameter. No need for JavaScript!
  3. Form handlers for external website forms.
  4. Reusable content blocks available when creating emails. This release brings some solid enhancements to the Email Builder!
  5. Enhanced reports and dashboards.

The Email Builder, Content & Messaging

Reusable Content Blocks

No more reinventing the wheel each time you create a new email layout! Content Blocks are exactly what the name suggests, bits of content you’ll want to use on multiple email assets. For example, banners, specially formatted footers, terms & conditions text, buttons or any other regular content you use often. Or, any combination of this content. For example, a content block can be an image, accompanying text and a CTA button below it. You’ll find the “content block” option under Layout and can easily drag blocks onto the email canvas.  Content Blocks are stored in your Marketing Workspace along with your other content. 

In addition, you can ramp up your personalization by creating Content Blocks for different audiences and apply variation rules that serve personalized content to the right recipients.

A screenshot of Content Blocks being used in the Email Builder.

Email Templates

Marketing Cloud Account Engagement users will appreciate the addition of email templates! Email Template Campaigns allow your admins or campaign managers to create standardized, branded email campaigns that your marketers can simply use for their own marketing emails. No more cloning old assets. 

Content Builder Agent

With the new Content Builder Agent, users can draft, revise, or optimize content in Marketing Cloud. The new agent helps marketers create assets, like email body copy, subject lines, or SMS messages. Just like other Agents, you help guide the output by providing brand/company information. To get started, from Agent Builder, find and select the new Content Builder Agent template.

Data Sources for Personalization

Within emails, marketers can now use other data sources that feed merge fields, repeaters, and dynamic content. Instead of using a data graph, which is currently how emails are personalized, users can change the data source within the Data Source panel to select different sources for the personalization. 

UI Updates

Users will notice other small UI enhancements to the Email Builder. A few small changes to the names of buttons making the aforementioned personalization experience easier. Furthermore, you can update the Title, API Name, and Description of the email within the Builder instead of needing to click the Settings cog to access those fields. 

Salesforce has cited additional UX enhancements regarding email setup and configuration, including branded link management, DNS entry support, and display names, in addition to bug fixes, but details are limited right now.

Updated Deliverability Dashboard

The Deliverability Dashboard has been enhanced to provide deeper insights for your email campaigns. There are new filters available for “domain” so you can review results by recipient domain, useful when reviewing failure reasons.

A screenshot of a deliverability dashboard.

SMS & WhatsApp Enhancements

Additional countries are available for SMS marketing, but remember each of these countries has their own sender codes, compliance regulations, and multipliers. New regions include Hong Kong, Peru, and Singapore.  WhatsApp reports metrics got a boost and now include click rate and open rate on the Insights dashboard. You can also filter by Sender Display Name. WhatsApp also includes more interactive messaging options in flows, including location sharing, CTA buttons, carousel messages which can integrate with your real-time product catalog. These new features also enable you to trigger flows based on customer responses!

Campaign Creation and Analysis with Agentforce

You’re now able to customize the flow for drafting and creating campaigns and briefs. The underlying flow can be customized by an admin to accommodate business needs. For example, the flow can assign a campaign owner, send notifications to other users, or add business logic like approval steps. Now, your marketing team can simply ask Agentforce to draft a brief or a campaign and adjust as needed. For those marketers who have leaned into the AI capabilities, this is a nice enhancement. 

Marketers can also use Agentforce to see improved campaign performance insights. The Agentforce Action, “Generate Campaign Insights” retrieves performance metrics such as message opens, clicks, or unsubscribes, and generates a summary of key insights. Furthermore, your admin can customize this action in Flow Builder to focus on metrics that are most relevant to your users. These insights turn into action when you use the results to make campaign adjustments, like updating the subject line or changing the time between email sends.

Forms & Landing Pages

Form Field Enhancements

Hidden fields – (yay) are now available! Add fields that you want hidden, such as UTMs or Lead Source, and hide them simply by checking a box. Set a default value (another – yay) with two options: a static value (whatever text you want), or pull from a URL parameter! Can you tell, we’re super excited about these form enhancements?

A screenshot highlighting using the checkboxes to mark hidden fields on a form.

Did somebody say Form Handlers?

Yes, Marketing Cloud Growth and Advanced now has form handlers, similar to Marketing Cloud Account Engagement, and they are used to capture data from external website forms. You can use them to capture leads, cases, and other records, so they’re more flexible than the form handler that Account Engagement users are used to because the flow can be configured to create different record types, not just Prospects. The form handlers also include a built-in honeypot field for spam protection, custom redirect URLs for successful or failed submissions, and web tracking to monitor user engagement and form performance.

Personalize Landing Pages

You can now personalize your landing pages using merge fields to include a prospect’s name, company, or other data. In addition, you can set up a real-time data graph in Data Cloud. Similar to enhanced personalization in emails, users can select it from the Data Sources panel while editing the landing page.

Landing Page Templates

In addition to Email templates, you can now add landing page templates as well. The Landing Page Builder also includes additional support for HTML tags and elements. 

Other cool stuff

Push Notifications for your Mobile Apps

Engage with your customers using interactive push notifications on their mobile devices. The push types available are one media attachment, customized content, tap actions, Android-specific icons, and interactive buttons. The Carousel push type supports up to 6 swipeable cards, each with media, text, and individual tap actions.

When you add mobile app messaging channels to your campaigns, you’ll see aggregated metrics across all your different messages and campaigns. You can view metrics related to sends, deliveries, views, and interactions related to individual messages or entire campaigns.

Marketing Cloud Next in Sandboxes

You can now set up Marketing Cloud Next in your Sandbox. Create more complex flows and campaigns, test things out, and easily deploy them in production. This feature is available to both Growth and Advanced editions.

Smarter Identity Resolution Rulesets

Enhanced Identity Resolution Rulesets (IRR) help prevent duplicate records. In IRR setup, you’ll notice two additional match rules:

  • Lead to Contact—Prevents duplication when leads become contacts.
  • Device to Known—Matches web visitors to known profiles.

The original ruleset includes Normalized Email only, so if you already have this generated, you can manually edit the ruleset and add these new rules.

Multiple Scoring Models & Frequency Enhancements 

You can now create multiple scoring models (think Scoring Categories in MCAE), which allows you to further customize your scoring model for both People and Accounts. Additionally, you can adjust the frequency that the scoring rules run, saving you data credits on unnecessary processing.

A screenshot showing multiple scoring models.

Reporting and Insights

As reporting and insights are a must in every marketer’s day-to-day, the Salesforce team is focused on creating easier reporting and enhanced filters, and visualizations. We’re happy to see some nice enhancements in this release.

A screenshot of an Engagement Insights report.

Automated Winner Selection for Path Experiment

Path Experiment, available with Marketing Cloud Advanced Edition, allows Marketers to maximize engagement with their audience through testing. This feature allows marketers to test variations within marketing content, in channels, and even in cadence. With the Winter ‘26 release, Marketers can now  configure automated Path Selection directly within the Path Experiment element. This allows the path to pick a winner based on your selected performance metric, such as email clicks, registrations, or purchases. 

A screenshot of the Automated feature being selected for the Configure Path Selection in Path Experiment.

Business Units

Business Units are officially on their way to Marketing Cloud Growth and Advanced. This feature is going to have a limited GA during the Winter ‘26 release, but the Product team is making strides to ensure Business Units work out of the box for Marketers. In this initial release, Marketers can associate data spaces to their automations and flows to ensure data is kept secure and separate.

Final Thoughts

Overall, the Winter 26’ release brings some really nice enhancements to Marketing Cloud Next, with a majority of these terrific features being for Growth and Advanced Edition. Marketers using Account Engagement and Engagement should continue to learn more about these new features, so that they can understand how they can consider applying them to their own campaigns and experiences. 

If you’re looking for guidance on how to navigate what’s next for your org with Marketing Cloud Growth/Advanced or Marketing Cloud Next, reach out to the Sercante team. Our experts can help you build a strategy and guide you through the next phase of your journey.

Understanding the Marketing Cloud Convergence Path

Marketing Cloud Account Engagement (Pardot) offers the opportunity for marketers to give their sales team the information they’ll want, notifications worth paying attention to, and truly actionable insights about their prospects.

But it’s not always easy to get people excited about new software — especially when it involves learning a new process or procedure. 

When I became an accidental admin of Account Engagement in 2015, it took me a while to dig into the underutilized features that make it a great platform. But once I did, I learned how to provide sales with useful, actionable data.

In this post, I’ll share the big things that have helped to get sales teams excited about Account Engagement so they can be more productive with marketing leads.

Show all that Account Engagement goodness in Salesforce — where your sales folks can see it

Your sales and leadership teams are probably not using Account Engagement. But that’s where the marketing team is getting work done, like sending email campaigns, building engagement studio journeys, and reviewing prospect engagement.  

However, since Account Engagement is baked into the entire Salesforce ecosystem, there are a lot of ways to bridge the gap between the two systems and offer visibility into everything Account Engagement is doing. 

Add Engagement History to Contact Page Layout

If I had a dime for every client I met who didn’t have Engagement History added to their Contact page layout, I would have at least enough money for a mocha latte at Starbucks. But I cannot imagine a scenario where you wouldn’t want this information in Salesforce for everyone to see. 

Adding the Engagement History component to your Lightning record page is super-simple and will provide a log of all activities your trackable prospects are doing. For example, the component shows emails they are opening or clicking, landing pages they’re visiting, PDFs they’ve downloaded from your site and all the pages on your domain they have visited. 

Your Salesforce administrator can easily edit the Contact record page in Lightning Builder and drag the Engagement History component onto the page. 

The sales team is going to love this intelligence because it offers them insights into their prospects that they wouldn’t normally have. Furthermore, they’ll know simply by reviewing the history whether or not their prospects are opening marketing emails and what their level of engagement is. 

A couple of caveats

  • Only prospects that are cookied will show engagement history. They must be a prospect that has clicked on an email or previously filled out a Pardot form to be cookied and trackable.
  • Oftentimes emails may show opened or even clicked multiple times. Spam protection software can send a message pack to the sender (Pardot) that an email has been opened or clicked, even if it hasn’t been, which can be confusing. 

Bonus Tip! 

I love Page Actions, which allow you to designate specific pages on your website that trigger an automated action when a cookied prospect visits that page (for example, Add prospect to a list if they visit this particular product page). 

In addition, there is a checkbox on the Page Action that indicates it’s a Priority Page. By checking this box when setting up a Page Action your page will actually show up in the prospect’s Engagement History with the specific page they visited. So, for example, if you created a Page Action for your pricing page and marked it as a Priority Page, when a prospect visited that page it would be very easy for your sales folks to see that on the prospect’s history. 

Don’t forget to connect your campaigns

With the introduction of connected campaigns a few years ago, Account Engagement now syncs relevant email engagement data directly into Salesforce. 

There’s no need for leadership or other stakeholders to ask the marketing team how an email campaign or landing page is doing — that data is available right in Salesforce. 

Similar to the Engagement History component, this needs to be added to the campaign Lightning record page.

A couple of caveats

  • Users will need the Marketing permission checkbox on their profile to be checked to access Campaigns.
  • Emails and landing pages must be associated with the campaign in Account Engagement for the data to flow into the connected Salesforce Campaign.

Bonus Tip! 

Use Campaign Hierarchy to your advantage. On the dashboard you can view just the parent campaign results, or click the toggle to view the child campaigns as well. For example, you may have one main campaign for a Spring Campaign, then create and assign a child campaign to each email wave, or separate landing page.

Let’s add the Account Engagement fields, too

Not everything Account Engagement related can be added with a component. We’ll need to add some fields to the page layouts as well. 

I recommend adding a new Section to the Details area of the Contact page layout. Drag in the Account Engagement fields you wish to display.

At a bare minimum, let’s give your team:

  • Score: Your team will love the Score because it’s an implicit indicator of the level of interest a prospect has in you. It will help guide the sales folks in their prospecting efforts.
  • Grade: Not all organizations have this setup, if you don’t start here to learn about why it’s worth the time and effort.
  • Last Activity: This gives you a good idea of how long it’s been since a prospect has opened/clicked on an email or visited your website. 
  • Created Date: This is different from the contact’s create date. This is when Pardot first created the prospect record.
  • Finally, I like to include the Hard Bounce field so that the sales team is aware if they have a prospect with a bad email address. This will usually prompt them to check to see if they have the correct email on the record, or if the contact has left the company.

Salesforce reports your team will love

It’s nice to have all of the fields and components in Salesforce where your team can easily access them, but let’s talk a bit about reports too. There’s some cool stuff you can do with Salesforce reporting to keep your sales team wanting more. 

Account based marketing (ABM) reports

Instead of looking at the engagement of a single prospect, why not look at the entire account to see how engaged they are as a whole? 

Let’s create a report that will summarize our accounts and give us the Sum and Average of all of the contacts that belong to the given account.

  1. Create a new Contact & Account report. Apply any filters you need.
  2. The report layout should include the contact’s name, Account Engagement Score and whatever other fields you need.
  3. Under Group Rows, add Account Name to add a grouping by Account.
  4. On the Account Engagement Score field, click the down arrow to expand the field options in the layout
  5. Hover over Summarize and check Sum and Average.
  6. Save and Run your new report!

Recently active and highly engaged prospects report

The purpose of this report is to help sales folks identify prospects that are highly engaged and recently active. It creates a call sheet of sorts for your sales team.

To create this report, simply build a normal Contact & Account report but include the fields Account Engagement Last Activity and Score

You can then filter and/or sort the report to see the most recently active prospects with the highest engagement.  I used this type of report to keep an active list of prospects that sales people could call on when they had spare time. 

Note: Your users may already receive a similar report from Account Engagement called their daily prospect activity report. To find out, go to Account Engagement Settings > User Management > Users and click on a user. Then select Edit Preferences in the top right to see what emails they’re subscribed to.

Final thoughts

Hopefully you have found a couple of tidbits you’re ready to implement in your own org. One of the reasons I absolutely love this topic is because I know as a marketer it’s important to prove your value to the organization as a whole. I spent a large portion of my career learning to work with sales teams and leadership to provide them the insights they needed to succeed. 

It wasn’t always easy but good synergy between your sales and marketing teams is essential and will pay dividends. A good relationship includes transparency and Account Engagement offers that through excellent native integration with Salesforce. 

Looking to break down silos and build a stronger relationship between your sales and marketing teams? Contact the team at Sercante to start a conversation and learn about solutions we’ve built and the possibilities that exist.

About a mile and a half west of their Midtown Manhattan office tower, Salesforce hosted their World Tour New York for Winter 2022 at the Jacob Javits Center in NYC.

The usual characters were walking around, like Einstein, the Genie rabbit (Marc Benioff’s admitted favorite) and the Trailblazing bear. But amongst the crowds and the usual pomp there was a clear theme that permeated through the entire event.

Salesforce World Tour NYC Theme: Are you a customer company?

From the keynote session, through to many of the product updates and case studies, Salesforce asked the question; are you a customer company? And to that rhetorical question, they had the answer. 

Using many of the tools you may already be familiar with, such as Slack or B2BMA, Salesforce Customer 360 helps you build an organization that is focused on the customer and their needs. But really what we’re talking about here is harnessing the incredible tools in the Salesforce ecosystem to create efficiencies and easier access to data.

The 7 Habits of a Customer Company (keynote address)

During the Salesforce World Tour keynote address, Salesforce CEO, Marc Benioff highlighted what he calls the 7 Habits of a Customer Company. 

  1. Salesforce Customer 360: is not so much a single product offering, but the concept of utilizing Salesforce tools to create a complete view of your customer, shared by various departments like sales, marketing, service, etc. The Customer 360 puts your customer in the center.
  2. Create a single source of truth. Most organizations have data throughout different systems. There wasn’t an easy way for customers to connect all of their data and integrate it into one platform. Mulesoft helps companies connect data from different sources to create one single source of truth.
  3. See and understand your customer. Because of the many different data storage needs companies have, they have created their own data lakes to house information. This causes “data silos” and during his keynote address, Benioff admitted this was their [Salesforce’s] mistake. Introducing, Salesforce Genie Customer Data Cloud, which is a new data warehouse product, powered by Tableau, that is deeply integrated with Salesforce and offers real-time, automated access to your data. 
  4. Maximize time to value. Using Industry Clouds, organizations can save on customizations because these various industry clouds already contain the language and processes different organizations use, such as nonprofit, education and financial clouds. Think of it as a template for your Sales Cloud org that contains the industry-specific customizations you need.
  5. Do impossible things as a team. Slack is a terrific collaboration tool and since being acquired by Salesforce in July 2021, the integration has continued to improve. I watched a terrific demo in the Campground (exhibitor area) of Slack’s integration and it really was impressive. Teams can collaborate on Accounts and Opportunities, pull in various stakeholders and work together to close business. Doing “impossible things” may be a bit of hyperbole, but the value for teams (geographically separated more now than ever before) is obvious.
  6. Save time, save money and grow revenue. Salesforce president and CMO, Sarah Franklin gave  kudos to the “Success Ecosystem” that includes partners, app developers and support teams. Furthermore, the innovation from these players in the ecosystem results in more automated processes, faster service response times and lower support costs resulting in efficiencies and profits.  
  7. Finally, Trailblazers! The folks that make the magic happen for organizations every day. Growth in the Trailblazer community has created what Franklin called a “Trailblazer economy,” referring to millions of new jobs, business revenue and community members/groups. I love my black Trailblazer zip-up sweatshirt and wear it with pride.

Introducing Net Zero Cloud

Sustainability is a core value for Salesforce as an organization. Their goal is to achieve net zero emissions by 2050. Recognizing that this is important to many companies, Salesforce has introduced Net Zero Cloud. 

This new cloud product offers a management platform for a company’s carbon footprint. It helps you track and manage your environmental impact. You can run emissions forecasting and simulations, optimize different areas for efficiency and even work with your suppliers on their environmental goals. Additionally, the carbon accounting features let you convert your energy consumption into carbon emission data. 

The Net Zero Marketplace also provides a place for companies to purchase carbon credits to offset their environmental impact.

Wandering into the Salesforce World Tour Campground

The Campground, Salesforce-speak for exhibitor hall, was abuzz with tons of activity. There were several mini theaters with tree-stump seats providing short presentations on everything from Customer 360, Slack integrations, demos and case studies. 

Trailblazer Forest was always a busy spot for seasoned Trailblazers and admins just beginning their education journey to meet up and learn more about the latest offerings, pick up some cool swag (I left empty handed), and show off their skills. 

I grabbed a seat, err, tree stump at the Customer Success Theater to watch a presentation on the 6 Guiding Principles for CRM Adoption, but missed out when the required headsets were all taken. But don’t feel too bad for me, I spent that time catching up with a great client in the partner’s hangout nearby. 

Though it may seem trivial, I loved the way Salesforce designed the Campground. Those of us that have been to other industry trade shows know that you typically find yourself in large concrete rooms, walking between narrow pathways, desperately seeking coffee or a restroom. However, the Campground was nicely decorated with lots of signs, decorations and plenty of space between exhibits (except during peak hours), with multiple opportunities to grab a snack, coffee or a drink.

The Slack demo I watched was terrific. It was sort of a “day in the life” approach to a demo and you got to see how an organization was able to collaborate with an account and eventually an opportunity. No meetings, no endless email chains, just collaboration. It was impressive.

My Favorite Session: Delivering Success as a Salesforce Admin, the Skill Every Admin Needs…

I was expecting this session to be a general overview of tips for Salesforce admins, but the focus was on one single thing. Arguably, one of the most important skills every admin needs to master. Flows. For a brief introduction, check out this terrific overview of Flows.

What was once done using complex Apex code can often be done with Flows in a simple drag/drop interface, using the same “journey paths” look and feel of Pardot’s Engagement Studio. And what is probably being done right now in your org by Workflows Rules and Process Builder will eventually need to be a Flow. 

Note: Workflow Rules and Process Rules are being retired in Winter 2023.

Overall, the session inspired me to sharpen my own Flow skills so that I can take advantage of all of the new functionality that will (pardon the pun) flow through Salesforce Flows. It’s essential that every Salesforce admin is able to automate both simple and complex business processes and Flows is the future.

Salesforce World Tour is Worth the Effort to Attend

Salesforce hosts these events all over the world and if you’re fortunate enough to be a reasonable distance from one of the host cities, it’s worth it for anyone that interacts with Salesforce as part of their role. 

The learning opportunities are practically limitless, in fact, there is no way to take in all the sessions you want simply because many sessions are scheduled concurrently, which forces you to make some tough decisions. 

The event is sponsored by the few dozen or so exhibitors that are usually represented by some of the big players in the AppExchange. But the event is well organized and designed to get you excited about everything available in the massive Salesforce ecosystem. It’s certainly not simply a trade show where endless rows of booths vie for your attention. Not at all. It’s an education event. You’ll leave inspired to try something new, explore a new product, or seek to sharpen your skills in one area of your work. 

A few tips for your next World Tour:

  1. Arrive before the exhibit hall opens. I arrived about 30 minutes before the event opened and that gave me the opportunity to grab my credentials and get the lay of the land without rushing. It’s just too massive and the lines get too long to wait until you’re trying to get to your first session.
  2. Figure out specifically what vendors and sessions you want to visit. Make sure you know what you want to learn more about and plan around it. If you rely on wandering around looking for something interesting you’ll likely miss sessions that you would otherwise be interested in. There’s too much to see and do.
  3. Similar to the first tip, arrive as quickly as possible to each session. I missed several sessions simply because I was too late to get a seat or the privacy headphones. Thankfully, the venue had coffee and refreshments on every level so I didn’t need to go out of my way for a cup of coffee, which I am always willing to do.

And make sure you check out this blog post from Andrea Tarrell to make sure you get the most out of Salesforce community events in the future.

Salesforce and Pardot connected campaigns bridge two distinct campaign reporting functions into one powerful feature. 

Prior to 2019, Salesforce and Pardot campaigns were independent of each other. But with the introduction of connected campaigns the two entities joined forces. And with that, the humble marketer’s life is made easier. 

The Difference Between Salesforce and Pardot Campaigns

Before we jump in, let’s do a quick 101 refresh on the difference between Salesforce campaigns and Pardot campaigns.

The Skinny on Pardot Campaigns

Pardot campaigns refer to the first touch interaction that could be tracked. It answers the question: “What brought this person to us?”

For example, let’s say someone visits your How to Be Good At Stuff webinar page. They didn’t sign up, came back 30 days later, and converted to a lead by downloading your I’m Awesome at Stuff whitepaper. Their campaign would be set to the How to Be Good At Stuff webinar, since that was the first initiative that brought them to you.

Pardot campaigns are one-to-one. That means each person has ONE source campaign. And every asset created in Pardot has to be tied to one campaign as well.

This gives you useful reporting data on the number of leads sourced by your campaigns and how these convert into closed-won opportunities downstream in the pipeline.

How Salesforce Campaigns are Different

Salesforce campaigns are more… how normal people think about campaigns. Campaigns are marketing initiatives, and each contact or lead can belong to multiple campaigns.

Tracking this in Salesforce is hugely impactful. If you leverage Salesforce campaigns to record who you touch with your marketing efforts, then you’re laying the foundation to be able to show all of the marketing touchpoints that led to a sale on each of your opportunities:

Opportunity Dashboard

And at the campaign level, you can see the total volume of opportunities that were influenced by your marketing activities.

Salesforce Campaign dashboard

Marketers have been talking about revenue attribution for the last decade. But for most organizations, this stops with “talk.” We all like the idea of being able to link marketing campaigns to hard revenue numbers, but our disparate systems and measurements make that incredibly hard to deliver.

Campaign influence reporting finally makes revenue attribution doable for a typical marketing team — all with tools native to the platform. This comes together in first touch, last touch, or any other custom attribution models your team needs to analyze the impact of its marketing spend.

Campaign performance dashboard

How to Set Up Connected Campaigns in your Pardot Org 

The good news is that connected campaigns are automatically activated for Pardot orgs setup after 2019. But, there are a few settings we’ll want to take a look at to make sure everything is functioning.

 The magic is in the Pardot connector!

Connected campaign settings are managed by the connector that bridges Salesforce and Pardot. 

In Pardot Lightning…

  1. Click on Pardot Settings
  2. Connectors (on left menu)
  3. Click the settings cog under Actions on the right for the Salesforce connector
  4. Select Edit Settings

On this screen, you’ll notice the campaign that is being used to connect contacts that come from Salesforce into Pardot. They will be marked with this “first touch” campaign when they sync from Salesforce. If you do NOT have a campaign here, you should create a campaign in Salesforce, something generic like “Salesforce Contacts,” and select it here. 

Question: I created the campaign in Salesforce and it doesn’t appear in this picklist?

This is pretty common. There are three reasons why the campaign would not appear, here are some troubleshooting steps…

  1. When setting up the campaign in Salesforce you must check the box to make the campaign “Active.”
  2. Be patient! It can sometimes take 5-10 minutes for the campaign to appear in Pardot. You may need to refresh the connector settings page to see it appear.
  3. As a last resort, delete the campaign you created in Salesforce and create a new campaign. You might be shocked at how often this solves the problem.
Connector Settings

Let’s Look at Campaign Settings

Once you have the connector settings worked out, click on the Campaigns tab at the top.

Pardot Settings, campaign tab

Let’s take a closer look at the setting options.

  • First, ensure the check box for “Enable Connected Campaigns and Engagement History” is checked. This should already be checked by default, which turns on all the wonderful connected campaign magic. 
  • Enable Campaign Member Sync should also be checked to ensure that when you add people to your campaign in Salesforce or Pardot they stay in sync. Note: If you add people to a campaign in Pardot but they do not exist as Contact or Lead records in Salesforce, you will not see them in Salesforce under that particular campaign. 
  • Use Salesforce to manage all campaigns should be checked allowing you to create and manage campaigns in one place — Salesforce! No more duplicating efforts in Pardot.
  • Limit Campaign Creation by Date – this handy feature gives you the ability to limit what campaigns sync to Pardot. If your Salesforce org has been around for a while, it undoubtedly has campaigns that were created and you may not wish to clutter Pardot with old campaigns. You can select a cut-off date here!
  • Show unconnected campaigns in Pardot Campaigns tab is good to check if you wish to see what campaigns in Pardot are not connected to Salesforce. As the subtext under the box states: Unconnected campaigns are always shown unless Manage Campaigns in Salesforce is enabled.
  • Finally, Campaign record types enabled for connection. This will say “Master Record Type” by default if you only have one Salesforce campaign record type. But some orgs are fancy and have multiple record types for different parts of the business. If this is the case, you can select which record types should sync to Pardot.

Once Connected Campaigns are flowing here’s what you’ll notice

  • All new campaigns will be created in Salesforce — you can not create campaigns in Pardot.
  • Every time you add a new active campaign to Salesforce, it’s automatically available in Pardot.
  • You can add campaign members in Pardot through automation rules or completion actions. As long as they are assigned to a user, they will sync to Salesforce and show up as members of that campaign in Salesforce. 

PRO TIP: If you have a campaign set up for a weekly or monthly newsletter, add a completion action to your signup form. This ensures that when a prospect fills out the form, they are automatically added to that campaign.

These campaign fields will also be updated by Salesforce and pushed to Pardot:

  • Name
  • Cost
  • Created By
  • Updated By
  • Updated At

Now for the Really Exciting Stuff: Show Engagement History on the Campaign in Salesforce & Report On It

To add another layer of awesomeness to this, Connected Campaigns allows you to also enable Engagement History on Salesforce campaigns.

What this means is that on Salesforce campaigns that are connected to Pardot campaigns, you can pass engagement metrics from:

  • List emails
  • Forms
  • Form handlers
  • Links & custom redirects

When you turn on Engagement History, new custom objects called ListEmail, MarketingForm, and MarketingLink are created and populated with data from corresponding Pardot records. These records DO count against your org’s data storage limits. 

Important: these custom objects do need to be added to your Campaign page layout! Here are detailed instructions to do this.

Benefits of Enabling Engagement History

Enabling Engagement History lets you add KPIs for these assets to the Campaign Page Layout:

Engagement History

And even better, it lets you get at this data in Salesforce reports & dashboards:

campaign report

My heart literally flutters with anticipation of the power this is going to bring to marketers on the platform.

 A few general FYIs on what you need to make Engagement History work:

  • Connected campaigns set up (duh)
  • Prospects syncing with a Salesforce lead or contact, and added to the connected campaign
  • The prospect must be assigned to a user, group, or queue in Salesforce (a requirement for it to sync to Salesforce in the first place)
  • To access Engagement History data, users need the Sales User or CRM User standard permission set and field-level security access to the engagement history fields.

Ready to Roll with Salesforce and Pardot Connected Campaigns?

Once you experience connected campaigns, there’s no going back. (Literally and figuratively. Once it’s on, it can’t be turned off.)

To make this magic happen, you will need your Salesforce admin on board, since a lot of the configuration changes take place inside Sales Cloud. 

Do you utilize the power of connected campaigns? What’s your experience been? We’re dying to know — please share with fellow readers in the comments!