Category

Analytics & Reporting

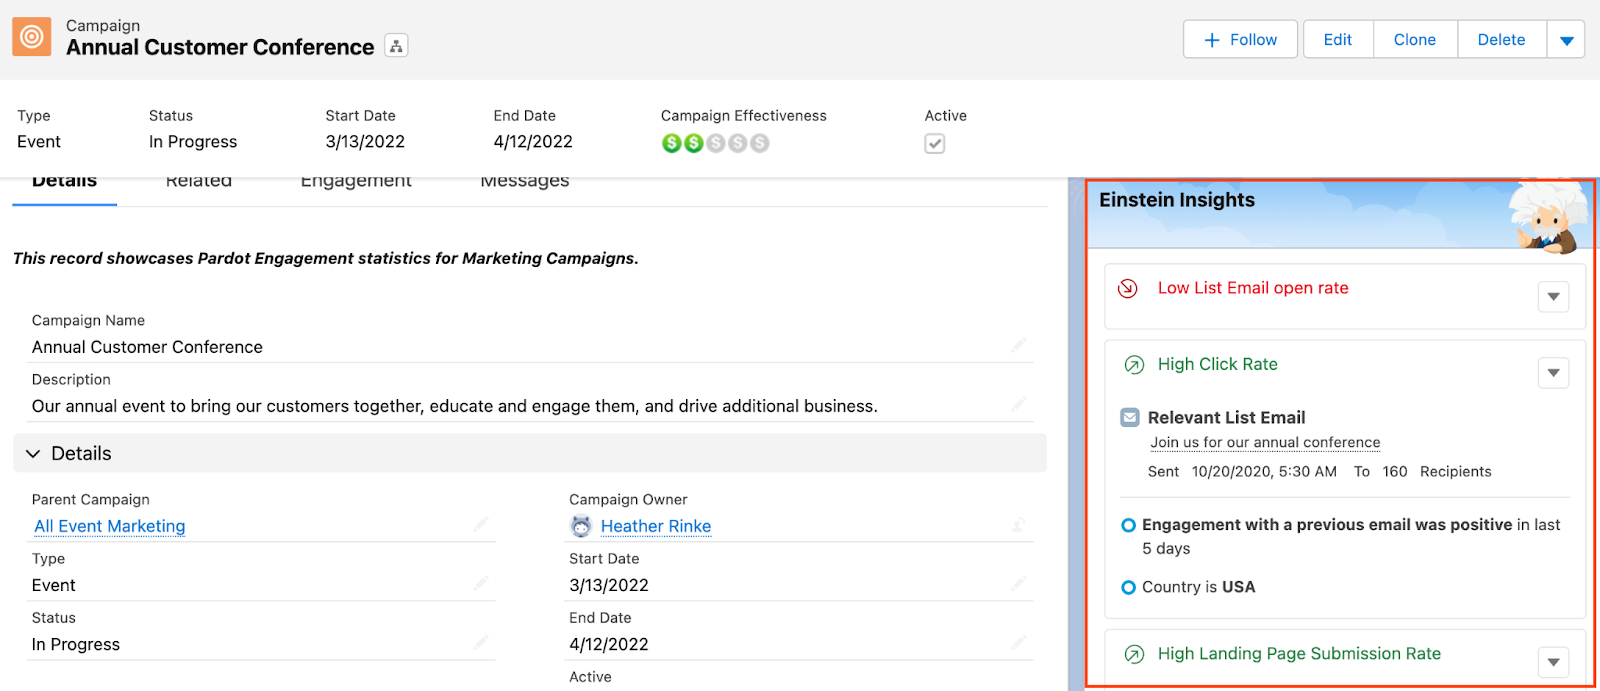
Getting marketing team access to your Salesforce org breaks down company siloes and can lead to enriched data you can use for things like Einstein campaign reporting.

So, you want to make the case for getting your marketing team’s hands into your company or organization’s Salesforce org. But, you’re having trouble making the case to the team that manages it.

The team may come back to you with things like,

Why do you need to get into our Salesforce org?

and

Don’t you have your own marketing automation program and mailing lists?

Well, this post is going to help you make the case for getting marketing admin access to your Salesforce org.

Salesforce needs interconnectivity to fulfill its data hub destiny

Think of Salesforce (a.k.a. Sales Cloud/Service Cloud) as your one stop shop for all your data. 

When you’re working for a company with multiple departments, or at an enterprise-level company with many locations and lines of business, you have multiple technology tools that connect to Salesforce and enrich that data.

And the reality is, you are one person. So, you can’t possibly know all the ins and outs of each tech tool that’s connected to your Salesforce org. 

All the Salesforce admins can live in harmony with shared access

The good news is that other tools probably have their own admins and experts who are part of your company or organization. 

These technology specialists can be your best friend when it comes to troubleshooting something between that tool and Salesforce. But, they can only be an effective best friend if they have the right level of access in Salesforce. 

Otherwise, you’re going to be an annoying best friend who asks them to look at a bunch of things you could easily look at yourself to solve the issue. 

What I’m trying to say is they become a bottleneck — unintentionally or intentionally. 

Build a process to prevent issues from Salesforce user access

They are probably thinking, 

but I don’t want anybody to mess up the Salesforce system I’ve worked so hard to build.

And it’s understandable.

I’m here to tell you that admins can give you access and ask you not to change something in the system without going through the proper process. 

Yes, that means they have to instill trust in you. That’s what makes a good team! 

Understand the Salesforce user roles

The Salesforce Marketing User in Sales/Service Cloud can create, read, edit, and delete records they can access, and they can import leads.

If you’re granted access to Sales Cloud through an Admin role, or something custom, be sure the person communicates the specifics of your user role to you. You should fully understand what you’re capable of before diving in. And the person granting access to you has a responsibility to assign a user role to you that provides an appropriate level of access.

Document a process for marketing users

Work with your Salesforce admin to establish everything marketing users need to know about their level of Salesforce access. Put it all in a document, and remember to include the process for requesting changes beyond the marketing user access level.

Make your case and get the user access you need

In case your Salesforce admin still isn’t sold on the idea of giving you admin access, here are three reasons why they should. Use these to help them understand why it’s so important for the marketing team to have access.

Giving marketing users access to Sales Cloud:

  1. Allows troubleshooting to happen quickly. The marketing user doesn’t have to ping the Salesforce admin every time they need help with simple tasks for things like reporting or connected campaigns.
  2. Makes other software admins learn how Salesforce works. There’s less back-and-forth communication in the long run! 
  3. Creates shared ownership among the tools. This means less finger pointing and more collaborative ownership to build and troubleshoot.

So, if your Salesforce admin was on the fence about giving you access to Salesforce, I hope this helps you get them to rethink and ultimately grant access. I am confident in saying it’s best for the long run.

Use the comments section to tell us how it goes! Or share your Salesforce admin access stories if you dare.

Picture the scene… You’re using a custom amount field on your opportunities (or even multiple amount fields) in Salesforce. You notice that your Salesforce Campaign Influence reports are not showing any data. You have an amount value on all your opportunities, and you’re using custom roles.

So, why is nothing working?*

The standard Salesforce Opportunity Influence model (and the associated reports) work on the basis that you are using the standard Opportunity Amount field. But more often than not, business operations are far from the “standard” processes. 

*It is assumed at this point that all other Campaign Influence set up items and prerequisites have been completed.

Going beyond standard amount fields on opportunities in Salesforce

Business models flex and are customized to the business needs. So, there are use cases where populating the one standard amount field on opportunities just won’t work. We also know that Sercante loves to break free of the “standard mindframe” and test the limits of Salesforce!

So how can you use Campaign Influence (and reports) when you don’t use the standard opportunity amount field? 

The recommended option would be to create a Salesforce Flow to update the standard amount field with the values found in your multiple custom amount field(s). But flow can be tricky to navigate if you don’t have the experience.

This post will offer an alternative way to use a custom opportunity amount field in Salesforce Campaign Influence reports that any Salesforce admin will be able to follow and apply. 

Step 1: Create one custom amount field 

If you only have one custom amount field, skip to Step 2. 

If you are using multiple custom amount fields, for example “Estimated Amount” and “Won Amount,” you will need to create ONE custom amount field that populates from your multiple amount fields. You will need to create this custom amount field because you cannot edit the standard amount field. 

I’d recommend you create a formula field using the opportunity statuses to determine which value is shown in the newly created amount field.

Instructions

  1. Create a new custom field on the Opportunity Object
  • Data Type = Formula
  • Formular Return Type = Currency
  1. Create an advanced formula – IF( IsWon = true, Won_Amount__c , Estimated amount__c )

What is this formula doing?

If the opportunity Stage = Closed Won, then the custom Opportunity Amount field will populate with the Amount Won value. However, if the opportunity stage is anything but Closed Won, the value in this field will be populated from the Estimated Amount.

  1. Check Syntax
  2. Set the field-level security 

NOTE: If users cannot see the field they won’t be able to see it in reports or create reports using it 

  1. Add the new field onto your page layouts if you wish. 
You don’t have to add this field to the page layout(s). Not adding this field to the Opportunity page layout would prevent confusion for the sales reps – They would continue to populate the custom Revenue fields as normal
  1. Save

Consideration

I would recommend adding a validation rule that prevents users from marking an opportunity as “Closed Won” without an Amount Won Value. If the opportunity is marked as Closed Won and there is no value in Amount Won, then the Custom Opportunity Amount Field will show £0.

Step 2: Create a custom Campaign Influence Amount field

The Campaign Influence reports and dashboards get their data from the Campaign Influence object. The data the reports need from the Campaign Influence object are: 

  • Opportunity Amount
  • Revenue Share 

Now we have one singular custom opportunity amount field we need to get it onto the Campaign Influence object, so the campaign influence reports have visibility of the data. 

Instructions

  1. Create a new custom field on the Campaign Influence Object
  • Data Type = Formula
  • Formular Return Type = Currency
  1. Create an advanced formula – Opportunity.Custom_Amount_Field__c

What is this formula doing?

This formula is simply pulling in the value found on the custom Opportunity Amount field and adding it to the Campaign Influence object. 

  1. Check Syntax
  2. Set the field-level security 

NOTE: If users cannot see the field, they won’t be able to see it in reports or create reports using it.

  1. Add the new field onto your page layouts if you wish. 
  2. Save

Step 3: Create a custom Campaign Influence Share field

At this point we have:

  • A Custom Opportunity Amount field (if you’re using multiple amount fields, you now have one that populates depending on the opportunity stage)
  • A Custom Campaign Influence Amount field, which simply pulls in the value from the custom opportunity amount field 

The final custom field that needs to be created is the Custom Revenue Share, which is also found on the Campaign Influence object. 

The Standard Revenue Share field on the Campaign Influence object will use the standard Opportunity Amount to work out the revenue share for each campaign and opportunity. 

So, since a custom Opportunity Amount is being used we need to create a custom Revenue Share field, which will replicate the standard behavior using a formula.

Instructions

  1. Create a new custom field on the Campaign Influence Object
  • Data Type = Formula
  • Formular Return Type = Currency

2. Create an advanced formula – Opportunity.Custom_Amount_Field__c * Influence

What is this formula doing?

This formula is looking at the value in the custom Opportunity Amount field and multiplying it by the Influence percentage field (this is a standard field that we do not need to change)

3. Check Syntax

4. Set the field-level security 

NOTE: If users cannot see the field, they won’t be able to see it in reports or create reports using it.

5. Add the new field onto your page layouts if you wish. 

6. Save

Final Outcome

You should now have:

  • Custom Opportunity Amount Field – If you are using multiple custom amount fields this should be pulling in the value from either of these fields
  • Custom Campaign Influence Amount Field – Pulling in the value from the Custom Opportunity Amount Field
  • Custom Campaign Influence Revenue Share Field – Displaying the share of the revenue by using the Custom Opportunity Amount field and Influence field

Step 4: Customize Campaign Influence reports 

If you have installed the Sercante Campaign Influence Starter Pack, then the reports and dashboard that come with this will only work when the standard Salesforce fields are used (Opportunity Amount and Revenue Share). So, you will need to customize these reports and the dashboard (we’ll tell you how to do this next) to include your custom Opportunity Amount and Custom Revenue Share fields. If you have any of your own Campaign Influence reports you will also need to edit these. 

Sercante Campaign Influence Starter Pack – Editing the reports and dashboard 

Step 1. Open Salesforce Dashboards where you will see the Campaign Influence Dashboard that comes with the Sercante starter pack. 

Additionally. open up this link. You will need the images on this page to ensure that when you update the dashboard components you

  • Select the right report
  • Select the correct chart
  • Add the chart title and subtitle 
  • Select the correct Measure

Step 2: Right click the report on the dashboard component and open the report in a new tab

Step 3: Edit the report

  1. Under Columns, remove #Revenue Share and #Opportunity Amount.
  2. Under Columns, add the Custom Opportunity Amount field and Custom Revenue Share (Campaign Influence).
  3. Save and Run.

Step 4. Go back to the Dashboard and click Edit on the dashboard.

Step 5. Edit the individual component in which you just edited its report and use this link as a reference.

  1. Update the report the component uses
  2. Check that the correct chart is used. 
  1. Update the Measure.
  1. Update the component title and subtitle.

Step 6: Save the component and dashboard.

You’ll need to Repeat these steps for each of the other dashboard components.

Begin your journey to the marketing ROI promised land with the Sercante Campaign Influence Starter Pack

We’ve enabled and configured Salesforce Campaign Influence a number of times, and we noticed a pattern of reports and dashboard elements that were useful in getting started. 

So, we consolidated those views down into a report and dashboard package that you can ask your Salesforce Admin to install for free from our Github account. 

Get started here. Or reach out to us with any questions.

Balancing all the emails your teams want to send to Prospects versus how many emails the Prospects want to receive is difficult. 

Email your Prospects too often and they may opt out. Email them too little and they may miss the important updates they subscribed for. 

Also, determining when to email your Prospects is always a struggle. Should you split your sends by time zones? Is there a sweet spot that covers most time zones? Does anyone actually read emails on Mondays?! 

Up until now, the best way to tackle these decisions is Dynamic Frequency and Recency lists coupled with the numerous studies concerning which days and times are the best to send emails. However, with Pardot and Einstein, you can let machine learning do this analysis for you and have one less thing to think about.

Note: The 2 Einstein Solutions below are only available to Advanced and Premium Editions of Pardot. 

Optimize your email send times

Pardot Einstein Send Time Optimization analyzes the timestamp of sends, opens, clicks, unsubscribes, and spam complaints to determine the optimal time to send a Prospect an email. 

Keep in mind, Einstein Send Time Optimization includes List emails, Engagement Studio Program emails, and Salesforce Engage sends in its analysis. It does not include Operational emails or Autoresponders. 

How Send Time Optimization works in the abstract is a little confusing, but this example from Salesforce’s help doc is great: 

example

Send Time Optimization is only available in emails sent from the new MCAE (Pardot) Lightning Email Builder

When sending a list email from the Lightning Builder, three Send Time options appear:

  1. Einstein Optimized (choose this option)
  2. Send Now
  3. Send Later
Einstein Optimized
  • For “Start Date” enter the earliest day you want the emails to go out. 
  • For “Time,” it takes about an hour for Einstein to analyze the prospects, so set this one hour before the earliest time your email should go out (i.e. If I want the emails to start sending at 9AM, I’ll select 8AM). 
  • Then set your “Send Emails Within” value (up to 168 hours which is 7 days). The gray box at the bottom of the Send Time section will show the latest time your email can go out and will update as you change your “Send Emails Within” value. 

Once your email starts sending, you can monitor how many emails have gone out anytime during the Send Time window by going to Pardot Email > Scheduled > All Scheduled Emails.

What data do you need?

Each Prospect needs to have engaged with an email in the last 90 days. If a Prospect is new or has not engaged within this window, Einstein will recommend an aggregate of your email engagement data. 

Enabling Einstein Send Time Optimization

You’ll enable Einstein Send Time Optimization by going to Setup > Einstein Pardot > Send Time Optimization

Once enabled, it will take up to 72 hours to analyze your data and create your custom model.  

Use Einstein Send Time Optimization to customize email frequency 

Einstein Engagement Frequency (EEF) analyzes Prospect’s email engagement over the last 90 days plus their overall engagement data in the past 28 days to determine if the Prospect is Undersaturated, On Target, or Saturated. 

Similar to Einstein Send Time Optimization, EEF analyses List emails, Engagement Studio Program emails, and Salesforce Engage sends. It does not include Operational emails or Autoresponders. 

So, say for example you have a list of 100 Prospects who all received an email two days ago. You need to send all 100 another email, but you are worried about over emailing them. With EEF, you can run a dynamic list looking at your Recipient list from your first email and see which Prospects are Undersaturated or On Target and could be emailed again. 

Dynamic list rules

Or, even better, you could set up an Engagement Studio Program for the second email, and any future communications, to wait for the Prospect’s EEF status to change from Saturated. 

Engagement studio program

What data do you need?

Each Prospect needs to have engaged in at least the last 28 days, but 90 days is recommended. EEF also requires 5+ variations of emails be sent to at least 10 Prospects within the last 28 days.

Enabling EEF

You’ll enable Einstein Send Time Optimization by going to Setup > Einstein Pardot > Einstein Engagement Frequency

Once enabled, it will take up to 72 hours to analyze your data and create your custom model, a new Prospect default field, Einstein Engagement Frequency, will also be created. 

dynamic list rules

Lean on the machines with Einstein Send Time Optimization

With Einstein Send Time Optimization and Einstein Email Frequency, we can begin leaning on machine learning to make some of the email sending decisions for us.

 If you’ve already started using these two Einstein tools with Pardot, please share your tips, tricks, and findings in the comments!

I have a rather embarrassing story from my pre-Einstein campaign reporting days. 

When I started out as a Salesforce admin (i.e. I got told I was the new admin and that I’d “figure it out.” It was a very small company.) I was also in charge of doing the end-of-quarter reporting on sales and campaigns. 

For attribution, I would manually review every single Closed Won campaign, try to determine the Contacts from the Opportunity notes, tasks, etc., and manually make associations. Primary Campaign Source and Contact Roles were in Salesforce at the time, but no one filled them out. 

So, I just had to go on a fact finding mission. Then I exported all the data into excel and did multi-touch attribution manually. 

In Excel. Ugh.

Sure grandma

Use Einstein to report on Marketing Cloud Account Engagement (Pardot) campaigns

Without the team actively and frequently using Contact Roles, reporting on Campaign Performance was no better. 

I could view who responded to a call to action (CTA) or registered for an event, but reporting on Account Engagement (Pardot) assets + Salesforce campaigns wasn’t really a capability. So, it was also a lot of manual work. 

As much as thinking about these old processes makes me cringe, I’ve heard similar stories from a lot of Pardot admins and marketers. 

Campaign reporting and attribution has come a long way since then — especially since Connected Campaigns and Campaign Influence were first introduced. Now we can easily extend these capabilities with the power of Einstein Machine Learning. 

Note: The two Einstein solutions below are only available to Advanced and Premium editions of Marketing Cloud Account Engagement (a.k.a. MCAE/Pardot). 

Campaign reporting with Einstein Campaign Insights

Einstein Campaign Insights analyzes Prospects’ engagement with your Campaign assets to spot trends and outliers. 

You’ll see two types of insights:

  1. Global Insights: These insights compare the performance of the campaign and assets to other campaigns/assets of the same type (i.e. comparing a single form’s performance to the performance of your other forms)
  2. Segment Insights: These insights shed light on which audiences engage with your campaigns and assets (i.e. Directors opened this email less than other segments).

Einstein Campaign Insights looks for engagement levels that are either higher and lower than usual. 

example

You can also select the dropdown arrow to provide feedback on the Insights and help Einstein improve. 

Einstein insights

What data do you need?

Nearly all data used in the Einstein Campaign Insights model originates from Pardot, so Connected Campaigns must be enabled. Salesforce also recommends having at least 50 Connected Campaigns.

How to enable Einstein Campaign Insights

You’ll enable Einstein Campaign Insights by going to Setup > Einstein Pardot > Einstein Campaign Insights

Once enabled, it will take about 24 hours for your initial insights to appear. Make sure you add the Einstein Insights component to your Lightning record page. 

Analyze campaign performance with Einstein Attribution

Einstein Attribution is Campaign Influence with the power of machine learning. This tool analyzes your campaigns to spot trends and then allocates campaign influence credit to multiple campaigns. 

Einstein Attribution has a few requirements before it can run:

  1. Connected Campaign and Campaign Influence must be set up.
  2. Your org has to be using the standard Opportunity object as well as the default “Close Date” and “Amount” fields.
  3. This tool only looks at Campaign Members with a “Responded” status. Note: This means the “Responded” checkbox needs to be selected for the individual Campaign Member Statuses.
Campaign member statuses

What data do you need?

Salesforce recommends you have at least 100 Opportunities with Contact Roles so Einstein Attribution can analyze which Campaign engagements influence Opportunities. 

Enabling Einstein Attribution

You’ll enable Einstein Attribution Insights by going to Setup > Einstein Pardot > Einstein Attribution

Once enabled, a new Campaign Influence Model called “Data-Driven Model” will be created. To set this as the default over what is specified within Campaign Influence, select the “Use this model as the Campaign Influence default” checkbox.

Enable Einstein Attribution

Set your Campaign Influence Time Frame

Next, set your Campaign Influence Time Frame (3 months to 2 years). This limits which campaigns are considered influential. 

For instance, you probably wouldn’t want a webinar from 5 years ago to get credit for an opportunity created today. I recommend this time frame be 2-3 times your typical sales cycle. 

If you plan on comparing the Data Driven model to the out-of-the-box Campaign Influence models (First Touch, Last Touch, and Even Distribution), make sure the “Set Campaign Influence Time Frame” setting here matches your Auto-Association “Campaign Influence Time Frame.” You can find this by going to Setup > Campaign Influence > Auto-Association Settings. If these two time frames are different, you will see a difference in the Total Attribution in your reports and dashboards. 

campaign influence and multitouch attribution

Select your Success Milestone

Finally, select your Success Milestone. This should be the Opportunity Stage that indicates an Opportunity is legitimate. 

Out-of-the-box Campaign Influence uses the Opportunity creation date as the Success Milestone, but in reality, a Salesperson may open an Opportunity before ever getting the Lead/Account involved. 

Note: Your Data Driven model and the out-of-the-box Campaign Influence models may also show a different Total Attribution number if your Milestone is an Opportunity Stage after campaign creation. 

In the example below, I’ve used my Proposal/Quote stage as the Success Milestone because this stage indicates the Lead/Account is involved and is considering making a purchase. 

data driven model

Salesforce admins have it so good these days

If I had these Einstein campaign reporting tools back when I started my journey as an admin, I would have saved so much time! 

These tools still save me time today and I love not having to worry about if my reports and attribution have the most complete information. 

Are you using Einstein Campaign Insights and Attribution in your org? Or do you have an embarrassing admin story to share? Tell us in the comments!

Looking for a way to capture lead source data from across pages on your website and pull that data into your CRM? 

Since we use Marketing Cloud Account Engagement (Pardot), we figured out how to do that by transferring UTM parameters across webpages and capturing them in a Pardot custom field. 

Using a magical mixture of UTM parameters and Google Tag Manager with a Pardot custom field and third-party forms, here’s our solution for capturing pre-form fill visitor data in Pardot. 

However, you can use your imagination to take this solution further and send the data to any CRM that allows you to capture data in a custom field.

What is a lead source?

A lead source establishes how a prospective customer first engaged with your business. That can be through your website, by phone, by email or even visiting your location in person. 

Most lead sources originate through advertising, social channels, word-of-mouth, referrals, or even location signage.

Why does the lead source matter?

Understanding how buyers find your business serves two purposes:

  1. It improves the buyer’s journey. You can use the information to be more relevant and responsive  with highly tailored content, interactions, and communications, leveraging the channels and sources your audience prefers. 
  2. It reveals the most effective channels and methods. Having insights into lead sources helps you build awareness, connect and engage with buyers by focusing on what works.

How to track marketing parameters via UTM

The best way to gain digital lead source insight is to use UTM (Urchin Tracking Module) parameters. UTMs are variables that are passed to your website via the link a buyer clicks to get to your website or landing page. 

As the standard for tracking lead sources, UTMs play an integral role in providing data to Google Analytics and other marketing analytics platforms. 

Setting up UTM parameters is super easy by using a handy tool provided by Google Analytics. Remember to create a consistent naming convention so when you add them to your links you’ll be able to easily identify key data points when viewing your reporting.

Why do I need source cookies?

Capturing a UTM parameter on your web form can be tricky. If a user visits a page with a form through a UTM URL and submits the form, the UTM parameters get captured. However, if a user visits a page through a UTM URL and navigates to another page on the website, the form submission is unable to capture the UTM parameter values. 

To solve this dilemma, we used Google Tag Manager (GTM) to implement a cookie on the first page visit and then populate the hidden fields with the stored UTM values.

How to capture lead source via a Marketing Cloud Account Engagement (Pardot) form handler

The steps to capturing your lead source data in Pardot are as follows:

Step 1. Set up Pardot Form Handler

Create a new form handler in Pardot. Magic Wand > Marketing > Forms > Form Handlers.

  • Add information about your form:
    • Name – This will not be seen by the visitor, so use a naming convention that will help you understand the form’s purpose.
    • Folder
    • Tags
    • Campaign
    • Tracker Domain
      • Do NOT check kiosk/data entry mode
      • Check “Enable data forwarding to the success location” only if pushing data to a location other than Pardot.
      • Only check “Disable Activity throttling” if you wish to send auto-responder emails after every submission. A time buffer is set by Pardot to prevent a visitor from duplicating completion actions or emails if they repeat a form submission too quickly. Still not sure? Read more here.
    • Add Success Location URL – Either add a new URL ‘Thank You’ page or send them back to the referring URL.
    • Add Error Location URL – Either add a new URL ‘Error’ page or send them back to the referring URL.
  • Add Completion Actions
  • Add Form Fields
    • Set up your fields in Pardot if not already there
    • Map fields to third-party form by field “name” not the label. These must match exactly or the form handler will not work.
      • e.g.,  <input type=”text” id=”fname” name=”fname”>
      • Do NOT make them “required”
  • Copy the endpoint URL of your newly created form handler and add that to the third-party form.

Step 2. Configure your third-party form

To capture the UTM parameters we determined we want to use, we have to include the following eight HIDDEN fields on the third-party form and do NOT set as required:

  1. utm_source 
  2. utm_medium 
  3. utm_campaign 
  4. utm_content 
  5. last_utm_source 
  6. last_utm_medium   
  7. last_utm_campaign 
  8. last_utm_content

In our example, we are using a Gravity Form. But this should work with most forms. 

To minimize our efforts, if there are many forms on your site, I recommend adding a class like ‘utm_source’, ‘utm_medium’, etc., to the fields you are creating on the form. This way, we can target the class names and their containing inputs in the script later.

Step 3. Capturing a cookie using Google Tag Manager (GTM)

UTM information is only visible on the page it first lands on. If the user goes from one page to the next on the website, the UTM information disappears. 

Add Persist Campaign Data (3rd Party) Template 

There’s no need to reinvent the wheel. Use the 3rd party template, Persist Campaign Data.

  • Click the Tags tab > New
  • Click inside “Tag Configuration” box
  • Search for Persist Campaign Data

What does this container do? It will first look for URL parameters that can be edited. But out of the box, it is looking for anything with utm_source, utm_medium, utm_campaign, utm_term, utm_content, utm_it, gclid. 

This container will store a 2 cookies:

  1. __gtm_campaign_url
  2. __gtm_referrer
  • Click Triggering and select ‘All Pages’ – This will ensure your tag will fire no matter what page a user enters from.

Add a Cookie Variable

We now need to be sure the web tracking cookie we are grabbing is in the correct format.

  • Click Variables
  • Name Variable: cookie-__gtm_campaign_url
  • Variable Type: 1st Party Cookie
  • Cookie Name: __gtm_campaign_url

Check the box: URI-decode cookie

If you preview in debug mode you should now be able to see the cookie set. 

How do you see tracking cookies in Google Chrome? 

  1. Right click on browser window
  2. Choose ‘Inspect’
  3. Choose ‘Inspect’
  4. Choose the Applications tab
  5. Check installed cookies

Add UTM parameters to your form

Now that the cookie is set and working, let’s add the important parts to the form we already created.

  • Click Tags
  • Name the new tag:  utm_form_tracking
  • Tag Type: Custom HTML 
  • Drop in the HTML Script:
<script>
// Parse the Cookie
function getCookie(cname) {
	var name = cname + "=";
	var decodedCookie = decodeURIComponent(document.cookie);
	var ca = decodedCookie.split(';');
	for(var i = 0; i <ca.length; i++) {
		var c = ca[i];
		while (c.charAt(0) == ' ') {
			c = c.substring(1);
		}
		if (c.indexOf(name) == 0) {
			return c.substring(name.length, c.length);
		}
	}
	return "";
}
// Parse the URL inside Cookie
function getParameterByName(name) {
    name = name.replace(/[\[]/, "\\[").replace(/[\]]/, "\\]");
    var regex = new RegExp("[\\?&]" + name + "=([^&#]*)");
    results = regex.exec(getCookie("__gtm_campaign_url"));
    return results === null ? "" : decodeURIComponent(results[1].replace(/\+/g, " "));
}
// Pass the values to hidden field 
document.querySelector(".utm_source input").value = 
getParameterByName('utm_source');  	document.querySelector(".utm_medium input").value = getParameterByName('utm_medium');  	document.querySelector(".utm_campaign input").value = getParameterByName('utm_campaign');  	document.querySelector(".utm_content input").value = getParameterByName('utm_content');
</script>

Change the JavaScript to match the gravity form field values.

  • Set up a Trigger – This will fire the HTML JavaScript code when the cookie fires
    • Name Trigger: trigger_utm_script
    • Trigger Type: Page View – DOM Ready
    • References to this Trigger: utm_form_tracking 

Test your results

You can change the Field Type to text or not hidden while testing your form. Just be sure to flip it back. 

Here is a handy tool that will allow you to easily add campaign parameters.

Watch the full tutorial video

Limitations to capturing lead source data

A caveat — this solution will work for unique visits. However, since it uses cookies, it doesn’t track accurate visitor data across multiple visits. So, if the person visits your website many times before completing a conversion form, then you’ll only have data from the last cookied visit. 

We’re still cooking up that solution, but we’ll share it when it’s ready. 

We’d love to hear suggestions from the community for solving that problem. Or let us know how you did in the comments.

Twice in the span of less than a week, two different clients had questions or issues related to Salesforce campaign activation. I had my fair share of questions and assumptions about that little checkbox when I was in a marketing role and it seems like I’m not the only one. 

With the help of a very simple Salesforce flow (that we’ll build in this post), we can automate the Salesforce campaign activation (and deactivation) process for Marketing Cloud Account Engagement (formerly Pardot), and let the marketing folks get back to marketing!

What does that “active” checkbox even do?

When creating a Salesforce campaign, we’ve all robotically checked that standard “Active” checkbox and never given it a second thought (because that’s what we were told to do). Well, for every good marketer who “checks the box,” there are plenty who don’t — and it does matter. 

Campaign activation implications in Marketing Cloud Account Engagement (Pardot) 

Just about all MCAE (Pardot) assets REQUIRE a campaign to be selected upon creation including: 

  • Custom redirects
  • Emails
  • Forms
  • Form handlers

When the Active box is checked, you’ll be able to see your campaign and correctly associate it with your MCAE (Pardot) asset. If it’s not checked, then you are out of luck!

Additionally, imports into MCAE (Pardot) also require a campaign and play by the same rules. And completion actions? You guessed it. Only active campaigns can be selected and used.

Campaign deactivation implications in Marketing Cloud Account Engagement (Pardot) 

Scrolling through long lists of campaigns in MCAE (Pardot) is not one of my favorite things. Deactivating campaigns helps by limiting visibility and shortening lists.

However, deactivating a campaign will NOT remove associations to assets that were made when the campaign was active.

If there’s an Add to CRM Campaign completion action set, it will continue to add members after the campaign has been deactivated. However, you will not be able to create new completion actions that reference the deactivated campaign.

I thought that box was automatically checked

I’ve been there too! Seems like a logical assumption. 

If you’re going to ask me for the campaign start date and end date, then why the hell don’t you put it to use! 

We’re going to do just that with a simple flow.

Enter Salesforce Flows

For MCAE (Pardot) Admins, think of Flow Builder as the Salesforce equivalent of Engagement Studio. With Flow Builder, just about anything in Salesforce can be automated using a graphical user interface and no code. 

For Salesforce Admins, you should be getting comfortable with flow as Salesforce is retiring Workflow Rules and Process Builder at the end of 2022.

Let’s build our Flow to automate Salesforce campaign activation

Prerequisite Requirements 

Before we start building, we need to ensure that we have all the necessary data to power the flow. Take a moment to look at your campaign page layout and make sure the following fields are present and required. 

  • Start Date (Make required)
  • End Date (Make required)

We recommend you build and test your flow in a Sandbox environment. After testing and validation, deploy to production.

Step 1: Create a new Salesforce Flow 

We will be using a Record-Triggered Flow for this use case. The flow will launch when a record is created, updated, or deleted.


Step 2: Configure start 

In this step, you’ll be selecting the object and configuring the trigger. We’ll be using the Campaign object in this example and we’ll be triggering the flow when a record is created. 

We won’t be adding any entry conditions, but you might want to based on how your organization is set up. For example, you could set the Flow to only trigger for marketing record types.


Step 3: Configure the immediate path

We’ll be using two paths in this flow. We’re going to address the first path in this step and we’ll tackle the second path later.

The first path will run immediately (hence the “Run Immediately”) label. All we need this path to do is check the active box once our campaign is created. 

To do this, we’ll be using the Update Records element. Add this by clicking the + sign under the Run Immediately label and selecting Update Records.

You’ll then want to add a descriptive label and set the field values. In this case, a good label is “Set Active to True.” 

The field that we’ll be updating is the IsActive field. Since this is a checkbox, we’ll be using the $GlobalConstant.True to “check the box.”

Step 4: Configure the second path

To add a second path to your flow, select the “Add Scheduled Paths” option. If you don’t see this, you’ll need to click on the “Start” trigger to open the editing section.

After adding the scheduled path, we’ll need to configure it. Below are the key elements:

  • Path Label – Name/description of the path
  • Time Source – The time element that will trigger the path
  • Offset Number – The length of the delay
  • Offset Option – Specify the measure of time (minutes, hours, or days) and if the path should activate before or after the Time Source

In this example, the scheduled path will run one day after the campaign end date. If you would prefer to have your campaigns visible for a longer period of time, you can increase the Offset Number.

After configuring our scheduled path, we’ll need to add another Update Records element. This will look very familiar from the Run Immediately path. The only difference is that we will be using the $GlobalConstant.False value to uncheck the Active box.


Step 5: Save, Activate and Test

Your flow should look like the image below at this point. 

If you are anything like me, you don’t want to sit around waiting days to see if your flow works as expected. To speed up your testing, simply update the setting in your scheduled path. 

You can set the Time Source to Campaign: Created Date, Offset Number to 5, and Offset Options to Minutes After. With this configuration, your campaign will be deactivated 5 minutes after it’s created.

You can test your flow by creating a campaign (be sure the flow has been saved and activated), verifying that the Active box has been checked, and then checking the campaign again in 5 minutes to confirm that the Active box has been unchecked.

Once your testing is complete, don’t forget to update your scheduled path options back to the original settings.

Step 6: Deploy to Production

Once your flow has been tested, deploy to production using a change set, and sit back and relax! 

Full Salesforce campaign management

The flow we built today was very basic and served a single purpose — to automate the activation of campaigns. However, it does not need to end there. 

This flow can be enhanced to automatically update campaigns to “Completed” when they end and to send reminder emails to the campaign owner if they fail to enter the Actual Cost in Campaign.

Automate your Salesforce campaigns with Flow 

Campaign management does not need to be manual. And it’s an essential piece when reporting on your efforts as a marketer. With the help of a simple Salesforce Flow, automation can be used to simplify the process and make things easier for your marketing team. 

If you have questions about the simple flow detailed in this post or would like to look under the hood of the full campaign management solution, drop us a note in the comments section or reach out to the team at Sercante.

No more posts to show