
Picture the scene… You’re using a custom amount field on your opportunities (or even multiple amount fields) in Salesforce. You notice that your Salesforce Campaign Influence reports are not showing any data. You have an amount value on all your opportunities, and you’re using custom roles.
So, why is nothing working?*
The standard Salesforce Opportunity Influence model (and the associated reports) work on the basis that you are using the standard Opportunity Amount field. But more often than not, business operations are far from the “standard” processes.
*It is assumed at this point that all other Campaign Influence set up items and prerequisites have been completed.
Going beyond standard amount fields on opportunities in Salesforce
Business models flex and are customized to the business needs. So, there are use cases where populating the one standard amount field on opportunities just won’t work. We also know that Sercante loves to break free of the “standard mindframe” and test the limits of Salesforce!
So how can you use Campaign Influence (and reports) when you don’t use the standard opportunity amount field?
The recommended option would be to create a Salesforce Flow to update the standard amount field with the values found in your multiple custom amount field(s). But flow can be tricky to navigate if you don’t have the experience.
This post will offer an alternative way to use a custom opportunity amount field in Salesforce Campaign Influence reports that any Salesforce admin will be able to follow and apply.
Step 1: Create one custom amount field
If you only have one custom amount field, skip to Step 2.
If you are using multiple custom amount fields, for example “Estimated Amount” and “Won Amount,” you will need to create ONE custom amount field that populates from your multiple amount fields. You will need to create this custom amount field because you cannot edit the standard amount field.
I’d recommend you create a formula field using the opportunity statuses to determine which value is shown in the newly created amount field.
Instructions
- Create a new custom field on the Opportunity Object
- Data Type = Formula
- Formular Return Type = Currency
- Create an advanced formula – IF( IsWon = true, Won_Amount__c , Estimated amount__c )
What is this formula doing?
If the opportunity Stage = Closed Won, then the custom Opportunity Amount field will populate with the Amount Won value. However, if the opportunity stage is anything but Closed Won, the value in this field will be populated from the Estimated Amount.
- Check Syntax
- Set the field-level security
NOTE: If users cannot see the field they won’t be able to see it in reports or create reports using it
- Add the new field onto your page layouts if you wish.
| You don’t have to add this field to the page layout(s). Not adding this field to the Opportunity page layout would prevent confusion for the sales reps – They would continue to populate the custom Revenue fields as normal |
- Save
Consideration
I would recommend adding a validation rule that prevents users from marking an opportunity as “Closed Won” without an Amount Won Value. If the opportunity is marked as Closed Won and there is no value in Amount Won, then the Custom Opportunity Amount Field will show £0.
Step 2: Create a custom Campaign Influence Amount field
The Campaign Influence reports and dashboards get their data from the Campaign Influence object. The data the reports need from the Campaign Influence object are:
- Opportunity Amount
- Revenue Share
Now we have one singular custom opportunity amount field we need to get it onto the Campaign Influence object, so the campaign influence reports have visibility of the data.
Instructions
- Create a new custom field on the Campaign Influence Object
- Data Type = Formula
- Formular Return Type = Currency
- Create an advanced formula – Opportunity.Custom_Amount_Field__c
What is this formula doing?
This formula is simply pulling in the value found on the custom Opportunity Amount field and adding it to the Campaign Influence object.
- Check Syntax
- Set the field-level security
NOTE: If users cannot see the field, they won’t be able to see it in reports or create reports using it.
- Add the new field onto your page layouts if you wish.
- Save
Step 3: Create a custom Campaign Influence Share field
At this point we have:
- A Custom Opportunity Amount field (if you’re using multiple amount fields, you now have one that populates depending on the opportunity stage)
- A Custom Campaign Influence Amount field, which simply pulls in the value from the custom opportunity amount field
The final custom field that needs to be created is the Custom Revenue Share, which is also found on the Campaign Influence object.
The Standard Revenue Share field on the Campaign Influence object will use the standard Opportunity Amount to work out the revenue share for each campaign and opportunity.
So, since a custom Opportunity Amount is being used we need to create a custom Revenue Share field, which will replicate the standard behavior using a formula.
Instructions
- Create a new custom field on the Campaign Influence Object
- Data Type = Formula
- Formular Return Type = Currency
2. Create an advanced formula – Opportunity.Custom_Amount_Field__c * Influence
What is this formula doing?
This formula is looking at the value in the custom Opportunity Amount field and multiplying it by the Influence percentage field (this is a standard field that we do not need to change)
3. Check Syntax
4. Set the field-level security
NOTE: If users cannot see the field, they won’t be able to see it in reports or create reports using it.
5. Add the new field onto your page layouts if you wish.
6. Save
Final Outcome
You should now have:
- Custom Opportunity Amount Field – If you are using multiple custom amount fields this should be pulling in the value from either of these fields
- Custom Campaign Influence Amount Field – Pulling in the value from the Custom Opportunity Amount Field
- Custom Campaign Influence Revenue Share Field – Displaying the share of the revenue by using the Custom Opportunity Amount field and Influence field
Step 4: Customize Campaign Influence reports
If you have installed the Sercante Campaign Influence Starter Pack, then the reports and dashboard that come with this will only work when the standard Salesforce fields are used (Opportunity Amount and Revenue Share). So, you will need to customize these reports and the dashboard (we’ll tell you how to do this next) to include your custom Opportunity Amount and Custom Revenue Share fields. If you have any of your own Campaign Influence reports you will also need to edit these.
Sercante Campaign Influence Starter Pack – Editing the reports and dashboard
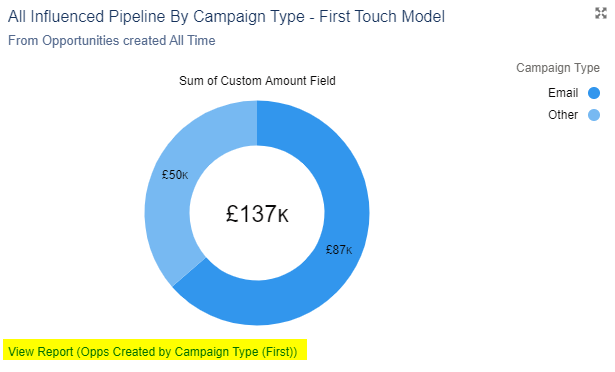
Step 1. Open Salesforce Dashboards where you will see the Campaign Influence Dashboard that comes with the Sercante starter pack.
Additionally. open up this link. You will need the images on this page to ensure that when you update the dashboard components you
- Select the right report
- Select the correct chart
- Add the chart title and subtitle
- Select the correct Measure
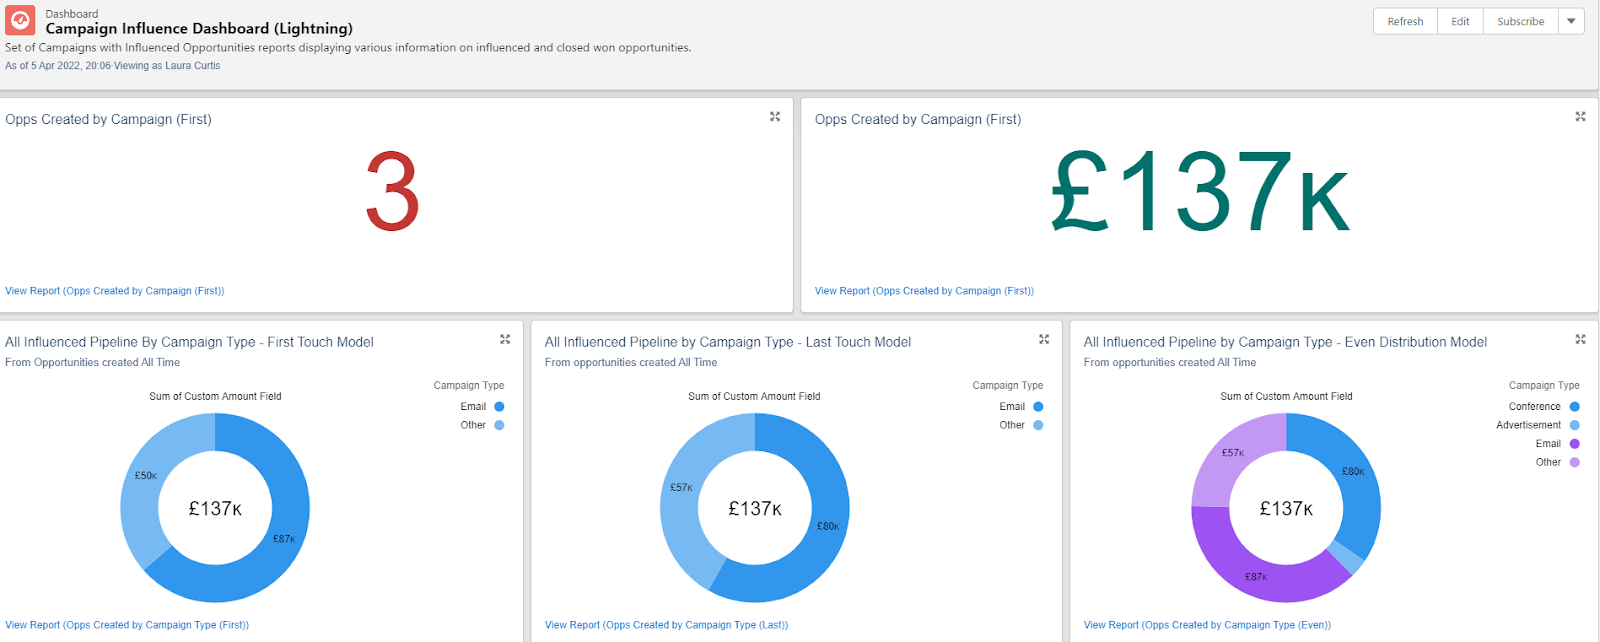
Step 2: Right click the report on the dashboard component and open the report in a new tab
Step 3: Edit the report
- Under Columns, remove #Revenue Share and #Opportunity Amount.
- Under Columns, add the Custom Opportunity Amount field and Custom Revenue Share (Campaign Influence).
- Save and Run.
Step 4. Go back to the Dashboard and click Edit on the dashboard.
Step 5. Edit the individual component in which you just edited its report and use this link as a reference.
- Update the report the component uses
- Check that the correct chart is used.

- Update the Measure.

- Update the component title and subtitle.

Step 6: Save the component and dashboard.
You’ll need to Repeat these steps for each of the other dashboard components.
Begin your journey to the marketing ROI promised land with the Sercante Campaign Influence Starter Pack
We’ve enabled and configured Salesforce Campaign Influence a number of times, and we noticed a pattern of reports and dashboard elements that were useful in getting started.
So, we consolidated those views down into a report and dashboard package that you can ask your Salesforce Admin to install for free from our Github account.
Get started here. Or reach out to us with any questions.