
Looking for a way to capture lead source data from across pages on your website and pull that data into your CRM?
Since we use Marketing Cloud Account Engagement (Pardot), we figured out how to do that by transferring UTM parameters across webpages and capturing them in a Pardot custom field.
Using a magical mixture of UTM parameters and Google Tag Manager with a Pardot custom field and third-party forms, here’s our solution for capturing pre-form fill visitor data in Pardot.
However, you can use your imagination to take this solution further and send the data to any CRM that allows you to capture data in a custom field.
What is a lead source?
A lead source establishes how a prospective customer first engaged with your business. That can be through your website, by phone, by email or even visiting your location in person.
Most lead sources originate through advertising, social channels, word-of-mouth, referrals, or even location signage.
Why does the lead source matter?
Understanding how buyers find your business serves two purposes:
- It improves the buyer’s journey. You can use the information to be more relevant and responsive with highly tailored content, interactions, and communications, leveraging the channels and sources your audience prefers.
- It reveals the most effective channels and methods. Having insights into lead sources helps you build awareness, connect and engage with buyers by focusing on what works.
How to track marketing parameters via UTM
The best way to gain digital lead source insight is to use UTM (Urchin Tracking Module) parameters. UTMs are variables that are passed to your website via the link a buyer clicks to get to your website or landing page.
As the standard for tracking lead sources, UTMs play an integral role in providing data to Google Analytics and other marketing analytics platforms.
Setting up UTM parameters is super easy by using a handy tool provided by Google Analytics. Remember to create a consistent naming convention so when you add them to your links you’ll be able to easily identify key data points when viewing your reporting.
Why do I need source cookies?
Capturing a UTM parameter on your web form can be tricky. If a user visits a page with a form through a UTM URL and submits the form, the UTM parameters get captured. However, if a user visits a page through a UTM URL and navigates to another page on the website, the form submission is unable to capture the UTM parameter values.
To solve this dilemma, we used Google Tag Manager (GTM) to implement a cookie on the first page visit and then populate the hidden fields with the stored UTM values.
How to capture lead source via a Marketing Cloud Account Engagement (Pardot) form handler
The steps to capturing your lead source data in Pardot are as follows:
Step 1. Set up Pardot Form Handler
Create a new form handler in Pardot. Magic Wand ![]() > Marketing > Forms > Form Handlers.
> Marketing > Forms > Form Handlers.
- Add information about your form:
- Name – This will not be seen by the visitor, so use a naming convention that will help you understand the form’s purpose.
- Folder
- Tags
- Campaign
- Tracker Domain
- Do NOT check kiosk/data entry mode
- Check “Enable data forwarding to the success location” only if pushing data to a location other than Pardot.
- Only check “Disable Activity throttling” if you wish to send auto-responder emails after every submission. A time buffer is set by Pardot to prevent a visitor from duplicating completion actions or emails if they repeat a form submission too quickly. Still not sure? Read more here.
- Add Success Location URL – Either add a new URL ‘Thank You’ page or send them back to the referring URL.
- Add Error Location URL – Either add a new URL ‘Error’ page or send them back to the referring URL.
- Add Completion Actions
- Add Form Fields
- Set up your fields in Pardot if not already there
- Map fields to third-party form by field “name” not the label. These must match exactly or the form handler will not work.
- e.g., <input type=”text” id=”fname” name=”fname”>
- Do NOT make them “required”
- Copy the endpoint URL of your newly created form handler and add that to the third-party form.
Step 2. Configure your third-party form
To capture the UTM parameters we determined we want to use, we have to include the following eight HIDDEN fields on the third-party form and do NOT set as required:
- utm_source
- utm_medium
- utm_campaign
- utm_content
- last_utm_source
- last_utm_medium
- last_utm_campaign
- last_utm_content
In our example, we are using a Gravity Form. But this should work with most forms.
To minimize our efforts, if there are many forms on your site, I recommend adding a class like ‘utm_source’, ‘utm_medium’, etc., to the fields you are creating on the form. This way, we can target the class names and their containing inputs in the script later.
Step 3. Capturing a cookie using Google Tag Manager (GTM)
UTM information is only visible on the page it first lands on. If the user goes from one page to the next on the website, the UTM information disappears.
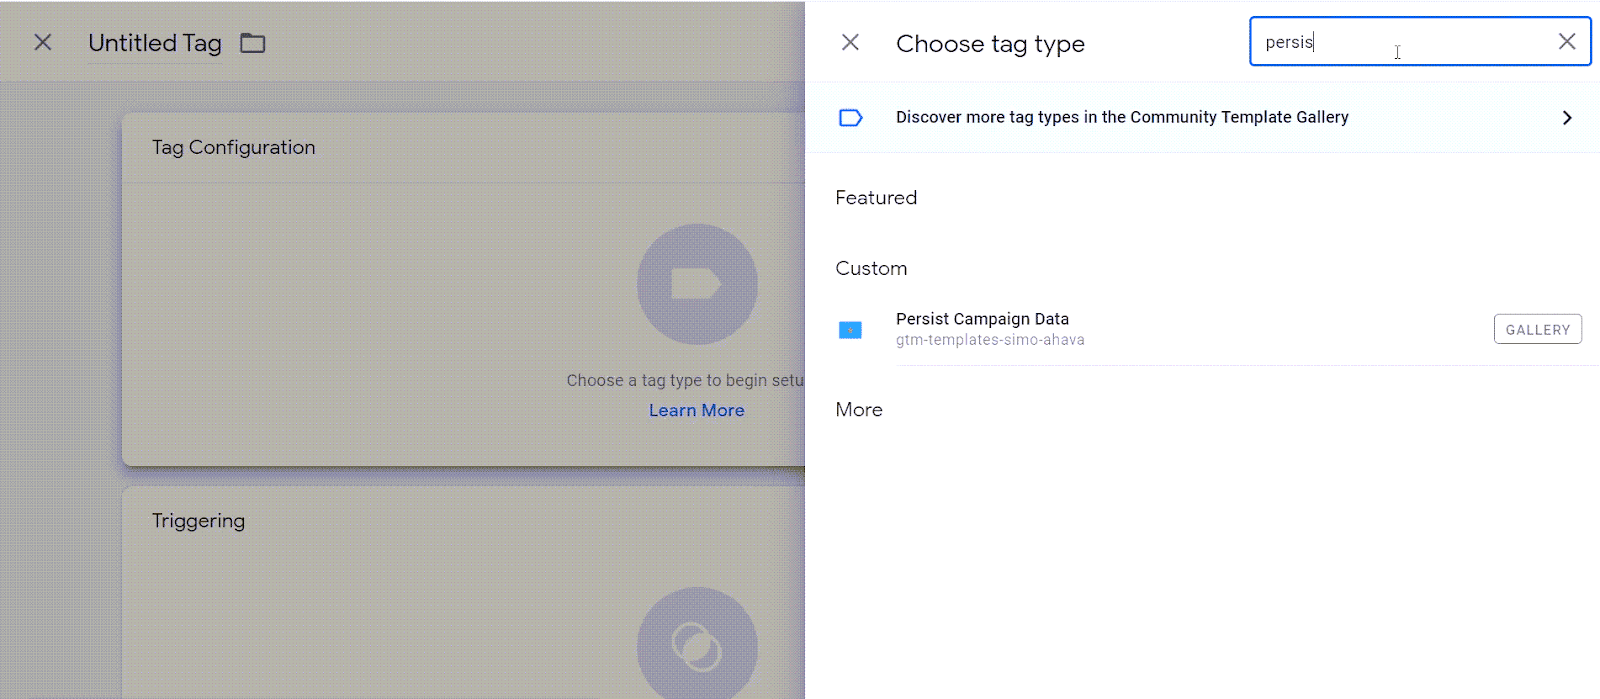
Add Persist Campaign Data (3rd Party) Template
There’s no need to reinvent the wheel. Use the 3rd party template, Persist Campaign Data.
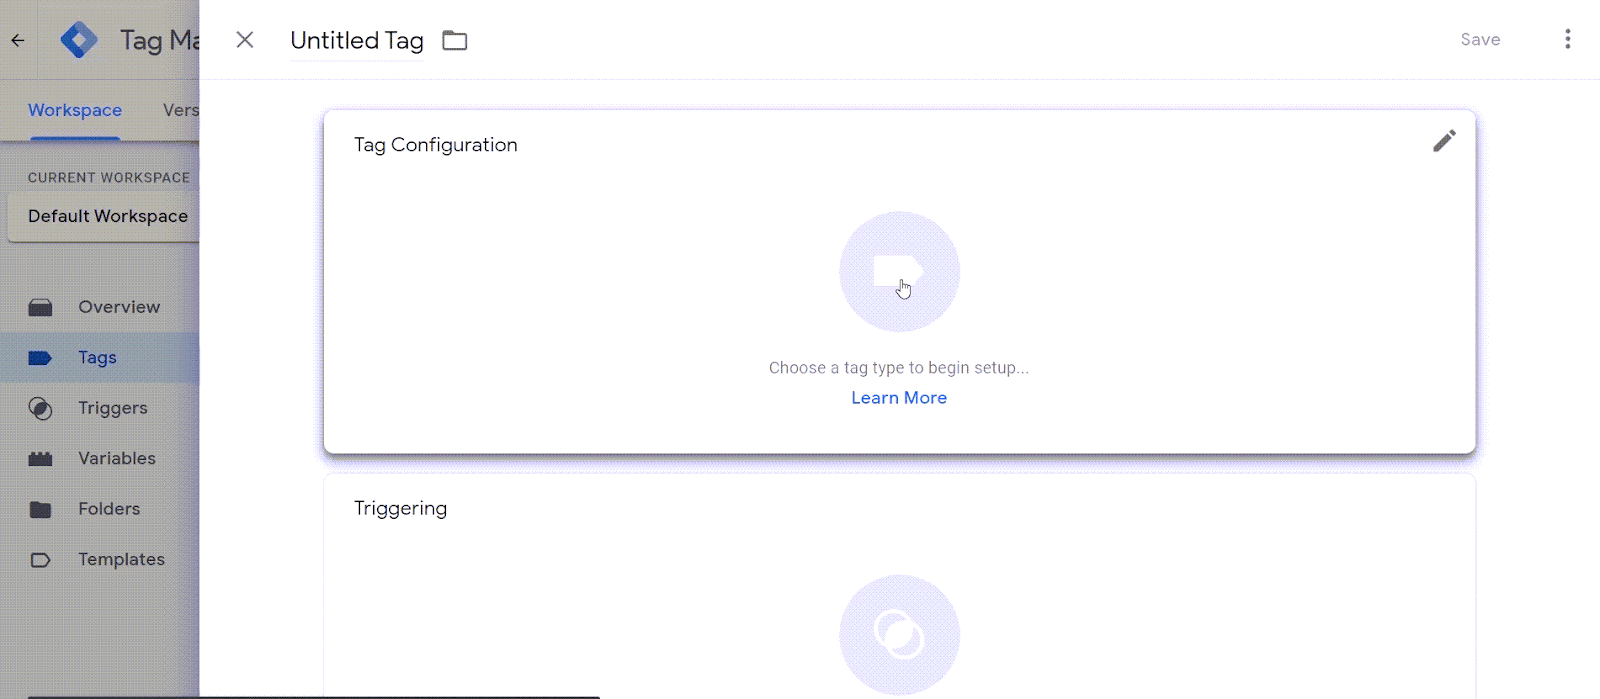
- Click the Tags tab > New
- Click inside “Tag Configuration” box

- Search for Persist Campaign Data

What does this container do? It will first look for URL parameters that can be edited. But out of the box, it is looking for anything with utm_source, utm_medium, utm_campaign, utm_term, utm_content, utm_it, gclid.
This container will store a 2 cookies:
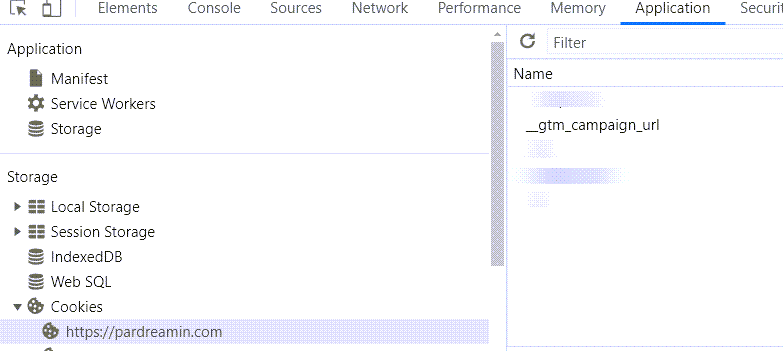
- __gtm_campaign_url
- __gtm_referrer
- Click Triggering and select ‘All Pages’ – This will ensure your tag will fire no matter what page a user enters from.
Add a Cookie Variable
We now need to be sure the web tracking cookie we are grabbing is in the correct format.
- Click Variables
- Name Variable: cookie-__gtm_campaign_url
- Variable Type: 1st Party Cookie
- Cookie Name: __gtm_campaign_url
Check the box: URI-decode cookie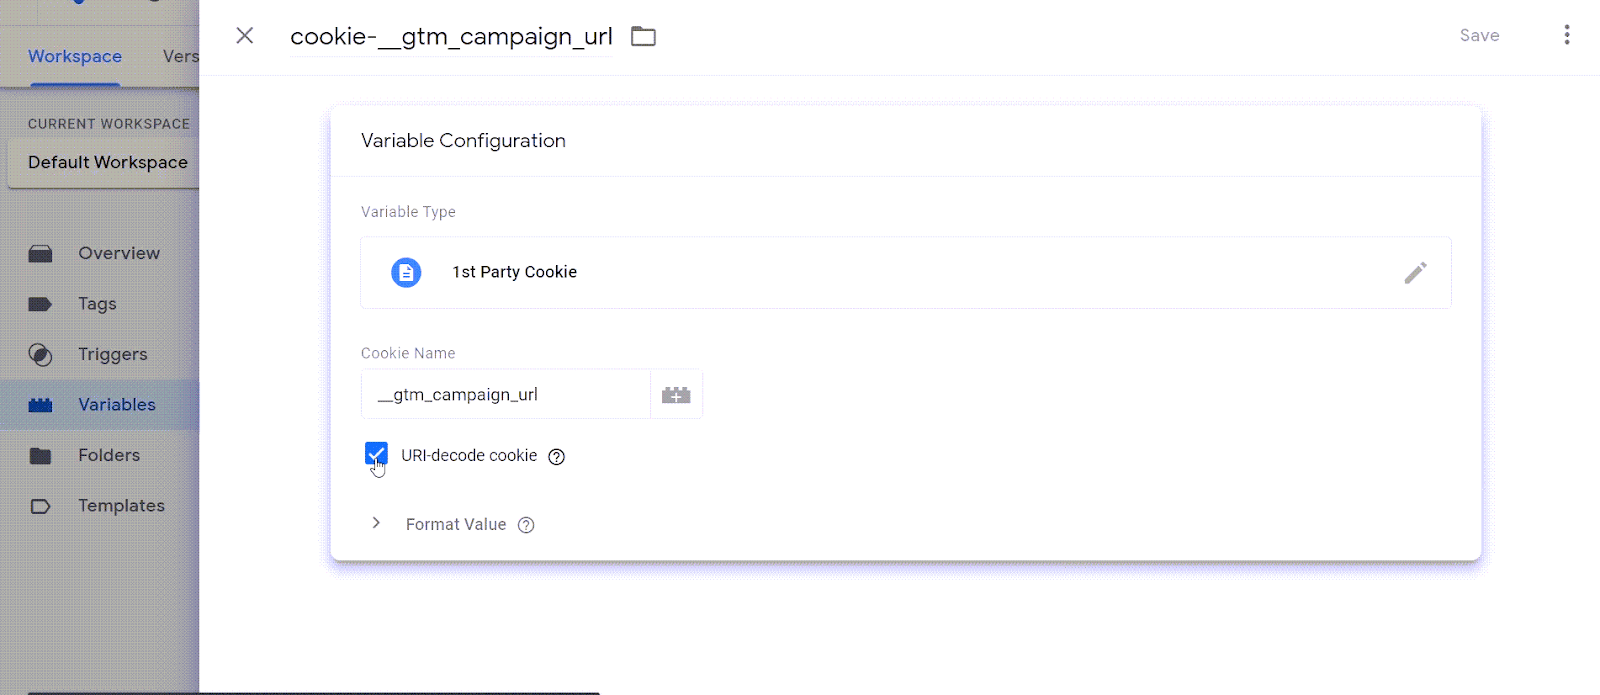
If you preview in debug mode you should now be able to see the cookie set.
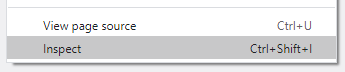
How do you see tracking cookies in Google Chrome?
- Right click on browser window
- Choose ‘Inspect’
- Choose ‘Inspect’
- Choose the Applications tab
- Check installed cookies
Add UTM parameters to your form
Now that the cookie is set and working, let’s add the important parts to the form we already created.
- Click Tags
- Name the new tag: utm_form_tracking
- Tag Type: Custom HTML
- Drop in the HTML Script:
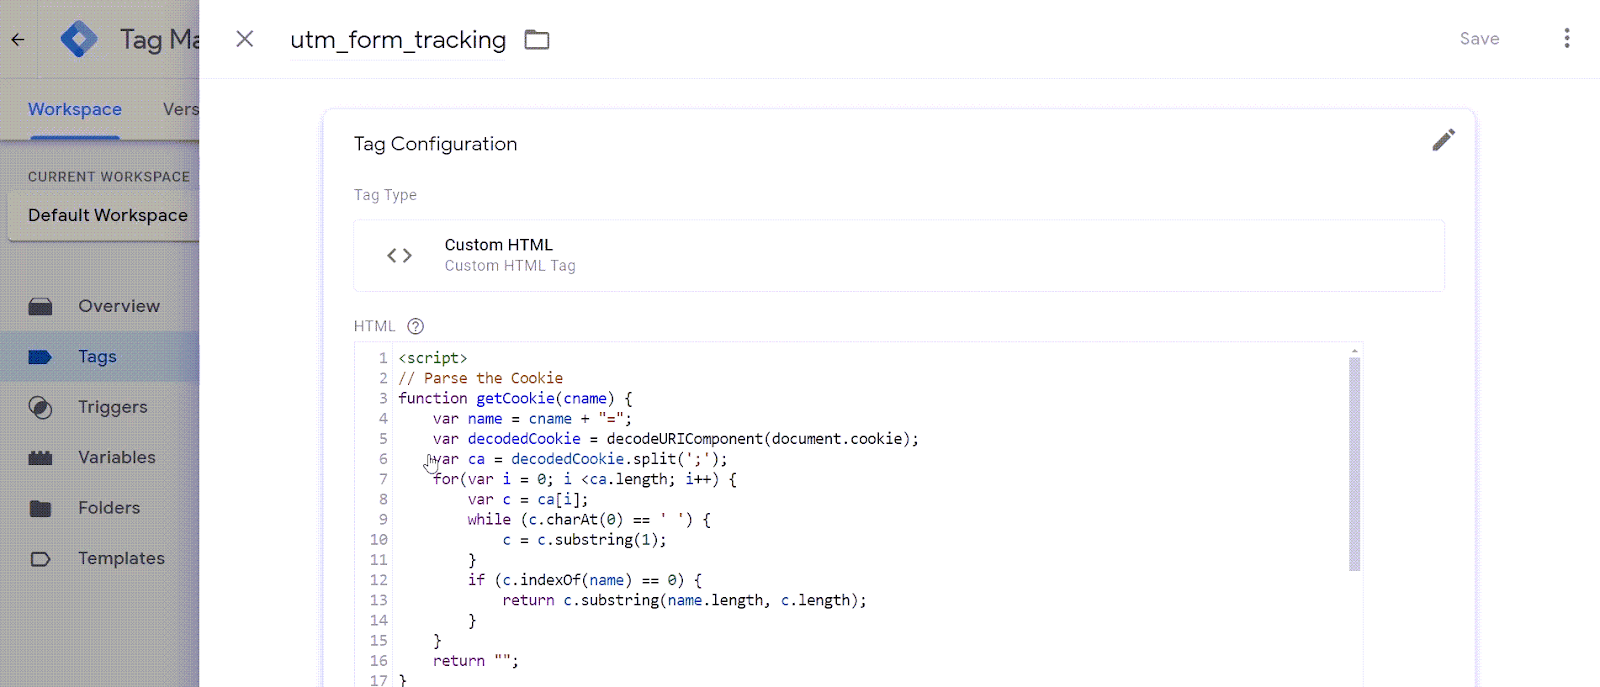
<script>
// Parse the Cookie
function getCookie(cname) {
	var name = cname + "=";
	var decodedCookie = decodeURIComponent(document.cookie);
	var ca = decodedCookie.split(';');
	for(var i = 0; i <ca.length; i++) {
		var c = ca[i];
		while (c.charAt(0) == ' ') {
			c = c.substring(1);
		}
		if (c.indexOf(name) == 0) {
			return c.substring(name.length, c.length);
		}
	}
	return "";
}
// Parse the URL inside Cookie
function getParameterByName(name) {
    name = name.replace(/[\[]/, "\\[").replace(/[\]]/, "\\]");
    var regex = new RegExp("[\\?&]" + name + "=([^&#]*)");
    results = regex.exec(getCookie("__gtm_campaign_url"));
    return results === null ? "" : decodeURIComponent(results[1].replace(/\+/g, " "));
}
// Pass the values to hidden field
document.querySelector(".utm_source input").value =
getParameterByName('utm_source');  	document.querySelector(".utm_medium input").value = getParameterByName('utm_medium');  	document.querySelector(".utm_campaign input").value = getParameterByName('utm_campaign');  	document.querySelector(".utm_content input").value = getParameterByName('utm_content');
</script>
Change the JavaScript to match the gravity form field values.
- Set up a Trigger – This will fire the HTML JavaScript code when the cookie fires
- Name Trigger: trigger_utm_script
- Trigger Type: Page View – DOM Ready
- References to this Trigger: utm_form_tracking

Test your results
You can change the Field Type to text or not hidden while testing your form. Just be sure to flip it back.
Here is a handy tool that will allow you to easily add campaign parameters.
Watch the full tutorial video
Limitations to capturing lead source data
A caveat — this solution will work for unique visits. However, since it uses cookies, it doesn’t track accurate visitor data across multiple visits. So, if the person visits your website many times before completing a conversion form, then you’ll only have data from the last cookied visit.
We’re still cooking up that solution, but we’ll share it when it’s ready.
We’d love to hear suggestions from the community for solving that problem. Or let us know how you did in the comments.
